I now wanted to get it working in a manner that suited me. That meant that I wanted Microsoft Edge to work normally for things like Microsoft 365, Azure and other Microsoft sites but to automatically open Edge with WDAG if I ventured outside that. I also wanted to retain the flexibility to have a third party browser (Brave) also working on my machines. In essence, I am trying to achieve the ability to automatically ‘sandbox’ general internet browsing from work in the Microsoft Cloud as way of protecting the workstation from malicious web sites.
I’m not going to cover off setting up WDAG on your machine or via Intune because there are plenty of articles out there that show you how to enable it. You can start here:
In essence, WDAG opens a defined set of URLs in a sandboxed version of Edge automatically. This means you’ll need to do a little configuration and add some features to your local version of Windows prior to getting it working. You can read about that here:
My configuration will be in Enterprise-managed mode. This means that I can automatically ‘white-list’ domains that I don’t want WDAG to operate with via a policy pushed from the Internet. In my case, these will be Microsoft Cloud URLs like http://www.office.com, portal.office.com and so on. Everything, apart from what I ‘white list’ I want to open using WDAG for protection.
The first thing to note here is that if you want to use Enterprise-managed mode you will need to have Windows 10 Enterprise edition. Windows 10 Pro edition only supports stand alone mode. This means:
In this mode, you must install Application Guard and then the employee must manually start Microsoft Edge in Application Guard while browsing untrusted sites.
To do this manually, you must edit the local computer policy using the local Group Policy editor or like as shown here:
It is pretty easy to set up and get working but not really scalable. Scripting may help overcome that.
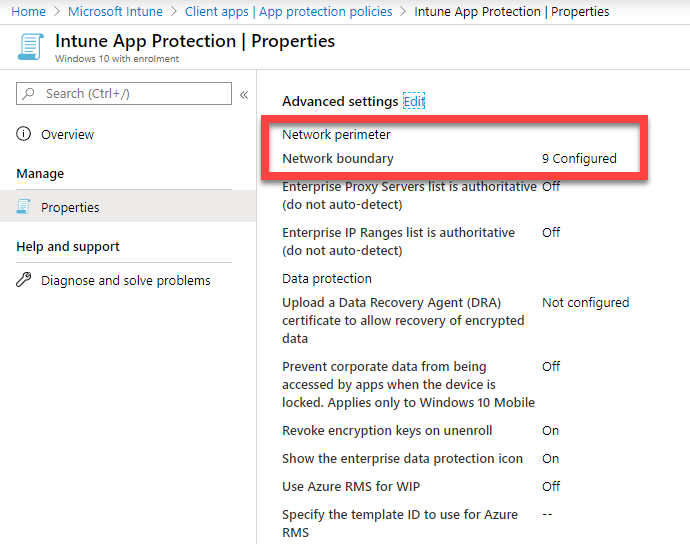
In Enterprise-mode my initial questions was ‘Where do I define my sites?’. As it turns out, this isn’t particularly obvious, so it took me a while to track down. The definitions for the sites you want to ‘white list’ for WDAG are actually in the Intune App Protection policy settings.
Turns out they are in the Advanced settings of your Intune App Protection policy, as shown above.
I had wrestled with these settings previously, which I detailed here:
What I didn’t appreciate initially was that sites you define here however ALSO APPLY to WDAG! Makes sense now that I look at it, but I certainly didn’t think it was the place I should be looking to ‘white list’ sites for WDAG. Now you too are the wiser.
Another subtle configuration option that took me a while to figure out was:
Initially, I had portal.office.com white listed from WDAG but in fact the navigation was going to http://www.office.com, which means WDAG would trigger and open http://www.office.com because it wasn’t ‘white listed’. Then I thought *.office.com would work, but no. Maybe office.com? Nope. Turns out what I needed was
..office.com
which:
Trust all levels of the domain hierarchy that are to the left of the dot. Matching sites include shop.contoso.com, us.shop.contoso.com, http://www.us.shop.contoso.com, but NOT contoso.com itself.
So be super careful with how you configure you network perimeter settings and domain wildcards as it can make things very confusing if you don’t have a good handle on it. My suggestion is to start with only one or two sites in your network perimeter and ensure that they work. Only then scale up once you have verified it is operating as expected.
Finally, with all that configured correctly, WDGA was working as expected. Yeah! This meant that when I went to a Microsoft Cloud URLs like http://www.office.com, portal.azure.com, etc. WDGA wasn’t activated, but if I went elsewhere, WDGA launched and navigated to that site in the WDAG container. In the end I also white listed sites like bing.com, docs.microsoft.com, etc as I go there many times a day.
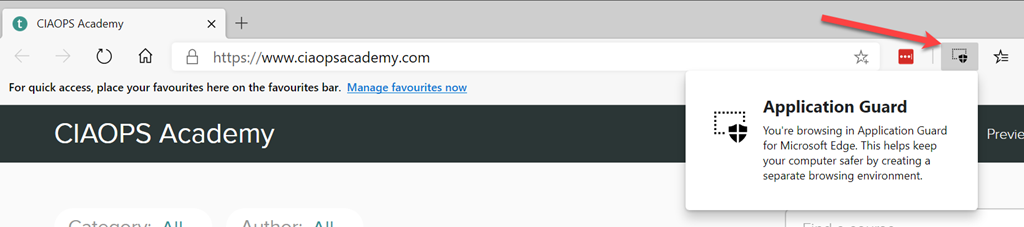
If you browse to a non ‘white listed’ site (here www.ciaopsacademy.com), then a WDAG session is launched. You’ll see WDAG spin up, if it is the very first time it has been activated. You’ll then see the browser load the site in question and then you’ll notice a WDAG icon in the toolbar as shown above, which, when opened, will let you know that the current browser is using WDAG.
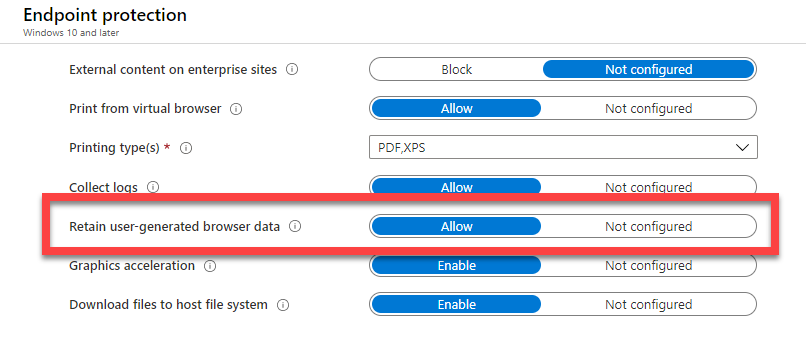
You configure WDAG settings via Intune Endpoint protection policies as shown above.
My suggestion would be to enable the option to Retain user generated browser data as shown above. This means things like extensions, session cookies and the like will be retained between sessions. However, if you want a totally clean experience each time, then disable that option.
By default, you’ll find that any file you download while WDAG is active, will be saved into an Untrusted files folder as shown above.
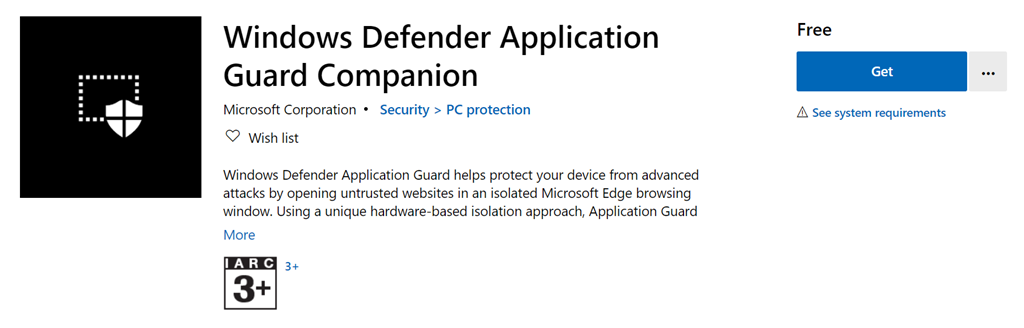
You can also get a WDAG companion app from the Windows store:
This allows you to manually launch a WDAG session, which is probably handy if you are not using Enterprise-managed mode. It will launch this is a container isolated from anything that automatically launches via your browsing, keeping that separate as well.
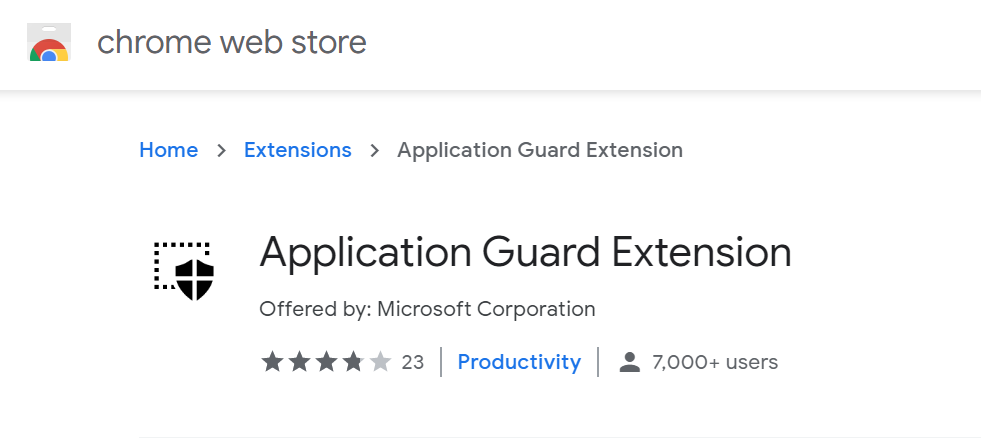
If you want non Microsoft browsers to also be protected with WDAG then you’ll find plugins available:
With these plug ins installed, those browsers will also only open non-whitelisted sites. Anything else will be opened in an Edge WDAG session for protection.
So now I have WDAG working the way I wanted. My main stumbling block was no appreciating that the WDAG ‘white list’ was the same as WIP and set via Intune App Protection policies. I now have a better appreciation for the breath of the settings in these policies.
I’m sure I’ll be tweaking WDAG along the way but I feel much more secure in the fact that I have it working and protecting my ‘random browsing’. Like most security configurations, WDAG takes a little bit of understanding and setup to get working but the end result is a much safer environment to work in and I’m all for that. Hopefully you are too!
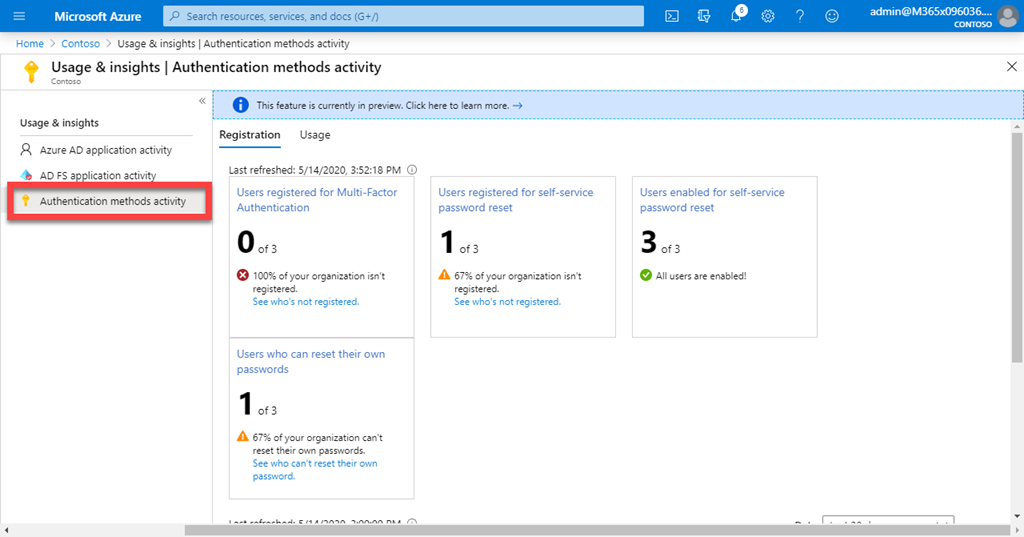
If you go to your Azure portal and navigate to Azure Active Directory, you should see something like that shown above. If you then scroll down the options on the left and locate Usage & insights , under Monitoring as shown above, you’ll end up here.
Selecting Authentication method activity on the left gives you some information about things like MFA, Self Service Password reset and more. You can also select the Usage tab at the top of the window on the right, will give you some nice historical graphs well.
An easy way to see how and when people are completing security registrations for Azure AD.
This course is especially for those looking to understand and sell Microsoft Cloud Services like Microsoft 365 and Azure, especially in the Small Business (SMB) space. The course takes you through overviews of services plus deep dives into things like security. It also shows you how to craft unique go to market offerings that you can build easily.
All the information you need is here including:
Over 18 hours of video instructions
Downloadable content, including slides, white papers, etc
Links to additional training material
If you are looking at coming to grips with everything that the Microsoft Cloud can provider your customers and users, then this is course for you!
As a special offer to kick things along I’m offering a 50% discount for a limited time. Use the promo code:
I’ll continue to add content to this course, so there is never a better time to take advantage of the launch of this course! You may also want to consider the full course catalogue at the CIAOPS Academy which will include this new course as well.
With all this work from home going on it is a good time to focus on security in Microsoft 365. Attend to learn how you can make your environment more secure and minimise your risks. I’ll have the the latest Microsoft Cloud updates plus open Q and A as well.
You can register for the regular monthly webinar here:
CIAOPS Need to Know Webinar – May 2020 Friday 29th of May 2020 10.30am – 11.30am Sydney Time
All sessions are recorded and posted to the CIAOPS Academy.
The CIAOPS Need to Know Webinars are free to attend but if you want to receive the recording of the session you need to sign up as a CIAOPS patron which you can do here:
Also feel free at any stage to email me directly via director@ciaops.com with your webinar topic suggestions.
I’d also appreciate you sharing information about this webinar with anyone you feel may benefit from the session and I look forward to seeing you there.
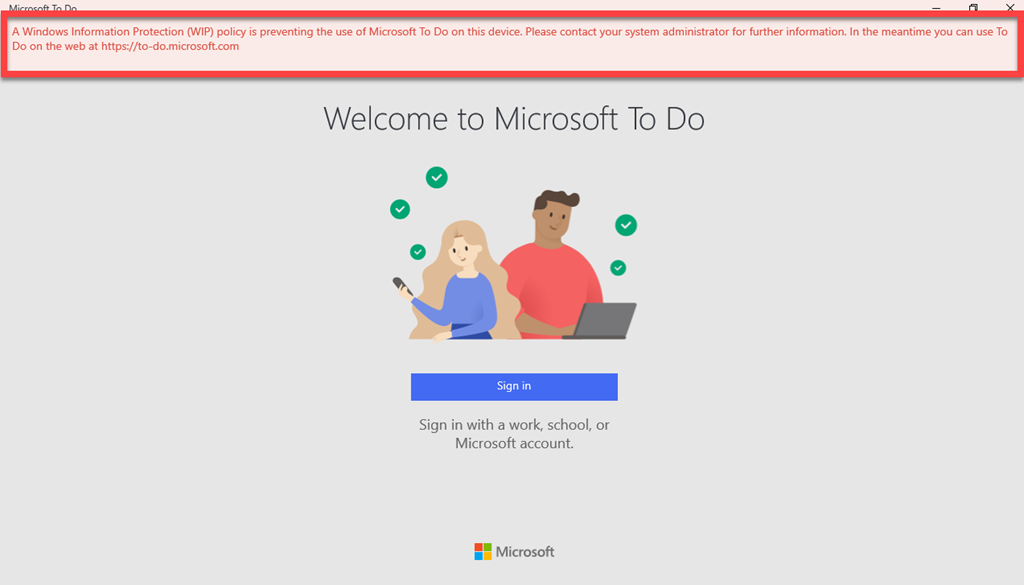
I’m a big fan of Microsoft To-Do but recently noticed that I was having trouble syncing data from my Windows 10 desktop to my other devices. Everything looked fine on my desktop but the next troubleshooting step I took revealed my problem as you can see below.
A Windows Information Protection (WIP) policy is preventing the use of Microsoft To Do on this device.
Ah ha, I had indeed recently changed my Windows Information Protection (WIP) policy for the desktop. This change had inadvertently stopped Microsoft To Do syncing as well as preventing me from logging in.
To solve the problem you need to add the Microsoft To Do app to the list of Protected apps in the Intune App Protection policy for the device, which by default, isn’t there.
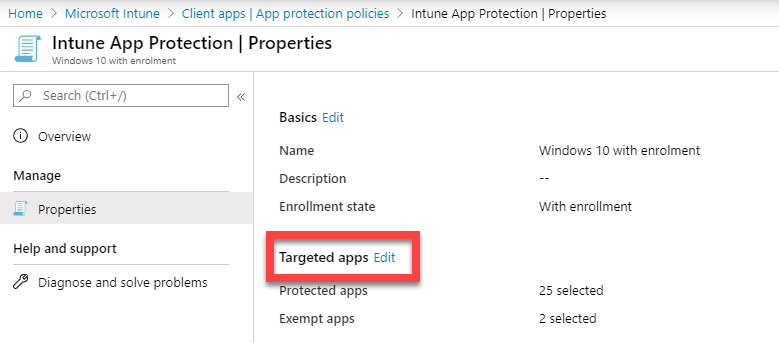
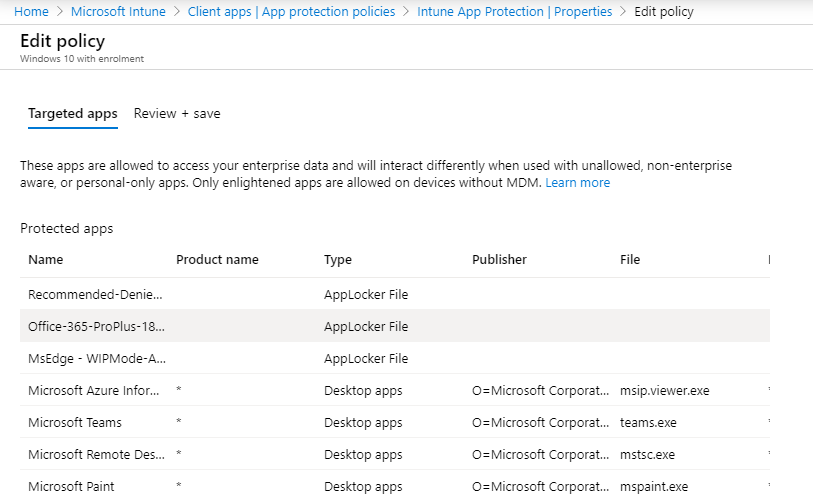
Navigate to the Intune App Protection policy in question and view the properties as shown above. On the right hand side, select the Edit link next to Targeted apps as shown.
You should then see the Targeted apps as shown above.
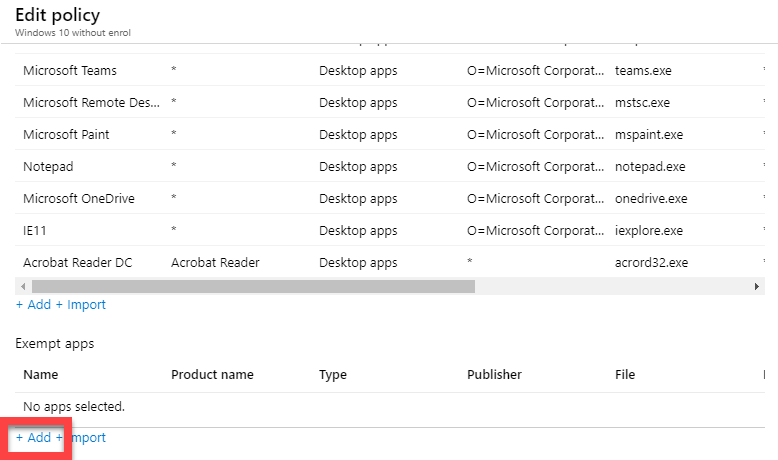
Scroll to the bottom of the list of Protected Apps and select the +Add link at the bottom as shown.
This process is similar to one I documented a while back for Adobe Acrobat:
The difference this time is that Microsoft To Do is a store app.
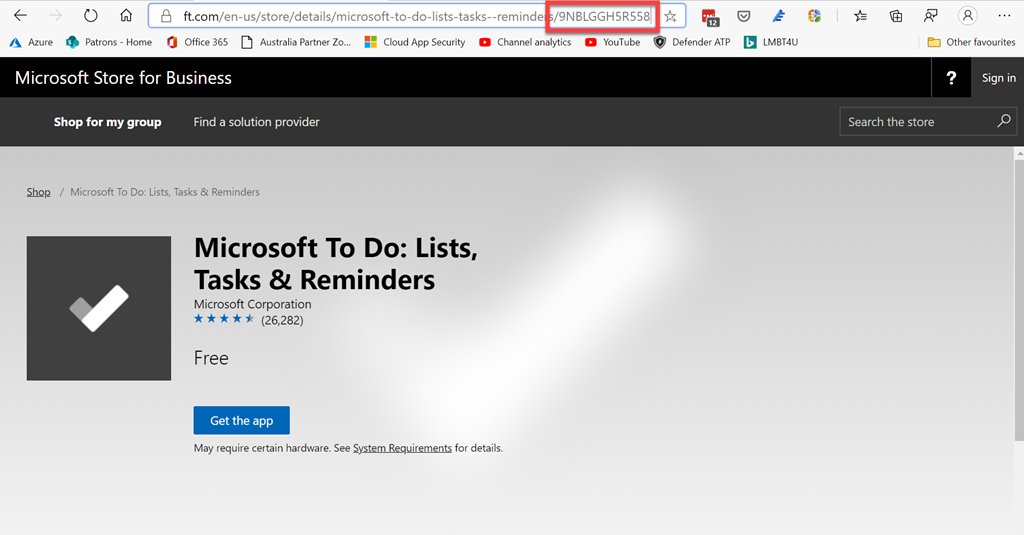
To identify the app you need to search for the store app on the Microsoft Store as shown above. When you locate the app and view the URL you will see a unique identifier as shown. In this case, for Microsoft To Do, it is 9NBLGGH5R558.
Doing so will spit out the information you need to add the app as a protected app to your policy. To view the result for other store apps just insert the appropriate identifier into the URL instead of the one for Microsoft To Do shown here.
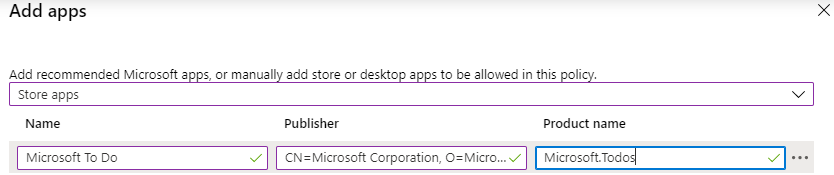
Back on the Add apps page opened earlier, change the pull down at the top of the page to be Store apps. Then enter the information for Name, Publisher and product name as:
Select OK at the bottom of the dialog to save the changes. Then select Review+Save to update the policy.
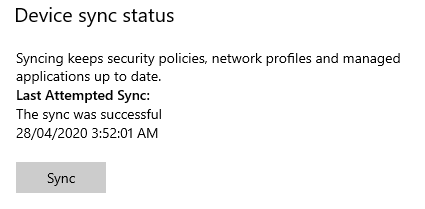
You can either wait for the policy to be pushed down or force a sync from the device sync settings in the user account information for the Windows device. Once the policy has been updated to the machine you’ll be able to open and use Microsoft To Do or any store app you have configured. Doing so fixed my Microsoft To Do issue by allowing me to login to the app again on the desktop and sync information.
In recent articles I’ve covered off how to add an Azure AD application to multiple tenants, then set the permissions and finally run a report all quickly and easily using automation. You’ll find all that here:
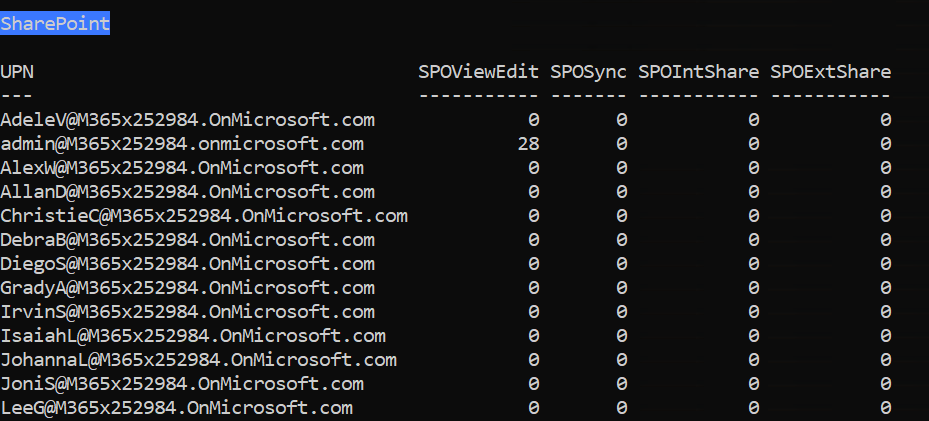
With those same Azure AD applications and permissions in place I have now developed a program that will provide you a summary report of emails, Teams, OneDrive for Business and SharePoint usage across multiple tenants, all WITHOUT the need to login to any of them!
You’ll find this program available at my GitHub repo here:
For it to execute you’ll have needed to completed the process I detailed earlier of creating an Azure AD application in every tenant and adding suitable permissions. When that is complete you can simply run the above program. The program will need to be downloaded into the same directory that the tenant configuration files are located and run from there.
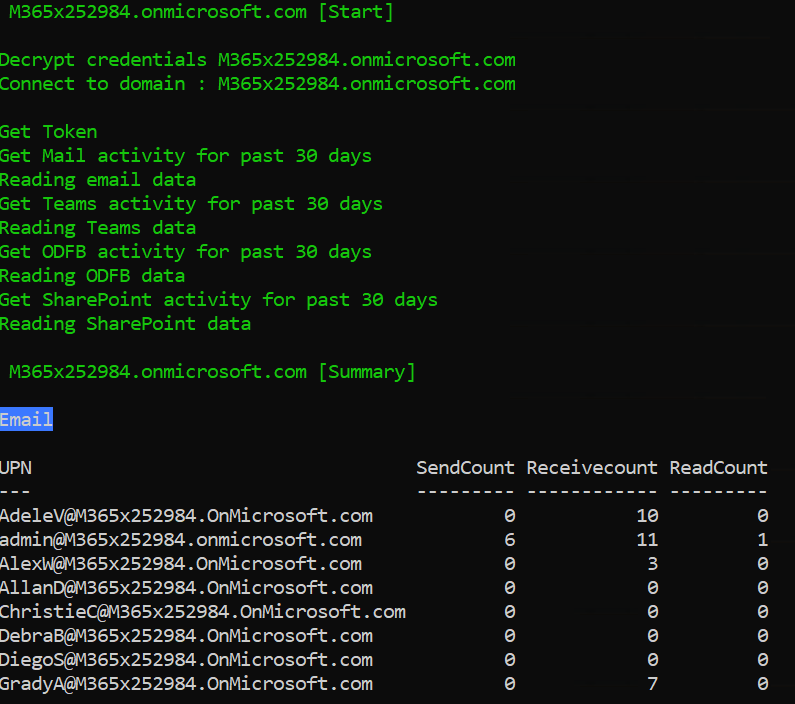
When it runs, it will get the configuration files in the current directory and access each tenant in order. It will collect information via the Microsoft Graph and then report on emails (above),
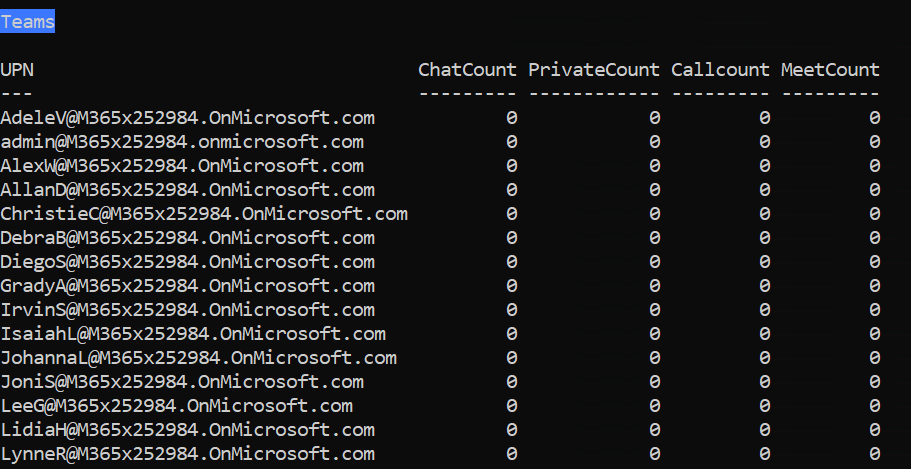
Teams (above),
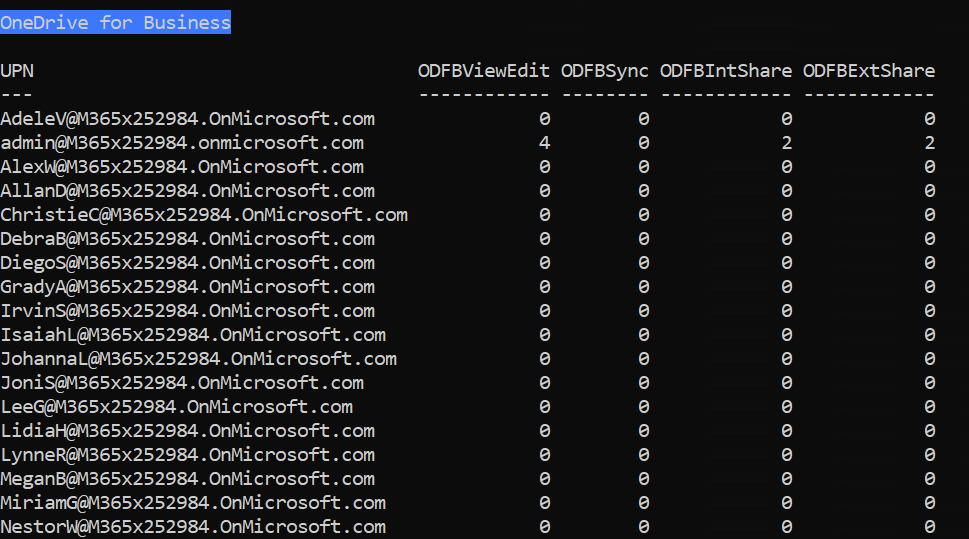
OneDrive for Business (above),
and SharePoint (above). It will do this for each user in each tenant, again without the need to login to the tenant.
Thus, you could use this report to run on a regular schedule and provide details on each of the tenants. because no login is required to the tenants you can do this whole process unattended!
There is lots more that can be done in this manner via the Microsoft Graph, so look out for more stuff I’ll be making available in the future.
FAQ podcasts are shorter and more focused on a particular topic. In this episode I’ll talk about the differences between OneDrive for Business and SharePoint.
This episode was recorded using Microsoft Teams and produced with Camtasia 2019
Robert Crane 0:00
Welcome along to the Need to Know podcast. My name is Robert Crane and this is episode 237. Now, these episodes are shorter episodes known as FA Q’s and they are aimed at a deeper dive into some of the technologies in the Microsoft Cloud. Now these episodes are brought to you by my CIAOPS Patron community and again, you’ll find information about that at http://www.ciaopspatron.com. Check it out if you’re interested in learning more and keeping up to date with everything in the Microsoft Cloud. Now what I want to cover today is a very common question I see out there around the differences between OneDrive for Business and SharePoint. Now the first point of order is to note that SharePoint is a technology, a service that OneDrive for Business takes advantage of. So the way to think about it is that SharePoint is the overarching technology that OneDrive for Business runs on and will also designate the common area as team sites. So again, think of SharePoint, the top of the tree, and that’s providing the storage capabilities for files and folders for OneDrive for Business and for team sites. And also for Microsoft Teams as well. So think of, again SharePoint as the manner in which items files are stored in Microsoft is five, four, which OneDrive
takes advantage of it, and so does team sites. Now one of the other differentiators here is to appreciate that OneDrive for Business is designed as personal storage per user. And team sites are designed for shared data. So think about a OneDrive for Business as what is on your desktop, my documents or a home drive or traditional home drive, you would have had potentially with a on prem server, and think of team sites as location for shared file. So this is going to be you know, the F drive in the old style file, so therefore shared location used by multiple people. Now, OneDrive for Business, as I said, is aimed at personal storage. And basically all you get is a single document library, right? So inside SharePoint technology, there are these apps or these locations where you can put information. The location that you put files into in SharePoint technology is called a document library.
And you only get one of those with OneDrive for Business. Whereas with team sites, you can have as many document libraries as you want. So the first differentiation point around these two technologies is that OneDrive is you get one document library with team sites, you can create as many document libraries as you want to help you separate out and manage your different files in their environment. So when we open our OneDrive for Business, we see one document library, and basically just see a list of files and folders. So think about the fact that we get no width. We don’t get the ability to add additional apps. We can’t add document libraries to OneDrive for Business. We can’t add calendars, contacts, lists all the other things that our intranet into OneDrive for Business or OneDrive for Business is a solely aimed at allowing users to store they follow information. Now this is really good to allow users to get information off there.
My Documents off their desktop off their home drive from a server and put it into an area in the cloud, which is backed up manage, maintain controlled and accessible remotely. Now, the most important thing I think about any SharePoint technology bit OneDrive for Business or team sites, is the fact that it’s all searchable. So once we put information up into SharePoint technologies, we’re able to take advantage of the fact that all the data will be indexed and can be recovered or can be viewed basically using search. Alright, so OneDrive for Business, one document library, you can’t add more document libraries. And you can, for example, add sub areas, you just get one single area with no width and no depth. It’s just a storage location. Now when you start out, in most cases, users will get at least one terabyte of space in their OneDrive for business to be able to store their own personal files. Okay, so one terabyte per user.
Generally is what is provision and is aimed at the users personal documents is not a place for parsers. It’s not a place largely for common documents, right? That is what we use team sites for. Now, the idea here with team sites is that it’s designed for this shared storage concepts. divined for designed for users to work on files in a group environment. Right. Now, as I mentioned, in SharePoint, you can add as many apps as you want to broaden what is available in that location. So you can add multiple document libraries. So you may have one location for your policies, your procedures, maybe a templates areas where you can keep building these out. And the advantage of having different document libraries, for example, is you can format them in a different way. And you can also have different permissions. But with team sites, we can also add things like calendars, contacts, lists,
We can build it out into a true intranet environment. So the idea with team sites is that it is for a group of people. And we can add more content in there besides just pure files and OneDrive for Business, largely designed for pure file storage. Now, when we basically configure our environment with our team sites, we get one terabyte of total storage across all of the teams I separate. So remember that when we create a Microsoft team, we get a team site, a SharePoint team site, into which we can put our documents for our Microsoft team, that and all the other SharePoint team sites when added together their total storage is or cannot exceed, generally one terabyte now, you get that one terabyte standing space which is shared across your Microsoft team, the team’s site environment and you also then get an additional 10
gigabytes per user added onto that space, you start with one terabyte. And then for every licenced user you have, using SharePoint team sites, you will get an additional 10 gig of storage capacity added on to that one terabyte, right? So if you have 10 users, you’re going to get 10 times the 10 gigs, you’re going to get hundred gigs of additional storage. And that means you’re going to get basically 1.1 gigs worth or sorry, 1.1 terabytes worth of data out there that you can use to put all your shared documents in. Now, not only can you get the one terabyte starting space with SharePoint team sites, you get the 10 gig per licence use as well, but you could also buy additional storage. So one of the advantages of SharePoint team sites is the fact that you get the one terabyte 10 gig per licence user
Then you also can add additional storage on there as a paid option if you so choose. So that makes it a little bit more extensive, a little bit more flexible to achieve what you want. Now, remember that this total space is one terabyte you can manage that you can make that automatically allocated, you can control that by the different team site, if you wish. Now, what are some of the other differences between my SharePoint team sites versus OneDrive for Business? Well, in a SharePoint team site, you get something called check in check out. So what that means is that when users work on typically we’re typically Office documents inside these technology inside SharePoint technologies. Then what happens is, is they are co authored by default, which means that multiple users can edit them, update them, change them at the same time by default. Now, there are probably times when you want to make sure that only as
single author has access to a document. In that case, you can check the document out, the author can update the file, everybody else can view the last version of it. And then when they’re finished, when the author’s finished with that they check the document in and make it available later on. So, SharePoint team sites gives us the ability to do these document manage which we management, which we don’t see with OneDrive for Business, because OneDrive for Business, again, is designed for a single user to work with. Now, probably the biggest difference between OneDrive for Business and SharePoint team sites is the fact that you get metadata. So metadata is available in SharePoint team sites, what use metadata for us think of it like tagging files. So the idea is is you will put a file into a SharePoint team site document library, and then you would tag it so instead of creating folders or very deep structure, you would use the tagging to keep that structure as flat as possible. The advantage of
Doing and using metadata which you can now filter, you can now sort. And you can now launch automated processes based on the metadata, you have now, a file an item inside, a SharePoint team site can have as many metadata tags effectively as you wish. So you can tag a file lot by, for example, an author by location by whatever you wish by a customer. And then you can start using that to filter and sort and we don’t see that metadata capability in OneDrive for Business. Now, the other thing with SharePoint team site is we can create a hierarchical structure so we can create something called sub sites inside our SharePoint team sites to allow us to organise our data in a hierarchical structure. Now generally best practices not to do very deep data structures these days, but it is possible and again, it’s one of the differentiation points between
A SharePoint team site and OneDrive for Business so they get ticked off. At SharePoint team sites. It’s much more like a traditional file server with data located in a hierarchical structure, and OneDrive for Business as just a single location with no sub area that you can put your files and folders if you want. So just in summary, again, the idea here is that the technology the storage technology, then the Microsoft Cloud typically uses easy storage technology, known as SharePoint that’s been with us probably for over 20 years now. Now, that technology allows us to build OneDrive for Business, which is a limited subset of the full features of SharePoint, as well as team sites. So team sites are aimed at grouping together information files, Contacts, Calendars, for a group of people, a team of people, where I OneDrive for Business is purely designed as a
storage location for a user’s files, right. So every user generally, by default, will get their own OneDrive for Business, they can put their own files in there, they can then access them in any location, they can share the odd file in and out of that. But if they’re working on a group of files, like your traditional file server, the idea is to put it into SharePoint team sites. Now, there are some differences between the two and what’s available and what surfaced and you get more of the functionality in SharePoint team sites. So you get things like check in check out, you get the ability to add additional metadata. You can, for example, pin files to the top of a document library list. To highlight them. You can also add calendars, contacts lists a number of different apps into a SharePoint team site to make it more like an intranet, right? So you want to gather all your information in there. Now importantly, remember that other components of the Microsoft Cloud like Microsoft Teams, do you
Use SharePoint team sites. So every time you create a Microsoft team, it will create a SharePoint team site in which you can put your files and folders in there that is surfaced in the Microsoft team’s interface. But you can dig in behind that. And you can go and get access to that full SharePoint team site from that Microsoft team if you want. Alright, so remember that the storage for a group of users is going to be in a SharePoint team site. And the individual data location for users and their files is going to be OneDrive for Business. And both of these are built on SharePoint technology giving us a lot of these enterprise capabilities, document management that is available in that. So hopefully that has given you a bit better clarification as to the difference between OneDrive for Business and SharePoint Online. And it sort of boils down to the fact that they both stores locations, they’re both built on SharePoint, OneDrive for Business is
individual users with SharePoint team sites are four groups of users. And that’s where you’re going to get the best usage and functionality out of that. Now, of course, you can use those services for other things, but they really shine when they are used in the correct way for storing data. So with that, Have you enjoyed that episode? Thank you very much for listening. You have been listening to the Need to Know podcast from CIA ops training on using technologies like SharePoint online or Microsoft 365, visit www dot CIA ops academy.com. by purchasing from the selections available, you’ll be directly supporting this podcast. To provide feedback on this episode, visit www.ciaops.com slash contact
In it, you see how to use the code that I created to install Azure AD applications in tenants, provide permissions to these Azure AD applications and then finally run a report routine to extract the desired information.
Hopefully, this summary provides a nice easy way to see this concept in action end to end.