July Office 365 Webinar Resources

Slides from this month’s webinar are at:

https://www.slideshare.net/directorcia/july-2018-office-365-need-to-know-webinar

If you are not a CIAOPS patron you want to view or download a full copy of the video from the session you can do so here:

http://www.ciaopsacademy.com.au/p/need-to-know-webinars

Watch out for next month’s webinar.

Need to Know podcast–Episode 186

We’ll keep it simple for this episode and just give you a run through of the latest from Office 365 and Azure with Brenton and myself. A shorter episode for a change. Let us know what you think.

Take a listen and let us know what you think –feedback@needtoknow.cloud

You can listen directly to this episode at:

https://ciaops.podbean.com/e/episode-186-news-from-the-cloud/

Subscribe via iTunes at:

https://itunes.apple.com/au/podcast/ciaops-need-to-know-podcasts/id406891445?mt=2

The podcast is also available on Stitcher at:

http://www.stitcher.com/podcast/ciaops/need-to-know-podcast?refid=stpr

Don’t forget to give the show a rating as well as send us any feedback or suggestions you may have for the show.

Resources

@contactbrenton

@directorcia

Four new ways Microsoft takes the work out of teamwork

How to use Cortana commitments

Roko’s Basilisk

Free Microsoft Teams

OneDrive updates – July

OneDrive updates – June

Microsoft Whiteboard App

Microsoft Inspire

Microsoft Financial results

CIAOPS Office 365 Security course

Configuring DKIM In Office 365

DKIM is a configuration that you can easily add to your Office 365 environment to improve the security of your custom domains.

To configure DKIM, you need to add two DNS records and then enable the setting in Office 365. Then, your outbound emails will have an encrypted portion added to their headers that a receiver can verify securely to ensure the email came from you.

You can read more about how all this works and how to configure it here:

Use DKIM to validate outbound email sent from your custom domain

What my video shows you is how to do this setup using PowerShell combined with Azure DNS. This means the DNS records for the custom domain are hosted in an Azure DNS zone and thanks to PowerShell I can do the whole DKIM configuration via a script. In fact, you can do your whole Office 365 records in Azure DNS using a single script. That’s how I do it, to save time and be more consistent.

Here are the PowerShell commands you’ll need:

$dkim = Get-DKIMSigningConfig $domain

$cname1 = $dkim.Selector1Cname

$cname2 = $dkim.Selector2Cname

$hostname1 = “selector1._domainkey”

$hostname2 = “selector2._domainkey”

New-AzureRmDnsRecordSet -Name $hostname1 -RecordType CNAME -ZoneName $domain -ResourceGroupName $res_grp -Ttl 3600 -DnsRecords (New-AzureRmDnsRecordConfig -Cname $cname1)

New-AzureRmDnsRecordSet -Name $hostname2 -RecordType CNAME -ZoneName $domain -ResourceGroupName $res_grp -Ttl 3600 -DnsRecords (New-AzureRmDnsRecordConfig -Cname $cname2)

set-dkimsigningconfig -identity $domain -enabled $true

Make sure you are connected to both Azure and Exchange PowerShell environments and that you put the custom domain in the variable $domain first. You’ll also need the Azure resource group ($res_grp) for the DNS zone as well.

Now DKIM is not the be all and end all when it comes to domain spoofing protection but having it configured helps and using a scrip to deploy it makes it much easier to implement across all your custom domains in Office 365.

You should also note the following from the above article:

If you do not enable DKIM, Office 365 automatically creates a 1024-bit DKIM public key for your custom domain and the associated private key which we store internally in our datacenter. By default, Office 365 uses a default signing configuration for domains that do not have a policy in place. This means that if you do not set up DKIM yourself, Office 365 will use its default policy and keys it creates in order to enable DKIM for your domain.

Also, if you disable DKIM signing after enabling it, after a period of time, Office 365 will automatically apply the Office 365 default policy for your domain.

Although DKIM is not mandatory for emails sent via the Internet having it enabled does help others with DKIM detection enabled to better ensure legitimate emails are received from your email. It doesn’t take long to configure and once done doesn’t require any maintenance, so best practice is to set it up and help the Internet better detect and protect against spoofing.

Final discount to my new Microsoft 365 Security course

security-protection-anti-virus-software-60504 (1)

If you missed the first discount round and you want deep dive training into Office 365 security, with video demonstrations, included PowerShell configuration scripts, reference material and more then don’t hesitate. I’m offering one last round of discounts before I completely finish my course.

Use the coupon code LASTCALL at check for:

Microsoft 365 Security

or this direct URL that includes the discount:

https://www.ciaopsacademy.com/p/o365-security/?product_id=715774&coupon_code=LASTCALL

That will give you access to the complete course immediately, plus any coming additions for only US$249. There are already over 40 lessons in the course that you can take advantage of and I have lots more to add but that won’t take me long.

Remember, this is the last round of discounts I’ll do. After this the price reverts to the standard price of US$399.

So, if you want to learn more about the security options for Microsoft and Office 365 then sign up today to advantage of the discount while it lasts.

Don’t show folders in SharePoint

image

Best practice with the structure in SharePoint is to keep things as flat as possible. This typically means avoiding multi level folders within Document Libraries because doing so reduces the visibility of information and make it hard for people to find information if they don’t understand the folder structure it lives in.

However, best practices is not what always happens I appreciate. So is there any easy way to see all in the file in a structure with a SharePoint Document Library? There certainly is and it requires working with Views.

image

The recommended starting point is to navigate to the Document Library in question and then in the top right select the All Documents button. This should display a menu like shown above.

Select the Save view as option to create a duplicate of the way the Document Library is currently being displayed.

image

For this example, I’m looking for Visio files in my folder structure so I’ll call this new view Visio as shown above.

image

You should now see that the menu option on the right now show an item called Visio as shown, with a check to the left. This indicates that we are viewing the Document Library with a View called ‘Visio’.

image

Because the ‘Visio’ view is simply a copy of the default All Documents view, we now want to go in and customise what is displayed with this View. To do this, select the Edit current view option from the menu as shown above.

image

You are now taken into an area where you can customise all sorts of aspects of the current View.

image

If you now scroll down to the bottom of all these options, you will find one called Folders, which you should expand as shown above. There you will find an option, Show all items without folders, which you need to select.

Scroll down to the bottom of the page and select Save to update your preferences.

image

You should no be returned to the list and you should no longer see any folders but every file in the structure shown together as shown above.

image

With this new list of just documents, you can select the Type column (first from the left) and from the menu that appears the Filter by option as shown above.

image

On the right hand side a filter menu will appear as shown above. Here, select Visio and then the Apply button.

image

You should now only see Visio files as shown above.

This has achieved our aim but, all the filtering options are temporary. If we return to this Document Library later we’ll again see a full list of files. If we want our new View to continue to show just Visio files we’ll need to go in a edit the View again and make some changes.

image

Once we are again editing the Visio view we can locate the Filter section and set conditions for what we want to see. Here, I’m adding filtering on the Type column in that I only want to see VDW or VSD file types.

Again, make sure you Save you changes before exciting the editing options.

image

Now, every time I go to that Document Library and select the Visio vie win the top right I will see my filtered list of all Visio files in that structure. If you want to make this new filter View the default, just go back to editing the View and select that option. Easy.

SharePoint views therefore allow to easily view your Document Libraries the traditional way with folders or roll up to single ‘non-folder’ View.

Cleaning up orphaned SharePoint Online sites

image

A while back I made a script available that allows you to find all the external users in your environment. You can learn about this here:

Checking SharePoint External Users PowerShell Script

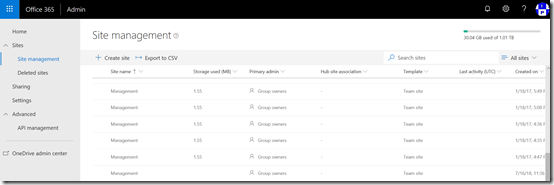
Now when I ran the script on my own tenant I noticed a number of SharePoint sites that didn’t seem right. As you can see from the above screen shot, these typically have the word “management” (e.g.management71, management93, management59, etc).

Hmm…ok, seems like I have some orphaned SharePoint sites. I kinda of remember playing around when Microsoft Teams came out, creating and deleting Teams to test the functionality. So it seems that when I deleted the Teams stuff in the early days it didn’t delete everything.

Ok, time for a clean up

image

So I started with site Management71 and checked to see whether I could get to it. As you can see from the above, yes I can.

So back in the day, this would have been connected to the Office 365 Group. If I delete the site and it is isn’t fully orphaned (i.e. no Office 365 Group still exists) then I could have issues. So to see whether an Office 365 Group still existed with the word “management” in the title I ran this command to give me a list of every Office 365 Group in my tenant:

Get-UnifiedGroup | Format-List DisplayName,EmailAddresses,Notes,ManagedBy,AccessType

Turns out there still is an Office 365 Group called Management in my tenant as you can see from the results below.

image

So the question now, is whether the existing Office 365 Group called Management tied to the SharePoint site Management71 or another site also with management in the name? See how confusing I’ve made things?

image

So next I checked whether I could discover this operational Office 365 Group I see via PowerShell and indeed I could see it in my tenant as you see above.
SNAGHTML208e3e48

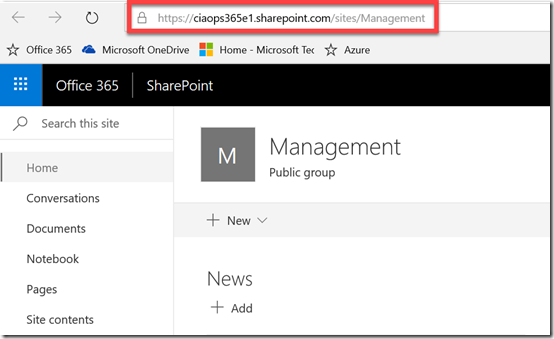
To determine whether this indeed was connected to Management71 I navigated to the SharePoint site connected to the Office 365 Group from the Group page. Low and behold, the Group Site in question is a different site, with a URL that includes the word Management not Management71. Hopefully you get why I’m trying to make all this go away!

So, not needing this valid Office 365 Group I decided the best way to remove it was to use the PowerShell command to delete it which you will find here:

Remove-UnifiedGroup -Identity "Management"
image

To see the sites created by Office 365 Groups you’ll need to go into the new SharePoint Online Admin console as you see above. Problem is, that this new portal doesn’t as yet allow you to delete sites. That means I’ll have to user PowerShell.
image

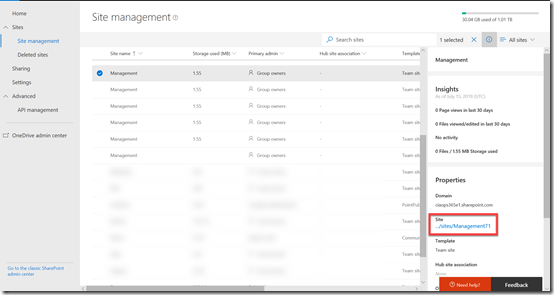
I was then able to locate the orphaned site in question – Management71 as shown above.

image

But if I look carefully at the properties for the site I see that it still thinks this site is connected to an Office 365 Group.

image

So I once again ran the PowerShell command to check the Office 365 Groups in the tenant and there is no longer one with the name management. I am therefore going to assume the site in question is orphaned and I’ll remove it using PowerShell.

image

When I look in the new SharePoint administration console, in the recycle bin for deleted sites I now see the site that was tied to the valid group that I just deleted called Management. To keep things tidy, I decided the best option was to purge unwanted items from here so the rogue SharePoint sites are completely gone from my tenant. To do that I ran:

remove-spodeletedsite -Identity https://ciaops365e1.sharepoint.com/sites/management –NoWait

To remove the other rogue SharePoint sites I firstly run:

remove-sposite -Identity https://ciaops365e1.sharepoint.com/sites/management71 –NoWait

Followed by the initial command to also remove them from the recycle bin and my tenant completely.

In the end, I have been able to remove active SharePoint sites in my tenant that appear to have been created by now defunct Office 365 Groups. I did all this via PowerShell to ensure that they weren’t still connected to something else in Office 365.

I feel much better have a clean tenant without these additional SharePoint sites float around and I got to also user PowerShell to get the job done. Win!