Custom web filtering for Microsoft Defender for Endpoint

In a recent post I showed how you can enable web filtering with Defender for Endpoint using the built in blocked categories method.

Enabling web filtering with Microsoft Defender for Endpoint

The limits of this approach are that you can only use the categories that have been provided (i.e. Adult content, High bandwidth, Legal liability, Leisure and Uncategorized). An interesting omission, in my opinion, is the ability to block social networking (i.e. Twitter, Facebook, etc).

You can achieve custom web filtering with Microsoft Defender for Endpoint if you wish using the custom indicator approach.

image

You’ll first need to ensure that custom network indicators have been enabled in your environment. You do this by navigating to  https://security.microsoft.com, scroll down the list on.the left hand side until you locate Settings, then select Endpoints.

image

From the menu that now appears, select Advanced features. Ensure that the Custom network indicators option is turned on as shown. Don’t forget to save any changes with the Save preferences button at the bottom of the page.

image

To enable a custom  indicator, navigate to https://security.microsoft.com, scroll down the list on.the left hand side until you locate Settings, then select Indicators. On the right you can create an indicator as File hash, IP address, URL or Certificate. In this case, select URLs/Domains. Then select the option to Add item.

image

Enter the URL you wish to block and select whether you wish an expiry date for this indicator. Unfortunately, you can’t use wildcard characters here, it must be the direct URL. Press the Next button to continue.

image

Select the action you wish to take (Allow, Audit, Warn, Block execution). It is also recommended that you select the Generate Alert option so that information can be shared with other applications such as Azure Sentinel, which I’ll cover in an upcoming article. Also, give the alert a descriptive title (I suggest you mention the particular web site you are blocking here). Scroll down the page to continue.

image

Enter the Alert severity, Category as well as the Recommended actions and a Description as shown above. Press the Next button at the bottom of the page when complete.

image

View the summary that is now displayed and press the Save button at the bottom of the screen.

image

You should see your entry listed as shown above. You can edit this by simply clicking on it. You also delete the indicator once you edit it.

Also note the Import menu option that allows you to import a list of items from a CSV file.

Now according to the Microsoft documentation:

Create indicators for IPs and URLs/domains

– Classless Inter-Domain Routing (CIDR) notation for IP addresses is not supported.

– URL/IP allow and block relies on the Defender for Endpoint component Network Protection to be enabled in block mode.

– Supported on machines on Windows 10, version 1709 or later, Windows 11, Windows Server 2016, Windows Server 2012 R2, Windows Server 2019, and Windows Server 2022

– Only external IPs can be added to the indicator list. Indicators cannot be created for internal IPs.

– If there are conflicting URL indicator policies, the longer path is applied. That is, the more specific path.

– Only single IP addresses are supported (no CIDR blocks or IP ranges).

– Encrypted URLs (full path) can only be blocked on first party browsers (Internet Explorer, Edge)


Encrypted URLS (FQDN only) can be blocked outside of first party browsers (Internet Explorer, Edge)

– Full URL path blocks can be applied on the domain level and all unencrypted URLs

– There may be up to 2 hours of latency (usually less) between the time the action is taken, and the URL and IP being blocked. My personal experience is around 45 minutes.

image

Enforced result on Edge. If you use third party browsers, and the site is encrypted (i.e. uses https) it will not be blocked as mentioned above.

Adding indicators using the web and even importing using a CSV is somewhat time consuming and cumbersome, especially if you have a standard set you wish to block. I’ll show you how to add indicators using a script and API calls in an upcoming post. so stay tuned for that.

Remember, that you can use these indicators to not only block but also warn and audit if you wish. You can also have a number of different indicators and types. I’d also recommend you take a look at this article from Microsoft:

Best practices for optimizing custom indicators

when you start creating these custom indicators.

All the Microsoft Defender for Endpoint options

It is important to understand that there are current 3 plans for Defender for Endpoint

1. P1

2. Defender for Business

3. P2

Note: that Defender for Business is currently in preview.

image

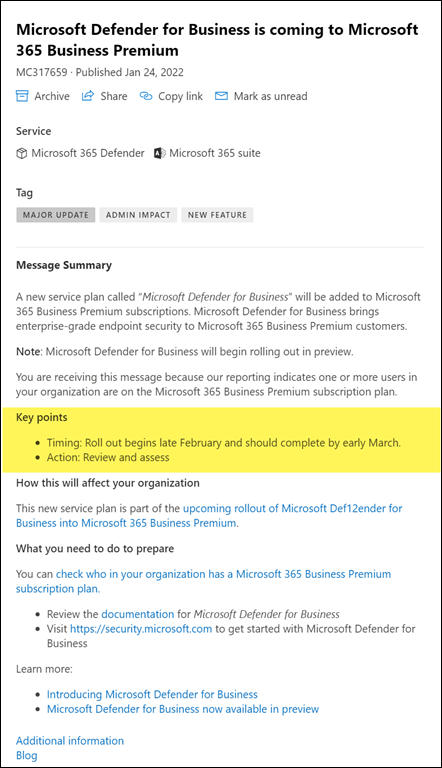
The indicated general available is late February/early March per the above Message Center item.

I have perhaps been some what cavalier in the screens I have shared with a few posts of late. This could potentially lead to confusion about what plans include when I am showing screens from plans that maybe different from what people assume it is.

The issue is not with the functionality, the issue is that what I have shown may not be identical to the specific plan I’m focusing on. In essence, if you look at your screen and what I have shown, you might see differences in the total number of options available for example.

So, let’s clear all that up with a look at the three plans and their differences.

This is probably the best place to start:

Compare Microsoft Defender for Business to Microsoft Defender for Endpoint Plans 1 and 2

The following provides a more current granular break down:

image

image

Some other helpful links:

Microsoft Defender for Endpoint

Overview of Microsoft Defender for Endpoint Plan 1

HadleyE_0-1636992556830.png

Microsoft Defender for Endpoint Plan 1 and Plan 2

Microsoft Defender for Business

Overview of Microsoft Defender for Business (preview)

Compare security features in Microsoft Defender for Business to Microsoft 365 Business Premium

There are also differences in the options available in the interface. For example with Defender for Endpoint P2 you see the following in Settings | Endpoints:

image

While in Defender for Business you only see:

image

Key items like Onboarding, Offboarding and Web content filtering etc. still appear but a significant amount of other don’t. This is where some of the confusion may lie with my previous content (sorry). Hopefully people aren’t too fazed by stuff not being there as they can still get to the stuff I do call out. However, it is on me to do a like for like if I do show screens. So, going forward I’ll do my best to do that to avoid the confusion around all these Defender for Endpoints.

Of course, this will change over time and I’ll try and update my future articles to reflect that.

Enabling web filtering with Microsoft Defender for Endpoint

One of ‘bonuses’ of Microsoft Defender for Endpoint is the inclusion of web filtering. This means that you can block a range of pre-configured sites as well as custom ones if needed. This article will cover how to set up this capability for pre-configured sites.

To get web filtering working you’ll basically need:

– Windows 10/11 devices onboarded to Defender for Endpoint

– Windows Defender Smartscreen and Network Protection enabled.

Web filtering for other platforms, like iOS and Android, is on the roadmap.

Please note that the options that appear may differ based on what version of Defender for Endpoint you are using (P2, P1 or Business)

image

Navigate to https://security.microsoft.com and scroll down the menu options on the left and select Settings. From the options that appear on the right select Endpoints.

image

Locate the Web content filtering option from the menu that now appears, and select + Add item on the right as shown above.

image

From the dialog that appears from the right, give the policy a name (here, Default) and select the Next button.

image

image

Select the Block categories required. You can expand the headings and select individual items insides these. Also note, that you can block both Newly registered domains and Parked domains.

Press the Next button when you have made you choices.

image

You can target this policy at specific Defender for Endpoint groups if you wish, depending on the version of Defender for Endpoint you use. In this case, no groups have been created, so All devices will be targeted. Note, that Device Groups does not currently appear with Defender for Business and thus all policies there will be scoped to all devices by default.

Press the Next button to continue.

image

image

Review the policy summary and select the Save button to complete the creation process.

In my experience it takes around 40 – 45 minutes for this policy to be applied to Windows 10/11 device endpoints, so be patient.

image

When a restricted site is visited using a Microsoft browser like Edge, you’ll very briefly see the restricted website flash up and then almost immediately be replaced with the content blocked message shown above.

image

If you use a non-Microsoft browser, Brave in this case, then you will see a message saying that access is denied and you’ll also receive a Windows Security message as shown in the bottom right above.

If you wish to remove or edit a web filtering policy, simply navigate back to the web filtering option in the security console. Changes, including policy deletions, again take about 40 or so minutes to become evident on endpoint devices.

What’s covered here is just the basics. Look out for future article where I cover off how to filter custom sites and locations. You’ll also find lots more details in the Microsoft documentation here:

Web content filtering

At this stage (January 2022), as I said earlier, web filtering is only available on Windows 10/11 devices but more options are coming in the very near future.

Incident overview with Defender for Business

https://www.youtube.com/watch?v=vTPXei_0l6k

When incidents occur on device endpoints you can view and manage these using the Defender for Endpoint tools in the Microsoft 365 Security Center. This video provided an overview of what happens when incidents are created and how to view their details and manage them from the administration console.

You will find the PowerShell scripts used to generate the device incidents here – https://github.com/directorcia/office365

Troubleshooting Defender for Business

I wanted to create a single point, that I will aim to maintain over time, that provides a repository of troubleshooting tips, links and information on Microsoft Defender for Business.

[Updated 1 February 2022]

Information

Microsoft Defender for Business documentation

Microsoft Defender is subset of the capabilities of Microsoft Defender for Endpoint.

Microsoft Defender for Endpoint

Microsoft Defender for Endpoint documentation

What’s new in Microsoft Defender for Endpoint

Minimum requirements for Microsoft Defender for Endpoint


Onboarding

Onboarding to the Microsoft Defender for Endpoint service

Onboarding using a local script

Onboarding using Intune device configuration policy

Onboarding using an Endpoint Security policy

image

– Most of the required files are in a directory:

C:\Program Files\Windows Defender Advanced Threat Protection

which is already present on Windows Pro and Enterprise devices.

– Look for events from WDATPonboarding in the Application logs in the Event viewer.

These event IDs are specific to the onboarding script only.

Troubleshooting onboarding issues using Microsoft Intune

View the MDM event logs to troubleshoot issues that might arise during onboarding:

Log name: Microsoft\Windows\DeviceManagement-EnterpriseDiagnostics-Provider

View agent onboarding errors in the device event log

Applications and Services Logs > Microsoft > Windows > SENSE

Make sure that the diagnostic data service is enabled on all devices in your organization

– The Microsoft Defender for Endpoint sensor requires Microsoft Windows HTTP (WinHTTP) to report sensor data and communicate with the Microsoft Defender for Endpoint service.

– Services that should be running for Windows 10/11 device:

C:\ProgramData\Microsoft\Windows Defender\Platform\4.18.2111.5-0\MsMpEng.exe”

Service name = Microsoft Defender Antivirus Service

Service = WinDefend


C:\ProgramData\Microsoft\Windows Defender\Platform\4.18.2111.5-0\NisSrv.exe

Service name = Microsoft Defender Antivirus Network Inspection Service

Service = WdNisSvc


C:\Program Files\Windows Defender Advanced Threat Protection\MsSense.exe”

Service name = Windows Defender Advanced Threat Protection Service

Service = Sense


Note – SENSE is the internal name used to refer to the behavioral sensor that powers Microsoft Defender for Endpoint.

When the SENSE service starts for the first time, it writes onboarding status to the registry location     HKLM\SOFTWARE\Microsoft\Windows Advanced Threat Protection\Status

image


C:\WINDOWS\system32\svchost.exe -k LocalServiceNoNetworkFirewall –p

Service name = Windows Defender Firewall

Service = mpssvc


– It may take up to one (1) hour for the onboarded device to appear in Device Inventory

– The status of the device will be switched to inactive after 7 days of failed contact

Troubleshoot Microsoft Defender for Endpoint onboarding issues


Offboarding

Offboarding from the Defender for Endpoint service

Offboarding using a local script

Offboarding using Intune device configuration profile

Offboarding using an API and PowerShell

Offboarding using Power Automate

– If the device was offboarded, it will still appear in devices list. After seven (7) days, the device health state should change to inactive.

– Offboarded devices’ data (such as Timeline, Alerts, Vulnerabilities, etc.) will remain in the portal until the configured retention period expires.

– The device’s profile (without data) will remain in the Devices List for no longer than 180 days.

– Any device that is not in use for more than seven (7) days will retain ‘Inactive’ status in the portal.

– A new device entity is generated in Microsoft 365 Defender for reinstalled or renamed devices. The previous device entity remains, with an ‘Inactive’ status in the portal. If you reinstalled a device and deployed the Defender for Endpoint package, search for the new device name to verify that the device is reporting normally.

– Offboarding a device causes the devices to stop sending data to Defender for Business (preview). However, data received prior to offboarding is retained for up to six (6) months.

– Threat Vulnerability Management (TVM) will only collect and process information from active devices.


Connectivity

Verify client connectivity to Microsoft Defender for Endpoint service URLs

– Defender for Endpoint Connectivity analyzer – https://aka.ms/mdeanalyzer

– The Connectivity Analyzer tool cloud connectivity checks are not compatible with Attack Surface Reduction rule Block process creations originating from PSExec and WMI commands. You will need to temporarily disable this rule to run the connectivity tool. Alternatively, you can temporarily add ASR exclusions when running the analyzer.

– When the TelemetryProxyServer is set, in Registry or via Group Policy, Defender for Endpoint will fall back to direct if it can’t access the defined proxy.


Review event logs and error codes to troubleshoot issues with Microsoft Defender Antivirus – Microsoft Defender Antivirus event IDs and error codes | Microsoft Docs

To generate the support information, type

MpCmdRun.exe -getfiles

After a while, several logs will be packaged into an archive (MpSupportFiles.cab) and made available in

C:\ProgramData\Microsoft\Windows Defender\Support

Extract that archive and you will have many files available for troubleshooting purposes.

The most relevant files are:

  • MPOperationalEvents.txt – This file contains same level of information found in Event Viewer for Windows Defender’s Operational log.
  • MPRegistry.txt – In this file you will be able to analyze all the current Windows Defender configurations, from the moment the support logs were captured.
  • MPLog-***.txt – This log contains more verbose information about all the actions/operations of the Windows Defender.

Onboarding Windows 10 devices to Microsoft Defender for Business using Endpoint Security

You can onboard Windows 10 devices to Microsoft Defender for Endpoint in a few ways:

1. Local script

2. Using Intune device configuration profiles

and what will be covered here:

3. Using Endpoint Manager Endpoint security policies

image

Navigate to:

https://endpoint.microsoft.com

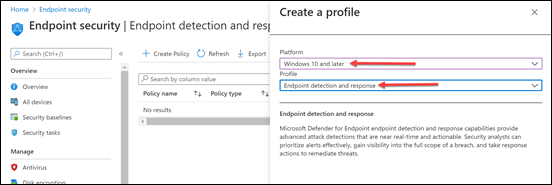
and select Endpoint security from the menu on the left. Then select Endpoint detection and response. Finally, select the option + Create policy as shown above on the right.

image

Select the Platform as Windows 10 and later and for Profile, Endpoint detection and response as shown above.

image

In the next dialog, give the policy a suitable Name and Description.

image

As with the article on the onboarding process using Intune, I’d recommend setting the Expedite telemetry reporting frequency to Yes as shown above before proceeding.

image

As with any Endpoint policy, select the devices and/or users this policy will apply to. Generally, it is recommended that you apply these types of policies to device groups.

image

Proceed through the remaining screens until you end up on the Review + create as shown above. As with the Intune device configuration profile policy, if you look closely you will an option displayed which wasn’t shown during the policy creation process, Auto populate Microsoft Defender for Endpoint onboarding blob set to Yes. This is what will actually configure the targeted devices to connect to the Defender for Endpoint cloud service.

Press the Create button to complete the policy creation process.

image

If you now view the newly created policy, and unlike the Intune device configuration profile policy, you don’t see any mention of the Auto populate setting mentioned above. Makes it somewhat hard to troubleshoot for the uninitiated.

image

We can now monitor the deployment of the policy to devices via the Device status option in the policy options, as shown above. After a short wait, we see the policy has successfully been deployed to the machine in question.

image

Looking the Device inventory in the Microsoft 365 security center we now see the devices in question has been onboarded to Defender for Endpoint.

Both the Intune and Endpoint security approach are easy to implement with an almost identical policy, so which is better? There doesn’t appear to be any guidance from Microsoft on which policy to use, however Microsoft’s own wizards for Defender for Business implement onboarding via the Endpoint security approach shown here. In my brief experience, the Endpoint security approach also seems to be deployed faster to devices. I would also point out that Endpoint security is the more modern approach to device management and what Microsoft seems to be investing in currently. The only major draw back I can see is that Endpoint security policies currently only apply to the Windows platform.

Intune and Endpoint security approach are an indication of one of things Microsoft needs to fix I believe, because having two ways of doing the same thing in the same portal, without any warning of a potential clash makes things hard for those who have to maintain these environments. Given that the Endpoint security approach is the more modern, I expect it to be the winner in the long and suggest you only implement that policy for onboarding your Windows 10 devices for Microsoft Defender for Endpoint.