Join my Teams Shared Channel

Microsoft now has the capability to create a Shared Channel. I have created a Shared Channel in my own tenant that I am freely making available to anyone who wants an invite to see what Shared Channels are all about.

If you are keen on participating then you’ll need to take some actions in your own tenant first to allow the connection.

As an administrator open the Azure portal.

image

In the top search box inside the Azure portal search for Azure Active Directory. Then select the service matching that when it appears as shown above.

image

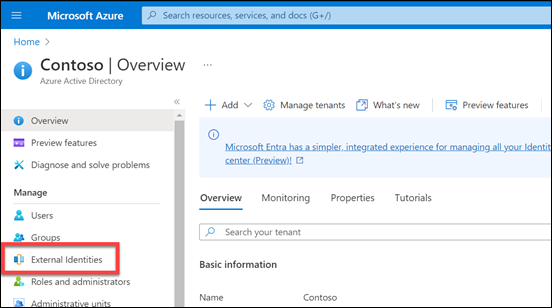
From the menu that appears on the left select External Identities.

image

On the screen that appears, select Cross-tenant settings from the menu on the left. Then select Organizational settings on the right as shown above.

image

Now select Add organization either from the menu at the top or the button at the bottom as shown.

image

From the dialog that appears from the right enter either the domain ciaops365.com or the tenant id 5243d63d-7632-4d07-a77e-de0fea1b77a4. You see the name as CIAOPS after this is completed successfully. When it does appear as shown above, select the Add button.

image

A CIAOPS entry should now appear as shown above.

image

Select the hyperlinked text under the Outbound access heading which will say Inherit from default.

image

Select B2B direct connect from the menu across the top. Then select Customize settings. Finally, select Allow access as shown above.

image

Select the External applications tab. Then Allow access. Finally, select Save at the bottom of teh screen.’

If you take a moment to read the top of the screen before you press Save you’ll see:

Outbound access settings determine how your users and groups can interact with apps and resources in external organizations. The default settings apply to all your cross-tenant scenarios unless you configure organizational settings to override them for a specific organization. Default settings can be modified but not deleted.Learn more

B2B direct connect lets your users and groups access apps and resources that are hosted by an external organization. To establish a connection, an admin from the external organization must also enable B2B direct connect. When you enable outbound access to an external organization, limited data about your users is shared with the external organization, so that they can perform actions such as searching for your users. More data about your users may be shared with an organization if they consent to that organization’s privacy policies.Learn more

In short, you have allowed your tenant to access my shared Teams channel from just my tenant (ciaops365.com).

image

When you do press Save you see the above message. Press Yes to continue and accept.

That is all the configuration you need to do inside your tenant. What you then need to do is send me an email (director@ciaops.com) letting me know you’d like to be added to my shared channel. When I receive this I will add you.

image

After I’ve added you the shared channel should appear in your Teams environment as shown above without the need to switch tenants.

Once you are in my shared channel encourage you to participate and get involved with the content that is there. More details are inside my shared channel. To get things started post a message about why you are in the shared channel and say hello to everyone else.

Feel free to let others know about this offer as I’d like to make my shared channel a free resource for people to come and share information about the Microsoft Cloud.

Power Automate Azure Key Vault access inconsistencies

I’m in the process of building a Flow that connects to a Dataverse database inside a Microsoft Team. When you create this you get the ability to create Cloud Flows (aka Power Automate).

image

However, there is an issue when you try and use something like Azure Key Vault actions here.

image

In the above, you can see that I’m in my default Power Automate environment and the Get secret action of Azure Key Vault is accessible as expected and shows all the items I have inside the vault.

image

However, if I swap to another environment that was created as part of a Team (here an environment called Automation), you’ll see that I can add the Azure Key Vault action Get Secret but I no longer see the items inside that vault as I did before! I am using the same user in both cases.

It has clearly something to do with the connection,

image

which shows up as invalid as you can see above.

image

If I try and add a new connection, I see the above dialog but can’t make any changes or enter any information. Looks like I might need to investigate the Connect with a service principal option perhaps?

However, for now, there seems to be a limit when you use the Azure Key vault actions inside anything that is not the default environment for the Power Platform in your tenant. I will assume this is because these environments are limited to Microsoft Teams and have innate restrictions that I’ll need to find information on. If you know what this is, I’d love to hear from you.

Using PowerShell to create Teams from a CSV file

There was another Teams import from CSV PowerShell script that someone was working on and having issues with. That script was a bit old and used commands that had been changed in the Microsoft Teams PowerShell module since the script was created. So I have taken that script (unfortunately original source specifically unknown but credit noted) and modified it and uploaded to my Github repo here for all to use:

https://github.com/directorcia/Office365/blob/master/o365-tms-import.ps1

and the CSV file in the format required is here:

https://github.com/directorcia/Office365/blob/master/o365-tms-import.csv

image

Now that it is in my Github it is easy for me to update when and if required. I encourage you to also go in and have a look at the comments to understand what is going on.

In essence the script will import the data from CSV file and loop through all the entries creating a new Microsoft Team and then the channels specified in this Team as well as assign member and admin roles for you.

If you use the –debug command line parameter it will record a log file for you.

I have also added some error checking and improved output, as shown above, to give you a better idea of what is going on in each step.

I will note that when you assign member and admin permissions to the Team created via this script they seem to take  while to show up in the portal. So be patient, as they will appear. This isn’t a limitation of this script but just the refresh cycle of the portal.

There are some additional items I want to add but take a look and let me know what you’d like to see added or if I have made any errors that need fixing. Don’t forget to check back regularly for updates.

Enabling security defaults will enforce MFA on external users

A really good questions that I came across was whether enabling security defaults on a tenant will enforce MFA for external guest users.

Here is the documentation for security defaults:

Security defaults in Azure AD

and when enabled one of the things it will do is:

Require all users to register for Azure AD Multi Factor

which says:

All users in your tenant must register for multi-factor authentication (MFA) in the form of the Azure AD Multi-Factor Authentication. Users have 14 days to register for Azure AD Multi-Factor Authentication by using the Microsoft Authenticator app. After the 14 days have passed, the user can’t sign in until registration is completed. A user’s 14-day period begins after their first successful interactive sign-in after enabling security defaults.

The question is does “all users” include external guest users who have been invite into a tenant for collaboration on Microsoft Teams say? This is important because Microsoft is starting to enforce security defaults on all tenants.

Interestingly, none of the documentation seems to call out specifically whether “all users” does in fact include external guest users. After some digging I came across this post:

All users should be changed to all “member” users · Issue #78194 · MicrosoftDocs/azure-docs (github.com)

which has a response from someone at Microsoft and it says:

“Follow up from the product group… Security defaults should apply to guest users as well.”

So it looks as though it does indeed appear that security defaults applies to external guest users but I wanted to be sure.

image

I took a generic Gmail account I use and invited that user into a demo tenant that didn’t have security defaults enabled.

image

That user went through the expected process of connecting to the tenant.

image

using the email code verification process.

image

until they could access the tenant.

image

I also verified that they appeared in the Azure AD for that tenant.

image

So everything as expected so far.

image

Next, I invited that same user to a Microsoft Team inside that tenant.

image

and they could access that Team using the normal email code authentication process. I tried this a few times to ensure they could access the Team without needing anything but the usual email code. So far, so good still.

image

I then went in an enabled security defaults for the tenant.

image

After a few minutes wait to let the policies kick in I tried to login as the external guest user again to Microsoft Teams directly, and after providing a login and getting an email code I was prompted to enable MFA for the user as seen above.

image

Selecting Next will take you through the standard MFA registration process as you see above.

It is therefore the case that if you enable security defaults for a tenant, all users, INCLUDING any external guest users, will be REQUIRED to enable MFA to access resources inside that tenant.

Why this is important is because Microsoft will be enabling security defaults on ALL tenants as detailed here:

Raising the Baseline Security of all organizations in the World

which says:

“Based on usage patterns, we’ll start with organizations that are a good fit for security defaults. Specifically, we will start with customers who aren’t using Conditional Access, haven’t used security defaults before, and aren’t actively using legacy authentication clients.

Global admins of eligible tenants will be notified through email and the Microsoft 365 Message Center. Then, starting in late June [2022], they’ll receive [a] following prompt during sign-in”

Being it is now June 2022, this process has commenced. You can disable security defaults if you wish, even after they have been enabled, if desired per the details in the above link.

Given that I couldn’t find a specific answer about global external users being impact by security defaults, hopefully this now provides a reference for other looking for the same information.

Create a Dataverse database in Microsoft Teams

What I want to achieve in this process is to create a single Microsoft Dataverse database inside a Microsoft Teams and allow a basic Power Automate to add data to it.

image

Firstly, navigate to a Microsoft Team in the environment (here Automation), and select the + (plus) icon along the menu on the right as shown above.

image

In the list of options that appears, search for, and select Power Apps as shown above.

image

The first interesting thing, once you do that, is you typically can only select from pre-existing Power Apps that are listed in the dialog. However, there is an option create an app in Power Apps that you can select towards the bottom of the dialog as shown above.

image

You should then see the dialog display, like the one above, telling you to wait while things get set up.

image

If this process gets hung up after a minute or two, just refresh the page in your browser. You should now see something like that shown above with a list of the Microsoft Teams on the left. If you select the Microsoft Team you want to put the Dataverse database into (here Automation) you should see that nothing is built yet in the information area on the right.
image

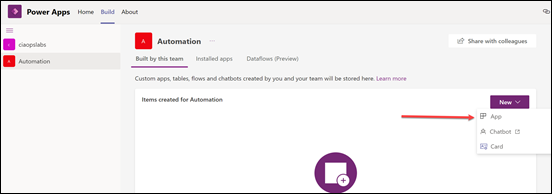
Select the New button on the right and then App from the options that appear as shown above.

image

If you take a quick peek at the Power Platform admin center, in a new browser tab, and then Environments from the menu on the left or use the direct link:

https://admin.powerplatform.microsoft.com/environments

You’ll see that a new Power Platform environment has been created matching the name of the Microsoft Team (here Automation).

As the Microsoft documentation on Power Platform environments says:

https://docs.microsoft.com/en-us/power-platform/admin/environments-overview

A Power Platform environment is a space to store, manage, and share your organization’s business data, apps, chatbots, and flows. It also serves as a container to separate apps that might have different roles, security requirements, or target audiences.

In essence, think of an environment as a container to store things you create in the Power Platform. When you create a Power Platform App inside a Microsoft Team, it creates them in a unique container.

image

The idea is that you should be able to easily switch between environments. However, if you navigate to the Power Platform service directly at:

https://make.powerapps.com/

You are not able to see the environment just created in Microsoft Teams as shown above for some reason. It seems the only environments you can see here are those created directly in the Power Apps make portal.

image

You can drill into the new Teams environment you just created in the Power Platform admin center by selecting it from the list. Information about the environment will be displayed as shown above.

image

If you return to your app creation process inside the Microsoft Team, you’ll now need to give your app a name (here Capture)

image

Typically, you build a full app here but for now all we want to create is a single database, so select the Data icon on the left (cylinder) as shown and then select the Create new table button to the right of it.

image

You’ll then be asked to give the table a name (here Id). If you open the Advanced settings option at the bottom of the dialog, you’ll see that there are not many additional options to select from.

Select the Create button to continue.

image

You should now see the table displayed as shown above. You’ll also notice that there is already a column called Name created. This is a bit like when you create a new SharePoint list and get a single column created for you as well.

image

If you try and edit this initial column by selecting the header and then the Edit column option from the menu that appears above,

image

you’ll find there are not a lot of options available. This maybe limiting or just annoying as it is in SharePoint, but for now just leave that column in place. You’ll just need to remember to put some data in it as it is a required field.

image

You can then add any addition columns you require. Here I’ve added the columns Domain, Date and Value. These are the fields I want to populate with custom data.

image

If I return to the previous screen you should now see the Dataverse database listed as shown above.

image

Returning to the Build page in Power Apps in Microsoft Teams, and selecting the Microsoft Team (here Automation), you should now see some entries in the Items created for Automation list on the right. Here, you should also see the database just created as noted above.

image

If you select the database directly from this screen you can drill in and see the table and any entries as shown above. No data appears in the table yet as none has been added.

image

The way to get data into the database here will be via a very basic Power Automate Flow. It is a good practice to create this also inside the same Power Platform environment in which the Dataverse database was just created. Do this via the Cloud Flows option on the left as shown above.

image

To create a Flow, select Cloud Flows, then from the menu at the top on the right select the + New button. From the options that appear select Cloud Flows then type of Flow desired (here an Instant Flow).

image

The process for creating a Flow is the same as if you were creating a stand alone Flow via the Power Automate service. In this case, simply add the Dataverse Add a new row action as shown above. Configure this action to connect to the Dataverse database created earlier (Ids), then add some random text for the required default Name field (Hello), then data for Date, Domain and Value as shown above.

Save and Run the Flow.

image

If everything is correct, the Flow should run without errors as shown above.

image

If you then look at the details of the database you should see that it now has data inside it as shown above.

image

You could also create a Flow directly from the Power Automate service, but remember to switch to the new Microsoft Teams environment that was created by adding a Power Automate app to the Microsoft Team before creating the Flow.

image

The final interesting item here is to look at the capacity of the new database in the Power Platform admin center where you’ll find that, although you have a total size of 2GB, about 25% has already been consumed by the system.

For more information about the Dataverse for Teams consult the Microsoft documentation here:

About the Microsoft Dataverse for Teams environment

Get your Azure invoice emailed to you

image

If you need a copy of the Azure invoice emailed to you then you can configure that inside your Azure portal be navigating firstly to the Cost Management + Billing.

image

Then select Invoices from the menu on the left.

image

Finally, select Invoice email preferences from the menu on the right then enter the desired email address on the right in the dialog that appears. Remember to save your changes and from now on that email address will receive a copy of your Azure invoice monthly.

Techwers 16

image

I am happy to announce that Techwerks 16 will be held in Brisbane CBD on Thursday August 18th 2022.


The course is limited to 30 people and you can sign up and reserve your place now! You reserve a place by completing this form:


http://bit.ly/ciaopsroi


or by sending me an email (director@ciaops.com) expressing your interest.


The content of these all day face to face workshops is driven by the attendees. That means we cover exactly what people want to see and focus on doing hands on, real world scenarios. Attendees can vote on topics they’d like to see covered prior to the day and we continue to target exactly what the small group of attendees wants to see. Thus, this is an excellent way to get really deep into the technology and have all the questions you’ve been dying to know answered. Typically, the event produces a number of best practice take aways for each attendee. So far, the greatest votes are for deeper dives into the Microsoft Cloud including Microsoft 365, Azure, Intune, Defender for Endpoint, security such as Azure Sentinel and PowerShell configuration and scripts, with a focus on enabling the technology in SMB businesses.


Recent testimonial – “I just wanted to say a big thank you to Robert for the Brisbane Techworks day. It is such a good format with each attendee asking what matters them and the whole interactive nature of the day. So much better than death by PowerPoint.” – Mike H.


The cost to attend in Brisbane is:


Gold Enterprise Patron = Free


Gold Patron = $33 inc GST


Silver Patron = $99 inc GST


Bronze Patron = $176 inc GST


Non Patron = $399 inc GST


I hope to also have a streaming option available as well. The costs for this will be:


Gold Enterprise Patron = Free


Gold Patron = Free


Silver Patron = Free


Bronze Patron = $33 inc GST


Non Patron = $99 inc GST


CIAOPS Patron information can be found here – www.ciaopspatron.com

I hope to see you there.