Need to Know podcast–Episode 182

In this episode Brenton does his first solo interview and speaks with Josh Pell who is currently head of Project and Solution Delivery at Bendigo Telco. As well as being a highly passionate, solution driven IT PMO professional, he has over 18 years providing fantastic experiences to his customers both internal and external across a multitude of industry. You can follow Josh on  Linkedin (https://www.linkedin.com/in/joshpell/) or Twitter (https://twitter.com/pell_josh). Brenton and I also cover off all the latest Microsoft Cloud news for you as well.

Take a listen and let us know what you think –feedback@needtoknow.cloud

You can listen directly to this episode at:

https://ciaops.podbean.com/e/episode-182-josh-pell/

Subscribe via iTunes at:

https://itunes.apple.com/au/podcast/ciaops-need-to-know-podcasts/id406891445?mt=2

The podcast is also available on Stitcher at:

http://www.stitcher.com/podcast/ciaops/need-to-know-podcast?refid=stpr

Don’t forget to give the show a rating as well as send us any feedback or suggestions you may have for the show.

Resources

@pell_josh

@askbrenton

@directorcia

SharePoint Virtual Summit

Introducing Microsoft training services

What’s new for your intranet in Office 365

Explore Build 2018 content with playlists

New updates for Microsoft Azure Storage Explorer

Preview of Azure AD Authentication for storage

Changes coming to PowerShell in Azure Cloud Shell

Selecting sites to include/exclude in Office 365 DLP

image

When you create a DLP policy you have the option to exclude or include certain SharePoint sites as shown above.

SNAGHTML6159fb77

If the sites you wish to include or exclude are anything but the default team site (i.e. https://tenant.sharepoint.com) then you need to manually search for the URL.

Thus, if you are looking to include or exclude a SharePoint site that was created by Microsoft Teams then you need to explicitly search for it by URL to add it to your list as shown above.

Office 365 DLP Document Finger Printing

Data Loss Prevention (DLP) is a way of preventing sensitive information inside you organisation from being sent places you don’t want. Office 365 E3 and above have always included DLP but now Microsoft 365 Business also includes DLP.

There a number of different options you can configure when it comes to DLP inside Office 365. One of these ways is to use DLP is via Document Fingerprinting that allows Office 365 to check information against a template you provide.

Here’s how it works.

image

The first thing I do is create a template of the information I want to be fingerprinted against. Here I have created an invoice template as shown above. Thus, information being sent from my tenant will be checked (‘fingerprinted’) against this to prevent documents that ‘look like’ this template from being sent externally.
image

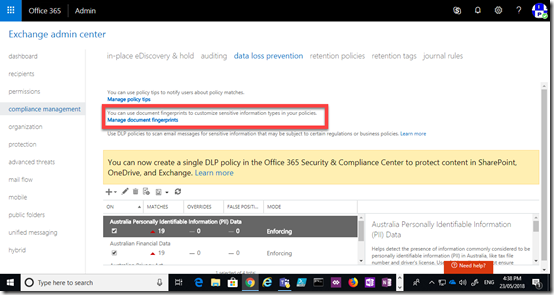
To configure DLP Document Fingerprinting you’ll need to navigate to the Exchange Admin Center and then the compliance management option on the left. You’ll then need to select the data loss prevention option at the top of the page on the right.

On this page you’ll need to select the Manage document fingerprints hyperlink in the top half of the page as shown above. 

image

Here you will see any document fingerprints already configured. Press the plus (+) key to add a new fingerprint document.

image

Simply give the fingerprint a name (in this case Invoice – DLP).

image

In the lower window you’ll need to select the plus (+) symbol and upload the template document that you have created. In my case, I’m going to upload the invoice template shown earlier.

Save you selections.

image

In the lower part of the data loss prevention page you’ll see a list of DLP policies in your tenant. Some of these policies may have been created elsewhere (like the Office 365 Security and Compliance Center). Locate the document fingerprint policies you just created (here called Check for Invoices), select it and then select the edit icon from the menu at the top as shown.

image

You can then further configure the DLP policy. Here I have elected to enable and enforce the policy but there are other options you can select.

Select the rules option from the menu on the left.

image

To create a new rule, select the plus (+) icon from the menu across the top.

image

Here is where you will create the outbound transport rule to check information sent via email. In this case, the rule will apply of the recipient is outside my Office 365 tenant.

image

When I select the type of sensitive information I can now select from the document fingerprint I just created.

When there is a policy match, I then elect to block the document, notify the user via a policy tip and send a report to a nominated user.

image

With my new document fingerprinting DLP policy in place I now create a new invoice based on the original template as shown above that you can see is different from the original template but still similar in format.

image

As you can see above, when I attempt to attach this new document via Outlook on the desktop that looks like the previously configured fingerprint document, it activates my DLP policy and prevents the item being sent outside the organisation as desired.

image

I get a similar result if I try and do this using the Outlook Web Client (OWA).

image

I get a policy tip at the top of email as shown above.

image

and when I attempt to send the email I can’t. DLP in action!

This is one example of the DLP capabilities of suitably licensed Office 365 and Microsoft 365 tenants. DLP is great way to prevent standard information, like invoices, being accidentally or maliciously sent outside your organisation.

As I mentioned, DLP is now part of Microsoft 365 Business which means that it an even more enticing offering for SMB who are subject to compliance regulations.

Pssst…want some free GBs in your OneDrive for Business?

One of the common beliefs with Office 365 is that OneDrive for Business storage for most plans (typically Business plans) is limited to 1TB per user. Well, I’m here to tell you that the limit for most tenants is in fact 5TB per user. Don’t believe me? Well, read on and be AMAZED!

image

You can see from the above that the user has the standard 1TB storage for the OneDrive for Business.

image

The ‘normal’ way that you set the amount of storage each user gets for their OneDrive for Business is via the Storage option in the OneDrive Admin console as you can see above.

Now, if you visit the link just below that setting you will see the following:

image

Here’s the full link:

https://support.office.com/en-us/article/set-the-default-storage-space-for-onedrive-users-cec51d07-d7e0-42a3-b794-9c00ad0f0083?ui=en-US&rs=en-AU&ad=AU

Thus, if you have more than 5 users (and perhaps less) you can get 5TB per user OneDrive for Business.

image

These days, I prefer to do most of my administration using PowerShell. The above script will set the new limit for all users provisioned with OneDrive for Business from this point on to have 5TB of space in their OneDrive for Business.

image

To increase any existing users OneDrive for Business up to the 5TB limit you’ll need to run the above script for each user. You’ll need to replace the URL with each users individual OneDrive for Business URL.

image

After doing this, if you now look at the users OneDrive for Business storage quota, you’ll see it is now 5TB!

Magic eh? And you thought I couldn’t give you free GB’s out of thin air! Shame on you.

Enterprise State Roaming

Microsoft 365 allows you to implement Enterprise State Roaming which is the ability to sync select Windows desktop settings across various machines. This is really handy if you work with different Windows 10 machines and want you information across all of them.

You enable Enterprise State Roaming in Azure AD and then all you need to have is Windows 10 Pro machines joined directly to Azure AD. This video tutorial will show you how to set up Enterprise State Roaming and how it works.