Need to Know Podcast–Episode 96

Marc Kean now joins me on a regular basis with the podcast to share his knowledge and experience on Azure and PowerShell. Marc also lined up our guest for this episode, Reid Purvis, Microsoft Cloud Infrastructure Technical Specialist based in Sydney.

Reid explains what Azure Express Route is all about and why it makes sense for even the smallest organisation these days. If you want to learn about Azure Express Route then this is episode for you.

You can listen to this episode at:

http://ciaops.podbean.com/e/episode-96-reid-purvis/

or subscribe to this and all episodes in iTunes at:

https://itunes.apple.com/au/podcast/ciaops-need-to-know-podcasts/id406891445?mt=2

The podcast is also available on Stitcher at:

http://www.stitcher.com/podcast/ciaops/need-to-know-podcast?refid=stpr

Don’t forget to give the show a rating as well as send me any feedback or suggestions you may have for the show. 

Resources

Azure Service Updates – https://azure.microsoft.com/updates

Azure Resource Manager – a holistic view of Azure Resource Manager – https://resources.azure.com

Australian Azure Express Route – Getting Started

https://azure.microsoft.com/en-us/services/expressroute/

http://resources.azure.com/

https://azure.microsoft.com/en-us/

Reid Purvis

Microsoft Cloud Infrastructure Technical Specialist (Sydney)

Email: reid.purvis@microsoft.com

Mobile: +61 427 038 685

Follow Me On Twitter: http://www.twitter.com/rpurvis  (@rpurvis)

Need to Know Podcast–Episode 95

In this episode I’m joined by returning guest James Eling from Extreme Networks to talk about leadership, especially business leadership. James shares both his extensive knowledge and experience of being a leader both personally and in business. You’ll get some great insights here about what skills it takes to lead people and organisations through the process of improvement.

As always, a big thank you to Marc Kean for producing this episode and doing the intro and outros.

You can listen to this episode at:

http://ciaops.podbean.com/e/episode-95-james-eling/

or subscribe to this and all episodes in iTunes at:

https://itunes.apple.com/au/podcast/ciaops-need-to-know-podcasts/id406891445?mt=2

The podcast is also available on Stitcher at:

http://www.stitcher.com/podcast/ciaops/need-to-know-podcast?refid=stpr

Don’t forget to give the show a rating as well as send me any feedback or suggestions you may have for the show. I’m also on the hunt for some co-presenters so if you are interested on being a regular part of the show please contact me.

Resources

Get Started with the OneDrive for Business Next Generation Sync Client in Windows

Enabling Office 365 Planner

Retaining your OneDrive bonuses

Beware of malware Office 365 statements

Enterprise Mobility Suite

CIAOPS Academy

James Eling
www.extremenetworks.com.au
jeling@extremenetworks.com.au

@extreme_james

Mastering the Rockefeler Habits – Verne Harnish

Why technology will doom us all

As much as I like and make a living from technology, I have always maintained a healthy interest in all aspects of digital security. I have written plenty of previous articles about how technology is pretty devoid of good security in my opinion, such as:

Bad guy just keep winning

The world of security anonomalies

Security before convenience or else

Here’s another recent personal episode that once again proves my point that we are headed to a very bad place with technology due to a lack of focus and understanding of the real value of security.

While visiting a family member they informed me they feared their PC had been hacked. The reason sighted was they saw a message appear on the screen, while browsing the Internet, that told them their system had been hacked. They immediately panicked and turned the whole system off awaiting my arrival.

Time to investigate.

I powered the machine back up and ran a few scans and checked the logs and couldn’t see anything nasty. The family member told me that had been searching the Internet and viewing the resultant sites. The last one they remember visiting was:

Tasmanian Air Adventures

Rather the visting the site I ran my own search on the name of the business.

image

Above is the first result that was returned. If you look closely you’ll see that results returned are just ‘default text’ ( i.e. Donec ullamcorper…). This indicates to me that site still has some ‘defaults’ set somewhere. If that is the case then the site also probably has ‘default’ security, which really means no security!

After a little more digging I turned up the suspect HTML page and the above image from the browser cache which is what the user remembered seeing.

The suspect HTML also revealed that the exploit used was against an outdated Mailchimp WordPress plugin.

After some further checking I was confident that the exploit targeted the insecure server not client browsers. I re-assured the user that all was good and they didn’t have anything to worry about (for the reasons I’ll point out a bit later).

After some more digging it turns out that the company whose web site it was actually went into liquidation a while back.

Tasmanian Air Adventures in liquidation

That was about 10 months ago as of today.

So here are my comments/questions:

1. Why the hell is an insecure web site still allowed be to be running when that company was liquidated 10 months ago?

2. Who the hell is paying for that server to be still running?

3. If that web server was actually shared amongst others that insecure account now potentially makes all accounts on that server vulnerable.

I could go on but ….

My point here is that as we race towards making technology more and more part of our lives and our businesses, including connecting them all together all the time, we make ourselves more vulnerable to any single insecurity.

The Internet of Things sure sounds great but it will open a Pandora’s box of pain for everyone by connecting every device we see to the Internet. Why? Because all it requires is one insecurity in any of these connected system to give the bad guys a foot hold. In fact, I would contend that it is too late, they already well entrenched.

I’m scared. I really am. We are building a world that is going to fail, and fail potentially castastrophically. It is going to make us more vulnerable. It’s a world were the financial incentive is heavily stacked towards doing evil rather than good.

It is pretty much impossible these days to go totally unibomber and unplug. Thus, our only realistic option is to deal with the world we have created. That means taking total ownership of your own security.

Case in point, the family member who experience this issue was running a FULLY patched AUTOMATICALLY updating version of Windows 10 with other security measure in place thanks to your truly. Many people complain about the change Microsoft made to have Windows and Office automatically update. I, however, think that is GREAT! It is one thing EVERY piece of software MUST do in my opinion. Otherwise, we leave holes that the bad guys can crawl into and never be removed once they are in.

The reality, which I believe fails to be grasped, is that technology security is a losing equation. Every day more and more software and devices become vulnerable because they are not being updated YET they remain connected, just like the web server my relative was visiting.

I’m sorry, we are all doomed and technology is to blame. You have been warned.

Enabling Customer Lockbox

image

Microsoft already has a very secure process about when and how support staff may access your Office 365 tenant data. Here’s a great video that explains this:

The recent addition of Customer Lockbox provides additional control for the customer.

Basically, once Customer Lockbox has been enabled the user has the final say over when and for how long Microsoft may access the tenant data to provide support.

image

To enable Customer Lockbox you’ll need to have the appropriate license (i.e. the new E5 SKU includes Customer Lockbox for example), then you’ll need to login as an administrator to the Office 365 admin center.

image

If you then locate and expand the Service Settings option on the left hand side of the screen, you should see the list shown above. In the list is the option Customer Lockbox, which you should select.


image

Now on the right you should see the above screen. To eanble Customer Lockbox simply change the switch to ON (i.e. move to right).

image

You’ll then receive the above warning. Select Yes to enable.

image

You should now see that Customer Lockbox is enabled as shown above.

To find out more about Customer Lockbox visit:

Office 365 Customer Lockbox Requests

and note once Customer Lockbox has been enabled:

If a content access request is denied or isn’t approved within 12 hours, the request expires. If this happens, you might continue to experience a specific service issue that could be resolved by allowing an engineer to access the content. We’ll (Microsoft) let you know if this happens.

So in summary, Customer Lockbox is a feature you can add on to Office 365 to prevent Microsoft accessing your data with out your specific permission once enabled.

Here is also an overview video from Microsoft:

Introduction to Azure

I have blogged and done plenty of presentations about different Azure services (i.e. Azure SMB File Shares recently), but when I looked through my list of YouTube videos I didn’t have a basic video that provided just an general overview of what Azure is.

So I took some content from a recorded webinar and packaged it up to the video you’ll see above and at:

What is Azure?

It runs for about ten minutes and hopefully provides a good resource for those who are still trying to understand what Azure is all about.

From there, I’d suggest you take a look at my online training academy which has a few courses on Azure but probably the most relevant one is:

Introduction to Azure

which has about 19 lessons that are aimed at giving you basic information about some of the most relevant features of Azure for IT Professionals.

You can also search all my blog posts on Azure using the Azure tag. The results of that are:

CIAOPS blog Azure posts

which you can use now or any time in the future as I aim to continue to tag each article which deals with Azure.

If you are still struggling with Azure, don’t hesitate to contact me with your questions and I’ll do my best to help shed some light on what at times, I understand, can be somewhat confusing. If you’d also like to see me write or present about something in Azure just let me know and I’d be happy to make it happen. All you gotta do is ask.

Disabling Delve per user

A while back I wrote a post about how to turn off Delve.

Disabling Delve

that information is echoed in the Microsoft documentation

Can I turn off Delve?

However, upon revisiting my tenant now I find the options somewhat different.

image

The first step is to select your user icon in the top right of the Office 365 portal. That will display the menu shown above from which you select About me.

image

This will take you to your Delve profile as shown above.

image

If you now select the COG in the cupper right you should see the menu shown. From this, select Features settings.

image

This displays the above information with the option to turn off documents in Delve.

[image%255B18%255D.png]

This is somewhat different to what it used to be as shown above which gives you the option to Turn off Delve and hide my activity from others.

Unfortunately the Learn more link in the current Delve settings, which resolves to:

http://go.microsoft.com/fwlink/?LinkId=715632&clcid=0x409

image

appears to navigate to a non existant page.

Some of this confusion maybe because I have my tenant set to First Release which means I get newer features faster but I feel that things are not quite as clear as before when it comes to disabling Delve if needed.

Previously, it spoke about not sharing your “activity” whereas now it only speaks about preventing your docuements howing up in other people’s Delve.

Now your “activity” could now just be documents in Delve. That is, they are one in the same, but for the paranoid amongst us this lack of clarity could be a privacy concern. I think using “Don’t share my activity” is a much clearer and potentially wide ranging option.

I can’t really see any benefits to users disabling Delve but there are a small minority who might and I think that somewhat clearer messaging around disabling Delve would prevent confusion in regards to privacy concerns. I however have no doubt that these setting will appear as the service conftinues to improve over time, however for the time being you only seem to be able to disable document sharing in Delve is as I have outlined above.

Azure Backup Server for Applications configuration

I have written before about how Azure can be used to backup files and folders quickly and shown how to set all that up here:

Azure Desktop Backup

Recently, Azure Backup was extended to now be able to do server services like Exchange, SQL, SharePoint etc:

Azure backup now does servers

This involves a different process to setup and so here is the walk through process of setting Azure Backup Server for Applications.

image

You’ll need to have an Azure Backup Vault already in place as the destination for your backups. You create this Azure Backup Vault in the Azure management console under the Recovery Services option. You can have as many Azure Backup Vaults as you wish and my personal practice is to have a separate vault for each machine. If you need to create a new vault I have detailed how to do this previously.
image

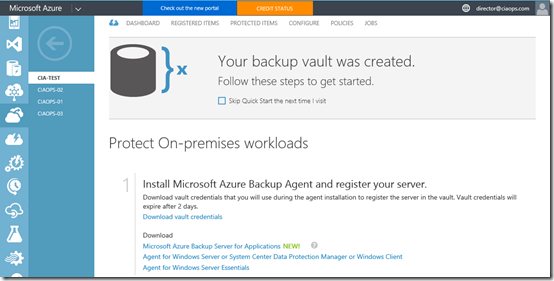
Once the vault has been created you’ll need to download the Azure Backup software. You can find this in the details for the Backup Vault as shown above. You need to download the Microsoft Azure Backup for Applications.

This will in effect take you to the following download link:

https://www.microsoft.com/en-us/download/details.aspx?id=49170

image

Which will allow you to download the software. Beware that the Backup for Applications software is about 3.2 GB in size. Why? Because it includes the Microsoft Data Protection Manager (DPM) and SQL 2014.

image

There are number of different files you need to download, as shown above. Place them all the same directory and then run MicrosoftAzureBackupInstaller.

image

The installation process will now commence. Select Next to continue.

image

The next step in the process is to expand the downloaded files into a single installation directory. You can customise this directory if desired. Select Next to continue.

image

Select Extract to continue.

image

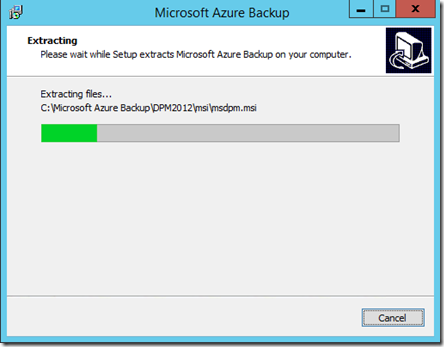
The files will now commence extracting into the directory that you nominated.
image

Be patient, the extraction process will take a few minutes.

image

When the extraction process is complete you are given the option to Execute setup.exe to install the software. Leave this option selected and press Finish.

image

The setup splash screen should now appear as shown above. From this screen select Microsoft Azure Backup under the Install column on the left.

image

The C++ Runtime will now be installed.

image

The setup screen should now appear as shown above. Select Next to continue.
image

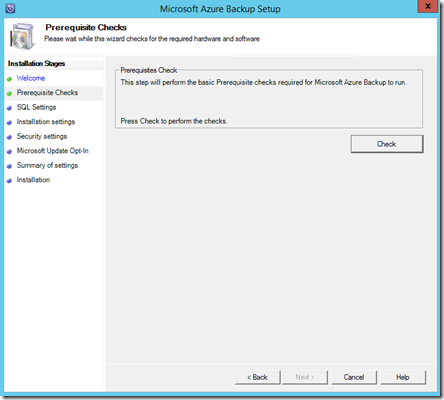
Select the Check button in the top right to ensure all the prerequisite software is installed.

image

If the prerequisites are met you should see a message confirming that as shown above. Select Next to continue.
image

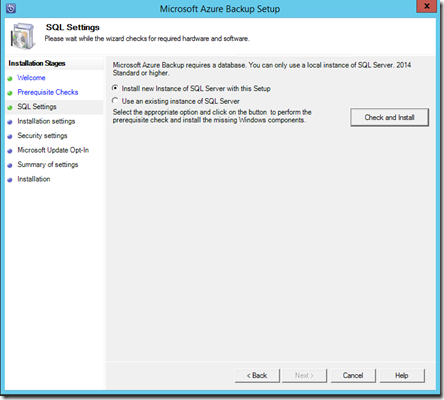
You’ll now need to specify an SQL server as part of the configuration. You can configure an existing SQL server on your network or you can elect to install a new instance on the current machine. If you select an existing SQL Server it will need to be running SQL 2014.

In most cases you’ll want to install a new instance of SQL 2014, so ensure that option is selected. Now select the Check and Install button in the top right.

image

Your system will then be checked. This should only take a minute or two.
image

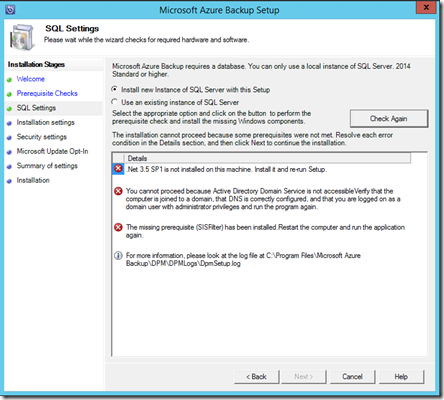
You’ll then see a report of the results. A couple of things to notice here:

– You need to install this software on a domain joined server

– You need to have .Net 3.5 SP1 installed

– You can install this software on a domain controller but if you do you’ll need to follow this guidance before proceeding:

https://technet.microsoft.com/en-us/library/ff399416.aspx

image

In this case the installation is on a member server and no critical issues were detected. Select Next to continue.

image

You’ll then be prompted to confirm your installation configuration.

Once you have made any modifications here select Next.

image

Now provide a password for the two accounts required to run services. Remember to record this password!

Select Next once you have entered a suitable password.

image

Select how you wish to manage updates and then Next to continue.
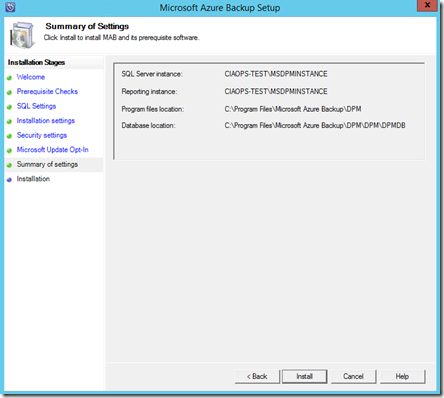
image

The configuration information is displayed. Select Install.
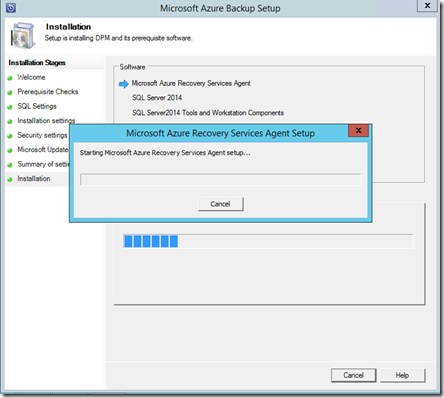
image

The selected software components will now be installed.

image

You’ll now be prompted to complete the Azure Recovery Services Agent Setup Wizard as you would with the normal Azure Backup option.

Enter any proxy details and select Next.

image

If additional software is required to support this agent it will be displayed.

Select Install.
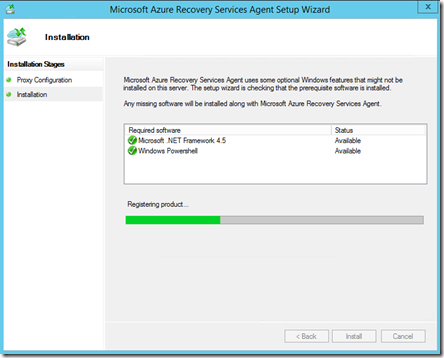
image

Supporting software will then be installed.

image

When the required supporting software has been installed select Next.

image

You’ll then be prompted for the location of the Vault credential file.

image

You download this file from the console of the Backup Vault as shown above by selecting the Download vault credentials link.

image

Once the vault credential file has been verified select Next.

image

You’ll now need to generate a unique encryption key for this backup. In most cases you will select the button Generate Passphrase to create a secure key.

You will also be prompted for a location to save a text file of this encryption key. Ensure that this key is recorded and a copy of the file is saved to another system so it can be used if recovery is required.

When all this is complete, select Next.

image

The installation process will continue.

image

You will receive a confirmation message as shown above that the process is complete.

Press the Close to complete the installation.
image

You should now find an icon on your desktop like that shown above for Microsoft Azure Backup Server. Double click this to launch.

image

The Microsoft Azure Backup console should now launch as shown above.

Here’s the Microsoft documentation on this configuration process:

Preparing to back up workloads using Azure Backup Server

I’ll look at covering how to use Azure Backup Server to backup and restore files in an upcoming post.

Just when you think you need to restore

image

Had a bit of a heart stopper with my Surface 3 Pro refusing to boot past the initial screen shown above.

Long story short, this site provided the solution:

Surface turns on, but Windows won’t start

This is what worked for me:

Solution 3: Two-button shutdown (Surface Pro models only)

Important

Don’t use this process on Surface RT, Surface 2, or Surface 3.

Use this two-button shutdown process to ensure that your Surface is turned off completely. Here’s how:

Step 1:
Press and hold the power button on your Surface for 30 seconds and then release it.

Step 2:
Press and hold the volume-up button and the power button at the same time for at least 15 seconds and then release both.
The screen may flash the Surface logo, but continue holding the buttons down for at least 15 seconds.

Step 3:
After you release the buttons, wait 10 seconds.

Step 4:
Press and release the power button to turn your Surface back on.

Phew! So if you didn’t know there is a two button process to ensure the Surface Pro 3 is off completely!

Hoppefully, this get someone out of a similar jam and prevents them from trying lots and lots of things before discovering this process.