Modern Device Management with Microsoft 365 Business Premium–Part 3

In the previous parts of this series I have covered:

Office 365 Mobile MDM – Modern Device Management with Microsoft 365 Business Premium–Part 1

Intune MDM – Modern Device Management with Microsoft 365 Business Premium – Part 2

The next step in the step in the process of securing and managing devices with Microsoft 365 Business Premium is Mobile Application Management (MAM) which we’ll look at now.

MAM allows the ability to fully manage select applications, typically business applications like Outlook Mobile, Word Mobile, etc on any device. MAM is handy because it doesn’t require device management (MDM). This makes especially handy when users bring their own personal devices and want access to business data like emails but don’t want the organisation having fully control of their device. Thus, MAM is prefect for the Bring Your Own Device (BYOD) scenario.

image

We can thus use MAM on any device, independent of whether it is Azure AD joined, registered or stand alone.

The Intune service inside Endpoint Manager is typically what is used for MAM. Application control is once again managed by policies that are pushed down to the individual applications on the device. The first of these policies is known as App Protection policies which is focused on application security.

SNAGHTML2087555d

These policies are located in the Endpoint Manager portal under Apps and then App protection policies as shown above.

You can target policies to different device OS versions and here you typically define ‘targeted apps’ (i.e. corporate apps) as well any apps you want exempted from protection policies. Anything not defined by either of these is considered a non-corporate app. In here you also define corporate data locations, which will typically be Microsoft 365 services like OneDrive, SharePoint, etc but may also include on premises and third party cloud based services (say Salesforce). Now with both corporate apps and corporate data locations defined you can set policies around how data is to be stored and managed. For example, you may want to only allow corporate data to be saved to corporate locations or maybe you only want to store corporate data onto ‘secure’ devices. App protection policies allow these configurations and definitions.

App protection policies also give you the ability to selectively wipe data from corporate managed apps. MDM gives you the ability to wipe the WHOLE device remotely, both corporate and personal apps and data. MAM however, gives you the ability to just wipe the data inside Outlook mobile for example. This is why MAM is generally the best option for BYOD devices where the device owner don’t want the business to have access to anything but corporate data on the device.

image

You then have Application Configuration policies as shown above which are also part of Intune MAM. These policies target the options you want configured for applications on devices.

image

This is again controlled by policy which can be targeted at the device OS. The above is taken from the configuration policy for Outlook for iOS and illustrates the level of detail you can go down to when configuring. You can ensure that suitably configured apps are made available to user and devices optionally or as a requirement. There is a lot that can be done here to allow you to deploy and manage applications on mobile devices.

image

You get to these policies via the Apps option in Endpoint Manager and then App configuration policies as shown above.

Many people ask the question about whether you should or can use MDM and MAM together? The answer is most certainly, Yes. The reason you would choose to do that is to provide extra security and convenience. MDM means for example I can ensure that my device storage is encrypted while MAM will prompt me for a pin number when I actually use a corporate app. That makes my data more secure. Do you need to use both MDM and MAM? It all depends on your security and deployment requirements. If you mainly have BYOD devices that don’t want to be device managed then MAM will be your only option. The main thing is that it provides flexibility when it comes to both security and configuration of your devices. The best strategy is defence in depth. The more layers of protection you have the lower your risk.

Given all the options that have been covered in both MDM and MAM so far, hopefully you can now see the huge amount of options available to you when it comes to managing devices. The tricks is to firstly get the device enrolled, apply MDM and then MAM policies.

Don’t think however this is the end of device options available to you. Oh no, Endpoint Manager has a many additional configuration options you can implement to make your devices EVEN more secure. Stay tuned for that upcoming article.

MOdern device Management with Microsoft 365 Business Premium – Part 4

Modern Device Management with Microsoft 365 Business Premium–Part 2

In

Modern Device Management with Microsoft 365 Business Premium–Part 1

I covered the basic overview and out of the box device management you get with pure Office 365. In this article I want to start digging into the more advanced features you get by using Intune which is part of Microsoft 365 Business Premium.

image

Microsoft has a service called Endpoint Manager that allows advanced device configuration and management. You access this via:

https://endpoint.microsoft.com/

image

Intune is now part of Endpoint Manager, so you use that to gain access to the Intune configuration.

image

Part of the Intune configuration capability is device management, this is more advanced than the basic options in pure Office 365 that were detailed in the previous article.

image

To have devices managed by Intune they first need to go through a specific Intune enrolment process.

image

Intune device enrolment can only be achieved once devices have been joined to Azure AD. Both registered and stand alone devices cannot be managed at a device level via Intune, only those devices that have been fully joined to Azure AD can be enrolled in Intune for device management.

image

If you look at your Azure AD in the Azure portal you’ll see the option Mobility (MDM and MAM). If you select that, you’ll probably see a Microsoft Intune option on the right as shown above.

image

If you select that Intune option and you don’t have a license for Intune you’ll be greeted with something like the above. What this is telling you is that automatic enrolment of device requires an Intune license.

image

If you do however have a license for Intune you’ll see the above instead. This allows you to select which groups (None, Some, All) that will automatically be enrolled in both device management (MDM) and application management (MAM). You could still of course, manually enrol if you wished but by adding an Intune license you now get the ability to automatically enrol devices into Intune management once you have joined these devices to Azure AD.

So the, typical steps so far have been:

1. Join device to Azure AD

2. Have it automatically commence device enrolment in Intune

You will find the configuration for Intune enrolment by navigating to Endpoint Manager:

https://endpoint.microsoft.com/

SNAGHTML14ccbdd9[4]

and then go to the Devices option from the menu on the left then Enroll devices as shown above.

SNAGHTML1487c6b2

The first major difference you’ll now see is that you have enrolment options for Windows, Apple and Android as well as the ability to enforce restrictions and allocate managers. Each operating system will have it’s own enrolment capabilities and options. For example, it is here that you configure Windows Autopilot and Windows Hello for Business if you wanted, as they are considered potentially part of any advanced device enrolment.

I’ll look at covering off many of these different enrolment options in future articles, however I do want to call your attention that to enrol Apple devices you will need to set up a free Apple certificate beforehand. I have detailed that process previously here:

Adding an Apple Certificate to Intune

SNAGHTML14b17f9b

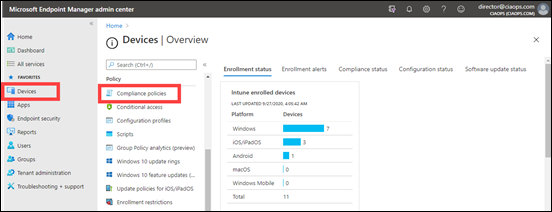
You can get an overview of the device enrolment status in your environment (i.e. successes and failures) via Endpoint Manager | Devices | Overview | Enrollment status as shown above. You’ll also see any Enrollment alerts on the very next tab to the right.

image

Once devices have successfully completed enrolment, they will commence device compliance.

SNAGHTML14a1feac

You can configure device compliance policies via Endpoint Manager | Devices | Compliance policies as shown above.

image

Here you create as many different Compliance policies as you wish. Typically, you have one per device operating system, however you can have more if you wish. A good example of why you might have two Windows 10 policies is to handle machines that have and those than don’t have TPM capabilities. Disk encryption is a compliance setting you can check for and enforce. However, you may not want to enforce full disk encryption via BitLocker for machines that don’t have inbuilt TPM chips for example. Thus, two separate compliance policies would be required. One to check machines with a TPM capability and one for those without.

image

If you select the Create Policy option, as shown above, you’ll be able to select from a range of platforms (OS’s).

image

The compliance options available will vary by device operating system, but an example of some of the Windows 10 options you can configure in the policy are shown above.

The main idea here is to configure appropriate checks via policies for each device operating system. Devices that fail these checks are considered and marked as ‘non-compliant’ and further action can then be taken. An example of an action that can be taken on a device that is ‘non-compliant’ is to exclude it from accessing Microsoft 365 information. A good example of this is a policy that prevents devices that have been jailbroken or have unsupported operating systems from being able to access corporate data.

SNAGHTML14b4bded

You can get an overview of the device compliance status in your environment by navigating to Endpoint Manager | Devices | Overview | Compliance status as shown above.

image

Once compliance policies have been applied to a device, the final part of adding devices to Intune device management is the application of configuration policies.

SNAGHTML14b99b3a

These policies are found by navigating to Endpoint Manager | Devices | Configuration policies as shown above.

image

When you create a new policy via the Create profile button from the menu as shown above you again need to select the device operating system and then the profile. The number, types and content of these profile will vary by operating system but for example allow to to do things like control when anti virus scans run, control photo uploads, enforce pin locks and so much more.

Here you will typically have lots of policies including different policies for different groups of users, different operating systems and so on.

image

Above is an example of the options that are available in an Android Device Restriction configuration policy.

In summary, this article has covered the process of enrolling in advanced device management (MDM) using Intune. The process is:

1. Join devices to Azure AD

2. Devices complete Intune enrolment

3. Devices have Intune compliance policies applied

4. Devices have Intune configuration policies applied

After this process, devices are considered to fully ‘device’ managed by Intune. That is MDM is now done via Intune.

Note, MDM is for devices that are Azure AD joined and require full control of the device down to the operating system. This means the business has full control of the device. That may not be desired for users who bring their own devices (BYOD). Such devices can be managed by application management (MAM) which will be the focus of the next article.

Modern Device Management with Microsoft 365 Business premium – Part 3

Modern Device Management with Microsoft 365 Business Premium–Part 1

The way that devices running Windows 10, iOS, Android and MacOS get managed with Microsoft 365 Business Premium can be daunting to those who aren’t familiar with it. The common way that it is explained is from the inside out, that is via policies in Intune first, rather than starting with the big picture and working in.

I therefore thought that I’d do my best to explain it from what I see is a more logical way to understand what is going on.

image

The starting point is the Microsoft 365 Business Premium tenant in which everything lives.

image

Inside a Microsoft 365 Business Premium tenant is an Azure AD tenant. See my article:

Deploy Office 365 and Azure together

for more information.

image

Inside the Azure AD tenant is Active Directory (AD) (i.e. Azure AD).

image

Inside Azure AD are user identities (i.e. login credentials).

image

Also inside Azure AD are devices.

image

The first type of device that can be used, are devices that are totally stand alone. They have no connection to the tenant or are joined in any way. Given a larger canvas, these would live outside the tenant, however for convenience and space, I’ll simply represent them where they are.

If you want to access Microsoft 365 Business Premium services on such devices, you typically do so just using a browser. There is no device (MDM) or application management (MAM) of these devices as well as no compliance to ensure they meet requirements like an up to date operating system.

image

The next set of devices are those that are simply ‘registered’ with Azure AD. You do this by following these steps:

Register your personal device on your organization’s network

for more information see:

Azure AD registered devices

Once a device is registered it will appear in Azure AD.

image

You typically find that in the Azure Portal under the Azure Active Directory service and then selecting Devices as shown above.

image

You will see that registered devices are displayed as Azure AD registered as shown above.

Azure AD registered devices typically have no application control (MAM), no device management (MDM) or compliance. The one advantage you do get over stand alone devices is that access to Microsoft 365 resources, like files, is easier and subject to less prompts to enter credentials.

Registered Azure AD devices are a typical scenario you see for BYOD in a pure Office 365 environment. That is, environments WITHOUT Intune.

image

The final type of devices are Azure AD Joined devices. The way that you join a device to Azure AD is covered here:

Join your work device to your organization’s network

and for more information about Azure AD joined devices see:

Azure AD joined devices

image

Azure AD joined devices will be shown as above with the join type as Azure AD joined. You will also note that these devices have MDM (device) management being Office 365 Mobile and a field for whether they are Compliant.

image

If you select an Azure AD joined device you largely get an inventory, as shown above, of that device, plus the ability to Enable, Disable and Delete the device via the top menu. Another benefit is the ability to capture BitLocker keys as well, which are shown at the bottom of the device if BitLocker is configured on the device.

Thus, the benefits of Azure AD joined devices is that they have some basic device management (via Office 365 mobile) as well as ability to be check for compliance. You can also, for example, do a device level wipe (i.e. factory reset) which you can’t do with the prior device connection methods. Azure AD Joined devices are also able to have easier access to Microsoft 365 services as with the previous two device connection methods.

Azure AD joined devices are a typical scenario you see for company issued devices in a pure Office 365 environment. That is, environments WITHOUT Intune where the company provides the device to employees.

Thus, Office 365 has a basic MDM and compliance capability which is detailed here:

Set Up Basic Mobility and Security

How you configure the Office 365 Mobile policies is found here:

Create device security policies in Basic Mobility and Security

You may need to use the direct URL:

https://protection.office.com/devicev2

to see these.

image

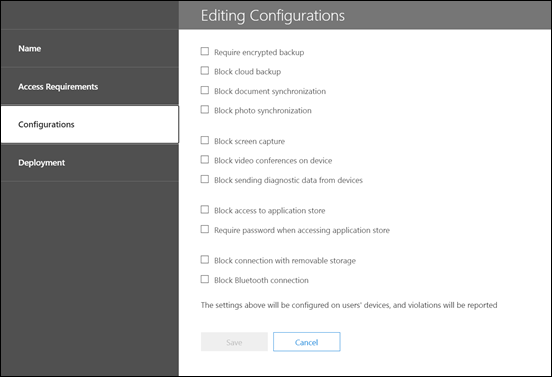
If you look at what these policies provide you see

image

for Access Requirements and

image

for Configurations.

Both of these options are quite limited and don’t provide any specific device OS/type targeting. They also roll compliance (Access requirements) and configuration together into a single policy, which lacks a certain amount of flexibility. In essence then, this is why the out of the box device management that comes with Office 365, known as Office 365 Mobile is ‘basic’. This is why something with more power and granularity is required if you are serious about device management.

You will note that, Office 365 Mobile management does not provide any real application management (MAM). This prevents doing things like push install to devices.

In summary, what has been covered so far is the out of the box device management capabilities you get with all Office 365 tenants. We can extend this much further using Microsoft 365 Business Premium and the power of Intune to manage devices. However, I’ll save that for an upcoming article as I want to break these concepts up into digestible chunks for people. So next we’ll take a look at how we can extend this basic device configuration using Intune.

Modern Device Management with Microsoft 365 Business Premium–Part 2

Need to Know podcast–Episode 254

In this episode we go a bit Dev and talk with MVP David Gardiner about software and using things like GitHub to make life easier for all those scripts you have developed. Having a handle on using software is a very important skill for IT Professionals to have in the cloud and David gives us some insight and experience as a developer that I think will help.

Of course I bring you up to date with all the news on the even of Microsoft Ignite and the fire hose we expect afterwards. Listen in an enjoy this episode.

This episode was recorded using Microsoft Teams and produced with Camtasia 2020

Take a listen and let us know what you think – feedback@needtoknow.cloud

You can listen directly to this episode at:

https://ciaops.podbean.com/e/episode-254-david-gardiner/

Subscribe via iTunes at:

https://itunes.apple.com/au/podcast/ciaops-need-to-know-podcasts/id406891445?mt=2

The podcast is also available on Stitcher at:

http://www.stitcher.com/podcast/ciaops/need-to-know-podcast?refid=stpr

Don’t forget to give the show a rating as well as send us any feedback or suggestions you may have for the show.

Resources

@davidrgardiner

@directorcia

https://david.gardiner.net.au/

https://github.com/flcdrg

https://www.adnug.net/

Microsoft Ignite 2020

Guidance for delivering Virtual Events

In development for Microsoft Intune

Move flows across environments

End of support for Office 2010

New conversations button in Teams

The changing security environment with Microsoft 365

A couple of new additions to Azure Sentinel

The changing security environment with Microsoft 365

First, a quick trip down memory lane. Back when Microsoft released Windows XP it had no local firewall (yep, I know, hard to believe now). After that fact being exploited by malicious software to spread through networks, Microsoft added a firewall to Windows XP in Service Pack 1. However, it didn’t automatically enable it. It remained something optional that was on the user to enable. Of course, given that most people are never going to enable a security feature that is optional, security issues continued. Then, with Service Pack 2, Microsoft enabled the firewall in Windows XP and it has been on ever since.

Most software is generally not configured as securely as it could be out of the box. In the case of Microsoft, it has to cater to a very, very broad audience with very different needs and configurations. Thus, it has fallen to the IT Professional for the business to implement the appropriate security using the features provided.

This equates to the Windows XP Service Pack 1 days. That is, the security capabilities are included but not enabled. And just like those days, only a very small percentage of them seem to get implemented. Multi Factor Authentication (MFA) is a great example of this. From Microsoft Ignite 2019 (i.e ONLY last year):

“it was discussed that out of all the Azure tenants globally, less than 8% of them WORLD-WIDE have enabled MFA.  99.9% of attacks on accounts are prevented by MFA.” – Reference

Even though EVERY Microsoft/Office 365 and Azure tenant includes MFA for identities, less than 8% have enabled it. This is hard to rationalise given the reality that doing so would prevent almost 100% of attacks. Clearly, it harkens back to the Windows XP Service Pack 1 days – if it ain’t on by default, then it will probably NEVER be turned on, no matter how much protection it provides.

So I hope you can appreciate, that in one aspect the IT security landscape hasn’t changed much from back when we had Windows XP (2002 if you check Wikipedia). I think however that this is in fact driving what I see as the ‘new’ security landscape for Microsoft 365.

The first big change with Microsoft 365 security is that Microsoft is beginning to move from Windows XP Service Pack 1 approach to a Service Pack 2 approach. That is, security enabled by default.

The first example of this is the End of support for Basic authentication and actively disabling it which you can read about here:

Deferred end of support date for Basic Authentication in Exchange Online

The next example is Security defaults.

Security defaults make it easier to help protect your organization from these attacks with preconfigured security settings:


  • Requiring all users to register for Azure Multi-Factor Authentication.
  • Requiring administrators to perform multi-factor authentication.
  • Blocking legacy authentication protocols.
  • Requiring users to perform multi-factor authentication when necessary.
  • Protecting privileged activities like access to the Azure portal.

If your tenant was created on or after October 22, 2019, it is possible security defaults are already enabled in your tenant. In an effort to protect all of our users, security defaults is being rolled out to all new tenants created.

and from – Introducing security defaults

“We will expand first to apply security defaults to all new tenants as well as applying it retroactively to existing tenants who have not taken any security measures for themselves.”

image

The next example are the new templated Exchange Online policies found in the Administration console which I have detailed previously here:

New templated email policies

image

Basically, this is a ‘Microsoft Security Baseline’ for securing Exchange online to best practices. You can read more about these at:

Preset security policies in EOP and Office 365 ATP

I can see a future where at least the Standard protection policy is applied to all new tenants out of the box.

SNAGHTML38b0b00c

Next, if you go and look in Microsoft EndPoint Manager you will see a growing number of similar baseline policies. I say growing, because a

New Security baseline for Office

is on the way.

At the moment, the smart approach is to use these baseline policies from Microsoft and then adjust or add as required to suit your own environment (i.e. Windows XP Service Pack 1 approach). Again, I see the day, in the not too distant future, where these baselines will be enabled by default (i.e. Windows XP Service Pack 2 approach).

image

Where I see a major difference between the Windows XP Service Pack 2 approach (i.e. security on by default) is with the introduction of Artificial Intelligence (AI). Thanks to telemetry from tenants and activities being fed back into the Microsoft Cloud, AI and Machine Learning (ML) can be used to look for anomalies. The best example of this Azure Sentinel.

In this new world of AI, you need to spend less time looking at individual events. In essence, you allow the AI to do that and determine what looks suspect based on EVERYTHING it sees in your environment and what it sees across the whole ecosystem. I can see a future where not only will the AI analyse all this data in a blink of the eye but it will also start taking action. For example, if you haven’t disabled basic authentication, it will disable it automatically because it knows that doing so is recognised by its algorithm to protect data to a high degree. I also believe we will also soon have the option for the AI to start taking ‘pro-active’ action to re-configure spam filtering to provide the best protection and adapt automatically to new methods of attack.

In short, I see a day, in the not to distant future, when all possible security options will be enabled by default and then AI will not only monitor but automatically adjust services and settings as required to meet the changing threat landscape. All of this will be driven by the growing volumes of telemetry that Microsoft collects from tenants big and small.

This all seems pretty marvellous, having a self adjusting security posture but perhaps the bigger question to consider is, what role does the IT Professional who is supposed to be setting this security configuration up manually today play in this future? Does a role for manual IT security configuration exist in the future? If not, where will the opportunities be in the IT security realm?

A couple of new additions to Azure Sentinel

If you have a look inside your Azure Sentinel console you should some new options.

image

The first is a new option in the Office 365 Data connector to allow you to bring Teams data from the Office 365 Unified Audit Log into Sentinel. All you need to do to enable this is open the Office 365 connector and select the Teams check box as shown above.

image

Once the data starts flowing in, the you’ll be able to run Kusto queries on the log data as shown above. This query will produce a quick report of all the Teams sessions over the last day. The KQL for this is:

OfficeActivity

| where TimeGenerated >= ago(1d)

| where RecordType == “MicrosoftTeams”

| summarize count () by UserId

| sort by count_

With Teams data now flowing into Sentinel you can start creating all sorts of interesting reports.

image

The next new item is the Entity behavior as shown above. Here is what it does:

image
image

Basically, it is going to give you the ability to be more granular when looking at data as well as providing more AI (Artificial Intelligence) across that data looking for anomalies.

image

Just scroll down the page and Turn it on.

image

Now when you visit the link you’ll see:

image

and selecting an account will show you information like:

image

Which is a great summary for that user over the time period you selected.

image

The Threat intelligence option provides the above options, which to be honest, I haven’t fully figured out how to use effectively yet. I may not as yet have enough data in this tenant to make full use of it. I’ll have to wait and see.

Overall some really handy additions to Azure Sentinel that I’d be encouraging you to take advantage of to improve you security analysis. If you are looking to get started with Azure Sentinel, don’t forget my online course:

https://www.ciaopsacademy.com/p/getting-started-with-azure-sentinel

Need to Know podcast–Episode 253

FAQ podcasts are shorter and more focused on a particular topic. In this episode I speak about some automation options that are available in the Microsoft Cloud.

This episode was recorded using Microsoft Teams and produced with Camtasia 2020

Take a listen and let us know what you think – feedback@needtoknow.cloud

You can listen directly to this episode at:

https://ciaops.podbean.com/e/episode-253-automation-optiona/

Subscribe via iTunes at:

https://itunes.apple.com/au/podcast/ciaops-need-to-know-podcasts/id406891445?mt=2

The podcast is also available on Stitcher at:

http://www.stitcher.com/podcast/ciaops/need-to-know-podcast?refid=stpr

Don’t forget to give the show a rating as well as send us any feedback or suggestions you may have for the show.

Resources

FAQ 16

CIAOPS Patron Community

@directorcia