Office 365 Delve and Groups

I would contend that most people have more technology at their fingertips than they imagine. The problem is that most don’t make full use of what’s available to them. In fact I would contend that most people are far from effective when it comes to using technology.

Why is this? The simple answer is legacy. Human beings are creatures of habit, they don’t like change and prefer to do things ‘the way they have always been done’. The typical manifestation of this is the common statement ‘I’m just too busy’.

In short, you need to invest to get the reward. To be constantly busy, as I have pointed out before, is a cop out. It is simply an excuse for being unfocused. Technology is there to be our slave not our master. What many fail to appreciate is that if we don’t use technology appropriately it actually makes us less effective. That’s right, the inappropriate use of technology makes you more unproductive and ‘busier’.

Therefore to reap the benefits of technology we need to invest in education to learn how to make best use of the technology we have. Typically this will also mean changing the way we do things to get optimal returns but isn’t that the end game? Isn’t the ultimate aim to become more productive and attain more ‘free’ time to do with what you choose? Yet few seem to be willing to make that investment in education, which to me is very strange.

A good case in point is the feature set that is available to people using Office 365. Most simply use it for email and they use in exactly the way they have always. What real benefit does that provide? How is their life really any better if they are just what they have always done? A smaller subset of people use OneDrive and Teams Sites but little else.

Having been available for many months, most people are still puzzled at what Delve actually is. I wrote an article a while back that explains it in detail and why it is so important:

Delve should be the centre of your Office 365 universe

Delve is automatically configured in Office 365, there is nothing that needs setting up. All you need to do is use it! Sure, it’ll mean doing things differently but the productivity rewards are great.

Another component of Office 365 that I don’t used nearly as frequently as it should be is office 365 Groups. Groups are merely a combination of an email distribution list and file storage and make a great starting point for basic collaboration inside a business. Sadly, most overlook it.

What I find helps is getting an overall picture of a product like Office 365 and then mapping data and functions into that. Here is an article I wrote to help people understand that very fact:

Where to put data in Office 365

To therefore help people better understand Office 365 Delve and Groups I have published the above webinar I conducted which will give you a deep dive into both areas and hopefully open you eyes to the potential benefits they can provide when it comes to boosting your productivity.

Remember, improved effectiveness means education and being ‘busy’ all the time is simply an excuse to avoid becoming more effective. Technology is merely a tool, whether you use to improve your life is totally up to you. Technology can only perform to the skill level of the operator, it doesn’t do anything magic or miraculous on its own. If you therefore want to use technology more effectively, educate yourself on the tools you have and the above video maybe a great place to start if you are yet to undercover the power of Delve and Groups in Office 365.

Need to Know Podcast–Episode 103

Join myself and co-host, Azure Technical Specialist Marc Kean, as we take a closer look at the backup options available from Azure. We speak about things such as Azure Backup for files and folders, backup for applications and especially Azure Site Recovery. There is of course coverage of the latest cloud news from the world of Microsoft as well as details about technologies such as Azure Resources Manager.

As always don’t forget to send us you questions and feedback as well as leaving review to help grow our audience. We appreciate you taking the time to listen.

or can listen to this episode at:

http://ciaops.podbean.com/e/episode-103-azure-backup-and-recovery/

or subscribe to this and all episodes in iTunes at:

https://itunes.apple.com/au/podcast/ciaops-need-to-know-podcasts/id406891445?mt=2

The podcast is also available on Stitcher at:

http://www.stitcher.com/podcast/ciaops/need-to-know-podcast?refid=stpr

Don’t forget to give the show a rating as well as send me anyfeedback or suggestions you may have for the show.

Resources

Marc Kean

Robert Crane

Windows 10 app for OneDrive

Skype for Business for Mac

Microsoft Gigjam

Azure Recovery Service Vault goes GA

Azure Cool Storage

Azure Backup for Files and Folders

Azure Backup for Applications

ARM Azure Site Recovery [VIDEO] – Part 1

ARM Azure Site Recovery [VIDEO] – Part 2

Azure Backup for Applications

In a previous article I showed how the first step into Azure is typically to use Azure backup for files and folders. I also covered off how you can restore files via that method. That backup method works great for static files and folders on a network but what about applications such as SQL, SharePoint, Exchange, etc where important data also resides? You typically can’t backup the data because it is ‘in use’ by the application. In most cases you need a special ‘agent’ that allows the data inside these applications to be backed up even when the data is in use. Luckily, Azure provides that with a service called Azure backup for applications.

This walk through covers how to use Azure Backup for applications with Azure Resource Manager. if you are looking for how to do this in the older ‘classic’ Azure Service Manager check out my previous article on that topic:

Azure Backup Server for Applications configuration

Azure backup for applications is an extension of Azure backup for files and folders. You’ll back the data up into the same Azure Backup Vault that I detailed how to create in a previous article. What I’ll therefore show you here now is how to set up Azure backup for applications.

image

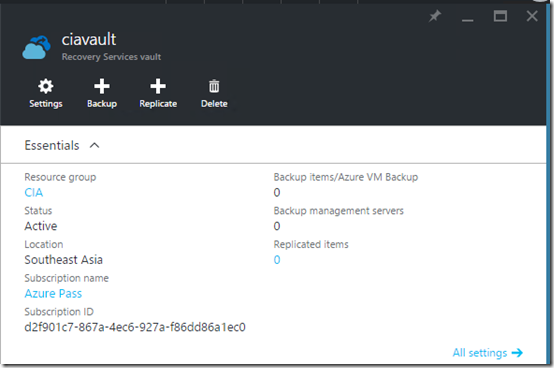
You’ll need to navigate back to the Azure Recovery Vault in the new Azure portal. When you do you should see a screen similar to that shown above. Select the Backup button at the top of the page.

image

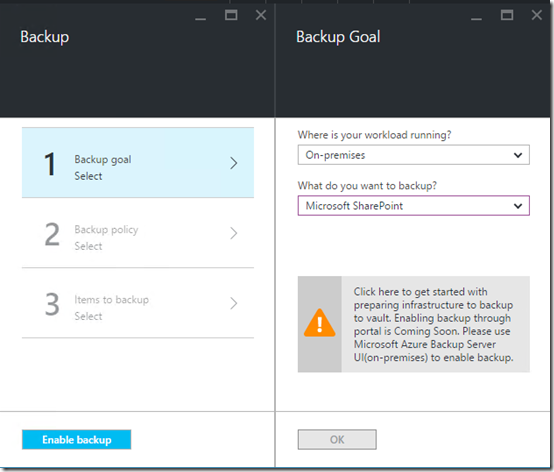
You’ll now be prompted to work through the steps required to configure the Azure backup. For the option Where is your workload running? Select On-premises from the selections available. For the option What do you want to backup select either Microsoft SharePoint, Microsoft SQL or Microsoft Exchange (i.e. an application).

When you do you’ll see a warning message appear below prompting you to click on it to get started. Do so.

image

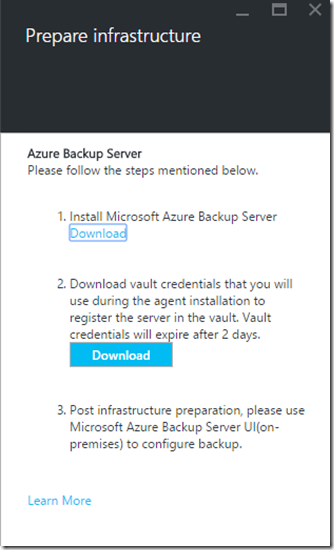
You’ll be taken to the Prepare Infrastructure blade as shown above. You’ll now need to download the dedicated Azure Backup software. This is different from what was used with Azure Backup for files. It is in fact a version of Microsoft Data Protection Manager (DPM). To download the DPM software select the Download link. This will open a browser windows to:

https://www.microsoft.com/en-us/download/details.aspx?id=49170

image

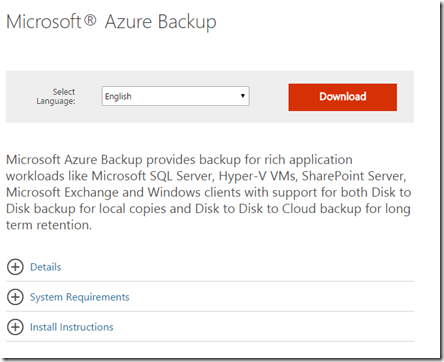
You are now taken to the download page for the Azure Backup for applications software as shown above. Select the Download button to continue.

image

You’ll need to select all the components and download them to the machine on which you plan to install the software. You’ll note that this software is much larger (at 3GB) than that for Azure Backup for files and folder, that is because this Microsoft Data Protection Manager.

image

Once the software has downloaded, kick off the setup and select Next to continue.

image

Select the location where the files can be extracted. Typically, just accept the default and press Next to continue.

image

Select Extract to expand the compressed files from the download.

image

You should now see the files being extracted as shown above.

image

Ensure the Execute setup.exe is select and press the Finish button.

image

The above splash screen should now appear. Select the Microsoft Azure Backup option under the Install column in the top left.

image

You may see some additional software components being installed as shown above.

image

Select Next at the Welcome screen to continue.

image

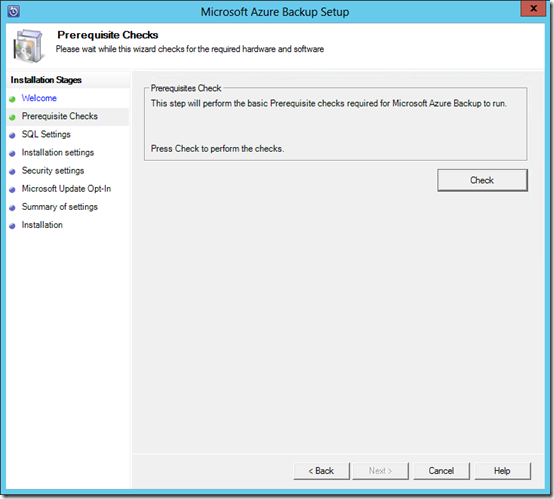
Select the Check button in the top right to verify the current computer meets the requirements for the Azure Backup software.

image

Hopefully everything is in order and the check are passed as shown above.

Select Next to continue.

image

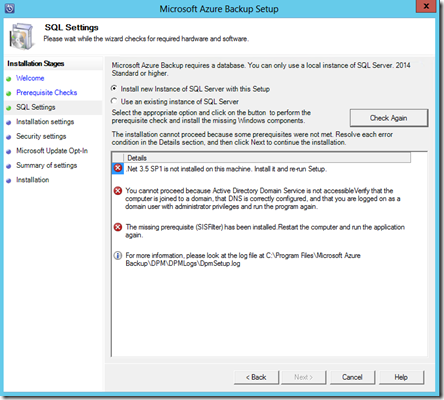
The backup software will need to store its data in an SQL database. You can either elect to install a new version of this or use an existing version. Typically, you’ll allow the installation to create a instance of SQL server and install the SQL software.

Select the Check and Install button in the top right to continue.

image

For Azure Backup software to install successfully you’ll need to ensure you have .Net 3.5 SP1 as well as ensuring that the machine can access a Domain Controller. Typically this means it is a member server in the network attached to the Domain Controller. You can install the software on a Domain Controller if you wish but you may need to take additional steps to accomplish this. Here is an article on this:

https://technet.microsoft.com/en-us/library/ff399416.aspx

image

If however, there are no red flags you should see a summary of the confirmation as shown above. Select Next to continue.

image

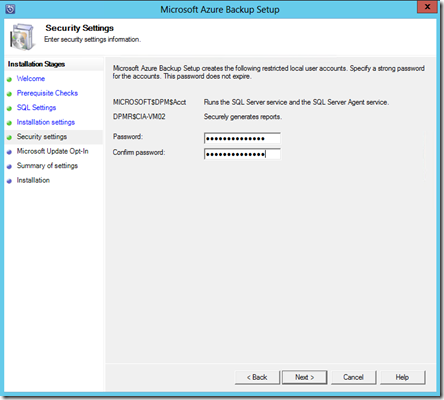
You’ll now need to specify a password that will be tied to a system account for the installed software. Enter and appropriate password and select Next to continue.

image

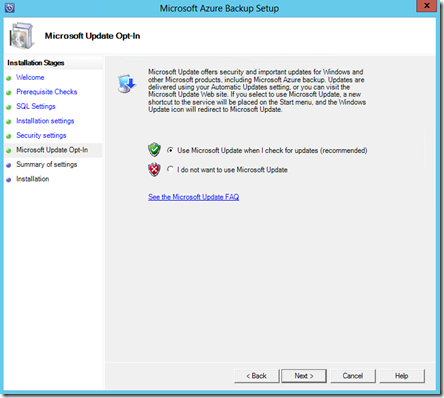
Typically select the option to allow Microsoft updates and select Next to continue.

image

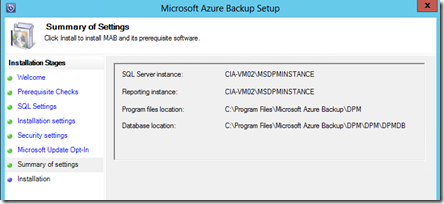
You will now see a summary of the installation. If all is good, select Next to continue.

image

The first step in the installation process will be the registration of the software with the Azure Recovery vault. You’ll need to browse to the location of the downloaded vault credentials. These will then be validated as shown above.

Select Next to continue.

image

As with the Azure Backup for files and folders, you’ll now need to enter or generate a strong passphrase to use to provide encryption of the backed up data.

Remember that you need to save this pass phrase in a location independent of the machine that you are currently using. If you lose the password you will be unable to restore the data you backup here, so best practice is to ensure you have multiple copies of the password.

Select Next to continue.

image

The registration process will now complete.

image

The installation process will then continue with the installation and configuration of SQL Server as shown above. The process will then proceed to complete the installation of the Azure Backup for applications.

image

When the process is complete you should all tasks have been completed successfully.

Press Close to complete the process.

image

You should see two icon now displayed on the desktop, one for the Azure Backup for applications program and one for an Azure Backup for applications PowerShell environment. Select the Azure Backup for applications program to launch the software.

image

You should now see Azure Backup for applications (basically Microsoft Data Protection Manager) as shown above.

Future articles will cover how to use this software to actually backup and restore from network locations.

In summary, if you are looking to backup more than files and folders to Azure you need to install Azure Backup for applications which means basically installed the Microsoft Data Protection software on a server in the network which is connected to an Azure Recovery Services vault configure using Azure Resource Manager.

For more details about using Azure Backup for applications see:

Preparing to back up workloads using Azure Backup Server

SharePoint updates have hit my tenant

image

image

When I took a look at my App Launcher in Office 365 I found that Sites has now been replaced with SharePoint. This tells me that the new SharePoint experience in Office 365 has arrived for my tenant.

image

If I then select that icon and navigate to my individual Site Collections I see a new page as shown above.

I am receiving these changes because my tenant is on the first release cycle. Normal tenants won’t see these changes immediately but they will start flowing through.

If aren’t aware of these changes to SharePoint, now is the time to prepare for the major changes that are coming down the road with SharePoint. You can read more about this here:

https://blogs.office.com/2016/05/04/the-future-of-sharepoint/

Watch out for future articles on these updates and what impact they’ll have for Office 365 users.

Prepare for a OneDrive for Sync client upgrade

A heads up for everyone using OneDrive for Business sync client with tenants of less than 250 users.

Beginning in May 2016, Office 365 customers with fewer than 250 Office 365 licenses will be required to use the OneDrive for Business Next Generation Sync Client to sync OneDrive for Business files. This requirement will be rolled out between May 2016 and July 31, 2016 and will not apply to on-premises customers or customers with more than 250 Office 365 licenses.

From:

https://support.office.com/en-us/article/Transition-from-the-previous-OneDrive-for-Business-sync-client-4100df3a-0c96-464f-b0a8-c20de34da6fa

I wrote an article about the different OneDrive Sync clients a while back that may also help answer some questions:

The various OneDrive Sync clients

Basically, this will ensure all Office 365 installations with <250 users will be using the NextGen sync client.


SBS to Azure event in Perth

I am happy to announce that I’m heading back to Perth on June 2, 2016 to speak at a Microsoft SBS to Azure event. You can register here:

https://msevents.microsoft.com/CUI/EventDetail.aspx?EventID=1032778010&Culture=en-AU&community=0

it is a morning session focused on giving you an overview of how to successfully transition a standard SBS environment to Azure and Office 365. You get plenty of strategy, demos and hopefully your questions answered.

I hope to see you there.

Need to Know Podcast–Episode 102

We had a few technical hitches getting this episode out and we apologise for the delay but thanks to the hard work of our producer Marc Kean and guest Paul Ward we have stitched together this episode for you all about Windows 10 deployments.

Marc and I are joined by Paul Ward to talk about Windows 10 deployments as well as tool like System Center. We discuss the update of Windows 10 for consumers as well as enterprise as well as were we see the future of the Windows platform from Microsoft leading. There is also our usual update on all the cloud news around Office 365 and Azure. It’s been almost 12 months since the release of Windows 10 so listen along and join in the anniversary celebrations.

As always don’t forget to send us you questions and feedback as well as leaving review to help grow our audience. We appreciate you taking the time to listen.

or can listen to this episode at:

http://ciaops.podbean.com/e/episode-102-paul-ward/

or subscribe to this and all episodes in iTunes at:

https://itunes.apple.com/au/podcast/ciaops-need-to-know-podcasts/id406891445?mt=2

The podcast is also available on Stitcher at:

http://www.stitcher.com/podcast/ciaops/need-to-know-podcast?refid=stpr

Don’t forget to give the show a rating as well as send me any feedback or suggestions you may have for the show.

Resources

Marc Kean

Robert Crane

Azure cool storage now available

Azure Site Recovery now available via Resource Manager

New SharePoint book – Beyond the Basics

The future of SharePoint

Updates to SharePoint Online are coming

Project Madeira

Miracast

Windows Phone 10 Continuum

System Center Dudes

Windows Noob

Coretech

System Center on Technet

Enabling Azure Remote App

You can think of Azure Remote App as basically Remote Desktop Services (RDS) as a service. At this point in time you will need to enable Azure Remote App using the ‘classic’ portal. Here’s how you do it.

image

Firstly, login to the Azure portal and scroll down the options on the left until you identify the option for Remote App that appears like:

image

Select this.

image

Typically, when you select this you will see that no current RemoteApp collection has been configured as shown above.

Select the Create a RemoteApp Collection link.

image

This will display the configuration dialog as shown above. Enter a collection name, region, plan and template image.

The region is the data center in which you wish to host this Remote App service. Typically you’ll want to select the region that is closest to you.

There are currently four pricing tiers and you can find more information about these here:

Azure Remote App pricing plans

Typically you’ll want to select the Standard or Premium Plan.

You can then select from the template image to use for the remote server. You have the choice of a number of preconfigured images or you can use your own if it has been suitably prepared. In this case the Office Professional Plus (30-day trial) will be select to provide Office applications to users.

When ready, select the Create RemoteApp Collection at the bottom of the page.

image

You should now see that RemoteApp collection has commenced creation as shown above. This process will take 15 – 30 minutes typically.

image

You’ll see that there is also the option to create a RemoteApp collection with a Virtual Network. This allows the RDS server to be placed on an existing Azure LAN so it can share other Azure resources. This article won’t cover this specifically, it will be covered in an upcoming article.

image

You may also see that by default you receive a 30 day trial of RemoteApp. If you want to upgrade to paid subscriptions immediately ensure you select the option provided at the top of the screen as shown above.

image

After the service has been enabled you will a check mark as shown above. Select the service name to view the settings.

image

Under the User Access option you will a list of any users who have access. You can add users that have Microsoft Account or if they are part of the Azure tenant already.

image

Under the Publishing option you can see all the applications that will be available to users. These applications are those that are currently on the virtual machine image used.

image

You can make additional options available by selecting the Publish button and either manually entering the directory path or you can select from the start menu as shown above.

image

Users can then use the appropriate RemoteApp application on their device to access this instance of RemoteApp and run the applications. Above is an example of the Windows 10 Universal App. Remote App device clients can be downloaded from:

https://www.remoteapp.windowsazure.com/en/

That has been only a basic overview of how to get RemoteApp up and running in Azure. Look out for more upcoming articles on RemoteApp including deeper dives into configuration and management.