Connect Power Automate to Twitter using a Bring Your Own App approach

*** On July 29 the MS docs now say:

The default shared application (Twitter Client application maintained by Microsoft) is no longer available. The connector now supports only one authentication type – Bring your own application. As of June 2023, it requires a paid Enterprise tier application. However, Twitter’s pricing policy might continue to change.

https://learn.microsoft.com/en-us/connectors/twitter/

Twitter or X as it is now, costs are here:

https://developer.twitter.com/en

Enterprise plans will cost >$5,000 per month!


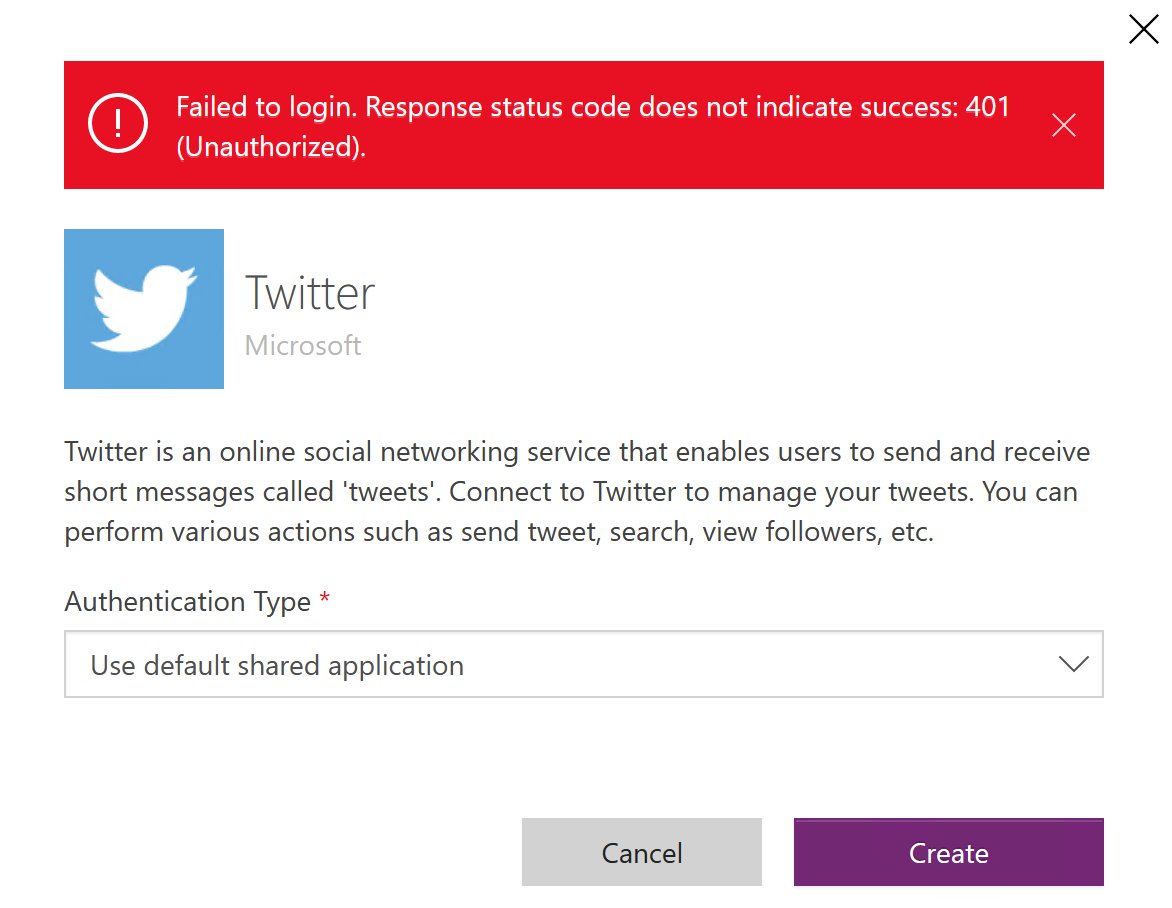
**** On July 19 2023 this configuration starting reporting errors and now no longer seems to work either!

As I have detailed previously:

Power Automate Twitter connector failing

I needed to regenerate the connection to Twitter in my Flows. The following is what worked for me and I hope it can help you as I didn’t find this set out clearly anywhere else. I found that you needed to create all new Twitter connections in your Flows, so remember to record how these are configured before you go and delete anything.

Step 1. Remove any existing Twitter connections in your Data

image

Navigate to Power Automate and select Data and then Connections from the menu on the left. In the top right of this screen you will find a Search box. Into this search box type:

Twitter

image

You should now see a list of all your existing Twitter connections. ALL of these will need to be removed and thus prior, ensure you have recorded what your Twitter actions do in your Flows, because once you delete the connection here you will NOT be able to see what the actions actually did. They will simply show as invalid.

image

The reason you need to delete ALL the Twitter connections you find is the above error:

Failed to create connection for connection id ‘/providers/MicrosoftPowerApps/apps/shared_twitter/connections/shared-twitter-<guid>’. You have reached the maximum number of connections for the ‘twitter’ API.

I personally found I actually had two connectors. Both years apart, but all must be removed as Twitter now only supports one connection for free.

Step 2. Create Twitter API credentials

Microsoft does provide documentation on this here:

Authentication and Bring your own application

and to start with ensure you are logged into your Twitter account in the browser and navigate to:

https://developer.twitter.com/

image

Select Developer Portal in the top right as shown above.

image

Select the option to Sign up for a Free Account towards the bottom of he page.

image

You’ll then need to write a 250 character or more essay and agree to to all the Terms and Conditions before you Submit.

image

Now select the COG under the default project name that has been created for you as shown above.

image

Select the Edit button as shown above.

image

Select the Delete App button at the bottom of the page. I found that the default app did not have the correct permissions and access so I removed it and created a new one with the right settings.

image

Make sure copy the name of the app because you’ll need to enter at the next dialog before pressing Delete app.

image

Back in the projects dashboard select Add an App as shown above.

image

Give the app a meaningful name select Next at the bottom of the page.

image

Copy the API Key and API Key Secret for later use. Make sure you DO SAVE both the API Key and API Key Secret as they’ll be needed back in Power Automate.Also, keep both of these secure as they control access to your Twitter account.

Select App settings at the bottom of the page to continue.

image

Select the Set up button under the User authentication settings towards the bottom of the page as shown above

image

Ensure:

App permissions = Read and write and Direct message

Type of App = Web App, Automated App or Bot

Call Back URI / Redirect URI = https://global.consent.azure-apim.net/redirect

Website URL = https://global.consent.azure-apim.net/redirect

image

Select he option to Save at the bottom of the page. Select Yes when the above dialog appears to confirm.

image

You’ll now see a Client ID and Client Secret as shown above. You won’t need these so simply select Done to continue. You can re-create them if needed later.

image

Select Yes, I saved it to continue.

Step 3. Reconnect Twitter account in Power Automate

Return to Power Automate, Data, Connectors

image

Select New connection from the top of the page as shown above.

image

Search for Twitter using the Search box in the upper right. Then select the Twitter connector to configure it.

image

Ensure:

Authentication type = Bring your own application

Consumer key = API Key

Consumer secret = API Key Secret

image

A browser pop up will now appear asking you to authorize access to your Twitter account. You’ll need to login here with your Twitter account details. Enter you login details and select Authorize app.

You should then see a confirmation appear in this dialog and the browser pop up window will now close.

image

In the list of connections should now appear an entry for Twitter as shown above, and it it should show as Connected.

image

If you now navigate to where the Twitter action is inside your Flows you should see that the existing one is invalid as shown above.

image

Select the ellipse in the top right hand corner and from the menu that appears select Delete. I found I had to minimise the Twitter action first to allow it to be deleted.

You can now create a new Twitter action which will use the new connector and API that was created.

With that all done you should now Save your Flow and test it to ensure it is working as expected.

In summary, you’ll firstly need to check the existing configuration for any Twitter actions you have in a Flow and record these. Next, you’ll need to remove any and all existing Twitter connections in Power Automate. Remember, there maybe more than one. Next, you’ll need to go Developer area in Twitter. There you’ll need to delete the default app that is created and create a new one. When you create a new one you’ll receive credentials you’ll need to save and use back in Power Automate. Once created you’ll need to configure it with a few additional settings. With that complete, you’ll return to Power Automate and create a new Twitter data connection with the credentials obtained. Finally, you’ll need to remove the old Twitter actions from your Flows and create new ones.

As I said, this process worked for me and I hope it does for you.

Power Automate Twitter connector failing

*** My resolution to this here – https://blog.ciaops.com/2023/04/27/connect-power-automate-to-twitter-using-a-bring-your-own-app-approach/

Since the 20th of April 2023 the Power Automate Twitter connector has been failing to authenticate. This means you get an error in your Flow that looks like:

image

When I tried to fix the connector I am greeted by.

Image

There have no doubt been changes in the Twitter API which have caused this.

I’m trying to find an answer from Microsoft on how this will be handled going forward, but as yet I have not heard nothing back. If I find out, I’ll post here again.

ANZAC Day 2023

April 25 is when Australia and New Zealand pause to remember those who sacrificed, now and in the past. It is the anniversary of the very first time that we fought as nations and fought together.

In military terms the whole campaign that gave birth to this day was ill fated and failed to meet its objectives making it a historical failure, but from it was born a sense of nationhood that is probably more what we celebrate today.

How the world has changed from all those years ago in 1915. How the world will continue to change in the years ahead. But let’s hope that the coming together and respect we see here is something that continues beyond just today and into the future. We lives in times that are perhaps more focused on the ‘me’ than the ‘we’ and ANZAC day is a reminder that one of our purposes in life is to serve others.

So today, take a moment to say thanks on those who have served you not just in the armed forces but anywhere. Pay them service by offering to serve others without desire for compensation. These are the things that make a society great. Let what we see today extend beyond the ceremonies and festivities into something that is evident everyday. ANZAC day demonstrates that the spirit is present but we need to manifest on more than just one day a year. Do it for them, if no one else. Commit as many did all those years ago.

Lest We Forget

If you want to learn more about the ANZAC battlefields in northern France, visit my web site – www.anzacsinfrance.com.

Adoption with fun and astronomy

A while back I detailed how to schedule a Dilbert comic to appear daily in a Microsoft Teams channel:

Adoption with fun

Sadly, Dilbert has moved behind a paywall which means that process no longer works. As such, I have been searching for a suitable replacement and have settled on the Astronomy Picture of the Day from NASA.

The basic concept from the Dilbert process is the same. This process also requires a premium Power Automate connector, which you can easily configure using with either a Power Platform Premium license or using Power Platform PAYG configuration with Azure which I have shown previously.

image

The starting process is to create a new Scheduled Cloud Flow and select the time when you wish that Flow to execute.

image

You will then need to add a HTTP action as shown above. This is a premium connection mentioned previously. This HTTP action will need to use a GET method for the URI:

https://api.nasa.gov/planetary/apod?api_key=DEMO_KEY

image

Open that URI in a new browser tab and you should see some JSON information returned as shown above. Copy all of this.

image

Next add the Parse JSON action to the Flow. Then select the Generate from sample button at the bottom of this action as shown above.

image

Paste the text obtained from browser window previously in here and select Done.

image

Ensure you have the Body option selected in the Content area as shown above.

image

Next, add the Post message in a chat or channel as shown above. Add the appropriate Team and Channel. Then in the Message area select the </> icon in the top right to enable HTML editing.

image

Complete the formatting any way you wish but this is what I used:

<br><h1>Space Image of the day</h1>
<p><b>@{body(‘Parse_JSON’)?[‘title’]}</b><br><br>
<img src = “@{body(‘Parse_JSON’)?[‘hdurl’]}”><br><br>
@{body(‘Parse_JSON’)?[‘explanation’]}</p>

Basically, I’m going to display a heading, then the title, high definition image and explanation (from the returned result).

The result when the Flow runs is:

image

and when the imaged is clicked on, you see something like:

image

Remember, the whole idea here is to encourage people to regularly visit the Team in questions and hopefully drive more engagement of the environment.

Connecting a Sparkfun ThingPlus ESP32-S2 WROOM to Azure IoT Central

One of the main aims I’ve had with all my IoT projects was eventually to integrate them into Azure. One way that I found was via:

Connecting to Azure IoT hub

The limitation there is that it really only gets the telemetry into Azure. From Azure IoT hub you need to send it off to another application to get any real value.

What I wanted to achieve was to send that data into Azure but have it display some sort of result, like a graph, without me having to do anything too much low level work.

The solution was to use the Azure IoT Central service. So the project plan was to use what I learned in building an

Adafruit Huzzah Temperature sensor

but instead of simply displaying the results on the serial console to have the results sent ot Azure and displayed in a graph.

The starting point was:

Quickstart: Connect an ESPRESSIF ESP32-Azure IoT Kit to IoT Central

problem was that the hardware device they use in this project is now obsolete it appears:

image

https://au.mouser.com/ProductDetail/Espressif-Systems/ESP32-Azure-IoT-Kit?qs=PqoDHHvF64%252BuVX1eLQkvaQ%3D%3D

Instead, I decided to use a:

SparkFun Thing Plus – ESP32-S2 WROOM

The hope being that it would be close enough to what the original document wanted.

Also for guidance and source files I used:

Connecting ESPRESSIF ESP32 to Azure IoT Central using the Azure SDK for C Arduino library

You should start here:

Getting started with the ESPRESSIF ESP32 and Azure IoT Central with Azure SDK for C Arduino library

which will take you through setting up a new IoT Central Application, which I won’t repeat here. The result of that will be 3 items that will need to be included in the code for the device:

  • ID scope
    Device ID
    Primary key

Next, you’ll need to download all the source files in the repo and include them in a new PlatformIO project. The files are:

  • AzureIoT.cpp
    AzureIoT.h
    Azure_IoT_Central_ESP32.ino
    Azure_IoT_PnP_Template.cpp
    Azure_IoT_PnP_Template.h
    iot_configs.h

I renamed Azure_IoT_Central_ESP32.ino to main.cpp in my project.

The next thing you’ll need to do is set your local wifi parameters in the file iot_configs.h. The settings should look like:

// Wifi

#define IOT_CONFIG_WIFI_SSID “<YOUR LOCAL SSID>”

#define IOT_CONFIG_WIFI_PASSWORD “<YOUR WIFI ACCESS POINT PASSWORD>”

Make sure you save any changes to the files you make.

In this same file also locate and the set the Azure IOT Central settings like:

// Azure IoT Central

#define DPS_ID_SCOPE “<ID SCOPE>”

#define IOT_CONFIG_DEVICE_ID “<DEVICE ID>”

// Use device key if not using certificates

#ifndef IOT_CONFIG_USE_X509_CERT

#define IOT_CONFIG_DEVICE_KEY “<PRIMARY KEY>”

which need to include the values obtained when configuring Azure IoT Central earlier.

If you now build your code and upload it to the device you should find that it will connect to your local wifi and start sending information to Azure IoT Central.

image

The device configured in Azure IoT Central should report as connected as shown above when you view this in the Azure IoT Central portal at:

https://apps.azureiotcentral.com/

image

If you then select the Raw Data menu item as shown above, you see the data from your device being received regularly into Azure.

image

If you look at the serial monitor connected to the device locally you should see something like the above indicating that data is being sent up to Azure.

This, therefore, now indicates that there is a correct connection to the Azure IoT Central portal. The problem is that the data being sent currently is actually just static dummy data that never changes. What I want to do is send actual data read from a temperature sensor connected to my device. So I need to find the source of the data in the code so I can replace that with the dynamic data from the tempreture sensor connected to my device I want.

Turns out the source of that dummy data is in the file Azure_IoT_PnP_Template.cpp around line 236:

image

What I now want to do is replace the static value of 21.0 for temperature and 88.0 for humidity with actual readings from the device.

To achieve that I’ll need the code from the previous project that read the temperature data which is here:

https://github.com/directorcia/Azure/blob/master/Iot/huzzah-tempsens.ino

I’m going to add that to a new file in my project called ciaath.cpp to keep my code separate from the templated Azure stuff. In there I’ll have 2 functions:

float ciaaht_getTemp() which returns temp.tempreture

float ciaaht_getHumidity() which returns humidity.relative_humidity

Remember, both temp and humidity are objects and all I want is the actual numeric value in there.

I’ll also create a ciaath.h file that looks like:

#ifndef CIAATH_H
#define CIAATH_H
void ciaaht_init();
float ciaaht_getTemp();
float ciaaht_getHumidity();
#endif

The idea is that this tells other pieces of code about these functions. You’ll also note I have a function ciaaht_init() to initialise the temperature sensor at start up.

Back in the Azure_IoT_PnP_Template.cpp file I need to include the line:

#include <ciaath.h>

to tell it about my functions in my ciaath.cpp file. I can now also change the lines that report the temperature and humidity from their original static value to the value read from the temperature senor connected to my device to be:

static float simulated_get_temperature() { return ciaaht_getTemp(); }
static float simulated_get_humidity() { return ciaaht_getHumidity(); }

which basically get the data from my device which will then be sent to Azure.

Back in main.cpp I need to add:

#include “ciaath.h”

to tell it about my custom functions. I also have to add around line 359:

ciaaht_init();

to initialise the temperature sensor on my device at startup.

Once this all compiles and uploads to the device I can again check Azure IoT Central portal and see in the Overview menu item

image

and I see my temperature and humidity are no longer a constant.

If I heat up the temperature senor connected to my device I see:

image

and if I leave it to return to normal I see:

image

I’ve put all the code up at:

https://github.com/directorcia/Azure/tree/master/Iot/ESP32-S2/IoT-Central

so you can have a look and use it if you need to.

I did need to get some help along the way, especially with the code and working out where the values uploaded to Azure came from initially as well as how to structure the .h files to make it cleaner. I’m no coder but hopefully my explanation here helps other non-coder, but let me know if I haven’t got it right as I really want to better understand all this.

I’m now super happy I have this working and I’m confident that I can use this as a base to start creating more powerful projects connected to Azure!

Need to Know podcast–Episode 300

In this episode I cover off why adding Azure to every environment makes sense. Even though the billing model is different that doesn’t there isn’t an opportunity to add value to an environment with what Azure can provide. There are also plenty of updates from the Microsoft Cloud with many exciting new things to try. Listen along and let me know if you have any feedback.

You can listen directly to this episode at:

https://ciaops.podbean.com/e/episode-300-why-you-should-add-azure/

Subscribe via iTunes at:

https://itunes.apple.com/au/podcast/ciaops-need-to-know-podcasts/id406891445?mt=2

The podcast is also available on Stitcher at:

http://www.stitcher.com/podcast/ciaops/need-to-know-podcast?refid=stpr

Don’t forget to give the show a rating as well as send me any feedback or suggestions you may have for the show

This episode was recorded using Microsoft Teams and produced with Camtasia 2022.

Brought to you by www.ciaopspatron.com

Resources

@directorcia

@directorcia@twit.social

Join my shared channel

CIAOPS merch store

Become a CIAOPS Patron

CIAOPS Blog

YouTube edition of this podcast

Introducing the new Microsoft Teams, now in preview

The new Teams

Welcome to the new era of Microsoft Teams

Windows 365 Frontline available in public preview

Adding your Microsoft Store for Business and Education apps to the Microsoft Store in Intune

What’s New at Microsoft Secure

Avatars for Microsoft Teams

Introducing Microsoft Security Copilot: Empowering defenders at the speed of AI

Explaining the Microsoft 365 Copilot System

Microsoft Incident Response Retainer is generally available

Microsoft awarded Best Advanced Protection for Corporate and Consumer Users by AV-TEST

New Microsoft Intune Devices experience

What’s new in Microsoft Intune – 2303 (March) edition

How to enable Microsoft Authenticator Lite for Outlook mobile (preview)