Need to Know Podcast–Episode 228

No Brenton still but that doesn’t stop me bringing you the Microsoft Cloud news. For Brenton fans you’ll still hear him with the interview of Lorenzo Coppa about Gluh that is in the second part of this episode. Some aggressive moves by Microsoft in the default browser search space so make sure you are aware of what’s happening and listening along.

This episode was recorded using Microsoft Teams and produced with Camtasia 2019

Take a listen and let us know what you think – feedback@needtoknow.cloud

You can listen directly to this episode at:

https://ciaops.podbean.com/e/episode-228-lorenzo-coppa/

Subscribe via iTunes at:

https://itunes.apple.com/au/podcast/ciaops-need-to-know-podcasts/id406891445?mt=2

The podcast is also available on Stitcher at:

http://www.stitcher.com/podcast/ciaops/need-to-know-podcast?refid=stpr

Don’t forget to give the show a rating as well as send us any feedback or suggestions you may have for the show.

Resources

@contactbrenton

@directorcia

Gluh

New Year new browser

Microsoft will be carbon neutral by 2030

Microsoft Search in Bing through Office Pro Plus

Windows 7 support end

Setting Archive Tier on Azure storage

In my article

Moving to the Cloud – Part 2

I spoke about using Azure Archive storage as a good location for long term data retention. The way that you configure this is basically to set up a storage account as usual and initially configure it as ‘Cool’ storage (since you can’t do Archive storage directly). You then upload files there (typically using Azure Storage Explorer). The final piece of the puzzle is to change the access tier from ‘Cool’ to ‘Archive’ by right mouse clicking on the item.

image

You can do the same using Azure Storage Explorer.

The challenge becomes when you want to do more than a single file at a time.

image

You’ll see that you now don’t get the option to set a tier any more once you have two items or more selected. The same happens with Azure Storage Explorer as well.

Thanks to Marc Kean who pointed me in the right direction, the solution lies in changing this programmatically. Marc has a script on his site and I found another on GitHub as well but decided to write my own anyway which you’ll find here:

https://github.com/directorcia/Azure/blob/master/az-blob-tierset.ps1

with mine you’ll need to set the following variable first at the top of the script:

$storageaccountname = “<your storage account name here>”

$storageresourcegroup = “<your storage account resource group name here>”

$storagetier = “<your desired storage tier level here>” # Hot, Cool or Archive

You’ll also need to connect to you Azure account beforehand which you can do with script of mine:

https://github.com/directorcia/Azure/blob/master/az-connect.ps1

My script will, get the storage account via:

$storageaccount = Get-AzStorageAccount -name $storageaccountname -ResourceGroupName $storageresourcegroup

Get the access for that account via

$key = (get-azstorageaccountkey -ResourceGroupName $storageaccount.ResourceGroupName -Name $storageaccount.StorageAccountName).value[0]

Get the context via:

$context = New-AzstorageContext -StorageAccountName $storageaccount.StorageAccountName -StorageAccountKey $key

get the actual container via:

$storagecontainers = get-azstoragecontainer -Context $context

It will then build an array of all the objects in that container. It will then cycle through all these items changing their tier level via:

$blob.icloudblob.SetStandardBlobTier($StorageTier)

This therefore effectively changes all the items in the container to the tier level you select. This is why I like to set up containers for specific tiers rather than intermingling.

Just remember to run this script AFTER you upload your files to swap them to the cheaper Archive tier. You could also use this script to swap them back at a later stage if you need.

Need to Know podcast–Episode 227

FAQ podcasts are shorter and more focused on a particular topic. In this episode I’ll talk about the recommended process for file migrations to Microsoft 365 collaboration.

Take a listen and let us know what you think – feedback@needtoknow.cloud

You can listen directly to this episode at:

https://ciaops.podbean.com/e/episode-227-wide-not-deep/

Subscribe via iTunes at:

https://itunes.apple.com/au/podcast/ciaops-need-to-know-podcasts/id406891445?mt=2

The podcast is also available on Stitcher at:

http://www.stitcher.com/podcast/ciaops/need-to-know-podcast?refid=stpr

Don’t forget to give the show a rating as well as send us any feedback or suggestions you may have for the show.

Resources

FAQ 4 – Your collaboration structure should be wide not deep

CIAOPS Patron Community

Azure AD Domain Services Cloud only user passwords

I have been creating a Windows Virtual Desktop (WVD) environment for internal testing. I’ll be sharing the process and tricks soon but this issue was one that I really didn’t know about for Azure AD Domain Services until someone pointed it out to me.  I am eternally grateful to gerry_1974 on the Microsoft Tech Community for this information that lead to the resolution. I thought I’d also share it here so others can avoid the oversight I made and prevent getting as frustrated as I did.

I recently wrote about setting up Azure AD Domain services for a cloud only environment

Moving to the Cloud – Part 3

The reason I needed to do this was to support my planned “cloud only” WVD test environment. Azure AD Domain Services is basically designed to create an ‘old style’ domain that WVD host machines connect to. That will change down the track, but for now WVD needs a traditional AD. Since I did not have an existing on premises domain, I planned to use Azure AD Domain Services.

After getting things working eventually (more about that soon), I was able to successfully login to my WVD environment with a user who didn’t have Multi Factor Authentication (MFA) enabled. I then tried a user with MFA and received:

clip_image001

The remote computer that you are trying to you are trying to connect to requires Network Level Authentication (NLA), but your Windows Domain controller cannot be contacted to perform NLA. if you are an administrator on the remote computer, you can disable NLA by using the options on the Remote tab of the System Properties dialogue box.

I put the issue down to being about MFA but as it turned out, I was so wrong!

When you have cloud only users with Azure AD Domain Services, no password hashes in a format that’s suitable for NT LAN Manager (NTLM) are automatically generated! To force this generation for cloud only users, it is required that the cloud only user change their password per:

Enable user accounts for Azure DS

which says:

The steps to generate and store these password hashes are different for cloud-only user accounts created in Azure AD versus user accounts that are synchronized from your on-premises directory using Azure AD Connect. A cloud-only user account is an account that was created in your Azure AD directory using either the Azure portal or Azure AD PowerShell cmdlets. These user accounts aren’t synchronized from an on-premises directory.

and most importantly:

For cloud-only user accounts, users must change their passwords before they can use Azure AD DS. This password change process causes the password hashes for Kerberos and NTLM authentication to be generated and stored in Azure AD.

After having this brought to my attention, I understand why this is but would also say this could be a very painful process if you have a lot of users that are wanting access to something like WVD.

Thus, another little configuration tip to remember if you are setting up a cloud only environment that utilises Azure AD Domain Services. Before users can potentially use services that are dependent on Azure AD Domain Services (like Windows Virtual Desktop) they need to change their password so the NTLM password hash can be generated for use by Azure AD Domain Services.

Ignite 2019 sessions on YouTube

Not everyone, including me, is able to get to Microsoft Ignite for various reasons. Microsoft, to their credit, live streams and records the sessions. Eventually, these sessions make their way onto YouTube which is my preferred viewing platform. However, what is missing is a catalogue of the links to each session.

image

As in previous years:

Ignite 2017 sessions on YouTube

Ignite 2018 sessions on YouTube

I have started building this index and making it available on my GitHub:

Ignite session 2019 on YouTube

Please note, all the session are not there as yet. I add them as I discover them along the way through the year.

Of course, if you have a link to a session that I don’t have up there yet, please send it along so I can add it and we can all benefit.

Thanks again to Microsoft for doing this and uploading the sessions to YouTube. They are a great source of learning and allows people like me would couldn’t get to Ignite the ability to work through the content.

Swapped “ and @ on keyboard

One day you are merrily typing away as you always have, and all of a sudden you find that what you typed is wrong. You retype it again and find that the key you press is not actually the key that appears! What the??

In my case the @ (SHIFT+2) was being replaced by “ (SHIFT+’).  Luckily, I remembered that this had happened before and involved the English pound (£) symbol.

SNAGHTML6446008

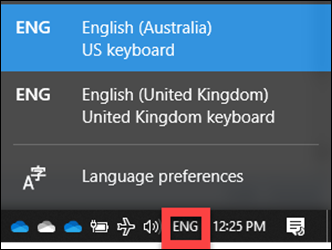
The reason is because I have 2 keyboards types installed on my desktop PC as you can see above. You can view your keyboards by selecting the language icon in the system tray which is next to the clock.

Once I re-selected the English (Australia) keyboard I was back in business with the correct keys.

image

Always wanting to know how this could happen, I received my answer when I moused over that same icon as shown above. The keyboard is swapped when you press the Windows key + space. I use the Windows key + another key on my keyboard all the time so I had obviously fat fingered the secret sequence to change the default keyboard! The things my subconscious does to try and distract me.

Hopefully, this helps someone else out because it can be very frustrating to solve the first time it happens.

That COG is pretty handy!

image

If you visit the page for your OneDrive for Business, you’ll notice a COG in the top right hand corner of the window as shown.

image

If you select that, you’ll see a menu like shown above. Select the OneDrive settings option as shown.

image

Here you’ll find a page with a whole lot more options. In this case select the option, Storage metrics as shown.

You should also note that there is a Run sharing report option as here well.

image

The Storage metrics option allows you to see a breakdown of the data storage in your OneDrive for Business as shown. You’ll also notice in the top right, the total and used capacity of your data.

image

You can drill further into directories by simply clicking on them. The above shows the data break down in the Documents directory below the OneDrive for Business home location.

Microsoft will also be adding more options to the COG over time so make you check there regularly.