The insecurity of shared mailboxes

Shared mailboxes are a really handy component of Microsoft 365 in that they allow multiple users to access a single mailbox. This works really well for generic accounts like info@, accounts@, etc. However, there are some security issues with these that I don’t think many people are aware of.

The first point to note is that shared mailboxes in Microsoft 365 actually have a login and password. Thus, they can be accessed directly using these details. Don’t believe me? Well check out the following documentation:

https://docs.microsoft.com/en-us/office365/admin/email/create-a-shared-mailbox?view=o365-worldwide#block-sign-in-for-the-shared-mailbox-account

which says:

“Every shared mailbox has a corresponding user account. Notice how you weren’t asked to provide a password when you created the shared mailbox? The account has a password, but it’s system-generated (unknown). You aren’t supposed to use the account to log in to the shared mailbox”

So, by default, when you create a shared mailbox you are actually creating an account with a system password in your environment. No so bad you think right? Well, the problem is that, by default, IMAP and POP3 are enabled on all mailboxes, including shared ones.

image

Some actually use this IMAP ability to be able to open shared mailboxes on mobile devices, however doing this comes with a huge risk in my books.

Why? Well, if IMAP is enabled, that means basic authentication is enabled and that is bad as I have said previously:

Disable basic auth to improve Office 365 security

You may feel an unknown system or complex password on a shared mailbox is good enough but to remote bad actors running automated cracking programs against accounts on your tenant, it is only a matter of time until they generate a matching password for that shared mailbox. Once they have that, boom, they’re into that mailbox. From that foothold, they can then launch all types of attacks, but the most likely being phishing your users. It’s all down hill from there!

If you use shared mailboxes on mobile devices, this means you have to know the password for the shared mailbox prior to configuration on the mobile device. Because the shared mailbox has an account, it can have it’s password changed. That means, if you want to use shared mailboxes on mobile devices, you reset the password for the shared mailbox so you know it. You then give that to users so they can configure access on their phones. Anyone else see a problem here? You are providing multiple people access to a single resource with a shared password. What is a shared password? It ain’t a secret for sure now is it? So, what happens when a user leaves the business? I’ll bet most businesses don’t go and reset the password on all the shared mailboxes that user had access to. This means you now have someone outside your business who has a login (shared mailbox email address) and password to a resource in your tenant.

Here’s a scenario where that came back to bite the business. A disgruntled user was terminated and their individual login account was disabled. After the user has fired, they connected back into a shared mailbox directly using IMAP and started sending all sorts of nasty emails to all staff from this mailbox. Now if they had been smart, they would have done this from an anonymous IP address, not one assigned to them from their ISP so we could track them down. However, the damage was done. Why? All because access to the shared mailbox was permitted by insecure protocols and shared passwords.

Edit sign-in status flyout in the M365 admin center

As with most things security, it is pretty easy to protect yourself from this BUT it requires changing the defaults. The easiest way is to:

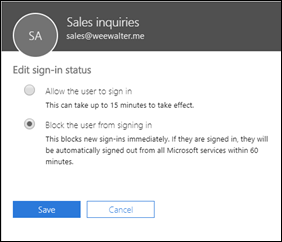
Block sign-in for the shared mailbox account

along with disabling IMAP, POP and basic auth. Yes, I fully appreciate that may have productivity ramifications, so you need to balance up the risk. However, given how easily this can be exploited, and the damage it could to the business, I’d rather be in the safe and secure camp than the ‘it’ll never happen to us’ blind faith camp personally. Anything that allows anonymous external users the ability to access accounts externally and allows them to keep guessing passwords as you can with IMAP spray attacks is very, very bad in my books. If you read this article:

https://www.proofpoint.com/us/threat-insight/post/threat-actors-leverage-credential-dumps-phishing-and-legacy-email-protocols

make sure you note the very last paragraph which says:

Update, March 21, 2019: This post has been updated to reflect specific cases in which IMAP-based password-spraying attacks were successful, particularly as threat actors targeted shared service accounts, (e.g., hr@company[.]com or helpdesk@company[.]com) or exploited weaknesses in MFA implementations and third-party email client logins.” 

So please, secure your shared mailboxes NOW! If you really, really need shared mailbox access on mobile devices I would suggest you use Office 365 groups instead until Microsoft enables shared mailboxes natively on mobile devices (which is on the roadmap).

Need to Know podcast–Episode 205

Welcome to episode 205. In this episode we’ll learn why Brenton has buyer’s remorse, how restoring files in SharePoint has been improved and how I protect my family using Microsoft 365 and the Microsoft Cloud. That and whole more are in this episode for your listening pleasure.

This episode was recorded using Microsoft Teams

Take a listen and let us know what you think – feedback@needtoknow.cloud

You can listen directly to this episode at:

https://ciaops.podbean.com/e/episode-205-buyers-remorse/

Subscribe via iTunes at:

https://itunes.apple.com/au/podcast/ciaops-need-to-know-podcasts/id406891445?mt=2

The podcast is also available on Stitcher at:

http://www.stitcher.com/podcast/ciaops/need-to-know-podcast?refid=stpr

Don’t forget to give the show a rating as well as send us any feedback or suggestions you may have for the show.

Resources

@contactbrenton

@directorcia

CIAOPS Patron Community

Files restore for SharePoint and Microsoft Teams

Do you need to backup Office 365

How I protect my parents using Microsoft 365

New cloud based policy management service for Office 365 ProPlus

What’s new in OneNote for Windows 10

MDATP Threat and Vulnerability Management now publicly available

Microsoft Kaizala rolls out to Office 365 customers globally and will become part of Microsoft Teams

PowerShell Version 7

Introducing Security Policy Advisor

Azure Backup support to move Recovery Service vaults across subscriptions and resources groups

Gratitude

The 25th of April here in Australia and New Zealand marks the anniversary of our first major conflict, fighting under the national flag. The operation at Gallipoli was designed as a diversion to relieve the hard pressed allied forces fighting in France since 1914. This gave birth the legend of ANZAC that we celebrate today.

That anniversary is now more than a hundred years in our past but we continue to use it as the rally point for contributions made by all members of our armed forces over the years. To be willing to serve and die for your country and people within is a special trait indeed. The hope is that we will never see carnage on the scale we have seen in the World Wars, but yet sadly, conflict continues throughout the world.

As much as today is a time to reflect on the sacrifices of the past it should also be a time to express gratitude for what we have today. The people around us, our families, friends, work colleagues and more all add to the fabric of our lives in very positive ways. It is easy in today’s age to over look the simple things, to say thanks to those we love and to help others without the expectation of return. Those that went to places like Gallipoli did this. Those that fight today to keep us safe do this. Those that respond to every day emergencies do this. And for all that we should be grateful.

We can honour the past, we can live in the present but we must plan for the future. We need to take this opportunity to think about how we can make this world a better place. How we can live up to the standards we see from others? Yes, we will fail. Yes, it will be a challenge, but if we truly take the spirt of ANZAC to heart we will continue to sacrifice every day in whatever small way as a daily expression of gratitude.

Start today. Ask yourself, how can I be more grateful because things could surely be a whole lot worse than they are right now!   

For those interested in learning of the continued sacrifices that the ANZACs made after withdrawing from Gallipoli in World War 1, when they went to fight in northern France until the end of the war, should visit my web site:

ANZACs in France

How I protect my parents using Microsoft 365

boy-car-child-1266014

I’m sure there are many of us out there that continue to provide free unpaid support for our family members. Well, many it isn’t so much free, as a ‘barter’ arrangement in that every time I’m on site I get fed. That type of compensation may of course vary in your particular situation but many IT Pros are expected to support our own family as they use technology. That can be extremely challenging if you don’t do it right. Thanks to the tools available in the Microsoft Cloud, you can quite easily!

One of the benefit of doing security right for your family is that it is going to drastically reduce the amount of support calls you receive. So here’s some of the stuff I do:

1. Everyone has Microsoft 365 Business

This one license ensures that they have commercial grade email and the latest version of Office on their desktops. It ensures that they have both Safe Links and Safe Attachments for their mailboxes to protect against inbound malware and viruses.

2. Everyone runs the latest version of Windows 10 Professional on their desktop

Windows Home has lots of limitations and does not allow connection to Azure AD. Thus, all machines are Windows 10 Professional and all machines update automatically.

3. All machines are joined to Azure AD

I don’t want to have a traditional on premises domain controller to manage these Window 10 machine. By joining all the Windows 10 Professional workstations directly to Azure AD I get the management, security and control that I want all from the cloud.

4. All machines have Intune compliance and configuration policies applied

image

Thanks to Intune, which is part of Microsoft 365 Business, at a glance I can ensure all the machines, including my own, are compliant and configured appropriately.

5. All machines only use Windows Defender as their AV

Windows Defender is the best solution for AV in my experience. I can manage many settings thanks to Intune, although I would like some more I would admit, but I have never had an viruses or malware issues wince ditching third party AV providers a number of years ago. I am considering potentially upgrading to Windows Defender ATP but it is probably not worth the investment given the other steps I am already taking.

6. All machines are covered by Azure AD Premium P1

Azure AD Premium P1 is an add on to Microsoft 365 Business but has a number of very, very handy security features that I use to keep everyone safe.

7. Conditional access is limiting access to devices via IP address

One of the features that Azure AD Premium P1 provides is the ability to set conditional access policies. I have restricted access to my parents logins to be ONLY available on two unique IP addresses, theirs and mine. This means that if they were phished and gave up their logins a remote user would be prevented from logging in thanks to these conditional access policies as they are not connecting from these allowed IP addresses.

In my own personal cases, I also use conditional access policies but I have them set a little broader, typically limited to allowing access just from Australia. If I travel, I need to temporarily adjust the policy to accommodate where I’ll be and then set it back to just Australia when I return.

8. All POP and IMAP access has been disabled to all mailboxes

image

The most common way that random bad actors on the Internet are trying to gain access to accounts is using IMAP and POP3 as you can see from a recent log above. Conversely, all Microsoft 365 mailboxes have both POP3 and IMAP enabled for all mailboxes by default unfortunately. No user needs to access mail via old protocols and thus it is disabled across the tenant.

9. Basic authentication has been disabled on the tenant

Because I have modern devices and software connecting to my information, as I have said before:

Disable basic auth to improve Office 365 security

‘nuff said.

10. All accounts have Multi Factor enabled

All accounts have the requirement for MFA on them. Now, my parents don’t have smart phones or devices other than their PC’s, so how do they access their accounts using MFA? Well, they actually don’t! See item 11 as to how I achieve this.

11. Trusted IPs have been enabled

Once again, thanks to magic of Azure AD Premium P1, I am able to implement Trusted IPs. This means that when a login request comes from a configured Trusted IP the user will not be prompted for MFA even if the account requires it. Thus, thanks to the locations I have already set up with Conditional Access I can also use these same IP addresses to configure Trusted IPs for my parents logins. This means, that their accounts ARE protected by MFA but since they are always logging in from a single IP address that is now trusted, they WON’T be asked for MFA. This, makes it easy on them and hard on the bad guys.

12. I have Office 365 Cloud App Discovery

Again, thanks to the wonders of Azure AD P1 I have Cloud App Discovery which enables me a far more granular logging of events in my tenant. I can see exactly what my parents are actually doing.

I’ve talked about the benefits of Cloud App Security before:

A great security add on for Microsoft 365

and recommend you have it.

13. All machines use password-less Windows Hello logins

All the machines are using Windows Hello, either biometric or a PIN to access the machines. No complex passwords to remember, just a simple PIN number or just sitting in front of the machine now gives my parents access to their desktops. It couldn’t be easier and yet secure.

There are a lot more actions I take on my production tenant to ensure it is secure but the above items are the ones that most affect and protect my parents and their information. As you can see, via the implementation of Microsoft Cloud technologies I have made it both super secure and super easy for them. In most cases they don’t even realise what I’ve done, and that’s the way it should be.

Now, if I can do this for my parents, why are you not doing the same for your business users? Eh?

CIAOPS AZ-103 Online training course

ballpen-blur-close-up-1925536

From the 1st of May 2019 Microsoft is retiring both the Azure AZ-100 and AZ-101 certification exams and replacing them with a single integrated exam AZ-103. You can find out more about this exam here:

https://www.microsoft.com/en-us/learning/exam-az-103.aspx

I think that this Azure administration certification exam is something that all IT pros working with, or looking to work with Azure should complete. I have written about the benefits of certification here:

Benefits of certification

With this in mind I have now created an AZ-103 online certification preparation course you can take. It is designed to give you the knowledge to pass the AZ-103 exam, typically in a 30 – 45 day period. Note, this online course doesn’t TEACH you Azure from scratch. It helps fill in the gaps in your experience to ensure you are prepared for the exam and therefore stand the best chance of passing. It by no means guarantees you’ll pass, but I feel it does give the best preparation.

The course contains around 100 individual lessons including video tutorials and downloadable material.

You can sign up for the course here:

https://www.ciaopsacademy.com/p/microsoft-azure-administrator-az-103-exam-preparation

Watch out for more Microsoft certification preparation online courses coming to www.ciaopsacademy.com soon.

Access the Microsoft Graph with a script

In a recent article I showed how to connect to the Microsoft Graph in a web browser:

Using the Microsoft Graph Explorer

I also showed how you could do the same:

Using Interactive PowerShell

This article is going to focus on how you can do the same thing but directly via a script that won’t prompt you for credentials.

Before running this script you’ll need to follow the Using Interactive PowerShell article and set up an app in your Azure AD.

image

image

During that process you’ll need to record three things that will be used here:

1. Application ID

2. Tenant ID

3. Client secret

I borrowed the connection piece of this script from:

https://www.lee-ford.co.uk/getting-started-with-microsoft-graph-with-powershell/

which I found really handy in helping me understand all this. You can download my script from my GitHub repository here:

https://github.com/directorcia/Office365/blob/master/graph-connect.ps1

You’ll need to enter your own Application ID, Tenant ID and Client secret in the variables section. After that, all you need to do is run the script. The results for the query of /security/alerts will end up in a variable called $query which you can view. The actual content of the alerts you’ll find in $query.content.

image

This Graph connection script should now allow you to connect to the Microsoft Graph for a tenant and start running queries and returning values for entries in there. At the moment it only queries security alerts, but you can modify it to query anything in the Graph for your tenant.

MSP Microsoft Partner MFA request

I’m not a Managed Service Provider (MSP) but there are lot of them inside the CIAOPS Patron community so I understand the challenges they have. Their role is typically to provide managed of customers technology, including things like Microsoft 365 and Azure. To perform that role they will typically need global administrator access to the clients tenant. They may need this access across multiple tenants.

Best practices is always to ensure you secure global administrator access via Multi Factor Authentication (MFA). This means, when you log into an account you’ll be prompted to verify your identity using a second factor like a code from an app on a mobile device. As I have detailed previously:

Using multiple authenticator apps with a single Microsoft 365 user account

you can have multiple ‘tokens’ to verify an account. If you want all of these tokens to be unique the current Azure AD arrangements are:

“Your users can now have up to five devices across the Authenticator app, software OATH tokens, and hardware OATH tokens.”

per – https://techcommunity.microsoft.com/t5/Azure-Active-Directory-Identity/Hardware-OATH-tokens-in-Azure-MFA-in-the-cloud-are-now-available/ba-p/276466

That arrangement is generally fine if only one person is logging into an account but is a problems if you an MSP.

Why? Because you’ll typically have multiple technicians all needing to potentially manage a customers account. You want them to do this from a single global administrator account, however you want each technician to use a different token when they login. That way, if a technicians device gets lost or a technician leaves you merely revoke that one unique token. So, in the case where an MSP needs more than 5 tokens (say 1 for MSP and 4 for technicians) there is going to be an issue. For example what happens when you have 7 technicians say? Yes, there are ways around this but they are messy, cumbersome and inefficient as well as being more insecure I would suggest.

The ask here then is for the ability to increase the amount of tokens beyond 5 for a single account. I would suggest that perhaps the best way to accomplish this is only via a unique PowerShell command and not via the GUI. I also however suggest that a better idea would be to have a new unique global admin role in a tenant, say called “Partner Global Administrator”, that would allow more than 5 tokens. No other administrator could have this enabled, only this unique account. I would also suggest that this unique “Partner Global Administrator” also only be available in tenants that use CSP program from Microsoft. Thus, if the MSP is a CSP partner they will see this special role in the tenant. They then run a PowerShell script if needed and the number of tokens available on that account is increased up to say 20.

I also think that there is number of other benefits that a special “Partner Global Administrator” role could provide but for this request I want to stick to allowing the number security tokens be increased beyond 5.

I believe this request will help the many MSPs globally who manage a significant number of tenants for customers. Making it easier for MSPs to be secure and manage multiple customers more efficiently is a win for everyone.

Using interactive PowerShell to access the Microsoft Graph

I recently published an article on how you can browse the Microsoft Graph directly from a web page here:

using the Microsoft Graph Explorer

The next step is to start working with the Microsoft Graph using PowerShell.

This article was recently published by Microsoft:

IT Pros can now easily connect to Microsoft Graph Security with the PowerShell Module!

and one of the confusing things I found where it talks about “Registering your application”, which you need to do successfully before you can run all the PowerShell commands.

Now if I find that confusing I’m sure others will also, as there is a bit of trick in setting it up correctly. So here is what you need to do, step by step, to actually get it all working.

SNAGHTML55ab07

Login to https://portal.azure.com using you Microsoft 365 credentials. Navigate to Azure Active Directory from the list of items on the left.

image

From the options available on the left select App registration (Preview).

image

From the pane on the right select New registration at the top of the page.

image

Give the new application a name. Here I have called it Graph. Next hit the Register button at the bottom.

image

You should now see the Overview of the app. On the right hand side save both the Application (client) ID and Directory (tenant) ID as you will need these later.

image

Here’s the bit that isn’t that clear in the existing documentation. Select the Authentication option from the menu and then on the right check the option

urn:ietf:wg:oauth:2.0:oob

From what I can work out, normally apps need to return to a location after using Azure AD authentication. However, because we will be using an interactive PowerShell session, the selected option will simply return there. Again, not really clear in the documentation I read.

You don’t need to make any other changes on the page but ensure you now select Save in the top left.

image

Next, select the Certificates and secrets option on the left. On the pane that appears on the right select + New client secret.

image

Give the secret a name and an expiry period and select Add.

image

You should then see you new secret and the actual value of that secret to the right as shown above. You will need to copy this secret value and keep it secure. treat it like a password.

You will see a banner across the top of the pane telling you that this is only time you get to see the value of the secret in the clear. After you navigate away, you’ll no longer be able to simply copy and paste the complete entry, so do it now and save the secret somewhere secure as you will need it down the track.

image

Now select API permissions on the left. You should see text Microsoft Graph is hyperlinked, so select this. This means your app already has some basic access to the Microsoft Graph, here just user read right. If the Microsoft Graph entry isn’t visible for some reason you can select the + Add a permission button at the top and then select Microsoft Graph from the following page. Hopefully however, the Microsoft Graph hyperlink will already be there.

image

There are two boxes at the top of the page. Ensure the left hand (Delegated permissions) one is selected first.

image

Scroll through the list of permissions in the bottom section until you find the heading SecurityEvents and expand it as shown.

image

Select both options as shown:

SecurityEvents.Read.All

SecurityEvents.ReadWrite.All

Once these options have been select, press the Update permissions at the bottom of the page.

image

You’ll be returned to the permission summary page as shown. You should now see the additional permissions you added displayed. You will however note a warning icon next to them as well as a banner across the top informing you that you need to consent to these. We’ll do that shortly, however we want to add some more permissions, so again select the hyperlinked text Microsoft Graph.

image

This time ensure the box on the right (Application permissions) is selected.

In essence, think of the box on the left (Delegated permissions) as permission for interactive sessions like typing commands into the PowerShell manually. that requires a user to login each time. The right box (Application permissions) however, is going to allow operations without the need for an interactive user login. Thus, we can run a PowerShell script and not be prompted for login. thus, while we are in here it is a good idea to set up both sets of permissions to give you the flexibility later.

 image

As before, scroll through the list of permissions below. Locate the SecurityEvents heading, expand this and select:

SecurityEvents.Read.All

SecurityEvents.ReadWrite.All

Once selected, press the Update permissions button at the bottom of the page to save the changes.

image

You are again returned to the summary page where you should see all the permissions added. You should see permissions of type Delegated and Application for the security events. A set for each.

image

If you scroll to the bottom of the page you should see a Grant consent section as shown. Select the Grant admin consent for tenant button below. This means all users will have the permissions you just created. If you don’t do this, then they will have to consent the first time they access the Microsoft Graph using this method.

image

You should see the above prompt asking you to confirm that you will be consenting for all users in the tenant. Select Yes to continue.

image

In a few moments, your permission screen should show all green as shown above.

image

As a final check in the portal, select the Owners option on the left and ensure the appropriate users are listed here. These people will basically have the permissions to edit the application settings, like what has just been configured.

Now you can run an elevated PowerShell window and type:

install-module microsoftgraphsecurity

Once that has installed successfully you can run:

get-graphsecurityalert

image

Because this is an interactive PowerShell session you’ll need to login to the tenant. A login prompt will appear as shown, however be careful here. You enter your user login AND the Application ID from the app just created in the Azure AD portal here. That is the really long string of digits in the Overview part of the application you just added in Azure AD NOT the user password!

image

You’ll then be prompted for the user password and MFA if configured

image

If all of that is good then you should get results as shown above. Now you can continue on with your interactive PowerShell session and all the great stuff in the microsoftgraphsecurity module. Yeah!

The main trick is selecting the urn:ietf:wg:oauth:2.0:oob option as the Redirect URI when configuring the app.

You may have noticed that we have used the Application ID here but not the Application secret. That is because this is an interactive session where the user is required to login in first. if we don’t want to be prompted for a login we need to use the Application secret. That process will be covered in an up coming article so stay tuned.