Migration by the numbers – Step 6

Step 6 in a series of posts documenting the Microsoft SharePoint Foundation 2010 upgrade process on SBS 2008. This is based on the document:


http://www.microsoft.com/downloads/en/details.aspx?FamilyID=2dc66a0f-f840-4b29-93d3-13db70c85cba&;;displayLang=en


Previous steps:


Step 1

Step 2

Step 3

Step 4

Step 5


Step 6 – Install Microsoft SharePoint Foundation 2010 in Farm mode


This step commences by instructing you to download SQL Express 2008 SP1 from:


http://go.microsoft.com/fwlink/?LinkId=186795


so here’s where my opinion differs from what is the document (even though these posts are following the Microsoft document, you’ll get the added “bonus” of my opinion along the way). I reckon your be better off downloading and installing SQL Express 2008 R2 with the Management Studio from:


http://go.microsoft.com/?linkid=9729747


Why?


1. SQL Express 2008 R2 has a 10GB database size limit rather than a 4GB limit with SQL Express 2008.


2. You are going to need the SQL Management Studio installed on there anyway so do it all in one hit which is what the Microsoft document recommends). If you do this you’ll need to remove the SQL Express 2005 Management studio first.


We now return you to the program already in progress ….


After download SQL Express 2008 run the file as an administrator. The installation files will be expanded to your hard disk.


clip_image001_2_3A125269


When the SQL installation splash screen appears select the Installation option from the left hand menu (under Planning). Then select New SQL standalone installation or add features to an existing installation on the right (top option).


clip_image002_2_3A125269


The installation will commence and some prerequisite files will be installed.


clip_image003_2_3A125269


Next you move through the licensing screen. Nothing to see here, move along, move along.


clip_image004_2_67FFA521


Next, you’ll need to accept the EULA.


clip_image005_2_67FFA521


Now some support files will be installed. This is basically the SP1 files that allow SQL 2008 to run on Windows Server 2008.


clip_image006_2_67FFA521


You should then see a summary like so,


clip_image007_2_67FFA521


Yup, you shouldn’t run SQL server on a domain controller but this is SBS so we don’t have a choice. You should only have warning messages here so continue along.


clip_image008_2_67FFA521


Select Database Engine at a minimum. If you are installing a package that includes the Management Studio there will be option here that you should check to install that. You’ll be doing it later so that’s why I reckon its better to do it now but ….


clip_image009_2_67FFA521


Now you need to name your SQL instance. Another interesting point here. The Microsoft document says that you should call it Express, even though it is normally set to SQLEXPRESS by default. So strictly speaking you need to go in there and change it. Microsoft’s thinking was probably to try and avoid clashing with another potential SQL instance called SQLEXPRESS already on the box.


Anyway, whatever you call your SQL instance make sure you remember what it is called.


clip_image010_2_67FFA521


If there is enough disk space for the install you should see a green tick and be able to continue.


clip_image011_2_67FFA521


Here is where you set the service account for your instance. The Microsoft document warns you that it needs to be running as a domain account. There are all sorts of security and least privilege arguments that can be made here but we are focusing on the process here so press the button Use the same account for all SQL Server services and enter a ‘suitable’ account.


clip_image012_2_530E22AE


You should see the top row completed with account you just entered. Continue on.


clip_image013_2_530E22AE


Leave the Authentication mode set to Windows authentication but press the button at Add Current User (normally a domain admin account) as an SQL Server administrator.


clip_image014_2_530E22AE


Leave both of these option unchecked and move along.


clip_image015_thumb_530E22AE


The process runs a few more checks and let’s you know if there are any problems. If not time to install.


clip_image016_2_530E22AE


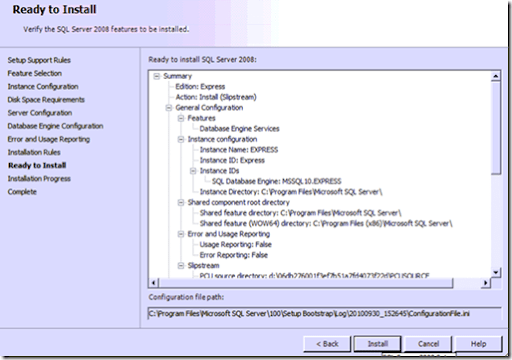
One last summary screen. Looks good to me, go for it – press Install.


clip_image017_2_530E22AE


Files get copied to your system and the configured using the options you just selected. This installation process may take a while ( several minutes ) depending on the speed of your machine.


clip_image018_2_530E22AE


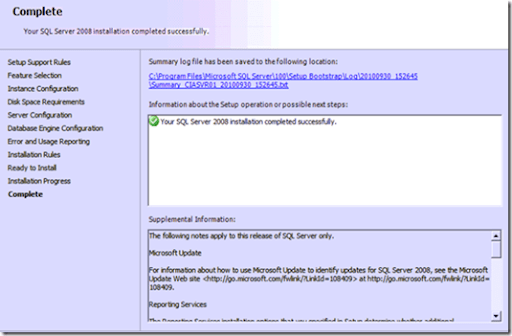
Green is good. Installation success! Yeah.


clip_image019_2_530E22AE


One last window of notes but everything is still green. SQL Express 2008 is now on our SBS 2008 system. Now for SharePoint Foundation Server 2010.


clip_image020_2_00FB7567


Fire up the SharePoint Foundation 2010 installation program again (you downloaded this in a previous step) and select option to Install software prerequisites.


clip_image021_2_00FB7567


Even though this has been run before we run it again to ensure everything required for SharePoint Foundation 2010 is on your system.


clip_image022_2_00FB7567


Accept the terms of the license and continue.


clip_image023_2_00FB7567


If everything is on the system as it should be you should get the all clear very quickly.


After returning to the splash screen select Install SharePoint Foundation and awwwwaaaayyyy we go.


clip_image024_2_2EE8C81F


Accept another license agreement and Continue.


clip_image025_2_2EE8C81F


Determine where the installation will go. By default this will be C: drive.


clip_image026_2_2EE8C81F


Now you should see the bar move across the screen as SharePoint Foundation 2010 is installed. It never moves fast enough it? if I had a dollar for every one of these I’ve watched over the years ….


clip_image027_2_2EE8C81F


Leave the Run the SharePoint Configuration Wizard now checked and continue.


clip_image028_2_19F745AC


You are now cordially invited to the installation of SharePoint Foundation 2010 on your SBS 2008 server. Do you wish to continue? I’ve come this far haven’t I? So yes, Continue.


clip_image029_2_19F745AC


Warning Will Robinson, warning your IIS and SharePoint services will be shut down during this wizard. Don’t forget that IIS is used for a number of other things that may interrupt users. If you have sent all your users home or just don’t care about users (I like your style), then Continue.


clip_image030_2_19F745AC


Select Create a new server farm as there is not yet any SharePoint on this server.


clip_image031_2_19F745AC


Now here’s where you need to connect to the SQL instance you created earlier. In the case of this Microsoft document the instance is will be EXPRESS or more correctly \EXPRESS.


Complete all the details including the user name with the domain prefix (i.e. \) and Continue. Typically you use the same account which you are installing the product with and made an SQL administrator earlier.


clip_image032_2_19F745AC


Enter a complex password for securing SharePoint configuration. You’d need this if you ever expanded beyond a single SharePoint server (which you can do).


clip_image033_2_47E49864


You can specify the port at on which the SharePoint Central Administration web site appears if you want (say port 5555) but generally you leave this blank. Also leave the authentication set to NTLM and continue.


clip_image034_2_47E49864


A final summary screen. Looks good, let’s Continue.


clip_image035_2_47E49864


Off the wizard goes to complete its 10 steps.


clip_image036_2_32F315F1


At the end you will hopefully get a successful configuration. After you press Finish a browser will now open.


clip_image037_2_32F315F1


Select whether you wish to participate in the Customer Experience and press OK.


clip_image038_2_32F315F1


What more wizards? This is worse than Oz!


Now here’s where I diverge from the Microsoft document again. I can’t see why you need to use the wizard to create a new default SharePoint site when you are only going to delete it in an upcoming step. If it was me I’d Cancel the wizard, but that’s not what the Microsoft says and that’s not what we are going to do here, so click your heels together and the Start the Wizard button Dorothy and let’s Continue.


clip_image039_2_32F315F1


Select a service account for SharePoint. Again, don’t forget to consider security here. Leave the bottom two services checked and Continue.


clip_image040_2_60E068A9


Some thinking time….


clip_image041_2_60E068A9


Give the new SharePoint site a name. It doesn’t really matter as you are going to delete it soon.


clip_image042_2_60E068A9


What the heck, make it a Team Site.


clip_image043_2_60E068A9


After some more processing finally all done. Phew.


clip_image044_2_60E068A9


Upon clicking finish you’ll be taken to the SharePoint Central Administration web site. It should look all new and flashy like shown above.


clip_image045_2_0ECDBB62


If you type the name of the server into the URL of your browser you should see a SharePoint Foundation 2010 web site. Note this is not yet Companyweb but at least you know SharePoint 2010 is now working on your SBS 2008 server!
Walking the cloud

If you are coming to SMB Nation in Las Vegas then I’d recommend you check out the ‘Walking the cloud’ pre-day from Karl Palachuk. Here’s some info:


PLEASE do yourself a favor and register now for the big SMB Nation PreDay Event – Walking Into The Cloud: Make Money Selling Cloud Services in the SMB Space

This is a SIX HOUR training by two SMB I.T. Pros. And it’s only $199 right now. But October 1st the price goes to $249.


You’ll find more details over at Karl’s blog at:


http://blog.smallbizthoughts.com/2010/09/walking-into-cloud-prices-go-up-friday.html


As I have said many times before the cloud is simply a product that someone is going to make money from. If you are going to get hung up about the ‘technology aspect’ of it then you find business life a lot tougher in the very near future.


So don’t miss out on this full day’s training from people who understand the BUSINESS opportunity the cloud represents in the SMB space.

Open desktop Office docs from Skydrive?

Microsoft have updated their Office Web Apps to include the ability to embed Office documents in web pages amongst other things. However this post:


http://blogs.office.com/b/office_blog/archive/2010/09/23/office-web-apps-reach-20-million-new-features-today-7-more-countries.aspx


Also notes the following:


Open desktop Office from SkyDrive: Now you can open Office files on your desktop directly from SkyDrive. We added this feature after seeing that over 90% of the Office documents on SkyDrive are created in Office on the desktop. Making it easier for you to work with those files just makes sense.


What I want to know is HOW? Maybe that feature hasn’t been rolled out to my Skydrive account but the article doesn’t mention any limitations.


I think this would be a really handy feature that I’d love to test but for the life of me I can’t find out how to do it. Surely, I’m missing something and I can’t find anything on the web.


Does anyone know how to open an Office document on your desktop directly from Skydrive?


Update:


So as some people have noted maybe the Microsoft blog post should read


Open desktop Office [applications] from SkyDrive: Now you can open Office files on your desktop [using the Office applications installed on your computer] directly from SkyDrive. We added this feature after seeing that over 90% of the Office documents on SkyDrive are created in Office on the desktop [with the desktop Office applications]. Making it easier for you to work with those files just makes sense.

i.e. this button

image_2_14D44711


however I always though that was there. Maybe not. Confusing none the less.

Migration by the numbers – Step 5

Step 5 in a series of posts documenting the Microsoft SharePoint Foundation 2010 upgrade process on SBS 2008. This is based on the document:


http://www.microsoft.com/downloads/en/details.aspx?FamilyID=2dc66a0f-f840-4b29-93d3-13db70c85cba&;;displayLang=en 


Step 5: Uninstall Windows SharePoint Services 3.0 and edit the Registry

Before you go any further I would suggest that you consider what your recovery plan is if everything goes pear shaped. One of the things that this process doesn’t help you with is recovering a SharePoint v3 installation on SBS 2008. If you don’t know how to do that then I suggest you make sure you at least understand what maybe required to recover SharePoint v3 on SBS 2008, given the steps you are about to take.


You need to firstly download the SharePoint Foundation 2010 installation file from http://go.microsoft.com/fwlink/?LinkId=191959. The size is about 170MB so make sure you get the complete copy.


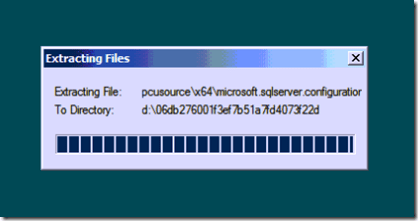
Download the file to you SBS 2008 and run it. After expanding some file you should be greeted by the following splash screen.


image_2_42FA3BA5


Select the option Install software prerequisites under the Install section.


image_4_42FA3BA5


You will then be greeted with a complete list of software that needs to be installed on your server prior to SharePoint 2010 being installed.


Press the Next button to continue.


image_6_42FA3BA5


Accept the EULA and press the Next button to continue.


image_8_70E78E5D


The first step will be the automatic configuration of the IIS server. This process may take a few minutes so be patient.


image_10_70E78E5D


Once that is complete you should see the required software being downloaded and installed on your system.


image_12_70E78E5D


You should also see a number of updates being downloaded and installed. This is going to most likely mean a reboot once this process is complete.


image_14_70E78E5D


So you may want to keep an eye on the process and delay the pending reboot until the prerequisite process is complete.


image_18_70E78E5D


When the process is complete you should see the displayed above. Beware, that in my experience if your machine needs a reboot and you press the Finish button your SBS 2008 will automatically recommence a reboot. So make sure you are aware of that.


Even if the server doesn’t need to reboot it, I would just to ensure everything comes up cleanly.


Most likely the SharePoint Foundation 2010 installation will re-launch and start configuring the Web Server again.


image_20_70E78E5D


No fear, just let the process complete (it may take several minutes).


Once the server has rebooted this is where the real fun begins. Log back into your SBS 2008 server and select Control Panel and the Programs and Features.


image_22_70E78E5D


Ok, deep breath. Select Microsoft Windows SharePoint Services 3.0 from the list of installed programs and then select Uninstall from the top.


Accept the UAC.


image_24_5BF60BEA


Press the Yes button.


image_26_5BF60BEA


Your last warning to make sure you REALLY want to do this! Press OK to continue.


image_28_5BF60BEA


Wave bye bye to Windows SharePoint Services v3 on your SBS 2008 server.


image_30_5BF60BEA


Your SBS 2008 server is now SharePoint free. Press Close.


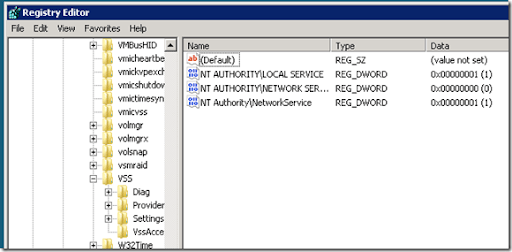
Run regedit and accept the UAC presented. Navigate to the registry key HKEY_LOCAL_MACHINE\SYSTEM\CurrentControlSet\Services\VSS\VssAccessControl\.


image_32_5BF60BEA


So the Microsoft documentation says:


4. Double-click NETWORK SERVICE, and then, in Value data, type 1.


In my situation above I have a NETWORK SERVICE and a NetworkService entry but the NETWORK SERVICE not set to 1. So I double clicked on the second entry and changed the value to 1 and selected OK.


image_38_5BF60BEA


Next step is to install SharePoint Foundation 2010 on SBS 2008.

Migration by the numbers – Step 4

Step 4 in a series of posts documenting the Microsoft SharePoint Foundation 2010 upgrade process on SBS 2008. This is based on the document:


http://www.microsoft.com/downloads/en/details.aspx?FamilyID=2dc66a0f-f840-4b29-93d3-13db70c85cba&;;displayLang=en

Step 4: Back up the Windows Internal Database files


So now we need to back up the SharePoint content databases. SharePoint uses SQL to store just about all its content so having a copy of these databases is always a good move.


Go to the Services from the Administration Tools.


Scroll down the list of services until you locate Windows Internal Database as shown below.


image_2_14899DFA


Right mouse click on this service and select Properties.


image_4_7F981B86


Set the Startup Type to Disabled and press the Stop button to stop the service. Then press OK.


The most likely reason for dong this is to ensure that the service doesn’t accidentally start while you are a attempting to backup the databases, which may take some time if they are large.


image_6_7F981B86


Now run the file manage and locate the directory in which the SharePoint databases are located. This will usually be c:\windows\sysmsi\ssee\mssql.2005\mssql\data. If you have used the wizard to move the databases they will be in same directory structure but in the drive letter you moved them to.


Microsoft indicates which databases to copy but it is probably just as easy to copy the whole \data directory out.


image_8_14899DFA


Aside from the SharePoint databases Microsoft recommends copying out the information in the \schemasig directory as well as the WSUS databases (in C:WSUS\SUSDB\UpdateServicesDbFiles\ usually). Beware that your WSUS databases could also be very large and may take quite a while to copy.


Once you have done this you go back to the Services console and set the Windows Internal Database to start automatically and then start the service.


It would seems that by doing the above steps you are ensuring that if the default installation of SQL 2005 Embedded Edition becomes corrupt you can recover, because don’t forget that SQL 2005 Embedded Edition is not only used for SharePoint so if it smokes it will affect other applications (most likely WSUS).


You’ve now backed up everything and your ready to being the process of removing Windows SharePoint Services v3 from SBS 2008 in preparation for installing SharePoint Foundation 2010 instead.

For an even better SBS 7

As Chris Knight rightly points out in a comment on my recent posting on improving SBS 7 any implementation of SharePoint these days should allow the easy indexing of PDF documents.


Now from personal experience I can tell you to do PDF indexing in Windows SharePoint Services v3 is a pain but do able, but in SharePoint 2010, from what I can determine it is almost impossible for the average IT Professional (though not if you buy my SharePoint Guide). Why this process has been made so hard beats me. Why this process couldn’t be something easily configured by Microsoft an Adobe, beats me.


Given that PDF’s are so common these days, especially as Chris points out, from scanning devices, why there isn’t a simple implementation in SharePoint 2010 (especially on SBS 7) beats me. So I’m definitely adding that to the wish list and thanks to Chris for the reminder, glad someone reads what I post!

For a better SBS 7

I’ve now submitted some suggestions of what could be done to SBS 7 to improve it before it releases. Here’s what I think is are worthwhile inclusions:

image_2_07EFA108

1. Automatically install the TIFF iFilter. Windows Server 2008 R2 includes the ability to add TIFF iFilter as a feature. Even though it is not enabled by default I reckon it should be simply because SharePoint Foundation 2010 is installed. Why? Well, and iFilter lets you index the content in file files for which that iFilter is designed for. Thus, an iFilter for TIFF files means they can be indexed and searched by SharePoint 2010. So many documents are scanned using the TIFF file types (e.g. faxes) and if they end up in SharePoint (which makes the most sense for them generally) you’d want them indexed? I reckon so, that’s why I recommended it.

2. Include Search Server Express 2010. This is a biggie I believe. Search Server Express 2010 is a free download from Microsoft that is built on SharePoint technology that allow you to not only index SharePoint information but information from Exchange public folders, web sites and NETWORK SHARES. This means that with Search Server 2010 installed on SBS 7 all the user information stores in shares could be index and made SEARCHABLE through SharePoint! That also includes the ability to search information within documents that have been configured with an iFilter (see point 1 above). How many businesses have an internal search server? Not many, here’s an opportunity, I believe, to give businesses functionality they really need to help them find the information in their network.

There has also been plenty of discussion around including Office Web Apps in some version of SBS, which I certainly agree with. Interestingly in my testing I am finding that I am unable to install Office Web Apps and Search Server Express 2010 together. I am still trying to resolve the issue in case I have over looked something simple and I’ll report here soon about what I find.

SharePoint on SBS 7

If you haven’t heard, the beta of Microsoft Small Business Server 7 is now available for download and evaluation. I’ve done just that to check out SharePoint 2010.


image_2_5CDF793B


So after a relatively simple install SBS 7 was up and running and typing good old http://companyweb into a web browser brings up the screen shown above, looking all pretty standard.


Some quick observations.


1. SharePoint 2010 on SBS 7 uses SQL Express 2008 R2 which means there is a 10GB database limit for content. This is different from SBS 2008 which had unlimited content database size. The SQL instance is now called \sharepoint.


2. SharePoint 2010 on SBS 7 seems to retain fax integration but doesn’t support email archiving, However this may be because the installation of Exchange 2010 failed on this attempt to install SBS 7 but I don’t think email archiving does appear but I’d need to double check to 100% sure.


3. It supports the installation of Office Web Apps, allowing the viewing and editing of Office documents in a web browser. I really think this is going to be a huge feature BUT you need to be licensed for Office Web Apps, it doesn’t come as part of the SBS 7 installation.


So from what I see all working as expected so far.