Creating Microsoft Teams general guidelines

pexels-photoscom-93400

You’ll find plenty of advice about creating Microsoft Teams and a collaboration environment out there. None of it should be considered absolute but instead, guidelines when creating your own Teams environment. However, the most important rule should be that Teams should be a planned process, not something randomly generated. Actually taking time to think and plan your Microsoft Teams environment will make your life a whole easier.

The first major suggestion is to plan an environment that is wide, not deep as I have outlined here;

Your collaboration structure should be wide note deep

Unlike traditional file server environments, you have the benefit of powerful search functions and AI surfacing relevant material now in Microsoft 365. Having a flat structure also make it easier to re-arrange if you need to down the track and it also make permissions much easier to handle. If you need some form of hierarchical structure for navigation you can create this using hyper links but underneath the covers, keep the structure of what you build as flat as possible. This means creating lots of Teams and SharePoint sites as needed and then linking them together, using hyperlink, into whatever you need, NOT creating subsites.

Also, as I have outlined in

A framework for file migrations to Microsoft 365

Don’t dump your information into a single location, Team , SharePoint site or Library, etc. There are lots of places for collaboration inside Microsoft 365 and certain types of information works better in different places. Break your information up and put in where it makes sense. You have all these areas available to you, use them.

Along these lines, another guideline I can give is that when information requires pure storage (no conversations or chat around it) then use a SharePoint site. If however, there will need to be conversations around that information then a Team is a much better option. For example, a SharePoint site is a great place for an archive, with finalised forms and documents like manuals and marketing material. A Team works better when creating documents that when finalised, will end up in a SharePoint. Using Teams chat correctly will cut down back and forth emails as well as making all these conversations searchable for all members of the Team.

Further, I’d suggest is to limit the depth of the structure to three (3) levels per:

The rule of three

Making a structure deeper than 3 levels generally results in people hunting up and down a structure looking for the information they are after. At the lowest level you should be able to go into a Document Library and see everything, including one level of folders below. Going deeper means you lose the initial context and when you come out you need to get re-orientated again to continue. This wastes time and creates frustration for users.

Next, when you create a new level, Team, Library, folder, etc always ask yourself the question, “Will be this be by function or location”?”. For example, if you want to create a new Team, ask the question. You then decide with Team will be for Human Resources (i.e. function). Then, when you create a channel below that Team, ask the question again. This may result in channels by State (i.e. by location). When you create a folder inside that channel, ask the same question and maybe create folders like CV, jobs, application, etc (i.e. function again)

Asking this simple question at each level provides a surprising logical structure very quickly. This is in fact where I find most people get hung up when creating a new collaboration environment and having very simple guidance you can follow helps overcome this and get on building what you need.

It is also important to follow some basic guidelines when naming each item in your structure.

– Keep the names you use as short as possible i.e. HR is far better than Human Resources

– Avoid using spaces and special characters i.e. Customer-Service not Customer Service

– Avoid having duplicate items. For example calling your Team “Projects” and then each channel something like Project-1, Project-2, Project-3, etc is redundant and consumes space.

Settling on a naming convention prior to creating your collaboration structure is a very worthwhile investment of your time. For example, settling on how to name a location like a state which could be New South Wales, NSW, N.S.W., Nsw, just to name a few possible iterations. Having a consistent approach to how you name all items in your environment will greatly assist users when they are searching for information and avoids duplicated areas. This is why a small amount of timed invested up front planning your collaboration structure pays huge dividends down the track. Unfortunately, I see too many rushing in and just creating items on the fly and then having issues down the track.

Remember, that you don’t have to build the complete structure on day one. What is the minimum viable solution required? Maybe it is something for a limited group of your users. Build it, learn, test, adjust and then move forward. Typically, you are introducing major changes inside an organisation and best method to see how this is adopted is to take a slow and sure approach while seeking feedback from users. You certainly still have your overall plans but taking one step at a time is going to allow you to quickly adjust if you need to.

Don’t forget that you’ll also have to invest in user training as I have detailed previously here:

Stop making your users feel stupid

This will be especially true if you have moved from a traditional server. Collaboration is very different from storage and failing to help users come to grips with all the features Microsoft 365 provides is going to make adoption of any new system hard. Remember, you can create the greatest collaboration structure in the world, but if people fail to use it, then that investment is wasted. In the end, technology serves humans, so help your humans come to grips with the new system and you’ll be surprised at what they can achieve it with. In my experience, the single biggest point of failure when building a new collaboration system is a failure to train the people who will be using it every day. Fail to do that, and you will struggle to make things better.

As I have outlined in

Process for file migrations to Microsoft 365

Assigning permissions comes AFTER you have created the structure. Remember, by default, Microsoft 365 is an environment designed to make it easier for users to collaborate. This means, by default, users are encourage to share, edit, and so on. For example, Teams is largely designed so that all members have the same permissions inside a Team and can read, write and delete documents by default. The more restrictive permissions you wish to apply to a structure the harder it becomes to bend the technology to accommodate this. Can it be done? Of course, but the more complex and restrictive the permissions, the harder it becomes to accommodate these inside a structure. In short, Microsoft 365 is primarily designed to allow people to work together not blocking them from getting to information. Think of it as allow more than deny.

As I said initially, there are not hard and fast rules when it comes to creating a collaboration structure in Microsoft 365. It is a tool that can be structured in just about any way to suit a business. However, following the above guideline, is going to make your life much easier and will mean you are not fighting the technology to achieve what you want. Because you want to create a structured environment it is always recommended that you design this prior to actually building it. Cleaning up afterwards always takes more time and causes more frustration in my experience. Always start simple and build from there.

Hopefully, these guidelines, based on my experience, will help you get the most from your Microsoft 365 collaboration environment. In the end, build something that work for you.

Need to Know podcast–Episode 293

Happy holidays everyone. Hope you are all enjoying the festive season. A few updates from Microsoft including the availability of Teams Premium plus an editorial on industry burnout. I’m seeing more and more IT Professionals becoming burnt out and feeling lost. At this time of the year take some time to look forward and decide whether it is time for a change. Also, don’t be afraid to reach out and share with others what your feeling. If anyone wants to chat feel free to reach out in total confidence via director@ciaops.com.

You can listen directly to this episode at:

https://ciaops.podbean.com/e/episode-293-are-you-burnt-out/

Subscribe via iTunes at:

https://itunes.apple.com/au/podcast/ciaops-need-to-know-podcasts/id406891445?mt=2

The podcast is also available on Stitcher at:

http://www.stitcher.com/podcast/ciaops/need-to-know-podcast?refid=stpr

Don’t forget to give the show a rating as well as send me any feedback or suggestions you may have for the show.

This episode was recorded using Microsoft Teams and produced with Camtasia 2022.

Brought to you by www.ciaopspatron.com

Resources

@directorcia

@directorcia@twit.social

Join my shared channel

CIAOPS merch store

Become a CIAOPS Patron

CIAOPS Blog

YouTube edition of this podcast

Microsoft 365 incident response training

GPT Chat

Try an improved Quick Assist experience

Reminder: End of servicing for Windows 10, version 21H1

Listen to your favorite Microsoft Tech Community Blog articles, powered by Azure Speech Services!

End user passwordless utopia

Microsoft Teams Premium Experiences and How to Set It Up

Teams Premium preview now available

New Work vertical in Windows Search

Basic Authentication Deprecation in Exchange Online – Time’s Up

Connecting to Azure IoT hub

The main aim of my dive into IoT was to get a remote device talking to Azure. After getting the IoT device connected to WiFi, flashing LEDs, accepting input from a button and capturing temperature data, it was now time to make that dream a reality.

There are different methods of connecting devices to Azure but for my first attempt I decided to use Azure IoT hub. The first step in that process is to login to the Azure portal and create a new IoT hub.

image

To do this, select the Create menu option in the top left of the Azure IoT hub blade

image

Once you have selected the Azure subscription and Resource group you’ll need to pick a Name for your Azure IoT hub. This name needs to be unique as a URL will be generated from this. Then select a Region and a Tier. You’ll notice that there is a Free tier, which I have selected for this example (very handy for tests like this).

image

Next, you can configure your networking. Because my device will just connect to a public Internet connection I selected Public access.

image

I left the management options as shown above.

image

The add-ons shown here are not available on the Free tier.

image

I didn’t need any tags.

image

I finally get a summary as shown. Note that the cost will be $0 because I am using the Free tier. Select Create to complete the process.

image

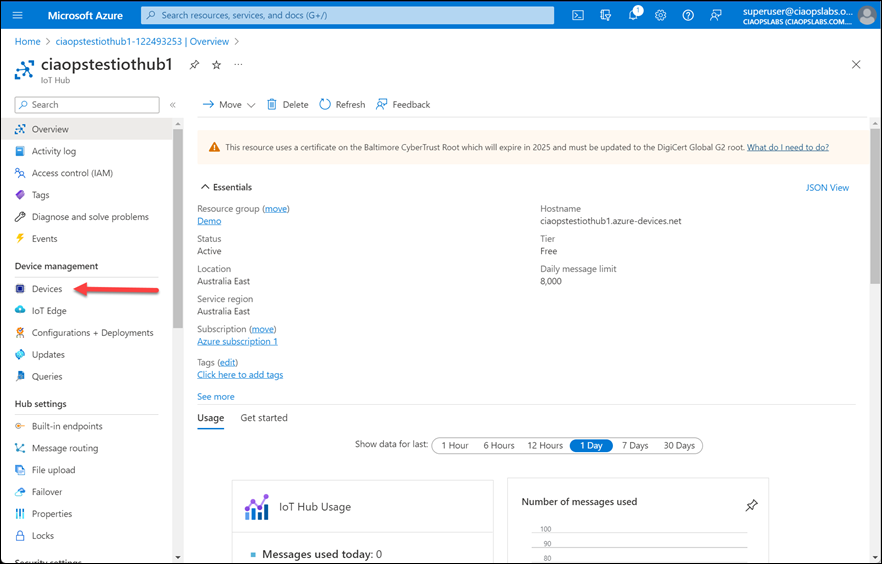
After a few minutes you should be able to see you IoT hub as shown above. Select Devices from the menu on the left.

image

Now select Add device from the menu on the right as shown above.

image

Give a the device a Name, and to keep things simple select Symmetric key for the Authentication type as shown. Ensure that the Auto-generate keys is select and that Connect this device to an IoT hub is set to Enable. Select Save to continue.

image

You should now see the device you just created listed as shown above. Select the name of the device to view it’s properties.

image

Here you will find the settings for your device. You’ll need to grab at least one Key and the matching Connection string to use when configuring your device.

With all of that information it’s time to head back and set up the device.

I have uploaded the code to get the device connected to Azure IoT hub here:

https://github.com/directorcia/Azure/blob/master/Iot/huzzah-iothub.ino

It is much more extensive that before and I will admit I am not yet 100% sure of what it all does but basically it connects the device to local Wifi then sends telemetry information to Azure IoT hub.

You’ll also need to have the file iot_config.h in the same directory when compiling your code. You can find an example of that here:

https://github.com/directorcia/Azure/blob/master/Iot/iot_configs.h

that file basically extracts all the unique security information like WiFi password, device keys and IoT Hub URL away from the main code. You’ll need to modify this file to suit your own environment before compiling.

The only other thing you’ll need to do is connect a single LED to pin 5 of the device to act as a diagnostic indicator. It will basically flash when data is sent to Azure IoT hub which gives a nice visual representation of something actually happening on the device.

image

When you compile the code you’ll also need to ensure all the appropriate libraries are available. Details of each of these is contained in the code.

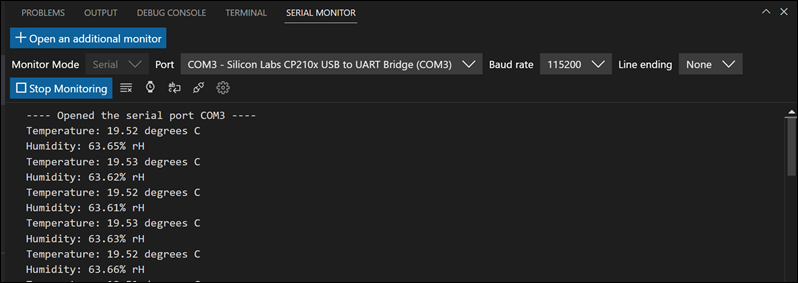
With the compiled code uploaded to the device you should see the LED light start to flash after a few seconds indicating that data is being sent. If you look at the serial port you should see diagnostic data like so:

image

If you then look at the Overview page in the Azure IoT Hub you should the diagnostics reporting a number of messages increasing over time like so:

image

You can also download a tool called the Azure IoT explorer which you will find here:

https://github.com/Azure/azure-iot-explorer/releases

image

When you configure this for your IoT hub environment and drill down into the Device then Telemetry, as shown above, should allow to see the actual information being sent.

So there you have it. Once you have set up an Azure IoT hub and added a device to it you can grab the connection details and plug them into the code you use to configure your device. You can also use the Azure IoT Explorer to get more granular details of what your device is doing.

The next challenge is now to get the device working with Azure IoT central.

Adafruit Huzzah Temperature senor

image

Last project was:

Input from button

Next up now is connecting the DHT20 temperature sensor to the Adafruit Huzzah. The idea is to read data from the sensor and display it via the serial output.

The wiring diagram is shown above and is pretty straight forward. The main thing is to get the pin functions for the sensor. All 4 pins needs to be connected. On the DHT20 pin 1 goes to the 3V output on Huzzah. Next, the DHT20 pin 2 goes to ground on the Huzzah.

The final 2 pins (SCL and SDA) are for serial communications. Thus, DHT20 pin 2 goes to the SCL connection on the Huzzah. Finally, pin 4 from the DHT20 goes to SDA on the Huzzah.

The code is also very straight forward and I found it here:

https://learn.adafruit.com/adafruit-aht20/arduino

and my version is at:

https://github.com/directorcia/Azure/blob/master/Iot/huzzah-tempsens.ino

To make this work you’ll also need to add the following the library:

Adafruit AHTX0

Once you combine all these elements you can compile the code and upload it to the Huzzah. Now, the Huzzah should produce a serial output that looks like:

image

which shows the temperature and humidity of the room.

A pretty simple one when it comes to capturing temperature and humidity.

The next challenge will be to getting data in and out of Azure.

Defender EASM adds billable assets blade

I’ve talked about the value of Defender EASM before:

Go get Defender EASM

image

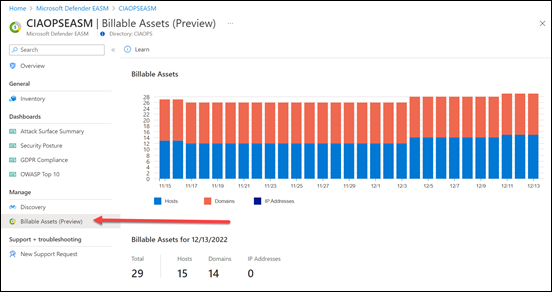
I now notice that there is a Billable assets option on the menu as shown above. Given that the costs for Defender EASM are based assets:

https://azure.microsoft.com/en-us/pricing/details/defender-external-attack-surface-management/

image

knowing exactly what those costs are is great.

As you can see in my environment I have about 29 billable assets equating to a grand total of:

29 x $0.0.17 per day = $0.49per day = $15.28 per month

As I maintain, Defender EASM is cheap for value it provides and now you can more easily track costs. (Don’t forget you also get a free 30 day trial!)

Need to Know podcast–Episode 292

The editorial for this episode is an always controversial topic on backing up Microsoft/Office 365. I am going to highlight some of the facts that, unlike what some say, Microsoft does indeed backup customer data and you’ll find all the links in the show notes.

This is the last episode before Christmas so thanks to all listeners for their support and I wish everyone a happy and safe time over the holidays. No break here, and I’ll be back with the latest news and updates again soon.

You can listen directly to this episode at:

https://ciaops.podbean.com/e/episode-292-microsoft-365-backup/

Subscribe via iTunes at:

https://itunes.apple.com/au/podcast/ciaops-need-to-know-podcasts/id406891445?mt=2

The podcast is also available on Stitcher at:

http://www.stitcher.com/podcast/ciaops/need-to-know-podcast?refid=stpr

Don’t forget to give the show a rating as well as send me any feedback or suggestions you may have for the show.

This episode was recorded using Microsoft Teams and produced with Camtasia 2022.

Brought to you by www.ciaopspatron.com

Resources

@directorcia

@directorcia@twit.social

Join my shared channel

CIAOPS merch store

Become a CIAOPS Patron

CIAOPS Blog

YouTube edition of this podcast

Use Access policies to require multiple administrative approvals

Introducing enhanced company branding for sign-in experiences in Azure AD

Office 365 company branding requirements have changed

New Admin Center Unifies Azure AD with Other Identity and Access Products

New Layout Options for OneNote on Windows are coming soon

Introducing Microsoft Teams Premium

Announcing new removable storage management features on Windows

Microsoft Defender for Cloud Apps data protection series: Understand your data types

Microsoft Security Product Reviews: Give product feedback & get rewarded!

Backup

Revisiting some facts around Microsoft 365 backup

Do you need to backup Office 365?

Microsoft policy on backup (Sept 2022)

“Additionally, each service has established a set of standards for storing and backing up data, and securely deleting data upon request from the customer.”

The Essential 8 Security guidelines

Search essential 8

External email indicator needs refinement

A while back I wrote about how you can enable

Native external sender notifications in Exchange Online

which is a great security enhancement. However, now I’m beginning to see some push back from SMB customers.

Why? Well, if you take a look at my inbox you can probably see why:

image

Most of my emails comes from external contacts, and only one is internal. That means I see the word ‘External’ a hell of a lot in my inbox. Many point out that this ‘External’ tag chews up a lot of precious screen real estate as it appears as a prefix in the From field during email preview..

image

The challenge is that if you disable the external sender notification you also lose the warning “The sender user@domain.com is from outside your organization’, which is very handy.

It would be handy if we had a bit more customisation for the ‘External’ tag in the Set-ExternalInOutlook command, that would perhaps allow the tag to be disabled in the email preview but retain the warning line when an email item is full opened. I think that would work much better for SMB and many others also.

Hopefully, someone can let the appropriate people at Microsoft know that SMB users in particular are beginning to request this very important security feature be disabled to save screen real estate. That is a very bad thing I would suggest given the importance of email security, especially in SMB. However, I think Microsoft does need to look at this ‘External’ tag in light of the SMB experience, where there are more external than internal senders and screen real estate is at a premium.