Script to check mailbox settings

image

I’ve just uploaded a new PowerShell script to my Github repository, which you can find here:

https://github.com/directorcia/Office365/blob/master/o365-mx-check.ps1

This one will cycle through all the mailboxes you have and then report back the status as you can see above. Basically, anything in red is bad (i.e. have POP3 and IMAP enabled as well as an email forward) and green is good (like have Litigation Hold and Archive enabled).

The script doesn’t make any changes to the mailboxes it basically just reports back the status so you can see what is configured and what is not. You can adjust the variables like log and deleted item limits to suit your needs but they are set at the default levels of the tenant (which should be generally increased).

Ensure you check back over time as I improve the scripts and don’t forget to check the others that I have available there.

August Office 365 Webinar Resources

Slides from this month’s webinar are at:

https://www.slideshare.net/directorcia/august-2018-office-365-need-to-know-webinar 

If you are not a CIAOPS patron you want to view or download a full copy of the video from the session you can do so here:

http://www.ciaopsacademy.com.au/p/need-to-know-webinars

Watch out for next month’s webinar.

Initial setup of an Office 365 PowerShell environment

Here’s a video I did to help people set up their PowerShell environment to support Office 365 and Microsoft 365 environments.

You’ll see how to install the various modules on a Windows 10 desktop as well as how to configure the environment and run scripts.

Once you have all this set up, of course, you can visit my Github repository at:

https://github.com/directorcia

and grab all the scripts I have there for Office 365 and Azure. Why re-invent the wheel I say? just use what is already there fore free.

Hopefully, this will enable you to get started using scripting to managing your Microsoft Cloud environment.

Need to Know Podcast–Episode 188

I’m joined in this episode by a regular guest on the podcast, Jeff Alexander from Microsoft, to speak about modern identity in the cloud. We focus on the role that Azure Active directory can play in your organisation and how it can be used to protect users identity. If you are looking to understand how to better manage user security using the cloud, then look no further. Before this however Brenton and I cover all the latest Microsoft Cloud news for you to ensure you are up to date with the latest.

Take a listen and let us know what you think –feedback@needtoknow.cloud

You can listen directly to this episode at:

https://ciaops.podbean.com/e/episode-188-jeff-alexander/

Subscribe via iTunes at:

https://itunes.apple.com/au/podcast/ciaops-need-to-know-podcasts/id406891445?mt=2

The podcast is also available on Stitcher at:

http://www.stitcher.com/podcast/ciaops/need-to-know-podcast?refid=stpr

Don’t forget to give the show a rating as well as send us any feedback or suggestions you may have for the show.

Resources

@jeffa36

@contactbrenton

@directorcia

How Azure AD is run

Guides for consuming Azure AD workloads

Gartner magic quadrant

Piviledged Accounts

Enable subscription management in your tenant

Password spray attacks

Password Guidance

Security best practices

Azure AD Conditional access

Azure AD identity protection

Microsoft has new plan for managing Windows 10 devices

Office 365 anti spoofing

Not Petya cyberattack

OneDrive camera upload for OneDrive for Business on iOS

Microsoft Teams Australian data residency announced

Microsoft underwater data centers

Azure DNS 100% availability

Microsoft Ignite sessions

Office 365 Alert activity options

Recently I wrote an article about setting an alert for file download in Office 365. This is just one of many alert conditions you can configure in Office 365 here:

image

Here is a list of all the conditions you can set and more details on each.

Common user activities
     – User submitted email = User reported a problem with mail filtering. This can include false positives, missed spam, or missed phishing email messages.
     – Detected malware in files = Office 365 detected malware in either a SharePoint or OneDrive file.
     – Shared file or folder = User shared or granted access to a file or folder.
     – Create mail forward/redirect rule = User created an inbox rule to forward or redirect mails.
     – Any file or folder activity = User performed any file or folder activity.
     – Change file or folder = User deleted, modified or renamed a file or folder.
     – Shared file externally = User shared, granted access of a file or folder to an external user, or created an anonymous link for it.
     – Granted Exchange admin permission = User granted admin permission to same or another user.
     – Granted mailbox permission = User granted permission for same or another user to access a target mailbox.
     – External user file activity = An external user accessed, modified, deleted, modified or checked in a file.
     – DLP policy match = A data loss prevention policy match is detected.
    
File and folder activities
     – Accessed files = User or system account accesses a file
     – Checked in file = User checks in a document that they checked out from a document library
     – Checked out file = User checks out a document located in a document library. Users can check out and make changes to documents that have been shared with them
     – Copied file = User copies a document from a site. The copied file can be saved to another folder on the site.
     – Deleted file = User deletes a document from a site.
     – Discarded file checkout = User discards (or undos) a checked out file. That means any changes they made to the file when it was checked out are discarded, and not saved to the version of the document in the document library.
     – Downloaded files = User downloads a document from a site.
     – Modified file = User downloads a document from a site.
     – Move file = User moves a document from its current location on a site to a new location.
     – Renamed file = User renames a document on a site.
     – Restored file = User restores a document from the recycle bin of a site.
     – Uploaded file = User uploads a document to a folder on a site.
    
File sharing activities
     – Accepted access request = An access request to a site, folder, or document was accepted and the requesting user has been granted access.
     – Accepted sharing invitation = User (member or guest) accepted a sharing invitation and was granted access to a resource. This event includes information about the user who was invited and the email address that was used to accept the invitation (they could be different). This activity is often accompanied by a second event that describes how the user was granted access to the resource, for example, adding the user to a group that has access to the resource.
     – Created company shareable link = User created a company-wide link to a resource. company-wide links can only be used by members in your organization. They can’t be used by guests.
     – Create access request = User requests access to a site, folder, or document they don’t have permissions to access.
     – Created anonymous link = User created an anonymous link to a resource. Anyone with this link can access the resource without having to be authenticated.
     – Created sharing invitation = User shared a resource in SharePoint Online or OneDrive for Business with a user who isn’t in your organization’s directory.
     – Denied access request = An access request to a site, folder, or document was denied.
     – Removed a company shareable link = User removed a company-wide link to a resource. The link can no longer be used to access the resource.
     – Removed anonymous link = User removed an anonymous link to a resource. The link can no longer be used to access the resource.
     – Shared file, folder or site = User (member or guest) shared a file, folder, or site in SharePoint or OneDrive for Business with a user in your organization’s directory. The value in the Detailcolumn for this activity identifies the name of the user the resource was shared with and whether this user is a member or a guest. This activity is often accompanied by a second event that describes how the user was granted access to the resource; for example, adding the user to a group that has access to the resource.
     – Updated an anonymous link = User updated an anonymous link to a resource. The updated field is included in the EventData property when you export the search results.
     – Used an anonymous link = An anonymous user accessed a resource by using an anonymous link. The user’s identity might be unknown, but you can get other details such as the user’s IP address.

Synchronization events
     – Allowed computer to sync files = User successfully establishes a sync relationship with a site. The sync relationship is successful because the user’s computer is a member of a domain that’s been added to the list of domains (called the safe recipients list) that can access document libraries in your organization.
     – Block computer from syncing files = User tries to establish a sync relationship with a site from a computer that isn’t a member of your organization’s domain or is a member of a domain that hasn’t been added to the list of domains (called the safe recipients list)that can access document libraries in your organization. The sync relationship is not allowed, and the user’s computer is blocked from syncing, downloading, or uploading files on a document library.
     – Downloaded files to computer = User establishes a sync relationship and successfully downloads files for the first time to their computer from a document library.
     – Downloaded file changes to computer = User successfully downloads any changes to files from a document library. This activity indicates that any changes that were made to files in the document library were downloaded to the user’s computer. Only changes were downloaded because the document library was previously downloaded by the user (as indicated by the Downloaded files to computer activity).
     – Uploaded files to a document library = User establishes a sync relationship and successfully uploads files for the first time from their computer to a document library.
     – Uploaded file changes to document library = User successfully uploads changes to files on a document library. This event indicates that any changes made to the local version of a file from a document library are successfully uploaded to the document library. Only changes are unloaded because those files were previously uploaded by the user (as indicated by the Uploaded files to document library activity).

Site administration activities
     – Added exempt user agent = Global administrator adds a user agent to the list of exempt user agents in the SharePoint admin center.
     – Added site collection admin = Site collection administrator or owner adds a person as a site collection administrator for a site. Site collection administrators have full control permissions for the site collection and all subsites.
     – Added user or group to SharePoint group = User added a member or guest to a SharePoint group. This might have been an intentional action or the result of another activity, such as a sharing event.
     – Allowed user to create groups = Site administrator or owner adds a permission level to a site that allows a user assigned that permission to create a group for that site.
     – Change exempt user agents = Global administrator customized the list of exempt user agents in the SharePoint admin center. You can specify which user agents to exempt from receiving an entire web page to index. This means when a user agent you’ve specified as exempt encounters an InfoPath form, the form will be returned as an XML file, instead of an entire web page. This makes indexing InfoPath forms faster.
     – Changed sharing policy = An administrator changed a SharePoint sharing policy by using the Office 365 Admin center, SharePoint admin center, or SharePoint Online Management Shell. Any change to the settings in the sharing policy in your organization will be logged. The policy that was changed is identified in the ModifiedProperty field property when you export the search results.
     – Created group = Site administrator or owner creates a group for a site, or performs a task that results in a group being created. For example, the first time a user creates a link to share a file, a system group is added to the user’s OneDrive for Business site. This event can also be a result of a user creating a link with edit permissions to a shared file.
     – Created send to connection = Global administrator creates a new Send To connection on the Records management page in the SharePoint admin center. A Send To connection specifies settings for a document repository or a records center. When you create a Send To connection, a Content Organizer can submit documents to the specified location.
     – Created site collection = Global administrator creates a new site collection in your SharePoint Online organization.
     – Deleted group = User deletes a group from a site.
     – Deleted sent to connection = Global administrator deletes a Send To connection on the Records management page in the SharePoint admin center.
     – Enabled document preview = Site administrator enables document preview for a site.
     – Enabled legacy workflow = Site administrator or owner adds the SharePoint 2013 Workflow Task content type to the site. Global administrators can also enable work flows for the entire organization in the SharePoint admin center.
     – Enabled Office on Demand = Site administrator enables Office on Demand, which lets users access the latest version of Office desktop applications. Office on Demand is enabled in the SharePoint admin center and requires an Office 365 subscription that includes full, installed Office applications.
     – Enabled RSS feeds = Site administrator or owner enables RSS feeds for a site. Global administrators can enable RSS feeds for the entire organization in the SharePoint admin center.
     – Enabled result source for People Searches = Site administrator creates or changes the result source for People Searches for a site.
     – Modified site permissions = Site administrator or owner (or system account) changes the permission level that are assigned to a group on a site. This activity is also logged if all permissions are removed from a group.
     – Removed user or group from SharePoint group = User removed a member or guest from a SharePoint group. This might have been an intentional action or the result of another activity, such as an unsharing event.
     – Renamed site = Site administrator or owner renames a site
     – Requested site admin permissions = User requests to be added as a site collection administrator for a site collection. Site collection administrators have full control permissions for the site collection and all subsites.
     – Set host site = Global administrator changes the designated site to host personal or OneDrive for Business sites.
     – Updated group = Site administrator or owner changes the settings of a group for a site. This can include changing the group’s name, who can view or edit the group membership, and how membership requests are handled.

Setting an alert for file download in Office 365

A very common request I see is people wanting to know when users have downloaded a file from SharePoint Online to their desktop. You can configure an alert to let you know when this does happen. However, I will provide a word of caution here. Remember, that alerting on this state could generate quite a number of alerts and finding the needle in that haystack can be a challenge. Thus, if you want to set these types of alerts, you should put as many filters on monitoring these activities so you don’t end up with a screen full of alerts and become overwhelmed.
image

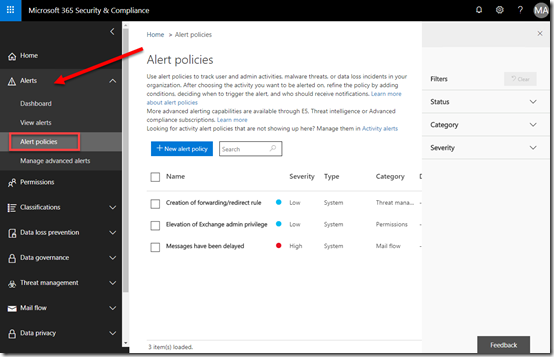
You’ll firstly need to navigate to the Security & Compliance center in the Office 365 web portal. You will also need to have the rights to do this.

Here you’ll need to expand the Alerts section on the left and then select the Alert Policies option from the items that appear.

image

On the right, you should see a list of the existing policies for the tenant.

Select the New alert policy button.

image

You’ll now be prompted to enter a Name for your policy, a Description, Severity and Category.

When complete, select the Next button at the bottom of the page.

image

On the next screen select the down arrow to the right of the Select an activity option to display a list of activities as shown above

Scroll down the list until you locate the Downloaded file option, which is under the File and folder activities heading, and select this.

image

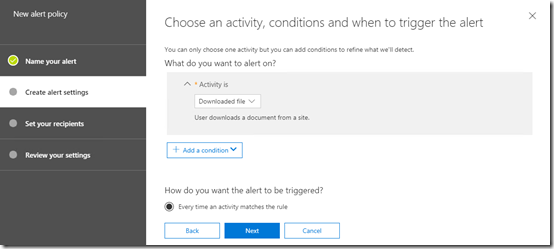
Below this you can select the Add condition button to filter your alert. This allows you to focus the alert to:

image

a specific IP Address (i.e. where the user is located) and/or

image

a specific user account and/or

image

a specific filename and/or

image

a specific site collection URL and/or

image

a specific file extension.

You want to take full advantage of these conditions to reduce the number of alerts you’ll receive. Thus, if you are only worried about a single user or perhaps a certain, put those conditions in now.
image

When complete, select the Next button at the bottom of the window.
image

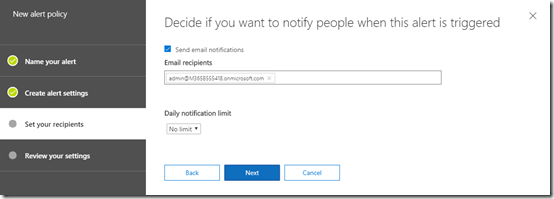
Now enter the email addresses of anyone you wish to receive notifications and ensure the Send email notifications option is set.

if you are expecting to receive lots of notifications (which is a bad idea) you may also wish to set the Daily notification limit.

Select the Next button at the bottom of the screen to continue.

image

Review the settings, make any changes and then select the Finish button. Generally, you will want to ensure the rule is enabled and turned on immediately.

image

You should now see that your policy appears in the list as shown above, and that it is enabled.

You can edit the policy simply by selecting it from this list.

image

Now, when a file is downloaded you should receive an email notification as shown above (assuming you have enabled email notifications of course).

You can get more details about the alert by selecting the Investigate button in the email.

image

Doing so will take you back to the Security & Compliance center and display the alert as shown above.

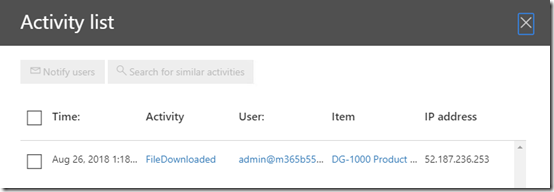
If you select the View activity list link you will get more details on the activity that triggered the alert.
image

When I do this I can see the time and date, activity, users, item, IP address and so on in a list as shown above, many of which are also hyper linked so you can get more detail.

image

Select the Item hyperlink, you will see the above screen and in this case see that the item downloaded was a PowerPoint file for the Marketing site collection.

image

You can return to this list of Alerts and see this item as shown above. Throughout this process please appreciate that alerts make take a few minutes to appear in emails, notifications and lists, so be patient.

You can select the alert item to drill back into the activity of you need to at any time.

image

You can also change the status of the alert to help your determine what items have been resolved. Simply change the status to suit and then Save the alert. You can always view alerts by changing the filtering options on the overview page.

There are many different types of alert policies you can set here and you therefore need to judicious in how you configure these. Too many alerts is just as bad as too few alerts so ensure you make them as specific as you can to avoid overload.

You can of course always create alert and leave them disabled until you need them activated.

Remember, there are only a few system alerts configured by default in most tenants. If you want more than these, then you need to go in and configure what you need.

I’m puzzled by new-protectionalert

Microsoft is transitioning Office 365 Activity Alerts which I have talked about configuring here with PowerShell:

Create Office 365 Activity Alerts using PowerShell

to Alert Policies which you can see in the console here:

image

You will notice that I have been able to go in and create two of my own alerts (test and Test 2). I did this via the web console. I performed this web console configuration on a Microsoft 365 Business tenant.

Working with the web console is the slow way to get things done. PowerShell is best practice if you want to do things quickly and make them repeatable.

My thinking was, if I can configure these alerts in the web console I “should” also be able to that in PowerShell.

Initially, I thought you could using this new PowerShell command:

new-protectionalert

Now the information for this actual command is a bit sparse but I started working backwards from the alerts I created in the web console.

image

As you can see from the above, when I was able to work out a command that seemed to execute I was greeted with the error:

Creating advanced alert policies requires an Office 365 E5 subscription or Office 365 E3 subscription with an Office 365

Threat Intelligence or Office 365 EquivioAnalytics add-on subscription for your organization. With your current subscription, only single event alert can be created.

which seems to indicate I don’t have the license, but yet I can create what I believe to be an identical alert in the web console. Basically, I just want an alert when someone marks an email as “Phish”.

image

In Powershell I’m using the parameter:

-filter “Activity.SubmissionType -eq ‘Phish'”

which would seem to me to be the same thing. Yet, I’m told that I don’t have the right license??

In the end, I want to create a PowerShell script that allows me to configure these commands so that they can be easily applied. Currently, at the moment, I’m a bit confused on how to exactly achieve this.

CIAOPS Need to Know Azure Webinar–August 2018

pexels-photo-325229

This month I’m going to take a closer look at one of the automation options in Azure, JSON templates. I’ll show you what they are, how they are created, what the parameter and how to use them in your deployments.

August Azure Webinar Registrations

The details are:

CIAOPS Need to Know Azure Webinar – August 2018
Wednesday 29th of August 2018
2pm – 3pm Sydney Time

All sessions are recorded and posted to the CIAOPS Academy.

There of course will also be open Q and A so make sure you bring your questions for me and I’ll do my best to answer them.

The CIAOPS Need to Know Webinars are free to attend but if you want to receive the recording of the session you need to sign up as a CIAOPS patron which you can do here:

http://www.ciaopspatron.com

or purchase them individually at:

http://www.ciaopsacademy.com/

Also feel free at any stage to email me directly via director@ciaops.com with your webinar topic suggestions.

I’d also appreciate you sharing information about this webinar with anyone you feel may benefit from the session.