End to End email protection with Microsoft 365–Part 1

image

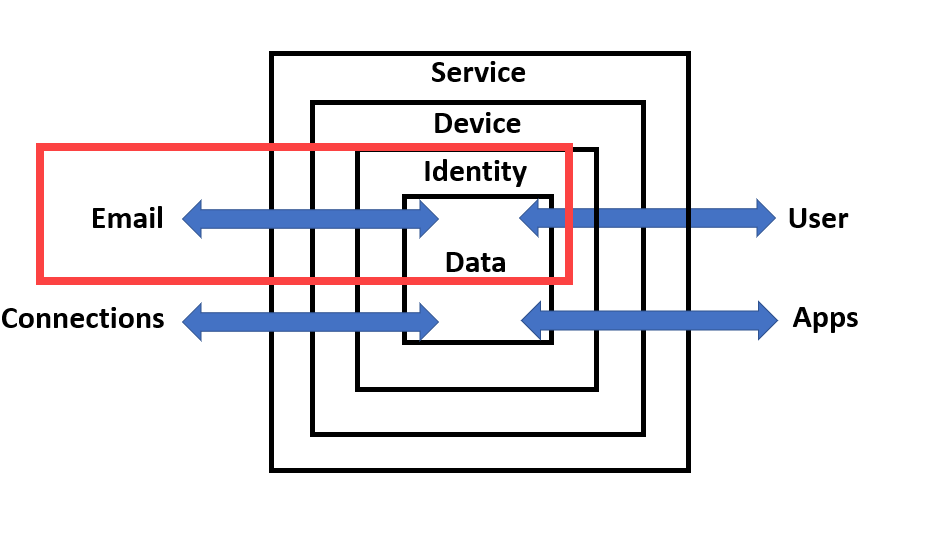
I’ve talked about the

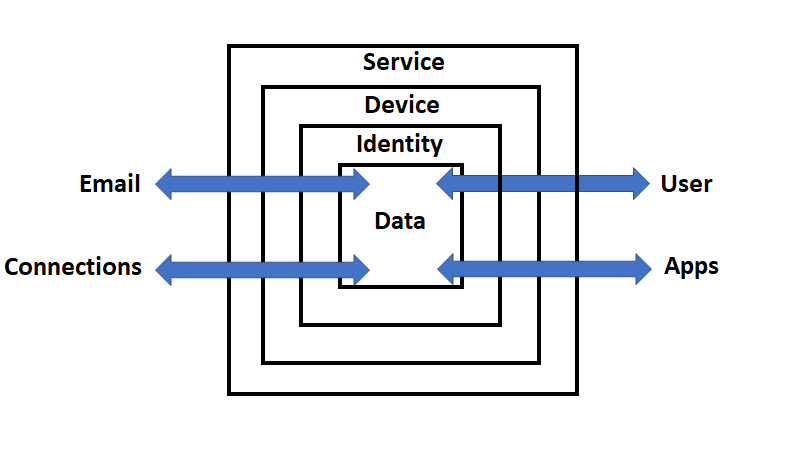
CIAOPS Cyber protection model

before and you can see it above.

image

Now it is time to start applying it directly to Microsoft 365 to help understand the security Microsoft 365 provides and what can be configured to provide enhanced security.

image

I’ve therefore started by breaking the Email connector from my model into two components, Inbound and Outbound, as shown above. The left hand side (outside the box) is the Internet, while inside the box on the right hand side, is Microsoft 365.

Outside the box, on the Internet, there are three user configurable items: SPF, DKIM and DMARC. You’ll see arrow from these three items away and further into the Internet as well as back into the Microsoft 365 service. This is because these three DNS records will affect both sent and received emails and should be considered the first item on your email security check list. Some articles that may help on this include:

SPF, DKIM, DMARC and Exchange Online

Set up SPF to help prevent spoofing

Support for validation of DKIM signed messages

Use DKIM to validate outbound email sent from your custom domain

Use DMARC to validate email

When others send email to Microsoft 365, the following articles may help:

Sending mail to Microsoft 365

Services for non-customers sending mail to Microsoft 365

Inbound email is received into Microsoft 365 via Exchange Online. A component of this service is Exchange Online Protection (EOP).

Exchange Online Protection overview

EOP features

Inbound emails

The first stage of a message progressing through Exchange Online Protection is for it to traverse the Edge Protections as shown above. These are basically policies and configuration managed and maintained by Microsoft. A user is unable to alter them but information about these can be found at:

Use Directory Based Edge Blocking to reject messages sent to invalid recipients

Backscatter in EOP

How EOP validates the From address to prevent phishing

It is important to note that DNS records like SPF play an important role in helping secure email data, which is why it is important to configure them.

How Microsoft 365 uses Sender Policy Framework (SPF) to prevent spoofing

After the Edge Protection phase is complete, any inbound email is then sent to Exchange Online Protection (EOP) for further processing. It is here that there are many policies and settings that can be configured by the user. The sequence in which these take place can be found here:

Order and precedence of email protection

Generally, first to be processed is the Connection filtering.

Configure connection filtering

Then Malware filtering.

Configure anti-malware policies in EOP

Then Transport rules.

Mail flow rules (transport rules) in Exchange Online

Next are any Data Loss Prevention (DLP) policies.

Data Loss prevention

Spam filtering follows.

Anti-spam protection in EOP

Configure anti-spam policies in EOP

Anti-spam message headers in Microsoft 365

Bulk complaint level (BCL) in Exchange Online Protection EOP

Finally inbound email will be checked for phishing and spoofing.

Anti-phishing policies in Microsoft 365

Configure spoof intelligence policy

After all these the inbound email will continue to be processed by any additional protection options and features like Defender for Office 365 which will be covered in an upcoming article, so don’t think that email protection stops with EOP, it continues with Defender for Office 365 right through to the email app on the device which will all be covered in upcoming articles.

Outbound emails

If we now turn our attention to outbound emails and work from right to left, along the bottom arrow, we see that the email has a lot less policies to travel through. The main one is the Outbound spam filter.

Configure outbound spam filtering in EOP

However, it will also go through the DLP policy:

Data Loss prevention

and then Transport rules:

Mail flow rules (transport rules) in Exchange Online

You can also use

Message Encryption

if you wish to protect the contents of emails sent from Microsoft 365.

Summary

Remember, what is covered here is only the first part of the full range of protection capabilities that Microsoft 365 provides for emails. You will also see that a significant amount of these capabilities provide the ability of customisation. For the items that are user configurable in the diagram, a good rule of thumb is to implement and configure from left to right, top to bottom. Once you have all that done, then you can move onto the next stage which will be covered in the next article on this topic.
End to End email protection with Microsoft 365 – Part 2

New Exchange Policy Configuration analyzer

image

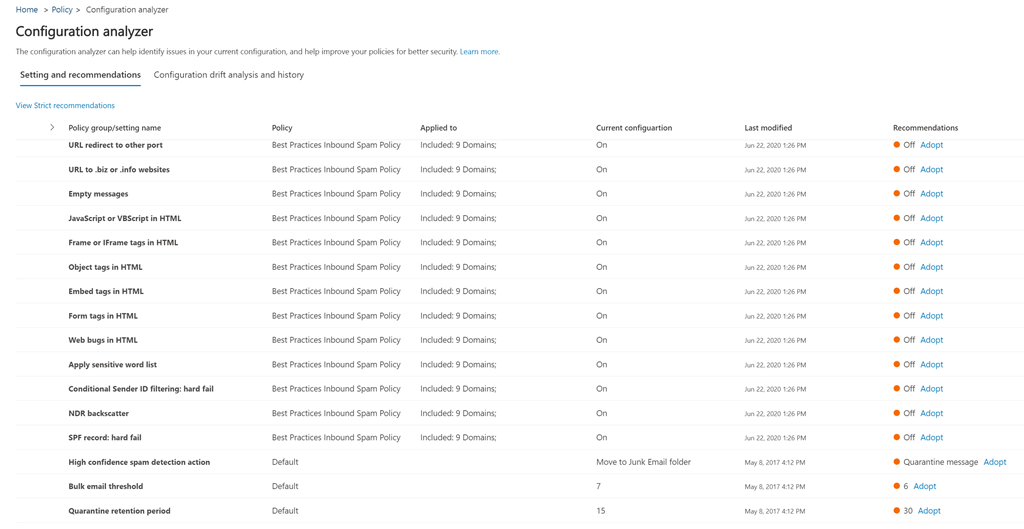
If you have a look in your Threat Management policies in Security and Compliance you’ll see a new tile called Configuration Analyzer as shown above. The direct URL is:

https://protection.office.com/configurationAnalyzer

image

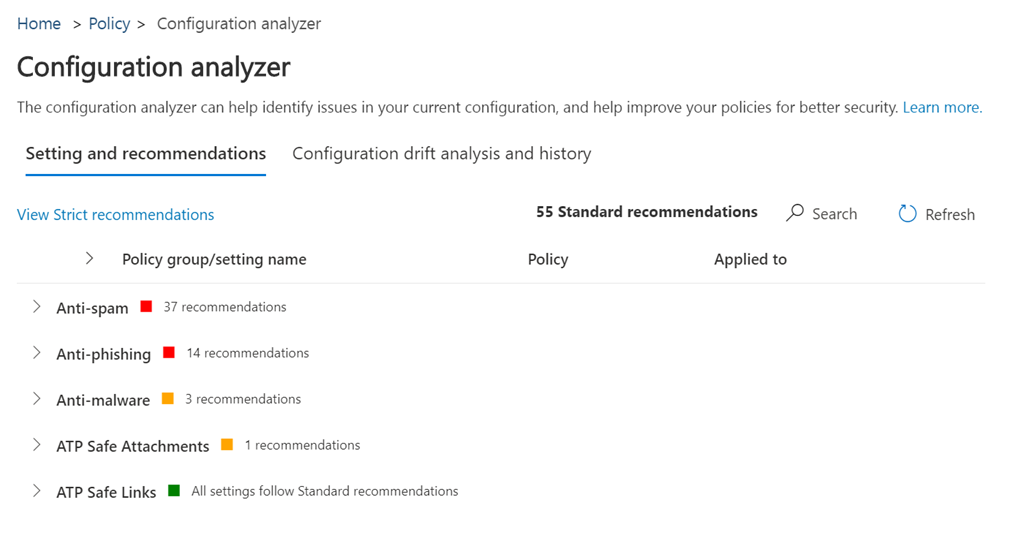
When you select this tile you’ll see a screen like that shown above which compares your current policy settings to Microsoft best practices.

image

If you expand any of the headings you’ll the settings in question and what the recommendation is on the right. You’ll also see a link that allows you to easily Adopt this setting.

image

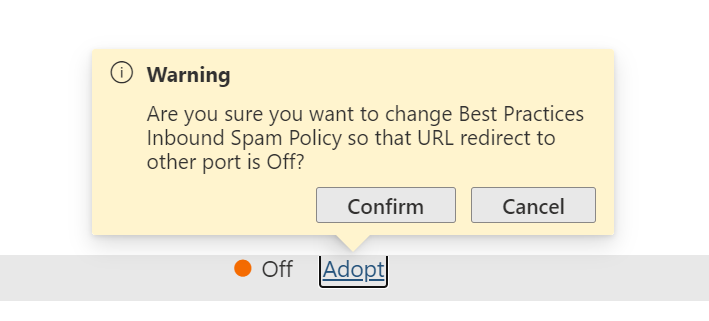
If you do select the Adopt link, you’ll be presented with the above warning asking you whether you wish to proceed and Confirm or Cancel the change.

image

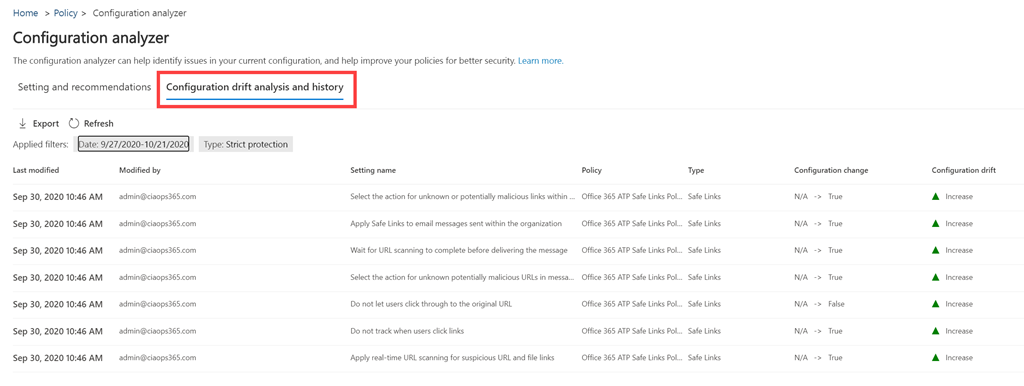
You will also see a Configuration drift analysis and history option as shown above. This allows you to compare changes in configuration over time and their effect. Basically, whether changes made improve email security or not.

If you want to learn more about Microsoft’s best practice configurations I suggest you take a look at my previous article:

New templated email policies

I see this as a further step towards what I spoke about here:

The changing security environment wit Microsoft 365

and how Ai will soon do all this automatically.

New templated email policies

image

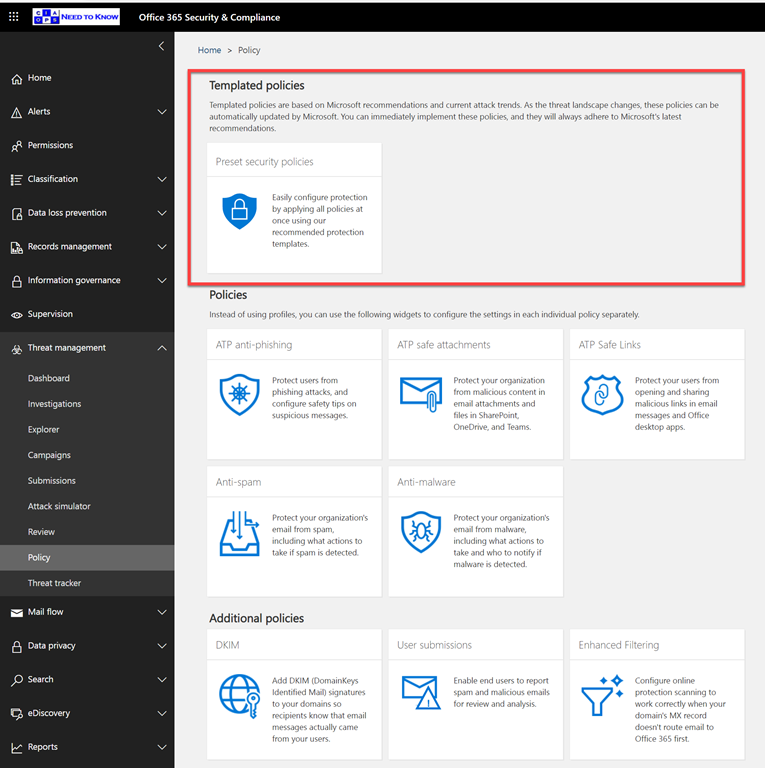
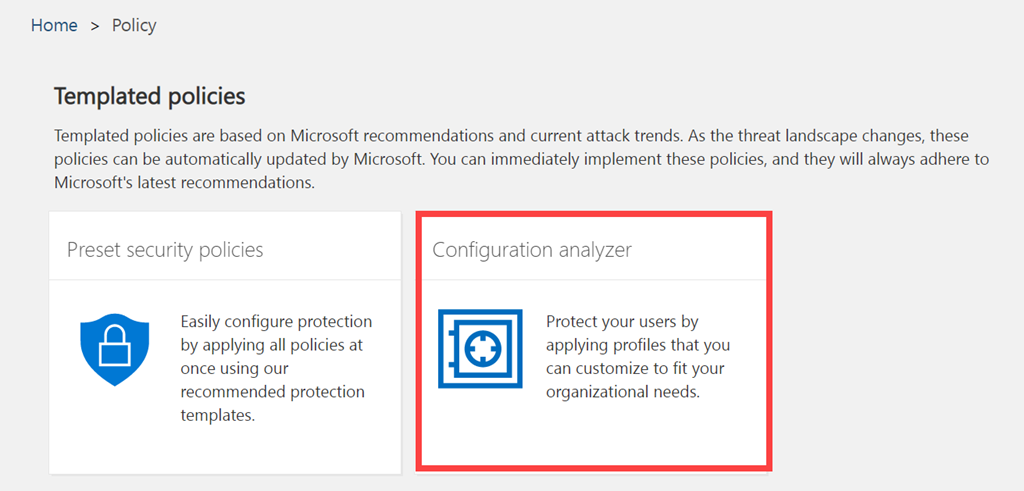
If you dip into your Microsoft 365 Security and Compliance Center, then into Threat Management and then into Policy as shown above you might some new Templated policies.

image

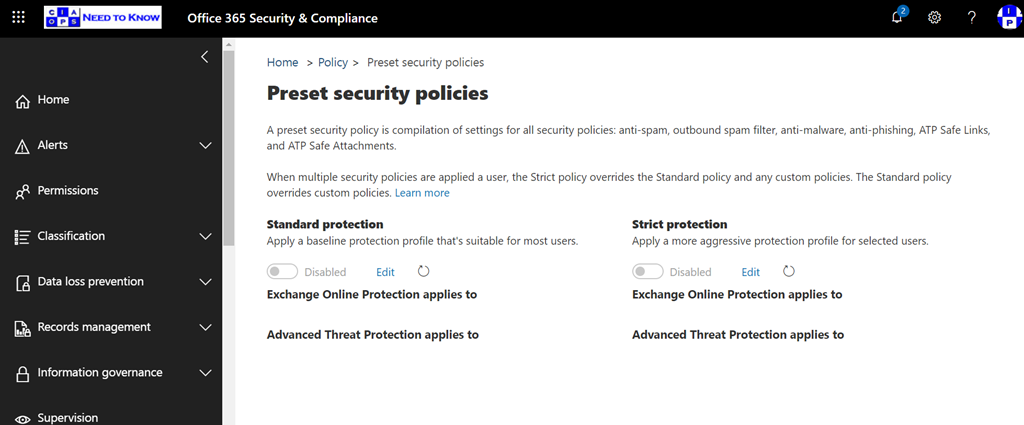
This will allow to select from two ‘best practices’ policies for your email protection from Microsoft. There is a standard and a Strict protection option.

You’ll find details about these here:

Preset security policies in EOP and Office 365 ATP

and if you want to know the low level settings that use you can find that here:

Recommended settings for EOP and Office 365 ATP

At the moment they are not enabled by default, but I can see the day when at the least the Standard template will be applied to all new tenants.

Of course, these are just a starting point for securing your email environment in but I certainly recommend that you do start with these templates because they apply a lot of best practices quickly and easily. They also configure not just Exchange Online but also Office 365 Advanced Threat protection (ATP) if that is part of the tenant.

Get-Formatdata issues when connecting to Exchange Online with PowerShell

*** Update 10 July 2020. This is a back end service issue that Microsoft is working on to resolve. See the following for more details – https://techcommunity.microsoft.com/t5/exchange/error-when-connecting-to-exchange-online-vis-powershell/m-p/1512141#M5466

image

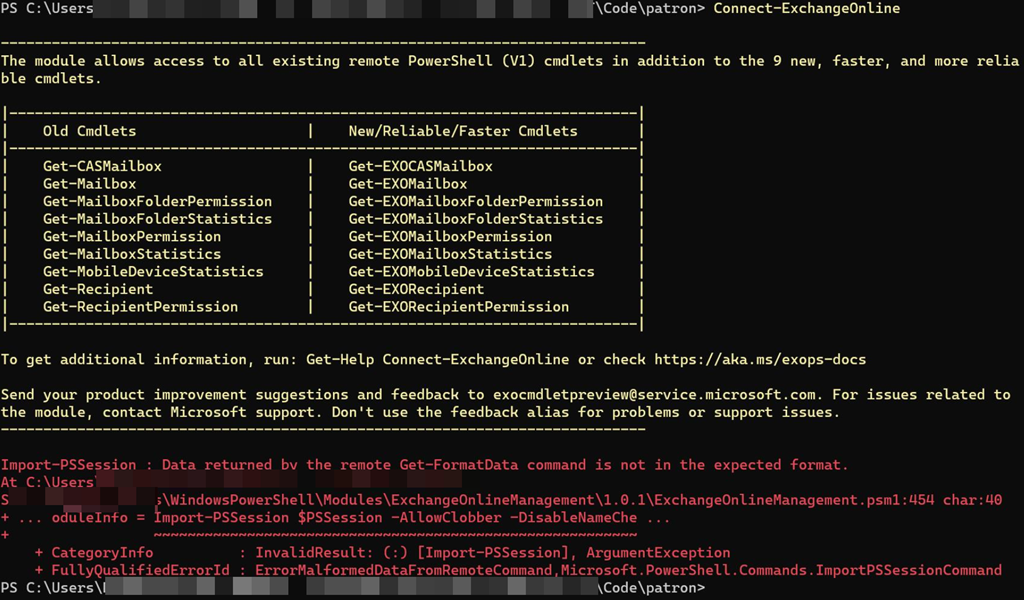
To connect to Exchange Online with PowerShell you simply type a command like:

connect-exchangeonline

as shown above. This “should” work with Exchange Online PowerShell V2. However, as you can also see from the above screen shot this generates the following error on a number of tenants:

Import-PSSession : Data returned by the remote Get-FormatData command is not in the expected format

This therefore, prevents you from connecting to Exchange Online via PowerShell.

Interestingly, you get the same issue if you use the older method of connecting to Exchange Online via PowerShell (aka V1) to those same specific tenants. It is also independent of the device you use to connect, updates, etc. It seems to be tied to only a limited number of tenants for some reason.

image

The fix for now is to specify the –delegatedorganization parameter with the full .onmicrosoft.com user identity. When you do that, to exactly the same tenant, you can gain access as shown above without an error.

So, if you need access use:

connect-exchangeonline –delegatedorganization <tenantname>.onmicrosoft.com

and you should be able to gain access. The problem is that this is ok for interactive sessions but if you already have bulk automated scripted in place that don’t use this then it is painful to start changing these just to accommodate a ‘limited’ number of affected tenants.

I am chasing down some leads to try to determine a reason for this and hopefully find a resolution soon.

Configure new Edge to allow Exchange PowerShell MFA module download

One of the challenges with MFA and PowerShell is that you need to basically go into the Exchange management console and download a special PowerShell module that supports MFA. The need for that MFA module when connecting to Exchange Online with PowerShell is largely being negated by using the Exchange Online PowerShell V2 module (yeah). However, if you want to connect to the Security and Compliance center online with PowerShell and MFA you are still going to need to install this special module MFA from the Exchange Admin center in the portal (damm).

image

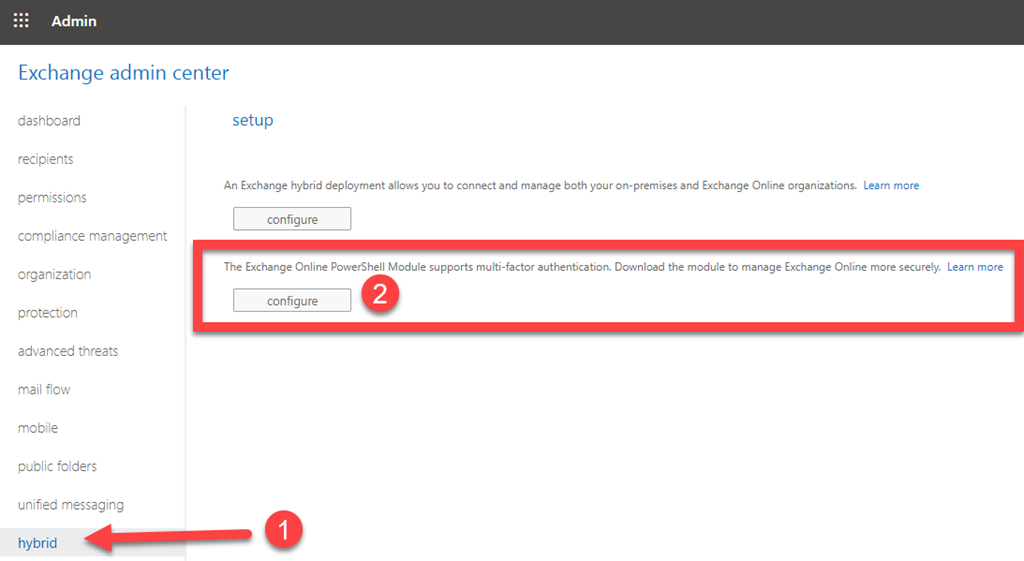
To do this, you’ll need to navigate to the Exchange admin center as shown above and select Hybrid from the items on the left. you’ll then need to select the lower option that is then displayed on the right hand side, which allows you to download the special MFA PowerShell module.

That should commence an automated download for you. This automated download “should” work in both the older Internet Explorer and the new Edge (chromium based) browser.

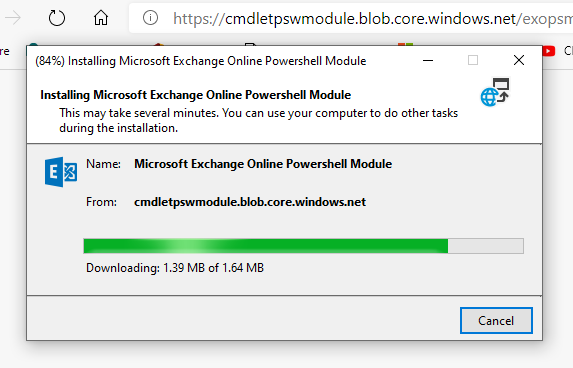
image

That download process should look something like what is shown above. However, if for some reason you can’t get it working with the new Edge (chromium based) browser navigate to:

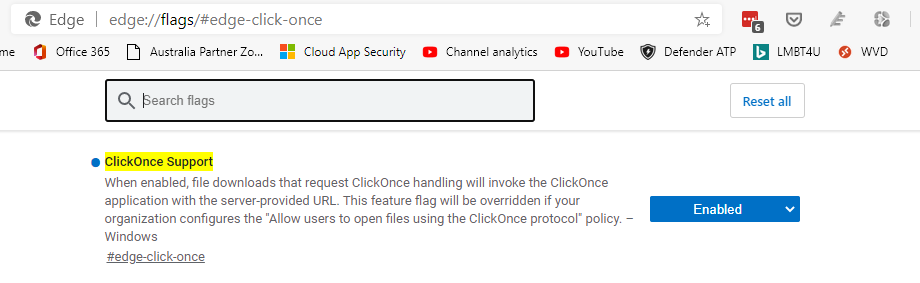
edge://flags/#edge-click-once

image

and Enable the ClickOnce Support option as shown above, if not already enabled. Most of the time it is set as Default, which you will need to change to allow the download to commence.

The browser will need to reload, but after that you should able to run the file in the Edge (chromium based) browser to get the Exchange Online MFA module installed on your local machine.

Exchange Online mailbox check script update

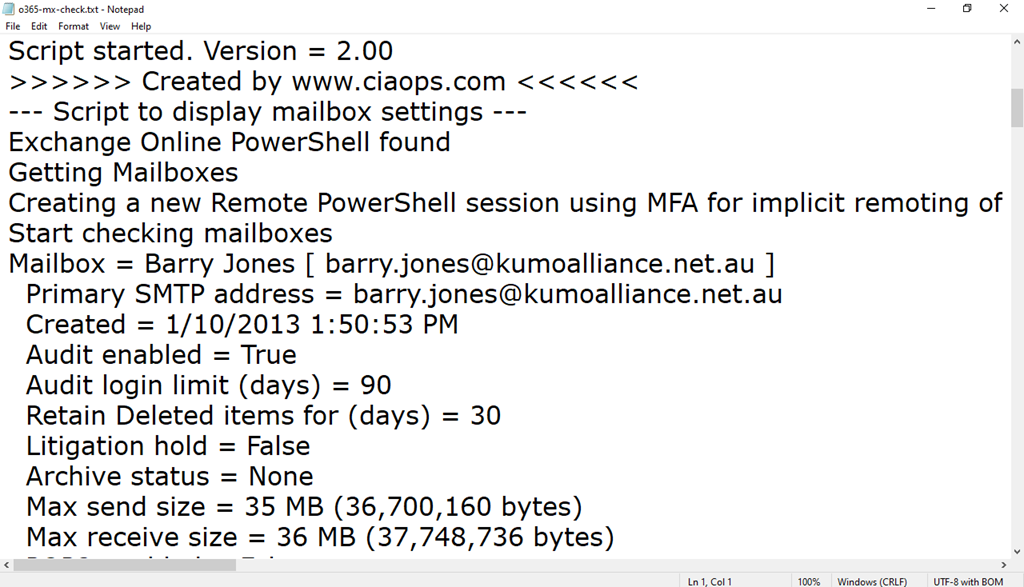
I have just updated another of the free PowerShell scripts I provide on Github. This time o365-mx-check.ps1 has been given an update. You will find it here:

https://github.com/directorcia/Office365/blob/master/o365-mx-check.ps1

1. Prior to running the script you will have needed to install the Exchange Online PowerShell module. To set up your PowerShell environment I suggest you check out:

2. Connect to Exchange Online with PowerShell. For that I recommend you use my script:

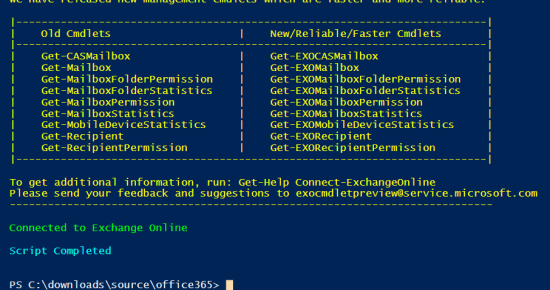
That should result in you being connected to Exchange Online PowerShell as shown above.

Once you have your PowerShell environment setup, you simply run the o365-mx-check.ps1 script at the PowerShell prompt.

image

After checking that the Exchange Online PowerShell module is loaded and connected, the script will loop through all the mailboxes in your tenant.

image

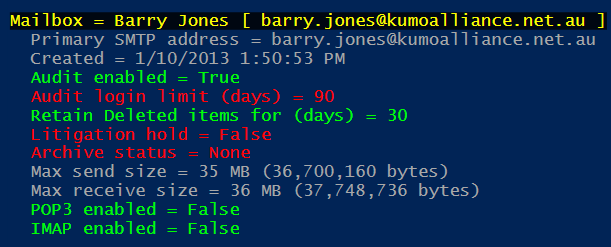
For each mailbox it will check and display a number of settings as shown above including:

  • Users Display name and principal name
  • The primary outbound email address the mailbox uses
  • When the mailbox was created
  • Whether auditing is enabled for the mailbox
  • What the maximum age limit of audit log entries for the mailbox
  • Deleted items retention period
  • If Litigation Hold is enabled
  • If mailbox archiving is enabled
  • The maximum message send size
  • The maximum message receive size
  • If POP3 is enabled for the mailbox
  • If IMAP is enabled for the mailbox

Items that are not best practices will be highlighted in red for your attention as shown above.

By default, these results will only display on the screen, however if you specify the optional –CSV parameter when you run the script like:

.\o365-mx-alert –csv

A CSV file with the output will be created in the parent directory.

image

You will see the name of the CSV created at the end of the script as shown above.

image

Each CSV file is timestamped to ensure that a unique file will be created each time the script is run.

A log file, o365-mx-alert.txt is also created in the parent directory as well on each run.

image

The log file will be overwritten each time the script is run.

Thus, the o365-mx-check.ps1 script has 1 optional parameter, that can be used:

-csv = output all logs for period to a CSV file in the parent directory. A new CSV file is created for each script execution

The script will also produce a log file (o365-mx-check.txt) in the parent directory, that is overwritten on the each run of the script.

You will find this script and all my publicly available scripts at:

http://github.com/directorcia

Don’t forget to check back there regularly for updates. Also, if you have any feedback or suggestion on this script or what you’d like to see me create, please let me know. I also maintain a large array of additional scripts via a paid subscription. More details of that can be found at www.ciaopspatron.com.

Need to Know podcast–Episode 241

FAQ podcasts are shorter and more focused on a particular topic. In this episode I’ll talk about the importance of checking your inbound Exchange Online policies to improve security.

This episode was recorded using Microsoft Teams and produced with Camtasia 2019

Take a listen and let us know what you think – feedback@needtoknow.cloud

You can listen directly to this episode at:

https://ciaops.podbean.com/e/episode-241-check-your-exchange-online-policies/

Subscribe via iTunes at:

https://itunes.apple.com/au/podcast/ciaops-need-to-know-podcasts/id406891445?mt=2

The podcast is also available on Stitcher at:

http://www.stitcher.com/podcast/ciaops/need-to-know-podcast?refid=stpr

Don’t forget to give the show a rating as well as send us any feedback or suggestions you may have for the show.

Resources

CIAOPS Patron Community

Configure SPAM policies in EOP

@directorcia

Audio

Microsoft 365 mailbox reporting issue

image

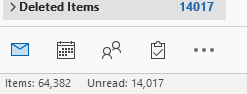
If I look at my mailbox I see a total of 64,382 items in the deleted items as shown above.

image

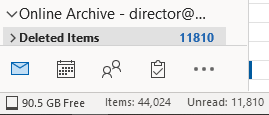
If I then look at my Online Archive I see 44,024 items in the archived deleted item as shown.

This means I have 64,382 + 44,024 = 108,406 items in total in my deleted items.

image

If I however run the Exchange Online PowerShell module v2 command as shown above,

get-exomailboxstatistics

it only reports 11,865 items??

image

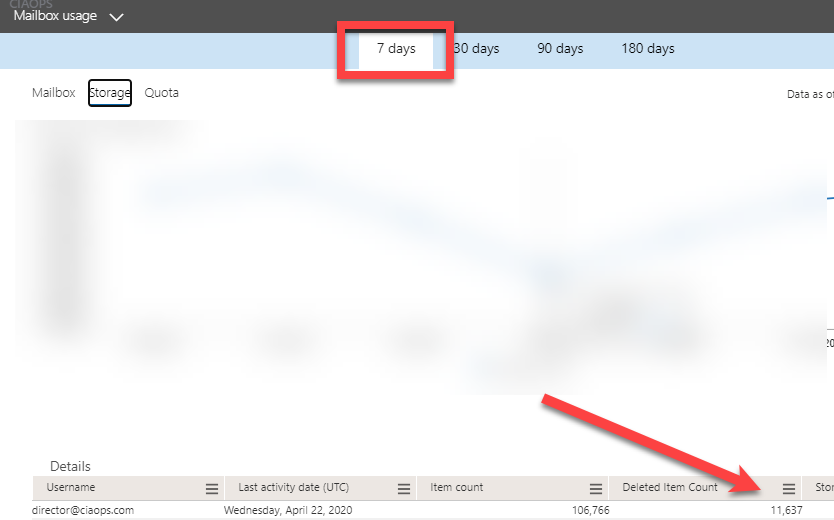
If I look at the Mailbox usage statistics in the Microsoft 365 Admin center reports for 7 days I see 11,637 as the deleted item amount.

image

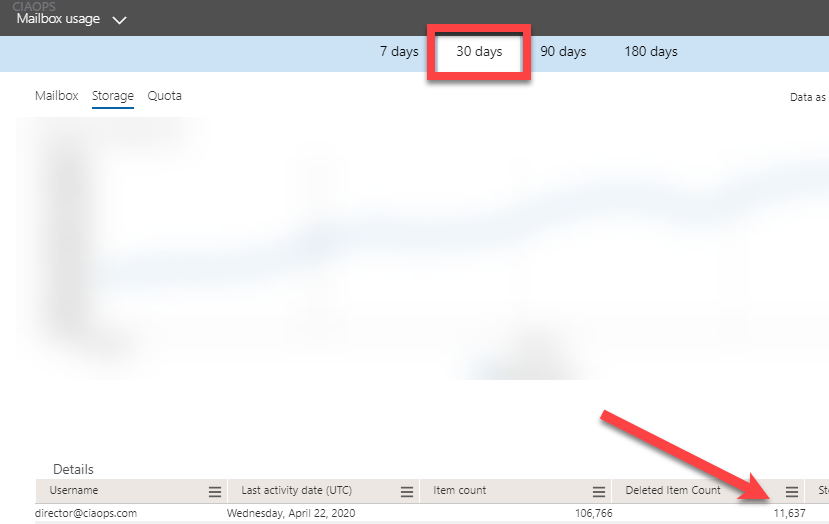
If I look at the Mailbox statistics in the Microsoft 365 Admin center reports for 30 days I see 11,637 as the deleted item amount. The same number as for 7 days.

image

image

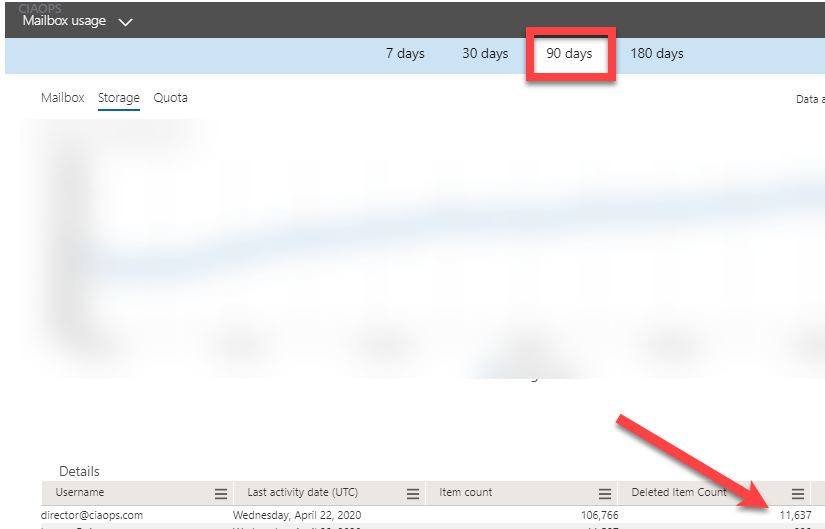
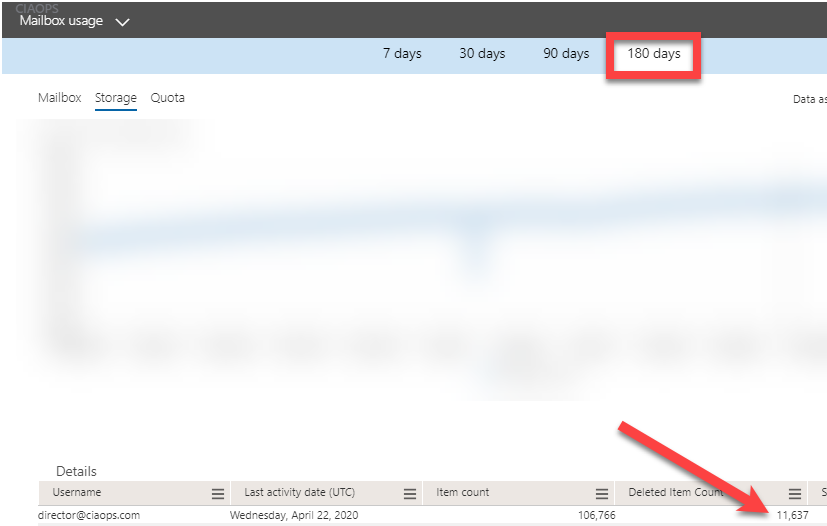
Both 90 and 180 day options reveal the same results, Deleted Item Count = 11,637? Why?

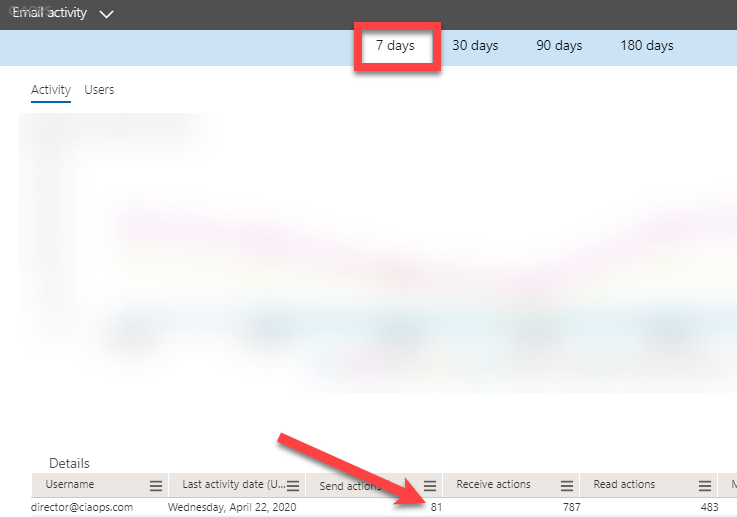
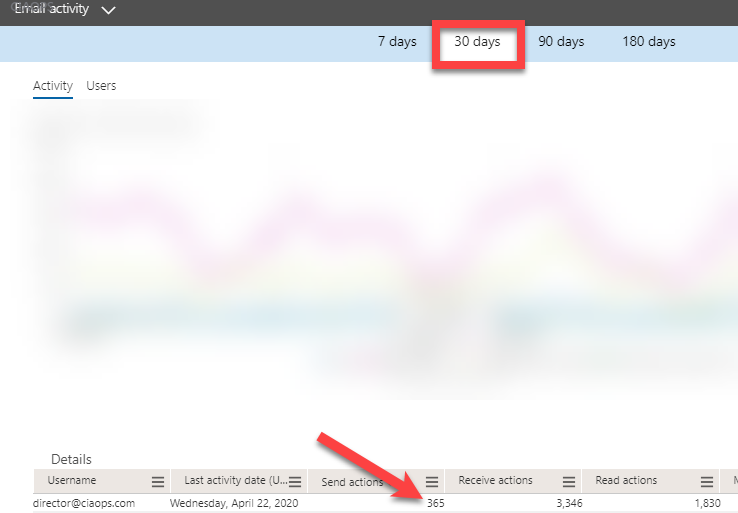
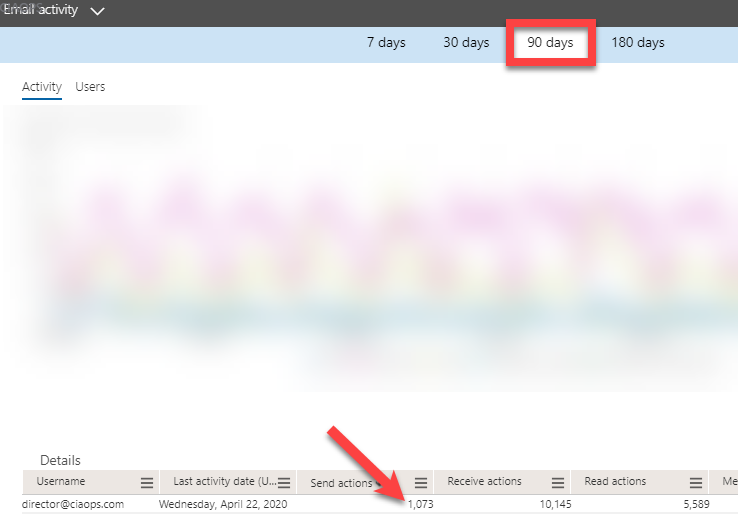
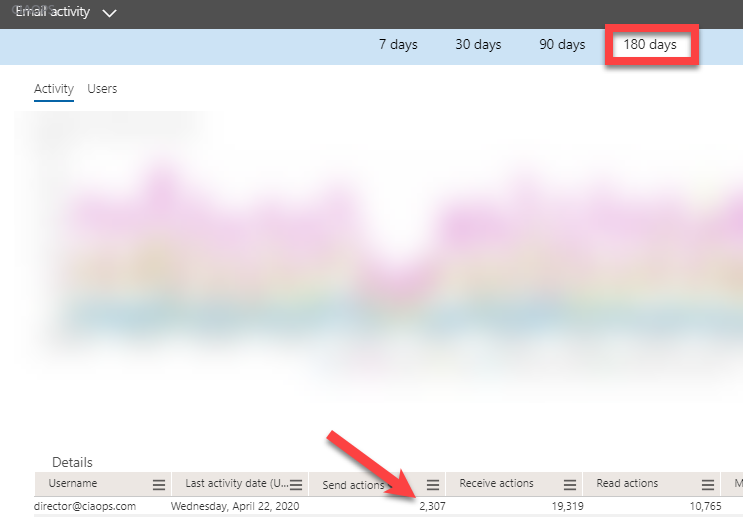
Now compare this to Email activity over 7, 30, 90 and 180 days.

image

image

image

image

The numbers vary based on the period as you see above. This is what I would expect to also see for Mailbox usage numbers.

If you have a look at:

Microsoft 365 Reports in the admin center – Mailbox usage

It says:

Deleted Item Count refers to the total number of deleted items in the mailbox.

but that is only reporting 11,637 items not the expected 64,382. Also, changing the period of those reports doesn’t change the number of Deleted Items. I would have thought that if the figures shown were total items during that period, they would vary as I changed the period. But they don’t. I would expect a small figure for Deleted Item for 7 days and a larger figure for 180 days say. I wouldn’t expect the same figure for 7, 30, 90 and 180 days!

So there must be something I’m missing here with these numbers? Anyone care to enlighten me?