The AI Toolkit Monetization Strategy: Building Enterprise Value with Microsoft Technologies

image

I’ll start with something that won’t win me any friends at the next AI meetup: owning the cleverest AI tool in the room won’t make you a cent. Not the model, not the agent, not the prompt you spent a weekend perfecting. I’ve watched a lot of people fall in love with the technology and then wonder why the invoices aren’t getting any bigger. The uncomfortable truth is that nobody pays for tools. They pay for problems disappearing.

Think about a carpenter for a moment. A carpenter doesn’t get wealthy selling you a single hammer off the back of the ute. They get paid because they walk onto a site, look at a house that needs building or a roof that’s letting the rain in, and they know exactly which tool to reach for and when. The hammer matters, but only because of the hand holding it and the job it’s pointed at. That’s the mindset I think anyone serious about AI needs to adopt — and if your organisation already lives inside the Microsoft cloud, you’ve quietly been handed a very good toolkit. Most people just haven’t worked out how to pick it up.

The hammer: Copilot and Azure OpenAI

The language model is your hammer. It’s the tool you swing by hand, and it’s genuinely powerful — but it does what you tell it, no more. In the Microsoft world that’s Microsoft Copilot sitting across your Outlook, Word and Teams, with Azure OpenAI underneath when you need to build something bespoke.

Here’s where most people get it wrong: they treat Copilot like a fancier search box. They type a vague half-question, get a vague half-answer, and conclude the whole thing is overhyped. The people getting real value approach it with a bit of discipline. The way I think about it is four steps — mission, ask, parameters, shape.

Start with the mission: the business outcome, not the chore. Don’t ask Copilot to “find me some leads.” Tell it you need thirty new enterprise clients this quarter to hit a revenue target. Then comes the ask — one sharp, specific request, like pulling together forty qualified IT directors in healthcare with their contact details. Then parameters — the context and the guardrails. This is where Copilot in Microsoft 365 earns its keep, because you can point it straight at the files in your SharePoint or OneDrive so it’s reasoning over your data, not a guess about the world. A tip I lean on constantly: dictate your context rather than typing it. The voice option in Copilot lets you talk through the background in thirty seconds, and you talk far faster than you type. Finally, shape — tell it the format you want. A clean table, a CSV you can drop into Excel, a tight bulleted summary. Stop reformatting things by hand like it’s 2015.

The screwdriver: Power Automate

A hammer needs a fresh swing every single time. The moment you find yourself doing the same AI-assisted task over and over, you’ve outgrown it. That’s when you reach for the screwdriver — automation — and in the Microsoft stack that’s Power Automate with AI Builder doing the heavy lifting.

The shift here is subtle but enormous. Instead of opening Copilot every morning to run the same prompt, you build a flow once and let it run on a schedule or off a trigger, quietly, in the cloud, forever.

Not everything deserves a flow, though, and this is where people burn weeks they’ll never get back. I run three quick tests before building anything. Is it repetitive — happening at least weekly, ideally daily? Is it rule-based, with predictable inputs and a predictable result? And does it actually pay back — does the time saved over a year dwarf the time spent building it? Don’t spend sixty hours constructing a flow that rescues someone two minutes a week. That’s not automation, that’s a hobby.

A example I like: a sales call recording lands in a Teams channel. Power Automate sees it, AI Builder pulls the transcript, reads the sentiment, drops the action items straight into Dynamics 365, and posts a tidy weekly summary back into the leadership channel in Teams. Nobody touched it. That’s the screwdriver doing its job.

The power drill: Copilot Studio

Then there are the jobs where you don’t want to define the steps at all — you just want the outcome. That’s the power drill, and Microsoft’s answer is Copilot Studio, where you build agents that handle whole processes on their own.

With the hammer and the screwdriver, you’re still drawing the map. With an agent, you describe the destination and let it find its own way through the subsystems. The trick to doing this without disaster is what I’d call staying on the loop rather than in it. Pick a genuinely meaty workflow — vendor onboarding end to end, say, from reading the invoice email, to cross-checking your Dataverse tables, to running compliance, to setting up billing. Then, and this is the hard part, don’t keep grabbing the wheel. Let it run.

Two habits make this safe. First, have agents check each other — a builder agent in Copilot Studio writes a script, and a separate reviewing agent picks it apart for security gaps before anything reaches a human. Second, watch for drift. An agent grinding away over hours or days can slowly lose the plot, so your role becomes the manager who inspects, resets the context when it wanders, and keeps it pointed at the goal.

The orchestrator gets paid

Here’s the part that actually moves the money. Owning these three tools doesn’t make you rich. Conducting them does. The orchestrator is the one who looks at a bleaking supply chain or a drowning support desk and reaches across the whole Microsoft AI toolkit — Copilot, Power Automate, Copilot Studio — to make the pain stop.

Your clients don’t lie awake wondering whether you used GPT-4o through Azure or a Copilot Studio agent. They lie awake about their costs. Solve that, and the technology underneath becomes a footnote. Problems are where the value lives.

So the real shift isn’t learning another tool. It’s moving from doing the work to directing it. Step back, find the problem worth solving, and orchestrate the kit you already own.
Outlook Draft Instructions vs Microsoft 365 Copilot Personalization — what’s the difference and which takes priority?

image

I see a lot of people trying out Microsoft 365 Copilot for Outlook, then asking why the emails it drafts don’t sound like them. Many end up manually tweaking every email Copilot writes, thinking it’s unavoidable.

“Why does Copilot always add ‘I hope you’re well’? I’m spending more time editing than drafting!”

Sound familiar? That’s not a failure of Copilot. That’s a missed opportunity. If you keep re-teaching Copilot your style every time you use it, you’re doing it wrong. The solution: set up the right instructions once, so Copilot learns how you want your emails written from the start.

What are Outlook Draft Instructions and Copilot Personalization, really?

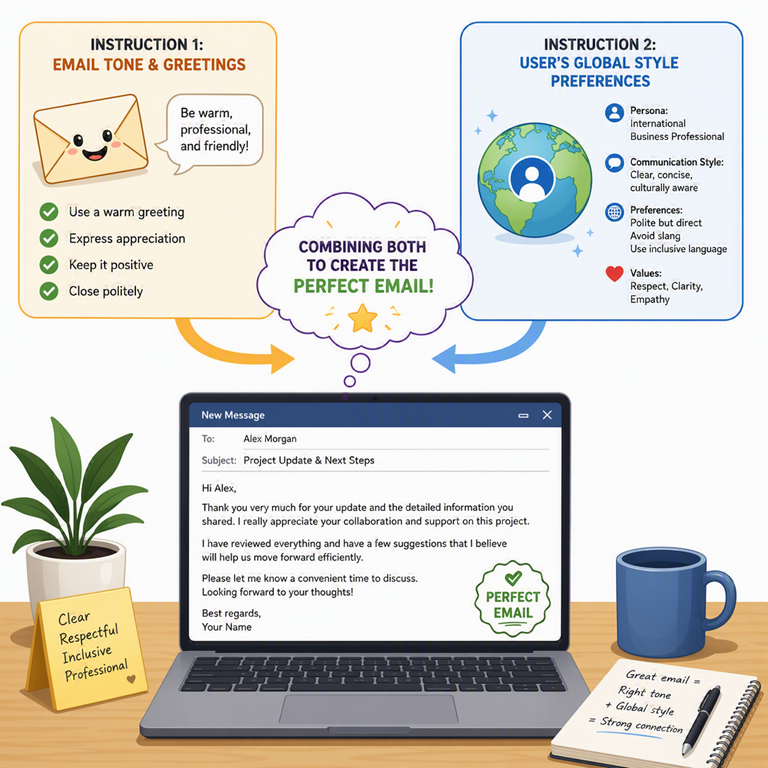
Think of them as layers of guidance for Copilot. Outlook Draft Instructions are your email-specific preferences stored in Outlook. They’re all about how your email drafts should look: friendly vs formal tone, how long or detailed to make messages, whether to use bullet points, how to greet people, the sign-off you prefer—basically, how to sound like you in email (https://support.microsoft.com/outlook/copilot-outlook/ask-copilot-to-make-email-drafts-sound-like-you).

By contrast, Microsoft 365 Copilot Personalization is your global Copilot profile—the custom instructions and memory that apply across all Copilot experiences in Microsoft 365 (Word, Outlook, Teams, etc.), not just email. These personalization settings let Copilot know your role, typical audience, and general communication style so it can tailor any response, in any app, closer to what you need (Customize how Microsoft 365 Copilot responds to you).

Put simply: Draft Instructions tell Copilot how to handle your emails, while Copilot Personalization defines how Copilot behaves everywhere. And there’s no mystery about which one takes priority. When you click Draft with Copilot in Outlook, here’s the order in which Copilot follows your instructions:

  • Your prompt (highest priority): Anything you explicitly ask for (tone, style, language, etc.) in the prompt overrides everything else.

  • Outlook Draft Instructions: Your app-specific email defaults; used whenever your prompt doesn’t override them.

  • Global Copilot Personalization: Your general preferences fill any gaps not covered by your prompt or Outlook’s instructions.

  • Organizational policies: These always apply for compliance and safety (e.g. Data Loss Prevention (DLP) blocking sensitive info) but they don’t affect writing style.
Step-by-Step: Fine-tune Copilot for your email style
Open Outlook’s Copilot Draft Instructions

To set this up, you’ll need the new Outlook (or Outlook on the web) since the feature isn’t in classic Outlook’s UI. In the new Outlook on Windows or web, click the Copilot icon in the compose window. From the dropdown, select Settings, then click Draft Instructions.

Add your email style preferences

Turn on Use custom instructions when drafting email. Now type a short description of how you want Copilot to draft your emails. Be specific about tone, structure, greetings, and sign-offs. Do you prefer concise messages or detailed ones? Formal language or a friendly vibe? For example, you might write:

Use a friendly tone.
Start each email with "Hi [Name],".
Avoid corporate jargon and fluff.
Sign off with "Thanks, [Your Name]".

Notice what’s missing? We didn’t mention anything about length or level of detail in those instructions. That’s on purpose – if you leave something out here, Copilot will fall back to your global Personalization settings to fill in the blanks.

Set global Copilot Personalization

Next, open your Microsoft 365 Copilot settings (for example, in the Copilot Chat app or via the Copilot sidebar in any Office app). Go to Settings and select Personalization. Under Custom instructions, add broad guidance about yourself and your style that should apply everywhere. Tell it who you are and how you like your output across Microsoft 365. For instance, “I’m a small business owner writing for busy clients, so keep everything concise and professional.” Save your instructions.

Why this changes how you email

Once you’ve set up these preferences, you’ll stop fighting with Copilot’s tone and phrasing. Instead of manually fixing greetings or trimming fluff each time, you get drafts that fit your style on the first try. It’s like hiring an assistant who already knows your voice—from day one.

Better yet, showing your clients how to configure these settings is an easy win. It reduces their frustration with generic AI output, boosts their trust in Copilot, and makes you look like a trusted advisor. If you’re not helping them set their Copilot’s style, you’re leaving a lot of value on the table.

Copilot’s drafting preferences aren’t about adding complexity – they’re there to remove it.

Set them up once, and you can stop rewriting Copilot’s emails and start reaping the benefits of an AI that truly sounds like you.

Why your DLP policy isn’t DLP (and how to fix it in Microsoft 365)

image

Most SMBs think they’ve “done DLP” because they ticked a box in Exchange.

They scan outbound email.

They block the occasional credit card number.

They call it done.

That’s not DLP. That’s transport filtering.

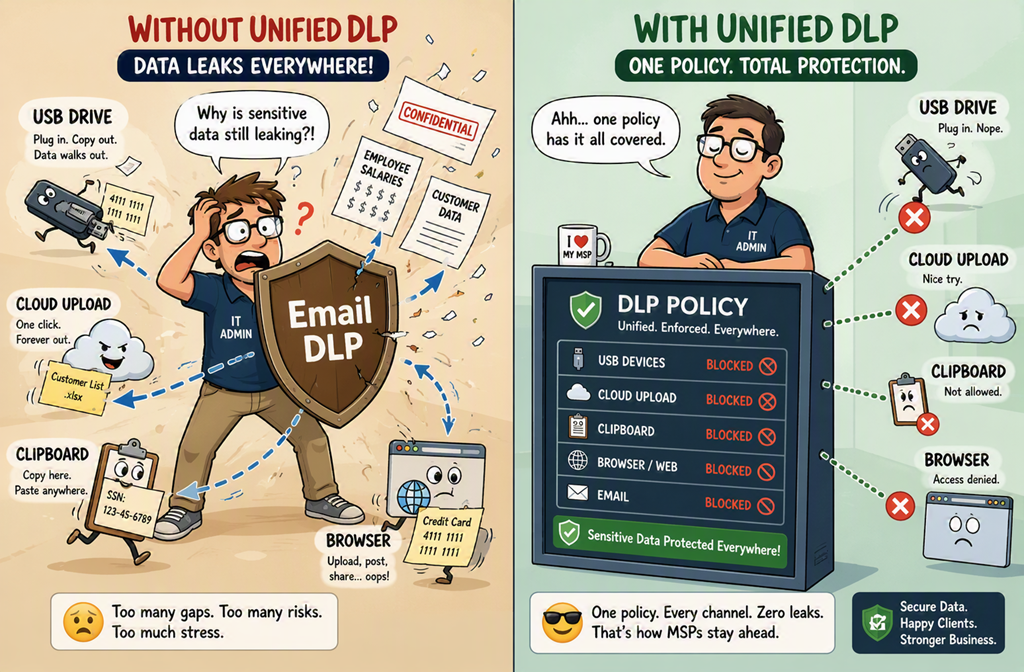
Real data loss doesn’t just leave through email anymore. It walks out via USB, clipboard, browser uploads, and users who don’t realise they’re doing anything wrong.

If you’re only protecting email, you’re protecting yesterday’s risk.

The shift is simple: stop thinking about where data leaves, and start thinking about where data lives and how it’s used.

What is Microsoft Purview DLP, really?

At its core, Microsoft Purview DLP is a policy engine that watches how sensitive data is used and shared, then steps in when it shouldn’t be.

Not just email. Not just files.

Behaviour.

It looks across Microsoft 365 — Exchange, SharePoint, Teams — and now endpoint devices as well.

That matters.

Exchange DLP scans emails and attachments and enforces actions.
Endpoint DLP extends this to USB copies, printing, clipboard, and uploads.

“We’ve got DLP on email, so we’re covered.”

No, you’ve just moved the problem somewhere else.

Data will always find another path out.

Step-by-Step: building a real DLP policy (Exchange + endpoint)
1. Go to the Purview portal

Navigate to Data loss prevention → Policies → Create policy.

2. Choose your locations

Select Exchange Online and Devices.

3. Define what matters

Use built-in sensitive information types and add context like external recipients.

4. Choose actions that teach

Warn, block, or allow override with justification.

5. Turn on endpoint coverage

Monitor and control how sensitive data is used directly on devices.

User copies sensitive file to USB → Block
User uploads to personal cloud → Block
User tries to email externally → Warn or encrypt

Notice what’s missing?
Separate tools.

Why this actually changes behaviour

Most security controls are reactive.

DLP — when done right — isn’t.

It works in the moment.

That’s the real win.

Instead of cleaning up incidents, you prevent them.

And you educate users while they work.

“Why did that get blocked?”

Now you’ve got a conversation instead of a breach.

My recommendation?

Start with one policy that covers Exchange and Endpoints. Run in audit mode. Then enforce.

Security doesn’t fail at the perimeter anymore. It fails in the moment of use.

DLP isn’t there to watch data leave.
It’s there to stop it leaving in the first place.

A Cleaner Way to Connect PowerShell to Microsoft Teams

image

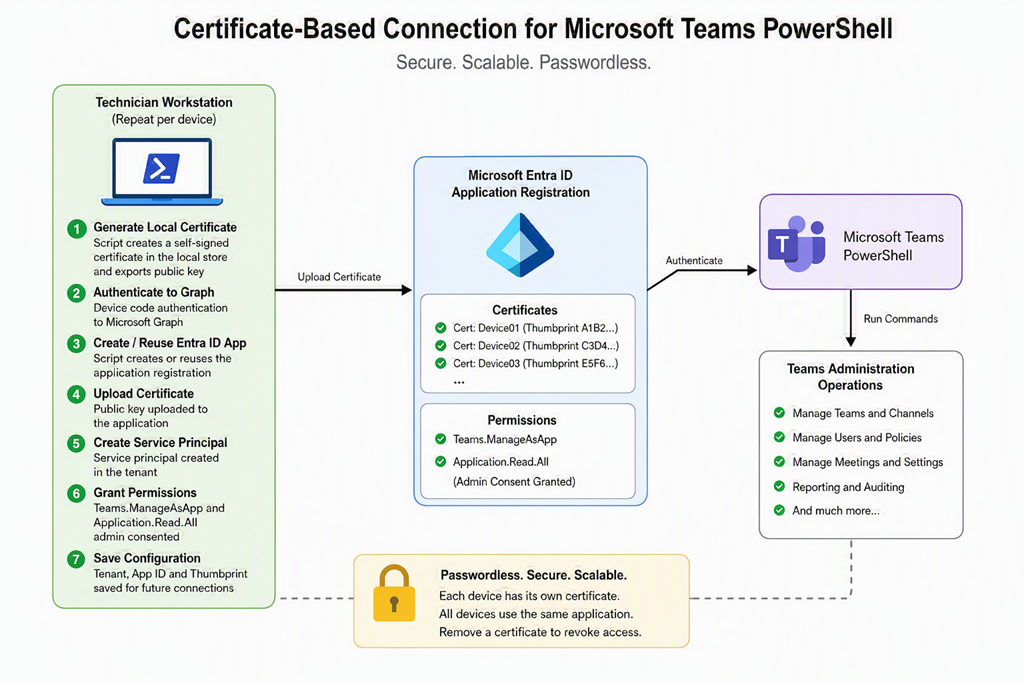
If you still rely on Connect-MicrosoftTeams with an interactive sign-in every time you need to do some administration, you already know the frustration.

Scripts stop and wait for credentials. Scheduled tasks simply can’t run unattended. MFA prompts interrupt automation. And if you’re managing multiple tenants as an MSP, jumping between browser windows and authentication prompts quickly becomes tedious.

Microsoft has supported certificate-based authentication for Teams PowerShell for some time. The challenge hasn’t been the technology. The challenge has been the setup.

I’ve created a script that handles that process for me, removing most of the manual work and making certificate-based authentication something I can deploy consistently across customer tenants. The approach follows the same design philosophy I’ve been using for Exchange Online and other Microsoft 365 workloads: automate the plumbing so I can focus on the outcome. You can find it here:

https://github.com/directorcia/Office365/blob/master/o365-connect-tms-cert.ps1

and the documentation is here:

https://github.com/directorcia/Office365/wiki/Certificate-based-connection-for-Teams

What the Script Actually Does

The script operates in two primary modes.

The first mode, -GenerateLocalCertificate, creates a self-signed certificate on the local machine and exports the information needed for authentication. If required, it can also provision the Entra ID application automatically. The local certificate becomes the device’s identity when connecting to Teams PowerShell.

The second mode, -UseCertificateAuth, performs the actual Teams connection using the existing certificate and application registration. No password. No browser pop-up. No MFA prompt in the middle of an automated process.

The really useful feature is combining certificate generation with application provisioning. In a single operation the script can:

  • Create the local certificate

  • Authenticate to Microsoft Graph using device code authentication

  • Create or reuse an Entra ID application registration

  • Upload the certificate to the application

  • Create the required service principal

  • Assign the necessary permissions

  • Store the configuration details for future use

Tasks that typically involve multiple portals, several copy-and-paste operations, and more than a few opportunities to make mistakes can be reduced to a single repeatable process.

Why Certificate Authentication Matters

The biggest advantage is that you’re no longer tying automation to an admin account.

Traditional approaches often depend on an account that someone logs into interactively. That works fine until MFA settings change, conditional access rules are updated, or the account password expires.

Certificate authentication shifts the trust model. Instead of trusting a username and password, Microsoft validates the certificate installed on the machine against the certificate registered in Entra ID. If they match, the connection succeeds. If they don’t, access is denied.

That makes the solution both more secure and more reliable.

For MSPs, it also provides a cleaner operational model. Each technician workstation can have its own certificate while sharing the same application registration inside the customer tenant. If a machine is retired or a staff member leaves, removing the associated certificate immediately blocks access from that device without affecting anyone else.

The MSP Advantage

This is where the approach starts to shine.

A common question is whether every machine requires a separate application registration. The answer is no.

The design I prefer is a single Teams application per tenant with multiple certificates attached to it. Each device gets its own unique certificate, but all of them authenticate through the same application registration. That keeps administration simple while still maintaining proper separation between devices.

When a new technician needs access:

  1. Run the provisioning process.

  2. Generate a new certificate.

  3. Associate it with the existing application.

  4. Start working.

When access needs to be removed:

  1. Delete the certificate association.

  2. Access from that machine immediately stops.

No password resets. No account changes. No disruption for other administrators.

Getting Started

If you’re still connecting to Teams PowerShell interactively for daily administration, I’d encourage you to investigate certificate-based authentication.

The technology isn’t new. What’s important is reducing the complexity required to deploy it.

The real benefit isn’t that you save a few clicks when connecting. The real benefit is that you create a repeatable, secure authentication framework that supports automation, improves operational consistency, and removes dependence on administrator credentials.

For MSPs managing multiple tenants, that’s a significant improvement.

The less time I spend authenticating, the more time I spend solving customer problems. And that, ultimately, is the point.

The Most Important Part of Productivity Is the Product

image

I had a conversation last week that’s stuck with me. Someone was describing their week — back-to-back meetings, an inbox wrestled down to zero, a colour-coded calendar that would make a project manager weep with joy. They were exhausted and, oddly, proud of it. So I asked a simple question: what did you actually make? Long pause. The honest answer was “not much.” A full week of motion, and almost nothing to show for it.

We’ve quietly redefined productivity to mean busyness. How fast you reply. How many minutes you squeeze from a day. How efficiently you move between tasks. But strip the word back and the heart of it isn’t the activity — it’s the product. The thing that exists now that didn’t exist on Monday morning. The proposal that’s written. The decision that’s made. The client problem that’s solved. Everything else is just noise around the signal. We measure the noise because it’s loud and easy to count. The signal is quieter, and it’s the only part that actually matters.

Motion is easy to measure. Output is the hard part.

The reason we drift toward efficiency is that it’s comfortable. You can count emails sent and meetings attended. You feel the satisfaction of a tidy inbox. But none of those are products — they’re scaffolding. I’ve watched people spend an entire afternoon “getting organised” and call it a good day’s work, when really they just rearranged the furniture. The week looked productive. Nothing was produced.

This is where I think Copilot changes the conversation, and not in the way the marketing suggests. The point isn’t that it makes you faster at the busywork. It’s that it takes the busywork off the table, so what’s left is the actual product. When I ask Copilot in Outlook to summarise a long thread and draft the reply, I haven’t saved twenty minutes — I’ve removed a task that was never the point. The reply was never my product. The thinking behind it was.

Spend the time you save on something worth showing.

That’s the part people miss. The danger isn’t that Copilot does the low-value work — it’s what you do with the gap it opens up. If Copilot pulls your meeting notes and action items together in Teams, and you spend that reclaimed hour clearing three more emails, you’ve efficiency-ed yourself in a circle. But if you use it to write the strategy document you’ve been avoiding, or to think properly about a client’s problem in Word with Copilot helping shape the argument, the tool has earned its place. Or you point Copilot at a messy spreadsheet in Excel, ask it what the numbers are really saying, and walk into the meeting with an answer instead of a pile of data. The output, not the speed, is the scorecard.

I’ve started asking myself a blunt question at the end of each day, and I’d suggest you try it. Not “was I busy?” — I’m always busy. The question is: what can I point to? What did I produce that someone else could pick up, use, or judge? Some days the answer is a single solid thing, and that beats a day filled with forty small tasks that vanish the moment they’re done.

Copilot has made me more honest about this, because once the friction is gone, you can’t hide behind it. The empty afternoon is exposed for what it is. That’s the real shift worth watching — not doing things faster, but finally being able to ask whether the thing was worth doing at all.

Entra ID Password Protection + Smart Lockout

image


People still obsess over password complexity.

Twelve characters. Special symbols. Rotation every 90 days.

And yet accounts still get compromised.

That’s because attackers don’t guess random passwords anymore. They guess human passwords.

That’s not a complexity problem. That’s a behaviour problem.

So instead of arguing about password rules, I push clients to focus on two things they already have in Microsoft 365:

Password Protection and Smart Lockout.

Quietly running. Often ignored. Rarely tuned.

Here’s what actually matters.


What is Entra ID Password Protection + Smart Lockout, really?

It’s not a password policy.

It’s a filter and a shield.

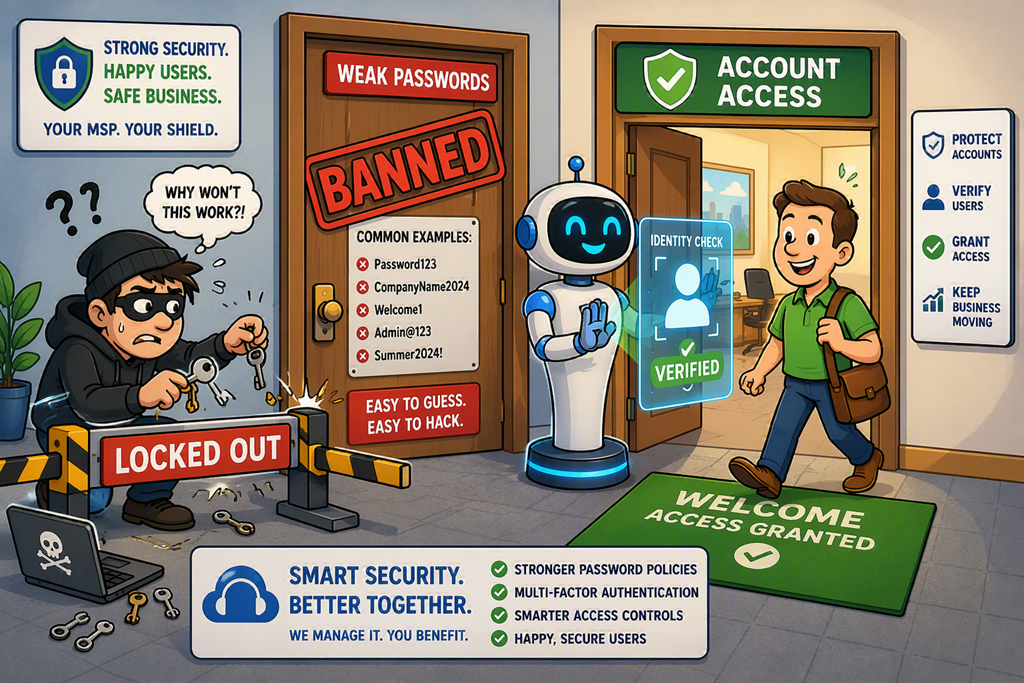
Password Protection stops users from choosing bad passwords in the first place.

It uses a global banned password list driven by Microsoft telemetry and blocks weak or common passwords automatically—no configuration required. [learn.microsoft.com]

On top of that, you can add your own banned terms. Company names. Locations. Products. The obvious stuff attackers try first.

Then there’s Smart Lockout.

This is what most people misunderstand.

It’s not “lock the account after X attempts”.

That’s old thinking.

Smart Lockout can distinguish between a real user fat-fingering a password and an attacker trying thousands of guesses. [learn.microsoft.com]

Same identity. Different treatment.

Attackers get blocked quickly.

Real users keep working.

That’s not a nicer lockout policy.

That’s a signal-driven control.

“But we already have account lockout on-prem.”

Exactly.

And that’s the problem.


Step-by-Step: Tune Password Protection and Smart Lockout

Portal only. No scripts. No excuses.

1. Open Password Protection settings

Go to:

Entra admin centre
Protection
Authentication methods
Password protection

This is the only place you need.

2. Add a custom banned password list

Add terms like:

  • Company name variations

  • Internal product names

  • Common abbreviations

  • Location names

These get evaluated alongside the global list and block weak variants automatically. [learn.microsoft.com]

Not just exact matches.

Variants.

That’s the key.

3. Review Smart Lockout threshold

Default is:

Most SMBs never touch this.

My recommendation?

Lower it slightly only if you understand user behaviour.

Too low and you create support tickets.

Too high and you give attackers room to work.

You’re not tuning numbers.

You’re tuning friction.

4. Set lockout duration

Default starts short (around a minute) and increases with repeated attempts. [learn.microsoft.com]

That’s deliberate.

Short for users.

Painful for attackers.

If you override this, be careful.

Long lockouts punish users.

Short lockouts reward attackers.

5. Leave Smart Lockout on (always)

Important:

Smart Lockout is already enabled.

There’s nothing to “turn on”.

There’s only:

  • Leaving it alone

  • Or breaking it
6. Pair it with MFA (properly)

Password protection is not enough.

Microsoft is very clear on that.

Use it alongside MFA and Conditional Access. [learn.microsoft.com]

Otherwise you’re just slowing attackers down.

Not stopping them.


Why this actually changes behaviour

This is the part most MSPs miss.

These features don’t just block attacks.

They retrain users.

Bad password?

Rejected.

Repeated guessing?

Blocked.

Users learn quickly what works and what doesn’t.

No training session required.

No PDF sent out.

No awareness campaign.

The system corrects behaviour in real time.

“We’ll just educate users instead.”

You can.

Or you can enforce it once and let the platform do it forever.

Ask once. Enforce always.

Here’s the real win:

  • Fewer compromised accounts

  • Fewer lockout tickets

  • Fewer “why is this happening?” calls

And importantly:

  • Better outcomes with less effort

That’s the bit most people overlook.


Notice what’s missing?

No password complexity discussion.

No rotation debates.

No “special characters required”.

Because those don’t solve the real problem.

Attackers aren’t brute-forcing randomly anymore.

They’re spraying expected passwords across thousands of accounts.

Password Protection removes the obvious targets.

Smart Lockout kills the attack path.

Different layers.

Same outcome.


Passwords aren’t going away.

But weak passwords should.

And repeated guessing definitely should.

Password Protection isn’t there to make passwords stronger.

It’s there to make bad passwords impossible.

Certificate-Based Authentication for SharePoint Online: The Bit Everyone Avoids


image

There’s a point every SharePoint admin eventually hits.

The script works.
The logic is solid.
But it still needs a username.

And that’s where it falls apart.

Because anything that relies on a human login isn’t automation. It’s just a task waiting to break the moment MFA tightens, conditional access changes, or the account gets locked.

Certificate-based authentication fixes that. It has for years.

The problem hasn’t been what to do.
It’s been how much effort it takes to do it properly.


The Problem Isn’t Authentication. It’s Assembly.

If you’ve ever set this up manually, you’ll know the sequence:

  • Create or import a certificate

  • Register an app in Entra ID

  • Assign API permissions like Sites.FullControl.All
  • Upload the certificate

  • Grant admin consent

  • Capture the thumbprint

  • Wire it all into your PowerShell scripts

None of it is particularly hard.

But it’s fragmented, fiddly, and very easy to get wrong.

Which is why most environments quietly fall back to interactive sign-ins… right up until they stop working.


What This Approach Actually Does

I’ve been written a new script —

https://github.com/directorcia/Office365/blob/master/o365-connect-spo-cert.ps1

with full documentation here – https://github.com/directorcia/Office365/wiki/Certificate-based-authentication-for-SharePoint-Online

The script behind this approach is designed to remove that friction.

Instead of documenting the steps, it executes them.

At a high level, it runs in one of two modes:

1. Generate Everything Locally

-GenerateLocalCertificate

This builds the foundation:

  • Creates a local certificate (optionally exports a PFX)

  • Can provision an Entra app automatically

  • Assigns required permissions (including SharePoint and Graph)

  • Prepares everything needed for ongoing use

It effectively handles the “setup once” phase.

2. Use Certificate Authentication

-UseCertificateAuth

This is the day-to-day mode:

  • Connects to SharePoint Online using the app and certificate

  • No username

  • No password

  • No MFA prompt

  • No interaction required

Just a clean, repeatable connection into the SharePoint admin endpoint. [github.com]


Why This Matters More Than It Looks

At face value, this is just authentication.

In reality, it’s capability.

Once your connection is non-interactive, a whole class of work becomes possible:

  • Scheduled SharePoint reporting

  • Overnight clean-up jobs

  • Site lifecycle management

  • External sharing audits

  • Compliance checks

All the tasks that were “nice ideas” suddenly become operational.

Because they no longer depend on someone being present.

That’s the real shift.


The Security Side (That People Miss)

There’s also a security upside that often gets overlooked.

Certificate-based authentication:

  • Removes passwords from scripts entirely

  • Reduces exposure to phishing and credential theft

  • Uses a service principal instead of a human identity

  • Allows tighter, scoped permissions (like Sites.Selected)

In short, it’s both more secure and more predictable than traditional login methods.


The Gotcha Everyone Hits Once

If you build this from scratch, you’ll probably hit the same issue most people do:

It doesn’t work immediately.

Not because it’s broken — but because permissions need time to propagate across Entra ID and SharePoint.

That delay is normal.

It’s also the main reason people abandon setups halfway through and revert to “just use an account”.


Where This Fits for MSPs

If you’re managing multiple tenants, this becomes even more valuable.

The pattern is simple:

  • One script

  • One certificate per tenant

  • One app registration per workload (or per tenant, depending on your model)

  • Store the mapping once

  • Reuse it everywhere

From there, your tooling becomes predictable.

No credential prompts.
No dependence on admin accounts.
No surprises when security policies tighten.


The Bottom Line

Certificate-based authentication isn’t new.

It’s just been inconvenient.

What this approach does is remove the inconvenience.

And once you do that, you start using it everywhere.

Because the real benefit isn’t the connection.

It’s everything that becomes possible after it.


Source material


The Quiet Productivity Cost of Watching AI Work

image

I noticed something a few weeks back during a busy Friday afternoon. I’d asked Copilot in Word to pull together a draft summary of a long client document, and instead of moving on to the next thing on my list, I just sat there. Watching. Cursor blinking. Sentences slowly stitching themselves across the screen like I was waiting for a kettle to boil. It took me a good thirty seconds to realise I was, in effect, staring at a digital pot — and getting absolutely nothing else done while I did it.

That small moment has stuck with me. Because I don’t think I’m the only one doing it.

The watching trap

There’s a quiet productivity tax that nobody really warned us about with generative AI inside Microsoft 365. We’ve been told these tools save us hours. And they will — but only if we actually use those hours. The moment we anchor ourselves to the screen and watch Copilot draft a reply in Outlook, summarise a meeting recording in Teams, or build out a deck slide by slide in PowerPoint, we hand back every minute of the gain.

I think this happens because the output feels unfinished until it’s done. The brain treats it a bit like a conversation — and you don’t walk away from someone mid-sentence. But Copilot isn’t speaking to you. It’s working for you. And it doesn’t care whether you’re in the room.

The result is a strange new flavour of busywork. You look productive. You’re sitting at your desk, focused, eyes on the screen. But the actual output of your time is whatever Copilot was going to produce anyway. You’ve added nothing. You’ve just supervised a process that didn’t need supervising.

Why staring at it doesn’t help

The other problem with the watching habit is that it isn’t even useful. You can’t speed Copilot up by looking at it harder. You’re not catching errors in real time, because most of us don’t read carefully enough mid-generation to spot a problem — and you’ll review the final output once it’s done anyway. The watching is pure overhead.

Worse, it primes a passive mindset. When you sit and observe the machine doing the work, you start to mentally check out. The next task on your list feels heavier than it should. You lose the rhythm of context-switching that real knowledge work depends on. By the time the draft email or summary lands, you’ve already half-disengaged. So instead of pouncing on it, reviewing it sharply, and sending it on its way, you take another minute or two to gather yourself.

That’s two layers of cost. The time you spent watching, and the time it takes to mentally re-enter the work.

Treat Copilot like a colleague, not a performance

The shift I’ve had to make is treating Copilot the same way I’d treat anyone I’ve delegated something to. You don’t stand over a colleague’s shoulder while they write a document. You hand it off, you go do something else, and you come back to review when it’s ready.

So when I ask Copilot in Excel to analyse a dataset, I switch to my inbox and clear a few replies. When I have Copilot in Word drafting something substantial, I move into Teams and respond to chats. When a deck is being assembled in PowerPoint, I’m reviewing tomorrow’s calendar or skimming a SharePoint document I’d been putting off. The five or ten seconds of context-switch cost is well worth the two or three minutes I would have otherwise stared away.

The deeper habit, though, is queueing the work. I now line up several AI-assisted tasks at once. A summary running here, a draft being produced there, an analysis underway in another window. Copilot is happy to run in parallel across Microsoft 365. There’s no good reason to make those tasks sequential by tying each one to your eyeballs.

What I’m watching next

The thing I’m paying attention to from here is how teams handle this collectively. Because once AI is doing more of the small tasks across an organisation, the productivity ceiling stops being defined by what the tools can do and starts being defined by what their humans do while the tools work. The businesses that win the Copilot game won’t be the ones with the best prompts. They’ll be the ones whose people have stopped sitting and watching, and started filling that reclaimed time with thinking, deciding, and acting.

The technology is doing its part. The next move is ours.