Improved SharePoint Online List creation discovery!

image

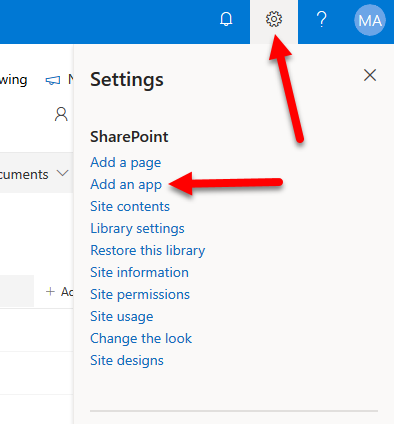
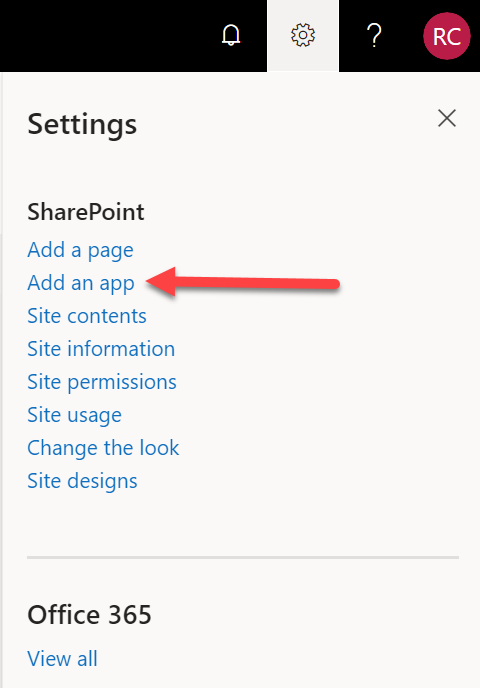
The traditional way that I had been creating lists in a SharePoint Online site was to select the COG in the top right hand corner of the site and selecting Add an app from the menu that appears as shown above.

image

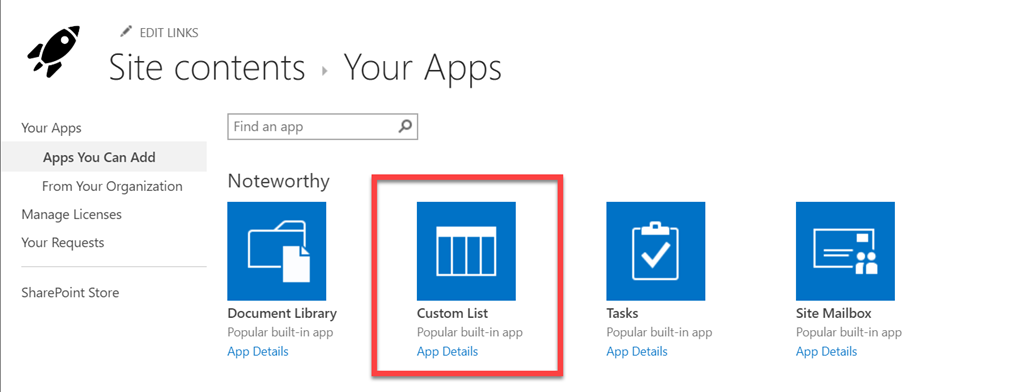
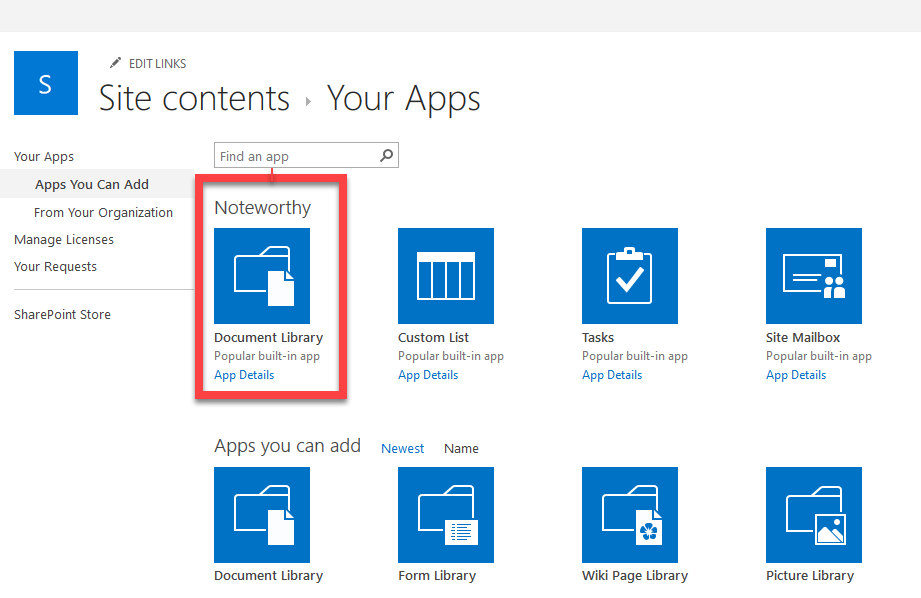
From there I’d select Custom List and follow the bouncing ball and create a list is one column and then have to go in and customised it. Hard work.

image

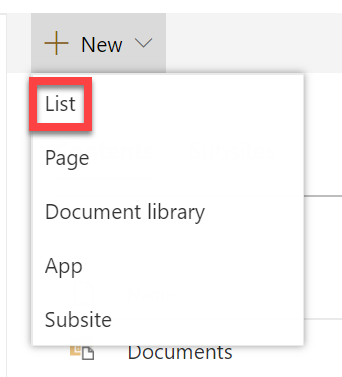
However, if you go to Site Contents and then select New and List you get a COMPLETELY different and much, much better experience!

image

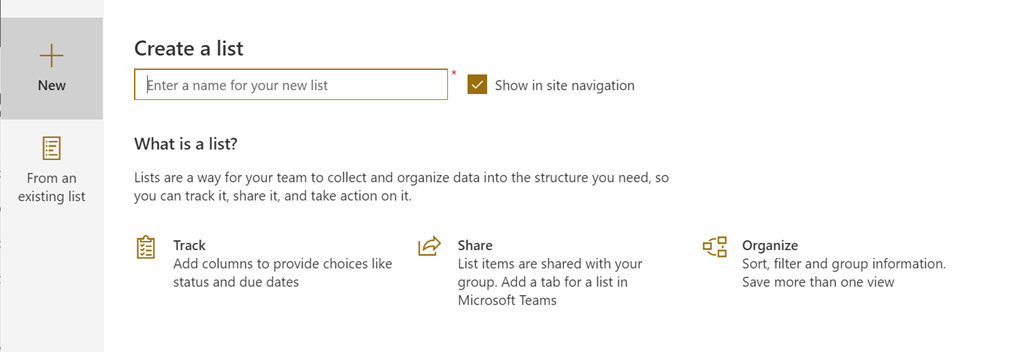
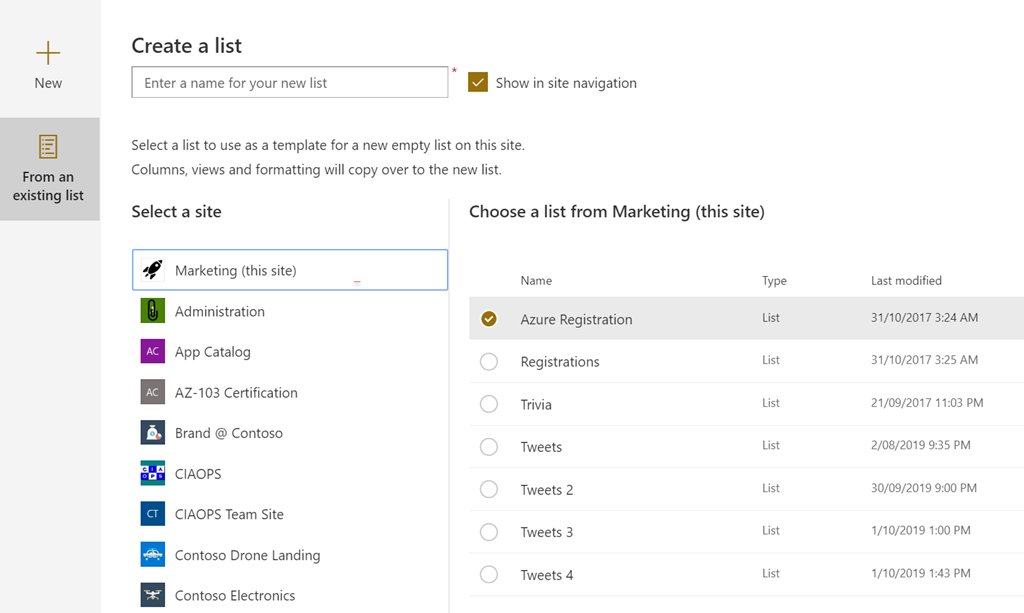
The above options appear. Even better, if you select From an existing list on the left you get:

image

a list of every site across your WHOLE SharePoint Online experience! WOW! All you need to do is pick a list that is the same and bamm, you’ll get a new one just like it!

I can’t tell you how much time this saved me once I discovered it. I wonder how I missed the memo?

CIAOPS Need to Know Microsoft 365 Webinar–October

laptop-eyes-technology-computer

The October webinar is here. This month we’ll take a closer look at the various options available to manage tasks in Microsoft 365. You’ll learn how tasks can be completed using SharePoint, Planner and Microsoft To-Do as well as when to use each service. There will also be the latest Microsoft Cloud news as well as Q and A plus loads more. I’d love if you’d come along and be part of this.

You can register for the regular monthly webinar here:

October Webinar Registrations

The details are:

CIAOPS Need to Know Webinar – October 2019
Thursday 31st of October  2019
10.30am – 11.30am Sydney Time

All sessions are recorded and posted to the CIAOPS Academy.

There of course will also be open Q and A so make sure you bring your questions for me and I’ll do my best to answer them.

The CIAOPS Need to Know Webinars are free to attend but if you want to receive the recording of the session you need to sign up as a CIAOPS patron which you can do here:

http://www.ciaopspatron.com

or purchase them individually at:

http://www.ciaopsacademy.com/

Also feel free at any stage to email me directly via director@ciaops.com with your webinar topic suggestions.

I’d also appreciate you sharing information about this webinar with anyone you feel may benefit from the session and I look forward to seeing you there.

Need to Know podcast–Episode 215

In this episode I speak with Alex Fields about the power of conditional access. You’ll learn what it is, how to implement it as well as many best practices recommended by Alex based in his experience and knowledge. The great new is conditional access is part of Microsoft 365 Business, so listen in for the way to make it work to protect your information.

Brenton and I also bring you up to speed with all the latest Microsoft Cloud news, so listen in for the latest as always. We hope you enjoy this episode and don’t forget to send us your feedback.

This episode was recorded using Microsoft Teams and produced with Camtasia 2019

Take a listen and let us know what you think – feedback@needtoknow.cloud

You can listen directly to this episode at:

https://ciaops.podbean.com/e/episode-215-alex-fields/

Subscribe via iTunes at:

https://itunes.apple.com/au/podcast/ciaops-need-to-know-podcasts/id406891445?mt=2

The podcast is also available on Stitcher at:

http://www.stitcher.com/podcast/ciaops/need-to-know-podcast?refid=stpr

Don’t forget to give the show a rating as well as send us any feedback or suggestions you may have for the show.

Resources

@vanvfields

@contactbrenton

@directorcia

CIAOPS Patron Community

ITProMentor

ITProMentor – Best parctices

Attacker Kill Chain described

ITProMentor – Free Microsoft 365 Business eBook

ITProMentor – Licensing Guide

Telstra Purple

New version of To-Do

Authenticator backup on Android now available

Prepare for iPadiOS Launch

New webparts coming to SharePoint

Azure QuickStart Center

Top 5 advantages of syncing with OneDrive

Modernize your root site

Waiting to upgrade to a Communications Site?

Microsoft have placed on their roadmap that you can run the following PowerShell command:

enable-spocommsite

to upgrade a classic site collection to a modern site collection.

However, the documentation at:

https://docs.microsoft.com/en-us/powershell/module/sharepoint-online/Enable-SPOCommSite?view=sharepoint-ps

reads:

Enables the modern communication site experience on an existing site. At this time, based on early adopter feedback, we have decided to postpone rolling out this feature. We apologize for any inconvenience and will communicate a new schedule via Message Center, once it is available. We expect to have an update in the Q3 time frame

and when you actually try it you get:

image

So it looks like we’ll have to wait a little longer. Hopefully not too much longer.

Use PowerShell to get site storage usage

One of the challenges for IT Pros when managing the online collaboration world of SharePoint Online and OneDrive for Business in Microsoft 365, is getting a quick overview of things like storage usage across their environment. In the gold ol’ days you’d just using Windows Explorer or something similar, but in the Microsoft 365 world these tools are not ‘online’ aware.

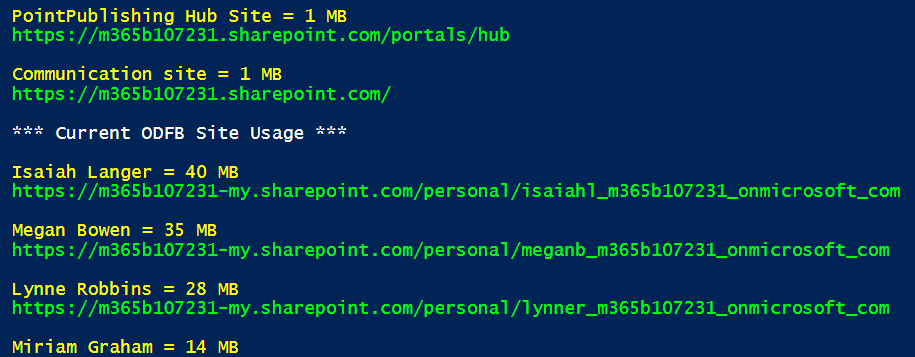
Thankfully, it is PowerShell to the rescue here again! What you can do is is basically grab all the SharePoint and OneDrive for Business Sites and look at a property called StorageUsageCurrent. Thus,

$sposites=get-sposite
$sposites.storageusagecurrent

will firstly get all the SharePoint sites and then display the storage usage of each in MB. However, that is a bit basic. What you really want is something like this:

image

for you SharePoint sites and and a separate group for your OneDrive for Business sites like this:

image

You might also notice that they are also sorted in descending order, from largest to smallest.

The good news is that I have done all that hard work for you and made the script available in my GitHub repo here:

https://github.com/directorcia/Office365/blob/master/o365-spo-getusage.ps1

The only thing that you need to do before running the script is to connect to SharePoint Online using PowerShell as an administrator.

Don’t forget there are also plenty of other handy scripts in my GitHub repo which get updated regularly. So, make your admin life easier and use what I have already created rather than re-inventing the wheel.

Creating unique file permissions with Teams

Microsoft Teams is a really easy way to share files with others. However, the modern concept with Microsoft Teams is that once you are part of the Team then you have the same rights as everyone else. This generally means that all Team members have the ability to read, write, modify and potentially delete files. This is common across all channels in the Team.

One thing that you really don’t want to do is go into the SharePoint back end of the Teams files and modify the default permissions. If you do, you’ll cause a whole lot of problems. We are expecting private channels in Teams very soon but here’s an easy way to overcome the default common sharing options in Teams by creating a separate area with unique permissions and linking that back into the Team.
image

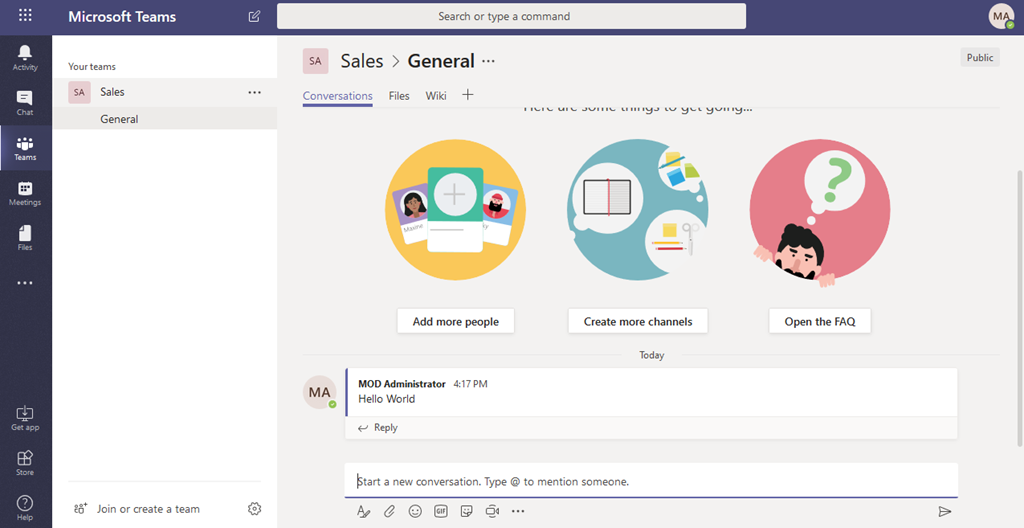
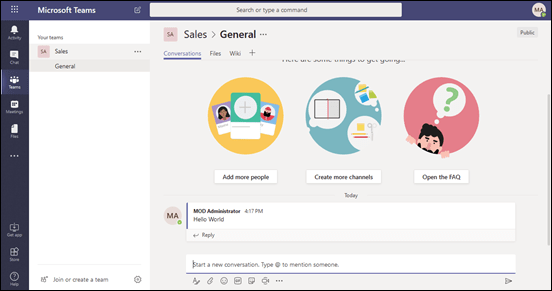
Firstly navigate to your Team.

image

Select the Files tab to the right of Conversations to see all the files for that channel as shown above. These are common files that all Team members have the same rights to.

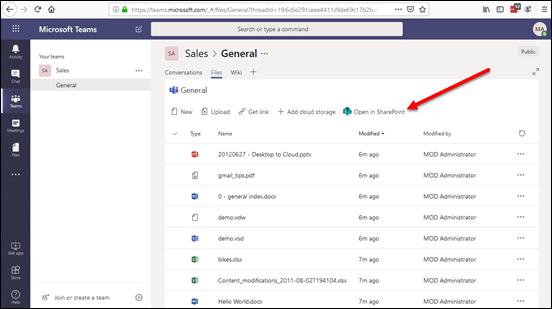
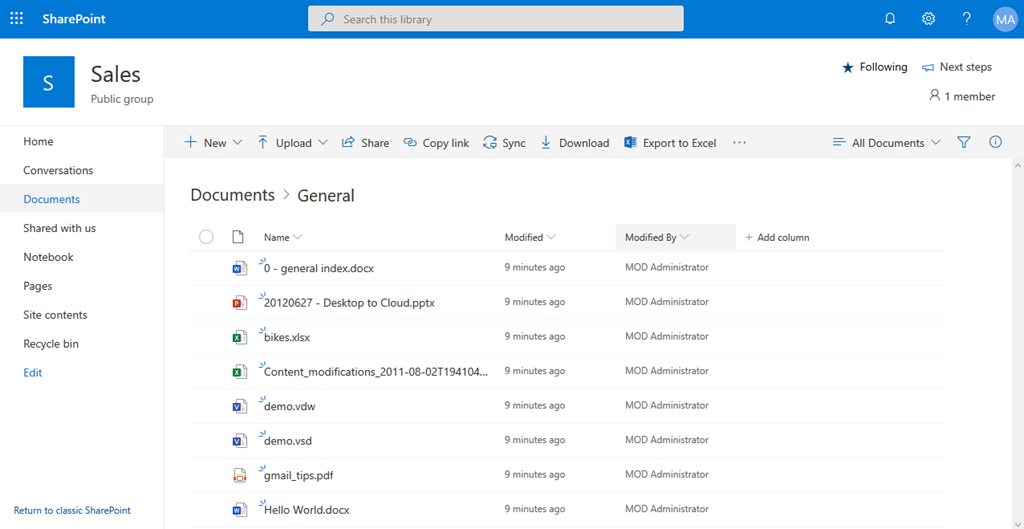
Select the Open in SharePoint option as shown above.
image

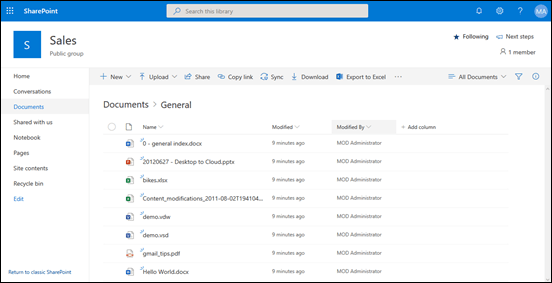
This will take you to the location of those channel files in SharePoint as shown above. This location is typically a subfolder with the name of the channel (here General), in a Document Library called Documents. 

You will need appropriate permissions to complete the process from here. So you will need to be an admin of the Team or a SharePoint Site owner.
image

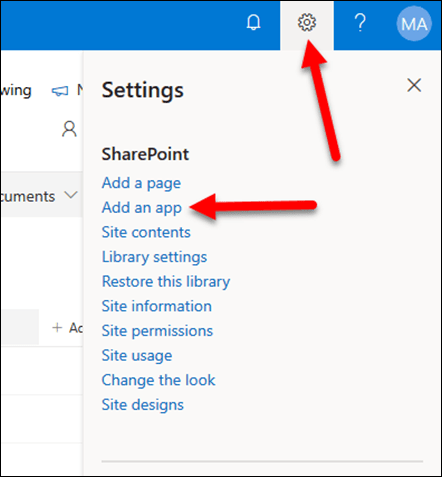
In the top right of the screen select the COG then Add an app from the menu that appears as shown.
image

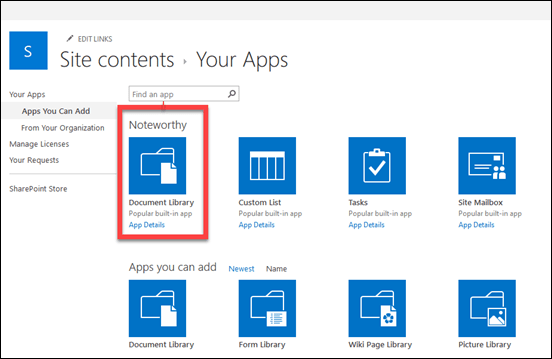
Typically, you’ll select to a new Document Library and give it a name.
image

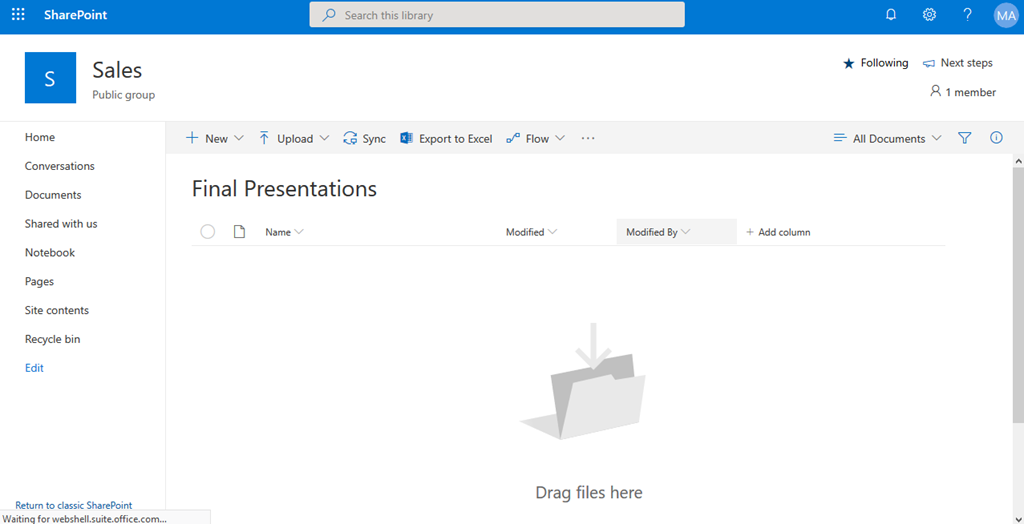
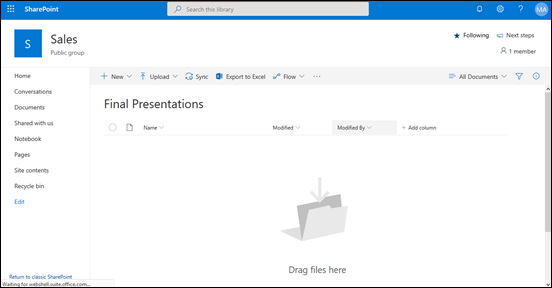
In this case, a new Document Library called Final Presentations has been created as shown.
image

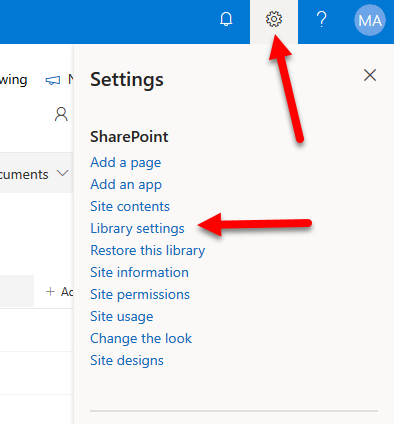
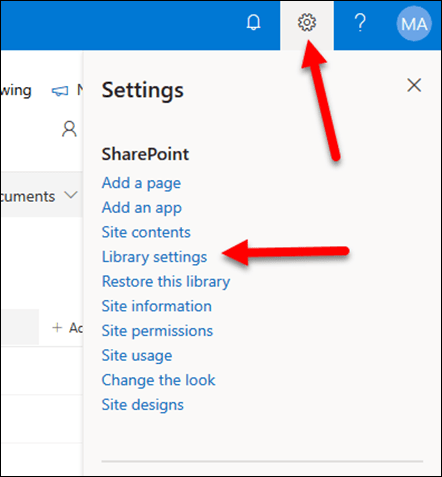
Once you are at this new location, select the COG again in the top right and this time select Library settings as shown.
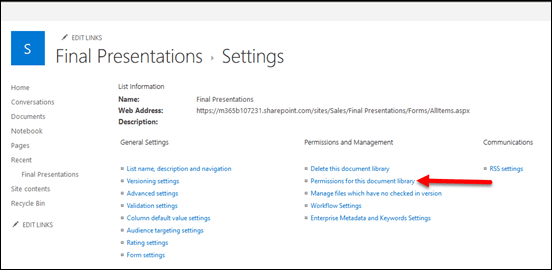
image

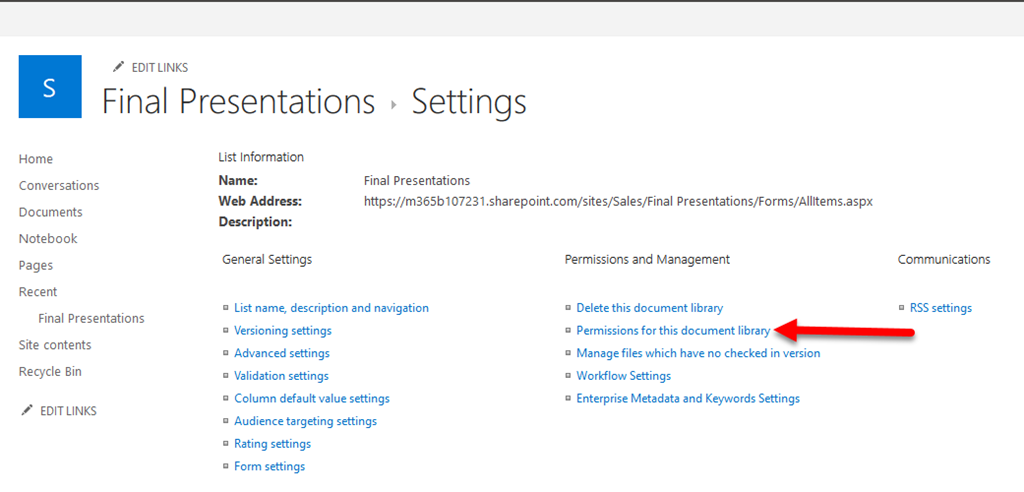
Select the second option from the second column at the top of the page called Permissions for this document library.
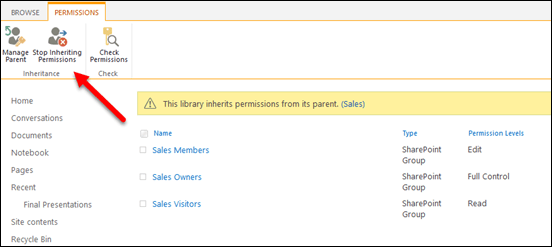
image

Now it is just good ol’ SharePoint permissions configuration.

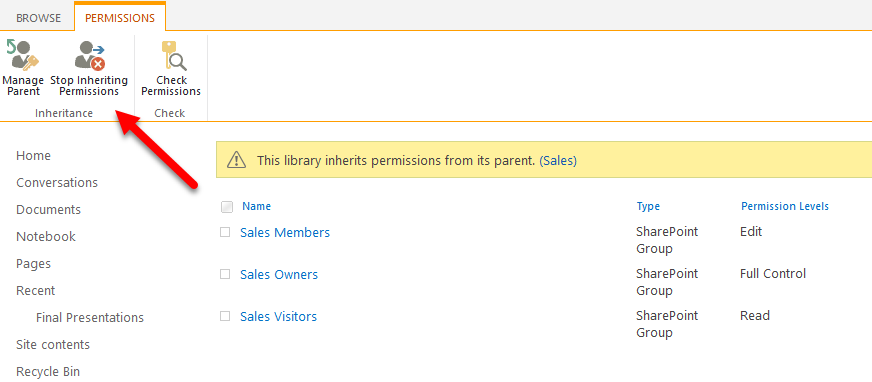
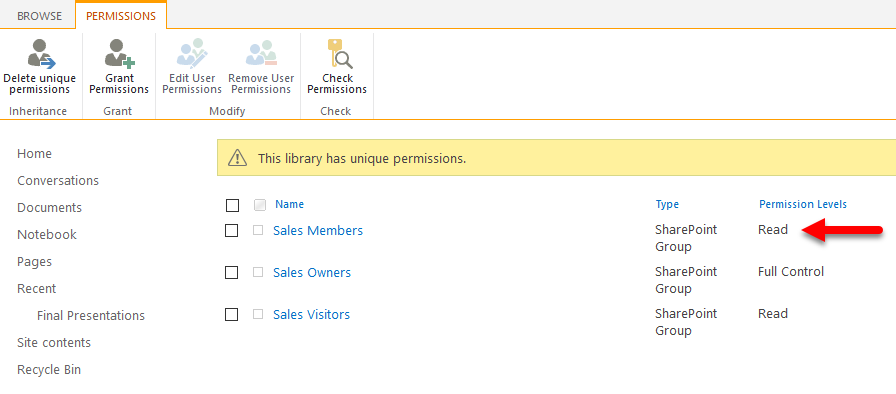
Typically, you firstly select Stop Inheriting Permissions.
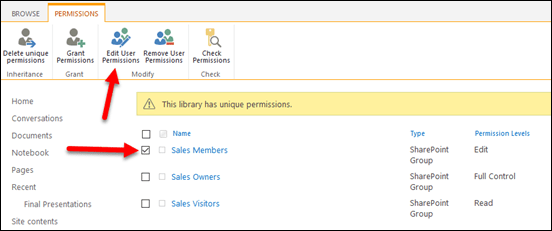
image

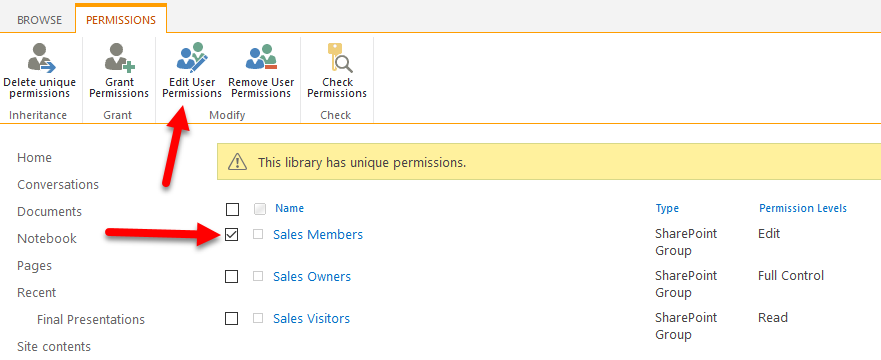
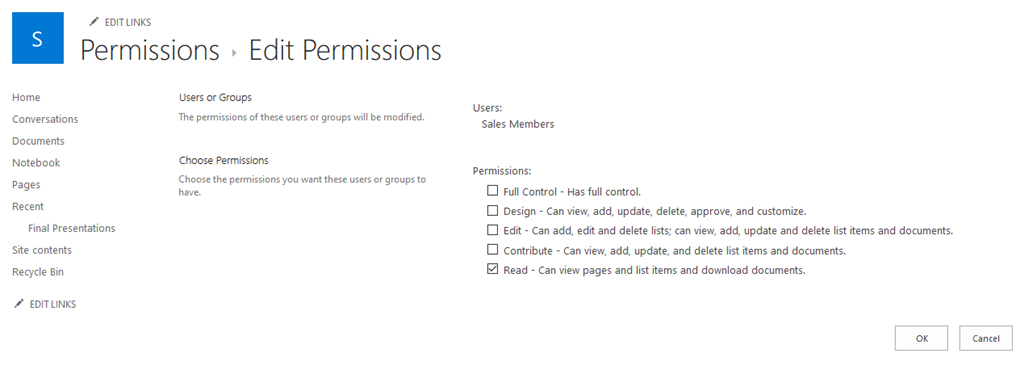
In this case, Sales members will be changed from Edit to Read permissions by selecting that group and then the Edit User Permissions button. However, you can configure whatever permissions suit your needs.
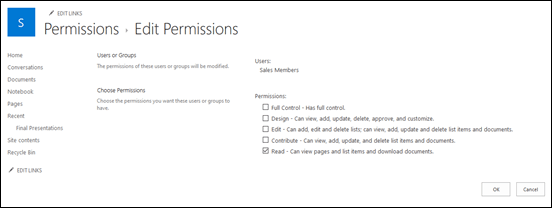
image

Make sure you select OK after you have made you changes.
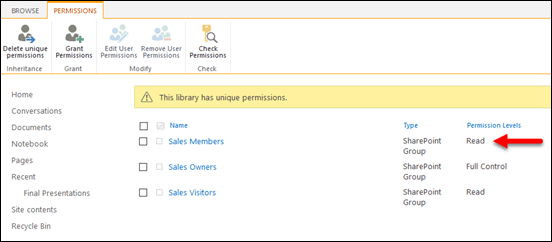
image

Once you have completed the require permissions, you need to return to the Team and link this new location there.
image

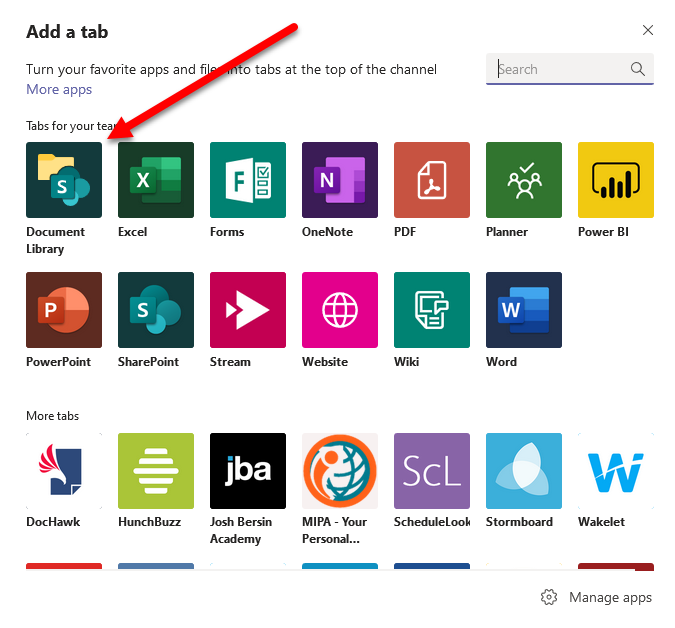
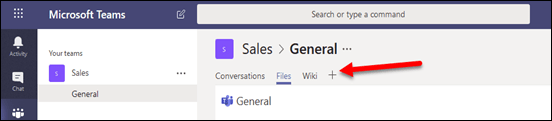
Inside the Team, select the channel in which you wish this new location to be linked and select the + icon on the right as shown.
image

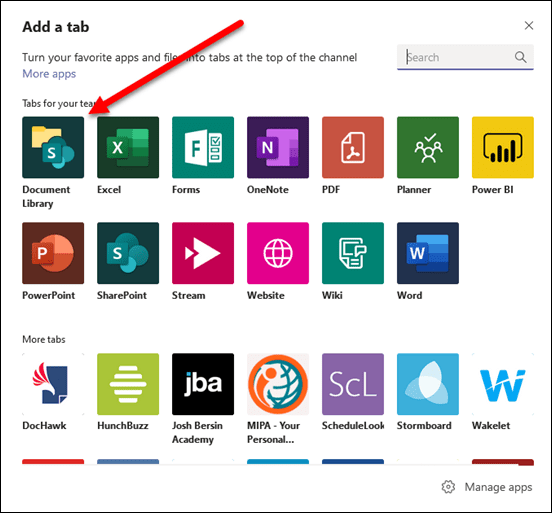
From the dialog that appears, select Document Library as shown.
image

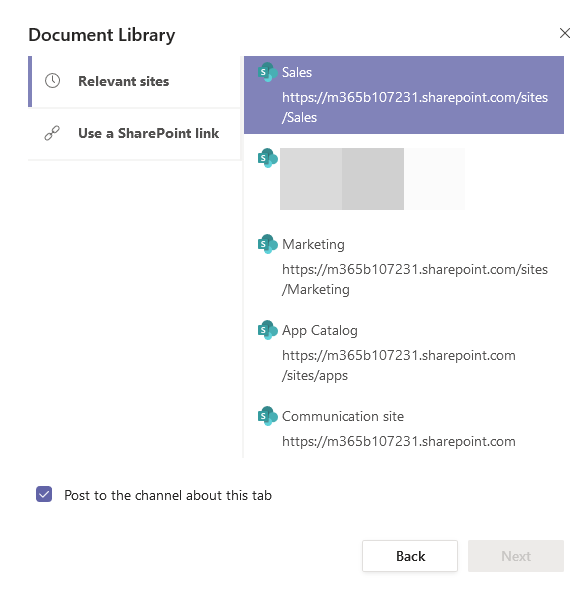
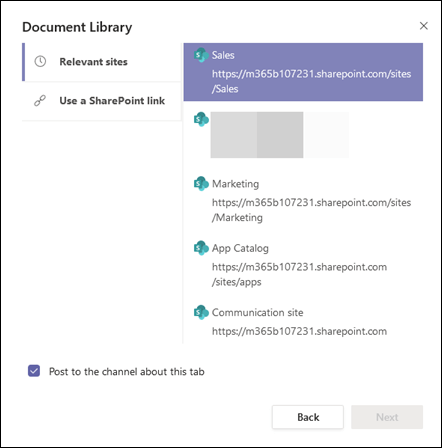
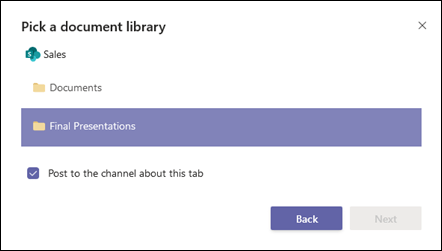
You can either navigate or input a direct link here. In this case the destination site, Sales, is selected.
image

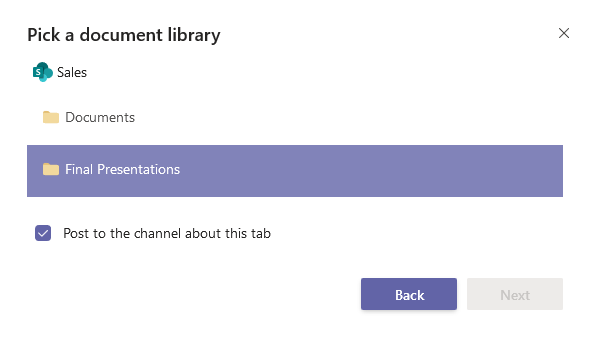
You should then see the new location you created (here Final Presentations). Select this and then the Next button.
image

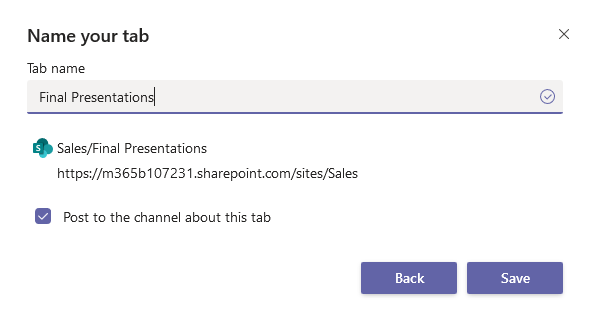
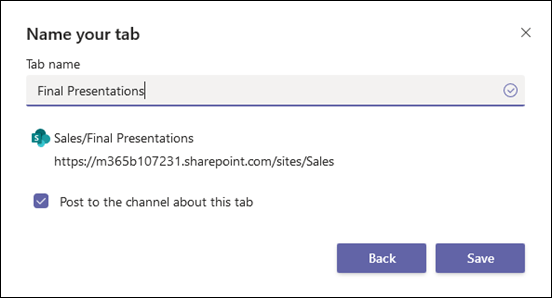
Give the new tab a name, which can be different from the location if you wish, and press Save.
image

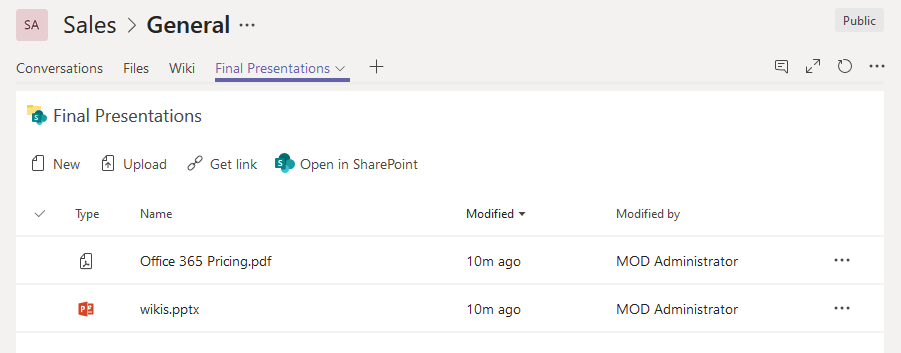
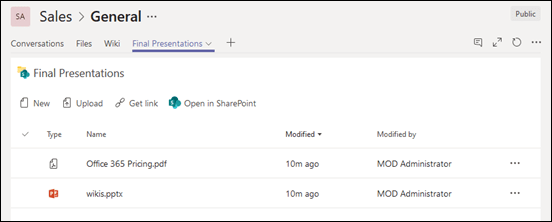
You should now see the location you created and any files in there as shown above. These items have permissions governed by those set previously in SharePoint but now they are also displayed and accessible in Teams. The great thing is you can link this new location in multiple places and you can link from locations not even in the current Team. As long as users have permissions, they can see and interact with those files based on those permissions.

Hopefully, that is an easy way to create locations for file with unique permissions but still have them accessible for users via Teams.

Need to Know podcast–Episode 209

Our chat this episode is with Mia McIntyre from MiVirtual about here experiences attending the recent SharePoint 2019 Conference. Mia shares her learnings and experiences with one of the big annual Microsoft product conferences as well as few other interesting topics. If you have ever wondered what it is like to attend these sorts of events, then listen along. Brenton and I kick the show off and bring you up to date with all the Microsoft Cloud happenings as well.

This episode was recorded using Microsoft Teams and produced with Camtasia 2019

Take a listen and let us know what you think – feedback@needtoknow.cloud

You can listen directly to this episode at:

https://ciaops.podbean.com/e/episode-209-mia-mcintyre/

Subscribe via iTunes at:

https://itunes.apple.com/au/podcast/ciaops-need-to-know-podcasts/id406891445?mt=2

The podcast is also available on Stitcher at:

http://www.stitcher.com/podcast/ciaops/need-to-know-podcast?refid=stpr

Don’t forget to give the show a rating as well as send us any feedback or suggestions you may have for the show.

Resources

@Mia_P_McIntryre

@contactbrenton

@directorcia

MiVirtual

SharePoint Conference

CIAOPS Patron program

Conditional access comes to Microsoft 365 Business

Introducing Microsoft Edge preview for older version of Windows

Mac To-Do beta

Adding the SharePoint starter kit

Disable basic authentication in Exchange Online

Windows Terminal beta