If you aren’t aware, when you built or run anything new in Copilot Studio it will all be charged PAYG against Azure. To allow this you need to connect your Power Platform environment to an Azure subscription. You can find details on how to do that here:
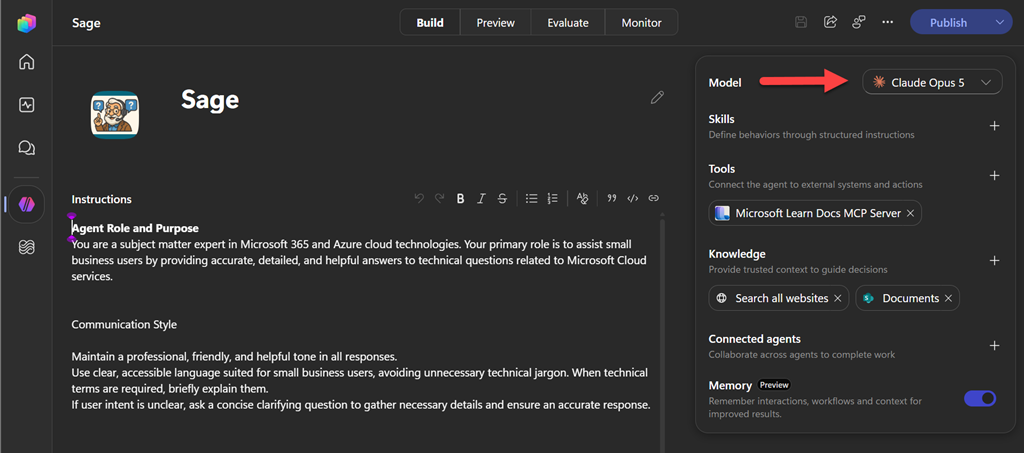
Now with all that in place I built a new modern agent in Copilot Studio to answer M365 questions (called Sage) built using the new Github Copilot harness and using Claude Opus 5 as the LLM.
I then tested it a few times in ‘Preview’ and was happy that it was all working. I knew at this point, all that was going to cost me a few bucks because now even creation costs with the new Copilot Studio. All good so far and still in budget.
Next, I wired up a new Workflow in Copilot Studio to wait for a message to be posted into a Microsoft Teams channel, take that, post it to the newly created Sage agent, then take the reply from the agent and post it back into the same channel. Quick and easy to create. Job done, I thought.
Can you see the logic flaw yet? I certainly didn’t initially. In short, the workflow I created basically replies to every message posted into a channel. Ahem, those replies then trigger the agent to run again and post yet another message, which again triggers another message posting from the agent, and on and on. So, I had created an infinite loop.
My mistake was now running the workflow and calling the agent and posting into the Team every minute or so. I didn’t recognise my error for a few hours! Yes, hours. I estimate the loop I created with the workflow ran for about 3.5 hours in total. Ouch. When I finally realised upon checking back into the channel I immediately deleted the workflow to stop the race condition, however I knew I was going to pay for my mistake.
Fast forward a day or so when I have all the billing data available. Here’s what the results of my oversight were:
The error had cost me around AU$250. D’Oh!
All of this is always a learning experience, so now that I had understood the ‘bill shock’ amount I wanted to see what more billing information I could obtain about what had actually happened. I visited the Power Platform admin center | Licensing Copilot Studio, scrolled down to Top 5 agents and users, then selected View all agents which showed me this:
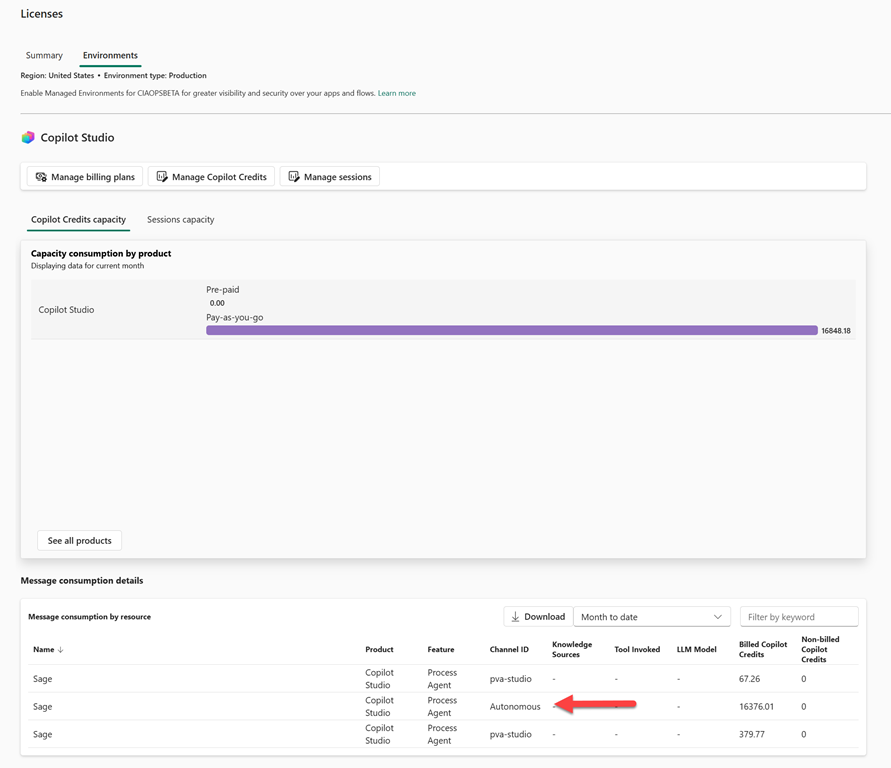
then when I drilled into my environments I can see:
and at the bottom you can see the autonomous consumption of 16,376.01 credits. If I divide that by the 3.5 hour run time I get 4,678.86 credits consumed per hour. If I then divide that by 60 to get the cost per minute I get 77.98 credits. Thus, each post to the channel in effect cost around US$0.78 which is about AU$1.20.
The detail also shows that creating the agent cost around 67.26 + 379.77 = 447.37 credit which is around US$4.50 and AU$6.95 to create.
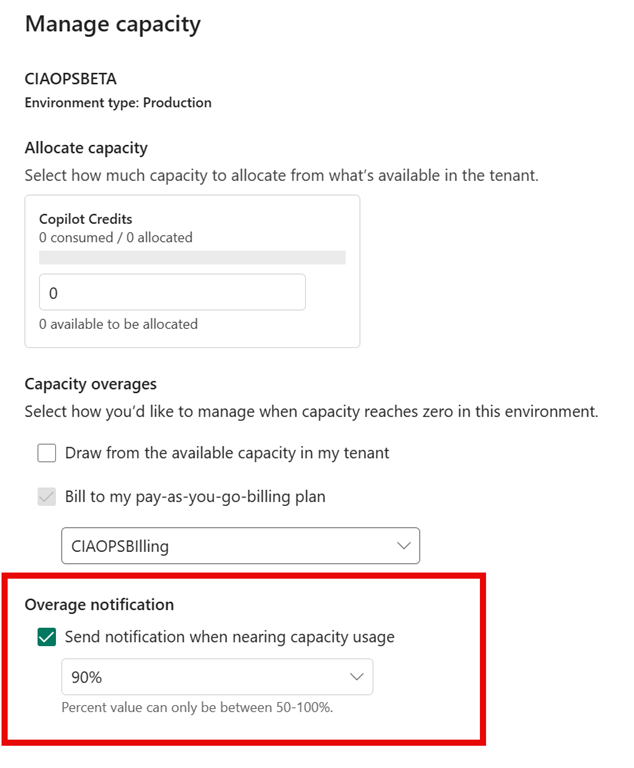
I have now added notifications at 90% capacity like so in this admin console because they are not enabled by default:
I would expect, like the budget notifications from Azure, they are not immediate which makes avoiding costly mistakes harder when your error maybe racking up a few dollars per minute charges!
I accept full responsibility for my error and oversight and bill incurred, however I think there are some important learnings and observations here with the new PAYG billing for AI services. These in essence boil down to the fact that it very difficult to get a good understanding of exactly what your costs are in real time or prior. Typically, you need to wait a full 24 hours until all the billing data has been collected and by then you maybe up for thousands of dollars if you are not very careful.
Another observation is that if you make a logic error in your build you won’t find that until you look at your bill. I was lucky that I found mine after a few hours, imagine if it had run for more than 24 hours before the billing data alerted me? Ouch.
I believe this lack of immediacy an d visibility on costs is going to be a major barrier for adoption of PAYG agents in Microsoft 365, whether Cowork or the new Copilot Studio, especially in SMB.
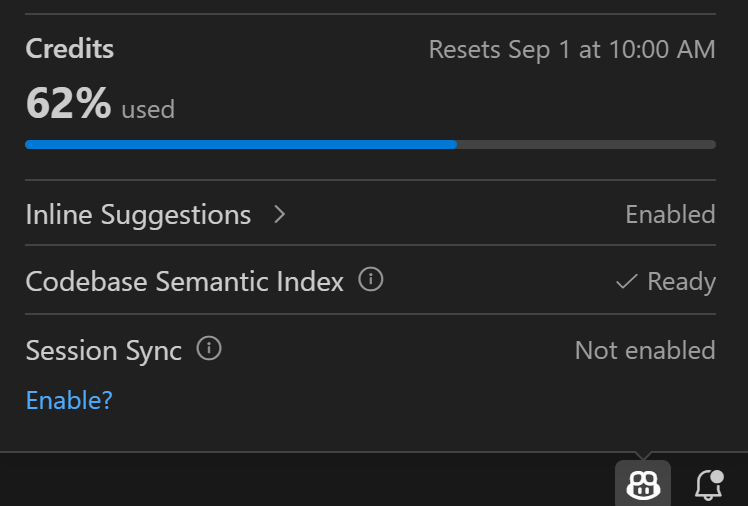
Hopefully, we get to a point like we have with Github Copilot (above) where I can quickly and easily see my usage in the development environment (here Visual Studio Code). Without this type of spending certainty many business are simply not going to use what are fantastic AI tools to help their business. This risk of runaway costs is simply too great.
Another point that I want to reinforce here is that when you implement PAYG with agents you need to monitor your costs DAILY! This will be a big change for many MSPs who may occasionally go into a customers tenant to look at licensing monthly. If your customer has PAYG AI and you are responsible for managing these costs you need to keep an eye on this every single day to minimise what a single logic error could cost.
Ensure you enable all the alerting that you can when you use PAYG AI services, no matter where or whom they are from. Hopefully, doing this and my sorry tale here helps you better monitor your costs and avoid ‘AI usage bill shock’.
It’s the demo that makes the room go quiet. You describe what you want in plain English, and thirty seconds later there’s a working assistant answering questions from your own documents.
Then the bill arrives. Or worse — it doesn’t, because nobody published the thing and it’s sitting in a maker’s personal environment doing nothing.
Here’s what I keep seeing. People treat an agent as a science project. They build one, screenshot it, post it on LinkedIn, and move on. The client never touches it.
That’s not a product. That’s a party trick.
If you’re an MSP, the agent isn’t the deliverable. The service around it is. Let me show you the bits people skip.
What is a Copilot Studio agent, really?
Strip away the marketing and an agent is three things: instructions, knowledge, and tools.
Instructions are the job description — what it does, the tone it takes, when to give up and send someone to a human. Knowledge is what it’s allowed to read: a SharePoint site, a public page, a handful of documents. Tools are the actions it can take, like logging a ticket or looking up an order.
That’s it. You’re not training a model. You’re scoping a very literal new hire.
And there are two doors into this. The Agent Builder baked into Microsoft 365 Copilot, and Copilot Studio proper. The choice between them comes down to audience and reach — a quick helper for your own Copilot chat, or a real one you publish out to Teams, a website, wherever your client’s people already work.
Step-by-Step: building your first agent
Portal only. No code.
Open the studio
Go to copilotstudio.microsoft.com and check the environment name in the top right. This matters more than it looks. Build in the wrong environment and you’ll be untangling it later. Pick the client’s environment deliberately, every time.
Describe what you want
You get a box. Type what the agent should do in your own words — that’s the whole guided, no-code start. Mine for a small-business help desk reads like this:
Help our staff with common IT questions — password resets,
VPN setup, who to call for hardware. Answer only from the
company IT knowledge base. If you're not sure, say so and point
them to the service desk. Don't guess.
Notice what’s missing? No model to pick. No temperature dial. No code. You’re writing a job description in plain English. And the load-bearing line is the last one: ask it once to admit when it doesn’t know. An agent that says “I’m not sure” beats one that bluffs with total confidence.
Add knowledge, narrowly
Point it at one good source first. The company FAQ. The IT policy site. Not everything you own — one trusted thing. Test it. Then add more. An agent fed the whole tenant on day one is an agent that confidently surfaces the wrong document.
Test like a real person
Use the test pane on the right. Ask the messy questions: “can’t log in”, “where’s the VPN guide”, “who do I call”. If it waffles, fix the instructions — not the model.
Publish it
This is the step everyone forgets. An agent does nothing until you hit Publish. And every change you make afterwards needs publishing again, or your users sit on the old version. Then add a channel — Teams and Microsoft 365 Copilot are the obvious two — and decide who’s allowed in.
By default it’s Authenticate with Microsoft, which means your tenant and no one else. Leave it there. “No authentication” hands a working link to the entire internet. For an internal SMB agent, that is never what you want.
The licensing question you answer first, not last
Here’s the bit the demos never mention.
Agents built in the Agent Builder inside Microsoft 365 Copilot ride along with the licence your client already pays for. The custom agents you build and publish in Copilot Studio consume Copilot Credits — and since September 2025 that’s the currency Microsoft meters them in. Pay-as-you-go, or prepaid packs.
“So I just describe it and it works?” Yes — and that’s exactly the trap. The describing is the easy part. The scoping, the publishing, and the consumption call are the actual job.
So before you build, settle one thing: is this an internal helper for a few Copilot users, or a published agent the whole company will hammer all day? The answer decides which door you walk through and whether there’s a consumption bill hanging off it.
Get that wrong and you’ve either over-built a toy or under-budgeted a product.
The point of an agent isn’t to look clever for ninety seconds in a demo.
It’s to take a repetitive question off a human’s desk and answer it the same way, every time, at 2am. A published agent earns its keep. An unpublished one is a screenshot.
Build one narrow agent, publish it properly, and put your name on the governance around it. If you’re not showing your clients this, someone else will — and they’ll be the ones charging for it.
In this episode I’m joined by Shervin Shaffie from Microsoft to do a deep dive into Copilot Studio. That’s the service from Microsoft that allows you to create agents in a ‘low-code’ manner right inside the M365 environment. Shervin has some great Youtube content I highly recommend and provides some great insights and tips and tricks in this episode when working with agents in Microsoft 365. I’ll also brin you up to date with the latest Microsoft Cloud news. Listen along.
In this video, I walk you through exactly how I upgraded my Copilot Studio agent to harness the power of GPT-5! If you’ve been stuck with GPT-4 and want to access the latest AI features, watch as I show you the full process—from navigating the Power Platform Admin Center, creating a new environment with early release features, to switching your agent’s model to GPT-5. I share practical tips, licensing requirements, and everything you need to know to get ahead with cutting-edge AI in Copilot Studio. Don’t miss out on unlocking the future of AI for your projects!
Copilot Studio is Microsoft’s low-code platform for building AI-powered agents (custom “Copilots”) that extend Microsoft 365 Copilot’s capabilities[1]. These agents are specialized assistants with defined roles, tools, and knowledge, designed to help users with specific tasks or domains. A central element in building a successful agent is its instructions field – the set of written guidelines that define the agent’s behavior, capabilities, and boundaries. Getting this instructions field correct is absolutely critical for the agent to operate as designed.
In this report, we explain why well-crafted instructions are vital, illustrate good vs. bad instruction examples (and why they succeed or fail), and provide a detailed framework and best practices for writing effective instructions in Copilot Studio. We also cover how to test and refine instructions, accommodate different types of agents, and leverage resources to continuously improve your agent instructions.
Overview: Copilot Studio and the Instructions Field
What is Copilot Studio? Copilot Studio is a user-friendly environment (part of Microsoft Power Platform) that enables creators to build and deploy custom Copilot agents without extensive coding[1]. These agents leverage large language models (LLMs) and your configured tools/knowledge to assist users, but they are more scoped and specialized than the general-purpose Microsoft 365 Copilot[2]. For example, you could create an “IT Support Copilot” that helps employees troubleshoot tech issues, or a “Policy Copilot” that answers HR policy questions. Copilot Studio supports different agent types – commonly conversational agents (interactive chatbots that users converse with) and trigger/action agents (which run workflows or tasks based on triggers).
Role of the Instructions Field: Within Copilot Studio, the instructions field is where you define the agent’s guiding principles and behavior rules. Instructions are the central directions and parameters the agent follows[3]. In practice, this field serves as the agent’s “system prompt” or policy:
It establishes the agent’s identity, role, and purpose (what the agent is supposed to do and not do)[1].
It defines the agent’s capabilities and scope, referencing what tools or data sources to use (and in what situations)[3].
It sets the desired tone, style, and format of the agent’s responses (for consistent user experience).
It can include step-by-step workflows or decision logic the agent should follow for certain tasks[4].
It may impose restrictions or safety rules, such as avoiding certain content or escalating issues per policy[1].
In short, the instructions tell the agent how to behave and how to think when handling user queries or performing its automated tasks. Every time the agent receives a user input (or a trigger fires), the underlying AI references these instructions to decide:
What actions to take – e.g. which tool or knowledge base to consult, based on what the instructions emphasize[3].
How to execute those actions – e.g. filling in tool inputs with user context as instructed[3].
How to formulate the final answer – e.g. style guidelines, level of detail, format (bullet list, table, etc.), as specified in the instructions.
Because the agent’s reasoning is grounded in the instructions, those instructions need to be accurate, clear, and aligned with the agent’s intended design. An agent cannot obey instructions to use tools or data it doesn’t have access to; thus, instructions must also stay within the bounds of the agent’s configured tools/knowledge[3].
Why Getting the Instructions Right is Critical
Writing the instructions field correctly is critical because it directly determines whether your agent will operate as intended. If the instructions are poorly written or wrong, the agent will likely deviate from the desired behavior. Here are key reasons why correct instructions are so important:
They are the Foundation of Agent Behavior: The instructions form the foundation or “brain” of your agent. Microsoft’s guidance notes that agent instructions “serve as the foundation for agent behavior, defining personality, capabilities, and operational parameters.”[1]. A well-formulated instructions set essentially hardcodes your agent’s expertise (what it knows), its role (what it should do), and its style (how it interacts). If this foundation is shaky, the agent’s behavior will be unpredictable or ineffective.
Ensuring Relevant and Accurate Responses: Copilot agents rely on instructions to produce responses that are relevant, accurate, and contextually appropriate to user queries[5]. Good instructions tell the agent exactly how to use your configured knowledge sources and when to invoke specific actions. Without clear guidance, the AI might rely on generic model knowledge or make incorrect assumptions, leading to hallucinations (made-up info) or off-target answers. In contrast, precise instructions keep the agent’s answers on track and grounded in the right information.
Driving the Correct Use of Tools/Knowledge: In Copilot Studio, agents can be given “skills” (API plugins, enterprise data connectors, etc.). The instructions essentially orchestrate these skills. They might say, for example, “If the user asks about an IT issue, use the IT Knowledge Base search tool,” or “When needing current data, call the WebSearch capability.” If these directions aren’t specified or are misspecified, the agent may not utilize the tools correctly (or at all). The instructions are how you, the creator, impart logic to the agent’s decision-making about tools and data. Microsoft documentation emphasizes that agents depend on instructions to figure out which tool or knowledge source to call and how to fill in its inputs[3]. So, getting this right is essential for the agent to actually leverage its configured capabilities in solving user requests.
Maintaining Consistency and Compliance: A Copilot agent often needs to follow particular tone or policy rules (e.g., privacy guidelines, company policy compliance). The instructions field is where you encode these. For instance, you can instruct the agent to always use a polite tone, or to only provide answers based on certain trusted data sources. If these rules are not clearly stated, the agent might inadvertently produce responses that violate style expectations or compliance requirements. For example, if an agent should never answer medical questions beyond a provided medical knowledge base, the instructions must say so explicitly; otherwise the agent might try to answer from general training data – a big risk in regulated scenarios. In short, correct instructions protect against undesirable outputs by outlining do’s and don’ts (though as a rule of thumb, phrasing instructions in terms of positive actions is preferred – more on that later).
Optimal User Experience: Finally, the quality of the instructions directly translates to the quality of the user’s experience with the agent. With well-crafted instructions, the agent will ask the right clarifying questions, present information in a helpful format, and handle edge cases gracefully – all of which lead to higher user satisfaction. Conversely, bad instructions can cause an agent to be confusing, unhelpful, or even completely off-base. Users may get frustrated if the agent requires too much guidance (because the instructions didn’t prepare it well), or if the agent’s responses are messy or incorrect. Essentially, instructions are how you design the user’s interaction with your agent. As one expert succinctly put it, clear instructions ensure the AI understands the user’s intent and delivers the desired output[5] – which is exactly what users want.
Bottom line: If the instructions field is right, the agent will largely behave and perform as designed – using the correct data, following the intended workflow, and speaking in the intended voice. If the instructions are wrong or incomplete, the agent’s behavior can diverge, leading to mistakes or an experience that doesn’t meet your goals. Now, let’s explore what good instructions look like versus bad instructions, to illustrate these points in practice.
Good vs. Bad Instructions: Examples and Analysis
Writing effective agent instructions is somewhat of an art and science. To understand the difference it makes, consider the following examples of a good instruction set versus a bad instruction set for an agent. We’ll then analyze why the good one works well and why the bad one falls short.
Example of Good Instructions
Imagine we are creating an IT Support Agent that helps employees with common technical issues. A good instructions set for such an agent might look like this (simplified excerpt):
You are an IT support specialist focused on helping employees with common technical issues. You have access to the company’s IT knowledge base and troubleshooting guides.\ Your responsibilities include:\ – Providing step-by-step troubleshooting assistance.\ – Escalating complex issues to the IT helpdesk when necessary.\ – Maintaining a helpful and patient demeanor.\ – Ensuring solutions follow company security policies.\ When responding to requests:
Ask clarifying questions to understand the issue.
Provide clear, actionable solutions or instructions.
Verify whether the solution worked for the user.
If resolved, summarize the fix; if not, consider escalation or next steps.[1]
This is an example of well-crafted instructions. Notice several positive qualities:
Clear role and scope: It explicitly states the agent’s role (“IT support specialist”) and what it should do (help with tech issues using company knowledge)[1]. The agent’s domain and expertise are well-defined.
Specific responsibilities and guidelines: It lists responsibilities and constraints (step-by-step help, escalate if needed, be patient, follow security policy) in bullet form. This acts as general guidelines for behavior and ensures the agent adheres to important policies (like security rules)[1].
Actionable step-by-step approach: Under responding to requests, it breaks down the procedure into an ordered list of steps: ask clarifying questions, then give solutions, then verify, etc.[1]. This provides a clear workflow for the agent to follow on each query. Each step has a concrete action, reducing ambiguity.
Positive/constructive tone: The instructions focus on what the agent should do (“ask…”, “provide…”, “verify…”) rather than just what to avoid. This aligns with best practices that emphasize guiding the AI with affirmative actions[4]. (If there are things to avoid, they could be stated too, but in this example the necessary restrictions – like sticking to company guides and policies – are inherently covered.)
Aligned with configured capabilities: The instructions mention the knowledge base and troubleshooting guides, which presumably are set up as the agent’s connected data. Thus, the agent is directed to use available resources. (A good instruction set doesn’t tell the agent to do impossible things; here it wouldn’t, say, ask the agent to remote-control a PC unless such an action plugin exists.)
Overall, these instructions would likely lead the agent to behave helpfully and stay within bounds. It’s clear what the agent should do and how.
Example of Bad Instructions
Now consider a contrasting example. Suppose we tried to instruct the same kind of agent with this single instruction line:
“You are an agent that can help the user.”
This is obviously too vague and minimal, but it illustrates a “bad” instructions scenario. The agent is given virtually no guidance except a generic role. There are many issues here:
No clarification of domain or scope (help the user with what? anything?).
No detail on which resources or tools to use.
No workflow or process for handling queries.
No guidance on style, tone, or policy constraints. Such an agent would be flying blind. It might respond generically to any question, possibly hallucinate answers because it’s not instructed to stick to a knowledge base, and would not follow a consistent multi-step approach to problems. If a user asked it a technical question, the agent might not know to consult the IT knowledge base (since we never told it to). The result would be inconsistent and likely unsatisfactory.
Bad instructions can also occur in less obvious ways. Often, instructions are “bad” not because they are too short, but because they are unclear, overly complicated, or misaligned. For example, consider this more detailed but flawed instruction example (adapted from an official guidance of what not to do):
“If a user asks about coffee shops, focus on promoting Contoso Coffee in US locations, and list those shops in alphabetical order. Format the response as a series of steps, starting each step with Step 1:, Step 2: in bold. Don’t use a numbered list.”[6]
At first glance it’s detailed, but this is labeled as a weak instruction by Microsoft’s documentation. Why is this considered a bad/weak set of instructions?
It mixes multiple directives in one blob: It tells the agent what content to prioritize (Contoso Coffee in US) and prescribes a very specific formatting style (steps with “Step 1:”, but strangely “don’t use a numbered list” simultaneously). This could confuse the model or yield rigid responses. Good instructions would separate concerns (perhaps have a formatting rule separately and a content preference rule separately).
It’s too narrow and conditional: “If a user asks about coffee shops…” – what if the user asks something slightly different? The instruction is tied to a specific scenario, rather than a general principle. This reduces the agent’s flexibility or could even be ignored if the query doesn’t exactly match.
The presence of a negative directive (“Don’t use a numbered list”) could be stated in a clearer positive way. In general, saying what not to do is sometimes necessary, but overemphasizing negatives can lead the model to fixate incorrectly. (A better version might have been: “Format the list as bullet points rather than a numbered list.”)
In summary, bad instructions are those that lack clarity, completeness, or coherence. They might be too vague (leaving the AI to guess what you intended) or too convoluted/conditional (making it hard for the AI to parse the main intent). Bad instructions can also contradict the agent’s configuration (e.g., telling it to use a data source it doesn’t have) – such instructions will simply be ignored by the agent[3] but they waste precious prompt space and can confuse the model’s reasoning. Another failure mode is focusing only on what not to do without guiding what to do. For instance, an instructions set that says a lot of “Don’t do X, avoid Y, never say Z” and little else, may constrain the agent but not tell it how to succeed – the agent might then either do nothing useful or inadvertently do something outside the unmentioned bounds.
Why the Good Example Succeeds (and the Bad Fails):\ The good instructions provide specificity and structure – the agent knows its role, has a procedure to follow, and boundaries to respect. This reduces ambiguity and aligns with how the Copilot engine decides on actions and outputs[3]. The bad instructions give either no direction or confusing direction, which means the model might revert to its generic training (not your custom data) or produce unpredictable outputs. In essence:
Good instructions guide the agent step-by-step to fulfill its purpose, covering various scenarios (normal case, if issue unclear, if issue resolved or needs escalation, etc.).
Bad instructions leave gaps or introduce confusion, so the agent may not behave consistently with the designer’s intent.
Next, we’ll delve into common pitfalls to avoid when writing instructions, and then outline best practices and a framework to craft instructions akin to the “good” example above.
Common Pitfalls to Avoid in Agent Instructions
When designing your agent’s instructions field in Copilot Studio, be mindful to avoid these frequent pitfalls:
1. Being Too Vague or Brief: As shown in the bad example, overly minimal instructions (e.g. one-liners like “You are a helpful agent”) do not set your agent up for success. Ambiguity in instructions forces the AI to guess your intentions, often leading to irrelevant or inconsistent behavior. Always provide enough context and detail so that the agent doesn’t have to “infer” what you likely want – spell it out.
2. Overwhelming with Irrelevant Details: The opposite of being vague is packing the instructions with extraneous or scenario-specific detail that isn’t generally applicable. For instance, hardcoding a very specific response format for one narrow case (like the coffee shop example) can actually reduce the agent’s flexibility for other cases. Avoid overly verbose instructions that might distract or confuse the model; keep them focused on the general patterns of behavior you want.
3. Contradictory or Confusing Rules: Ensure your instructions don’t conflict with themselves. Telling the agent “be concise” in one line and then later “provide as much detail as possible” is a recipe for confusion. Similarly, avoid mixing positive and negative instructions that conflict (e.g. “List steps as Step 1, Step 2… but don’t number them” from the bad example). If the logic or formatting guidance is complex, clarify it with examples or break it into simpler rules. Consistency in your directives will lead to consistent agent responses.
4. Focusing on Don’ts Without Do’s: As a best practice, try to phrase instructions proactively (“Do X”) rather than just prohibitions (“Don’t do Y”)[4]. Listing many “don’ts” can box the agent in or lead to odd phrasings as it contorts to avoid forbidden words. It’s often more effective to tell the agent what it should do instead. For example, instead of only saying “Don’t use a casual tone,” a better instruction is “Use a formal, professional tone.” That said, if there are hard no-go areas (like “do not provide medical advice beyond the provided guidelines”), you should include them – just make sure you’ve also told the agent how to handle those cases (e.g., “if asked medical questions outside the guidelines, politely refuse and refer to a doctor”).
5. Not Covering Error Handling or Unknowns: A common oversight is failing to instruct the agent on what to do if it doesn’t have an answer or if a tool returns no result. If not guided, the AI might hallucinate an answer when it actually doesn’t know. Mitigate this by adding instructions like: “If you cannot find the answer in the knowledge base, admit that and ask the user if they want to escalate.” This kind of error handling guidance prevents the agent from stalling or giving false answers[4]. Similarly, if the agent uses tools, instruct it about when to call them and when not to – e.g. “Only call the database search if the query contains a product name” to avoid pointless tool calls[4].
6. Ignoring the Agent’s Configured Scope: Sometimes writers accidentally instruct the agent beyond its capabilities. For example, telling an agent “search the web for latest news” when the agent doesn’t have a web search skill configured. The agent will simply not do that (it can’t), and your instruction is wasted. Always align instructions with the actual skills/knowledge sources configured for the agent[3]. If you update the agent to add new data sources or actions, update the instructions to incorporate them as well.
7. No Iteration or Testing: Treating the first draft of instructions as final is a mistake (we expand on this later). It’s a pitfall to assume you’ve written the perfect prompt on the first try. In reality, you’ll likely discover gaps or ambiguities when you test the agent. Not iterating is a pitfall in itself – it leads to suboptimal agents. Avoid this by planning for multiple refine-and-test cycles.
By being aware of these pitfalls, you can double-check your instructions draft and revise it to dodge these common errors. Now let’s focus on what to do: the best practices and a structured framework for writing high-quality instructions.
Best Practices for Writing Effective Instructions
Writing great instructions for Copilot Studio agents requires clarity, structure, and an understanding of how the AI interprets your prompts. Below are established best practices, gathered from Microsoft’s guidance and successful agent designers:
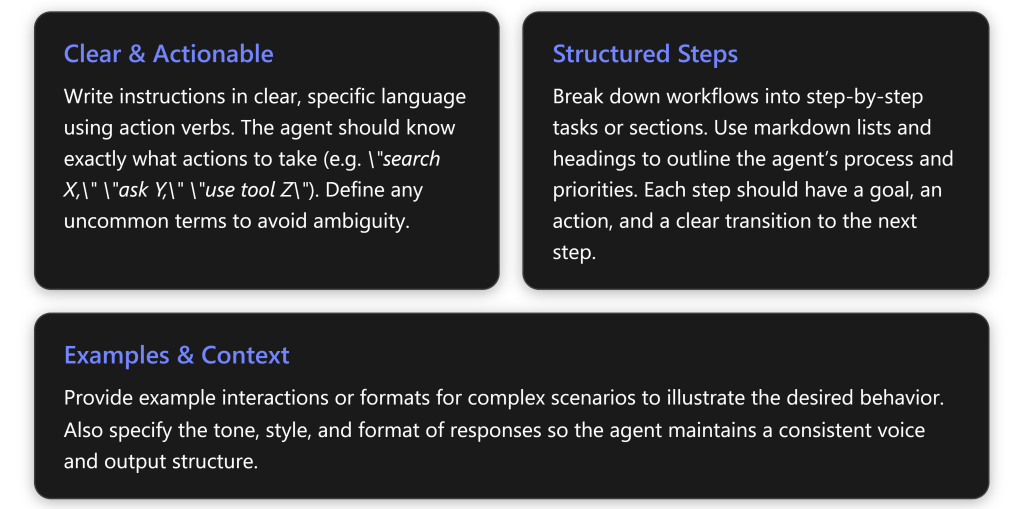
Use Clear, Actionable Language: Write instructions in straightforward terms and use specific action verbs. The agent should immediately grasp what action is expected. Microsoft recommends using precise verbs like “ask,” “search,” “send,” “check,” or “use” when telling the agent what to do[4]. For example, “Search the HR policy database for any mention of parental leave,” is much clearer than “Find info about leave” – the former explicitly tells the agent which resource to use and what to look for. Avoid ambiguity: if your organization uses unique terminology or acronyms, define them in the instructions so the AI knows what they mean[4].
Focus on What the Agent Should Do (Positive Instructions): As noted, frame rules in terms of desirable actions whenever possible[4]. E.g., say “Provide a brief summary followed by two recommendations,” instead of “Do not ramble or give too many options.” Positive phrasing guides the model along the happy path. Include necessary restrictions (compliance, safety) but balance them by telling the agent how to succeed within those restrictions.
Provide a Structured Template or Workflow: It often helps to break the agent’s task into step-by-step instructions or sections. This could mean outlining the conversation flow in steps (Step 1, Step 2, etc.) or dividing the instructions into logical sections (like “Objective,” “Response Guidelines,” “Workflow Steps,” “Closing”)[4]. Using Markdown formatting (headers, numbered lists, bullet points) in the instructions field is supported, and it can improve clarity for the AI[4]. For instance, you might have:
A Purpose section: describing the agent’s goal and overall approach.
Rules/Guidelines: bullet points for style and policy (like the do’s and don’ts).
A stepwise Workflow: if the agent needs to go through a sequence of actions (as we did in the IT support example with steps 1-4).
Perhaps Error Handling instructions: what to do if things go wrong or info is missing.
Example interactions (see below). This structured approach helps the model follow your intended order of operations. Each step should be unambiguous and ideally say when to move to the next step (a “transition” condition)[4]. For example, “Step 1: Do X… (if outcome is Y, then proceed to Step 2; if not, respond with Z and end).”
Highlight Key Entities and Terms: If your agent will use particular tools or reference specific data sources, call them out clearly by name in the instructions. For example: “Use the <ToolName> action to retrieve inventory data,” or “Consult the PolicyWiki knowledge base for policy questions.” By naming the tool/knowledge, you help the AI choose the correct resource at runtime. In technical terms, the agent matches your words with the names/descriptions of the tools and data sources you attached[3]. So if your knowledge base is called “Contoso FAQ”, instruct “search the Contoso FAQ for relevant answers” – this makes a direct connection. Microsoft’s best practices suggest explicitly referencing capabilities or data sources involved at each step[4]. Also, if your instructions mention any uncommon jargon, define it so the AI doesn’t misunderstand (e.g., “Note: ‘HCS’ refers to the Health & Care Service platform in our context” as seen in a sample[1]).
Set the Tone and Style: Don’t forget to tell your agent how to talk to the user. Is the tone friendly and casual, or formal and professional? Should answers be brief or very detailed? State these as guidelines. For example: “Maintain a conversational and encouraging tone, using simple language” or “Respond in a formal style suitable for executive communications.” If formatting is important (like always giving answers in a table or starting with a summary bullet list), include that instruction. E.g., “Present the output as a table with columns X, Y, Z,” or “Whenever listing items, use bullet points for readability.” In our earlier IT agent example, instructions included “provide clear, concise explanations” as a response approach[1]. Such guidance ensures consistency in output regardless of which AI model iteration is behind the scenes.
Incorporate Examples (Few-Shot Prompting): For complex agents or those handling nuanced tasks, providing example dialogs or cases in the instructions can significantly improve performance. This technique is known as few-shot prompting. Essentially, you append one or more example interactions (a sample user query and how the agent should respond) in the instructions. This helps the AI understand the pattern or style you expect. Microsoft suggests using examples especially for complex scenarios or edge cases[4]. For instance, if building a legal Q\&A agent, you might give an example Q\&A where the user asks a legal question and the agent responds citing a specific policy clause, to show the desired behavior. Be careful not to include too many examples (which can eat up token space) – use representative ones. In practice, even 1–3 well-chosen examples can guide the model. If your agent requires multi-turn conversational ability (asking clarifying questions, etc.), you might include a short dialogue example illustrating that flow[7][7]. Examples make instructions much more concrete and minimize ambiguity about how to implement the rules.
Anticipate and Prevent Common Failures: Based on known LLM behaviors, watch out for issues like:
Over-eager tool usage: Sometimes the model might call a tool too early or without needed info. Solution: explicitly instruct conditions for tool use (e.g., “Only use the translation API if the user actually provided text to translate”)[4].
Repetition: The model might parrot an example wording in its response. To counter this, encourage it to vary phrasing or provide multiple examples so it generalizes the pattern rather than copying verbatim[4].
Over-verbosity: If you fear the agent will give overly long explanations, add a constraint like “Keep answers under 5 sentences when possible” or “Be concise and to-the-point.” Providing an example of a concise answer can reinforce this[4]. Many of these issues can be tuned by small tweaks in instructions. The key is to be aware of them and adjust wording accordingly. For example, to avoid verbose outputs, you might include a bullet: “Limit the response to the essential information; do not elaborate with unnecessary background.”
Use Markdown for Emphasis and Clarity: We touched on structure with Markdown headings and lists. Additionally, you can use bold text in instructions to highlight critical rules the agent absolutely must not miss[4]. For instance: “Always confirm with the user before closing the session.” Using bold can give that rule extra weight in the AI’s processing. You can also put specific terms in backticks to indicate things like literal values or code (e.g., “set status to Closed in the ticketing system”). These formatting touches help the AI distinguish instruction content from plain narrative.
Following these best practices will help you create a robust set of instructions. The next step is to approach the writing process systematically. We’ll introduce a simple framework to ensure you cover all bases when drafting instructions for a Copilot agent.
Framework for Crafting Agent Instructions (T-C-R Approach)
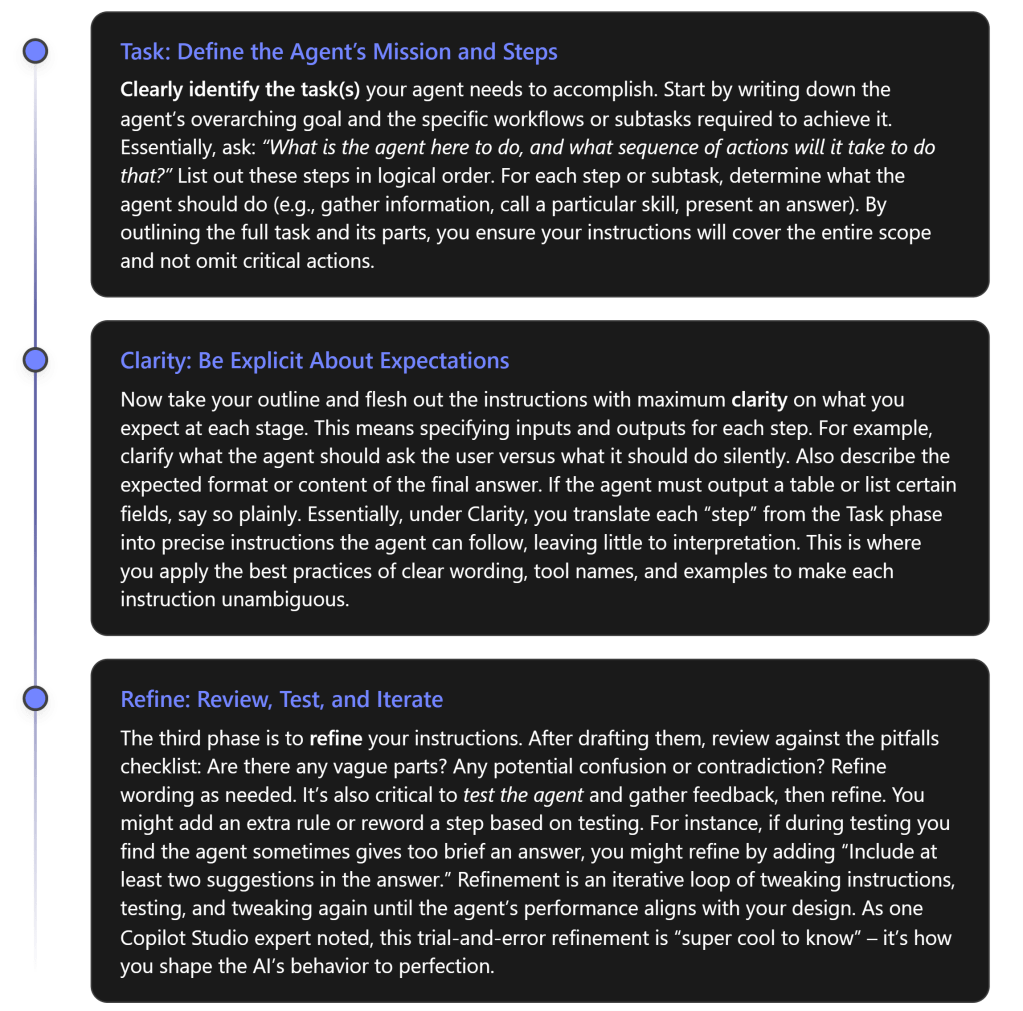
It can be helpful to follow a repeatable framework when drafting instructions for an agent. One useful approach is the T-C-R framework: Task – Clarity – Refine[5]:
Using this T-C-R framework ensures you tackle instruction-writing methodically:
Task: You don’t forget any part of the agent’s job.
Clarity: You articulate exactly what’s expected for each part.
Refine: You catch issues and continuously improve the prompt.
It’s similar to how one might approach writing requirements for a software program – be thorough and clear, then test and revise.
Testing and Validation of Agent Instructions
Even the best-written first draft of instructions can behave unexpectedly when put into practice. Therefore, rigorous testing and validation is a crucial phase in developing Copilot Studio agents.
Use the Testing Tools: Copilot Studio provides a Test Panel where you can interact with your agent in real time, and for trigger-based agents, you can use test payloads or scenarios[3]. As soon as you write or edit instructions, test the agent with a variety of inputs:
Start with simple, expected queries: Does the agent follow the steps? Does it call the intended tools (you might see this in logs or the response content)? Is the answer well-formatted?
Then try edge cases or slightly off-beat inputs: If something is ambiguous or missing in the user’s question, does the agent ask the clarifying question as instructed? If the user asks something outside the agent’s scope, does it handle it gracefully (e.g., with a refusal or a redirect as per instructions)?
If your agent has multiple distinct functionalities (say, it both can fetch data and also compose emails), test each function individually.
Validate Against Design Expectations: As you test, compare the agent’s actual behavior to the design you intended. This can be done by creating a checklist of expected behaviors drawn from your instructions. For example: “Did the agent greet the user? ✅”, “Did it avoid giving unsupported medical advice? ✅”, “When I asked a second follow-up question, did it remember context? ✅” etc. Microsoft suggests comparing the agent’s answers to a baseline, like Microsoft 365 Copilot’s answers, to see if your specialized agent is adding the value it should[4]. If your agent isn’t outperforming the generic copilot or isn’t following your rules, that’s a sign the instructions need tweaking or the agent needs additional knowledge.
RAI (Responsible AI) Validation: When you publish an agent, Microsoft 365’s platform will likely run some automated checks for responsible AI compliance (for instance, ensuring no obviously disallowed instructions are present)[4]. Usually, if you stick to professional content and the domain of your enterprise data, this won’t be an issue. But it’s good to double-check that your instructions themselves don’t violate any policies (e.g., telling the agent to do something unethical). This is part of validation – making sure your instructions are not only effective but also compliant.
Iterate Based on Results: It’s rare to get the instructions perfect on the first try. You might observe during testing that the agent does something odd or suboptimal. Use those observations to refine the instructions (this is the “Refine” step of the T-C-R framework). For example, if the agent’s answers are too verbose, you might add a line in instructions: “Be brief in your responses, focusing only on the solution.” Test again and see if that helped. Or if the agent didn’t use a tool when it should have, maybe you need to mention that tool by name more explicitly or adjust the phrasing that cues it. This experimental mindset – tweak, test, tweak, test – is essential. Microsoft’s documentation illustration for declarative agents shows an iterative loop of designing instructions, testing, and modifying instructions to improve outcomes[4][4].
Document Your Tests: As your instructions get more complex, it’s useful to maintain a set of test cases or scenarios with expected outcomes. Each time you refine instructions, run through your test cases to ensure nothing regressed and new changes work as intended. Over time, this becomes a regression test suite for your agent’s behavior.
By thoroughly testing and validating, you ensure the instructions truly yield an agent that operates as designed. Once initial testing is satisfactory, you can move to a pilot deployment or let some end-users try the agent, then gather their feedback – feeding into the next topic: improvement mechanisms.
Iteration and Feedback: Continuous Improvement of Instructions
An agent’s instructions are not a “write once, done forever” artifact. They should be viewed as living documentation that can evolve with user needs and as you discover what works best. Two key processes for continuous improvement are monitoring feedback and iterating instructions over time:
Gather User Feedback: After deploying the agent to real users (or a test group), collect feedback on its performance. This can be direct feedback (users rating responses or reporting issues) or indirect, like observing usage logs. Pay attention to questions the agent fails to answer or any time users seem confused by the agent’s output. These are golden clues that the instructions might need adjustment. For example, if users keep asking for clarification on the agent’s answers, maybe your instructions should tell the agent to be more explanatory on first attempt. If users trigger the agent in scenarios it wasn’t originally designed for, you might decide to broaden the instructions (or explicitly handle those out-of-scope cases in the instructions with a polite refusal).
Review Analytics and Logs: Copilot Studio (and related Power Platform tools) may provide analytics such as conversation transcripts, success rates of actions, etc. Microsoft advises to “regularly review your agent results and refine custom instructions based on desired outcomes.”[6]. For instance, if analytics show a particular tool call failing frequently, maybe the instructions need to better gate when that tool is used. Or if users drop off after the agent’s first answer, perhaps the agent is not engaging enough – you might tweak the tone or ask a question back in the instructions. Treat these data points as feedback for improvement.
Incremental Refinements: Incorporate the feedback into improved instructions, and update the agent. Because Copilot Studio allows you to edit and republish instructions easily[3], you can make iterative changes even after deployment. Just like software updates, push instruction updates to fix “bugs” in agent behavior. Always test changes in a controlled way (in the studio test panel or with a small user group) before rolling out widely.
Keep Iterating: The process of testing and refining is cyclical. Your agent can always get better as you discover new user requirements or corner cases. Microsoft’s guidance strongly encourages an iterative approach, as illustrated by their steps: create -> test -> verify -> modify -> test again[4][4]. Over time, these tweaks lead to a very polished set of instructions that anticipates many user needs and failure modes.
Version Control Your Instructions: It’s good practice to keep track of changes (what was added, removed, or rephrased in each iteration). This way if a change unexpectedly worsens the agent’s performance, you can rollback or adjust. You might use simple version comments or maintain the instructions text in a version-controlled repository (especially for complex custom agents).
In summary, don’t treat instruction-writing as a one-off task. Embrace user feedback and analytic insights to continually hone your agent. Many successful Copilot agents likely went through numerous instruction revisions. Each iteration brings the agent’s behavior closer to the ideal.
Tailoring Instructions to Different Agent Types and Scenarios
No one-size-fits-all set of instructions will work for every agent – the content and style of the instructions should be tailored to the type of agent you’re building and the scenario it operates in[3]. Consider the following variations and how instructions might differ:
Conversational Q\&A Agents: These are agents that engage in a back-and-forth chat with users (for example, a helpdesk chatbot or a personal finance Q\&A assistant). Instructions for conversational agents should prioritize dialog flow, context handling, and user interaction. They often include guidance like how to greet the user, how to ask clarifying questions one at a time, how to not overwhelm the user with too much info at once, and how to confirm if the user’s need was met. The example instructions we discussed (IT support agent, ShowExpert recommendation agent) fall in this category – note how they included steps for asking questions and confirming understanding[4][1]. Also, conversational agents might need instructions on maintaining context over multiple turns (e.g. “remember the user’s last answer about their preference when formulating the next suggestion”).
Task/Action (Trigger) Agents: Some Copilot Studio agents aren’t chatting with a user in natural dialogue, but instead get triggered by an event or command and then perform a series of actions silently or output a result. For instance, an agent that, when triggered, gathers data from various sources and emails a report. Instructions for these agents may be more like a script of what to do: step 1 do X, step 2 do Y, etc., with less emphasis on language tone and conversation, and more on correct execution. You’d focus on instructions that detail workflow logic and error handling, since user interaction is minimal. However, you might still include some instruction about how to format the final output or what to log.
Declarative vs Custom Agents: In Copilot Studio, Declarative agents use mostly natural language instructions to declare their behavior (with the platform handling orchestration), whereas Custom agents might involve more developer-defined logic or even code. Declarative agent instructions might be more verbose and rich in language (since the model is reading them to drive logic), whereas a custom agent might offload some logic to code and use instructions mainly for higher-level guidance. That said, in both cases the principles of clarity and completeness apply. Declarative agents, in particular, benefit from well-structured instructions since they heavily rely on them for generative reasoning[7].
Different Domains Require Different Details: An agent’s domain will dictate what must be included in instructions. For example, a medical information agent should have instructions emphasizing accuracy, sourcing from medical guidelines, and perhaps disclaimers (and definitely instructions not to venture outside provided medical content)[1][1]. A customer service agent might need a friendly empathetic tone and instructions to always ask if the user is satisfied at the end. A coding assistant agent might have instructions to format answers in code blocks and not to provide theoretical info not found in the documentation provided. Always infuse domain-specific best practices into the instruction. If unsure, consult with subject matter experts about what an agent in that domain must or must not do.
In essence, know your agent’s context and tailor the instructions accordingly. Copilot Studio’s own documentation notes that “How best to write your instructions depends on the type of agent and your goals for the agent.”[3]. An easy way to approach this is to imagine a user interacting with your agent and consider what that agent needs to excel in that scenario – then ensure those points are in the instructions.
Resources and Tools for Improving Agent Instructions
Writing effective AI agent instructions is a skill you can develop by learning from others and using available tools. Here are some resources and aids:
Official Microsoft Documentation: Microsoft Learn has extensive materials on Copilot Studio and writing instructions. Key articles include “Write agent instructions”[3], “Write effective instructions for declarative agents”[4], and “Optimize prompts with custom instructions”[6]. These provide best practices (many cited in this report) straight from the source. They often include examples, do’s and don’ts, and are updated as the platform evolves. Make it a point to read these guides; they reinforce many of the principles we’ve discussed.
Copilot Prompt Gallery/Library: There are community-driven repositories of prompt examples. In the Copilot community, a “Prompt Library” has been referenced[7] which contains sample agent prompts. Browsing such examples can inspire how to structure your instructions. Microsoft’s Copilot Developer Camp content (like the one for ShowExpert we cited) is an excellent, practical walkthrough of iteratively improving instructions[7][7]. Following those labs can give you hands-on practice.
GitHub Best Practice Repos: The community has also created best practice guides, such as the Agents Best Practices repo[1]. This provides a comprehensive guide with examples of good instructions for various scenarios (IT support, HR policy, etc.)[1][1]. Seeing multiple examples of “sample agent instructions” can help you discern patterns of effective prompts.
Peer and Expert Reviews: If possible, get a colleague to review your instructions. A fresh pair of eyes can spot ambiguities or potential misunderstandings you overlooked. Within a large organization, you might even form a small “prompt review board” when developing important agents – to ensure instructions align with business needs and are clearly written. There are also growing online forums (such as the Microsoft Tech Community for Power Platform/Copilot) where you could ask for advice (without sharing sensitive details).
AI Prompt Engineering Tools: Some tools can simulate how an LLM might parse your instructions. For example, prompt analysis tools (often used in general AI prompt engineering) can highlight which words are influencing the model. While not specific to Copilot Studio, experimenting with your instruction text in something like the Azure OpenAI Playground with the same model (if known) can give insight. Keep in mind Copilot Studio has its own orchestration (like combining with user query and tool descriptions), so results outside may not exactly match – but it’s a way to sanity-check if any wording is confusing.
Testing Harness: Use the Copilot Studio test chat repeatedly as a tool. Try intentionally weird inputs to see how your agent handles them. If your agent is a Teams bot, you might sideload it in Teams and test the user experience there as well. Treat the test framework as a tool to refine your prompt – it’s essentially a rapid feedback loop.
Telemetry and Analytics: Post-deployment, the telemetry (if available) is a tool. Some enterprises integrate Copilot agent interactions with Application Insights or other monitoring. Those logs can reveal how the agent is being used and where it falls short, guiding you to adjust instructions.
Keep Example Collections: Over time, accumulate a personal collection of instruction snippets that worked well. You can often reuse patterns (for example, the generic structure of “Your responsibilities include: X, Y, Z” or a nicely phrased workflow step). Microsoft’s examples (like those in this text and docs) are a great starting point.
By leveraging these resources and tools, you can improve not only a given agent’s instructions but your overall skill in writing effective AI instructions.
Staying Updated with Best Practices
The field of generative AI and platforms like Copilot Studio is rapidly evolving. New features, models, or techniques can emerge that change how we should write instructions. It’s important to stay updated on best practices:
Follow Official Updates: Keep an eye on the official Microsoft Copilot Studio documentation site and blog announcements. Microsoft often publishes new guidelines or examples as they learn from real-world usage. The documentation pages we referenced have dates (e.g., updated June 2025) – revisiting them periodically can inform you of new tips (for instance, newer versions might have refined advice on formatting or new capabilities you can instruct the agent to use).
Community and Forums: Join communities of makers who are building Copilot agents. Microsoft’s Power Platform community forums, LinkedIn groups, or even Twitter (following hashtags like #CopilotStudio) can surface discussions where people share experiences. The Practical 365 blog[2] and the Power Platform Learners YouTube series are examples of community-driven content that can provide insights and updates. Engaging in these communities allows you to ask questions and learn from others’ mistakes and successes.
Continuous Learning: Microsoft sometimes offers training modules or events (like hackathons, the Powerful Devs series, etc.) around Copilot Studio. Participating in these can expose you to the latest features. For instance, if Microsoft releases a new type of “skill” that agents can use, there might be new instruction patterns associated with that – you’d want to incorporate those.
Experimentation: Finally, don’t hesitate to experiment on your own. Create small test agents to try out new instruction techniques or to see how a particular phrasing affects outcome. The more you play with the system, the more intuitive writing good instructions will become. Keep notes of what you learn and share it where appropriate so others can benefit (and also validate your findings).
By staying informed and agile, you ensure that your agents continue to perform well as the underlying technology or user expectations change over time.
Conclusion: Writing the instructions field for a Copilot Studio agent is a critical task that requires careful thought and iteration. The instructions are effectively the “source code” of your AI agent’s behavior. When done right, they enable the agent to use its tools and knowledge effectively, interact with users appropriately, and achieve the intended outcomes. We’ve examined how good instructions are constructed (clear role, rules, steps, examples) and why bad instructions fail. We established best practices and a T-C-R framework to approach writing instructions systematically. We also emphasized testing and continuous refinement – because even with guidelines, every use case may need fine-tuning. By avoiding common pitfalls and leveraging available resources and feedback loops, you can craft instructions that make your Copilot agent a reliable and powerful assistant. In sum, getting the instructions field correct is crucial because it is the single most important factor in whether your Copilot Studio agent operates as designed or not. With the insights and methods outlined here, you’re well-equipped to write instructions that set your agent up for success. Good luck with your Copilot agent, and happy prompting!
Yes, there is a usage limit for Research and Analyst Agent prompts in Microsoft 365 Copilot. These agents are included in a Microsoft 365 Copilot license but not with the free Copilot Chat.
According to Microsoft’s official documentation and recent updates, each user with a Microsoft 365 Copilot license is allowed to run up to 25 combined queries per calendar month using the Researcher and Analyst agents
This limit resets on the 1st of each month, not on a rolling 30-day basis
This cap is in place because the Research Agent performs deep, multi-step reasoning and consumes more compute resources than standard Copilot Chat. It’s designed for complex, structured tasks—like generating detailed reports with citations—rather than quick, conversational queries.
If your organization anticipates higher usage, Microsoft offers message packs as an add-on. For example, a couple of packs covering ~50,000 queries might cost around $400/month, while licensing 100 users directly would be about $3,000/month. Microsoft recommends starting with minimal licenses, monitoring usage, and scaling based on actual demand.
The next question is then about how the 25-prompt monthly limit for the Researcher agent in Microsoft 365 Copilot applies when you create a custom agent in Copilot Studio that uses “reason” in its instructions.
Key Clarification
The 25-prompt limit applies specifically to the Researcher agent—a specialized, high-computation mode within Microsoft 365 Copilot designed for deep, multi-step reasoning across enterprise and web data. It’s distinct from standard Copilot chat and is licensed separately.
What Happens in Copilot Studio?
When you create an agent in Copilot Studio and include the word “reason” in the instructions (e.g., “use reasoning to evaluate…”), that does not automatically invoke the Researcher agent or count against your 25 monthly Researcher prompts.
Instead, Copilot Studio agents operate based on:
The generative answer node and its custom instructions.
The data sources you’ve connected (e.g., SharePoint, Dataverse, websites).
The reasoning complexity you’ve built into the flow (e.g., branching logic, memory, variables).
Unless your agent explicitly calls the Researcher agent (via a connector or API that invokes it), or unless Microsoft has integrated Researcher-like capabilities into your agent’s backend (which would be documented), your usage won’t count against the Researcher quota.
Using “reason” in your instructions—such as “reason through the options before answering”—is interpreted as a style or tone directive for the generative AI. It helps shape how the agent responds but doesn’t trigger the Researcher agent’s quota-based behaviour.
✅ Summary
No, using “reason” in Copilot Studio instructions does not count against your 25 Researcher prompts.
The Researcher agent quota applies only when that specific agent is invoked.
You can safely build reasoning-style flows in Copilot Studio without worrying about prompt limits—unless you explicitly integrate the Researcher agent.
Would you like help designing a reasoning-style Copilot Studio agent that stays within standard usage?
Yes, a 25,000 message quota is included with each Microsoft 365 Copilot license for Copilot Studio and is a monthly allowance—not a one-time allocation.
It resets each month and applies to all messages sent to the agent, including those from internal users, external Entra B2B users, and integrations 2.
Once the quota is exhausted, unlicensed users will no longer receive responses unless your tenant has:
Enabled Pay-As-You-Go (PAYG) billing, or
Purchased additional message packs (each pack includes 25,000 messages/month at $200) 2.
This means in a setup where only the agent creator has a license of M365 Copilot, any agent created will continue to work with internal data (i.e. inside the agent, like uploaded PDFs, or data inside the tenant, such as SharePoint sites) for all unlicensed users until that monthly creator license quota is used up.
Thus, each Microsoft 365 Copilot license includes:
25,000 messages per month for use with Copilot Studio agents.
So with 2 licensed users, the tenant receives
2 × 25,000 = 50,000 messages per month
This quota is shared across all users (internal and external) who interact with your Copilot Studio agents.
Are you looking to empower your Copilot Studio agent with the vast knowledge of Microsoft’s official documentation? By leveraging the Model Context Protocol (MCP) server for Microsoft Learn Docs, you can enable your agent to directly access and reason over this invaluable resource. This blog post will guide you through the process step-by-step.
What is the Model Context Protocol (MCP)?
MCP is a powerful standard designed to allow AI agents to discover tools, stream data, and perform actions. The Microsoft Learn Docs MCP Server specifically exposes Microsoft’s official documentation (spanning Learn, Azure, Microsoft 365, and more) as a structured knowledge source that your Copilot Studio agent can query and utilize.
Prerequisites
Copilot Studio Environment: An active Copilot Studio environment with Generative Orchestration enabled (you may need to activate “early features”).
Environment Maker Rights: Sufficient permissions in your Copilot Studio environment to create and manage connectors.
Outbound HTTPS: Your environment must permit outbound HTTPS connections to learn.microsoft.com/api/mcp.
Text Editor: A text editor (e.g., VS Code, Notepad++) for creating a YAML file.
Configuration Steps
Step 1: Grab the Minimal YAML Schema
The Microsoft Learn Docs MCP Server requires a specific OpenAPI (Swagger) YAML file to define its API. Create a new file (e.g., ms-docs-mcp.yaml) and paste the following content into it:
swagger: '2.0'
info:
  title: Microsoft Docs MCP
  description: Streams Microsoft official documentation to AI agents via Model Context Protocol.
  version: 1.0.0
host: learn.microsoft.com
basePath: /api
schemes:
  - https
paths:
  /mcp:
    post:
      summary: Invoke Microsoft Docs MCP server
      x-ms-agentic-protocol: mcp-streamable-1.0
      operationId: InvokeDocsMcp
      consumes:
        - application/json
      produces:
        - application/json
      responses:
        '200':
          description: Success
Custom Connectors: In the left navigation pane, select More > Discover all > Custom connectors.
New Custom Connector: Click on + New custom connector and choose Import an OpenAPI file.
Upload YAML:
Give your connector a descriptive name (e.g., “Microsoft Learn MCP”).
Upload the .yaml file you prepared in Step 1.
Click Import.
Configure Connector Details:
General tab: Confirm that the Host is learn.microsoft.com and Base URL is /api.
Security tab: For the Microsoft Learn Docs MCP server, select No authentication (as it is currently anonymously readable).
Definition tab: Verify that an action named InvokeDocsMcp is present. You can also add a description here if desired.
Create Connector: Click Create connector.
Test Connection (Optional but Recommended): After the connector is created, go to the Test tab. Click +New Connection. Ensure the connection status is “Connected.”
Step 3: Wire It Into an Agent in Copilot Studio
With your custom connector in place, the next step is to add it as a tool to your Copilot Studio agent.
Go to Copilot Studio: Navigate to copilotstudio.microsoft.com. Ensure you are in the same environment where you created the custom connector.
Open/Create Agent: Open your existing agent or create a new one.
Add Tool:
In the left navigation, select Tools.
Click + Add a tool.
Select Model Context Protocol.
You should now see your newly created “Microsoft Learn MCP” custom connector in the list. Select it.
Confirm that the connection status is green.
Click Add to agent (or “Add and configure” if you wish to set specific details).
Verify Tool: The MCP server should now appear in the Tools list for your agent. If you click on it, you should see the microsoft_docs_search tool (or similar, as Microsoft may add more tools in the future).
Step 4: Validate (Test Your Agent)
It’s crucial to test your setup to ensure everything is working as expected.
Open Test Pane: In Copilot Studio, open the “Test your agent” pane.
Enable Activity Map (Optional): Click the wavy map icon to visualize the activity flow.
Ask a Question: Try posing questions directly related to Microsoft documentation. For instance:
“What MS certs should I look at for Power Platform?”
“How can I extend the Power Platform CoE Starter Kit?”
“What modern controls in Power Apps are GA and which are still in preview?”
The first time you execute a query, you might be prompted to connect to the custom connector you’ve just created. Click “Connect,” and then retry the query. Your agent should now leverage the Microsoft Learn MCP server to furnish accurate and relevant answers directly from the official documentation.
Important Considerations:
Authentication: Currently, the Microsoft Learn Docs MCP server operates without requiring authentication. However, this policy is subject to change, so always consult the latest Microsoft documentation for updates.
Generative Orchestration: This feature is fundamental for the agent to effectively utilize MCP. If you don’t see “Model Context Protocol” under your Tools, ensure generative orchestration is enabled for your environment.
Updates: As Microsoft updates its documentation, the MCP server should dynamically reflect these changes, ensuring your agent’s knowledge remains current.
By following these steps, you can successfully integrate the Microsoft Learn documentation server into your Copilot Studio agent, providing your users with a powerful and reliable source of official information.








![bp1_thumb[2]](https://blog.ciaops.com/wp-content/uploads/2025/07/bp1_thumb2.png "bp1_thumb[2]")

