Determining legacy authentication usage

I’ve spoken previously about the need to eliminate basic authentication from your environment:

Disable basic auth to improve Office 365 security

The unfortunate reality is that some legacy applications could be using and can ONLY use legacy auth! So, you don’t want to necessarily disable it across your tenant without first understand who or what maybe using legacy auth.
image

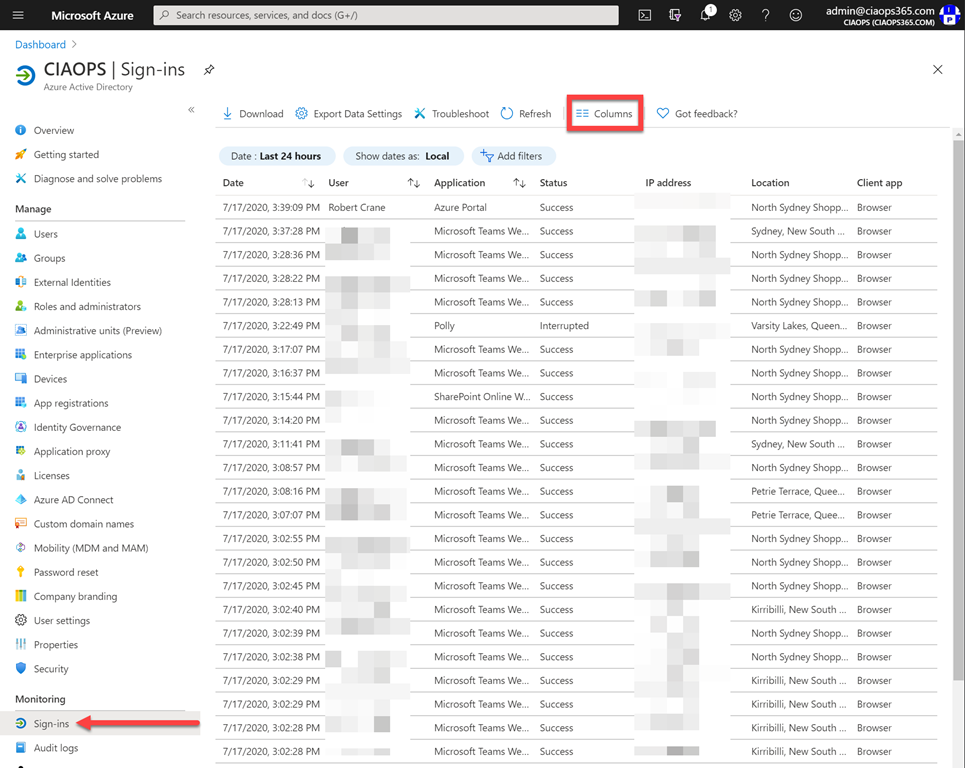
One way you can see this is by navigating to your Azure Active Directory in the Azure portal for your tenant. You then need to select the Sign-ins options on the left under the Monitoring heading towards the bottom as shown above. You should then see a list of events display on the right. At the top of this pane select the Columns menu item.
image

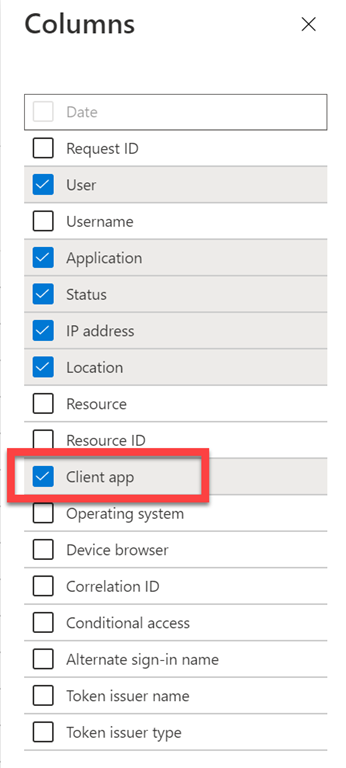
From the pane that appears from the right ensure you have the option Client app selected, as shown above.
image

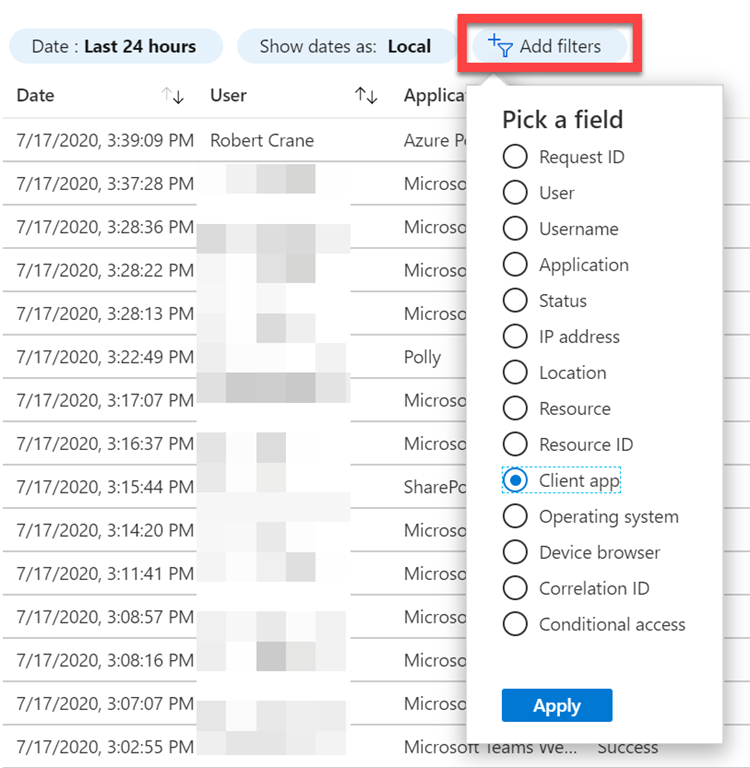
Next, select the Add filters button at the top of the list of events as shown above. From the list that appears select Client app and then the Apply button at the bottom.
image

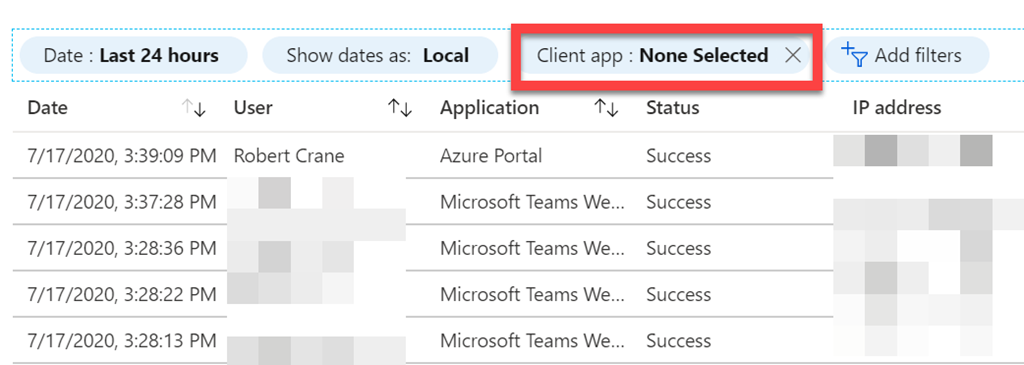
A Client app option should now appear at the top of the list as shown. It will typically show None Selected.
image

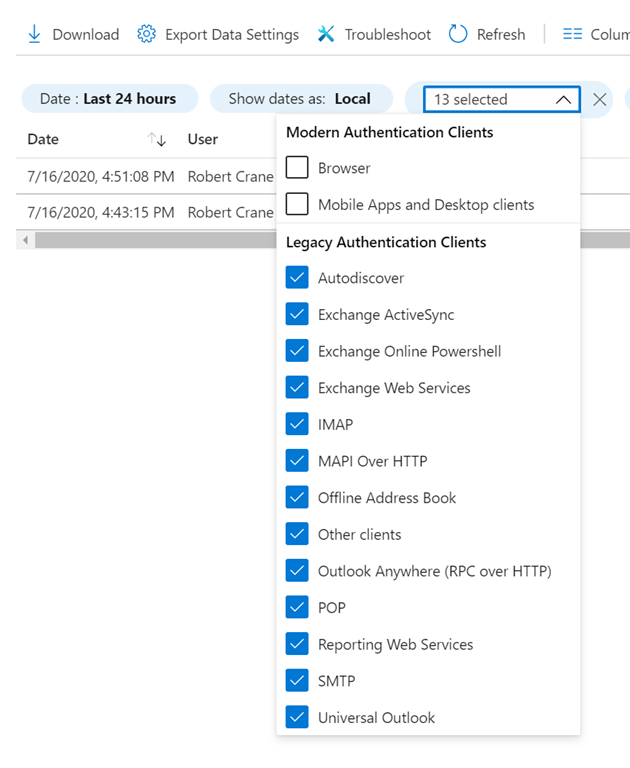
Select the new Client app button and a list of items will be displayed as shown above. From this list, select all the items under the Legacy Authentication Clients heading.
image

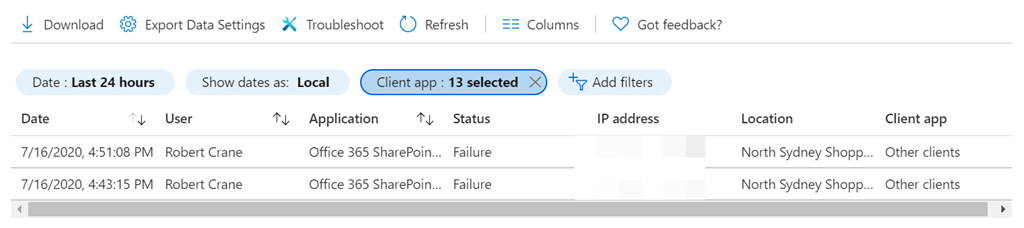
When you now click away, the list of events should be filtered to only those events that match the use of Legacy Authentication. You can select any of these to get more information about the event including who or what generated this.

Armed with this knowledge you can now start working whether upgrades or additional configuration is required in your environment to minimise the attack surface area of Legacy Authentication in your environment.
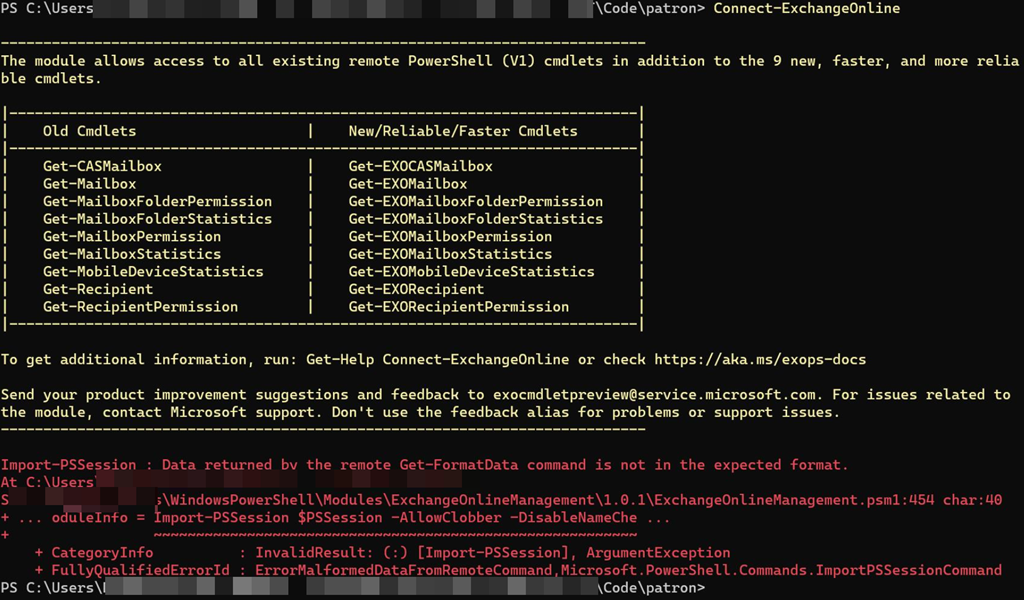
Get-Formatdata issues when connecting to Exchange Online with PowerShell

*** Update 10 July 2020. This is a back end service issue that Microsoft is working on to resolve. See the following for more details – https://techcommunity.microsoft.com/t5/exchange/error-when-connecting-to-exchange-online-vis-powershell/m-p/1512141#M5466

image

To connect to Exchange Online with PowerShell you simply type a command like:

connect-exchangeonline

as shown above. This “should” work with Exchange Online PowerShell V2. However, as you can also see from the above screen shot this generates the following error on a number of tenants:

Import-PSSession : Data returned by the remote Get-FormatData command is not in the expected format

This therefore, prevents you from connecting to Exchange Online via PowerShell.

Interestingly, you get the same issue if you use the older method of connecting to Exchange Online via PowerShell (aka V1) to those same specific tenants. It is also independent of the device you use to connect, updates, etc. It seems to be tied to only a limited number of tenants for some reason.

image

The fix for now is to specify the –delegatedorganization parameter with the full .onmicrosoft.com user identity. When you do that, to exactly the same tenant, you can gain access as shown above without an error.

So, if you need access use:

connect-exchangeonline –delegatedorganization <tenantname>.onmicrosoft.com

and you should be able to gain access. The problem is that this is ok for interactive sessions but if you already have bulk automated scripted in place that don’t use this then it is painful to start changing these just to accommodate a ‘limited’ number of affected tenants.

I am chasing down some leads to try to determine a reason for this and hopefully find a resolution soon.

MVP for 2020-21

MVP_Logo_Horizontal_Preferred_Cyan300_RGB_300ppi

It is with pride that Microsoft has again graciously awarded me as a Most Valued Professional (MVP) for 2020 in the Office Servers and Services category. This makes it now nine awards in a row for me. I thank Microsoft for this special award and acknowledge the responsibilities it entails.

This award is not possible without members of the community out there who take the time to do things like read and comment on my blog, watch my YouTube channel, attend events where I speak and more. Thanks everyone.

It is great to see the growth in recent years of the Microsoft Cloud technologies and the increasing number of people adopting them. It is something that continues to add so many new features it is hard to keep up. For me, that makes it really exciting and something I am always keen to be involved with. I enjoy the constant challenge of staying on top of everything in the space. I’m also keen to share that journey with others and help others solve problems and make the most from their technology investments.

The end of the past twelve months has been a very different place from the initial. The world we live is now a very different place from what it used to be. It has changed dramatically and we must all adapt to the new environment that has been forced upon us. Success in this new world will be with the help of others. That means being part of a community and working for the collective good. Being an MVP is being part of a unique worldwide community of very dedicated and smart people who truly love to share their knowledge. They are the benchmark that I aspire to, both technically and professionally. I therefore take the opportunity to also congratulate all those who were also awarded for this year. It is a great community to be part of and I am honoured to be a part.

Again, I thank Microsoft for this honour and will work hard to live up to the expectations it sets again for 2020-21, for without them and their technology, this award would not be possible.

Need to Know podcast–Episode 244

Sarah Young from Microsoft joins us again to talk about Azure Sentinel. We run through what it is and why you should be using it to protect your IT environments. Brenton joins us as well to cover off the latest news and certifications he has achieved. Listen in for all the details.

This episode was recorded using Microsoft Teams and produced with Camtasia 2020

Take a listen and let us know what you think – feedback@needtoknow.cloud

You can listen directly to this episode at:

https://ciaops.podbean.com/e/episode-244-sarah-young/

Subscribe via iTunes at:

https://itunes.apple.com/au/podcast/ciaops-need-to-know-podcasts/id406891445?mt=2

The podcast is also available on Stitcher at:

http://www.stitcher.com/podcast/ciaops/need-to-know-podcast?refid=stpr

Don’t forget to give the show a rating as well as send us any feedback or suggestions you may have for the show.

Resources

Sarah Young

@contactbrenton

@directorcia

L400 Sentinel Ninja Training

MS Tech Community Sentinel blog

Sentinel GitHub repo

Sentinel documentation

MS Security Community webinars

Defender ATP for Linux now GA

Defender ATP for Android

OneDrive Roadmap Roundup – May 2020

PowerPoint Live is now generally available

What’s New: Livestream for Azure Sentinel is now released for General Availability

Azure responds to COVID-19

20 updates for Microsoft Teams for Education, including 7×7 video and Breakout Rooms

Outlook for Windows: Signature cloud settings

Configure new Edge to allow Exchange PowerShell MFA module download

One of the challenges with MFA and PowerShell is that you need to basically go into the Exchange management console and download a special PowerShell module that supports MFA. The need for that MFA module when connecting to Exchange Online with PowerShell is largely being negated by using the Exchange Online PowerShell V2 module (yeah). However, if you want to connect to the Security and Compliance center online with PowerShell and MFA you are still going to need to install this special module MFA from the Exchange Admin center in the portal (damm).

image

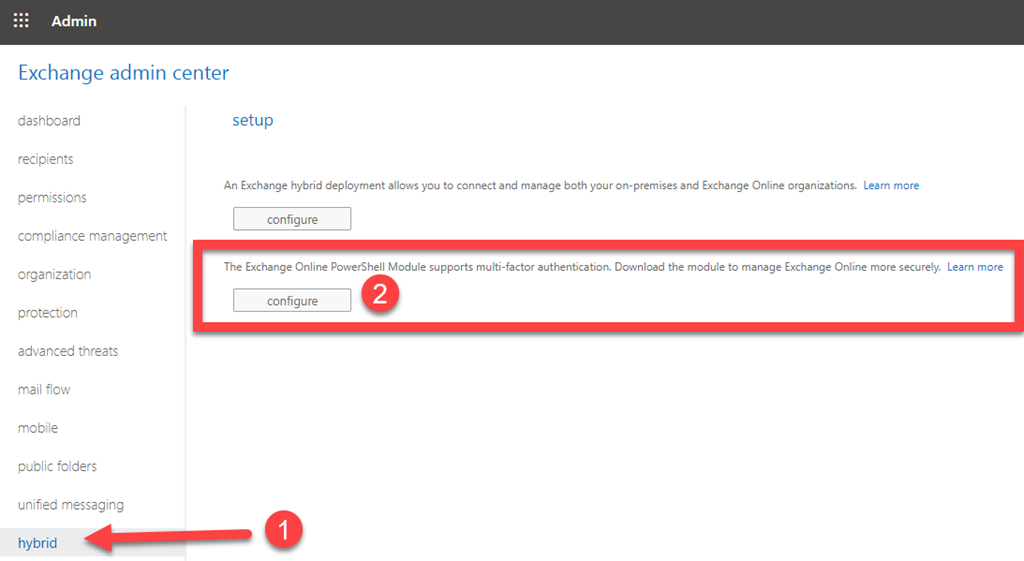
To do this, you’ll need to navigate to the Exchange admin center as shown above and select Hybrid from the items on the left. you’ll then need to select the lower option that is then displayed on the right hand side, which allows you to download the special MFA PowerShell module.

That should commence an automated download for you. This automated download “should” work in both the older Internet Explorer and the new Edge (chromium based) browser.

image

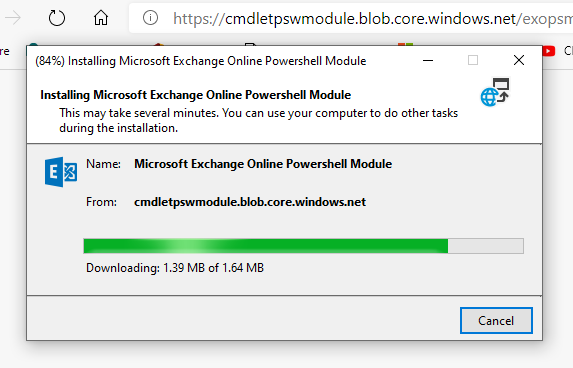
That download process should look something like what is shown above. However, if for some reason you can’t get it working with the new Edge (chromium based) browser navigate to:

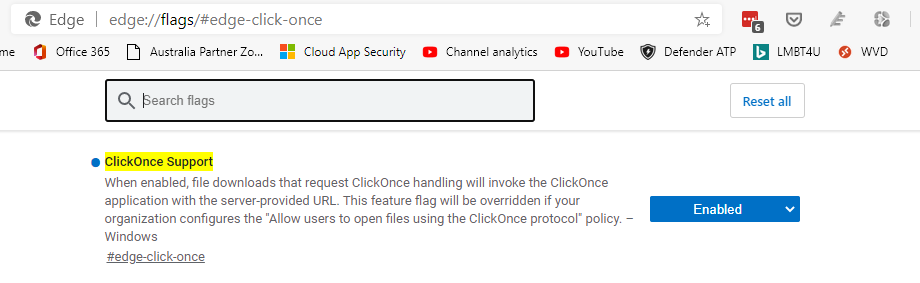
edge://flags/#edge-click-once

image

and Enable the ClickOnce Support option as shown above, if not already enabled. Most of the time it is set as Default, which you will need to change to allow the download to commence.

The browser will need to reload, but after that you should able to run the file in the Edge (chromium based) browser to get the Exchange Online MFA module installed on your local machine.

An easier way to connect using PowerShell

If you visit my Office 365 GitHub repository, you’ll find a whole of scripts there you can use for free. A subset of those scripts are designed to make connecting to the various Microsoft Cloud service easier. For example the script:

https://github.com/directorcia/Office365/blob/master/o365-connect-exov2.ps1

allows you to easily connect to Exchange Online using the version 2 module.

While all of this helps, it can still be a bit trickly for people to know what to run when to get connected. So, with that in mind I have created this script:

https://github.com/directorcia/Office365/blob/master/c.ps1

which when run by simply typing

.\c.ps1

in the PowerShell command line

image

will now pop up a dialog as shown above and allow you to select which service which wish to connect to.

image

Even better, you can also select multiple services in this same window. You simply use the CTRL and SHIFT keys to select multiple item, just as you do in any Windows desktop application (like Windows Explorer for files say).

After you have made your selection, those individual service connection scripts will be run.

Of course, the assumption is that you have all of my scripts (including the individual connection scripts) in the same directory. If not, then the connections will not be made. However, if you have ‘cloned’ what I have into a single location on your machine, then you should be all good.

I also created this short script:

https://github.com/directorcia/Office365/blob/master/r.ps1

which you can run at the PowerShell command prompt via:

.\r.ps1

to remove any currently loaded PowerShell sessions as well, quickly and easily.

Hopefully, this new ‘master connection’ script will make it easier for people to connect to the Microsoft Cloud services they need.

Make you you check back regularly to my Github repository for any updates and additions

Exchange Online mailbox check script update

I have just updated another of the free PowerShell scripts I provide on Github. This time o365-mx-check.ps1 has been given an update. You will find it here:

https://github.com/directorcia/Office365/blob/master/o365-mx-check.ps1

1. Prior to running the script you will have needed to install the Exchange Online PowerShell module. To set up your PowerShell environment I suggest you check out:

2. Connect to Exchange Online with PowerShell. For that I recommend you use my script:

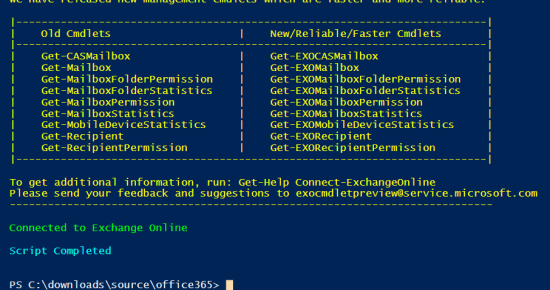
That should result in you being connected to Exchange Online PowerShell as shown above.

Once you have your PowerShell environment setup, you simply run the o365-mx-check.ps1 script at the PowerShell prompt.

image

After checking that the Exchange Online PowerShell module is loaded and connected, the script will loop through all the mailboxes in your tenant.

image

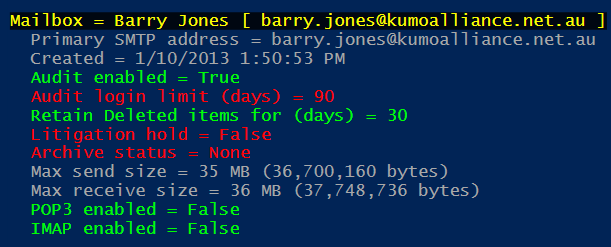
For each mailbox it will check and display a number of settings as shown above including:

  • Users Display name and principal name
  • The primary outbound email address the mailbox uses
  • When the mailbox was created
  • Whether auditing is enabled for the mailbox
  • What the maximum age limit of audit log entries for the mailbox
  • Deleted items retention period
  • If Litigation Hold is enabled
  • If mailbox archiving is enabled
  • The maximum message send size
  • The maximum message receive size
  • If POP3 is enabled for the mailbox
  • If IMAP is enabled for the mailbox

Items that are not best practices will be highlighted in red for your attention as shown above.

By default, these results will only display on the screen, however if you specify the optional –CSV parameter when you run the script like:

.\o365-mx-alert –csv

A CSV file with the output will be created in the parent directory.

image

You will see the name of the CSV created at the end of the script as shown above.

image

Each CSV file is timestamped to ensure that a unique file will be created each time the script is run.

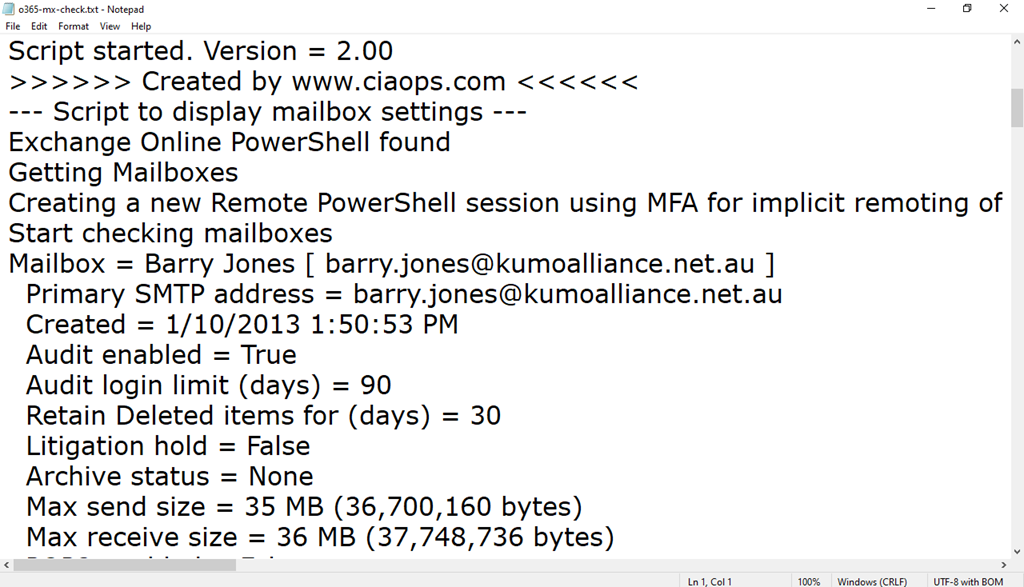
A log file, o365-mx-alert.txt is also created in the parent directory as well on each run.

image

The log file will be overwritten each time the script is run.

Thus, the o365-mx-check.ps1 script has 1 optional parameter, that can be used:

-csv = output all logs for period to a CSV file in the parent directory. A new CSV file is created for each script execution

The script will also produce a log file (o365-mx-check.txt) in the parent directory, that is overwritten on the each run of the script.

You will find this script and all my publicly available scripts at:

http://github.com/directorcia

Don’t forget to check back there regularly for updates. Also, if you have any feedback or suggestion on this script or what you’d like to see me create, please let me know. I also maintain a large array of additional scripts via a paid subscription. More details of that can be found at www.ciaopspatron.com.