Reading from the CIAOPS Best Practices repo

I’ve recently upload a new JSON configuration file to my Best Practices repo on Github that you can deploy to Intune using PowerShell. You can find it here:

https://github.com/directorcia/bp/blob/main/Intune/Policies/ConfigurationProfiles/SettingsCatalog/odfb.json

The first thing to realise if you want to read this directly in from the repo is that you’ll need to use the raw version of that file which you can find here:

https://raw.githubusercontent.com/directorcia/bp/main/Intune/Policies/ConfigurationProfiles/SettingsCatalog/odfb.json

You will then need to use the command:

$query = invoke-webrequest -method GET -ContentType “application/json” -uri $url -UseBasicParsing

which will store the result in a variable called $query. Of course, you will need to assign the raw URL to the variable $url also.

Once executed if you look at $query.content you should then find a copy of JSON file you can then use to create a policy with PowerShell in Intune.

You can read all of the JSON files in my Best Practices repo in this way and use them to easily deploy to your environment.

Need to Know podcast–Episode 321

Lots of news an updates after being a few weeks since last episode. Fear not however, they are all linked below. Plenty of really detailed and helpful articles from Microsoft of late, especially around security. All of which I highly recommend you spend time working through and implementing the recommendations. Also plenty of new features and products to cover so dive in and take a look.

You can listen directly to this episode at:

https://ciaops.podbean.com/e/episode-321-initiatives/

Subscribe via iTunes at:

https://itunes.apple.com/au/podcast/ciaops-need-to-know-podcasts/id406891445?mt=2

Don’t forget to give the show a rating as well as send me any feedback or suggestions you may have for the show.

Brought to you by www.ciaopspatron.com

Resources

@directorcia

Join my shared channel

CIAOPS merch store

Become a CIAOPS Patron

CIAOPS Blog

CIAOPS Brief

CIAOPSLabs

Support CIAOPS

Granular RBAC permissions for endpoint security workloads

How to break the token theft cyber-attack chain

Microsoft Incident Response lessons on preventing cloud identity compromise

How Copilot for Microsoft 365 Works

From pixels to presence: new features coming to Microsoft Mesh

How to unlock new experiences on your Copilot+ PC

Introduction to Cross-Tenant Mailbox Migrations

Copilot is now available in classic Outlook for Windows

Microsoft Incident Response tips for managing a mass password reset

Set default organization version limits for new document libraries and OneDrive accounts (Preview)

The guide to Microsoft Intune resources

Email Protection Basics in Microsoft 365: Bulk Email

Data security in Microsoft Copilot for Microsoft 365

Moving from AI experimentation to business breakthrough

Update on the Recall preview feature for Copilot+ PCs

Secure your business: Four ways Microsoft 365 for Business can help

The new Microsoft Planner is here! Streamline the planning, management, and execution of work

Announcing new Windows Autopilot onboarding experience for government and commercial customers

AI jailbreaks: What they are and how they can be mitigated

How Russia is trying to disrupt the 2024 Paris Olympic Games

Microsoft is again named the overall leader in the Forrester Wave for XDR

What’s New in Copilot | May 2024

Exploring Copilot for Security to Automate Incident Triage

Demystifying Microsoft Entra ID, Tenants and Azure Subscriptions

Moonstone Sleet emerges as new North Korean threat actor with new bag of tricks

Automatic attack disruption in Microsoft Defender XDR

Introducing Team Copilot

Missing devices in Windows Update for Business reports?

New Endpoint Security Windows Baseline


image

Microsoft have released an updated Endpoint Security Baseline for Windows 10 and later.

image

I have updated my Best Practices repository to include the new template JSON file here:

https://github.com/directorcia/bp/blob/main/Intune/Policies/Endpoint/Baselines/win.json

and the older JSON file here:

https://github.com/directorcia/bp/blob/main/Intune/Policies/Endpoint/Baselines/Archive/win.json

I have also found that the Graph endpoint to which these two policies are applied is also different.

The new Security Baseline for Windows 10 now has an enormous area under Administrative templates. It also has a LAPs setting.

You can’t upgrade the older policy to the newer one, you need to create a completely new Security Baseline using the new policy.

This is going to take some time to work through all the new options that have been added, and there are many!

image

Luckily, I can put Copilot for Security to work to help me!

Intune Enterprise App Management

One of the exciting features of the new Intune Suite is Enterprise App Management. This makes deploying and managing applications on devices via Intune a breeze.
image

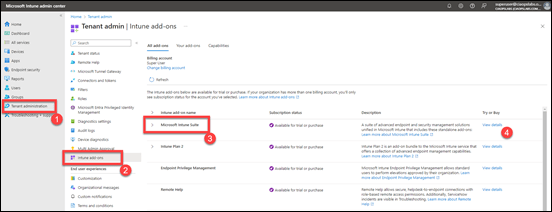
You’ll firstly need to go and add the Intune Suite (or a stand alone version of the Enterprise App Management option) to your environment. You can do this via a number of different methods but I’d suggest you go via the Intune management portal to see all your options.

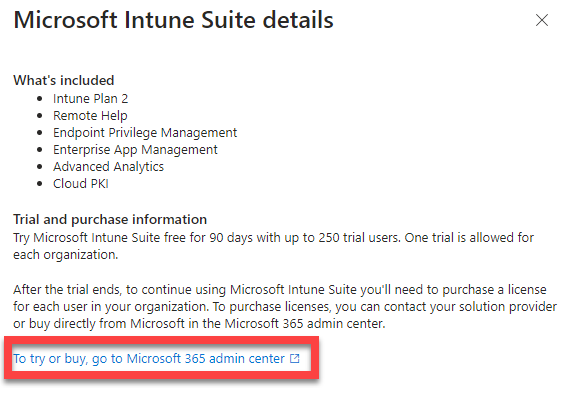
Inside the Intune Management portal select Tenant administration, then Intune add-ons, then Microsoft Intune suit and finally the View details link as shown above.
image

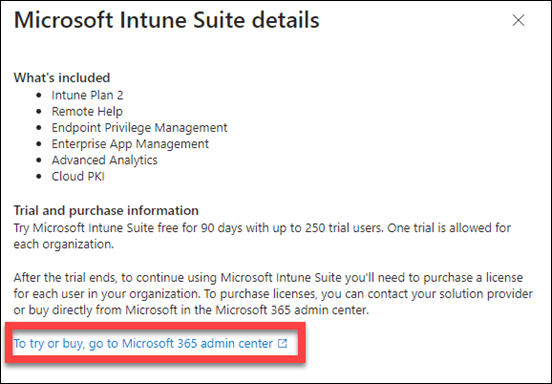
From the dialog that appears select the link at the bottom, as shown above, that will navigate you to the Microsoft 365 Administration portal where you can purchase (or sign up for a trial) of the Intune Suite.

After you have purchased the Intune Suite, don’t forget to assign Intune Suite licenses to you users!
image

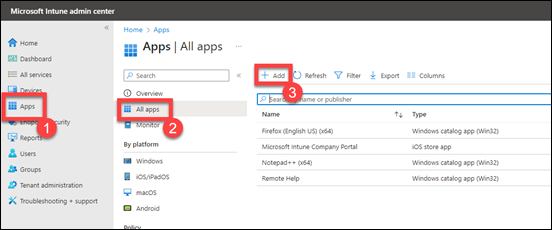
With licenses assigned, head back to the Intune Management portal and select Apps, then All apps and finally Add as shown above.
image

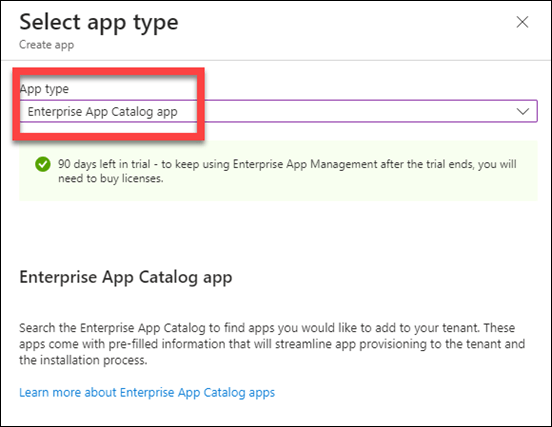
From the App type list select Enterprise App Catalog app, as shown above, and press Select at the bottom of the dialog.
image

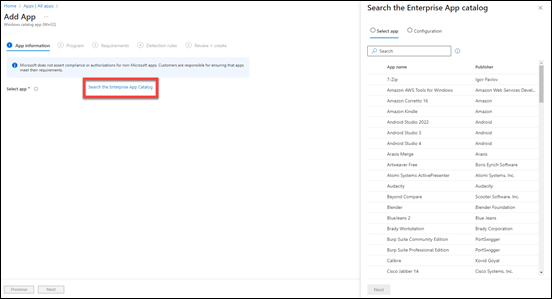
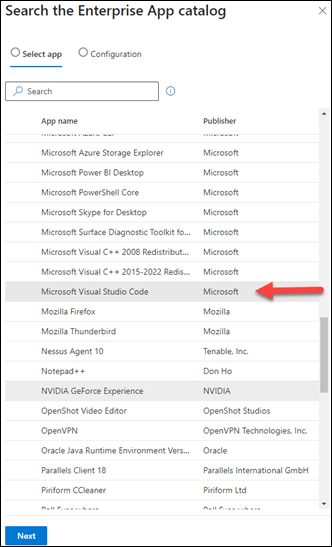
At the next screen select the hyperlink Search the Enterprise App Catalog. A dialog will appear on the right that allows you to select an app from a list.

You can only select one app at a time and more items will be added to this list over time.
image

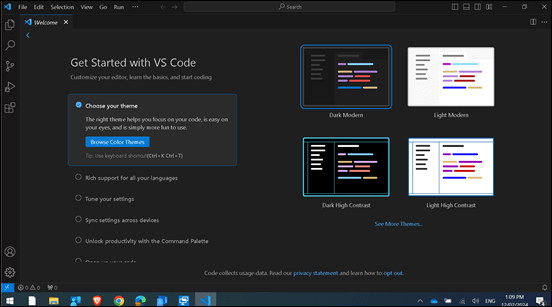
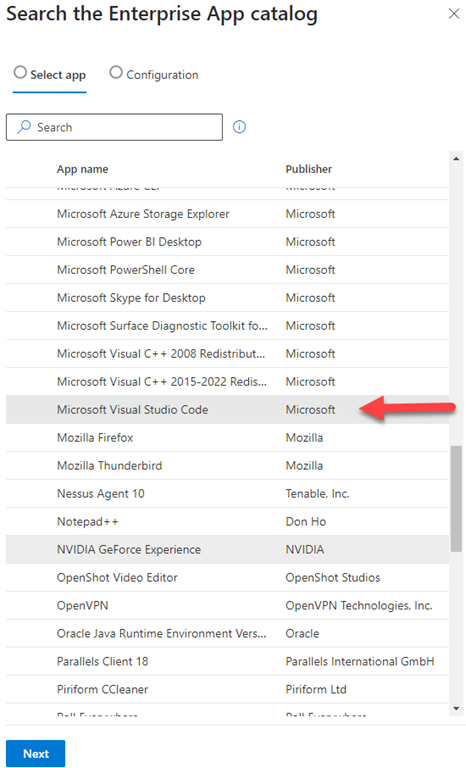
Here I’ve select Microsoft Visual Studio Code as shown above.

Select the Next button at the bottom of the dialog to continue.
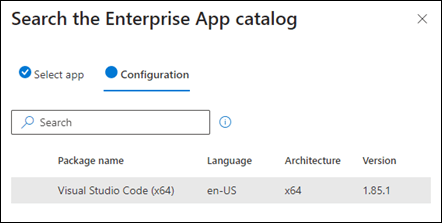
image

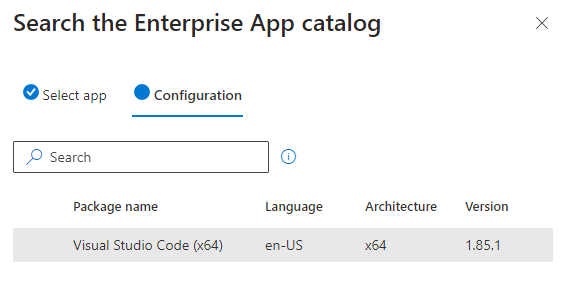
Select the app to configure and press the Select button at the bottom of the dialog.
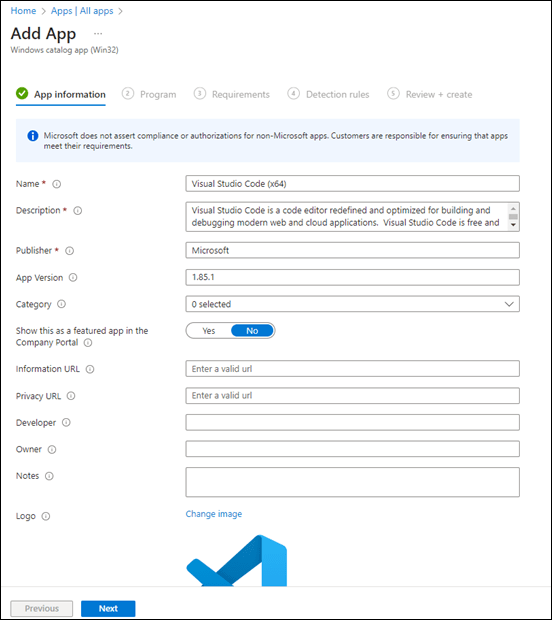
image

At the next screen, you find most of the application details already complete as shown above. You can edit or add to these if desired. Press Next to continue.
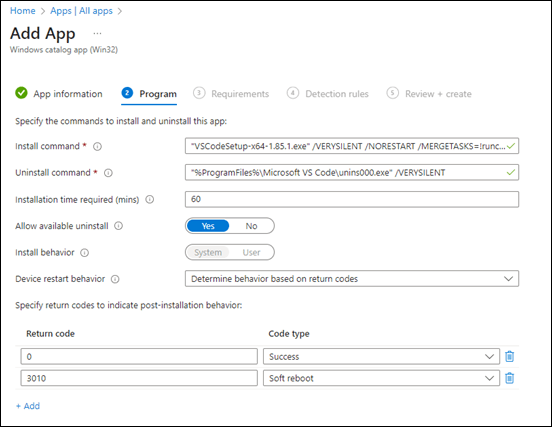
image

You should now see all the details for installing the application as shown above on the Program page. You can again edit or add to these if desired. Select Next to continue.
image

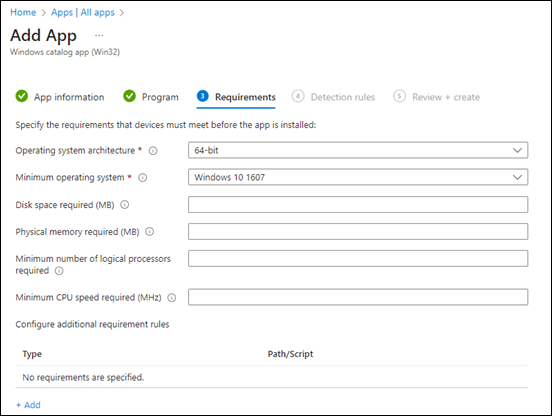
You should now see the Requirements page as shown above. Here you can set any minimum specifications for the application if required. Select Next to continue.
image

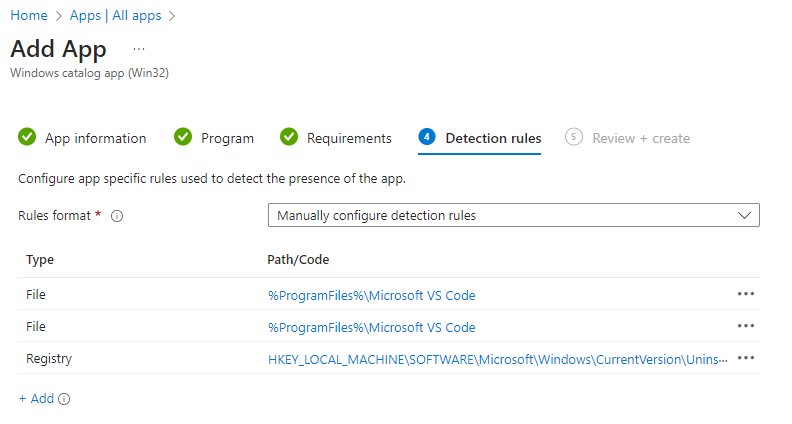
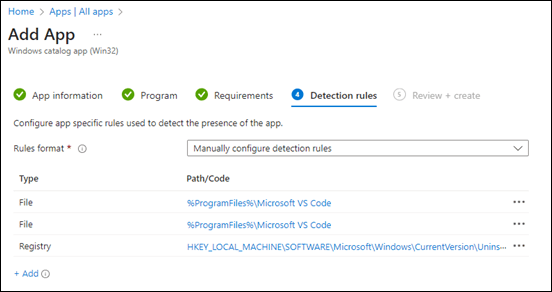
You should now see the Detection rules screen as shown above. These are the parameters to determine if, and when, the application is installed on the device. You’ll note that all these settings are already configured for you, but you can make changes if you want. Select Next to continue.
image

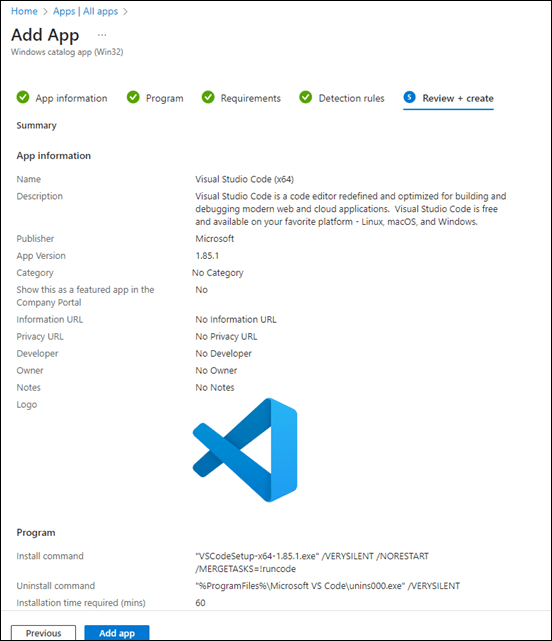
The final screen provides a summary of your settings. Select Add app at the bottom of the screen to complete the process.
image

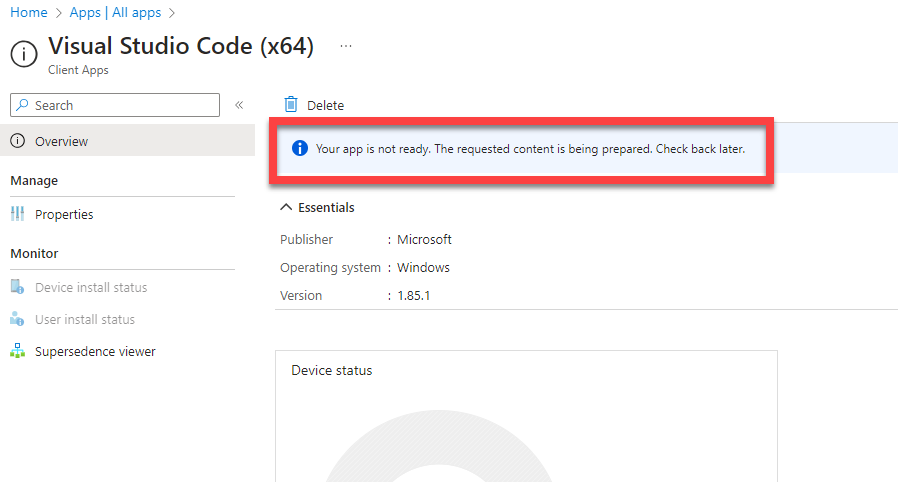
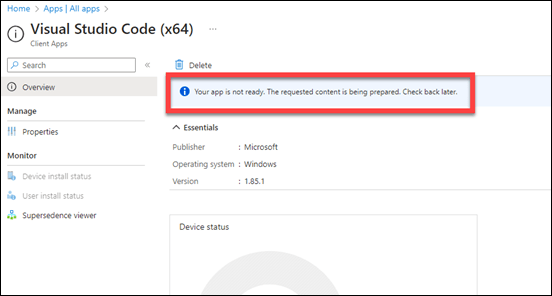
You’ll now see the configuration page for the app as shown above, but you will note that it is still being prepared as shown. You need to wait a few minutes for this process to complete before you can actually assign the app to devices and/or users.
image

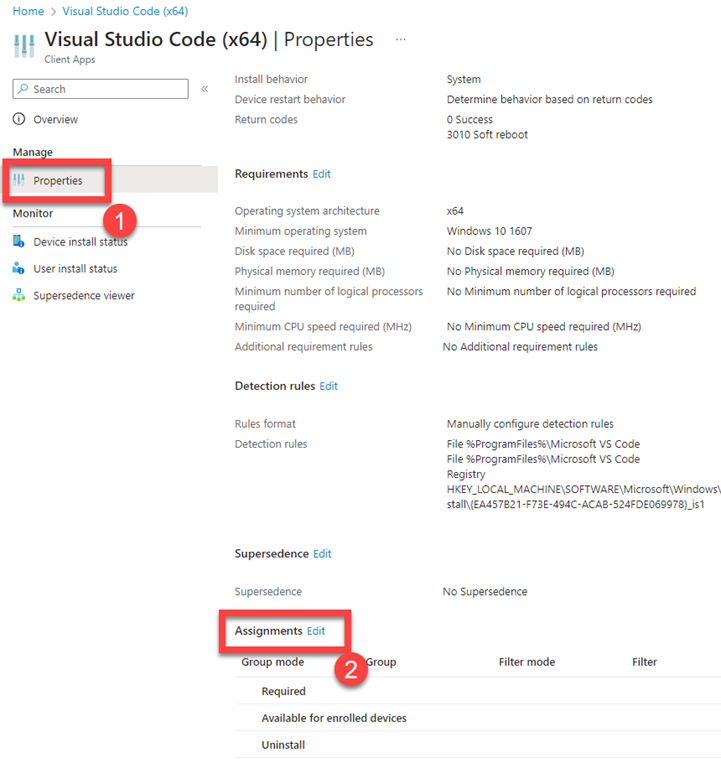
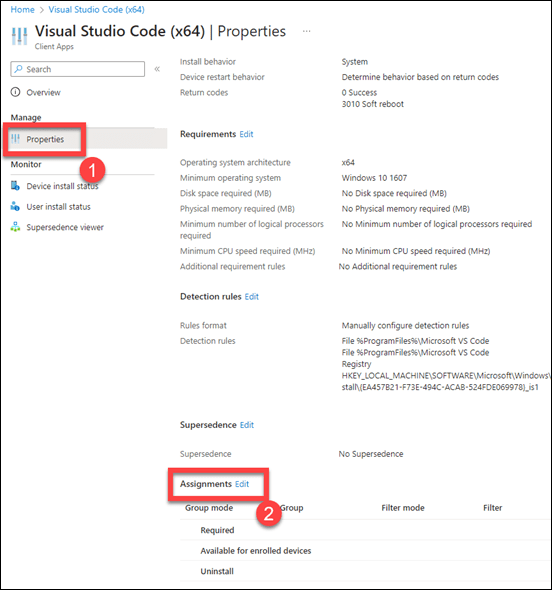
When the app is ready, select Properties, scroll down to Assignments and select the Edit link as shown above.

image

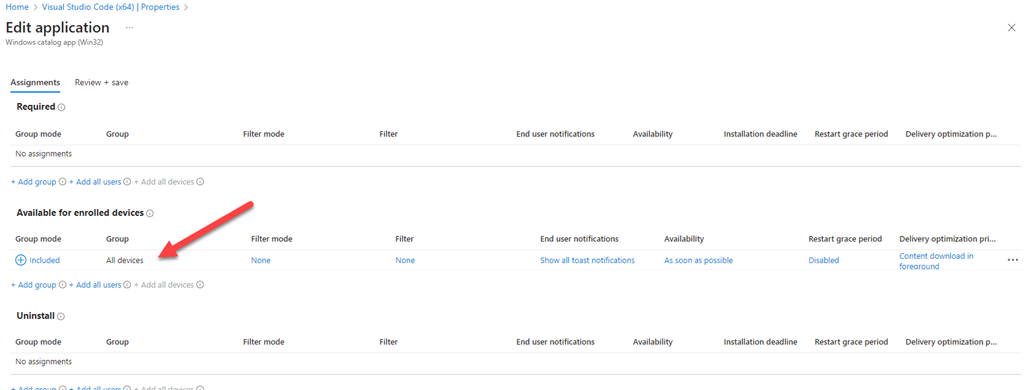
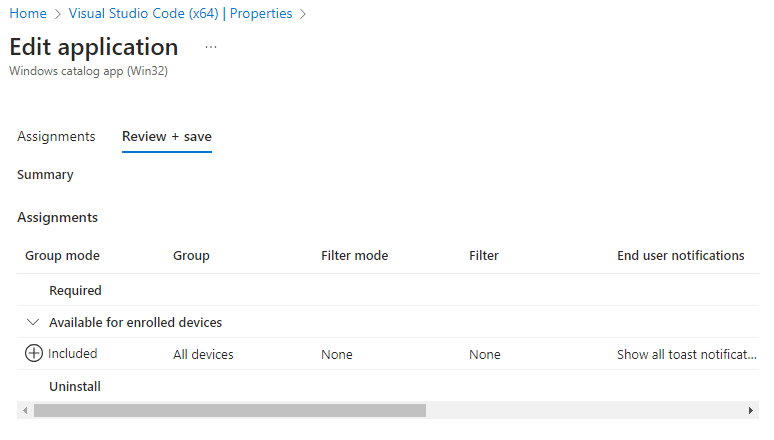
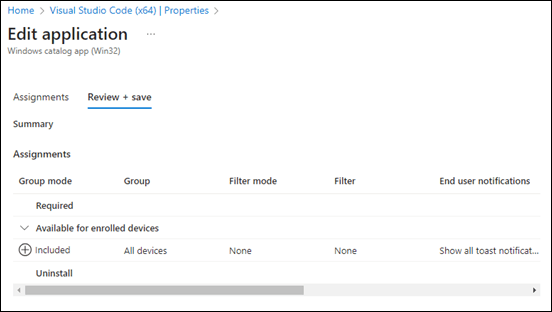
You can now select how you wish to assign this app. In this case I have elected to just make it available to all devices rather than making required or uninstalling it. Select Review + save to continue.
image

On the summary page, review your configuration and then select Save to complete the assignment process.
image

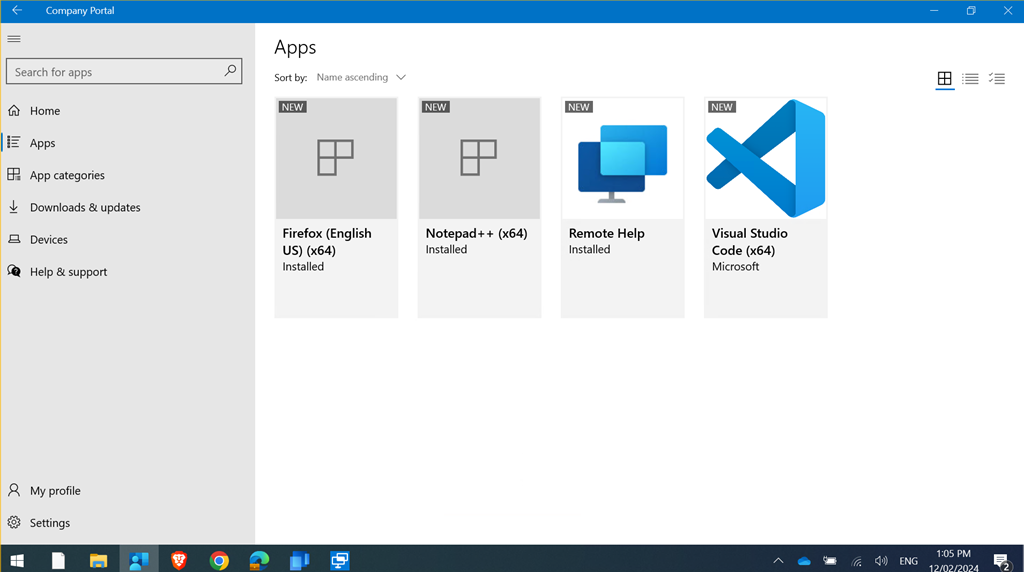
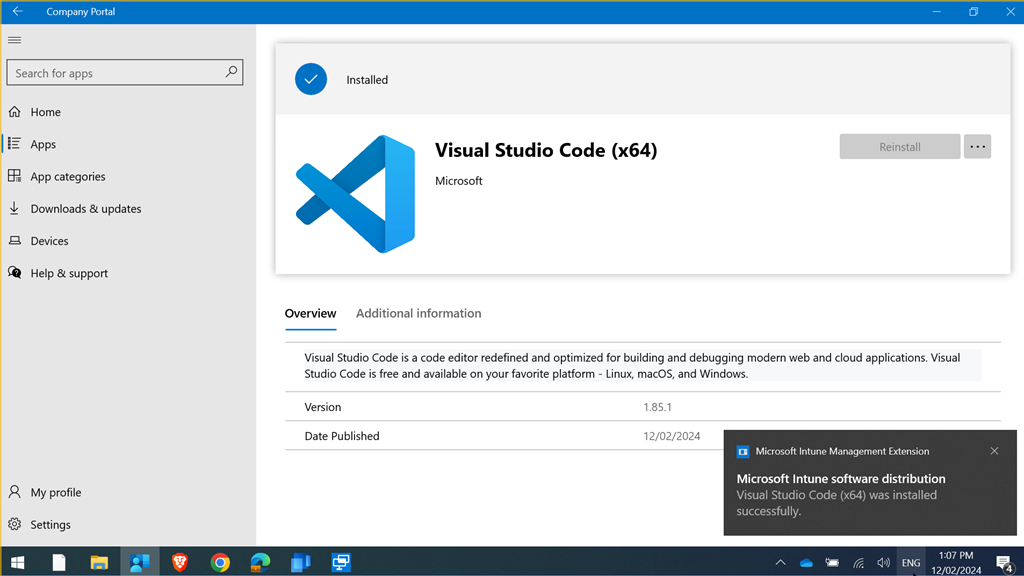
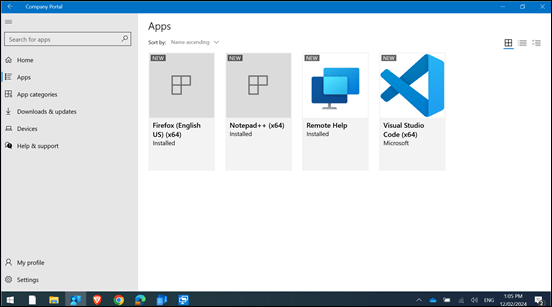
In this case, if the user navigates to the Company Portal App on their device they will see the newly deployed application as shown above in the Apps area.
image

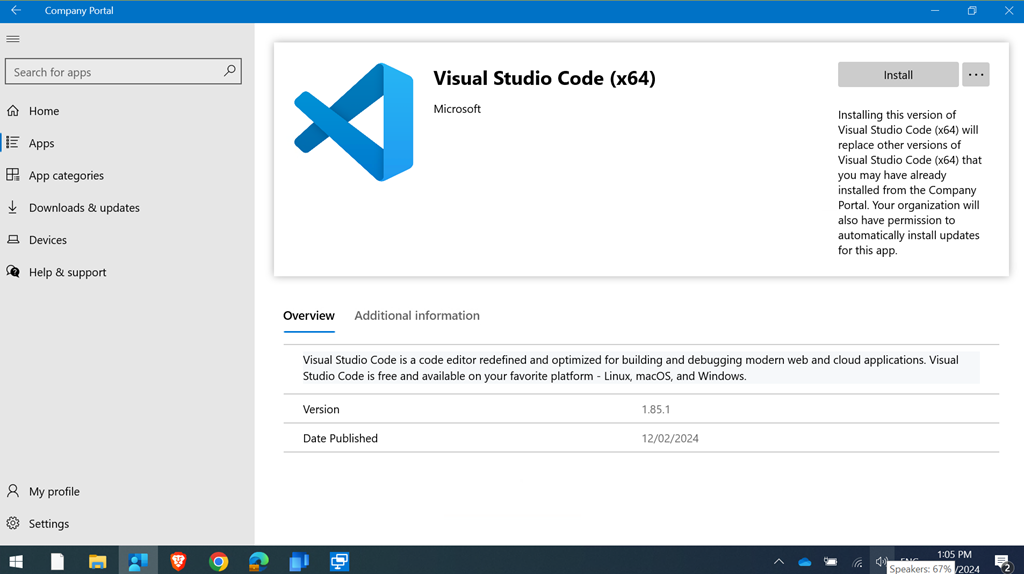
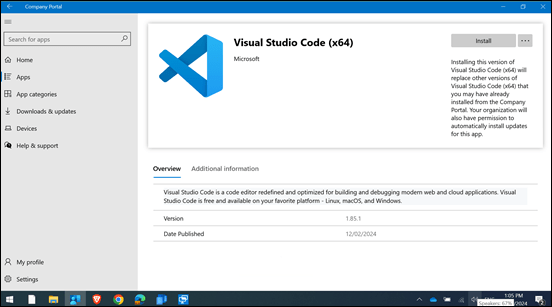
They simply need to select the desired app to install and then select the Install button in the top right to deploy.
image

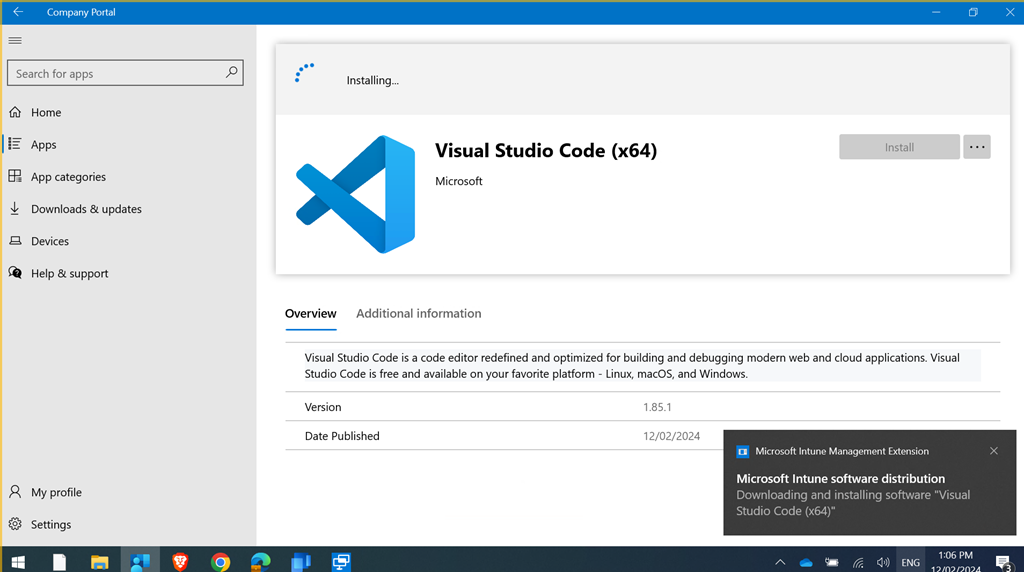
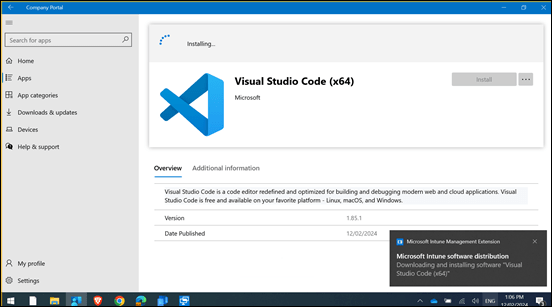
The app will deployed as shown and if a notification was selected in the app deployment, that too will be displayed as seen above.
image

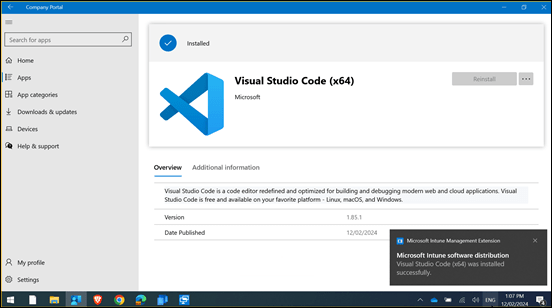
Notification will also be received when the app deployment has completed as shown above.
image

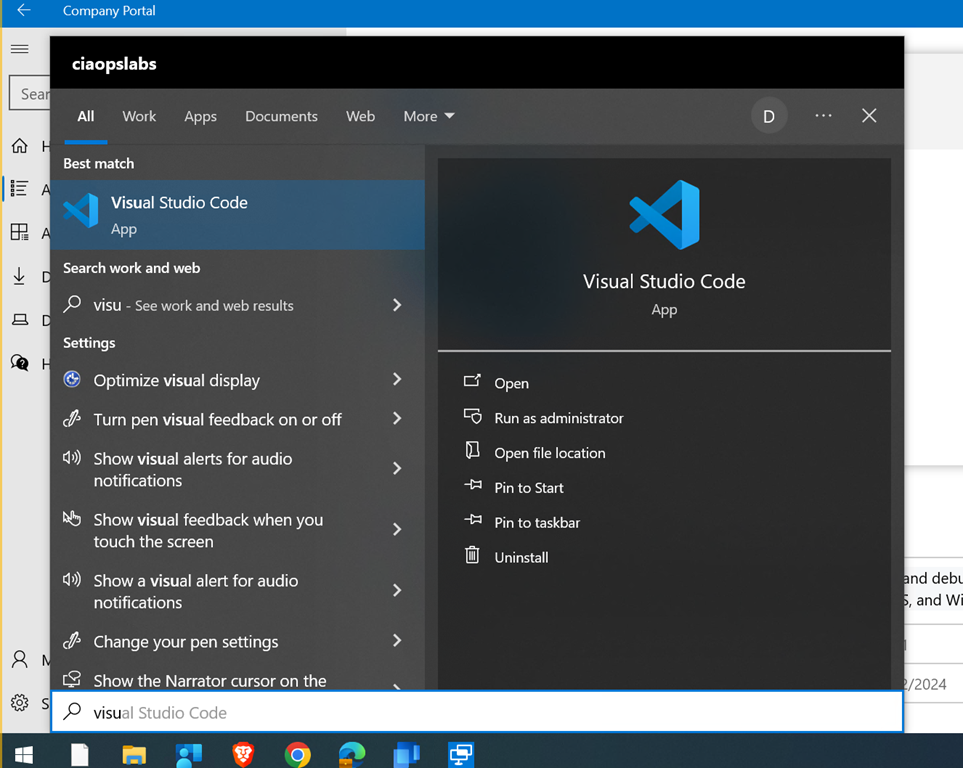
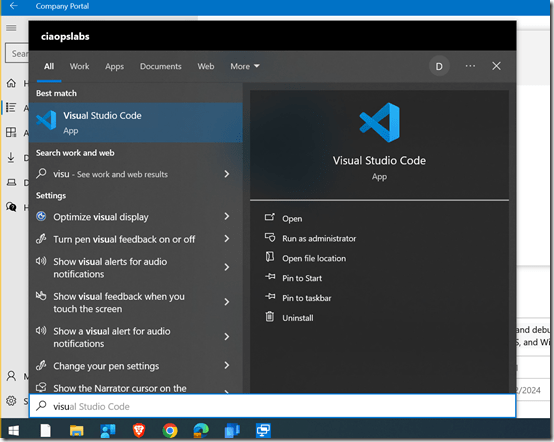
The app will then be on the device

image

and can be run as shown. Overall a very straight forward deployment without the need to enter custom settings. That’s the big benefit of using the app catalog. All that work is already done for you.
image

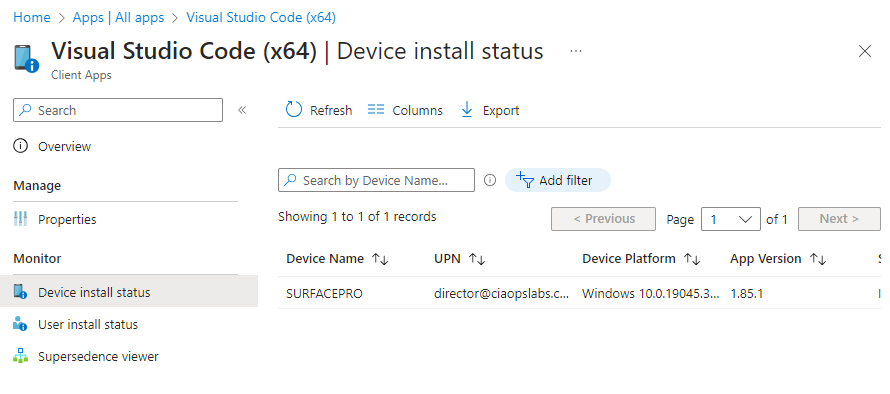
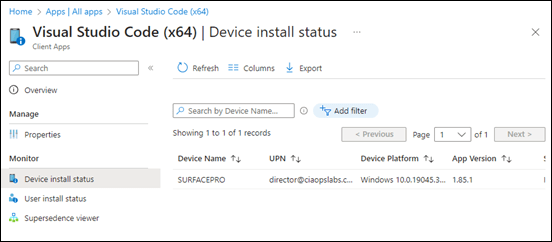
If you then look back at the Intune management console for that app it reports as installed on the device in question, as shown above.

Overall, the Intune Suite Enterprise App Management feature is pretty slick. Simple and straight forward to use. At the moment the catalog doesn’t have a whole lot of apps but I know many, many more are coming so stay tuned but if you want to manage applications on Windows devices (and Mac I believe, with others coming soon), then this is certainly the way to do it.

More on the Intune Suite coming soon.

Joined devices not appearing in Intune

image

If you have correctly joined your devices to EntraID and you have an Intune license, then these devices should appear in the Intune Management console, as shown above.

image

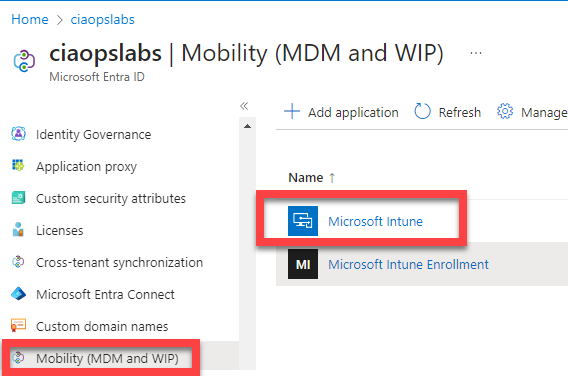
If they don’t, then go into the Azure Portal and select EntraID. Select the Mobility (MDM and WIP) as shown above. Then select Microsoft Intune.

image

Ensure that both settings are set to All. If they have been set to None, then this will be the issue as EntraID is not handing off device management to Intune.

Once you have set both of these settings to All as shown, ensure you save these settings before exiting the page.

Any device that is now joined to the tenant should appear in Intune, however existing devices that were added prior to this update being made won’t automatically enrol in Intune. They will need to be unjoined and re-joined to EntraID or re-enrolled via a script.

Using Sentinel to determine application usage

examinatyion using a magnifying glass

In recent article:

Block applications on Windows devices using Intune

I outlined how to prevent an application from running on a Windows device. It would be nice to know how many people are running this application prior to it being blocked (and even before). You can achieve this using Sentinel.

Many don’t appreciate

The extra value that Microsoft Defender provides

apart from security. In a nutshell, Defender for Endpoint sends signals from devices into the Microsoft cloud that something like Sentinel can take advantage of. This is something that can be taken advantage of to see application usage.

DeviceNetworkEvents
| where InitiatingProcessFileName contains “msedge.exe”
| project TimeGenerated, RemoteUrl, RemoteIP, DeviceName, InitiatingProcessAccountName
| summarize count() by bin(TimeGenerated,1day),DeviceName
| render columnchart

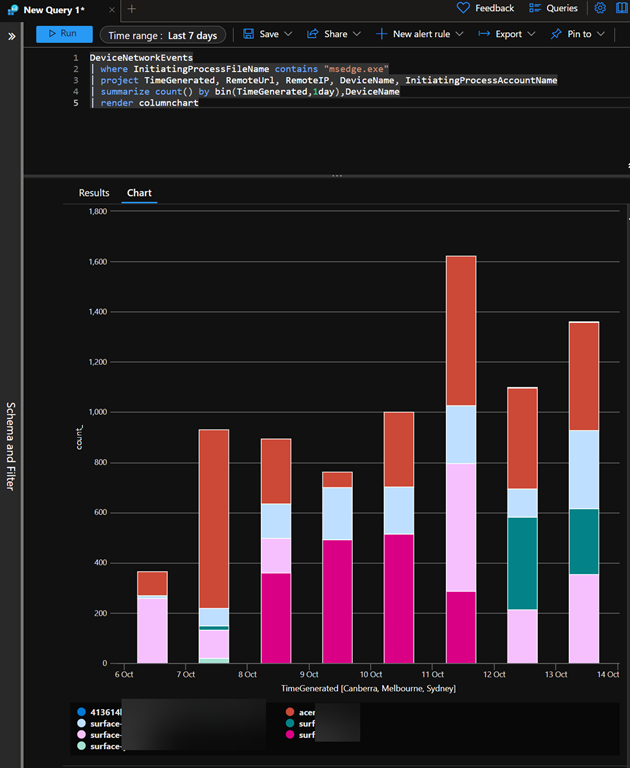
an example of this is the above KQL query, which when run provides an output like:

image

The result is basically a bar graph, over whatever time you specify, of how many times an application has been used. This is a great indicative way to get a feel for how often a device is running a particular application (here msedge.exe). The different bar colours show each particular device and each bar height represents the total usage of that application for one day.

The great thing is that you can further customize and enhance this query to suit your needs to product the output your require. You can then take that query and embed it into a Sentinel workbook so that it is available as part of a dashboard.

There is just so much that you can do and all it takes is becoming familiar with the tools Microsoft provides in your environment.


Block applications on Windows devices using Intune

This series of posts is an approach to implementing Intune inside a business. So far, I have covered off:

1. Create compliance policies and update devices to be compliant

2. Implement LAPS to control the local device admin account that cannot be deleted

3. Remove all other accounts from local administrator group on devices

4. Setting the default search engine in Edge with Intune

5. Managing browser extensions in Edge with Intune

6. Setting an Edge Security Baseline with Intune

7. Setting an individual Attack Surface Reduction (ASR) rule in Intune

8. Setting Edge as the default browser using Intune

Now that we have Microsoft Edge all set up and have done as much as we can to encourage people to shift away from using other browsers, it’s now time block any other browsing options.  We can again use Intune to achieve this and, typically, it can be done using a number of different methods. Here, we’ll use what I consider the easiest method.

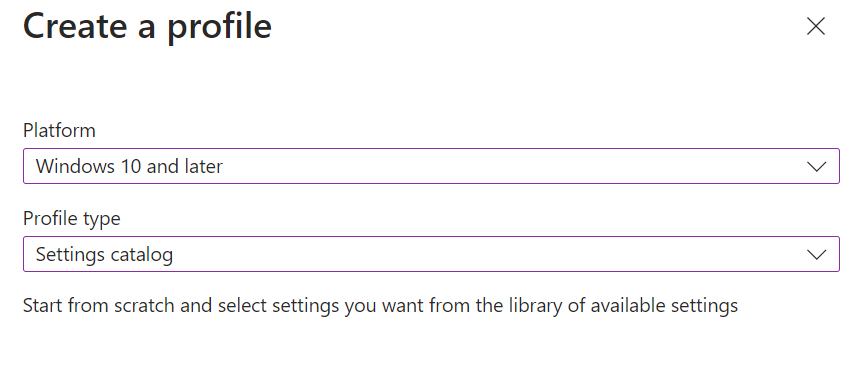
Once again, create a Configuration profile for Windows 10 and later using the Settings catalog as shown above.

Give the policy a suitable name and continue.

image

In the search field type ‘specified windows application’ and select Search. The only category that appears should be Administrative Templates\System, which you should select. Then in the lower pane select Don’t run specified Windows applications (User) as shown above.

image

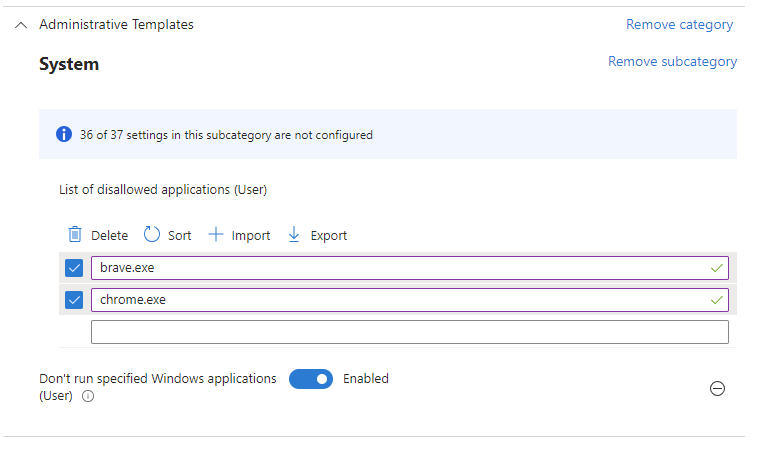
Enable the Don’t run specified Windows applications (User) and then enter the name of the applications you do not wish to run. Here, we’ll block chrome.exe and brave.exe as shown above.
These settings are covered in the RestrictApps documentation in which you will note:

1. The setting applies to users not devices:

image

and

2. This policy setting only prevents users from running programs that are started by the File Explorer process. It doesn’t prevent users from running programs such as Task Manager, which are started by the system process or by other processes. Also, if users have access to the command prompt (Cmd.exe), this policy setting doesn’t prevent them from starting programs in the command window even though they would be prevented from doing so using File Explorer.

3. Blocking occurs by filename only. If users can rename the file then it will execute.

As mentioned previously, this is but the simplest method to block existing applications from running. Other options are available if you wish a more comprehensive blocking approach.

Finish configuring the policy remembering to assign it to a user NOT device group.

image

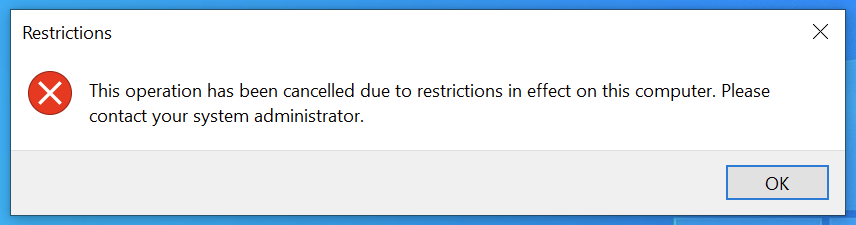
Once the policy has been deployed to your fleet and these machines have been rebooted, when a user tried to run an application that you have specified as block in the policy they will receive message like that shown above.

The good thing about this policy is that you can easily extend it to include any other applications you don’t users to run on their Windows devices.

Setting Edge as the default browser using Intune

This series of posts is an approach to implementing Intune inside a business. So far, I have covered off:

1. Create compliance policies and update devices to be compliant

2. Implement LAPS to control the local device admin account that cannot be deleted

3. Remove all other accounts from local administrator group on devices

4. Setting the default search engine in Edge with Intune

5. Managing browser extensions in Edge with Intune

6. Setting an Edge Security Baseline with Intune

7. Setting an individual Attack Surface Reduction (ASR) rule in Intune

Now that Microsoft Edge has been secured in the environment, the next task will be to set Microsoft Edge as the default browser. There are number of ways of achieving this, but I’ll use the more modern Intune Settings catalog approach.

The first step in the process is to take a machine that already has Microsoft Edge configured as the default browser app and run the command:

dism /online /export-defaultappassociations:edgedefault.xml

This will produce an XML with all the application defaults for that device.

If you just want to configure Microsoft Edge as the default browser you’ll need to edit the XML file until it looks something like this:

<?xml version=”1.0″ encoding=”UTF-8″?>
<DefaultAssociations>
     <Association Identifier=”.htm” ProgId=”MSEdgeHTM” ApplicationName=”Microsoft Edge” />
     <Association Identifier=”.html” ProgId=”MSEdgeHTM” ApplicationName=”Microsoft Edge” />
     <Association Identifier=”.mht” ProgId=”MSEdgeMHT” ApplicationName=”Microsoft Edge” />
     <Association Identifier=”.mhtml” ProgId=”MSEdgeMHT” ApplicationName=”Microsoft Edge” />
     <Association Identifier=”.pdf” ProgId=”MSEdgePDF” ApplicationName=”Microsoft Edge” />
     <Association Identifier=”.svg” ProgId=”MSEdgeHTM” ApplicationName=”Microsoft Edge” />
     <Association Identifier=”.xht” ProgId=”MSEdgeHTM” ApplicationName=”Microsoft Edge” />
     <Association Identifier=”.xhtml” ProgId=”MSEdgeHTM” ApplicationName=”Microsoft Edge” />
     <Association Identifier=”ftp” ProgId=”MSEdgeHTM” ApplicationName=”Microsoft Edge” />
     <Association Identifier=”http” ProgId=”MSEdgeHTM” ApplicationName=”Microsoft Edge” />
     <Association Identifier=”https” ProgId=”MSEdgeHTM” ApplicationName=”Microsoft Edge” />
     <Association Identifier=”microsoft-edge” ProgId=”MSEdgeHTM” ApplicationName=”Microsoft Edge” />
     <Association Identifier=”microsoft-edge-holographic” ProgId=”MSEdgeHTM” ApplicationName=”Microsoft Edge” />
     <Association Identifier=”ms-xbl-3d8b930f” ProgId=”MSEdgeHTM” ApplicationName=”Microsoft Edge” />
     <Association Identifier=”read” ProgId=”MSEdgeHTM” ApplicationName=”Microsoft Edge” />
</DefaultAssociations>

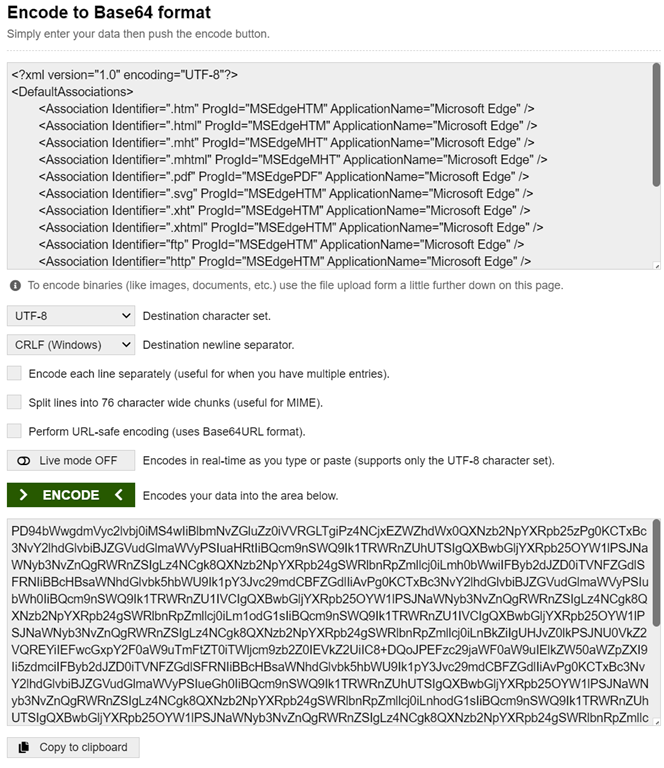
Next, you’ll need to convert that XML file to a base64 file for us an Intune policy. You can do that using the following site:

https://www.base64encode.org/

image

The output from this conversion should look like this:

PD94bWwgdmVyc2lvbj0iMS4wIiBlbmNvZGluZz0iVVRGLTgiPz4NCjxEZWZhdWx0QXNzb2NpYXRpb25zPg0KCTxBc3NvY2lhdGlvbiBJZGVudGlmaWVyPSIuaHRtIiBQcm9nSWQ9Ik1TRWRnZUhUTSIgQXBwbGljYXRpb25OYW1lPSJNaWNyb3NvZnQgRWRnZSIgLz4NCgk8QXNzb2NpYXRpb24gSWRlbnRpZmllcj0iLmh0bWwiIFByb2dJZD0iTVNFZGdlSFRNIiBBcHBsaWNhdGlvbk5hbWU9Ik1pY3Jvc29mdCBFZGdlIiAvPg0KCTxBc3NvY2lhdGlvbiBJZGVudGlmaWVyPSIubWh0IiBQcm9nSWQ9Ik1TRWRnZU1IVCIgQXBwbGljYXRpb25OYW1lPSJNaWNyb3NvZnQgRWRnZSIgLz4NCgk8QXNzb2NpYXRpb24gSWRlbnRpZmllcj0iLm1odG1sIiBQcm9nSWQ9Ik1TRWRnZU1IVCIgQXBwbGljYXRpb25OYW1lPSJNaWNyb3NvZnQgRWRnZSIgLz4NCgk8QXNzb2NpYXRpb24gSWRlbnRpZmllcj0iLnBkZiIgUHJvZ0lkPSJNU0VkZ2VQREYiIEFwcGxpY2F0aW9uTmFtZT0iTWljcm9zb2Z0IEVkZ2UiIC8+DQoJPEFzc29jaWF0aW9uIElkZW50aWZpZXI9Ii5zdmciIFByb2dJZD0iTVNFZGdlSFRNIiBBcHBsaWNhdGlvbk5hbWU9Ik1pY3Jvc29mdCBFZGdlIiAvPg0KCTxBc3NvY2lhdGlvbiBJZGVudGlmaWVyPSIueGh0IiBQcm9nSWQ9Ik1TRWRnZUhUTSIgQXBwbGljYXRpb25OYW1lPSJNaWNyb3NvZnQgRWRnZSIgLz4NCgk8QXNzb2NpYXRpb24gSWRlbnRpZmllcj0iLnhodG1sIiBQcm9nSWQ9Ik1TRWRnZUhUTSIgQXBwbGljYXRpb25OYW1lPSJNaWNyb3NvZnQgRWRnZSIgLz4NCgk8QXNzb2NpYXRpb24gSWRlbnRpZmllcj0iZnRwIiBQcm9nSWQ9Ik1TRWRnZUhUTSIgQXBwbGljYXRpb25OYW1lPSJNaWNyb3NvZnQgRWRnZSIgLz4NCgk8QXNzb2NpYXRpb24gSWRlbnRpZmllcj0iaHR0cCIgUHJvZ0lkPSJNU0VkZ2VIVE0iIEFwcGxpY2F0aW9uTmFtZT0iTWljcm9zb2Z0IEVkZ2UiIC8+DQoJPEFzc29jaWF0aW9uIElkZW50aWZpZXI9Imh0dHBzIiBQcm9nSWQ9Ik1TRWRnZUhUTSIgQXBwbGljYXRpb25OYW1lPSJNaWNyb3NvZnQgRWRnZSIgLz4NCgk8QXNzb2NpYXRpb24gSWRlbnRpZmllcj0ibWljcm9zb2Z0LWVkZ2UiIFByb2dJZD0iTVNFZGdlSFRNIiBBcHBsaWNhdGlvbk5hbWU9Ik1pY3Jvc29mdCBFZGdlIiAvPg0KCTxBc3NvY2lhdGlvbiBJZGVudGlmaWVyPSJtaWNyb3NvZnQtZWRnZS1ob2xvZ3JhcGhpYyIgUHJvZ0lkPSJNU0VkZ2VIVE0iIEFwcGxpY2F0aW9uTmFtZT0iTWljcm9zb2Z0IEVkZ2UiIC8+DQoJPEFzc29jaWF0aW9uIElkZW50aWZpZXI9Im1zLXhibC0zZDhiOTMwZiIgUHJvZ0lkPSJNU0VkZ2VIVE0iIEFwcGxpY2F0aW9uTmFtZT0iTWljcm9zb2Z0IEVkZ2UiIC8+DQoJPEFzc29jaWF0aW9uIElkZW50aWZpZXI9InJlYWQiIFByb2dJZD0iTVNFZGdlSFRNIiBBcHBsaWNhdGlvbk5hbWU9Ik1pY3Jvc29mdCBFZGdlIiAvPg0KPC9EZWZhdWx0QXNzb2NpYXRpb25zPg==

In the Intune console, create a new Device Configuration profile using the Settings Catalog:

image

Give the new policy a meaningful name and continue.

image

In the Settings picker search for applications and then select Application defaults and then Default Associations Configuration in the results as shown above.

image

Into the option Default Associations Configuration paste a copy of the base64 file you created from the original XML.

Complete the policy by assigning it to a group of devices NOT users. This is because the Policy CSP – ApplicationDefaults is only scoped to devices per:

image

This may mean you need to create a different Edge configuration policy from the one created in previous steps, if that policy was assigned to users.

When the policy has been deployed from Intune, and the device rebooted, Microsoft Edge will be the default browser for the device.

image

Of course, the user can still change the default back but they will need to do that after every reboot. In the future, you’d create a policy to prevent that, but for now, if the user is that desperate for their old browser they can swap. However, the next policy I’ll cover will show you how to stop other browsers (or any other application) from running on Windows devices.