Need to Know podcast–Episode 297

In this episode I do a quick overview of the differences between Windows 365 Business, Enterprise and Azure Virtual Desktop (AVD) and how they can be used inside a business. You’ll also get the latest news and updates from the Microsoft cloud.

You can listen directly to this episode at:

https://ciaops.podbean.com/e/episode-297-windows-365-and-avd/

Subscribe via iTunes at:

https://itunes.apple.com/au/podcast/ciaops-need-to-know-podcasts/id406891445?mt=2

The podcast is also available on Stitcher at:

http://www.stitcher.com/podcast/ciaops/need-to-know-podcast?refid=stpr

Don’t forget to give the show a rating as well as send me any feedback or suggestions you may have for the show.

This episode was recorded using Microsoft Teams and produced with Camtasia 2022.

Brought to you by www.ciaopspatron.com

Resources

@directorcia

@directorcia@twit.social

Join my shared channel

CIAOPS merch store

Become a CIAOPS Patron

CIAOPS Blog

YouTube edition of this podcast

Reinventing search with a new AI-powered Microsoft Bing and Edge, your copilot for the web

Introducing the New Post-delivery Activities Report in Microsoft Defender for Office 365

Yammer is evolving to Microsoft Viva Engage with new experiences rolling out today

Automate your alert response actions in Microsoft 365 Defender

Microsoft Defender – Monthly news – February 2023

Expanding support for Attack surface reduction rules with Microsoft Intune

Introducing Adaptive Protection in Microsoft Purview—People-centric data protection for a multiplatform world

Need to Know podcast–Episode 296

In this latest episode I take a quick look at Microsoft Sentinel as well as speak to the benefits and why if you are serious about cybersecurity you should be considering it in every environment. There is also the latest news and updates from the Microsoft Cloud. Listen along and enjoy.

You can listen directly to this episode at:

https://ciaops.podbean.com/e/episode-296-sentinel/

Subscribe via iTunes at:

https://itunes.apple.com/au/podcast/ciaops-need-to-know-podcasts/id406891445?mt=2

The podcast is also available on Stitcher at:

http://www.stitcher.com/podcast/ciaops/need-to-know-podcast?refid=stpr

Don’t forget to give the show a rating as well as send me any feedback or suggestions you may have for the show.

This episode was recorded using Microsoft Teams and produced with Camtasia 2022.

Brought to you by www.ciaopspatron.com

Resources

@directorcia

@directorcia@twit.social

Join my shared channel

CIAOPS merch store

Become a CIAOPS Patron

CIAOPS Blog

YouTube edition of this podcast

2023 identity security trends and solutions from Microsoft

Seamless application access and lifecycle management for multi-tenant Azure AD organizations

Skilling up on Microsoft Security, compliance, and identity: Quarterly recap

Cloud Skills Challenge

2023 End-of-Support Milestone in Microsoft 365

New Microsoft Intune troubleshooting experience

Intune remote help introduction

Combatting Risky Sign-ins in Azure Active Directory

Introducing Microsoft Teams Premium, now available

What is Microsoft Sentinel

Introduction to Sentinel

Getting Started with Azure Sentinel

Need to Know podcast–Episode 295

Aside from the usual update from the Microsoft Cloud I tackle I listener question about the methodology of staying up to date with technology. I think the question is more about what NOT to do than what to do. Success is a system and key factor in being successful in business is saying NO more than saying yes. In this episode I’ll give you some tips to creating a system to keeping you current with the Microsoft Cloud.

ou can listen directly to this episode at:

https://ciaops.podbean.com/e/episode-295-staying-up-to-date/

Subscribe via iTunes at:

https://itunes.apple.com/au/podcast/ciaops-need-to-know-podcasts/id406891445?mt=2

The podcast is also available on Stitcher at:

http://www.stitcher.com/podcast/ciaops/need-to-know-podcast?refid=stpr

Don’t forget to give the show a rating as well as send me any feedback or suggestions you may have for the show.

This episode was recorded using Microsoft Teams and produced with Camtasia 2022.

Brought to you by www.ciaopspatron.com

Resources

@directorcia

@directorcia@twit.social

Join my shared channel

CIAOPS merch store

Become a CIAOPS Patron

CIAOPS Blog

YouTube edition of this podcast

Using MSPs to administer your cloud services

SC-900 free practice tests

The new Sentinel incident experience is here!

A Look at Different Options for Storing and Searching Sentinel Archived Logs

How to run a Windows 11 VM on Hyper-V

Update on Stream (Classic) retirement: Last day of service set for Feb 15, 2024

Microsoft 365 Defender – Monthly news – January 2023

Centrally manage permissions with the Microsoft 365 Defender role-based access control (RBAC) model

Protect your sensitive data against malicious apps

Microsoft Entra: 5 identity priorities for 2023

IPv6 Coming to Azure AD

Microsoft Defender for Endpoint: The Ultimate Solution for Endpoint Security

URLs

Connecting to Azure IoT hub

The main aim of my dive into IoT was to get a remote device talking to Azure. After getting the IoT device connected to WiFi, flashing LEDs, accepting input from a button and capturing temperature data, it was now time to make that dream a reality.

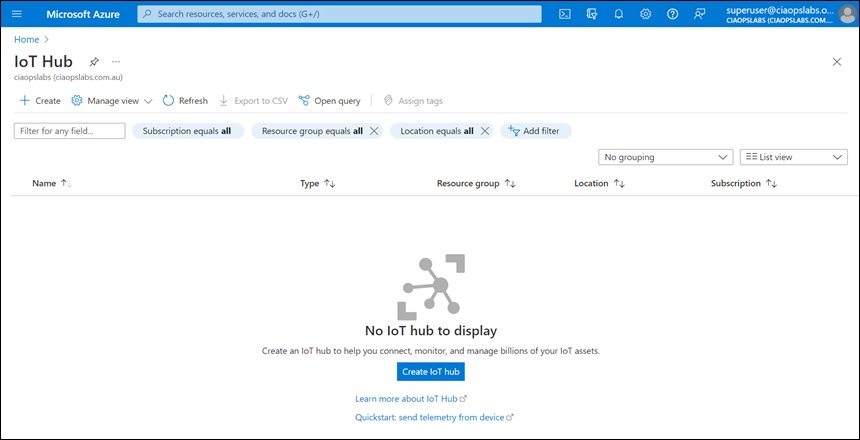
There are different methods of connecting devices to Azure but for my first attempt I decided to use Azure IoT hub. The first step in that process is to login to the Azure portal and create a new IoT hub.
image

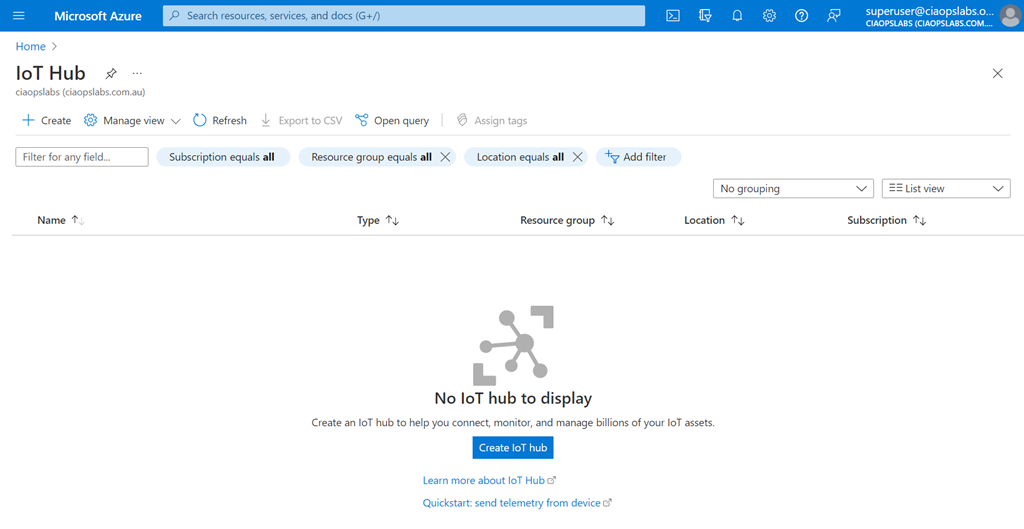
To do this, select the Create menu option in the top left of the Azure IoT hub blade
image

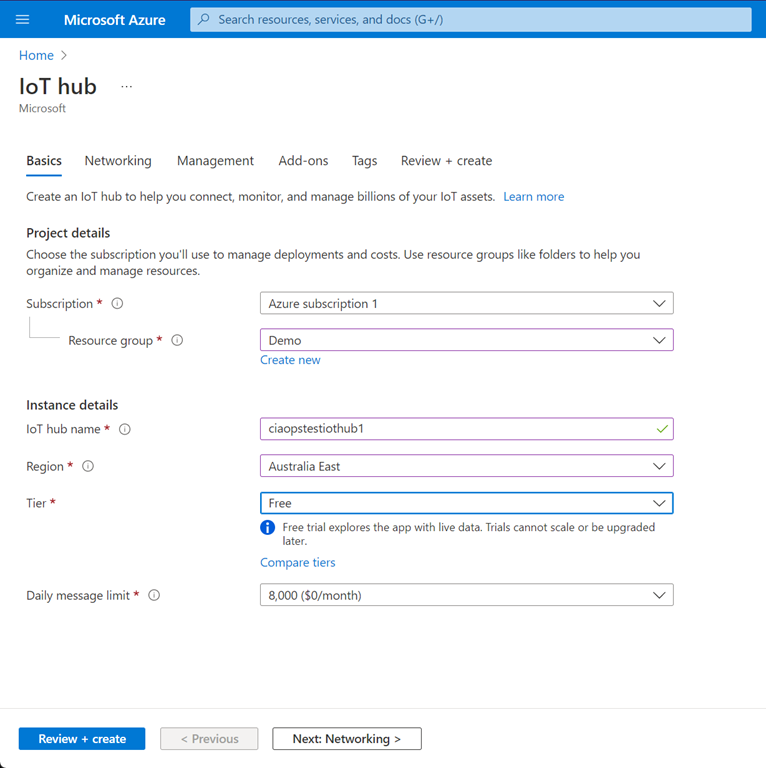
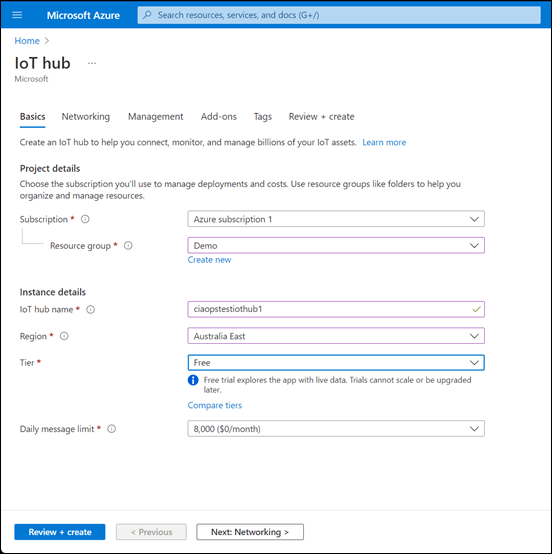
Once you have selected the Azure subscription and Resource group you’ll need to pick a Name for your Azure IoT hub. This name needs to be unique as a URL will be generated from this. Then select a Region and a Tier. You’ll notice that there is a Free tier, which I have selected for this example (very handy for tests like this).
image

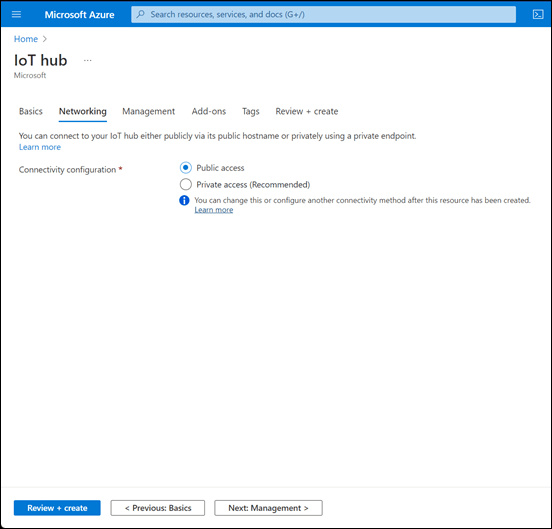
Next, you can configure your networking. Because my device will just connect to a public Internet connection I selected Public access.
image

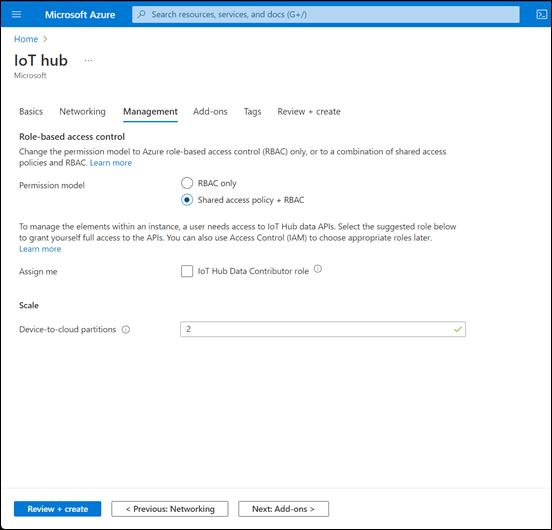
I left the management options as shown above.
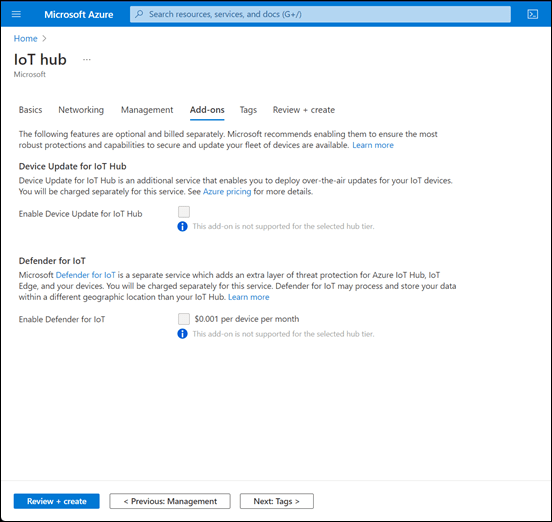
image

The add-ons shown here are not available on the Free tier.
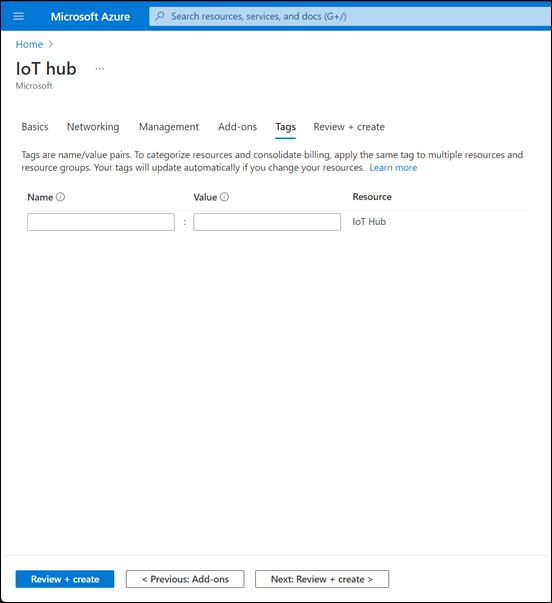
image

I didn’t need any tags.

image

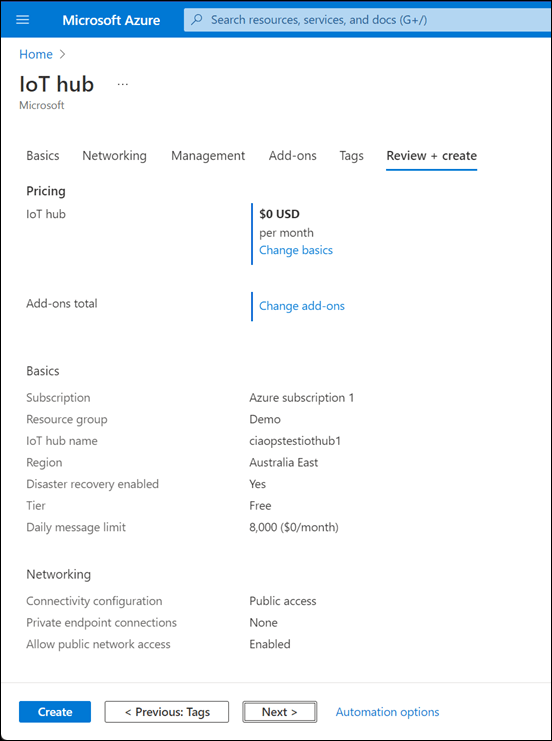
I finally get a summary as shown. Note that the cost will be $0 because I am using the Free tier. Select Create to complete the process.
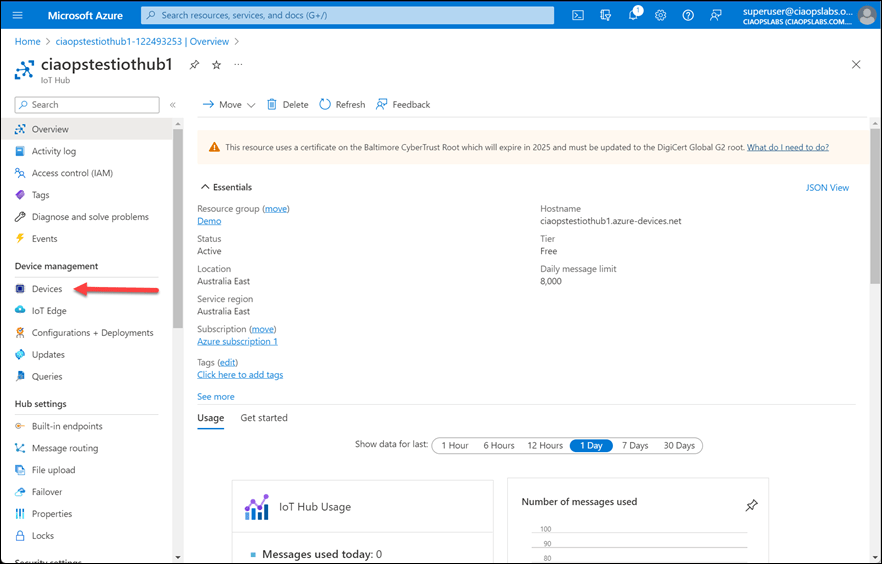
image

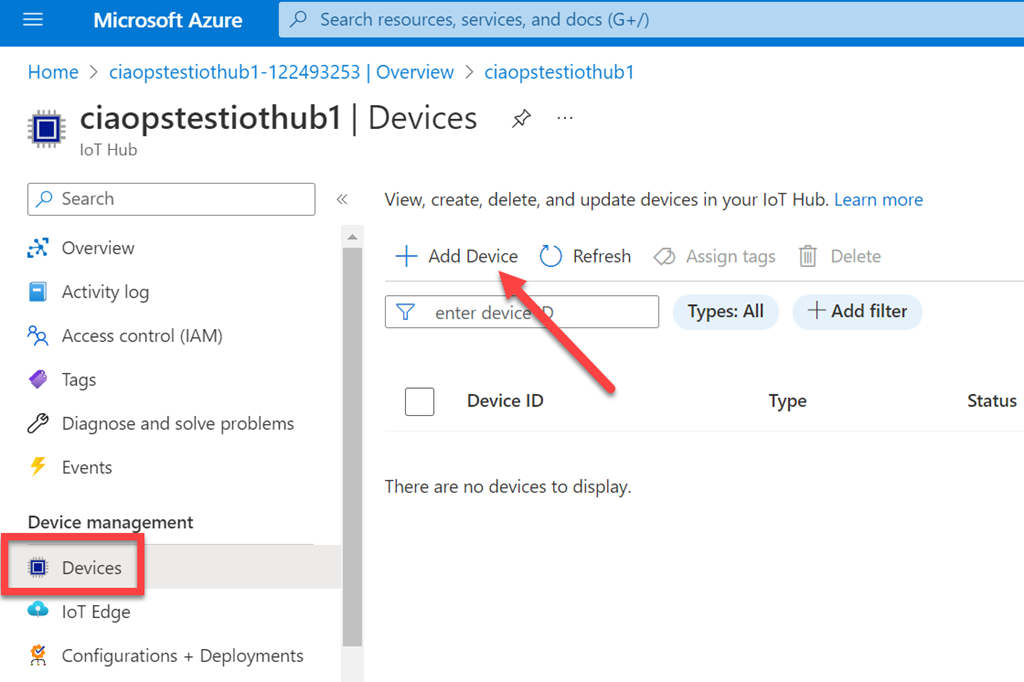
After a few minutes you should be able to see you IoT hub as shown above. Select Devices from the menu on the left.
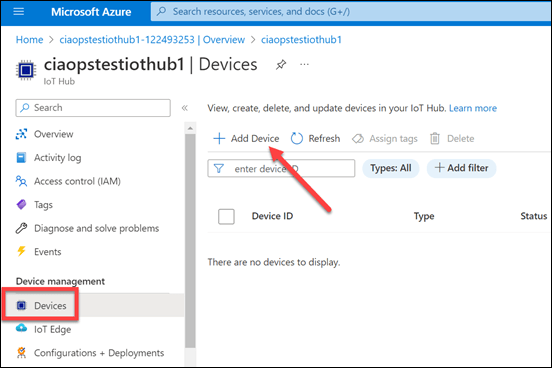
image

Now select Add device from the menu on the right as shown above.
image

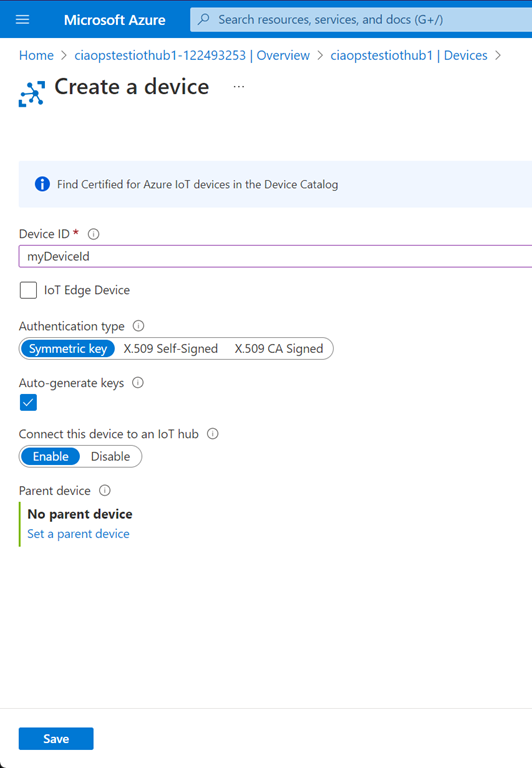
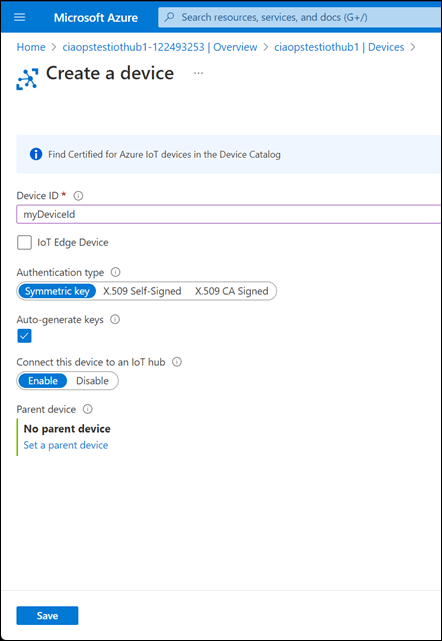
Give a the device a Name, and to keep things simple select Symmetric key for the Authentication type as shown. Ensure that the Auto-generate keys is select and that Connect this device to an IoT hub is set to Enable. Select Save to continue.
image

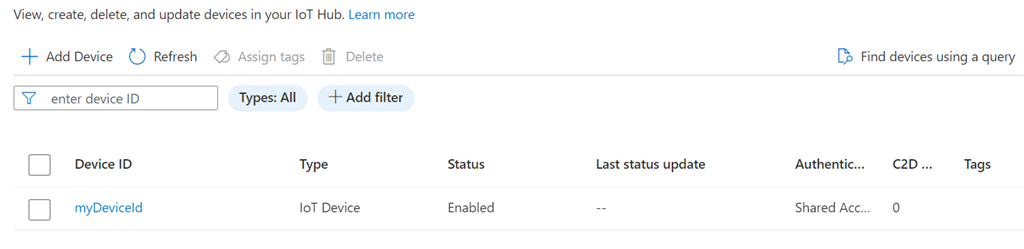
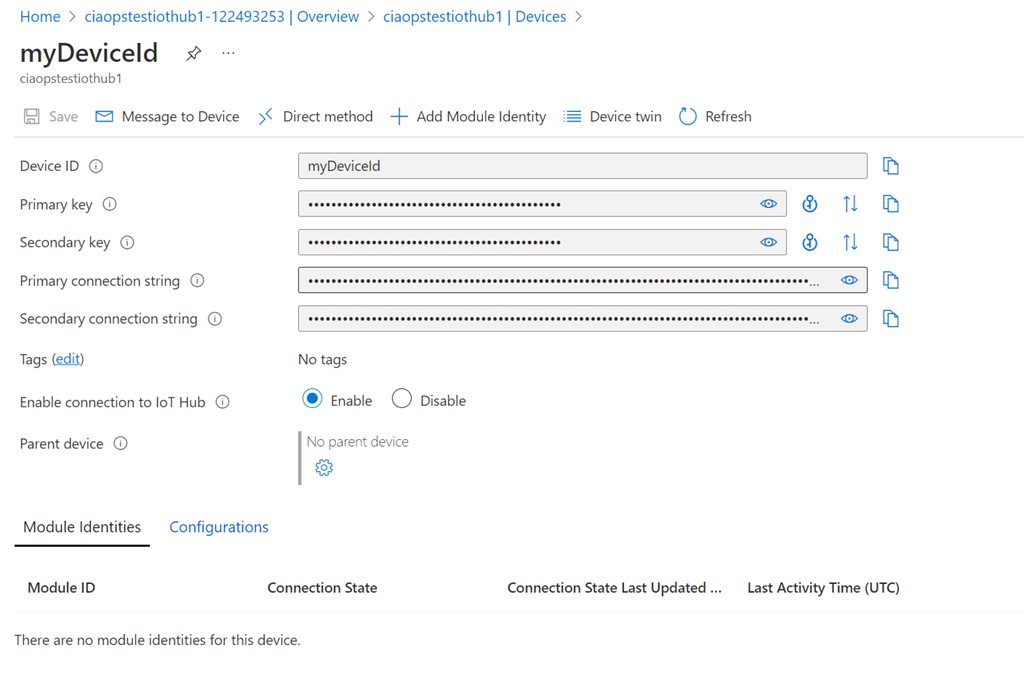
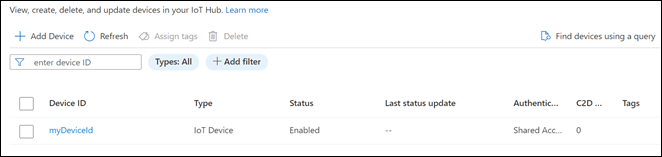
You should now see the device you just created listed as shown above. Select the name of the device to view it’s properties.
image

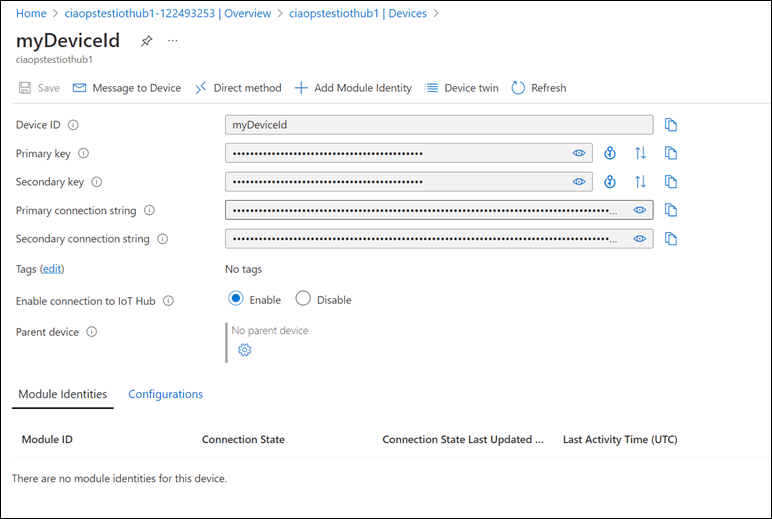
Here you will find the settings for your device. You’ll need to grab at least one Key and the matching Connection string to use when configuring your device.

With all of that information it’s time to head back and set up the device.

I have uploaded the code to get the device connected to Azure IoT hub here:

https://github.com/directorcia/Azure/blob/master/Iot/huzzah-iothub.ino

It is much more extensive that before and I will admit I am not yet 100% sure of what it all does but basically it connects the device to local Wifi then sends telemetry information to Azure IoT hub.

You’ll also need to have the file iot_config.h in the same directory when compiling your code. You can find an example of that here:

https://github.com/directorcia/Azure/blob/master/Iot/iot_configs.h

that file basically extracts all the unique security information like WiFi password, device keys and IoT Hub URL away from the main code. You’ll need to modify this file to suit your own environment before compiling.

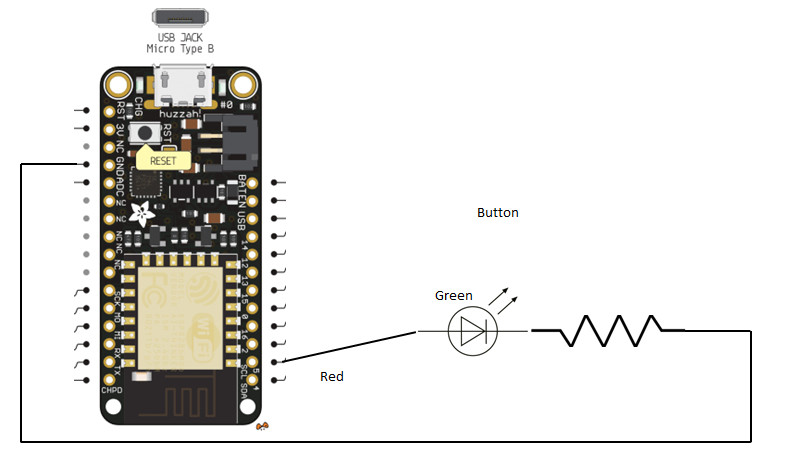
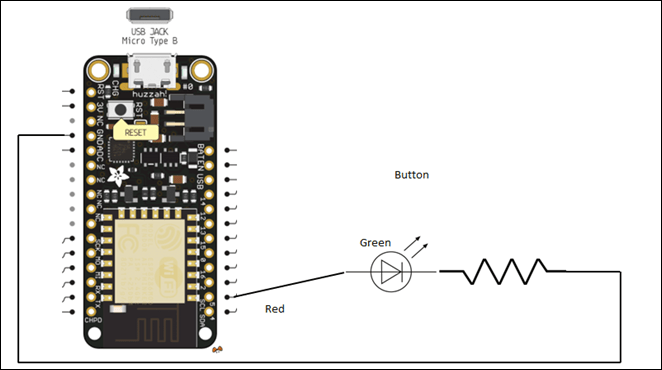
The only other thing you’ll need to do is connect a single LED to pin 5 of the device to act as a diagnostic indicator. It will basically flash when data is sent to Azure IoT hub which gives a nice visual representation of something actually happening on the device.
image

When you compile the code you’ll also need to ensure all the appropriate libraries are available. Details of each of these is contained in the code.

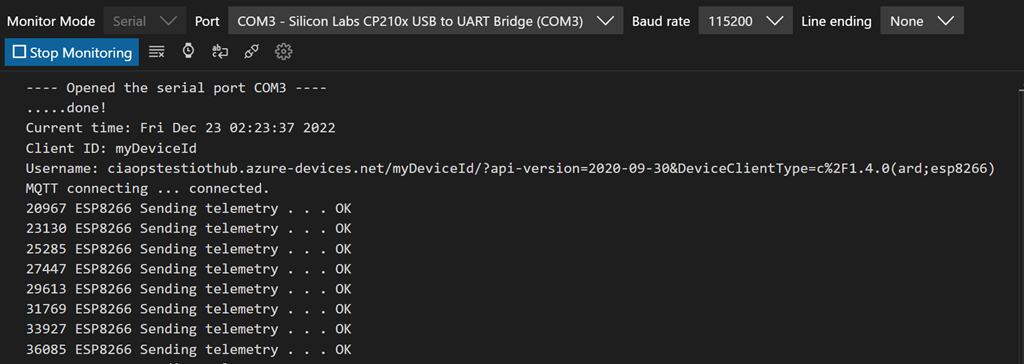
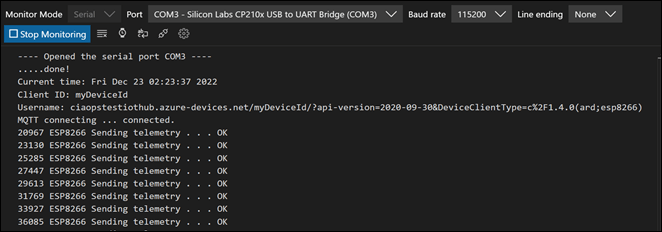
With the compiled code uploaded to the device you should see the LED light start to flash after a few seconds indicating that data is being sent. If you look at the serial port you should see diagnostic data like so:
image

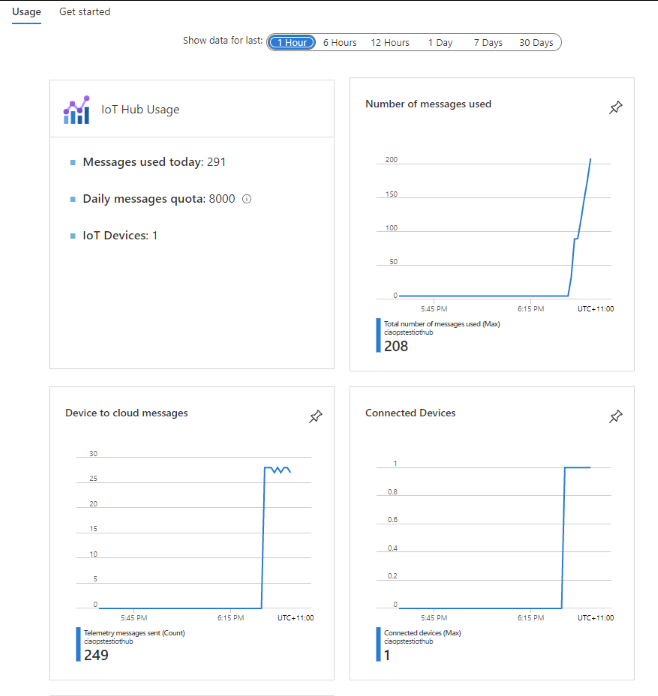
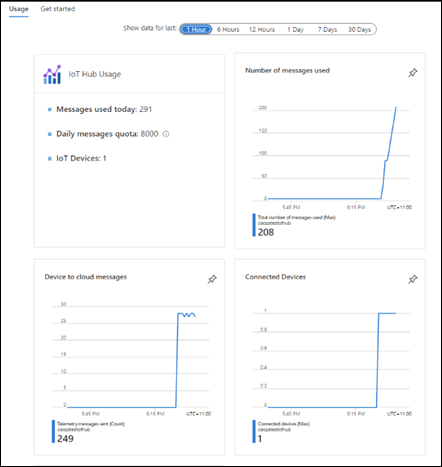
If you then look at the Overview page in the Azure IoT Hub you should the diagnostics reporting a number of messages increasing over time like so:
image

You can also download a tool called the Azure IoT explorer which you will find here:

https://github.com/Azure/azure-iot-explorer/releases

image

When you configure this for your IoT hub environment and drill down into the Device then Telemetry, as shown above, should allow to see the actual information being sent.

So there you have it. Once you have set up an Azure IoT hub and added a device to it you can grab the connection details and plug them into the code you use to configure your device. You can also use the Azure IoT Explorer to get more granular details of what your device is doing.

The next challenge is now to get the device working with Azure IoT central.

Defender EASM adds billable assets blade

I’ve talked about the value of Defender EASM before:

Go get Defender EASM

image

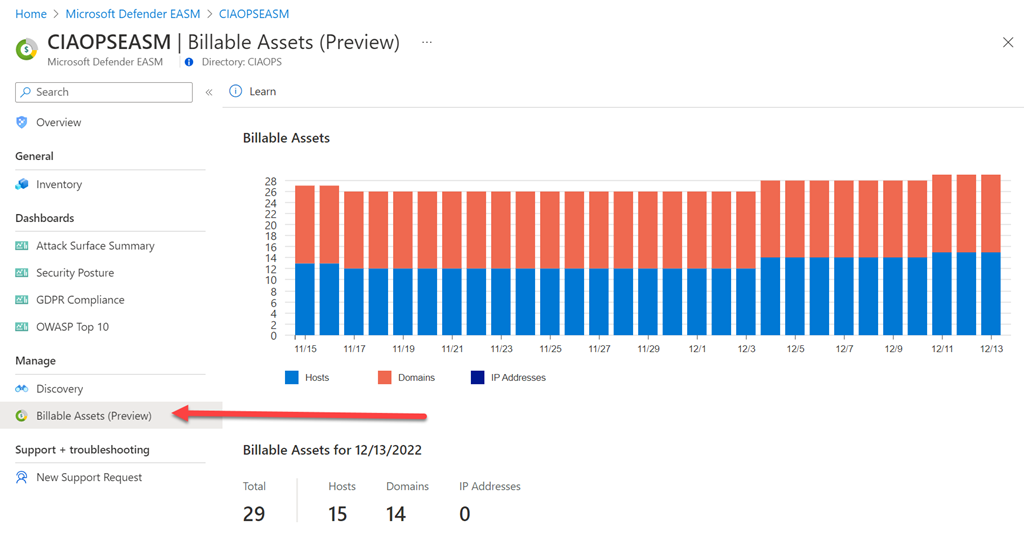
I now notice that there is a Billable assets option on the menu as shown above. Given that the costs for Defender EASM are based assets:

https://azure.microsoft.com/en-us/pricing/details/defender-external-attack-surface-management/

image

knowing exactly what those costs are is great.

As you can see in my environment I have about 29 billable assets equating to a grand total of:

29 x $0.0.17 per day = $0.49per day = $15.28 per month

As I maintain, Defender EASM is cheap for value it provides and now you can more easily track costs. (Don’t forget you also get a free 30 day trial!)

Office 365 company branding requirements have changed

*** Update ***

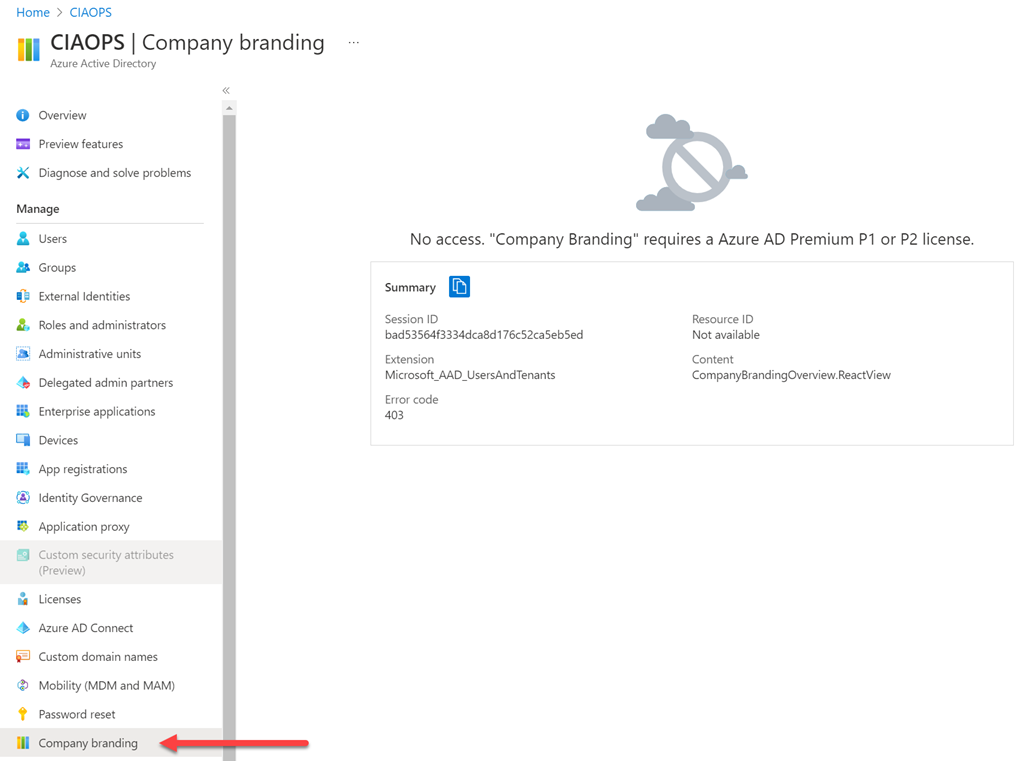
The issue with my tenant not displaying company branding as it used to was due to a bug in the interface. Microsoft have now rectified that and I have access to company branding as I once used to.


image

It seems that the requirements to configure Office 365 company branding have changed. The official documentation is here:

https://learn.microsoft.com/en-us/azure/active-directory/fundamentals/customize-branding#license-requirements

which says:

License requirements

Adding custom branding requires one of the following licenses:

  • Azure AD Premium 1

  • Azure AD Premium 2

  • Office 365 (for Office apps)

However, I definitely know this wasn’t the case until very recently, because a tenant I have without Azure AD P1 or P2 that allowed company branding configuration and now does not. So, something has indeed changed recently and I can find no acknowledgement or documentation of that. The existing branding of the tenant remains unchanged but I can no longer make changes.

If you don’t have Azure AD P1 or P2 in your environment you can always sign up for a 30 day trial and make changes. However, after that 30 days ends you’ll need to buy a full Azure AD P1 or P2 license it seems, if you wish to modify the company branding it seems.

I would have thought that in a world where we want to make tenants more secure using something like branding to help reduce the risk of phishing attacks tricking users into putting their details into false portals, the ability to brand a tenant would be available to all licenses.

Hopefully, this is simply an over sight by Microsoft and the ability is returned. However, for now it appears they are fully enforcing the licensing when it comes to company branding and requiring an Azure AD P1 or P2 licenced user to make changes.

Adafruit Huzzah input from button

After the last project:

Adafruit Huzzah WiFi

I wanted to have the device take input from a switch (which also came in the Starter kit).

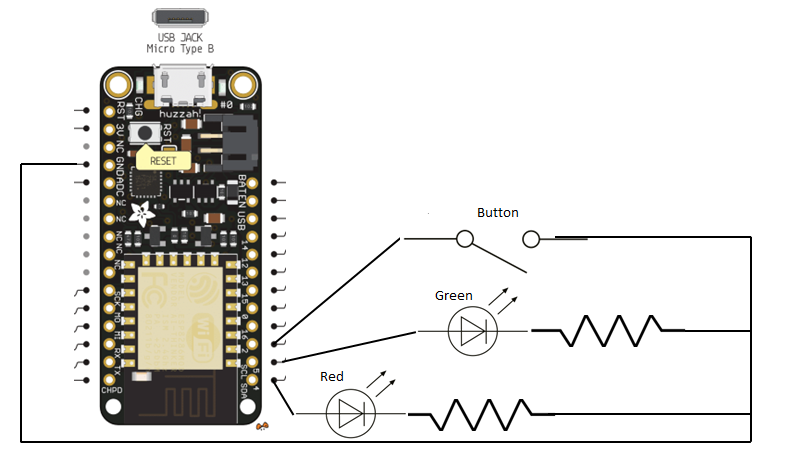
Based on my existing projects I now created a configuration of:

image

Pin 4 = Red LED + Resistor (560 ohm)

Pin 5 = Green LED + resistor (560 ohm)

Pin 2 = button

Each of these lines then went to the GND pin.

For the code I found the following article which was a great help:

https://create.arduino.cc/projecthub/muhammad-aqib/arduino-button-tutorial-using-arduino-digitalread-function-08adb5

from which I adapted my own code at:

https://github.com/directorcia/Azure/blob/master/Iot/huzzah-button.c

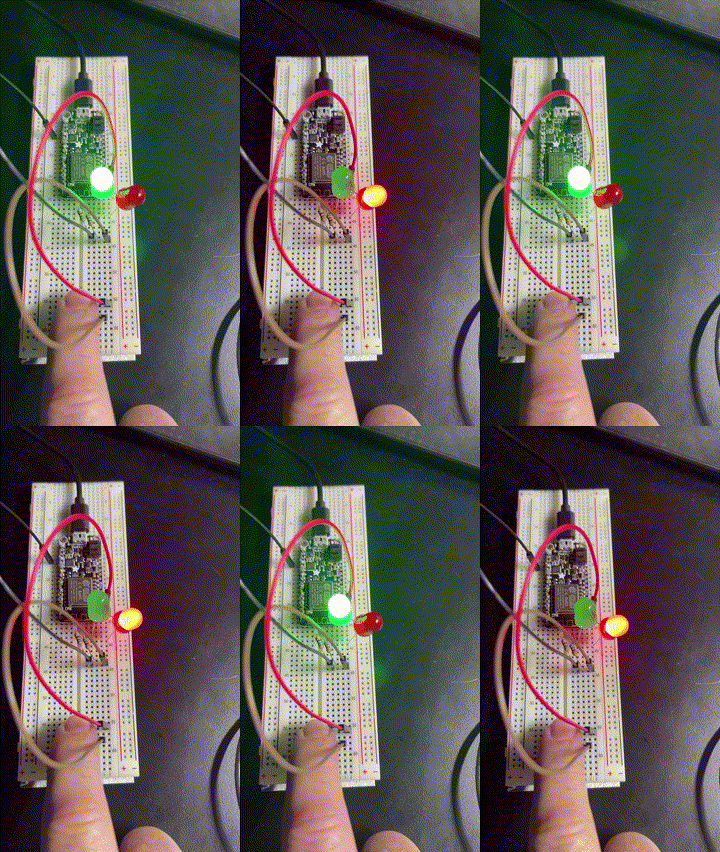
So that when the button is pressed it swaps which LED is on like so:

ledclick

Of course, it could be improved but I am still calling it a success as all I really wanted to do was incorporate input from an external source.

With all this now done, the next aim is to work out how to connect the device to Azure and get Azure capturing the input from the device and reporting it somehow.

Adafruit Huzzah Wifi

My last IoT challenge was to get an

External flashing LED

working and the next was to get the Adafruit Huzzah with ESP8266 to connect to Wifi. To do that I found most the required code here:

https://learn.adafruit.com/adafruit-feather-huzzah-esp8266/using-arduino-ide#connecting-via-wifi

and I’ve put my code on my Github here:

https://github.com/directorcia/Azure/blob/master/Iot/huzzah-wifi.c

You’ll need to put in your own WiFi access point details at the top of the code to connect to your own environment.

This script uses a lot of commands like:

serial.println

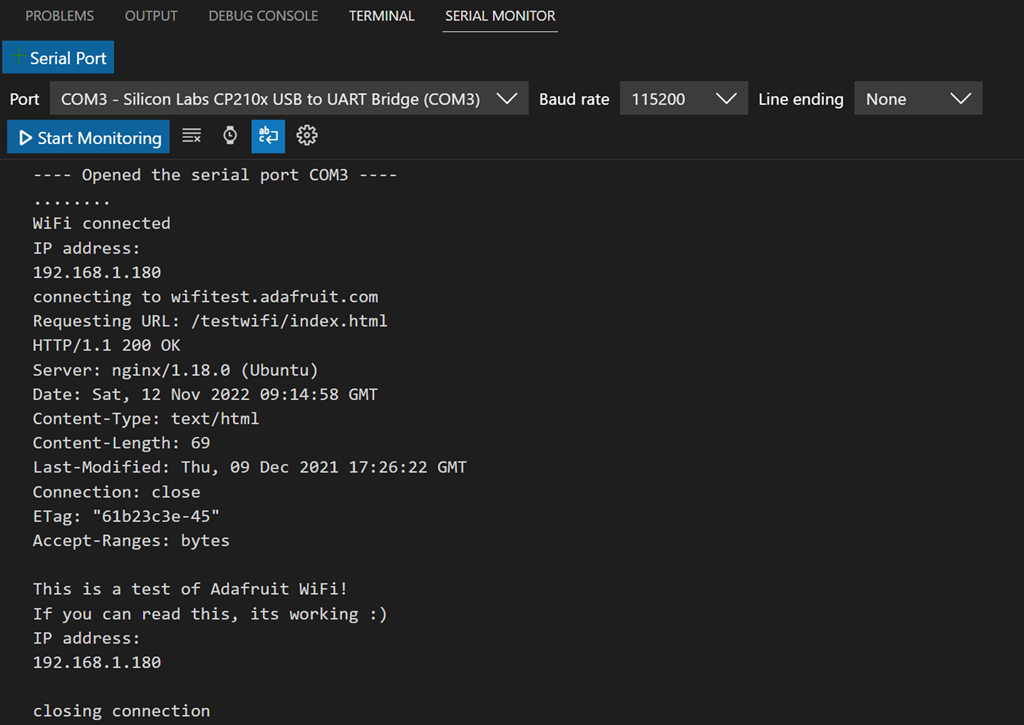
which basically outputs text to a serial port. This allows much easier troubleshooting so you can see what is going on. To see this output you will however need a dedicated serial monitor console program. I started off using Putty:

https://putty.org/

which works great but upon reflection, I wanted to use something that was integrated directly into Visual Studio code. After some poking around I found this extension:

https://marketplace.visualstudio.com/items?itemName=ms-vscode.vscode-serial-monitor

which is from Microsoft and seems to do what I needed.

image

You can see the output from my code above in serial monitor. Always ensure you match the output port and baud rate in the serial monitor to the device you have (here COM3 and 115200). Configuring this is very easy with the serial monitor extension.

Without much alteration, I was able to take the initial code and easily connect to my network as well as the Internet. Once connected I could ping the Adafruit Huzzah with ESP8266 from another PC in the network. A pretty painless exercise. Nice that things are becoming a little easier now I’m becoming familiar with this stuff.

So far, all I’ve done is use the Adafruit Huzzah with ESP8266 for output. Next, I’ll be to start taking simple input into the device by reading something like a button press and then taking action on that.

Stay tuned for details on that soon.