Using Azure Sentinel with Azure Lighthouse

A recent article:

Configure Azure Lighthouse

detailed how to get Azure Lighthouse working across different tenants (a ‘master’ and multiple ‘clients’). It is now time to look at how to use that capability inside the ‘master’ tenant with Azure Sentinel.

image

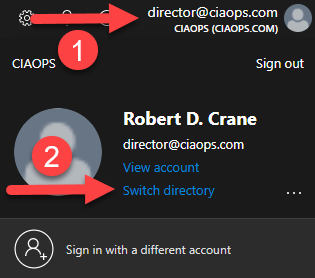
Log into your ‘master’ Azure tenant. Select the user in the top right and from the menu that is displayed select Switch directory.

image

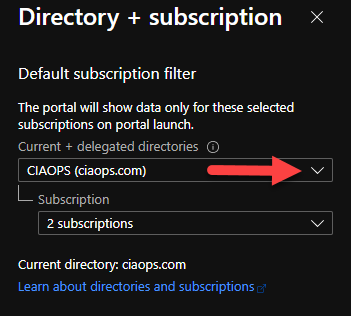
You’ll typically see only the current ‘master’ tenant listed in Current + delegated directories. Select the pull down arrow on the left of the Current + delegated directories option as shown.

image

You should now see all the ‘client’ tenants you connected with Azure Lighthouse now appear. However, you’ll will notice they are currently not selected.

image

Ensure that all the directories are selected.

image

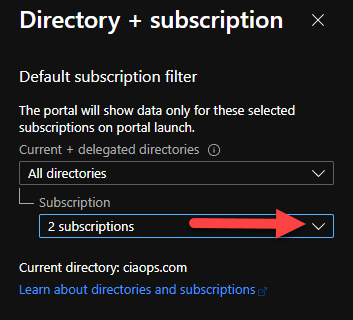
With All directories now selected in Current + delegated directories, clock on the pull down arrow on the right of Subscription as shown above.

image

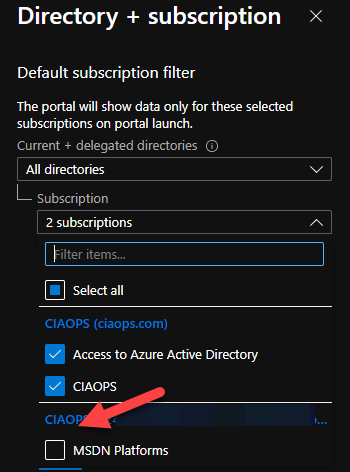
Again, you will probably see that the subscriptions in the ‘client’ tenants are not selected.

image

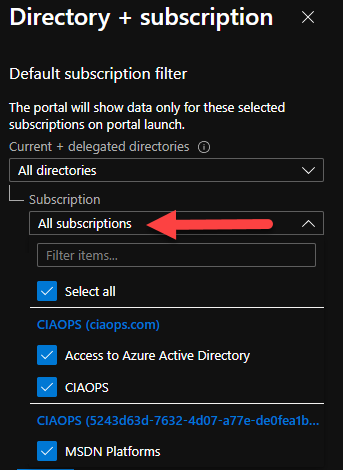
Ensure these are all selected and the Subscription option displays All subscriptions as shown above.

image

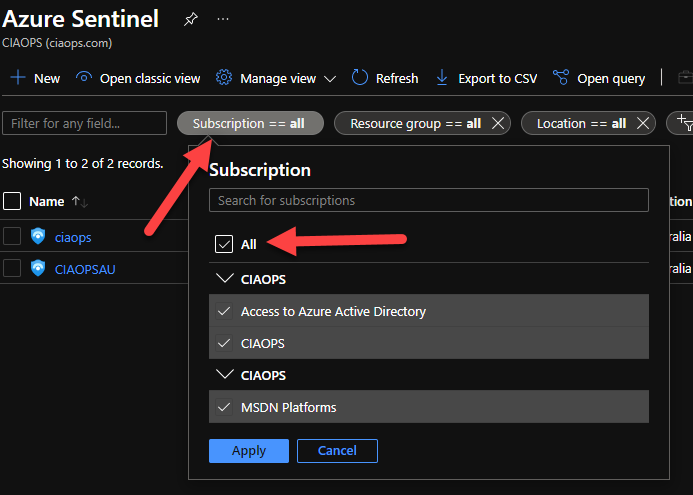
With all the ‘client’ tenant selections now complete it means they will be displayed just like any other in the ‘master’ tenant. Navigate to Azure Sentinel in the ‘master’ tenant and look at the list of workspaces that are displayed. If you don’t see ‘client’ Sentinel workspaces, select the Subscription filter at the top of the page and ensure it is set to All as shown.

image

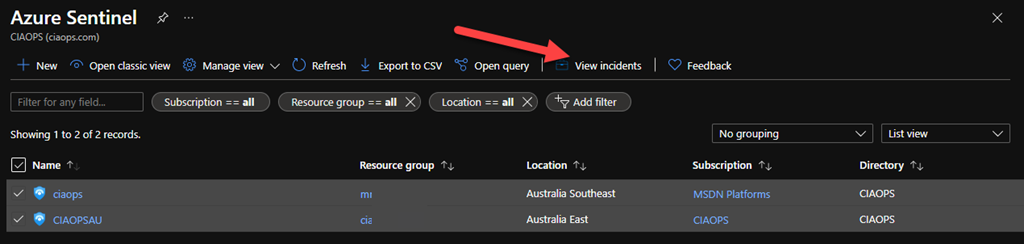
With all the workspaces selected, click the View incidents button from the menu along the top as shown above.

image

You should now see a list of all the incidents across all the tenants. You can see this by looking at the Directory column as shown in the output. You can, of course, view at individual Sentinel workspaces if you want by just clicking on them in the previous screen. This provides the same experience as if you viewed the results inside that ‘client’ tenant but you are doing that now inside the ‘master’ tenant.

This process now provides you a single pane of glass across all your Azure Sentinel environments. Depending on the permissions you have configured in the ‘client’ tenants, you get much the same capability across other Azure resources in the ‘master’ tenant now. This is the benefit of using Azure Lighthouse to manage multiple tenants and exactly how I use it with Azure Sentinel.

Missing calendar icon in Microsoft Teams

image

I recently ran a Live Event in Microsoft Teams and wanted to get back to the event resources but found my calendar was missing as seen above. This was evident on both the desktop and web interface.

image

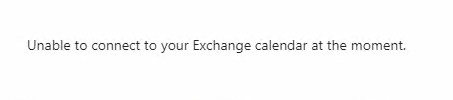
When I attempted to use the link from the Live Event appointment in the calendar in my Outlook I was greeted with the above message:

Unable to connect to your Exchange calendar at the moment

I thought this strange as i had scheduled the Live Event using the calendar icon in Teams?

Turns out that what I had done in the meantime was disable Exchange Web Services (EWS) in my environment. Doing so affects a number of services in my environment including Teams and Exchange Add-ins as it turns out.

If you are seeing the same issues you can use PowerShell to check the EWS status of your environment. You’ll firstly need to connect to Exchange Online with PowerShell which you can do using my script:

https://github.com/directorcia/Office365/blob/master/o365-connect-exo.ps1

then run the following command to see what the EWS settings are at the tenant level:

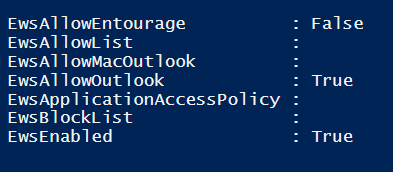
Get-organizationconfig | fl ews*

to which you should see something like:

image

From what I understand you’ll need to ensure that EWSEnabled and EWSAllowOutlook are NOT False (i.e. disabled). This will take care of allowing EWS for any new mailboxes created from this point forward.

Also run the command:

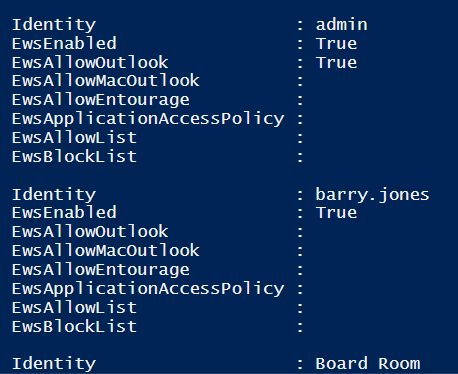
Get-CASMailbox  | fl identity, ews*

which should result in a list of all the EWS for each user like so:

image

Make sure that users do not have EwsEnabled or EwsAllowOutlook set to False (i.e. disabled). If it is you can use the command:

set-casmailbox –identity user@domain.com –ewsenabled $true –ewsallowoutlook $true

command to re-enable it and set it to True.

If you change an EWS setting for an individual mailbox it can take 4 – 24 hours for that change to flow through according to documentation I’ve seen. In my case however, I found by logging out and back in the change appeared almost immediately.

image

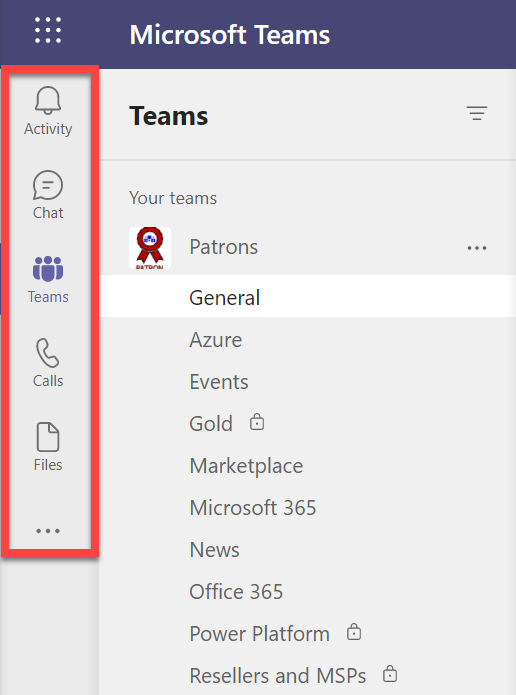
It should then re-appear in Teams as shown above. If it doesn’t, simply use the three dots (ellipse) at the bottom of the list to add it back in. You may also need to right mouse click it once you have added it back in and “pin” it to the side menu, so it stays there.

So in a nutshell, don’t disable EWS in your environment because things like Microsoft Teams needs it! If you are missing your calendar in Microsoft Teams or have issues with Outlook Add-ins, check EWS is enabled.

Configure Azure Lighthouse

Azure Lighthouse:

“enables cross- and multi-tenant management, allowing for higher automation, scalability, and enhanced governance across resources and tenants.”

In essence, it allows you to manage multiple ‘client’ Azure tenants from a single ‘master’ tenant. There is no cost for Azure Lighthouse and it is simple to enable. However, I would caution you to pay close attention to the permissions you assign the ‘master’ tenant inside the ‘client’ tenants and follow the best practice of least privilege security.

You are going to need a few things before you start configuring Azure Lighthouse.

1. A ‘master’ Azure tenant with a paid subscription

2. ‘Client’ Azure tenants with a paid subscription in each

3. For each ‘client’ Azure tenant you will require a login to that tenant who has the Owner built-in role for the subscription being onboarded. Typically, there is only one subscription in an Azure tenant and the initial administrator has that role. You will use this user, inside each ‘client’ tenant to permit access from the ‘master’ tenant.

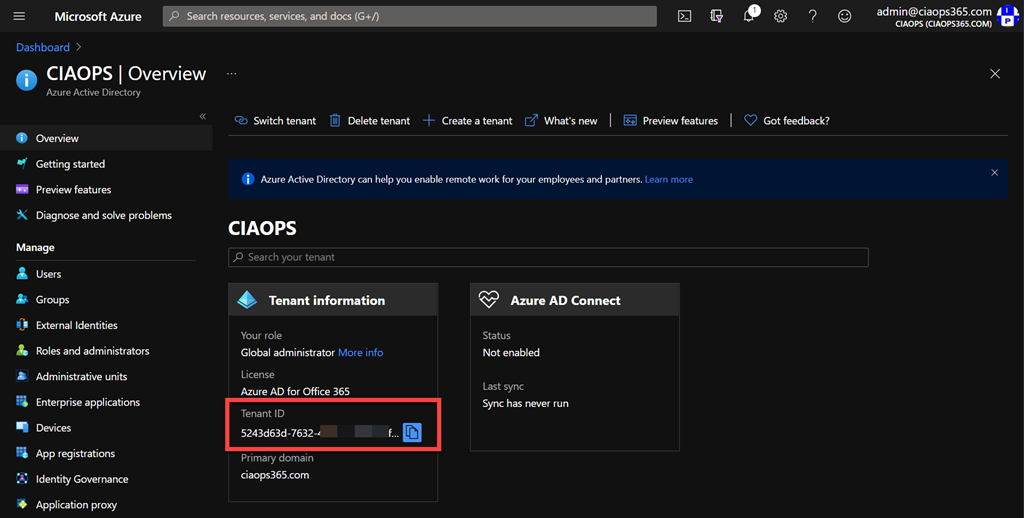
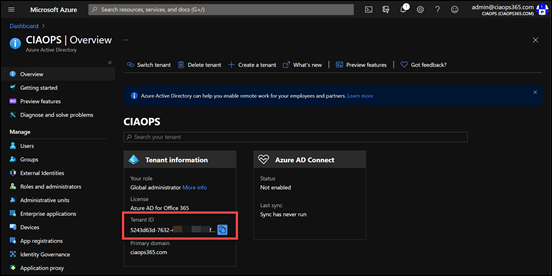
4. The Tenant ID of the ‘master’ tenant.
image

You will find that on the front page of the Azure Active Directory blade in the ‘master’ Azure tenant portal as shown above.

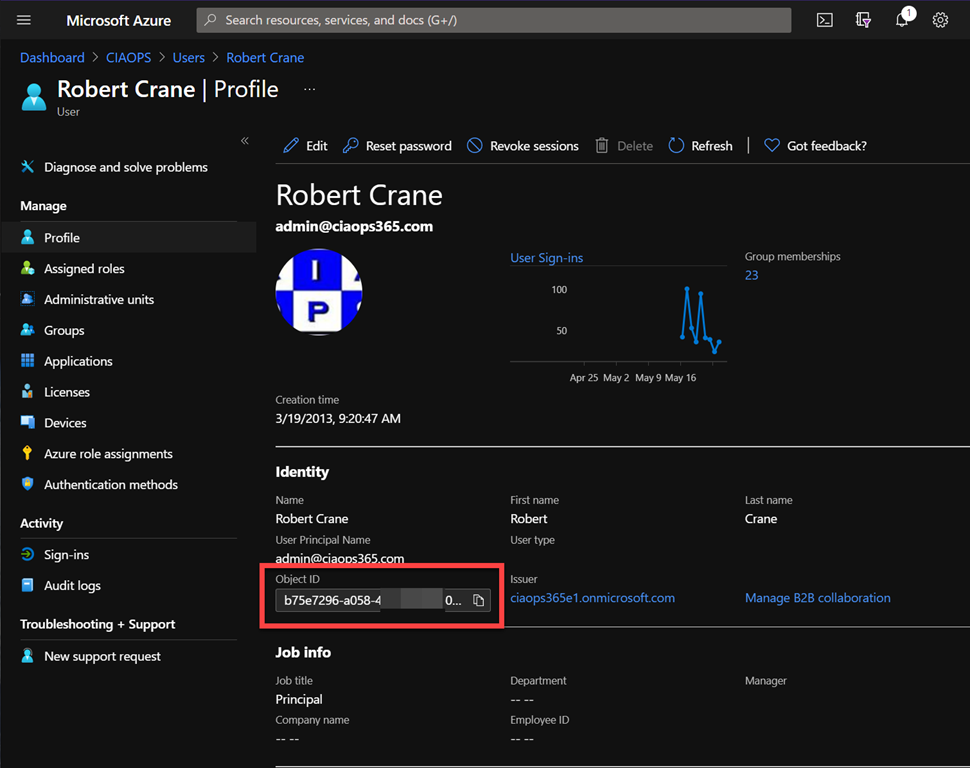
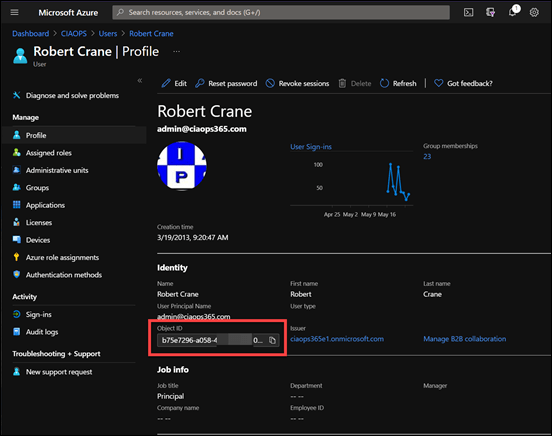
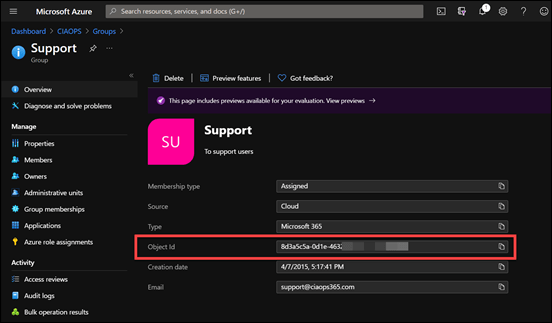
5. The Object ID for the controlling entity (user or group) in the ‘master’ Azure tenant. This is basically the individual user or Azure AD security group who you wish to give access rights to the ‘client’ Azure tenants.
image

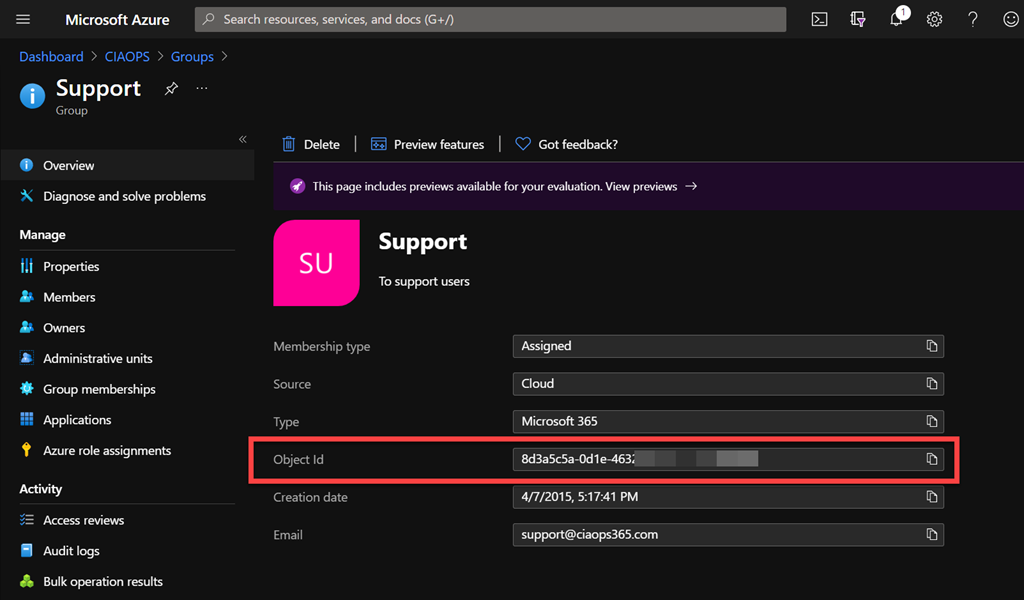
You will find the Object ID on the front page of that item in Azure AD as shown above. The above example show this for a single user.
image

The above example is for a group.

6. You now need to deicide what permissions you will give this Object ID from the ‘master’ Azure tenant inside the ‘client’ tenants. You can find all the Ids for Azure built-in roles here:

https://docs.microsoft.com/en-us/azure/role-based-access-control/built-in-roles

So, if you want for the ‘master’ tenant Object ID to have effectively full rights inside the ‘client’ Azure tenants use:

Contributor – ID = b24988ac-6180-42a0-ab88-20f7382dd24c

Remember, best practice is to follow least privilege and as such if you just want to view Azure Sentinel information in the ‘client’ Azure tenant use:

Azure Sentinel Reader – ID = 8d289c81-5878-46d4-8554-54e1e3d8b5cb

but as I said, be very, very careful about the rights you assign the ‘master’ Object ID inside the ‘client’ tenants.

Once you have all the above information, you’ll need to login to the ‘client’ Azure tenant with the user account in step 3 above (i.e. an owner of the ‘client’ Azure tenant).

In the same browser session open a new tab and navigate to:

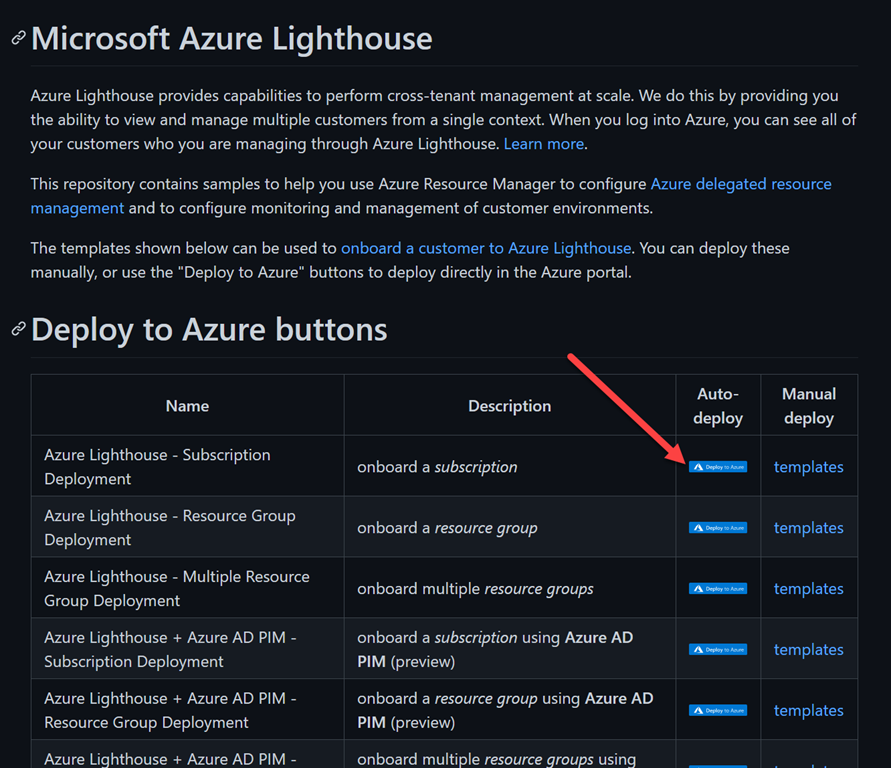
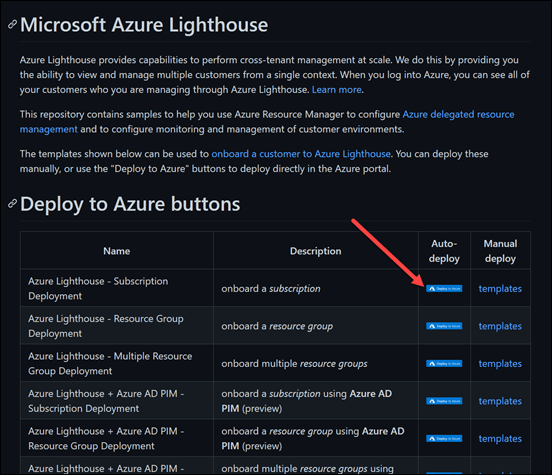
https://github.com/Azure/Azure-Lighthouse-samples/

and select the Auto-deployment button in the first row as shown:
image

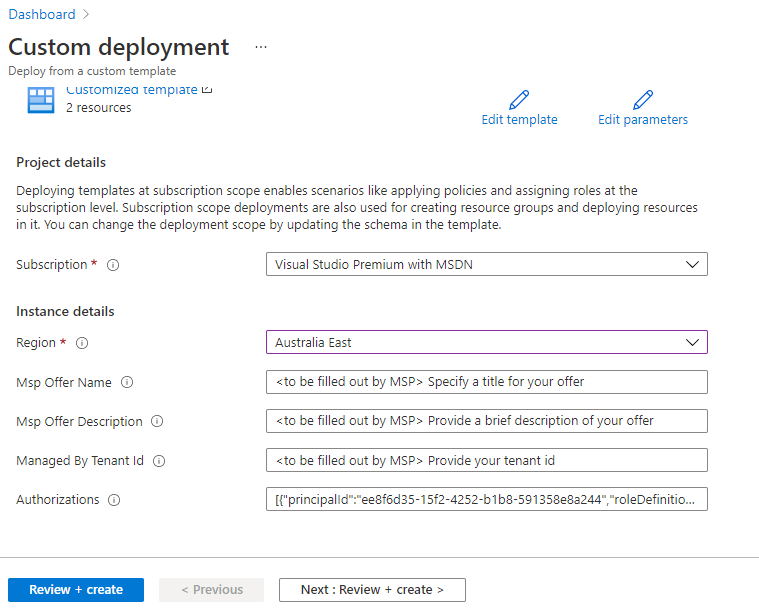
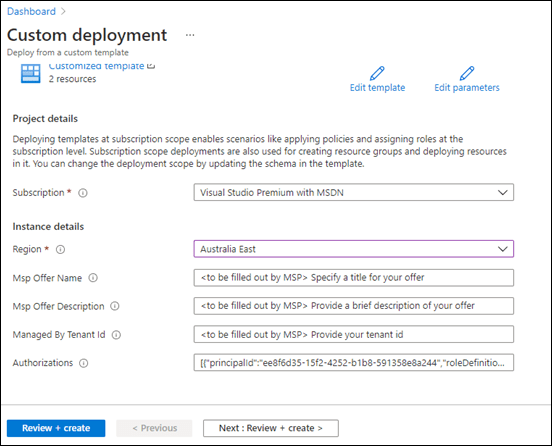
A custom deployment template should launch
image

and look like the above. Here, select the Subscription and Region appropriate in the ‘client’ Azure tenant. You can put any custom text you wish into the Msp Offer Name and Msp Offer Description field.

Into the Managed by Tenant Id field enter the value you recorded in step 4 above (i.e. the Tenant ID of the ‘master’ Azure subscription).

The Authorizations field needs to be in the format of:

[{“principalId”:”ee8f6d35-15f2-4252-b1b8-591358e8a244″,”roleDefinitionId”:”acdd72a7-3385-48ef-bd42-f606fba81ae7″,”principalIdDisplayName”:”PIM_Group”},{“principalId”:”ee8f6d35-15f2-4252-b1b8-591358e8a244″,”roleDefinitionId”:”91c1777a-f3dc-4fae-b103-61d183457e46″,”principalIdDisplayName”:”PIM_Group”}]

where the principalId field will be the item you obtained in step 5 above (i.e. who in the ‘master’ Azure tenant do you want to have rights to the ‘client’ Azure tenant) and roleDefinitionId will be the information obtained in step 6 above (i.e. what permissions you want to gibe inside the ‘client’ Azure tenant). You can assign the principalIdDisplayName field any meaningful text you wish.

As you can see from the example you can chain multiple permission assignments together. So in this example, let’s say that I want to assign my one user full contributor rights and a security group only Azure reader rights. The entry would then look like:

[{“principalId”:”b75e7296-a058-4000-0000-000000000000″,”roleDefinitionId”:”b24988ac-6180-42a0-ab88-20f7382dd24c”,”principalIdDisplayName”:”User_contributor”},{“principalId”:”8d3a5c5a-0d1e-4639-0000-000000000000″,”roleDefinitionId”:”8d289c81-5878-46d4-8554-54e1e3d8b5cb”,”principalIdDisplayName”:”Group_Sentinel_reader”}]

It is very, very important that you get the formatting of the Authorizations field correct. I suggest you compose it in something like Notepad (with word wrap = off) and paste it in. If you see any errors during deployment, double check you have this field EXACTLY correct!
image

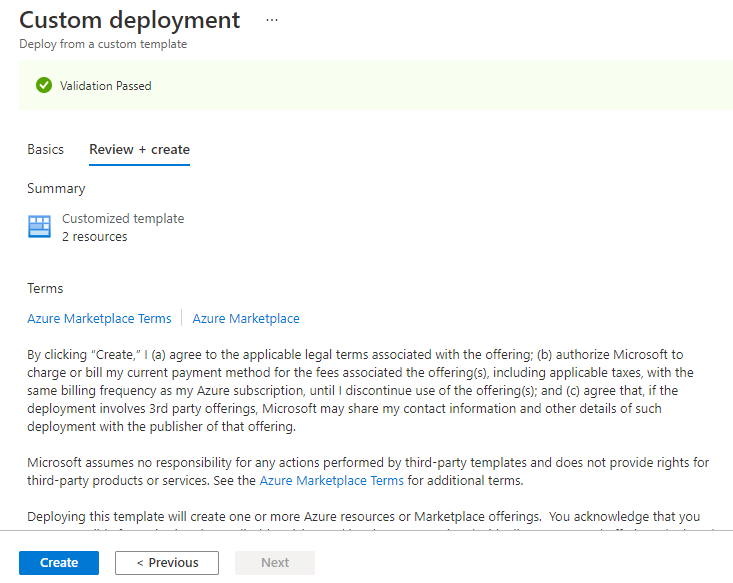
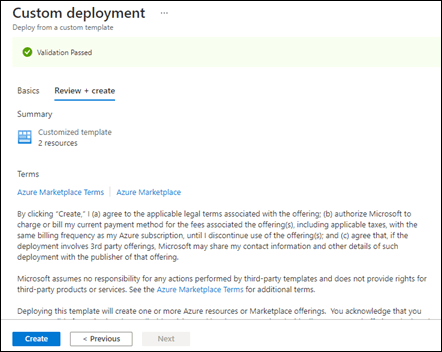
Once you have entered all the information, select the Review + create button an the bottom of the screen.

Your options will then be validated, and if passed, select the Create button at the bottom of the screen.
image

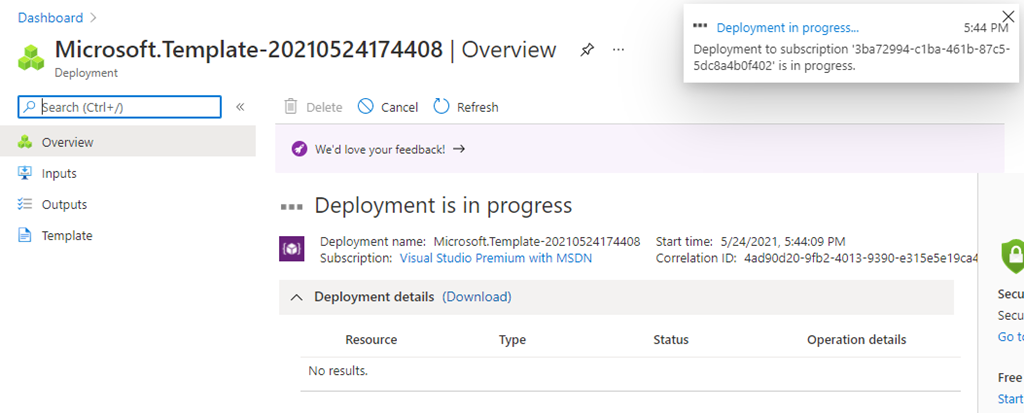
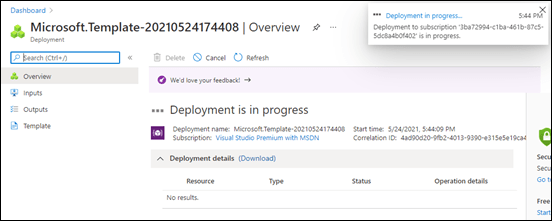
You should then see the deployment commence as shown above. The deployment will take a few minutes to complete, after which it take at least another 15 minutes for the Azure Lighthouse configurations to appear in the ‘master’ and ‘client’ tenants, so be patient.
image

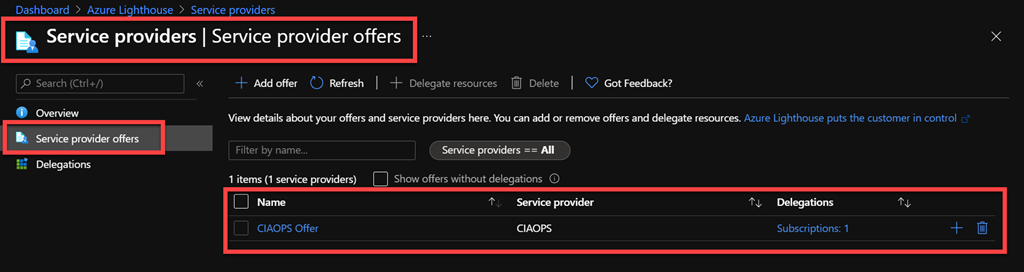
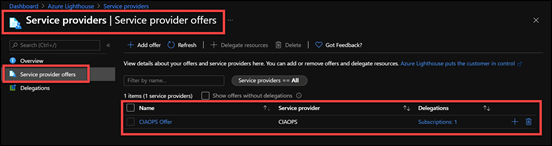
After the 15 minutes, navigate to Azure Lighthouse in the ‘client’ tenant and look at Service Provider offer as seen above. This basically tells you that this ‘client’ tenant has single delegation (i.e connect to a ‘master’ Azure tenant).
image

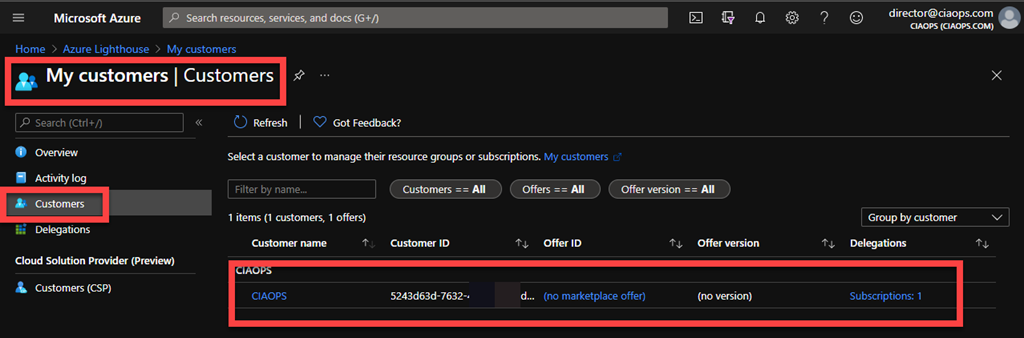
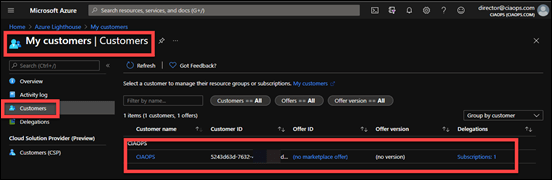
Now head over to the ‘master’ Azure tenant and view Azure Lighthouse there, but look at the My customers then Customers option as seen above. Here you should see the ‘client’ Azure tenant just added to the current ‘master’ Azure tenant. Again remember, this takes around 15 minutes to appear once configured.

Congratulation you have successfully used Azure Lighthouse to link a ‘client’ Azure tenant to a ‘master Azure tenant. Look out for upcoming articles on what you can now do once you have enabled Azure Lighthouse.

Register your interest for a hands on, deep dive Microsoft 365 Security event

pexels-pixabay-356065

If you are interested in attending a hands on in person 2 day deep dive event into Microsoft Security including:

– Exchange Online

– Windows 10 hardening

– Effective incident monitoring

– Identity security

– Data protection

and more then I encourage you to register your interest now for CIAOPS Secwerks 1 in Melbourne CBD over 2 days, Thursday the 5th and Friday the 6th of August 2021. I expect demand to be extremely high for this event and I will have more to share when I have confirmed all the details. However, feel free to reach out to me if you want more information. Please register your interest here to be kept up to date with the event:

http://bit.ly/ciaopsroi

The theme of this event will be to help you understand all the technologies that the Microsoft Cloud provides, how to configure them appropriately and get your Microsoft Secure Secure above 80%. The material covered will be technical and cover all the basics but then to extend beyond Level 400. The course is specifically designed for those who need to provide security for environments connected to Microsoft 365.

I hope to see you there.

Need to Know podcast–Episode 267

I speak with Aaron Dinnage from Microsoft who is the author of the great licensing resource Microsoft 365 maps. Aaron shares the history of this project and it takes to update it every month. We also get some great insights and suggestions when it comes to Microsoft 365 licensing.

This episode was recorded using Microsoft Teams and produced with Camtasia 2020.

Brought to you by www.ciaopspatron.com

Take a listen and let us know what you think – feedback@needtoknow.cloud

You can listen directly to this episode at:

https://ciaops.podbean.com/e/episode-267-aaron-dinnage/

Subscribe via iTunes at:

https://itunes.apple.com/au/podcast/ciaops-need-to-know-podcasts/id406891445?mt=2

The podcast is also available on Stitcher at:

http://www.stitcher.com/podcast/ciaops/need-to-know-podcast?refid=stpr

Don’t forget to give the show a rating as well as send us any feedback or suggestions you may have for the show.

Resources

Aaron Dinnage – Linkedin, Twitter

https://m365maps.com/

https://m365maps.com/guide.htm

Office 365 Platform Service Descriptions

Microsoft Teams now brings family and friends together to call, chat, and make plans

OneDrive Roadmap Roundup

Announcing Public Preview of OneDrive Sync Admin Reports

New Azure AD Capabilities for Conditional Access and Azure VMs

Introducing Webinars in Microsoft Teams: Easy, professional webinars to engage customers

A fluent new look for the Azure icon

Business email compromise: How Microsoft is combating this costly threat

Forrester names Microsoft a Leader in the 2021 Enterprise Email Security Wave

Connect to SharePoint PnP using PowerShell

The SharePoint PnP module is a handy way to get access to more granular aspects of the SharePoint Online that the standard administration modules doesn’t. You’ll find more details about the module here:

PnP PowerShell

image

I’ve created a free script to allow you to connect to SharePoint Online PnP that supports MFA logins. You’ll find the script here:

https://github.com/directorcia/Office365/blob/master/o365-connect-pnp.ps1

When you run this script it will firstly connect to Microsoft Online so it can determine what the correct name of your tenant is. Next, it will use this to connect to the SharePoint Online administration service to determine all the SharePoint sites you have in your tenant. It will then allow you to select from a list of all these site after which it will connect to your selection using SharePoint PnP.

image

The first time a connection is made to SharePoint PnP it will require you to accept a swag of permissions as shown above. These are required to allow SharePoint PnP to perform it administration role, so you’ll need to accept these. You’ll only need to this once for each user that needs to use SharePoint PnP PowerShell.

Once connected you can perform any of the SharePoint PnP commands:

SharePoint PnP commands documentation