My list for last year:
Documentaries
Easy to Learn, Hard to Master: The Fate of Atari
Movies
Link to video = https://www.youtube.com/watch?v=CQOcUrS93FA
Thanks to the integration between Microsoft Edge browser, Cloud Apps Discovery (which is part of Defender for Cloud Apps) and Defender for Endpoint you can quickly and easily block most web based applications. In the example I prevent Facebook access on a Windows 11 device using the Edge browser. It is important to note that this blocking capability currently won’t work with third party browsers, however there are other ways of blocking sites with these browsers using other methods that are not covered in this video.
[CORRECTION] – Please note that in the video I may have indicated that this is possible with Microsoft 365 Business Premium. By default, it is not. Apologies for the confusion I may have caused here
Happy holidays everyone. Hope you are all enjoying the festive season. A few updates from Microsoft including the availability of Teams Premium plus an editorial on industry burnout. I’m seeing more and more IT Professionals becoming burnt out and feeling lost. At this time of the year take some time to look forward and decide whether it is time for a change. Also, don’t be afraid to reach out and share with others what your feeling. If anyone wants to chat feel free to reach out in total confidence via director@ciaops.com.
You can listen directly to this episode at:
https://ciaops.podbean.com/e/episode-294-defender-for-cloud-apps/
Subscribe via iTunes at:
https://itunes.apple.com/au/podcast/ciaops-need-to-know-podcasts/id406891445?mt=2
The podcast is also available on Stitcher at:
http://www.stitcher.com/podcast/ciaops/need-to-know-podcast?refid=stpr
Don’t forget to give the show a rating as well as send me any feedback or suggestions you may have for the show.
This episode was recorded using Microsoft Teams and produced with Camtasia 2022.
Brought to you by www.ciaopspatron.com
Resources
YouTube edition of this podcast
Azure Storage Mover–A managed migration service for Azure Storage
Attack Simulation Training: New insights into targeted user behavior
Manage your multi-cloud identity infrastructure with Microsoft Entra
Disconnected environments, proxies and Microsoft Defender for Endpoint
What’s New in Microsoft Teams | December 2022
Check out my recommendations from last year:
Honourable mentions that I read last year:
– Never Finished: Unshackle Your Mind and Win the War Within – David Goggins
– Discipline is Destiny – Ryan Holiday
You can follow all the books I read and want to read over at Goodreads where I have an account. You can also view my activity via:
https://www.goodreads.com/review/list/708903-robert?shelf=read
Here’s my current top business books in order:
1. The Art of War – Sun Tzu
The all time classic on strategy. As relevant today as it ever was. A very short read but very deep.
2. The Millionaire Fastlane – M.J. DeMarco
I love the brutal honesty of this book. It doesn’t mince words about what it takes to shift from a pay check to actually living the life you want.
3. The Tipping Point – Malcolm Gladwell
The world is all about not what you know but who you know. This book explains exactly how this works and how to use it to your advantage. A lot of Gladwell’s writing have been called into question of late. Even so, putting aside the example he uses, I think the concept surfaced have great merit.
4. The Four Hour Work Week – Tim Ferriss
Many people believe this book is about shirking responsibility. It is in fact a blueprint for how to free up your time to do things you want and enjoy. It will challenge the way you look at your career. This book has become some what dated so ensure you get the latest revised edition. Again, I would suggest you read this and consider the 30,000 foot view of challenging many people pre-conceived concepts about career. The ability to do anything, anywhere these days has never been truer.
5. Secrets of the Millionaire Mind: Mastering the Inner Game of Wealth – T. Harv Eker
The successful are defined by a different mindset. This mindset can be learned. It can be trained. This is a great book to show you how to do just that.
6. Talent is over rated: What Really Separates World-Class Performers from Everyone Else – Geoff Colvin
Demonstrates that the best comes from implementing a system. Having a system allows you to focus on the right thing and do that work that is required. If you want to take yourself to an elite level, beyond just good, then read this book.
7. Book Yourself Solid: The Fastest, Easiest, and Most Reliable System for Getting More Clients Than You Can Handle Even If You Hate Marketing and Selling – Michael Port, Tim Sanders
You can’t survive in business without a steady flow of customers. Selling to people is the wrong approach, you instead need to attract them to your business. This book helps you achieve exactly that.
8. Profit First: A Simple System To Transform Any Business From A Cash-Eating Monster To A Money-Making Machine – Mike Michalowicz
Business is about making a profit. This then gives you the freedom to do what you want with that profit. This book helps you focus on profit and setting up systems to make the most of the profit you generate.
9. Barking Up the Wrong Tree – Eric Barker
Conventional wisdom does not always apply and in some case can actually be detrimental. Challenging what is taken for granted should be in the play book of everyone who wants to achieve at the highest level. Important lessons can be learned in the strangest places and form the strangest people. Have an open mind and you might be surprised at what you have believed to be bad in fact turns out to get just what you need.
10. Unbeatable Mind: Forge Resiliency and Mental Toughness to Succeed at an Elite Level – Mark Divine
Another mindset book. Business is not always going to be easy or take the intended route. This is when you need to have the determination to see your plans through to success. This book shows you how to develop the mental toughness to make this happen.
11. Mastery – Robert Green
Excellent read with lots of great strategies to take away. Excellence is not a talent it is a skill. That means that it takes hard work to achieve, but hard work is available to everyone, yet few choose the path. There is no secret to Excellence, it is something only time and effort will reward you with and iof you choose that path you’ll be one of the few.
12. Tools of Titans – Tim Ferriss
There are few books that take the learnings for so many exceptional people and puts them at your fingertips. This is one such book that packs a lot of business and life learnings between the covers.
13. Predictably irrational: The Hidden Forces that Shape our Decisions – Dan Ariley
Although we like to think logic and rationality rule our world emotion is by far the more powerful influence. Understand this in the context of business and you are well on your way to understanding why people make the decisions they do and how to best profit from them.
14. Extreme Ownership – Jocko Willink and Lief Babin
Moving beyond blame is tough. This book illustrates the ownership of the problem and the environment is a key to success in the military or in business. It is a path few will elect to take voluntarily, however more may do so after reading this.
15. Peak Performance: Elevate your game, avoid burnout and thrive with the science of success – Brad Stulberg
Success is largely about developing a winning system. This book show you how to approach that pragmatically. If you want to see results use this book to help you build the system.
16. Blink: The Power of Thinking Without Thinking – Malcolm Gladwell
The older you get the more experience you get. This experience is aggregated in your ‘gut feel’. Trusting your ‘gut’ may not appear rational but this book will help you understand why it is in fact your best option in many cases. Again, take Gladwell’s examples with a grain of salt but the message is still relevant.
17. The Now Habit: A Strategic Program for Overcoming Procrastination and Enjoying Guilt-Free Play – Neil A. Fiore
Plenty of great productivity learnings in here that help you take action. It shows you how to focus on the right stuff in the right priority. Even if you are not a major procrastinator there is plenty in this book that you can take away.
18. The One Thing – Gary Keller
Multi-tasking is a myth. Focus is the key to success to bringing all your resources to bear in unison makes a hell of a lot of difference. Most people can’t do it, so those that can stand a much greater chance of success.
19. Deep Work – Cal Newport
Distractions are wasted energy and time that you’ll never get back. You’d be amazed at how distracting the modern world is. If you can minimise these distractions you can focus more and be far more productive.
20. The E-Myth – Michael Gerber
The classic on ‘procedurising’ your business and creating a structure that doesn’t need you to survive. The simple secrets inside this book can transform any business from hardship to joy.
Let me know what you think. Do these work for you? What’s your top business reads? I’d love to hear.
Some other business books that I read that may be worth considering:
– The Metaverse and how it will Revolutionize everything – Matthew L. Ball
– The Practice: shipping Creative Work – Seth Godin
– Principles for Dealing with the Changing World Order – Ray Dalio
– Scary Smart: The Future of Artificial Intelligence and How You Can Save Our World – Mo Gawdat
– Getting to Yes: Negotiating Agreement Without Giving in Roger Fisher
– The Organized Mind: Thinking Straight in the Age of Information Overload – Daniel J. Levitin
– After Steve: How Apple became a Trillion Dollar Company and lost its Soul – Tripp Mickle
Recently, there has been much talk and gnashing of teeth over what to do about the recent LastPass breach. There is plenty of chatter about wanting to make a change and much discussion about what to actually change to.
As a LastPass customer I’m starting the process of evaluation myself and a handy tool I found to help in the decision process is Microsoft Defender for Cloud Apps (i.e. the old MCAS).
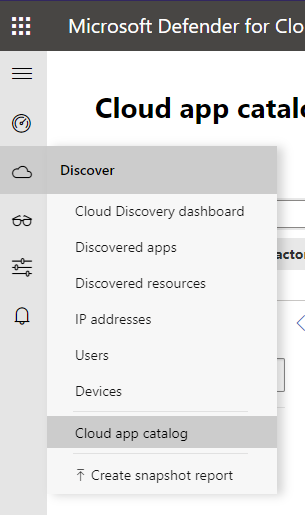
If you go into the Discover menu, you’ll find a Cloud app catalog option as shown above.
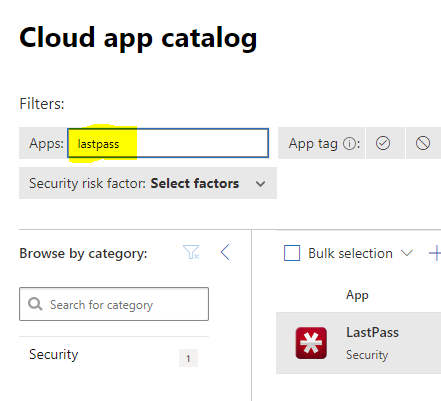
Enter the name of app you wish to search for and hit Enter.
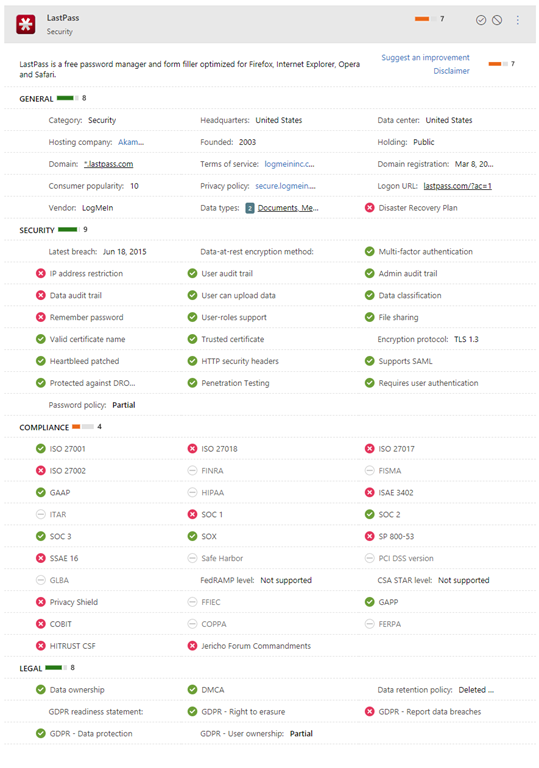
That should give you a page load of information like that shown above, which you can drill into if you want more details.
Of course, this information should only be part of your evaluation but it does provide a lot in one place for you to reference.

I remain a low volume mobile app user. I very selectively install apps on my device. Less is definitely more for me.
To see what I was using at the beginning of last year check out the article:
My daily driver when it comes to a phone is an iPhone 12 pro Max currently but I also have a Surface Duo 2 as a backup. The other device that I use apps on is my iPad mini.
My most used apps on mobile devices over the last year were:
Castro on iOS to listen to all my podcasts on iOS.
Lastpass password manager and authenticator for general password management. This may change after the recent security issues with Lastpass.
Microsoft Authenticator – I use this for a number of select web sites as well as Microsoft 365.
Car Play – Connects to my daily drive to provide the ability to listen to podcasts as well as use Waze for navigation.
OneNote – is a must on every device I own. Syncs all my notes to every device. Allows me to not only truly have my information everywhere I am but also capture information quickly and easily.
OneDrive – This mobile app now not only allows me to manage my Microsoft 365 files but it also incorporates the more advanced Office Lens technology that scans and uploads, documents, whiteboards, etc.
Tripview – One of the few apps that I have happily paid for. I use this to let me know the Sydney train schedule to help me get around when I need to negotiate the ‘real world’. Although not much travel is happening at the moment, this app is super handy for negotiating local public transport.
Audible – If I can’t read my Kindle then I can normally always listen. This app allows me to listen to my audio books where ever I am. This and Castro on iOS are probably the most used applications on my devices.
Amazon Kindle – If I don’t have access to my Kindle then I can still read my books. In my case that will most likely be on my iPad. I also use the Kindle app on the iPad when the ebook has a lot of images that sometime don’t display well or are too small for the Kindle device.
The following as currently only iOS:
Rode Reporter – which I use for recording many of my presentations when I am out on the road, which ain’t so much these days but still a handy app to have.
Of course I have all the social media apps, such as Twitter, and Linkedin on my devices.
I also have all the Microsoft/Office 365 apps. The ones I use the most are probably To-Do, Outlook, SharePoint, OneDrive, Teams and Yammer, although Word and Excel also get used regularly. Just about every Microsoft Office 365 service has an app that you should have on your mobile device. On my Duo 2 I am also using Edge as the primary browser along with the new Edge Insider. I also have the Brave browser on my devices as I no longer use Chrome at all.
I’ve also added the Intune app to all my devices so they can be better managed.
I use the Signal messaging app for private conversations and groups that I am part of.
Some occasional ones I use include:
– Duolingo
– Uber
– Amazon music
I use the normal personal apps for things like Internet banking and so on. I also use Coin Gecko for monitoring cryptocurrency.
One my iPad, which also serves as a personal entertainment device, I have the streaming services Netflix and Amazon Prime Video.
The above are my used apps across my various mobile devices. My aim to try and keep the apps standard across all the devices and as few as possible. I try and standardise on the Microsoft apps on all platforms and use these as much as possible. I certainly use a wide variety of apps on my devices by prefer the desktop versions if available.

A while ago I wrote an article:
Improved security is a shared responsibility
in which I encouraged the use of the Report message add in to Outlook.
What you may not realise about this add-in is that not only does it provide a centralised method to manage submissions per:
Providing feedback on user reported messages
but user reported messages also trigger an automated investigation:
What alert policies trigger automated investigations?
A security administrator can also manually trigger an investigation by using the Threat Explorer per:
Example: A security administrator triggers an investigation from Threat Explorer
If you want to better understand what Automated investigation and response (AIR) is and does, have look at:
AIR in Microsoft Defender for Office 365
This triggering of an automated investigation by simply using the Report message add in is another simple way to leverage the security tools that Defender for Office 365 provides and reduce administration workload.