Get a list of devices from Defender for Business into a SharePoint list

image

One of great things about an API is that it can be used in many places. I showed how to:

Offboard devices from Microsoft Defender for Business using an API with PowerShell

and I can do something similar with the Power Platform.

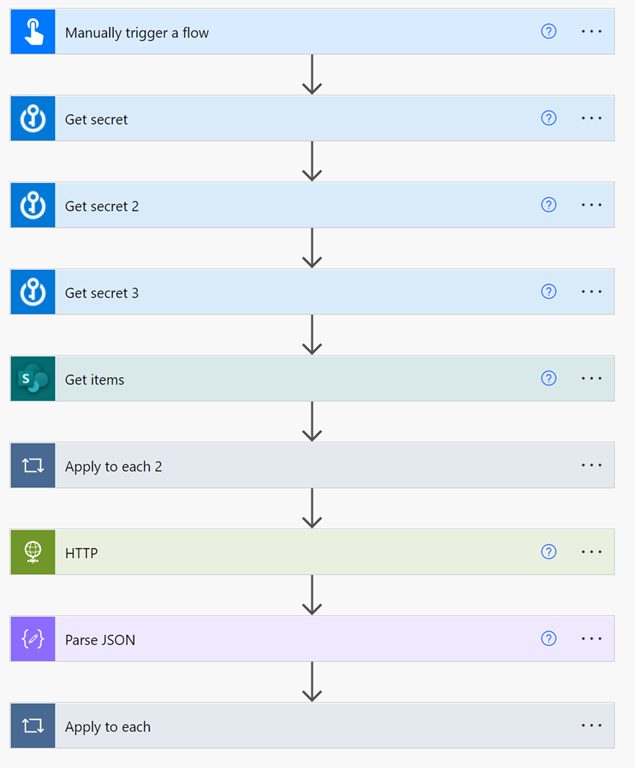
First step in that process is to get a list of Microsoft Defender for Endpoint devices and put them into a pre-existing list in SharePoint. For that I use the above Flow.

image

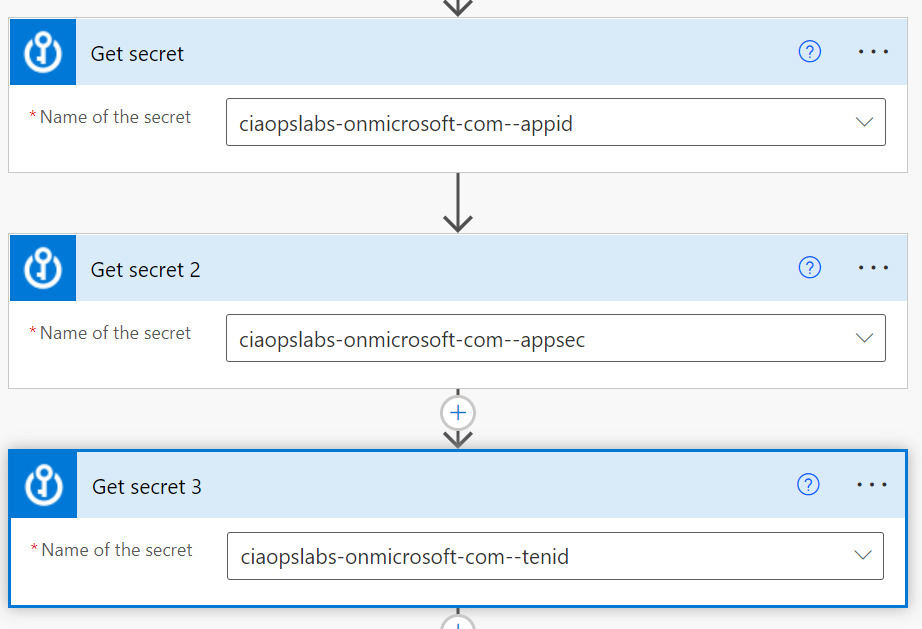
Once the Flow has been triggered I grab the Azure AD application credentials from the Azure Key Vault. I’ve covered off how to create an Azure AD application here:

https://blog.ciaops.com/2019/04/17/using-interactive-powershell-to-access-the-microsoft-graph/

and using a PowerShell script I wrote here:

https://blog.ciaops.com/2020/04/18/using-the-microsoft-graph-with-multiple-tenants/

Getting the Azure AD application credentials into an Azure Key Vault can be done manually or by using this scripted process I’ve covered previously:

Uploading Graph credentials to Azure Key Vault

Once they are in the Azure Key Vault they are easy to access securely using the Flow action Get secret as shown above.

image

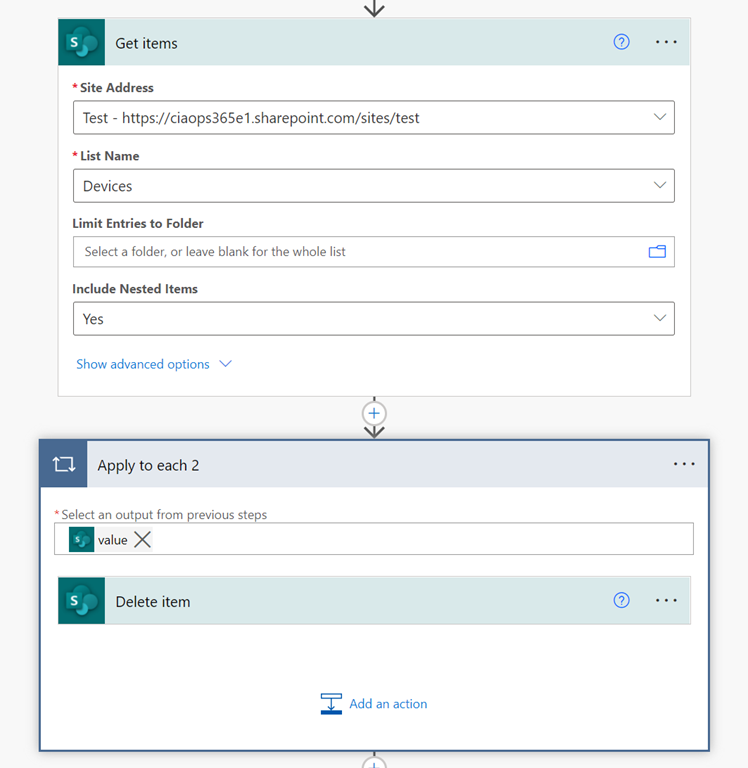
The next step is to delete devices I already have in the list in SharePoint because I want only current devices to be brought in. To achieve this, I get all the items from my destination SharePoint list using the Get items action. Then, using the Apply to each action and the Delete item action inside that loop, existing entries will be removed so I have a clean list.

image

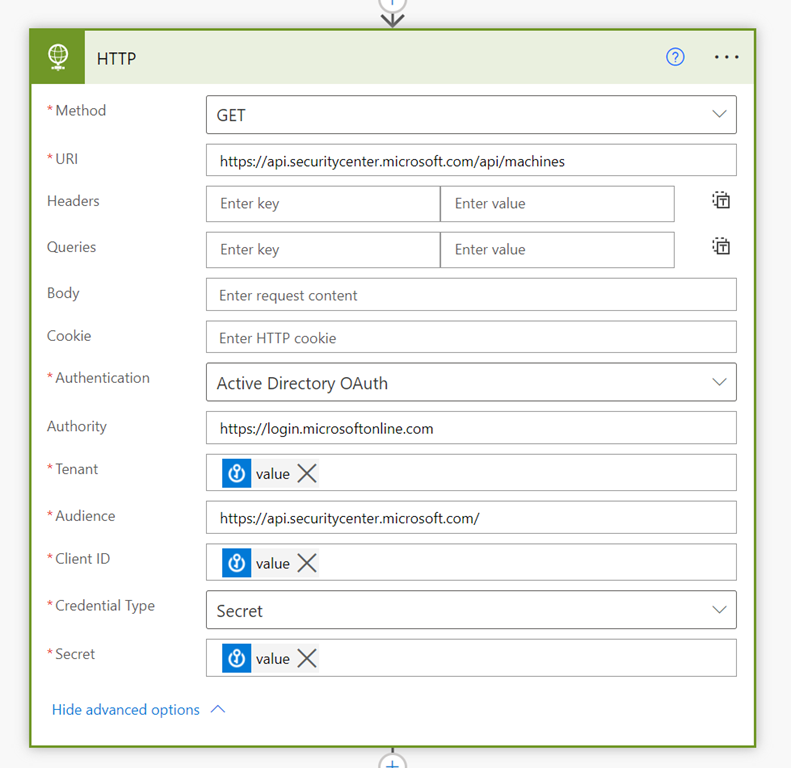
I’ll now use the HTTP action to execute an API call to the Defender environment as shown above. The API endpoint URI to get a list of devices in Defender for Endpoint is:

https://api.securitycenter.microsoft.com/api/machines

Access is granted via Active Directory Auth and the Authority is https://login.microsoftonline.com. You also need to use the credentials of the Azure AD application obtained previously from the Azure Key Vault, as shown above. Ensure that the Audience is https://api.securitycenter.microsoft.com/.

image

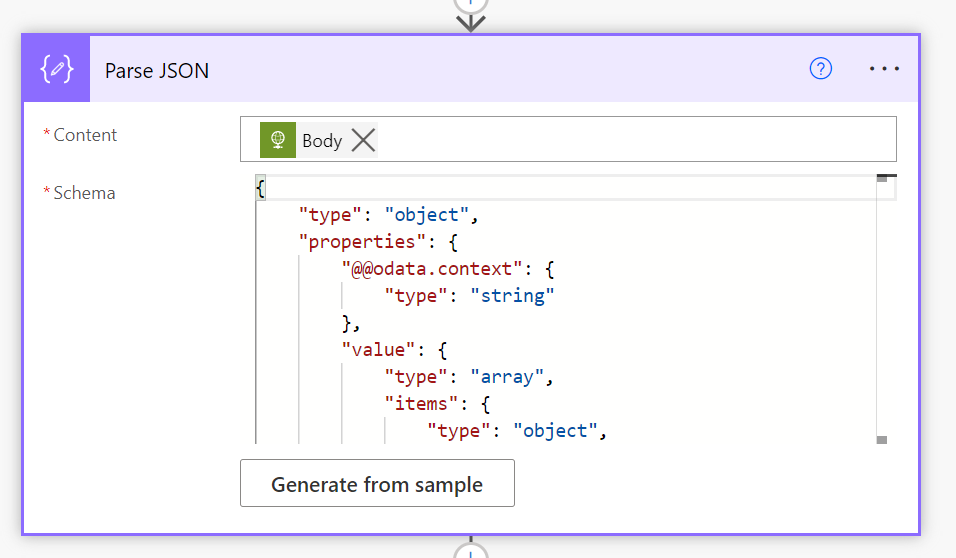
The output of this API request will be a JSON file so we now use the Parse JSON action to obtain the fields needed. To understand what the JSON looks like and insert a copy into this action look at the Microsoft documentation here:

List machines API

which provides a response sample that you can use.

image

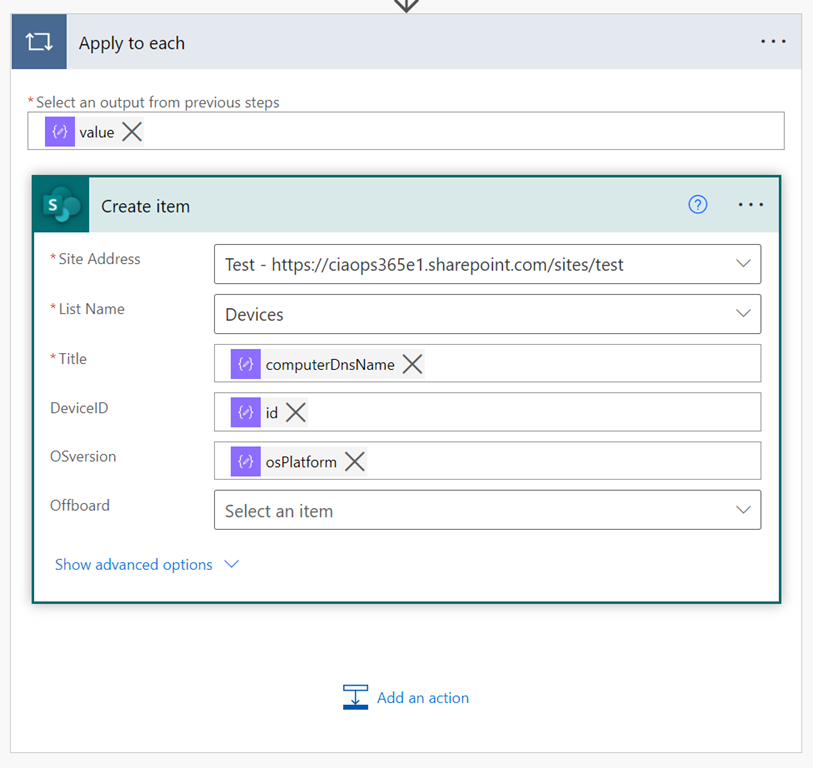
The last action in the Flow is to take the parsed JSON output and enter those details into the pre-existing SharePoint list that you need to create to house this information.

image

I’ve kept the destination list simple, as you can see above. Basically, the final Apply to each action places each device and its information as a row into the destination SharePoint list.

image

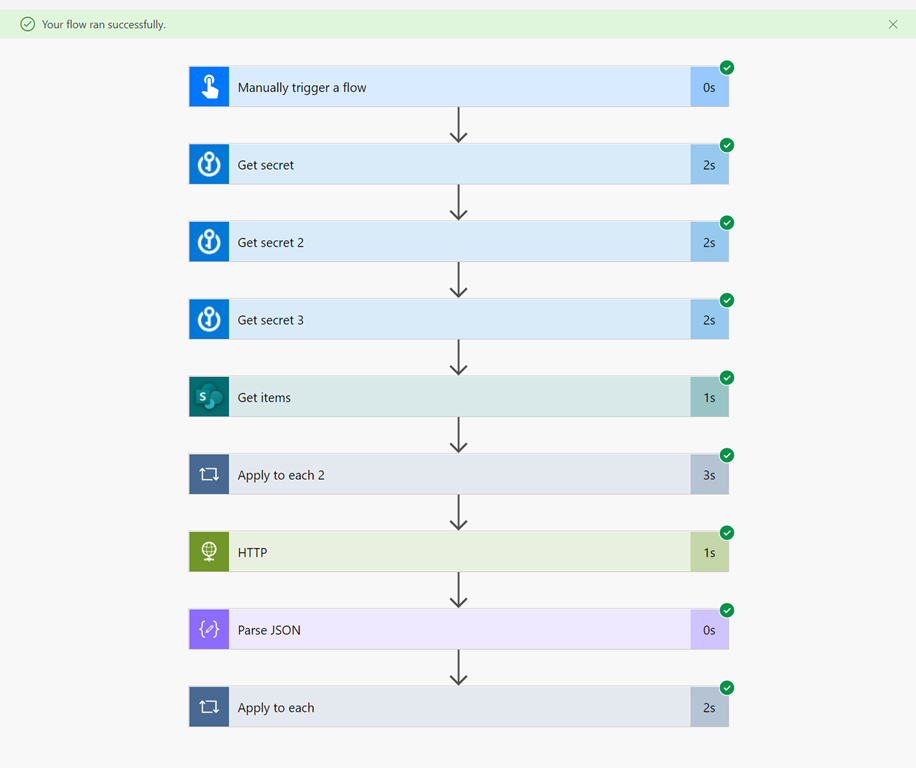
If I now run this Flow, I see it runs successfully.

image

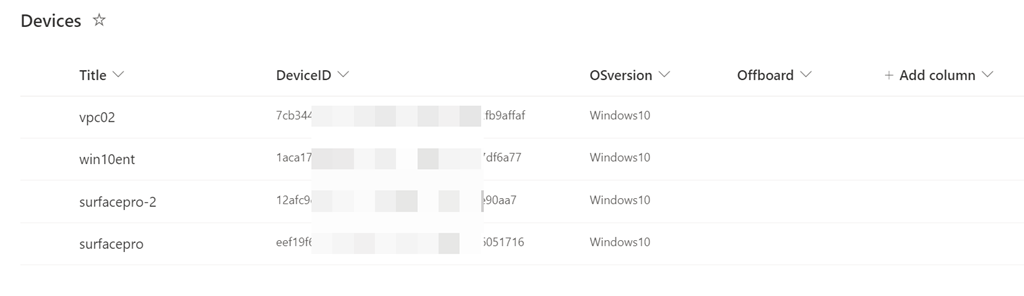
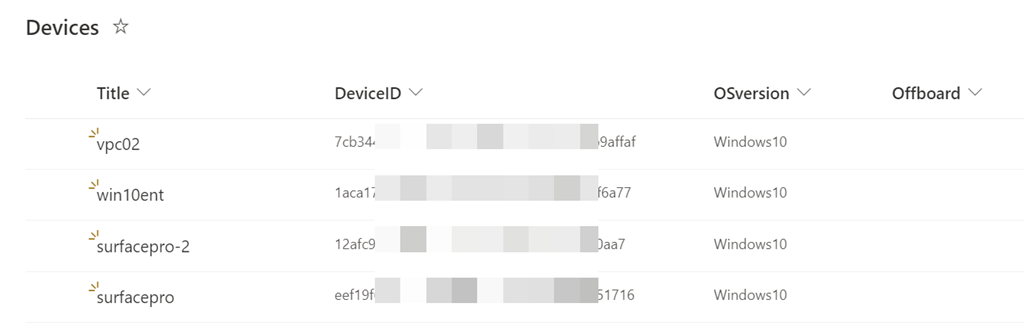
Looking at my SharePoint list I see I have a new list of items as expected.

image

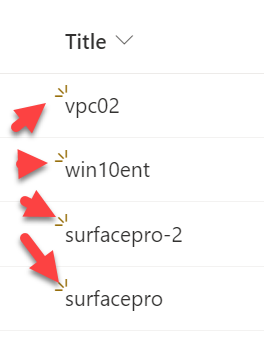
If you weren’t aware, the ‘eyelashes’ on an entry in SharePoint indicate it is new.

Now I have copy of all the machines in my Defender for Endpoint in a SharePoint list. You will also see that my SharePoint device list contains an additional ‘Offboard” column that I am going to use when I implement another Flow to offboard devices from Defender for Endpoint, much like I did with PowerShell previously.

You can also easily extend the operation across multiple tenants if I want using Azure AD applications in each.

The great thing about using the Power Platform and APIs is that for many, it is much easier to get the result they want rather than having to write code like PowerShell. Also, the Power Platform environment has many capabilities, such as sending emails, adding extra metadata, etc. that are much easier to do than using PowerShell. Once the Defender for Endpoint device list is in SharePoint there is really no end to what could be done.

With that in mind, stay tuned for an upcoming post on how to use what’s been done here and another Flow to actually offboard devices from Defender for Endpoint.

Offboarding Windows 10 devices from Microsoft Defender for Business

In a recent article I covered off how to:

Onboard Windows 10 devices to Microsoft Defender for Business

Two easy methods of onboarding Windows 10 devices to Defender for Business

Now we need to know how to offboard Windows 10 devices from Microsoft Defender for Business.

The first place to start is to review this article from Microsoft:

Offboard devices from the Microsoft Defender for Endpoint service

It details the following points:

– The status of a device will be switched to Inactive 7 days after offboarding.

– Offboarded devices’ data (such as Timeline, Alerts, Vulnerabilities, etc.) will remain in the portal until the configured retention period expires.

– The device’s profile (without data) will remain in the Devices List for no longer than 180 days.

– In addition, devices that are not active in the last 30 days are not factored in on the data that reflects your organization’s threat and vulnerability management exposure score and Microsoft Secure Score for Devices.

– To view only active devices, you can filter by health state, device tags or machine groups.

In essence what this means is that although you offboard a device a lot of information about that device will remain in the portal. Also, even after offboarding a device, if you look in the Endpoint portal, at first glance the device still appears to be there. The reality is that offboarding a device doesn’t make it ‘disappear’ from the portal immediately. This means we’ll need to use another method to verify that the device has actually been offboarded.

image

The easiest way is to look in the following registry key on the machine:

HKLM:\Software\Microsoft\Windows Advanced Threat Protection\Status

and examine the value of the key:

OnboardingState

If that is set to 1, as shown above, then the device is still considered connected to Microsoft Defender fo Endpoint. Thus, to confirm the device has been offboarded, we need to check that this value is 0.

You’ll also need to have a license for Intune/Endpoint Manager to enable this process from a centralised location.

Although not completely necessary it is best practice to have the integration between Microsoft Endpoint Manager portal and Defender for Endpoint enabled. Visit:

https://endpoint.microsoft.com

image

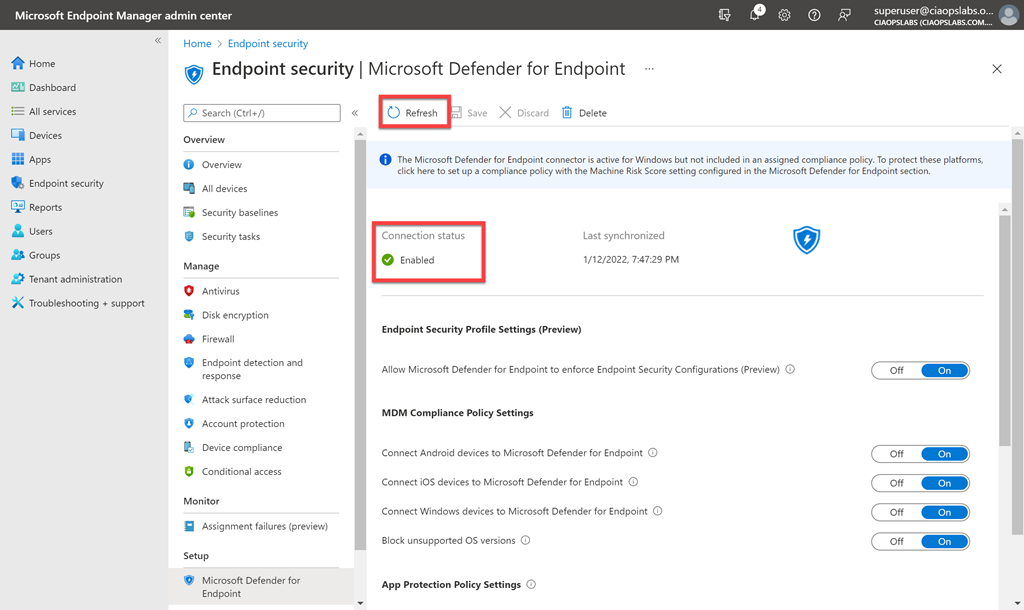
As shown above, here, navigate to Endpoint Security, then Microsoft Defender for Endpoint. Ensure that the option Connection status is enabled. If it isn’t then take a look at my previous onboarding article that shows you how to enable this.

Next, navigate to:

https://security.microsoft.com

image

You should see the screen above. Scroll down this page.

image

Select Settings as shown above and then Endpoints from the options that appear on the right.

image

From the menu on left scroll down and select Offboarding. On the right then select Windows 10 and 11 as the operating system. Then select Mobile Device Management / Microsoft Intune. With these selections made a Download package button should appear. Select this to download a zip file that contains a file called WindowsDefenderATP_valid_until_YYYY-MM-DD.offboarding

For security reasons, the package used to Offboard devices will expire 30 days after the date it was downloaded. Expired offboarding packages sent to a device will be rejected. That expiry date will be contained in the filename.

image

Navigate back to Microsoft Endpoint Manager and select Devices | Configuration profiles, then Create Profile.

image

Select Windows 10 and later for the Platform and Templates from the Profile type.

image

Select Custom from the list and then Create.

image

Give the policy a name and description and select Next to continue.

image

Select the Add button.

image

Enter the following details into the fields that appear on the right as shown above:

Name = <unique name>

OMA-URI = ./Device/Vendor/MSFT/WindowsAdvancedThreatProtection/Offboarding

Data type = String

Value = <contents of the unzipped file WindowsDefenderATP_valid_until_YYYY-MM-DD.offboarding downloaded from Defender for Endpoint portal>

image

The WindowsDefenderATP_valid_until_YYYY-MM-DD.offboarding file can be opened with Notepad and should look like the above.

Press the Save button to continue.

image

The Configuration settings page should now look like the above with the single entry you just configured.

Press the Next button to continue.

image

You now need to select which items this policy will apply to. In general, you are not going to be offboard all your devices at the same time from Defender for Endpoint. What we need to do then is target a specific group of devices.

A good approach to achieving this is to create a dedicated device group, with only the devices you wish to offboard with this policy. I detailed how to create such a group in Azure AD here:

Create a dynamic group in Azure AD

In this case, the dynamic group is called To be retired and I will assign it to the Intune policy as shown above.

Continue to select Next and then Create to complete the policy creation process.

image

If you select the Device status option as shown above, you’ll see whether the policy has been successfully applied to the devices. How long this takes will depend on when the devices ‘check in’ to get the policy.

As mentioned initially, there is no easy way to confirm that the device has successfully been offboarded unless you look at the registry key:

HKLM:\Software\Microsoft\Windows Advanced Threat Protection\Status\OnboardingState

and ensure that it is equal to 0. To assist with this I have created this free PowerShell script:

https://github.com/directorcia/Office365/blob/master/mde-offboard-check.ps1

image

That will show you the onboarding status as shown above.

Also, remember that the device will continue to be displayed in the Defender for Endpoint unless you use a display filter. Offboarding causes the device to stop sending sensor data to the portal but data from the device, including reference to any alerts it has had will be retained for up to 6 months.

If you want to offboard more devices you simply need to add them to the group you configured the offboarding Intune policy is assigned to. Remember, that after 30 days you’ll need to go and download a new offboarding package from the Defender for Endpoint console and upload the contents of the new WindowsDefenderATP_valid_until_YYYY-MM-DD.offboarding file to the offboarding Intune policy to allow devices to be successfully offboarded going forward. However, you can leave the policy in place and simply update it as and when needed.


Create a dynamic group in Azure AD

The purpose of a dynamic group in Azure AD is to be one based on a query. This means the membership of this group is then constructed on the successful matching of that query. The use case I’m going to build here is a dynamic Azure AD group that will contain devices that I wish to retire from an Azure AD.

To use dynamic groups in your environment you are going to need to be licensed for Azure AD P1 or P2. Thankfully, if you are using Microsoft 365 Business Premium, you’ll have Azure AD P1.

The way that the machines to be retired will be identified is by their unique Device ID as it appears in Azure AD. Thus, first stop will be the Azure AD portal to record these unique Device Ids.

image

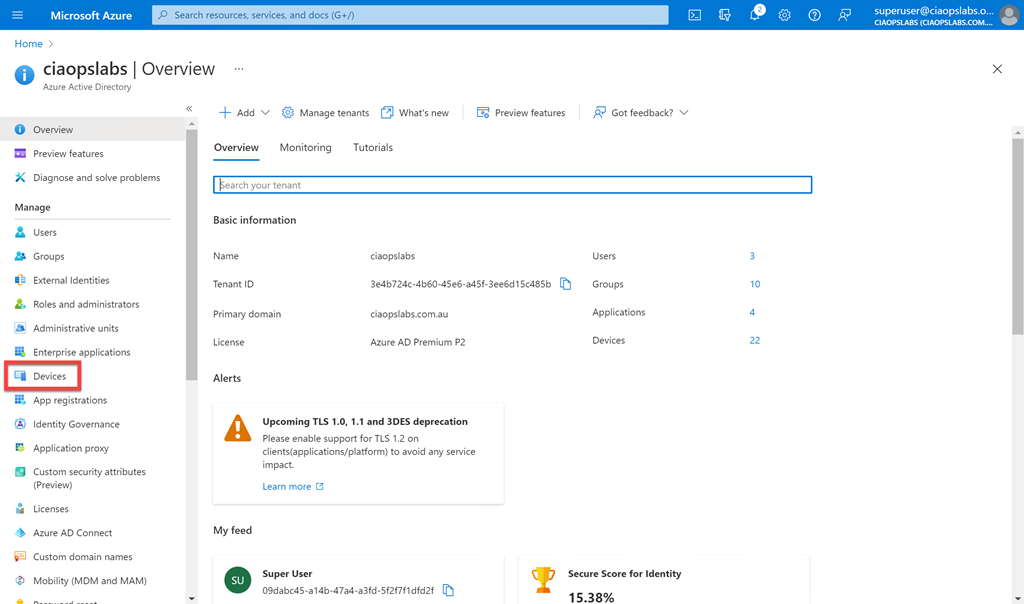
Navigate to the Azure AD portal as an administrator (https://aad.portal.azure.com) and select the Devices item on the left hand side as shown above to see all the devices your Azure AD knows about.

image

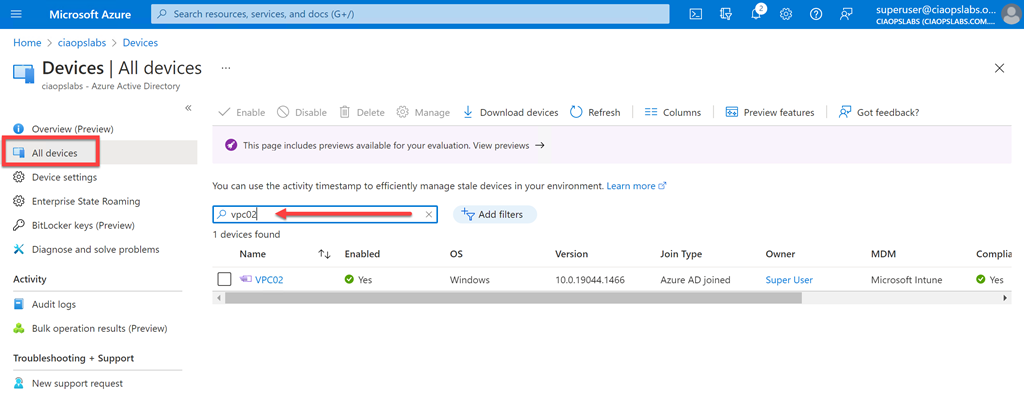
In the page that appears, select All devices on the left and then search for the device(s) you wish using the search box on the right as shown above. Here, I’m searching for the device called VPC02. Select the device name to get more information about that device.

image

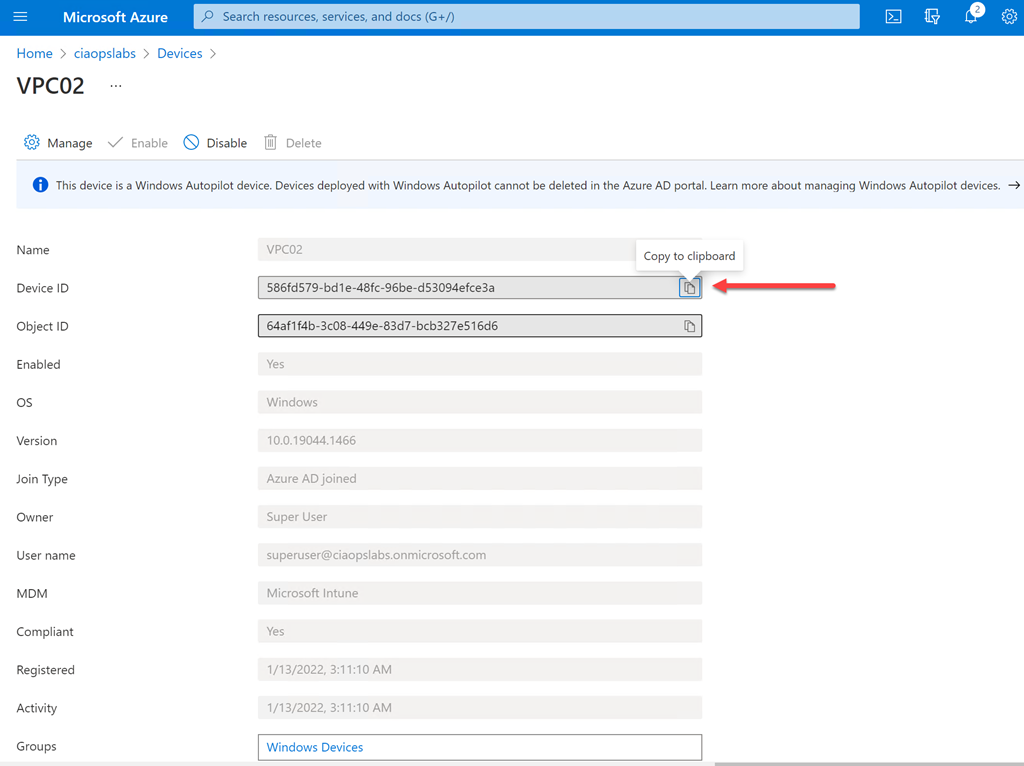
On the details page for the device you should now find the unique Device ID, as shown above. You should take a copy of this as it will be needed later.

Repeat the above process to obtain the unique Device ID of all the devices in Azure AD you wish to retire.

image

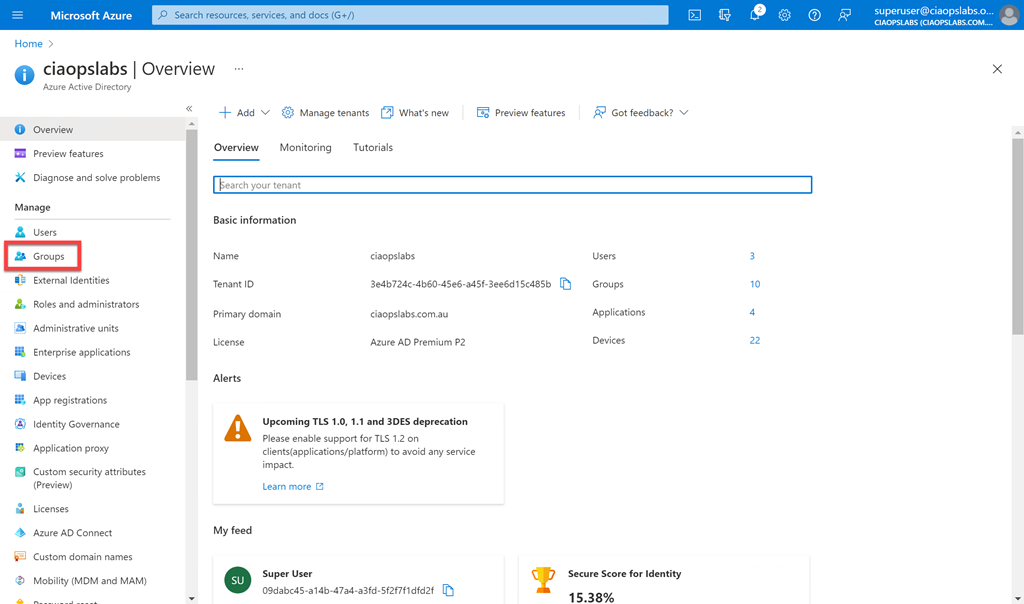
Return to Azure AD portal home page and now select Groups from the menu on the left.

image

Select the option on the top right for a New group.

image

Set the group type to Security. Give the group a meaningful name (here To be retired) as well as a description. Finally, ensure that the Membership type is set to Dynamic Device, because in this case we want to query a list a devices in Azure AD.

image

At the bottom of the options, select the Add dynamic query hyperlink as shown above.

image

On this page you will build the dynamic query for the membership of the group. Here we want to query the deviceid property to see whether it equals the Device Id we obtained initially for the device(s) we wish to retire.

Each unique device will generally require its own unique query line with the And/Or set to Or for this use case.

image

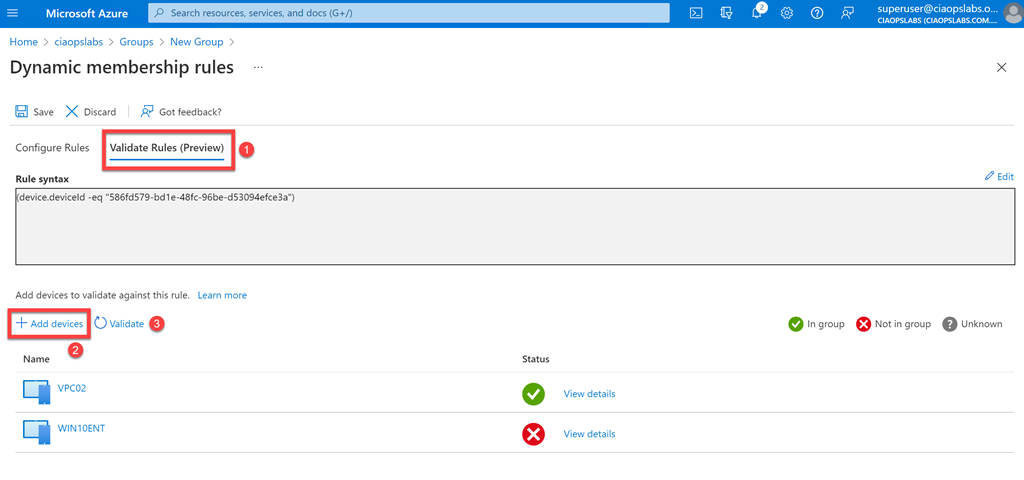
Once you add the entries at the top of the page you’ll see the actual rule syntax displayed in the box below, as shown.

image

To test the query returns the expected results, select the Validate Rules (Preview) option at the top of the page as shown. Next, Add devices you wish to test the query with. In the case above, I selected a machine I knew should match (VPC02) and one that wouldn’t (WIN10ENT). These selections will be validated and results displayed.

Here, the validation returns the expected results for this use case, so I can select the Save button at the top of the page to continue.

image

In the list of Azure AD groups, you should now be able to see the one that you just created.

.image

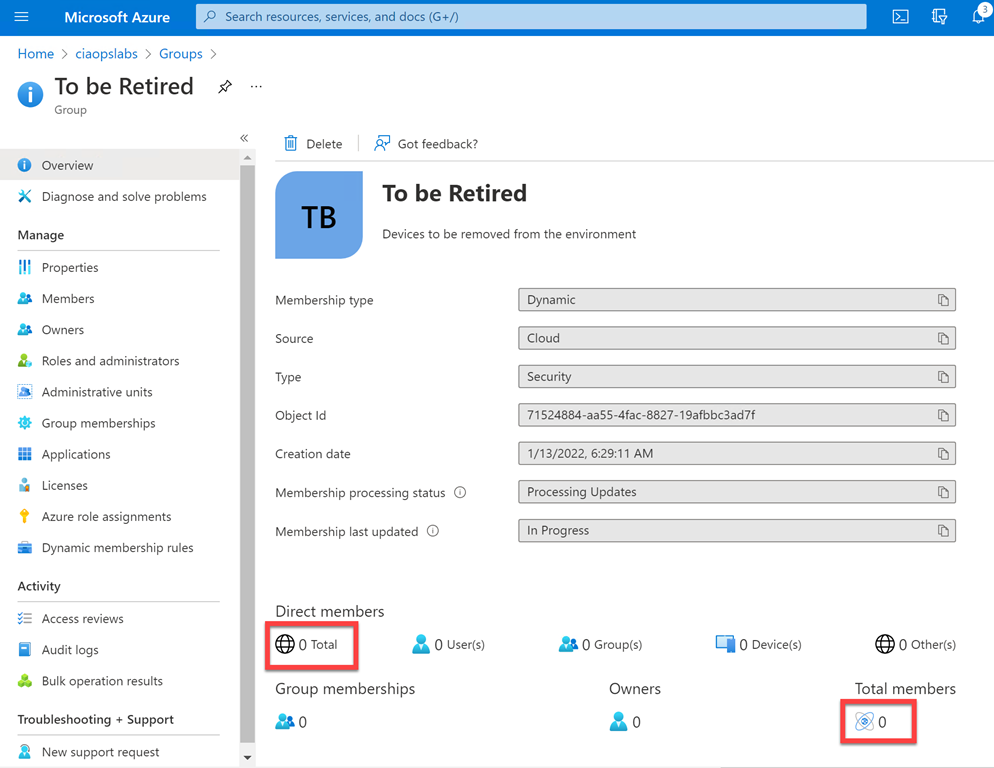
If you now select this new group you will probably find that it doesn’t have any members as yet as seen above.

SNAGHTML7d6fd8d

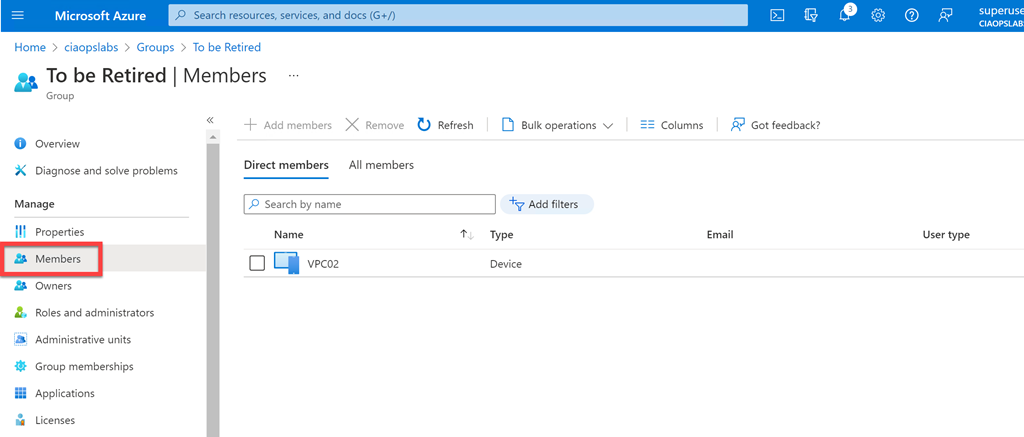
Fear not. Because the group is dynamic, it will take a few moments to run the query you created and populate it with matching members. When it has done this after a short time, you will be able to find the results in the Members option on the left hand side as shown above. Check that they match the expected results.

image

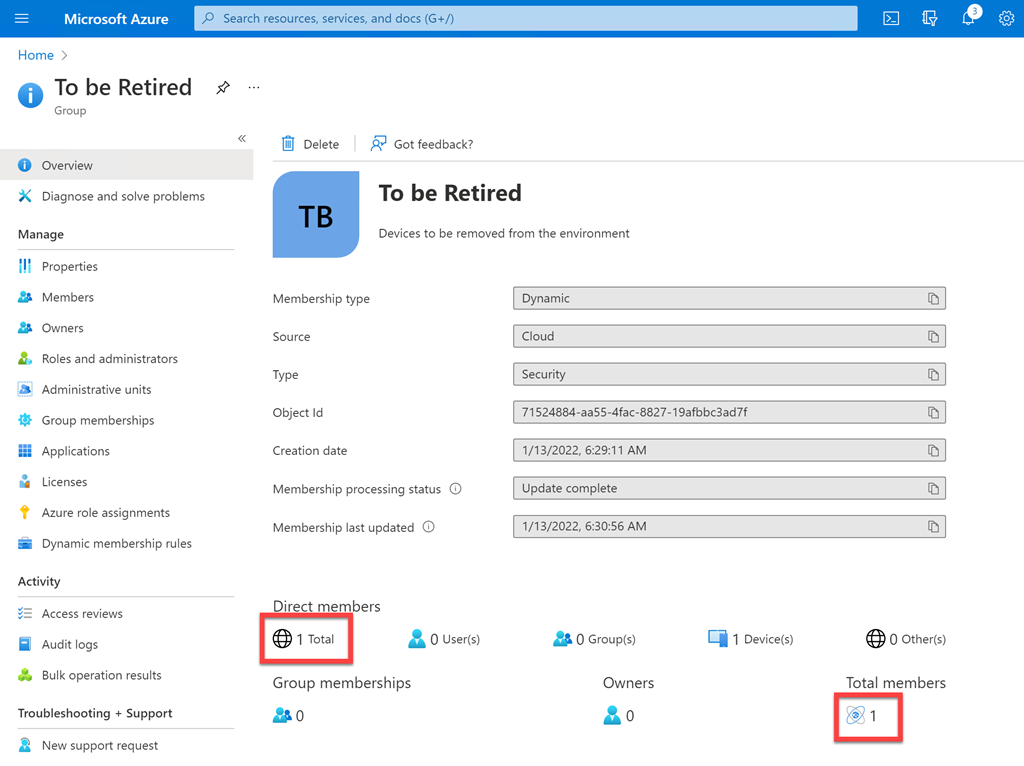
At that point, the Overview page should also display the correct count of members as shown above.

You can of course edit this Azure AD Dynamic Group at any point and change the membership criteria. In the case of retired devices, we’ll need to go in again and add any new Device Id’s for devices we want retired from our environment down the track.

A dynamic group can be based on just about any criteria and you may use it to identify new devices, users in the marketing department and so on. The queries can also be quite complex and it is recommended you consult this documentation from Microsoft for more information:

Dynamic membership rules for groups in Azure AD

In this case, we can now use this dynamic group of old devices to off board them cleanly from our Microsoft 365 environment. Stay tuned for upcoming articles on how to do this.

Two easy methods of onboarding Windows 10 devices to defender for Business

I recently detailed a way to use Endpoint Manager and Intune to onboard Windows 10 devices to Microsoft Defender for Business:

Onboarding Windows 10 devices to Microsoft Defender for Business

I’ve now extended that to include this video:

https://www.youtube.com/watch?v=UM-WZjHgy88

that shows that method plus using a local script. Using a local script is a good backup method to use if you are in a hurry or have issues with a device in your environment not receiving the policy.

Onboarding Windows 10 devices to Microsoft Defender for Business

One of the big benefits of Windows 10 devices when it comes to onboarding them to Microsoft Defender for Business is that they already have the ‘client’ software installed. That being Windows Defender. All the onboarding process needs to do is connect up the ‘backend plumbing’ so that Windows 10 also sends security information to the Microsoft 365 Security portal.

The first step in this onboarding process is to ensure that your Windows 10 devices are already Azure AD joined. You’ll also need to have a license for Intune/Endpoint Manager to enable this process from a centralised location.

Next, visit the Microsoft Endpoint Manager portal at:

https://endpoint.microsoft.com

image

As shown above, here, navigate to Endpoint Security, then Microsoft Defender for Endpoint. Ensure that the option Connection status is enabled. If it isn’t then open a new browser tab and navigate to:

https://security.microsoft.com

image

You should see the screen above. Scroll down this page.

image

Select Settings as shown above and then Endpoints from the options that appear on the right.

image

Scroll through the options presented and select Advanced features as shown. Location the Microsoft Intune connection option and set it to On. You may also want to have a look through the list of all the other available settings and also turn these on if desired.

You may need to wait a little while until connection status back in Endpoint Manager reports as being enabled.

image

You can always use the Refresh button at the top of the page, but be prepared for a short wait while the connection is made.

While you are on this Endpoint Manager page you will also probably want to turn all the settings available here.

image

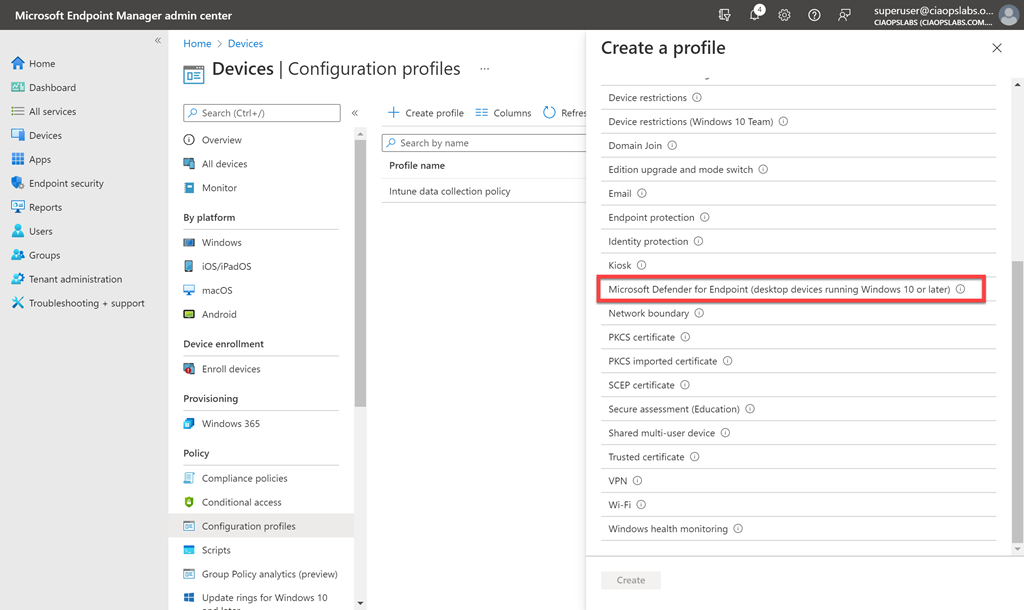
Still in Endpoint Manager, you’ll now need to select Devices, then Configuration Policies, then Create profile as shown above.

image

Select Windows 10 and later for the Platform and Templates from the Profile type.

image

Scroll through the list of templates and select Microsoft Defender for Endpoint (desktop devices running Windows 10 or later).

image

Give this new policy a meaningful name and select the Next button at the bottom of the page to continue.

image

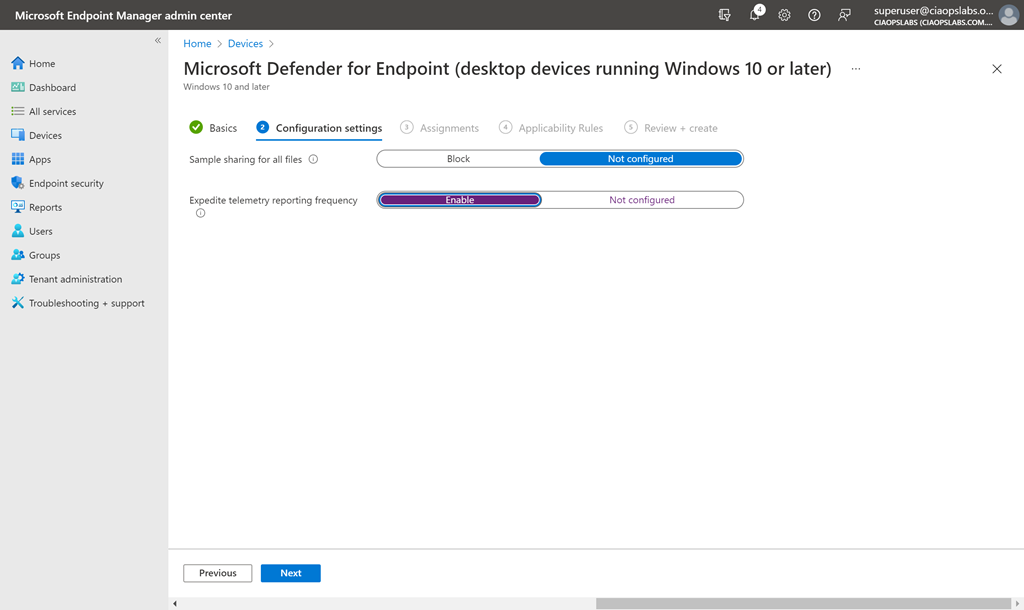
You don’t have to make any changes on the Configuration settings page but I like to Enable the option for Expedite telemetry reporting frequency. Select the Next button at bottom of the page to continue.

image

On the Assignments page you need to configure which groups this policy will include and exclude. Generally, you want to select All devices as shown above, but you can select whatever suits your configuration needs.

Continue through the remaining policy configuration pages and Create the new policy.

image

If you go back and look at the properties of the policy as shown above, you note an additional Configuration setting that wasn’t displayed when the policy was created – Microsoft Defender for configuration package type is set to Onboard. This is what effectively will onboard the Windows 10 devices for you automatically.

image

You can now use the Device Status option to monitor when this policy is applied to each device. Note that this status may take a while to change and the policy to be applied as it is dependent on when the devices ‘check in’ for policy updates.

image

Once the devices ‘check in’ and receive the policy, their status should be displayed as shown above with the Deployment status field now reporting as Succeeded.

image

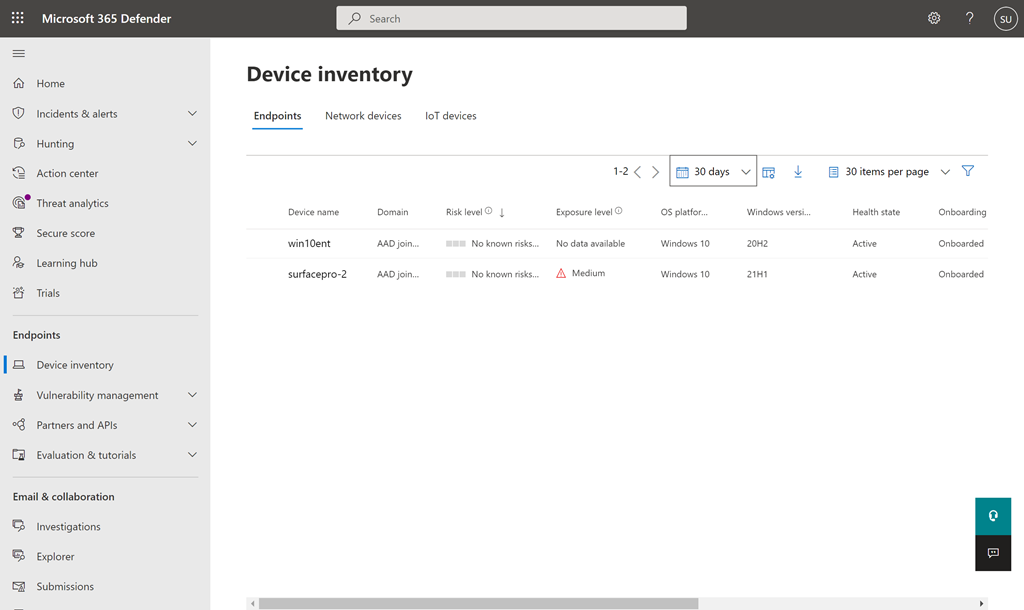
You can see which devices have been successfully onboarded to Defender for Endpoint by selecting the Device inventory option in the Microsoft 365 Security Center as shown above. Until machines have their ‘plumbing’ connected back to this console via the onboarding process they will not appear.

image

Once that onboarding process is complete on the device, it should appear in the Device inventory as shown above.

image

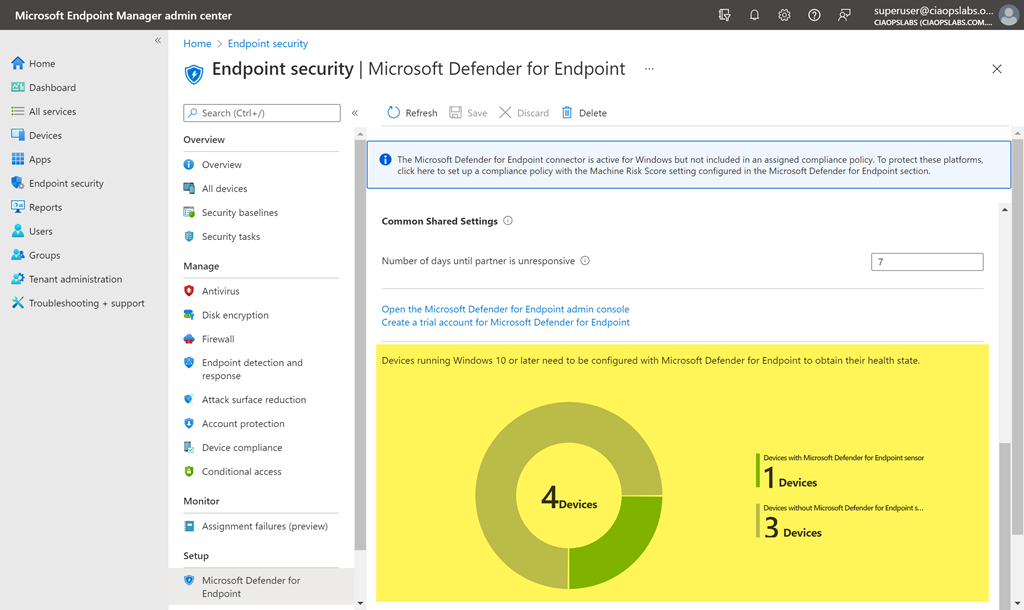
If you return to Endpoint Manager and scroll to the bottom of the Microsoft Defender for Endpoint screen, as shown above, you’ll see a summary of the devices onboarded.

The great thing is that you only need to do all this once, because once the Intune connection and Device configuration policy is in place, all Windows 10 machines will automatically be onboarded to Defender for Endpoint and all the options the Microsoft Security Center.

Celebrating anniversaries with Power Automate

A very common requirement is to remind people about anniversaries. In a business this could take the form of birthdays or commencement dates. It could, however, just as easily be any sort of event that happens on a certain date.

Previously, I’ve shown how to:

Send recurring tweets using Microsoft Flow

However, in this case, instead of simply rotating through a list of posts we want to match today’s date to a date on a list and then broadcast the message that corresponds to that date entry.

image

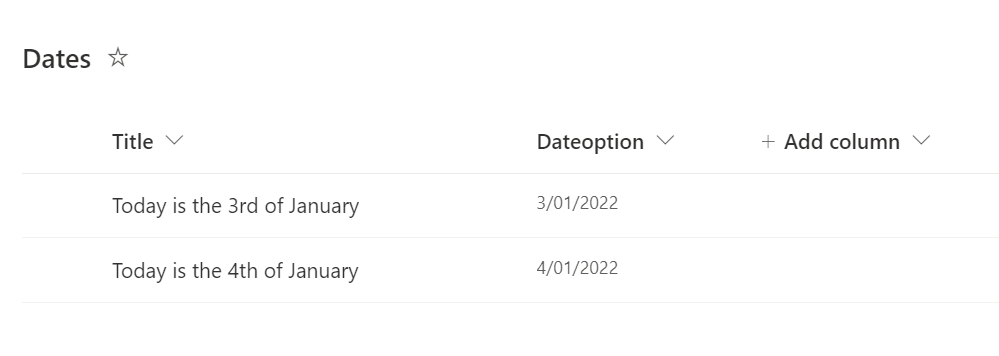
The starting point for this process is to create a reference list containing the dates and details you wish to share. I recommend that easiest place to do this is in a SharePoint list, as shown above. Of course, this list can contain as much detail and additional columns as you wish, but for this, I’ll keep it simple and just have two fields. It is important that you have at least one column (here Dateoption) that refers to the current year in which that item will be displayed.

image

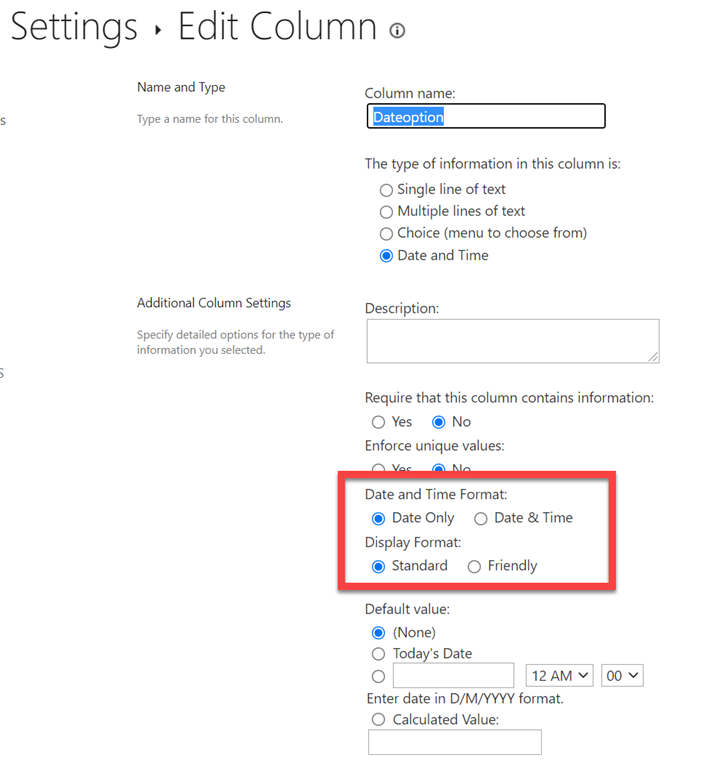
For simplicity, I have also configured my date column in the SharePoint list to exclude time and display in standard format as shown above. There is nothing stopping you using Date & Time if you wish, it just makes the filtering a little more complex later in this process.

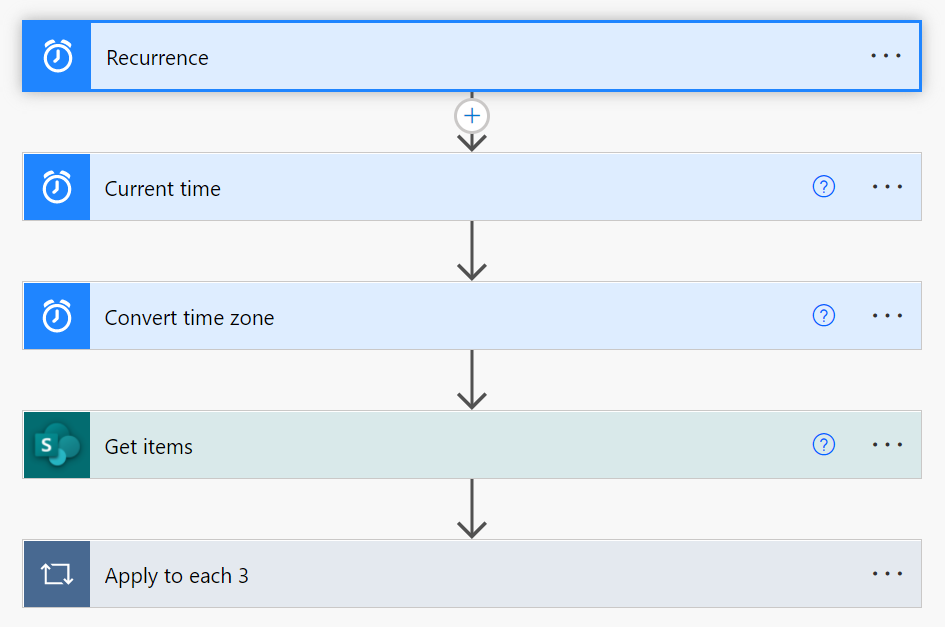
You’ll then want to create a Power Automate Flow that looks like this:

image

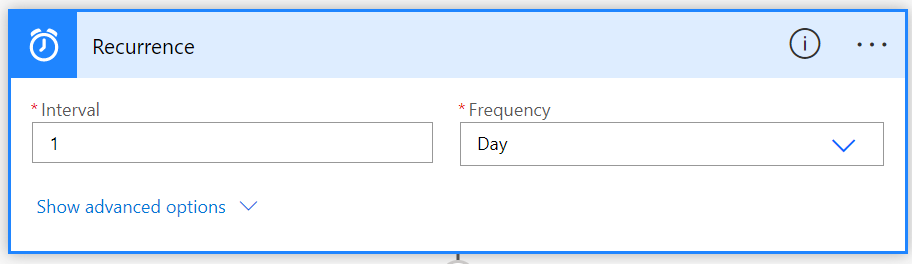
It all starts with a Recurrence action that will trigger this process once a day like so:

image

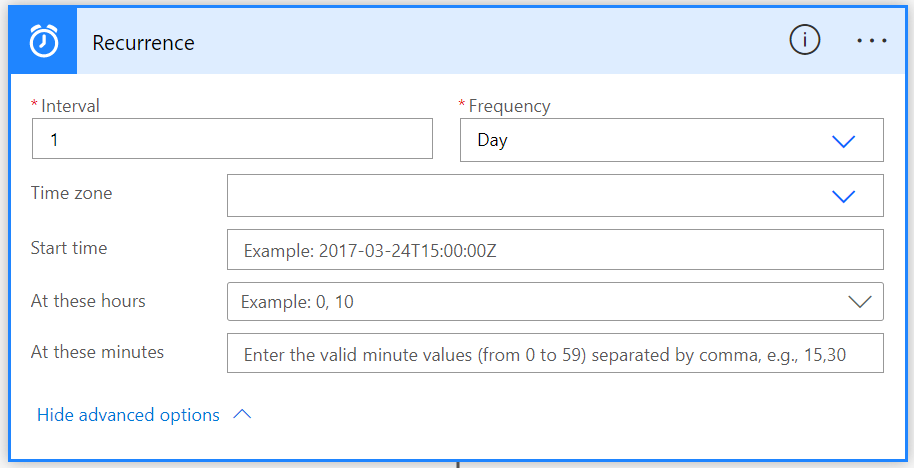
If you select the Show advanced options in this action like so:

image

You can set an exact time when this Recurrence action will be triggered (say 10am). However, since this example is a daily anniversary, we only need to trigger it at any time during the day.

image

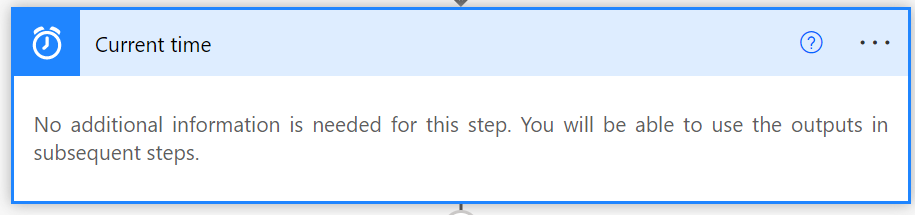
We now need our process to determine what the current date is and we can do this using the Current time action as shown above.

image

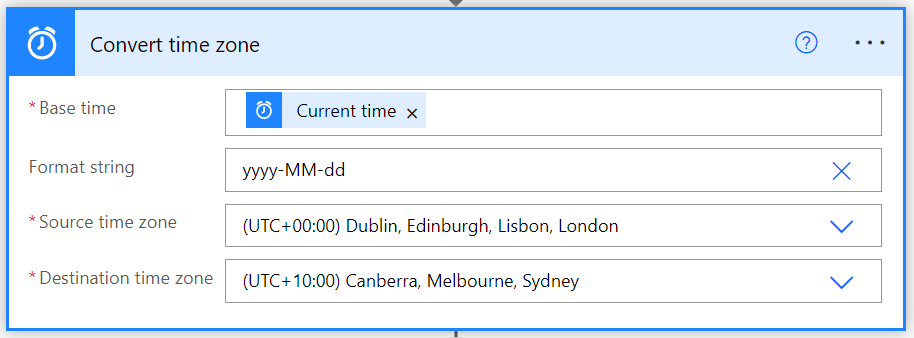
Next, add the Convert time zone action. There are two reasons for adding this action. Firstly, the Current time action returns today’s date in UTC which may cause issues if you are not in that time zone like me. Thus, I want the current time BUT I want it as a local value (i.e. to reflect the actual time in Sydney, Australia), thus the Source and Destination time zone field settings.

The second reason for the Convert time zone action is so the time value is in the right format for a comparison test later on in the process. Thus, the Format string field should be set to yyyy-MM-dd as shown.

Now, I need to add the Get items action to actually go and look at what is in my SharePoint list.

image

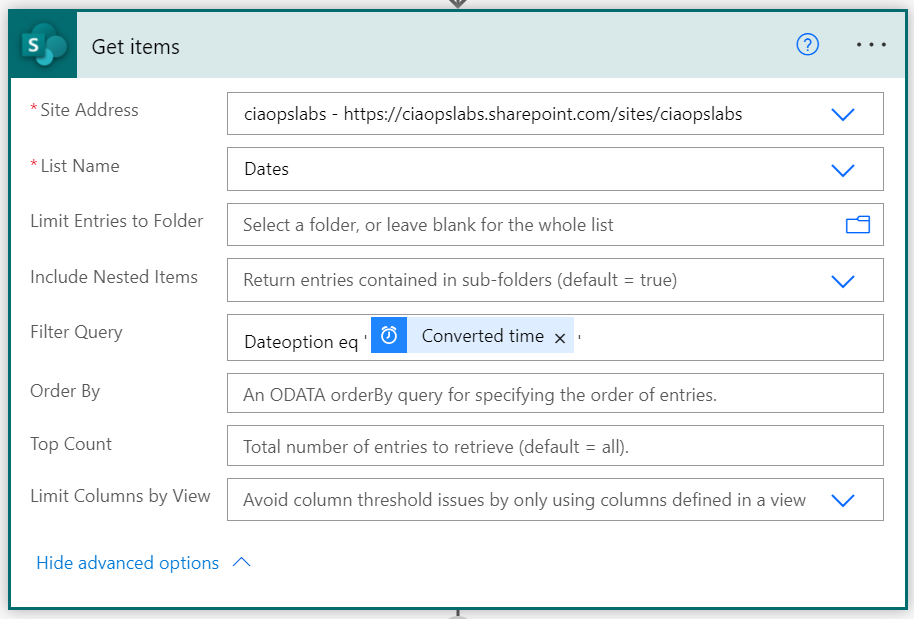
In this action I enter the Site Address and List name, however I also expand the advanced options to reveal the Filter Query field as shown.

image

The Filter Query field will limit the items returned by this action to only those that match the filter. Thus, I want the returned items to only be those that match today’s date, which I have correctly formatted and stored in the Converted time action result. Thus, I want to compare the date field from my SharePoint list (here Dateoption) to the Converted time result. It is important to note that I have enclosed Converted time result in single quotes (‘) to convert the value to a string for comparison. It is very important that you do that, otherwise you’ll get errors when your Flow runs.

image

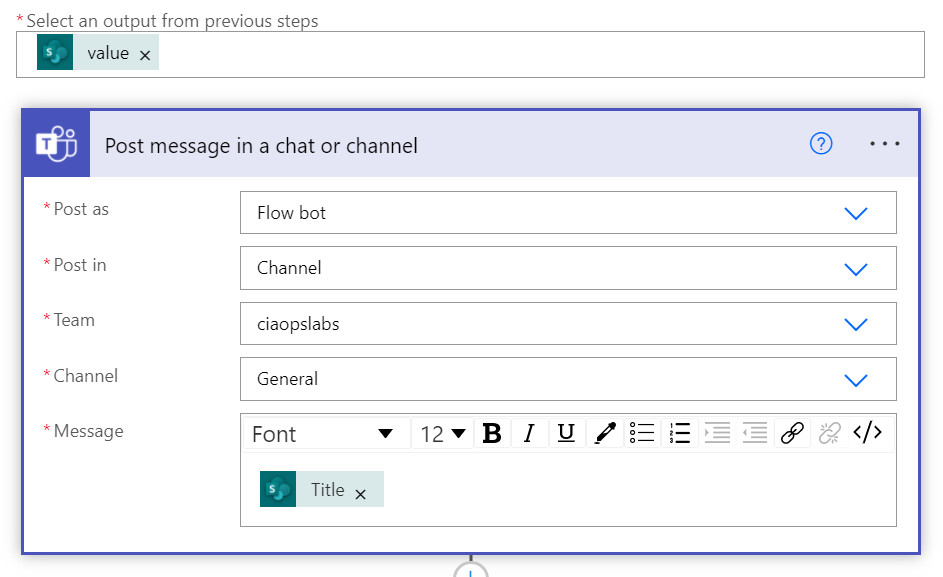
With the values that the Get Items action returns you’ll need to perform a number of steps. For this you use the Apply to each action as shown above.

image

In the case of this example, I’m simply going to post the text from the Title field in the SharePoint list that matches today’s date into a chat message as shown above. Again, this action could be anything you want, in fact, I’ll talk about how I use this with Twitter later on. For now the expectation is that if there is a match in the SharePoint list for today’s date, then the text for that entry will appear in a Teams chat message.

image

We need to do one more thing before we are finished here. As this is an anniversary calendar, we want to increment the current item for today and have it reoccur on the same date next year. To do that we use the Add to time action as shown by adding 12 months to the result date we have determined as shown above.

image

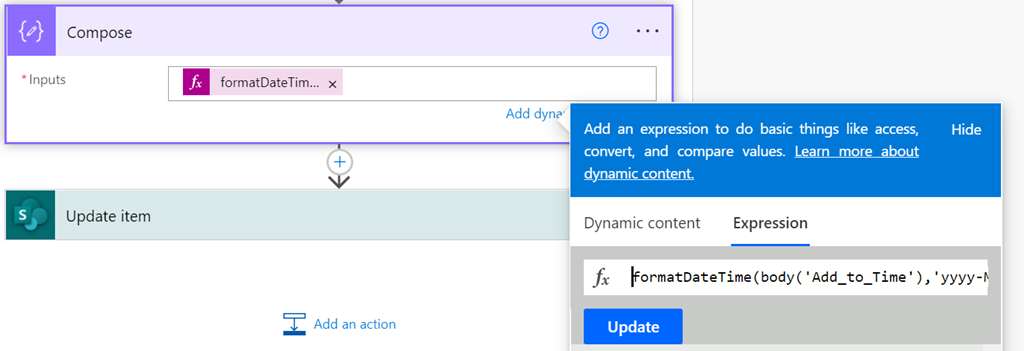
Before the new date can be added back to the SharePoint list it needs to be formatted correctly. This is achieved using the Compose action as shown using the following expression:

formatDateTime(body(‘Add_to_Time’),’yyyy-MM-dd’)

You’ll notice that that date format yyyy-MM-dd is the same as the one we set in Convert time zone action earlier.

image

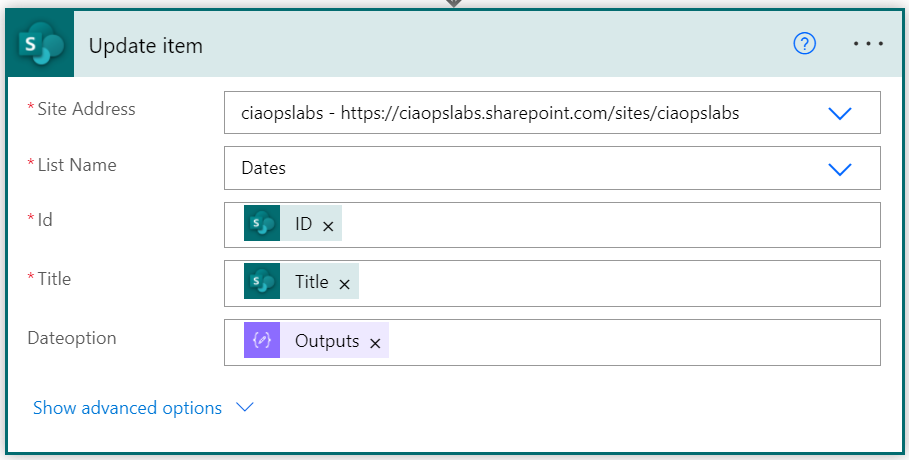
All that remains is to use the Update item action to update the item in the SharePoint list with the new date entry just composed. As shown above, the same SharePoint site and list is selected, along with the item ID and Title but the Dateoption field is set to contain our new formatted date output from the previous action.

You can now save your Flow and run a manual test.

image

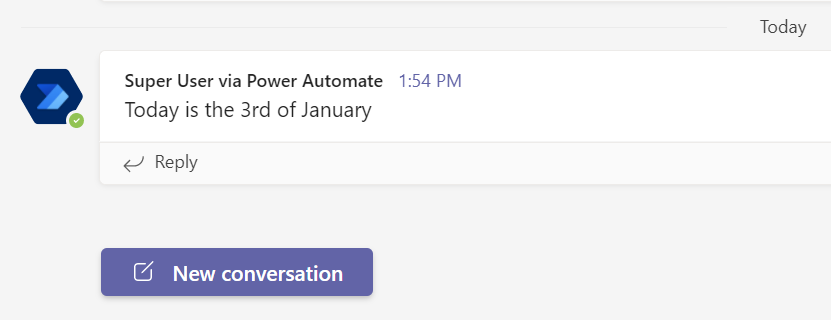
If I look at the chat in my Team I see the expected message that matches the item Title field in the original SharePoint list.

image

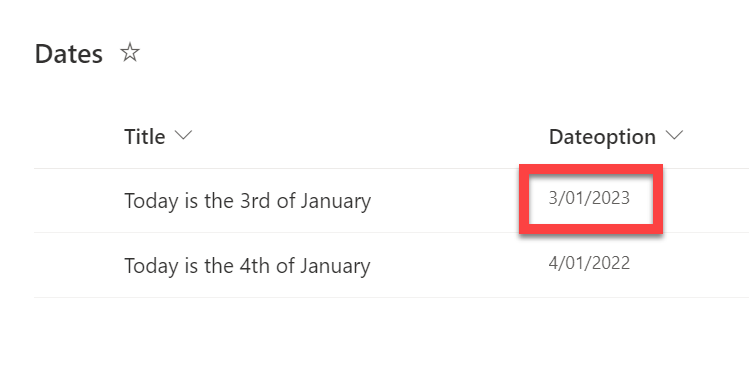
Also looking at my original SharePoint list I see that the date of today’s item has been incremented twelve months as shown.

image

One of the ways that I use this process with Twitter is to regularly post anniversary dates around ANZAC participation from World War One, which are taken from my site ANZACS in France.

The idea is that that the Flow checks this list of dates and then tweets out the text in the Title field if there is a match. Then it increments the PostDate field twelve months ready for next year. You’ll also see that I have added another custom column that records the original date of action just so I can filter and sort easily. Feel free to follow @ANZACSIF to be reminded of these dates.

As I initially mentioned, I believe there are plenty of applications for this type of process in a business. The most common ones I would suggest are for staff birthday and anniversary reminders. The great thing is that with Power Automate it is easy to modify this process to suit whatever need to have. It also makes it easy to edit the events and more if you need to because all you need to do is modify the SharePoint list that this process uses.

The possibilities are endless thanks to the Power Platform.

CIAOPS Need to Know Microsoft 365 Webinar – January

laptop-eyes-technology-computer

Join me for the free monthly CIAOPS Need to Know webinar and the first for 2022. Along with all the Microsoft Cloud news we’ll be taking a look at using OneNote for collaboration.

Shortly after registering you should receive an automated email from Microsoft Teams confirming your registration, including all the event details as well as a calendar invite.

You can register for the regular monthly webinar here:

January Webinar Registrations

(If you are having issues with the above link copy and paste – https://bit.ly/n2k2201 – into your browser)

The details are:

CIAOPS Need to Know Webinar – January 2022
Friday 28th of January 2021
11.00am – 12.00am Sydney Time

All sessions are recorded and posted to the CIAOPS Academy.

The CIAOPS Need to Know Webinars are free to attend but if you want to receive the recording of the session you need to sign up as a CIAOPS patron which you can do here:

http://www.ciaopspatron.com

or purchase them individually at:

http://www.ciaopsacademy.com/

Also feel free at any stage to email me directly via director@ciaops.com with your webinar topic suggestions.

I’d also appreciate you sharing information about this webinar with anyone you feel may benefit from the session and I look forward to seeing you there.

My software and services 2022

startup-photos

Here’s last year’s post for comparison:

My software and services – 2021

All my PC’s are running the latest version of Windows 10 (21H2) without any issues and none during the upgrade process either. I no longer run any Windows 10 Insider builds as I had trouble backing out of these when I needed to. I still have Office Insider builds happening in my environment. Most production machines I have are eligible for Windows 11 but none have been offered this upgrade as yet, however when it is I will be upgrading.

All Windows 10 Pro machines are directly joined to Azure AD and managed via Intune and Microsoft Endpoint Manager.  Their configurations are based on the Windows MDM security baseline settings. All machines only use Windows Defender for security monitoring and management. Thanks to Microsoft E5 on my production tenant, I am also using Microsoft Defender For Endpoint at the back end for monitoring and investigation of endpoint threats.

The WD Sentinel DX4000 runs Windows Storage Server 2008 and is now effectively obsolete and only maintained for historical purposes and as an archive.

My two main tenants are an Office 365 E5 demo and Microsoft 365 production environments. A mix of Windows 10 Pro and Enterprise machines are all Azure AD joined to the Microsoft 365 production domain. The production Microsoft 365 tenant has Microsoft 365 Business for all users except myself. I have a Microsoft 365 E5 license on which I have configured all the services including integrated PSTN calling via Switch Connect.

I use Microsoft Sentinel to monitor threats across my environments via a single pane of glass.

I use the following major browsers:

Edge – my primary browser across all my devices including iOS and Android. I have it locked down with baseline policies via Microsoft Endpoint Manager.

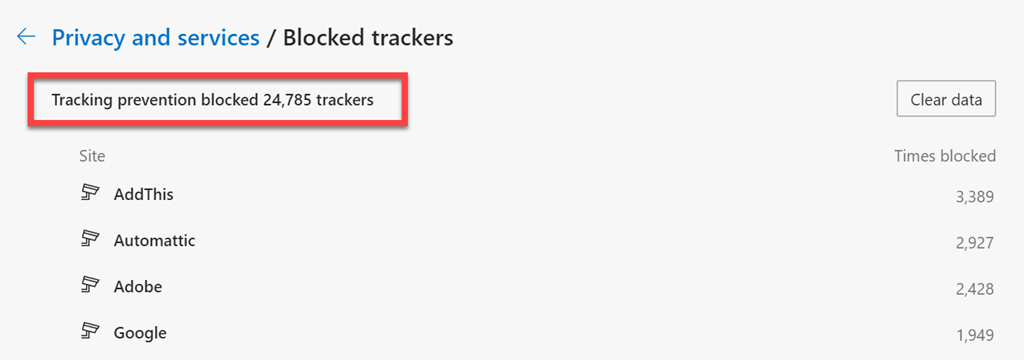
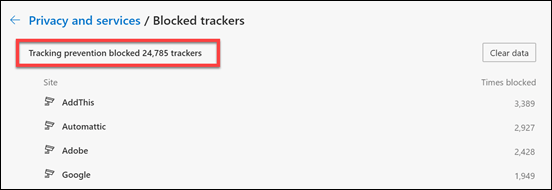
Brave – I have become increasingly concerned about the surreptitious tracking that many sites perform, especially when it comes to social media sites. I therefore now do all my ‘random browsing’, searching and viewing of social media sites. I became aware of the extent of tracking when I was adjusting the security settings in Edge Insider and found the following:
image

Made me realise that I probably need to take this ‘do not track’ stuff more seriously!

– Firefox – I now only use this on my Surface Pro X because Brave doesn’t offer an ARM version.

I have now cranked Edge up to the maximum security level but wanted to isolate the most likely tracking culprits into another browser that was security focused. After some evaluation, I have chosen Brave to be this browser. This is now where I do all the stuff that is more likely to be tracked and now hopefully blocked or at least minimised. I have also set this browser up to use Duck Duck Go as the default search engine, otherwise I use Bing for my production Edge browser. I have completely eliminated Google Chrome off all my machines without any issues and recommend those who are becoming more concerned about their privacy, like me, do the same.

Services like SharePoint Online and OneDrive I use regularly both in the demo and production tenant. I have the OneDrive sync client installed, running and connected to various locations on my production and demo tenants. I can now sync across all my different tenants as well as my consumer OneDrive storage. We have come a long way with the sync client!

I regularly use Microsoft Teams which is now my main messaging application. All the CIAOPS Patron resources like the intranet, team, etc all reside in the Office 365 E5 demo tenant but I connect to it on my desktop normally via an Azure B2B guest account from my production tenant. Thus, I can admin the Patron resources in a browser if need be but I get the same experience on my desktop as any Patron would. Handy to know what works and doesn’t work with Microsoft Teams guest access. Thanks to Microsoft E5 and Switch Connect, I also have Teams connected as a phone.

I use Lastpass to keep my passwords and private information secure. It allows me to do things like generate and store unique passwords for each website that I sign up for. It is also available across all browsers on my machine (including Microsoft Edge). I also now also use Lastpass to store secure notes.

The extensions I run in all my browsers are:

LastPass

GetPocket

I use Microsoft Power Automate for automation as well as Azure Functions.

For my email newsletters I use Mailchimp.

My preferred public social networks for business, in order are:

1. Twitter

2. Linkedin

3. Facebook

I consume a lot of content from YouTube both for business and personal interest. I also also use YouTube extensively for my publicly available training video training.

Microsoft Office desktop software is still part of my everyday workday via applications such as Outlook, Word, Excel, PowerPoint, etc. I use the desktop version of Outlook on my Surface Pro 7 which lives on my desk but I only use Outlook Web App on my travelling Surface Pro 6 device. I could happily not use Outlook on the desktop any more I believe but I still use so I understand the experience for most users. However, I do see the day when Outlook on the desktop begins to lose its appeal.

One of the things I have added to my desktop version of Outlook is a digital certificate that signs every email that I now send. This helps the receiver confirm that the message they have received is in fact from me and that it hasn’t been altered in any way. There are some issues when people attempt to reply to these emails from a mobile device but I believe a fix from Microsoft is coming..

The key application from the suite for me is OneNote. OneNote is my go to Swiss Army knife for just about everything digital. I use it to capture all sort of data. I even use it as a diary as I have detailed previous here:

One of the ways I use OneNote

The reason OneNote is key is because:

1. Just about everything I put in there us searchable

2. It is freely available across all platforms.

3. All my information is synced and accessible on all devices.
4. It is available on the web or offline if needed.

There are now two version of OneNote, the Windows store OneNote and OneNote 2016. I am a big user of OneNote on my iPad mini with the Apple pencil. This combination has allowed me to totally eliminate my paper notebooks for things such as journaling.

I use Pure Text to easily paste information, especially to and from OneNote as only text.

I am now a big Microsoft To-Do user. I use it to keep many tasks and items that I need to follow up. I love how it is available on all my devices and syncs across them all as well.

I use Windows terminal now for things like PowerShell execution and Microsoft Whiteboard for demonstrations and training.

Microsoft PowerToys allows me to customise my desktop layouts using FancyZones.

Another key service I use everyday along with Office 365 and OneNote is Azure. Typically, I use it for running up virtual machines that I test various things with but I also use it to backup my local data as well as that of other members of my family using Azure Backup.

Azure desktop backup

I have also now implemented an Azure site to site VPN as well as Azure SMB File storage to start moving my data into. I use Microsoft Sentinel to monitor all my services and machines in one single console and tell me about any incidents.

There is just so much that can be done with Azure and I pretty much use it everyday.

I still have a copy of some private data in Truecrypt but that is only as a backup. Nearly all of my data now lives in Microsoft 365 protected with things like Windows Information Protection and other Microsoft information protection options. All my Windows 10 machines run with full disk encryption thanks to Bitlocker, but stuff like financial and customer data live inside Microsoft 365..

In the last year I implemented Windows Defender Application Control (WDAC) to provide application control to improve security in my environment.

To capture my desktop for my online training academy or my YouTube channel I use Camtasia. I use SnagIt to capture screen shots and add highlights and emphasis to these. Snagit allows me to capture complete screens or specific areas quickly and easily.

I use Microsoft Teams to record my podcasts, which I then produce with Camtasia. These are uploaded to Podbean where they syndicated across various network.

To compose and publish blog articles I use Open Live Writer. My blog lives on WordPress.com.

My web site and Battlefields site live on Squarespace.

The majority of images I get, like the one at the top of this article, I get from Pexels. Pickit is also another great option.

For improved meeting management productivity I use Microsoft FindTime.

Having recently purchased a Duo 2 device I have it connected to my Surface Pro 7 using the Microsoft Your Phone app.

I use Visual Studio Code in which I do most of my PowerShell editing and publishing. The end result typically is my GitHub repository where you will find a range of scripts and other resources that I maintain regular. With Visual Studio Code I can edit publish and sync all my machines and my GitHub repository no matter where I am. Very handy.

Here are also a few of the other items I use regularly that are not for business:

Amazon Prime Video – only place to the latest The Grand Tour action. I also liked the Jack Ryan series and well as the Gymkana Files but most of this viewing is now on my iPad mini.

NetFlix – Seen a lot of great stuff this give all the time in lock down but most of this viewing is now on my iPad mini.

XBox Live Gold – access to all the online Xbox goodness.

Duolingo – language learning, Japanese and Italian at the moment but most of this access is now on my iPad mini.

I try and keep my production machines as ‘clean’ and free of unused software as possible. I ensure that they are updated regularly. Any software testing that I need to do is typically done on a virtual machine in Azure.

So there you have it, the major software and services that I use regularly. I continue to search out additional software that will improve my productivity. If you use something that you’ve found really handy, please let me know and I always keen to explore what works for others.