Using PowerShell to create Teams from a CSV file

There was another Teams import from CSV PowerShell script that someone was working on and having issues with. That script was a bit old and used commands that had been changed in the Microsoft Teams PowerShell module since the script was created. So I have taken that script (unfortunately original source specifically unknown but credit noted) and modified it and uploaded to my Github repo here for all to use:

https://github.com/directorcia/Office365/blob/master/o365-tms-import.ps1

and the CSV file in the format required is here:

https://github.com/directorcia/Office365/blob/master/o365-tms-import.csv

image

Now that it is in my Github it is easy for me to update when and if required. I encourage you to also go in and have a look at the comments to understand what is going on.

In essence the script will import the data from CSV file and loop through all the entries creating a new Microsoft Team and then the channels specified in this Team as well as assign member and admin roles for you.

If you use the –debug command line parameter it will record a log file for you.

I have also added some error checking and improved output, as shown above, to give you a better idea of what is going on in each step.

I will note that when you assign member and admin permissions to the Team created via this script they seem to take  while to show up in the portal. So be patient, as they will appear. This isn’t a limitation of this script but just the refresh cycle of the portal.

There are some additional items I want to add but take a look and let me know what you’d like to see added or if I have made any errors that need fixing. Don’t forget to check back regularly for updates.

Enabling security defaults will enforce MFA on external users

A really good questions that I came across was whether enabling security defaults on a tenant will enforce MFA for external guest users.

Here is the documentation for security defaults:

Security defaults in Azure AD

and when enabled one of the things it will do is:

Require all users to register for Azure AD Multi Factor

which says:

All users in your tenant must register for multi-factor authentication (MFA) in the form of the Azure AD Multi-Factor Authentication. Users have 14 days to register for Azure AD Multi-Factor Authentication by using the Microsoft Authenticator app. After the 14 days have passed, the user can’t sign in until registration is completed. A user’s 14-day period begins after their first successful interactive sign-in after enabling security defaults.

The question is does “all users” include external guest users who have been invite into a tenant for collaboration on Microsoft Teams say? This is important because Microsoft is starting to enforce security defaults on all tenants.

Interestingly, none of the documentation seems to call out specifically whether “all users” does in fact include external guest users. After some digging I came across this post:

All users should be changed to all “member” users · Issue #78194 · MicrosoftDocs/azure-docs (github.com)

which has a response from someone at Microsoft and it says:

“Follow up from the product group… Security defaults should apply to guest users as well.”

So it looks as though it does indeed appear that security defaults applies to external guest users but I wanted to be sure.

image

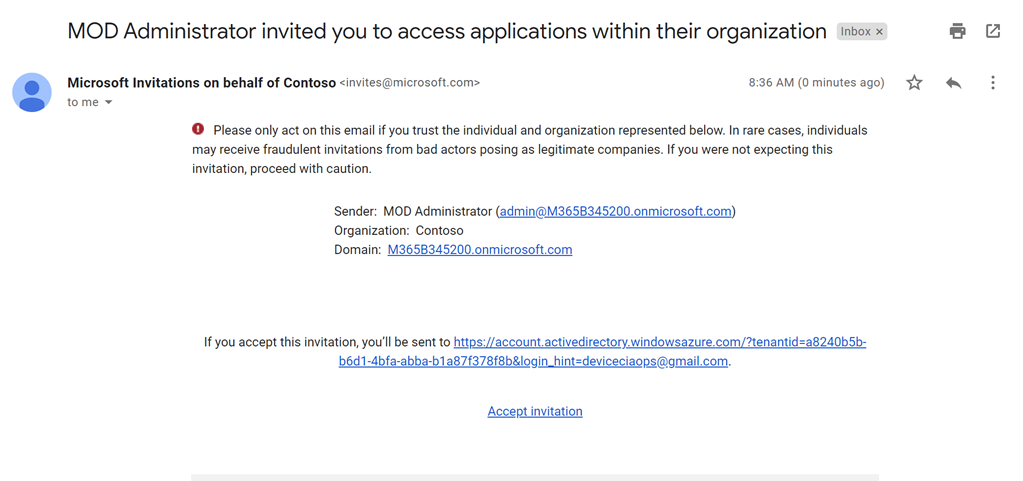
I took a generic Gmail account I use and invited that user into a demo tenant that didn’t have security defaults enabled.

image

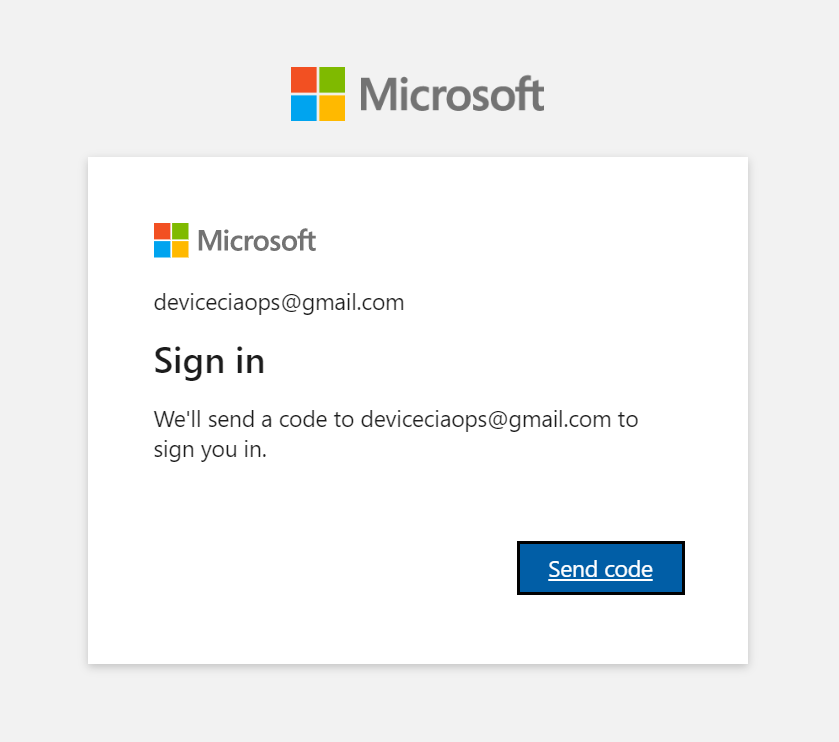
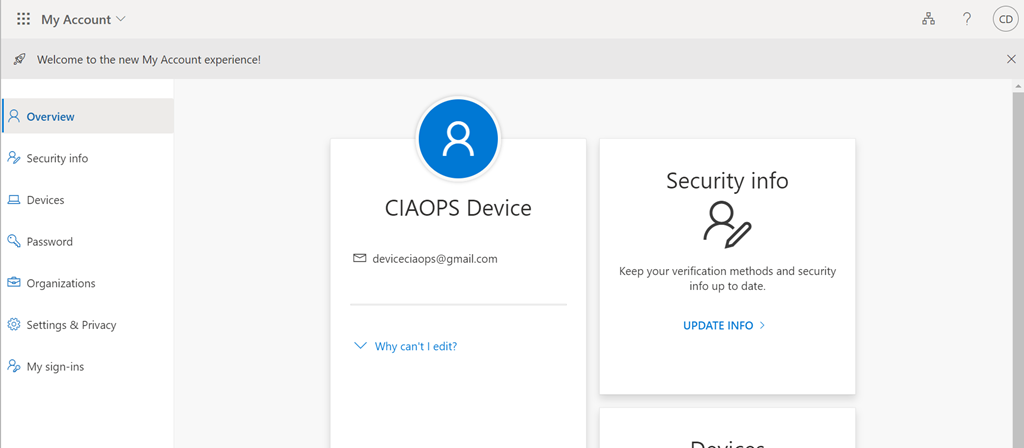
That user went through the expected process of connecting to the tenant.

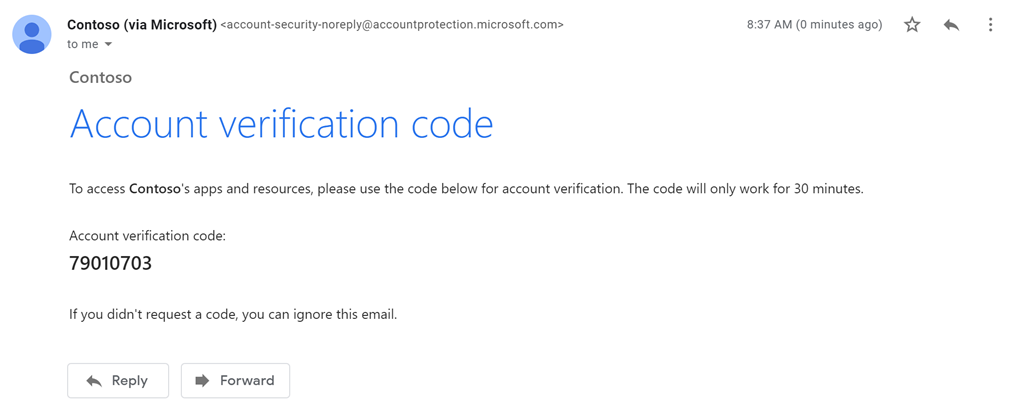
image

using the email code verification process.

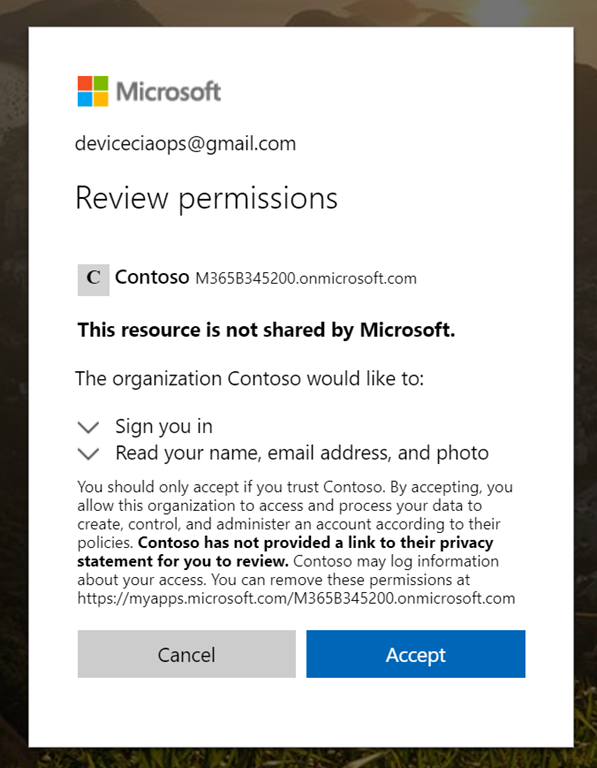
image

until they could access the tenant.

image

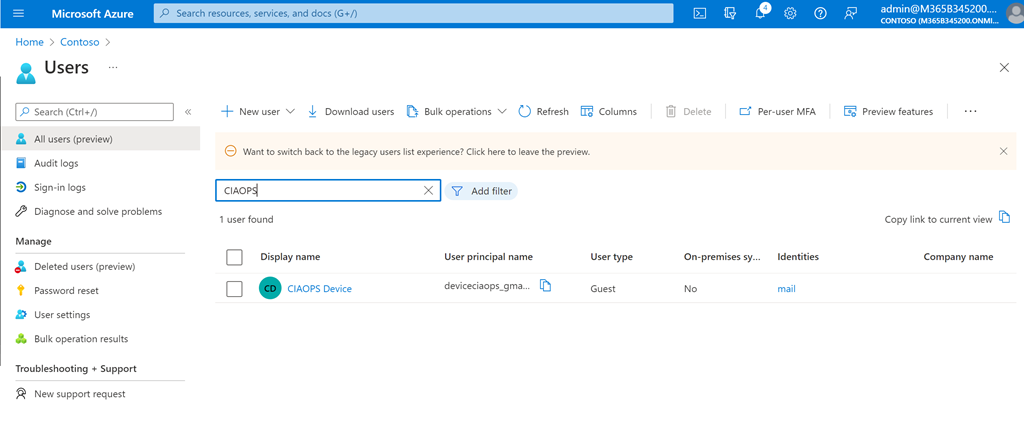
I also verified that they appeared in the Azure AD for that tenant.

image

So everything as expected so far.

image

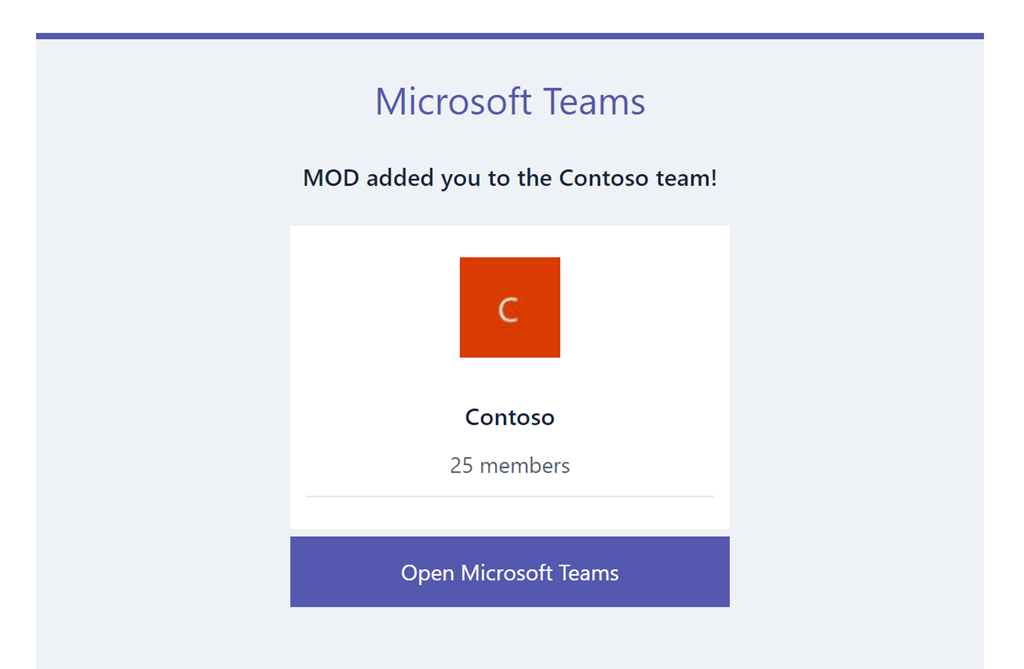
Next, I invited that same user to a Microsoft Team inside that tenant.

image

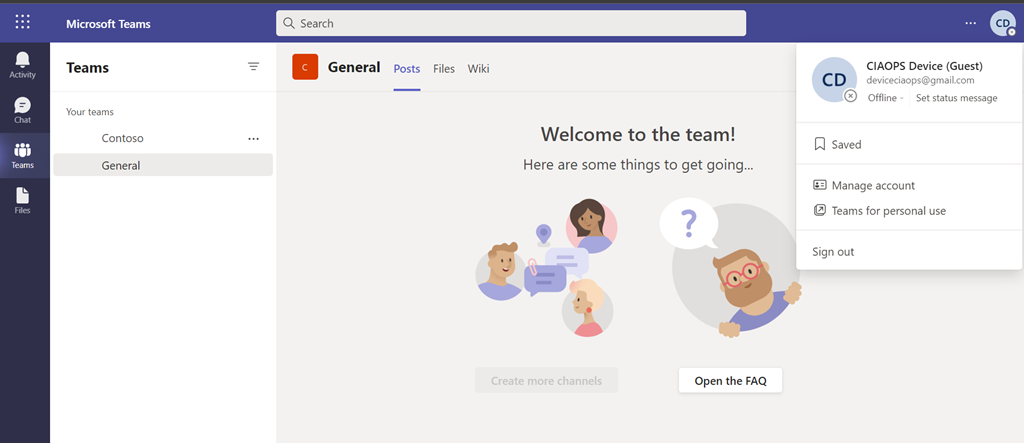
and they could access that Team using the normal email code authentication process. I tried this a few times to ensure they could access the Team without needing anything but the usual email code. So far, so good still.

image

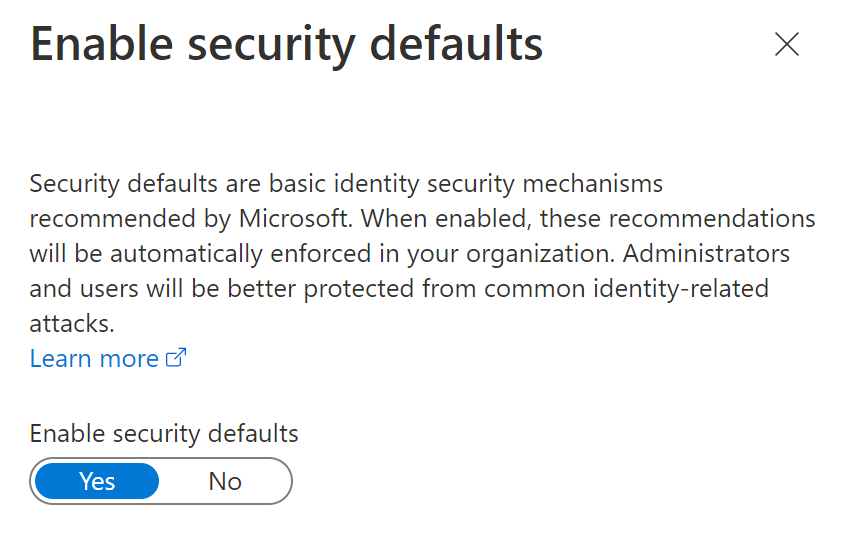
I then went in an enabled security defaults for the tenant.

image

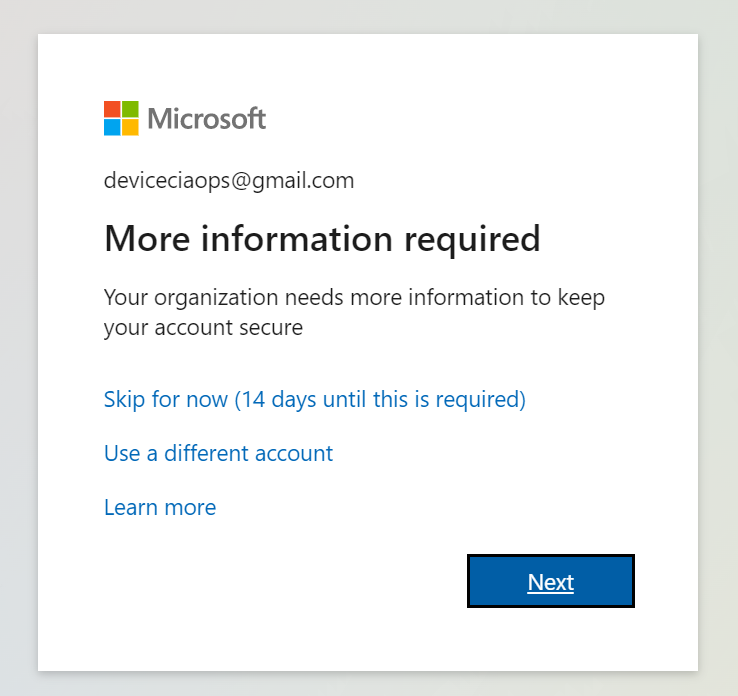
After a few minutes wait to let the policies kick in I tried to login as the external guest user again to Microsoft Teams directly, and after providing a login and getting an email code I was prompted to enable MFA for the user as seen above.

image

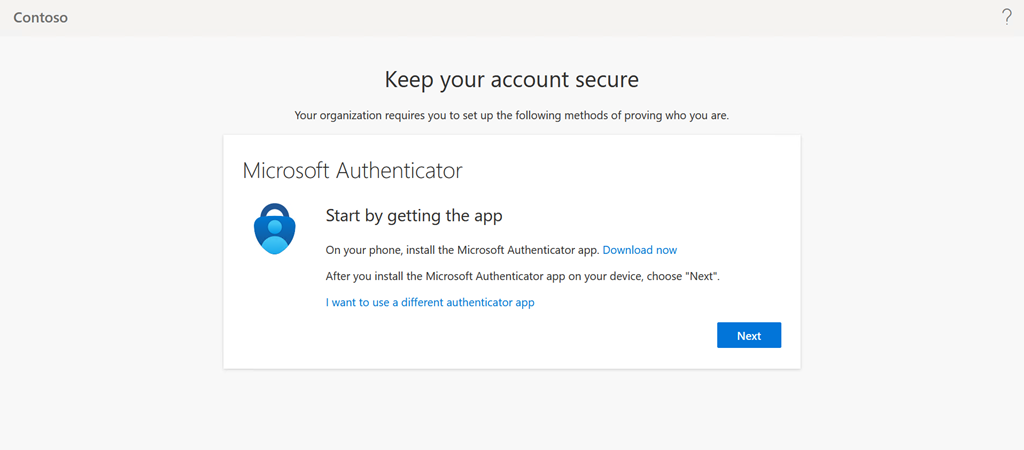
Selecting Next will take you through the standard MFA registration process as you see above.

It is therefore the case that if you enable security defaults for a tenant, all users, INCLUDING any external guest users, will be REQUIRED to enable MFA to access resources inside that tenant.

Why this is important is because Microsoft will be enabling security defaults on ALL tenants as detailed here:

Raising the Baseline Security of all organizations in the World

which says:

“Based on usage patterns, we’ll start with organizations that are a good fit for security defaults. Specifically, we will start with customers who aren’t using Conditional Access, haven’t used security defaults before, and aren’t actively using legacy authentication clients.

Global admins of eligible tenants will be notified through email and the Microsoft 365 Message Center. Then, starting in late June [2022], they’ll receive [a] following prompt during sign-in”

Being it is now June 2022, this process has commenced. You can disable security defaults if you wish, even after they have been enabled, if desired per the details in the above link.

Given that I couldn’t find a specific answer about global external users being impact by security defaults, hopefully this now provides a reference for other looking for the same information.

Create a Dataverse database in Microsoft Teams

What I want to achieve in this process is to create a single Microsoft Dataverse database inside a Microsoft Teams and allow a basic Power Automate to add data to it.
image

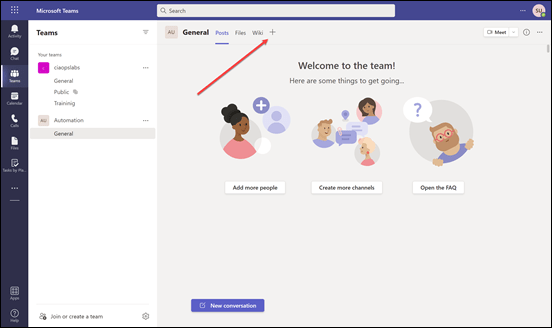
Firstly, navigate to a Microsoft Team in the environment (here Automation), and select the + (plus) icon along the menu on the right as shown above.
image

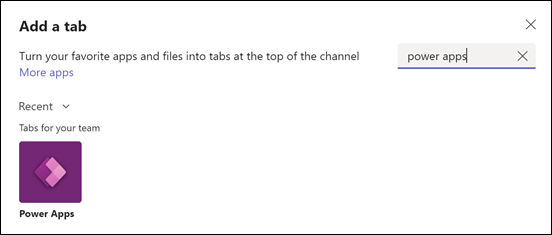
In the list of options that appears, search for, and select Power Apps as shown above.
image

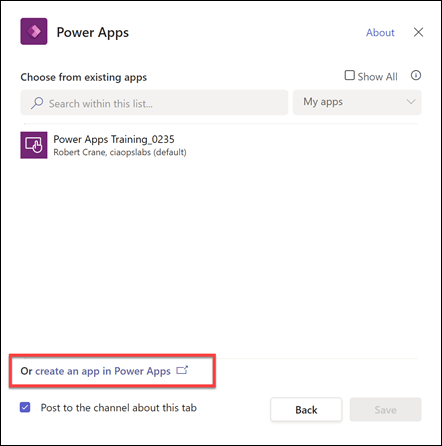
The first interesting thing, once you do that, is you typically can only select from pre-existing Power Apps that are listed in the dialog. However, there is an option create an app in Power Apps that you can select towards the bottom of the dialog as shown above.
image

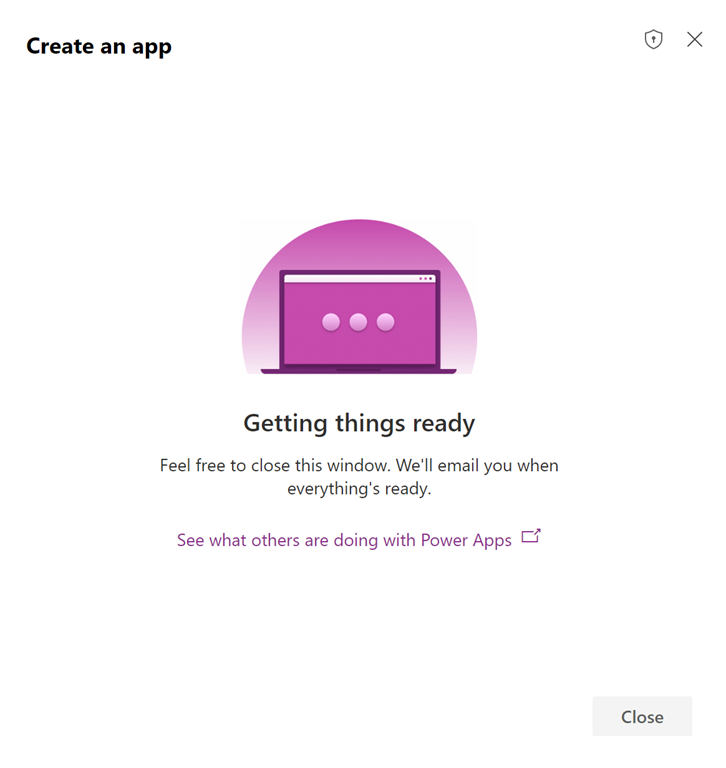
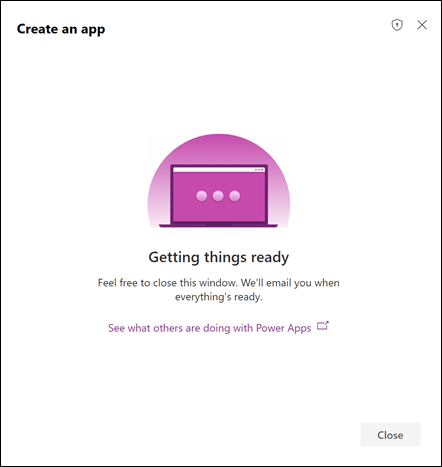
You should then see the dialog display, like the one above, telling you to wait while things get set up.
image

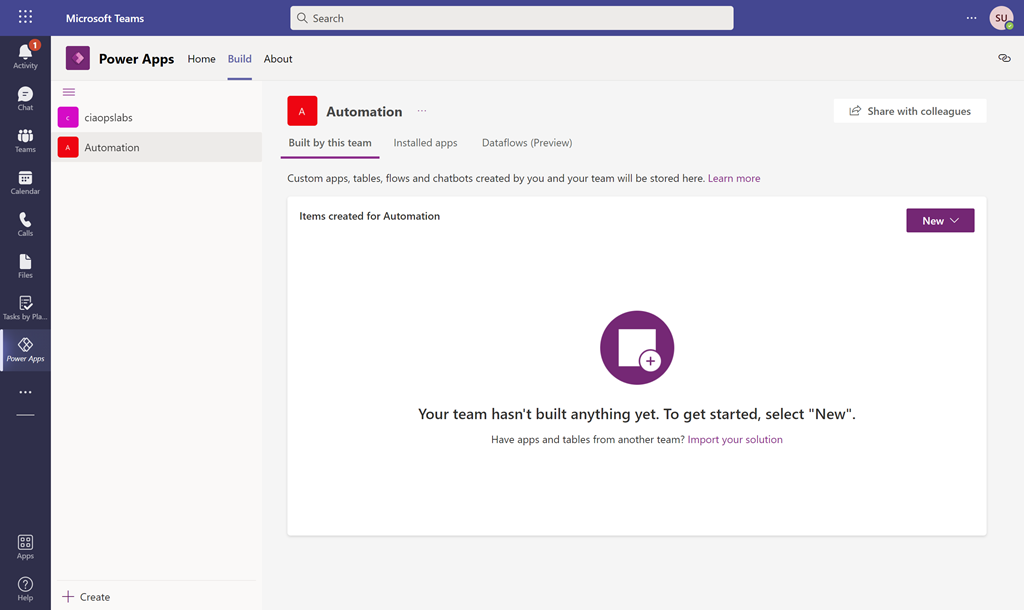
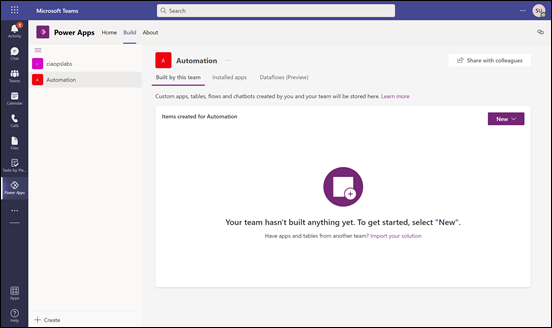
If this process gets hung up after a minute or two, just refresh the page in your browser. You should now see something like that shown above with a list of the Microsoft Teams on the left. If you select the Microsoft Team you want to put the Dataverse database into (here Automation) you should see that nothing is built yet in the information area on the right.
image

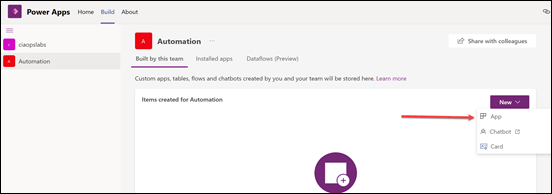
Select the New button on the right and then App from the options that appear as shown above.
image

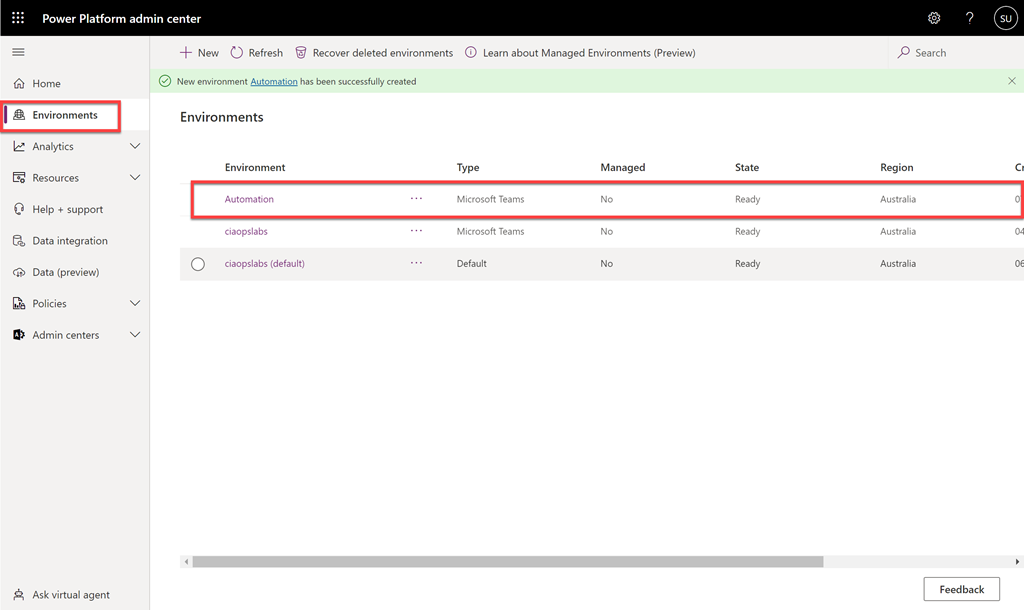
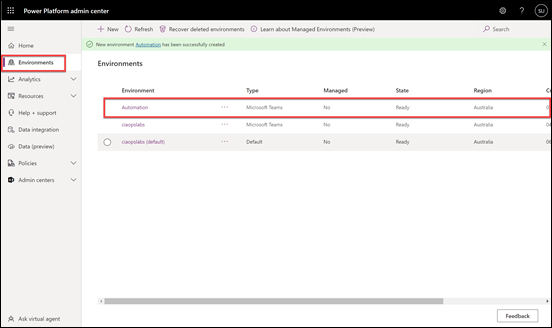
If you take a quick peek at the Power Platform admin center, in a new browser tab, and then Environments from the menu on the left or use the direct link:

https://admin.powerplatform.microsoft.com/environments

You’ll see that a new Power Platform environment has been created matching the name of the Microsoft Team (here Automation).

As the Microsoft documentation on Power Platform environments says:

https://docs.microsoft.com/en-us/power-platform/admin/environments-overview

A Power Platform environment is a space to store, manage, and share your organization’s business data, apps, chatbots, and flows. It also serves as a container to separate apps that might have different roles, security requirements, or target audiences.

In essence, think of an environment as a container to store things you create in the Power Platform. When you create a Power Platform App inside a Microsoft Team, it creates them in a unique container.
image

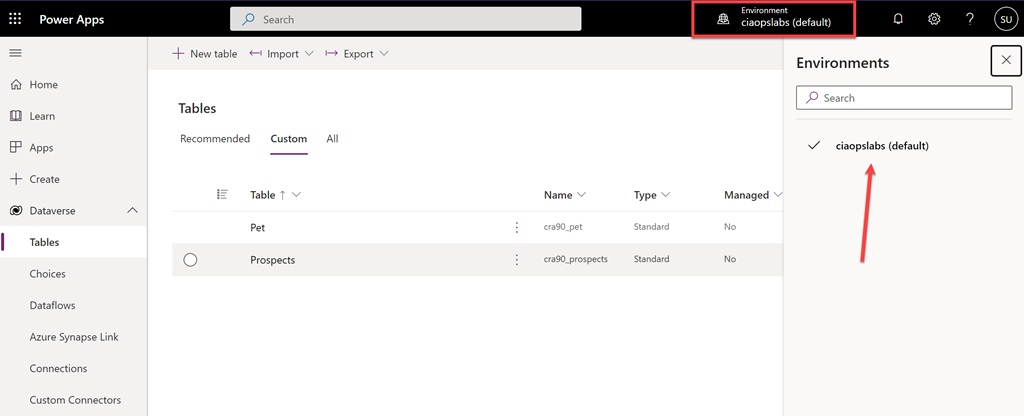
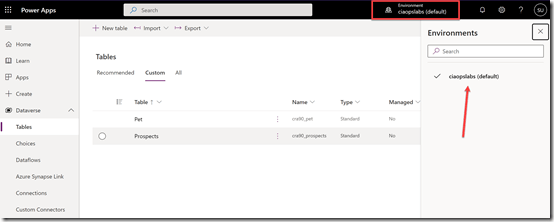
The idea is that you should be able to easily switch between environments. However, if you navigate to the Power Platform service directly at:

https://make.powerapps.com/

You are not able to see the environment just created in Microsoft Teams as shown above for some reason. It seems the only environments you can see here are those created directly in the Power Apps make portal.
image

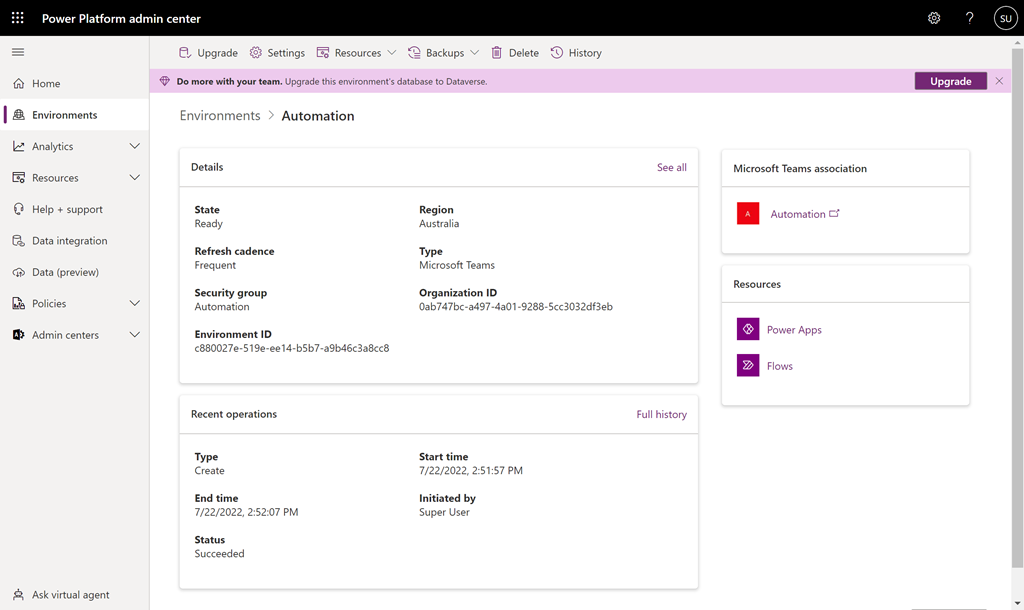
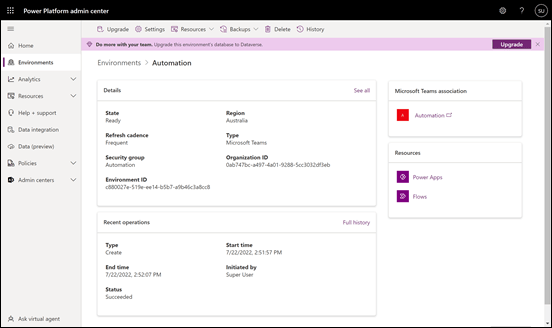
You can drill into the new Teams environment you just created in the Power Platform admin center by selecting it from the list. Information about the environment will be displayed as shown above.
image

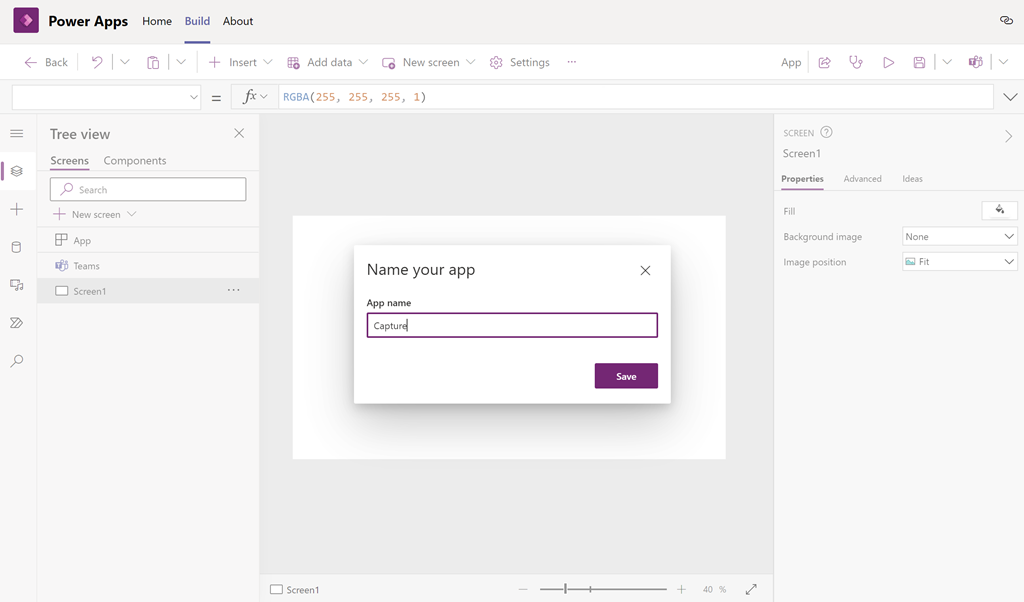
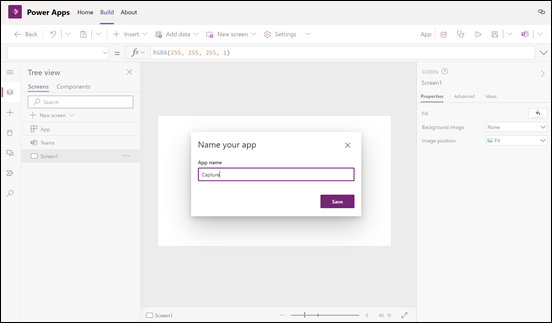
If you return to your app creation process inside the Microsoft Team, you’ll now need to give your app a name (here Capture)
image

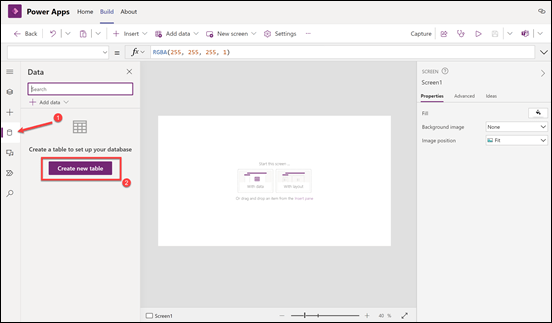
Typically, you build a full app here but for now all we want to create is a single database, so select the Data icon on the left (cylinder) as shown and then select the Create new table button to the right of it.
image

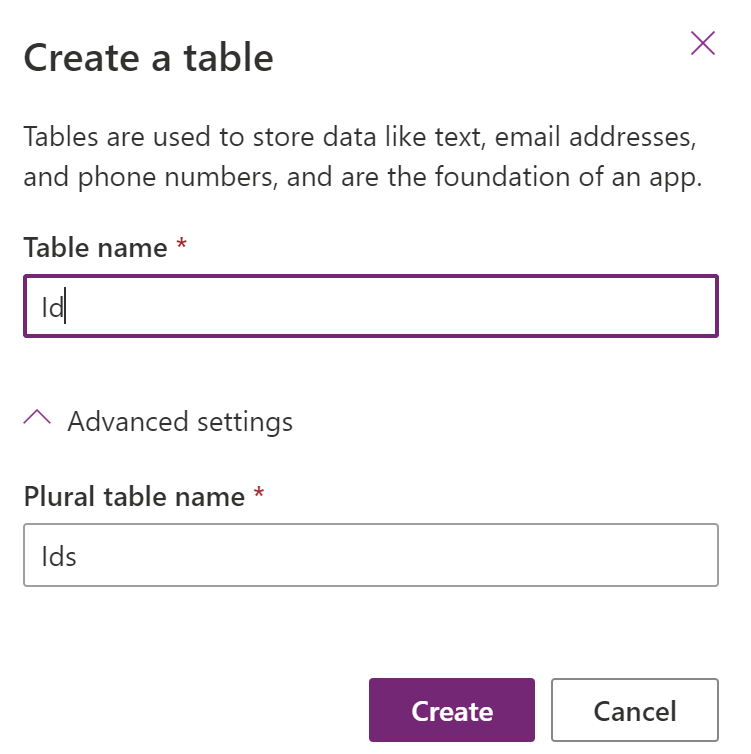
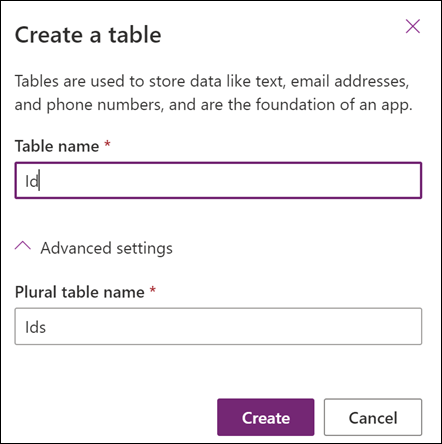
You’ll then be asked to give the table a name (here Id). If you open the Advanced settings option at the bottom of the dialog, you’ll see that there are not many additional options to select from.

Select the Create button to continue.
image

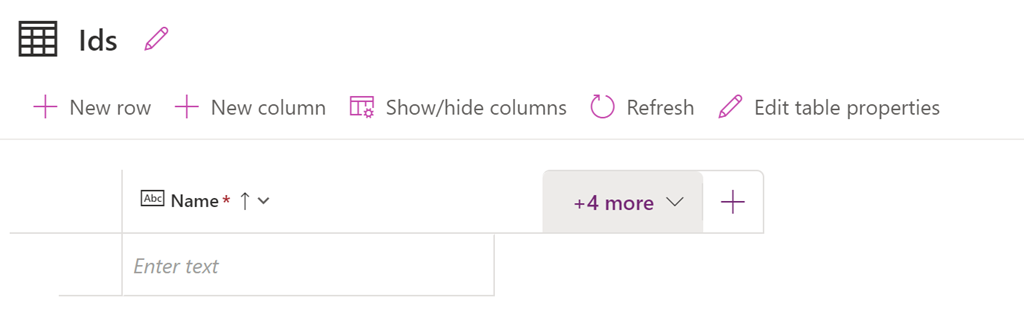
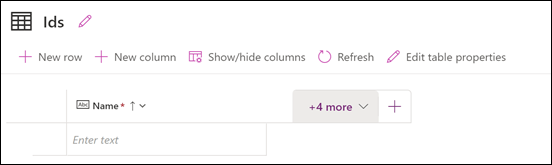
You should now see the table displayed as shown above. You’ll also notice that there is already a column called Name created. This is a bit like when you create a new SharePoint list and get a single column created for you as well.
image

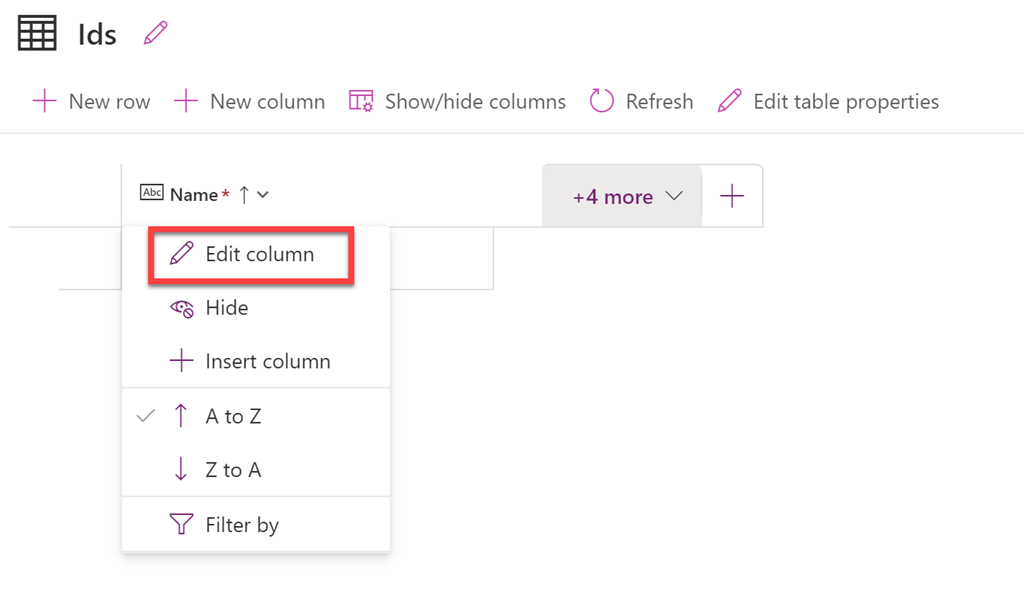
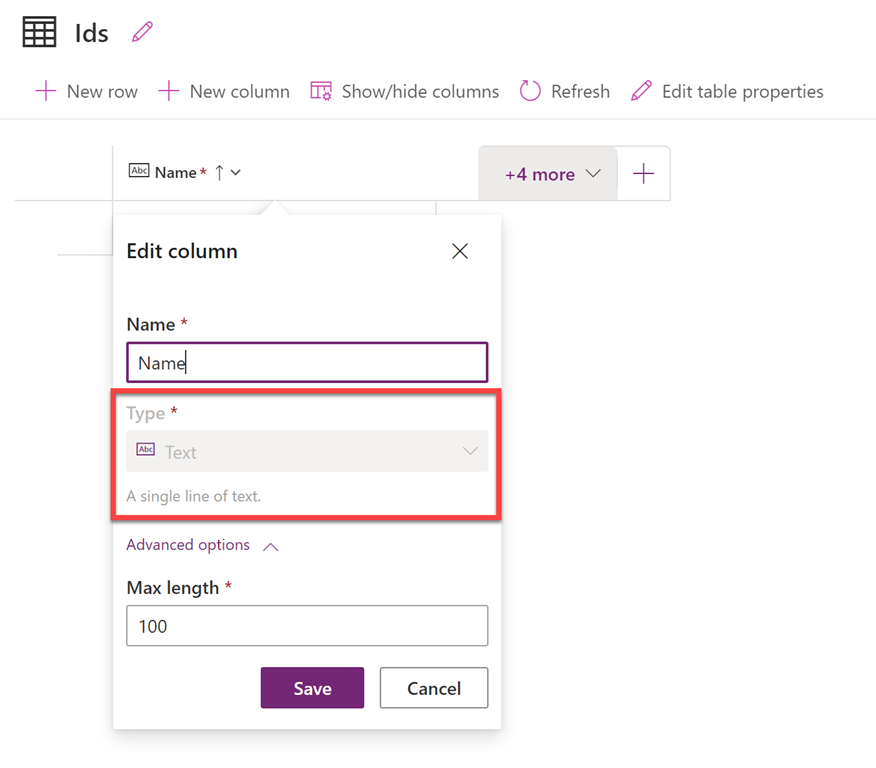
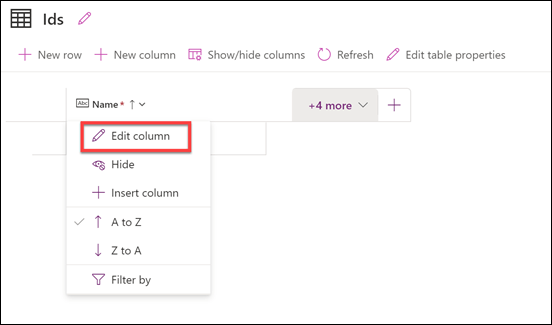
If you try and edit this initial column by selecting the header and then the Edit column option from the menu that appears above,
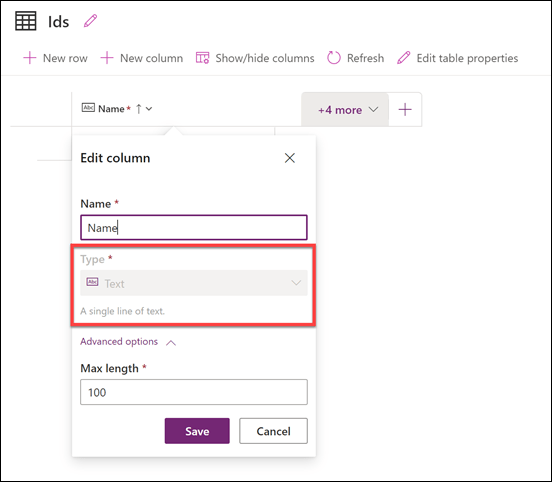
image

you’ll find there are not a lot of options available. This maybe limiting or just annoying as it is in SharePoint, but for now just leave that column in place. You’ll just need to remember to put some data in it as it is a required field.
image

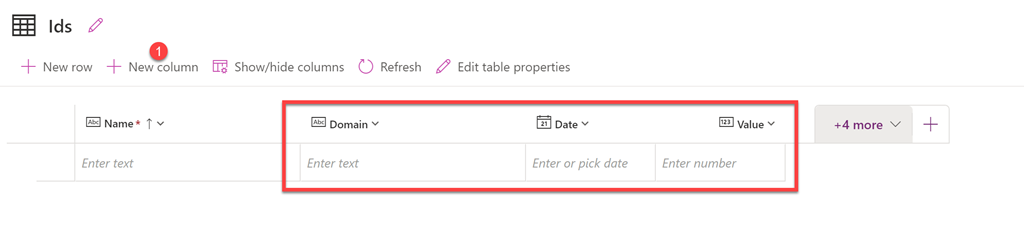
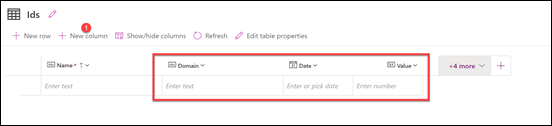
You can then add any addition columns you require. Here I’ve added the columns Domain, Date and Value. These are the fields I want to populate with custom data.
image

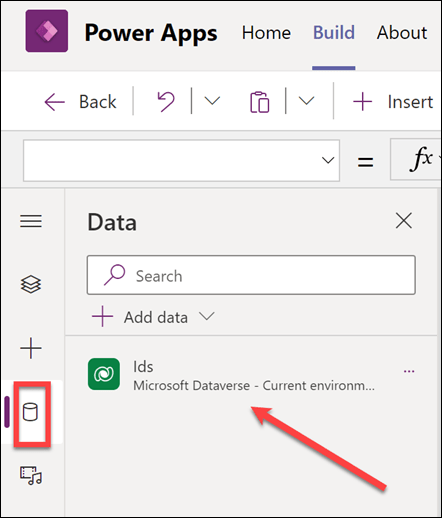
If I return to the previous screen you should now see the Dataverse database listed as shown above.
image

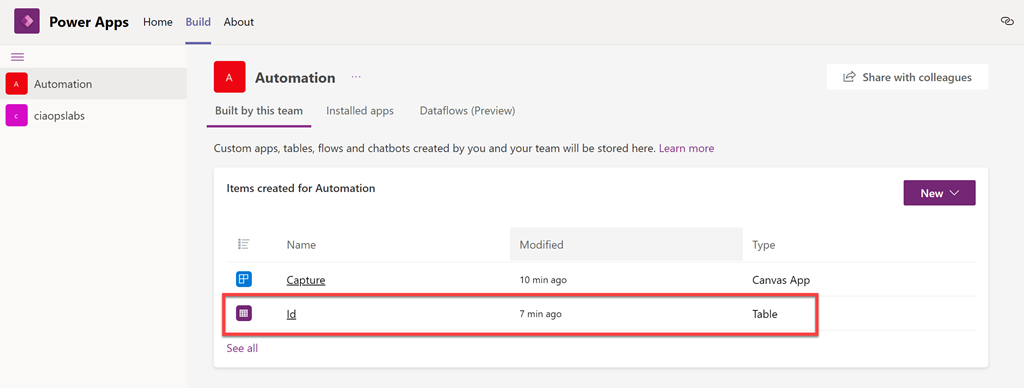
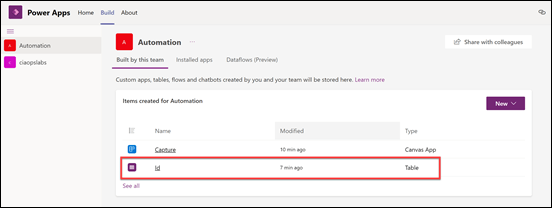
Returning to the Build page in Power Apps in Microsoft Teams, and selecting the Microsoft Team (here Automation), you should now see some entries in the Items created for Automation list on the right. Here, you should also see the database just created as noted above.
image

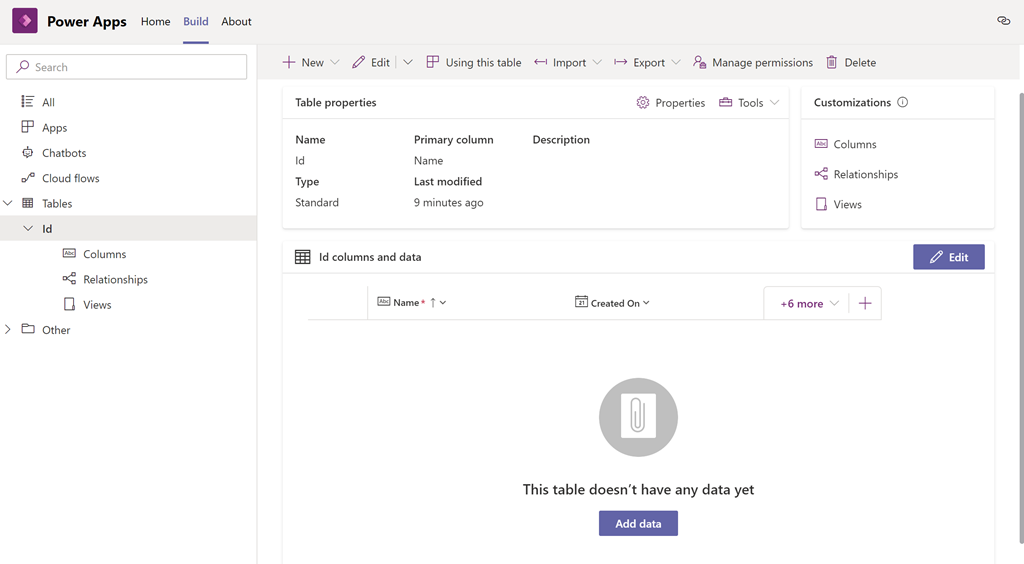
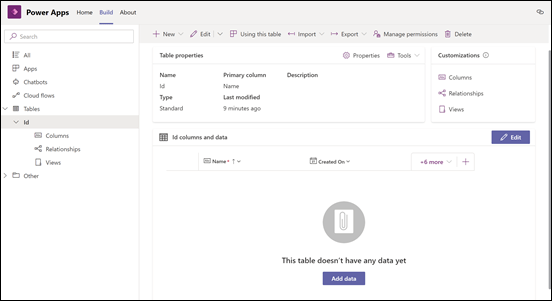
If you select the database directly from this screen you can drill in and see the table and any entries as shown above. No data appears in the table yet as none has been added.
image

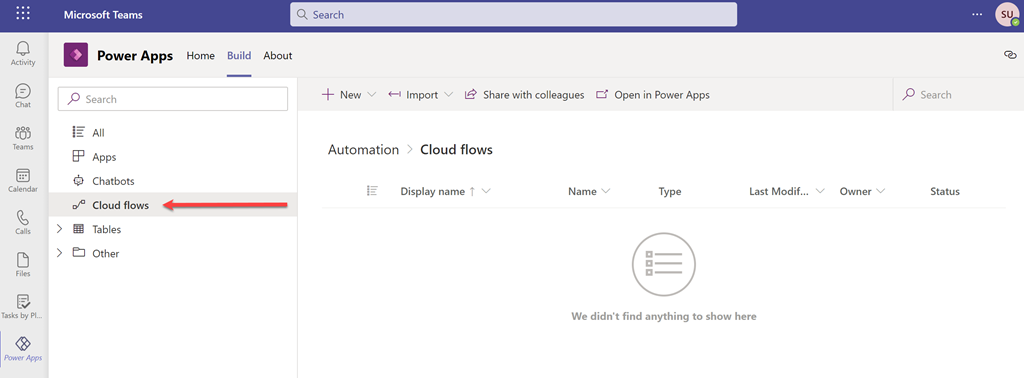
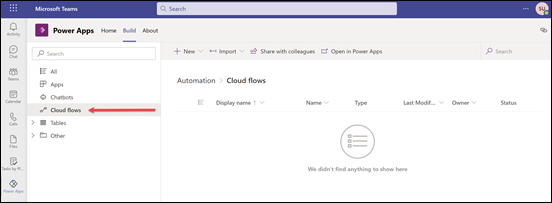
The way to get data into the database here will be via a very basic Power Automate Flow. It is a good practice to create this also inside the same Power Platform environment in which the Dataverse database was just created. Do this via the Cloud Flows option on the left as shown above.
image

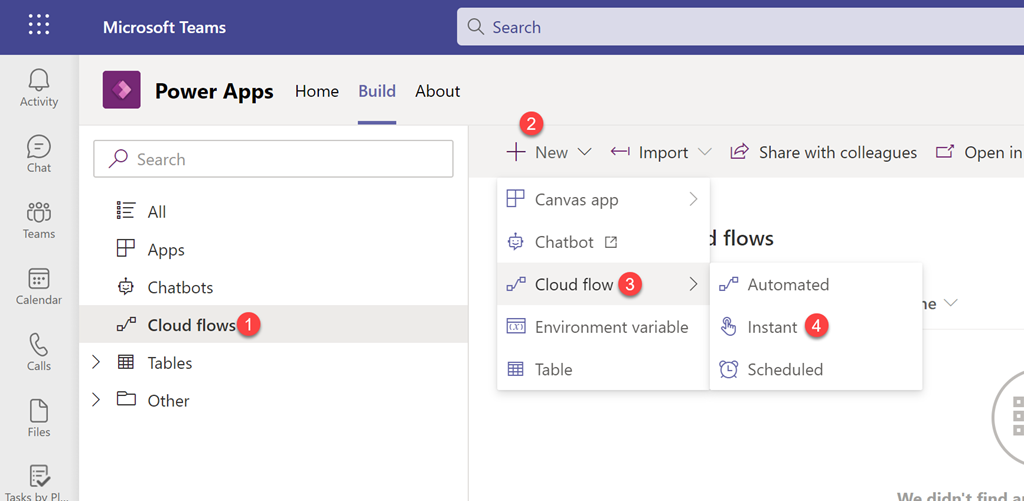
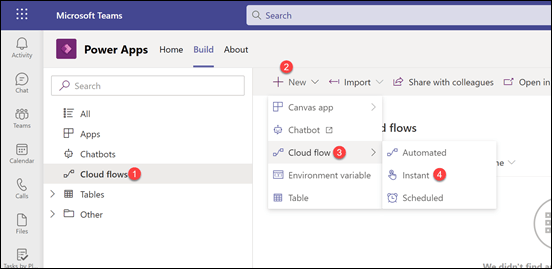
To create a Flow, select Cloud Flows, then from the menu at the top on the right select the + New button. From the options that appear select Cloud Flows then type of Flow desired (here an Instant Flow).
image

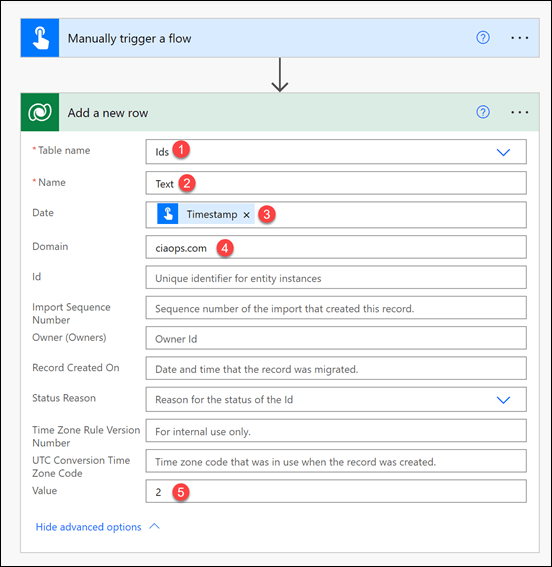
The process for creating a Flow is the same as if you were creating a stand alone Flow via the Power Automate service. In this case, simply add the Dataverse Add a new row action as shown above. Configure this action to connect to the Dataverse database created earlier (Ids), then add some random text for the required default Name field (Hello), then data for Date, Domain and Value as shown above.

Save and Run the Flow.
image

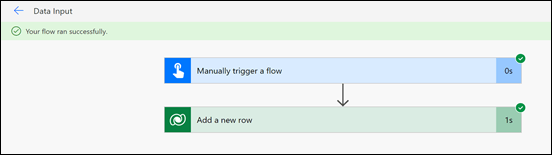
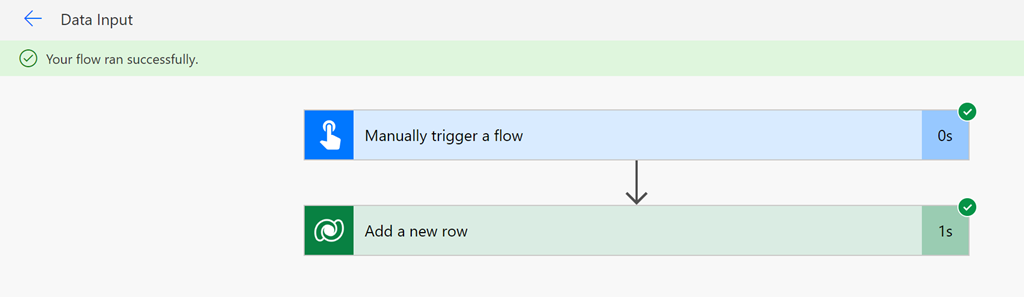
If everything is correct, the Flow should run without errors as shown above.
image

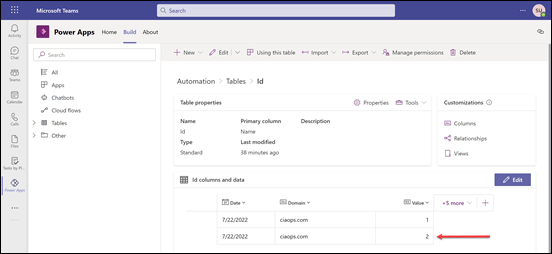
If you then look at the details of the database you should see that it now has data inside it as shown above.

image

You could also create a Flow directly from the Power Automate service, but remember to switch to the new Microsoft Teams environment that was created by adding a Power Automate app to the Microsoft Team before creating the Flow.

image

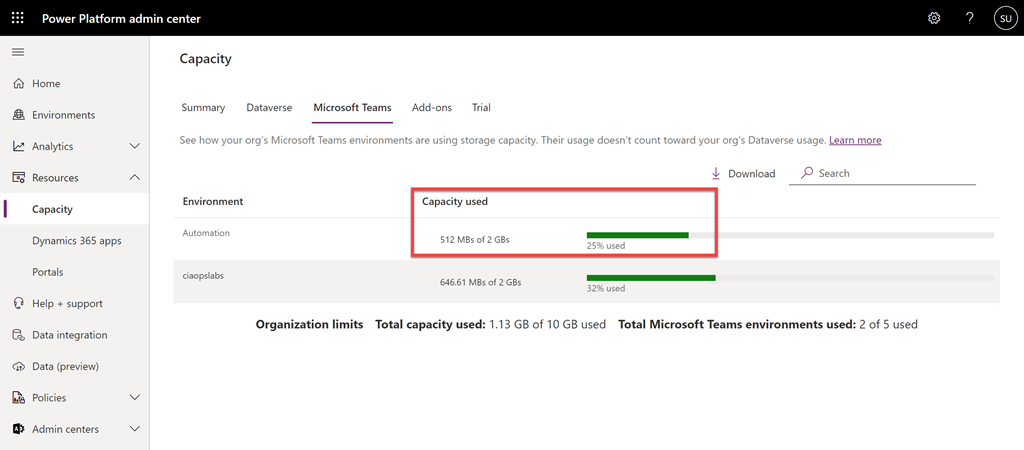
The final interesting item here is to look at the capacity of the new database in the Power Platform admin center where you’ll find that, although you have a total size of 2GB, about 25% has already been consumed by the system.

For more information about the Dataverse for Teams consult the Microsoft documentation here:

About the Microsoft Dataverse for Teams environment

Defender for Endpoint device execution restrictions

This is a video run through of the recent articles I wrote:

Microsoft Defender for Endpoint device isolation

Microsoft Defender for Endpoint restrict app execution

This video will show you how to both isolate a device and restrict app execution on a device. Both of these are great ways to respond to a suspected device security threat and limit security breeches while still allowing remote troubleshooting.

Microsoft Defender for Endpoint Restrict app execution

In a recent blog I looked at how Microsoft Defender for Endpoint can allow an administrator to restrict a device from communicating with everything except the Defender for Endpoint admin console. You’ll find that post here:

Microsoft Defender for Endpoint device isolation

Isolating a device is a pretty drastic measure, however Defender for Endpoint does have another device restriction option that is probably less intrusive known as Restrict app execution.

What Restrict app execution does is that it present applications that are not signed by Microsoft from running.

image

To Restrict app execution on a device firstly navigate to:

https://security.microsoft.com

and select the Device inventory from the options on the left. This will display a list of all the devices that Defender for Endpoint knows about. Select the device you wish to isolate from the list. In the top right hand side should appear an option Restrict app execution as shown above.

image

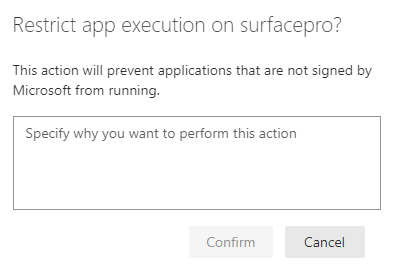
Once you select this option you’ll need to provide a reason for this restriction and press the Confirm button. This action will be logged in the admin console for later reference.

image

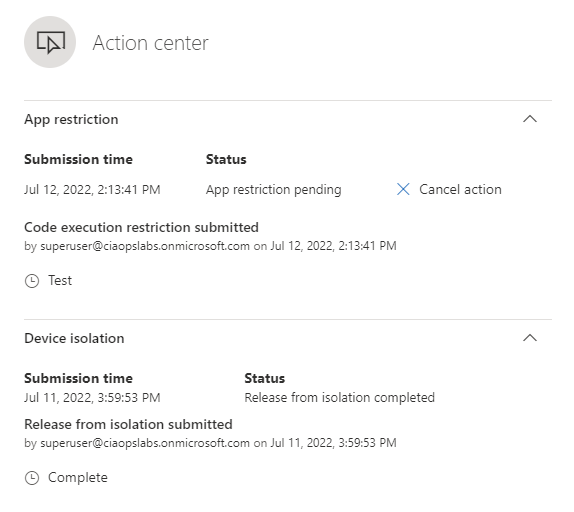
You will see the action item display as shown above. You can also cancel if required here.

On the device, in a matter of moments, a message will now appear:

Screenshot 2022-07-12 141355

and if a non Microsoft application is run you’ll see:

image

putty.exe

image

Brave browser

This process is using Windows Defender Application Control (WDAC) that I have spoken about before:

Windows Defender Application Control (WDAC) basics

which you can apply yourself via a policy, but in this case, it is being applied on the fly, which is impressive!

To remove this device restriction, all you need to do is select

image

the Remove app restriction which can be again found in the top right of the device page.

image

You’ll again be prompted to enter a reason for removing the restriction and then you’ll need to select the Confirm button.

image

The Action center confirmation will then appear as shown above and in a very short period of time the restriction will be removed from the device.

image

These confirmation can be found in the Action center option on the left hand side menu under the Actions & submissions item as shown above.

This is handy option in Defender for Endpoint for isolating a possible security issue on a device while minimising the impact to the user. Of course, smart attackers will use Microsoft tools located on the device, such as PowerShell to compromise machines to avoid this restriction. However, typically, they will also need to run a non-Microsoft application somewhere along the line which this technique will block.

For more information about Microsoft Defender Restrict app execution see the Microsoft documentation here:

Take response on a device

and remember that Restrict app execution is another feature that can be used with Defender for Endpoint when responding to security threats on devices.

Microsoft Defender for Endpoint device isolation

Let’s say that you have device that you believe has a security threat serious enough that it should be ‘unplugged’ from the network. Doing so physically makes it hard to troubleshoot any incident unless you are in front of that machine. However, Defender for Endpoint allows you to isolate the machine from the network while still remaining connected to the Defender for Endpoint console.

image

To initiate the device isolation navigate to:

https://security.microsoft.com

and select the Device inventory option from the menu on the left hand side. That should show you a list of all devices that Defender for Endpoint knows about. Select the device you wish to isolate from the list that appears.

In the top right side of the device page you will find the option to Isolate a device. If you can’t see that option check the ellipse (three dots). Select the ellipse to display the menu shown above. In that menu should be an option Isolate device, which you should select.

image

You’ll now see a dialog appear as shown above asking you to confirm that you wish to isolate the selected device. You also have the option here to allow Outlook, Teams and Skype for Business while device is isolated if desired. You’ll also need to enter a reason for isolating the device. When all that is done, select the Confirm button.

image

You should now see the action confirmed in the security console as shown above. You also have the ability to cancel this if needed here.

clip_image002

Almost immediately, the device being isolated will warn the current use that isolation is taking place and the network is disabled as shown above. At that point the user will no longer be able to navigate beyond their current machine (i.e. no browsing Internet or local LAN, no printing and no emails). More importantly, any other covert sessions will also be blocked preventing a security threat from spreading.

image

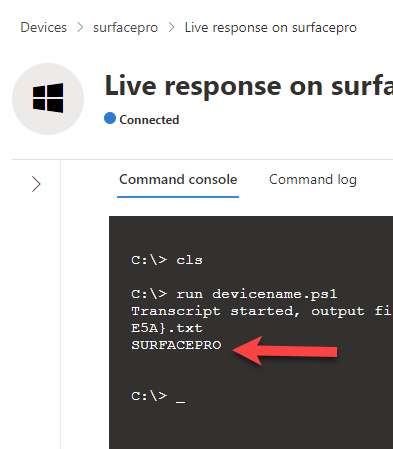
As an administrator you will however be able to launch a Live response session in the Defender console, as shown above, to triage the device and run PowerShell scripts if needed.

image

If you now look in the menu in the top right of this device when you have completed your work, you will see an option Release from isolation as shown above, for that device.

image

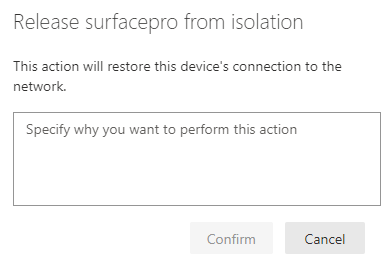
You will once again need to provide a reason why this device is being released from insolation and then select the Confirm button to complete the process.

image

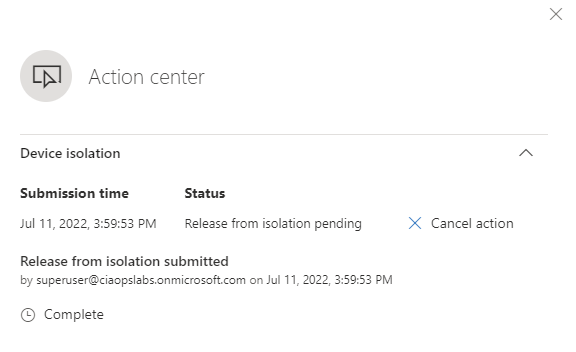
The Action center will appear again as the isolation is removed. You again, have the option to cancel this if you wish.

image

The history of the actions taken to isolate and release the device can be found in the Action center menu option under the Actions & submissions heading on the left in the Microsoft Security center.

Defender for Endpoint allow you to quickly and easily isolate a suspected device from all network connections but allow it to remain connected to the Defender console for remote troubleshooting. If you want to read more about this process then consult the Microsoft documentation here:

Isolate devices from the network

CIAOPS Need to Know Microsoft 365 Webinar – July

laptop-eyes-technology-computer

Join me for the free monthly CIAOPS Need to Know webinar. Along with all the Microsoft Cloud news we’ll be taking a look at how to work with files in Microsoft 365.

Shortly after registering you should receive an automated email from Microsoft Teams confirming your registration, including all the event details as well as a calendar invite.

You can register for the regular monthly webinar here:

July Webinar Registrations

(If you are having issues with the above link copy and paste – https://bit.ly/n2k2207 – into your browser or scan this QR code)

image

The details are:

CIAOPS Need to Know Webinar – July 2022
Friday 29th of July 2022
11.00am – 12.00am Sydney Time

All sessions are recorded and posted to the CIAOPS Academy.

The CIAOPS Need to Know Webinars are free to attend but if you want to receive the recording of the session you need to sign up as a CIAOPS patron which you can do here:

http://www.ciaopspatron.com

or purchase them individually at:

http://www.ciaopsacademy.com/

Also feel free at any stage to email me directly via director@ciaops.com with your webinar topic suggestions.

I’d also appreciate you sharing information about this webinar with anyone you feel may benefit from the session and I look forward to seeing you there.

Office desktop apps include Windows Explorer

A major stumbling block for many during the transformation process from on premises to Microsoft 365 is the desire for Windows Explorer. It is understandable that people want to maintain the status quo and their current work processes, however want many don’t appreciate is that Windows Explorer like capability is built right into Microsoft Office desktop applications.

image

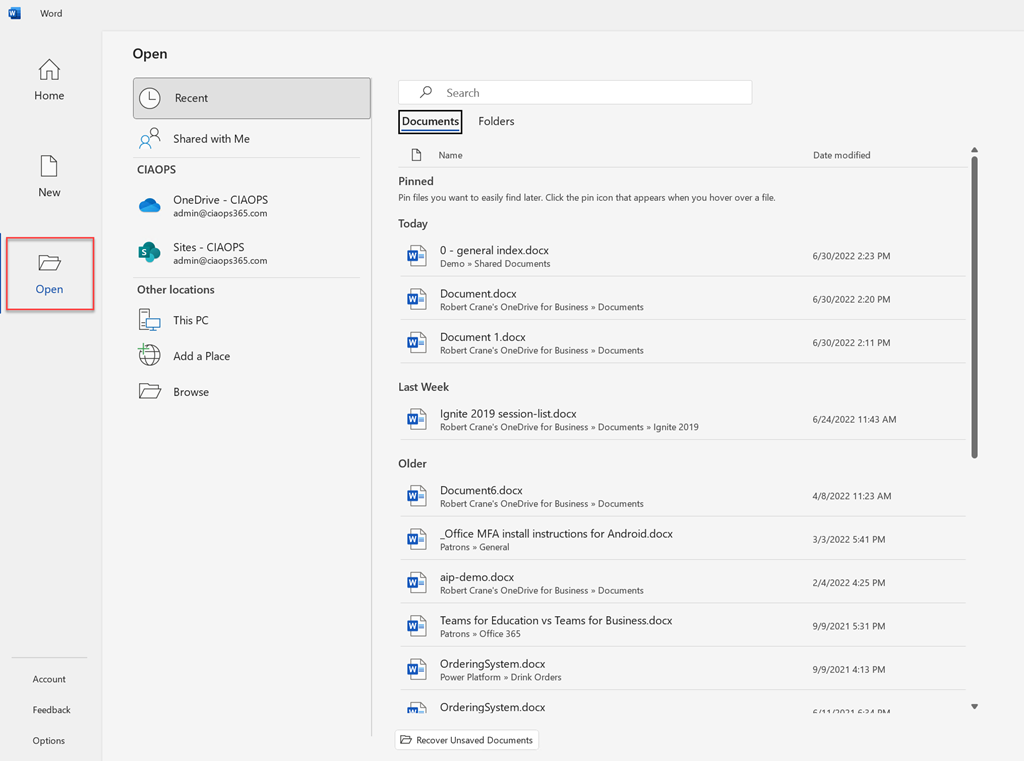
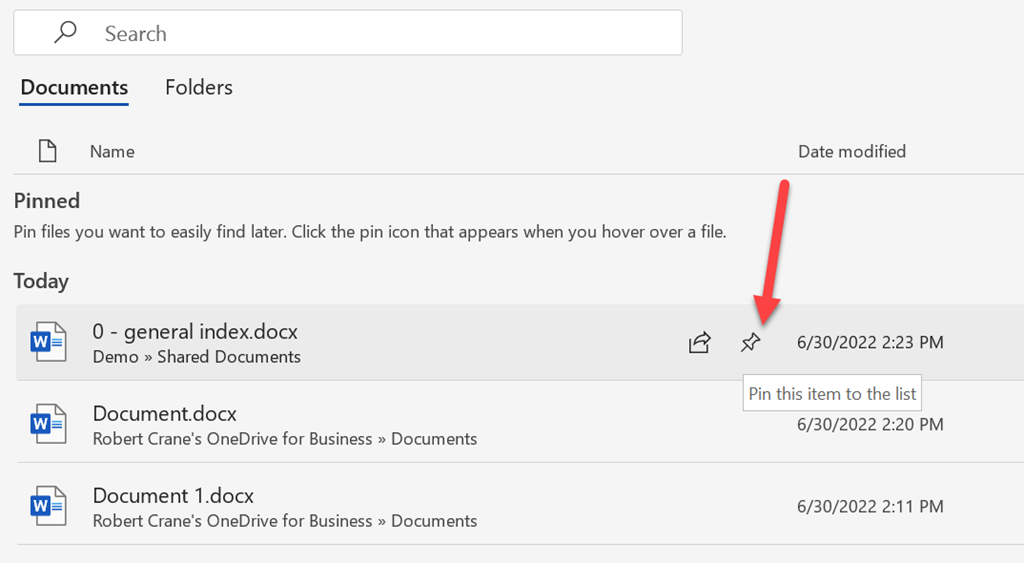
If we take a look a Word as an example, and then select Open from the menu on the left, we find an array of documents displayed that were recently opened as shown above. You’ll also notice that you can view recently accessed Folders from this same interface as well. There is even a Search option at the top of the page to help you locate items in this list.

image

You’ll see there is also the ability to ‘pin’ an item (file or folder) so that it will always appear as shown above.

image

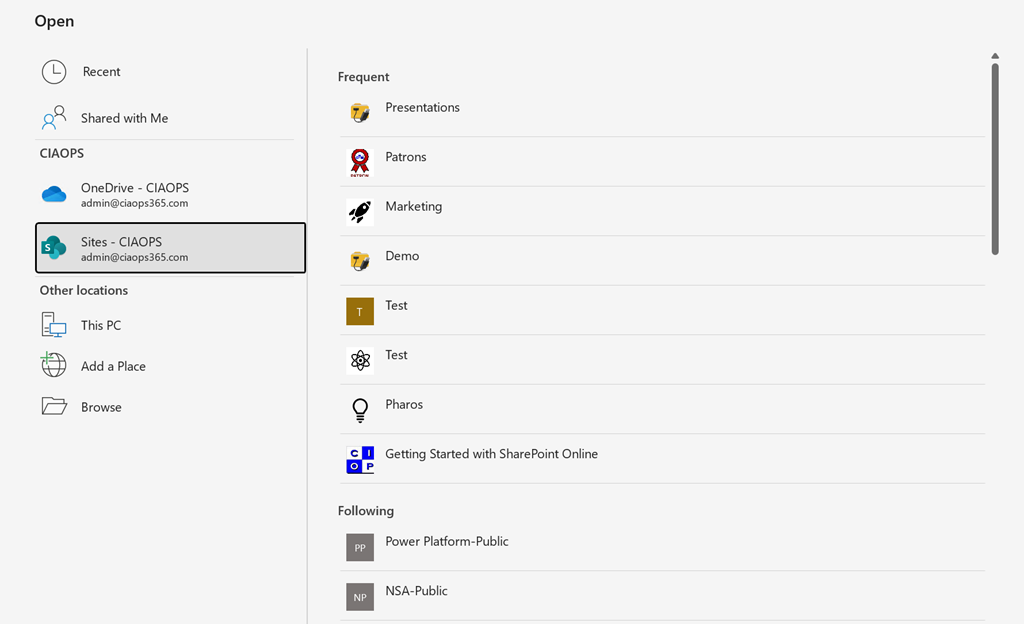
A little further down you will find the cloud storage locations you are connected to as shown above, which are typically associated with your Microsoft 365 environment. If I select SharePoint here, I will then see a list of my SharePoint sites on the right.

image

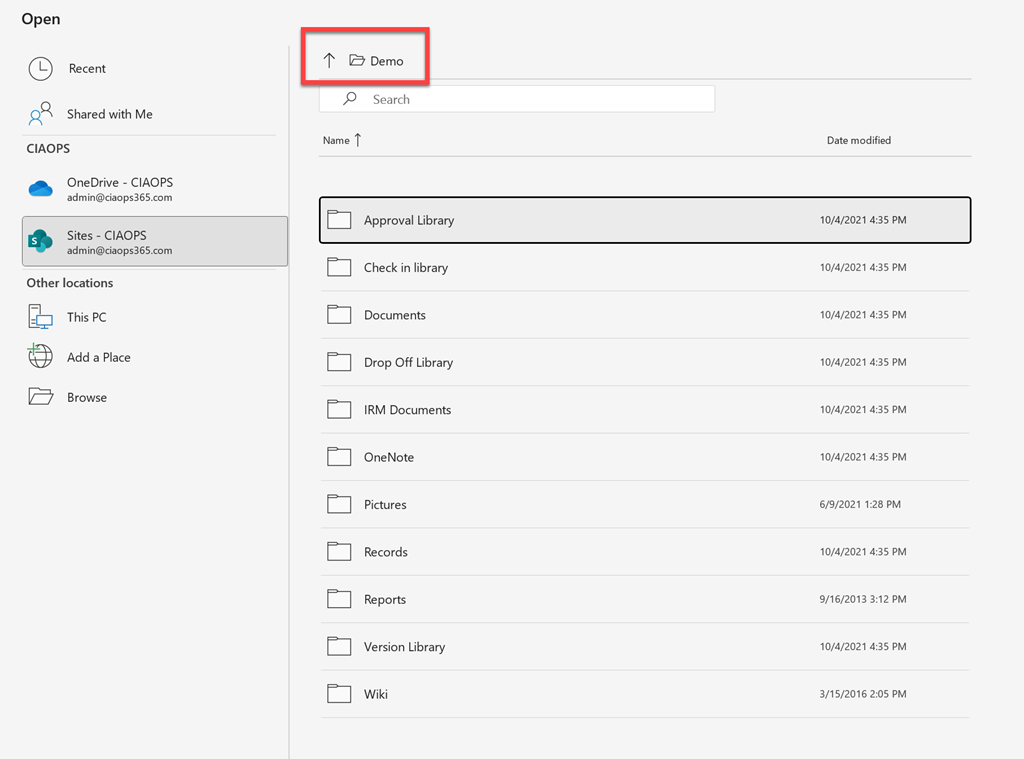
If I then drill into a site, I will see all the Document Libraries it contains. If then drill into a Document Library I will see all the files and folders within, just like you do when using Windows Explorer.
image

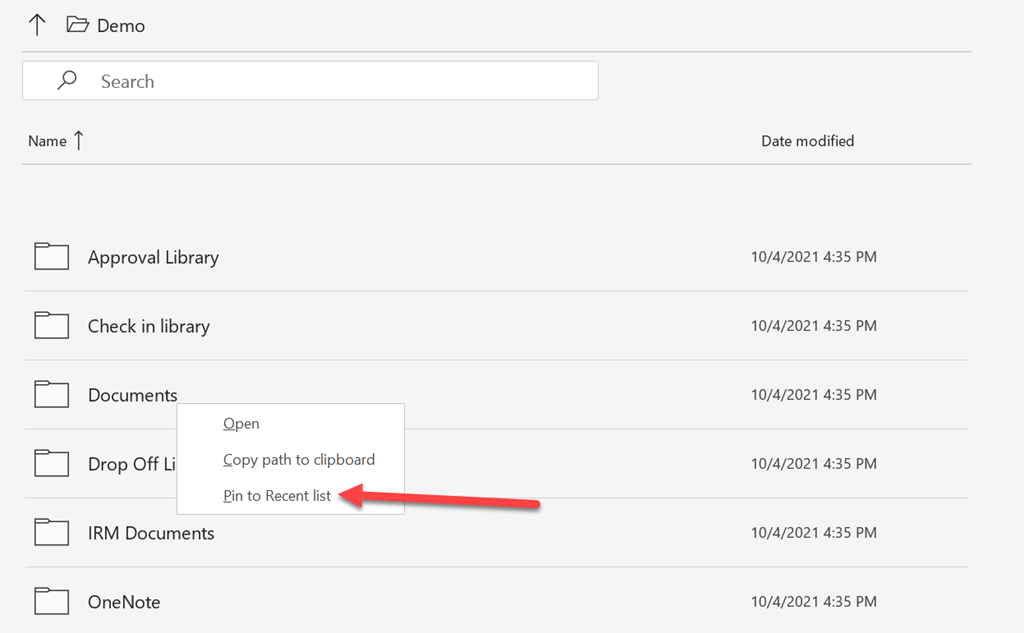
If I right click on something like a folder, you see from the above, that I again have the ability to Pin to Recent list. This makes it easy to navigate back to that location later. It is always a good idea to do this for those locations you need to get to regularly. 
I can move up and down the list of items as I could using Windows Explorer. This therefore, should be the familiarity that many are looking for when navigating file structures.

The file displays inside this application navigation are limited to files that can be opened or view by that application. For Word this would be things like DOC, DOCX, PDF, Text files and so on.

It would be nice if Microsoft (or anyone else) took this built-in Office desktop navigation and created a stand alone desktop application that could navigate all files at once. This would then be a direct replacement for the traditional version of Windows Explorer but for locations in Microsoft 365. How handy would that be?

As yet, I have not found an application that does this but hopefully some smart developer will look ate creating something as I reckon it would be a real winner. So, for the time being, remember that you do have a simplified version of the old familiar Windows Explorer built into Office desktop application that you can use to enhance your daily workflow with the common file types you work with in Microsoft 365.