Intune App Protection Policy blocking browser

image

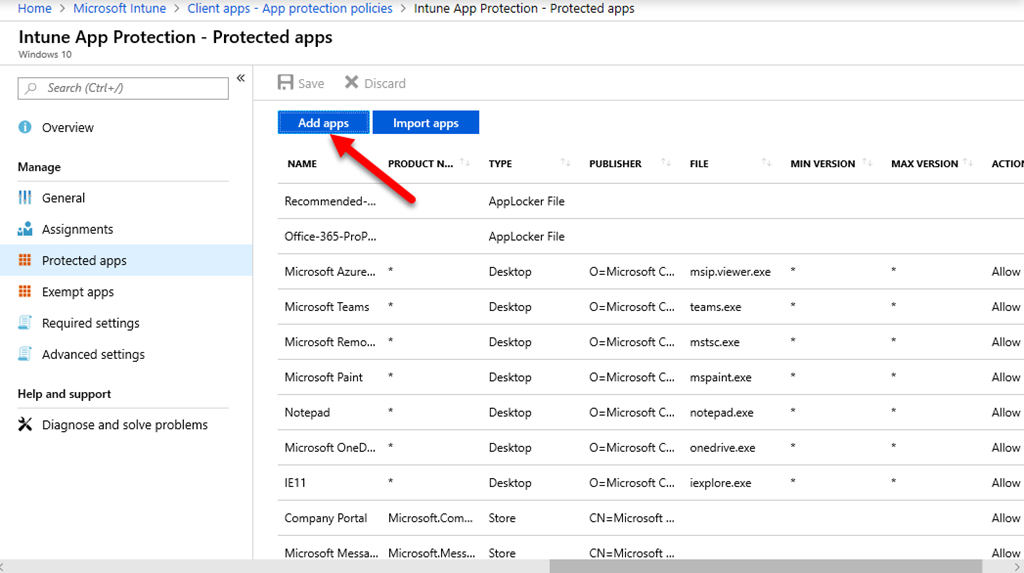
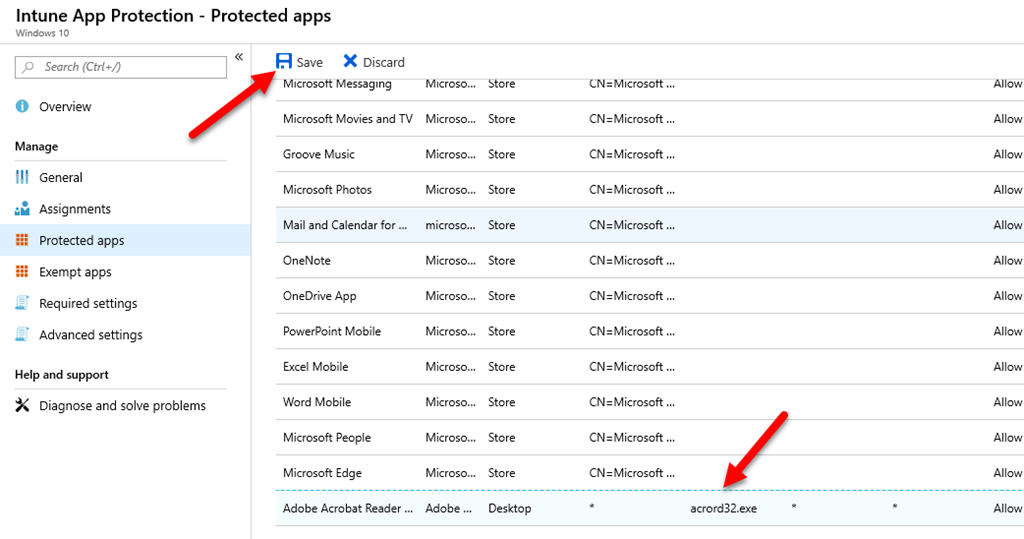
Within Intune I went and created a Windows 10 App Protection Policy.

image

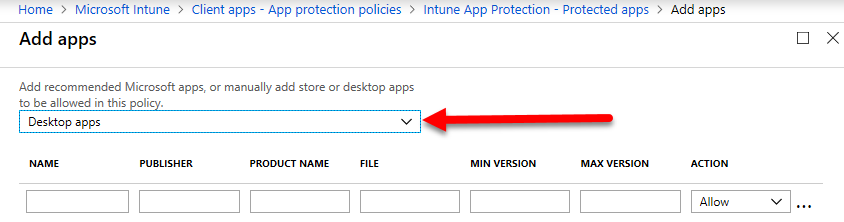
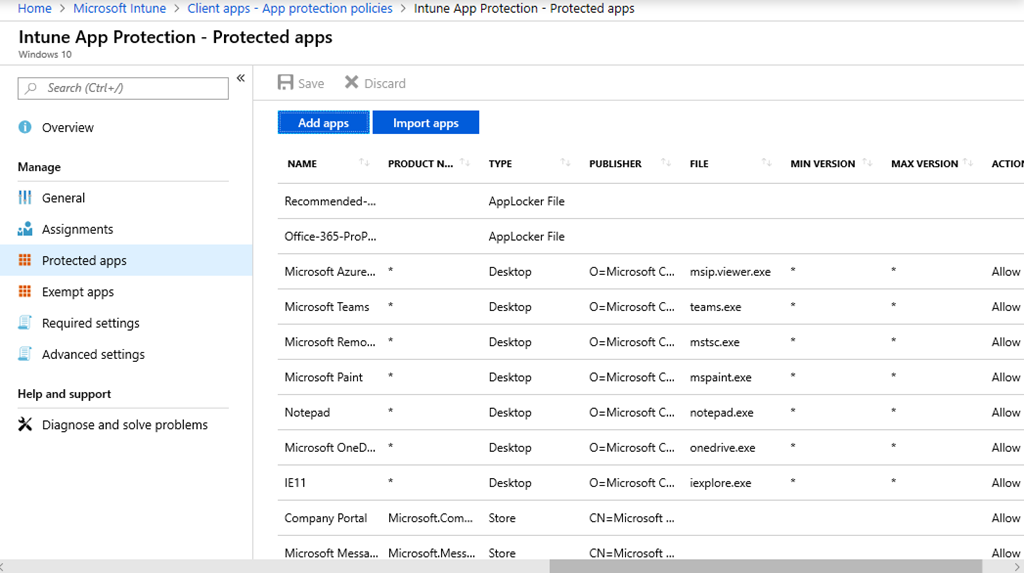
I defined my Protected apps as you see above.

image

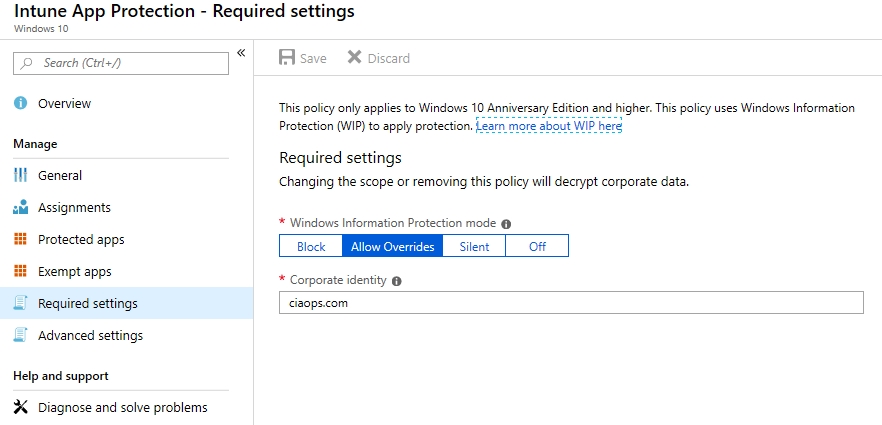
So the Required settings are as shown and utilise Windows Information protection (WIP). The idea is WIP is:

“Windows Information Protection (WIP), previously known as enterprise data protection (EDP), helps to protect against this potential data leakage without otherwise interfering with the employee experience. WIP also helps to protect enterprise apps and data against accidental data leak on enterprise-owned devices and personal devices that employees bring to work without requiring changes to your environment or other apps.”

according to Protect your enterprise data using Windows Information Protection (WIP).

After creating the policy I applied it to a test machine.

image

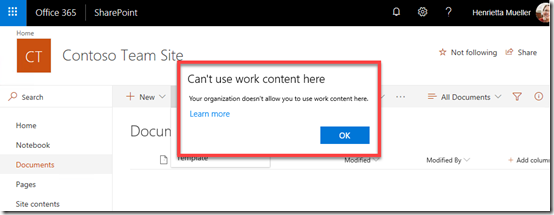
Most things worked as expected EXCEPT that I couldn’t use non-Microsoft browsers like Chrome! I kept getting a block message as shown above. if I removed the Application Protection policy then I could browse fine on non-Microsoft apps again. Clearly something to do with the policy was blocking Chrome browsing!

The root cause is the concept of enlightened apps in WIP.

“Windows Information Protection (WIP) classifies apps into two categories: enlightened and unenlightened. Enlighted apps can differentiate between corporate and personal data, correctly determining which to protect based on internal policies.”

from Unenlightended and enlightended app behavior while using Windows Information Protection (WIP).

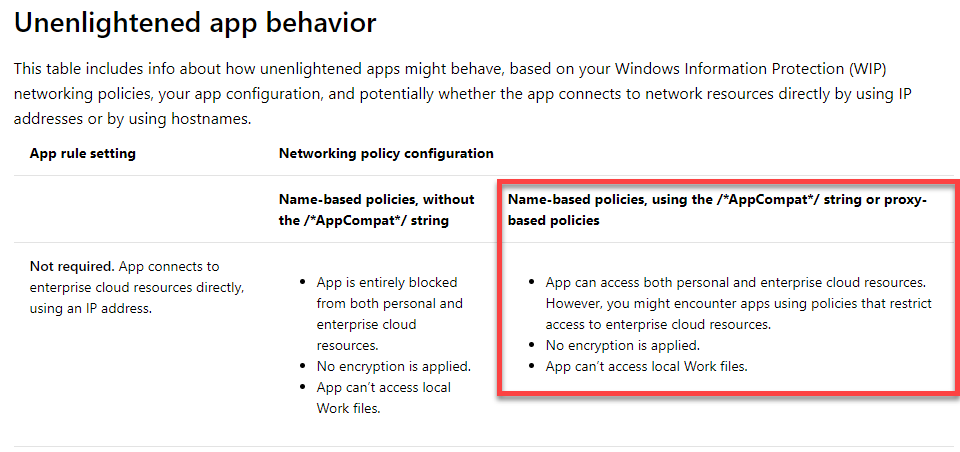
As it turns out, third party browsers like Chrome are considered unenlightened apps. If you read a little bit further down that article you find the following table:

image

This explains why Chrome (unenlightened app) is being blocked because it is trying to connect via an IP address effectively. Ok, so now we know why, how do we fix the problem?

image

Turns out the fix is in the last column as highlighted above. We need to use the /*AppCompat*/ string!

image

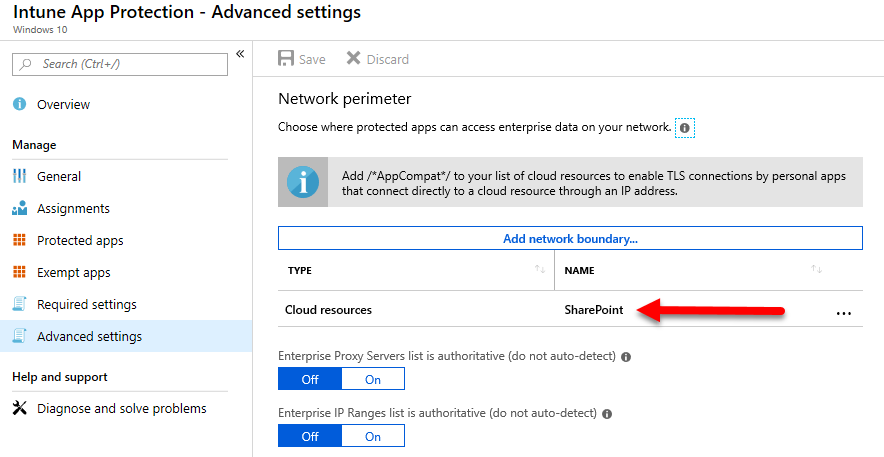
To do this navigate to Advanced settings from the menu on the left. Then select the entry you should have there called Cloud resources as shown above.

image

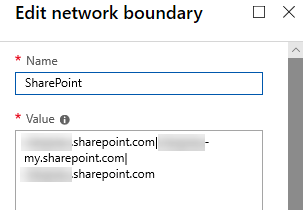
Here you should see your Microsoft 365 SharePoint and OneDrive sites as shown above.

image

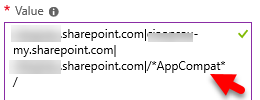
Add the string

|/*AppCompat*/

to the end of the line. Ensure the little green tick appears on the right hand side. Select OK to close that blade and the Save to update the Advanced settings page.

image

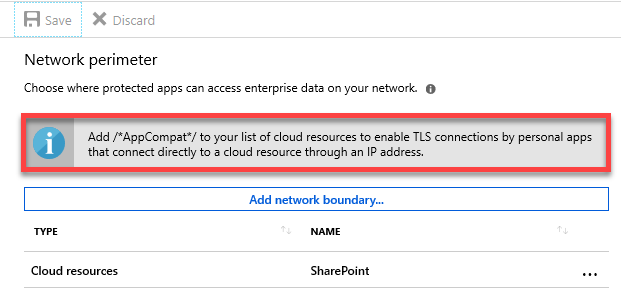
If you now look closely on the Advanced settings page you will see the above information box alerting you to the need for the /*AppCompat*/ string if you want TLS by personal apps that connect directly to cloud resources via an IP. You can consider a third party browser unenlightened and therefore a personal app. Thus, it is telling us to do what we just did to allow third party browsers to connect to the Internet on machines where the policy is applied. Always read the configuration page eh?

Once you have saved the updated App Protection Policy and it has been applied to the devices, you should no longer be blocked when using third party browsers like Chrome and Firefox.

Organization doesn’t allow you to use work content

image

Let’s say you have a bright and shiny Microsoft 365 Business tenant that you have configured out of the box. This means you have set up the default policies, assigned licenses and installed the software for users.

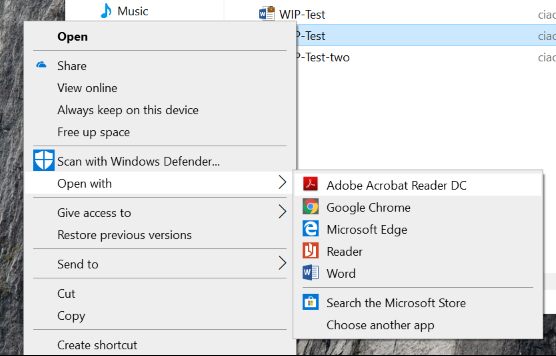
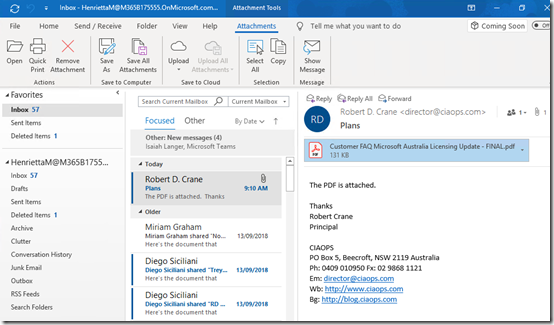
Your user now receives an email like the above with a PDF attachment. The system has Adobe Acrobat reader set as the default PDF reader.

image

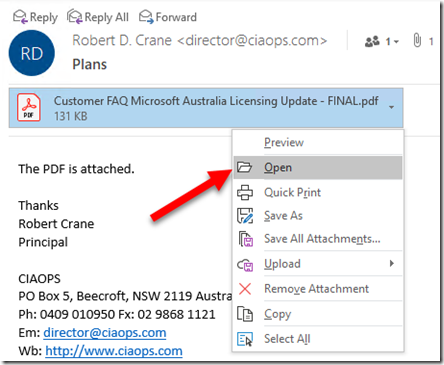
The user selects to open the attachment.

image

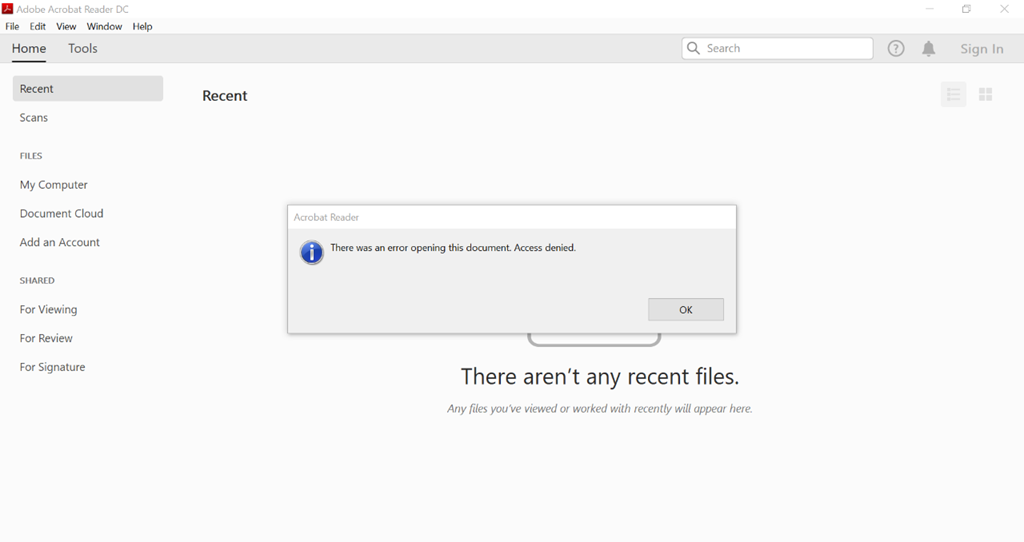
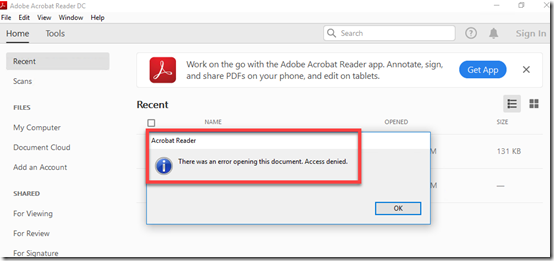
Adobe Acrobat launches as expected but you receive the above error:

There was an error opening this document. Access denied.

image

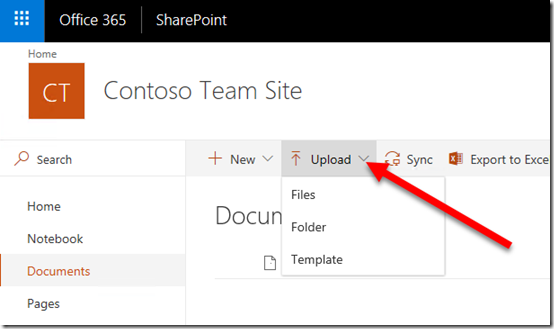
Instead, the user downloads the file to a local drive and then tries to upload it into a SharePoint Document Library as shown above.

image

They are greeted by another error:

Can’t use work content here.

Your organization doesn’t allow you to use work content here.

What’s going on? Why can’t users save files? In short, the reason is Windows Information Protection (AIP). You can read more about what WIP is here:

Protect your enterprise data using Windows Information Protection (WIP)

By default Microsoft 365 Business has WIP enabled. This means there is now a distinction between ‘corporate’ and ‘personal’ data. Corporate data is data that is created using pre-defined ‘corporate’ apps like Word, Excel, PowerPoint etc. Personal data is EVERYTHING else i.e. PDFs, files from network shares, local files. Why? Because these files were NOT created by the apps authorised by the WIP policy that has been enacted by Microsoft 365 Business.

Is there are correct way to se up WIP so you don’t get these hassles? Yes, there sure is but in this article let’s keep it simple and cover off how to disable WIP for the time being so users can get on with their work.

image

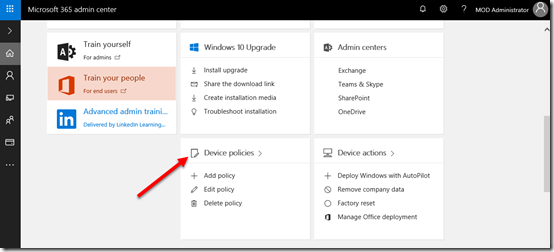
Locate the Microsoft 365 admin center and then select the Device Policies tile as shown above.

image

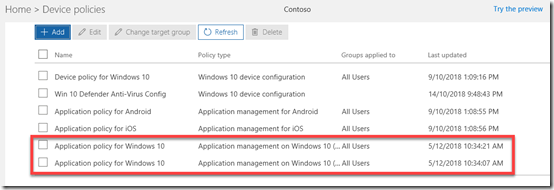
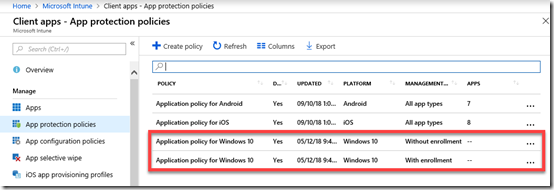
You should then see a list of policies as shown above. In this case, I have two Application Policies for Windows 10 (one for enrolled devices and another for non-enrolled devices).

If you have multiple Application Policies for Windows 10 you’ll need to take the following actions on each policy.

image

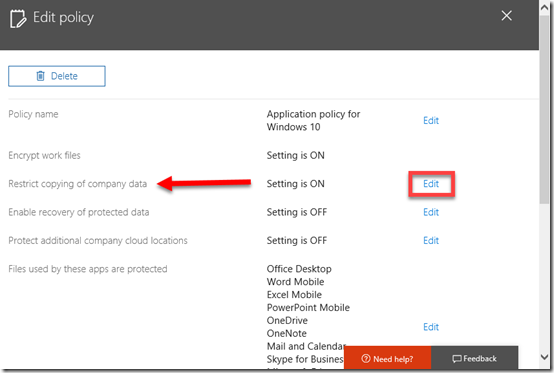
Select the policy to edit it. Details of the policy you select should appear on the right as shown above.

Locate the Restrict copying of company data line. Here you’ll see the Setting is ON, thus WIP is enabled. To change this setting, select the Edit hyperlink to the right as shown.

image

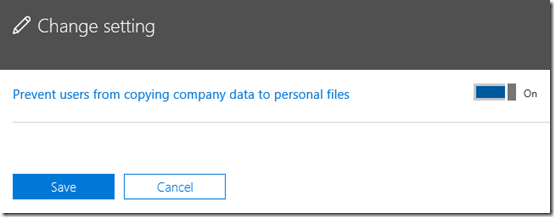
You should that that Prevent users from copying company data to personal files is ON as shown.

image

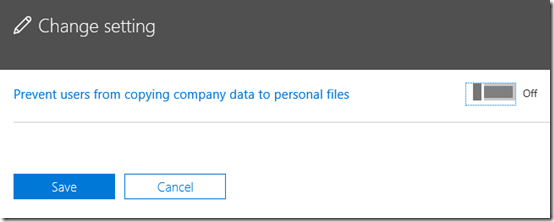
Change this setting to Off as shown and then select Save.

While you wait for that to sync to the Windows 10 desktops (which should only take a few moments) let’s go into the back end of Intune and see where this setting actually is.

image

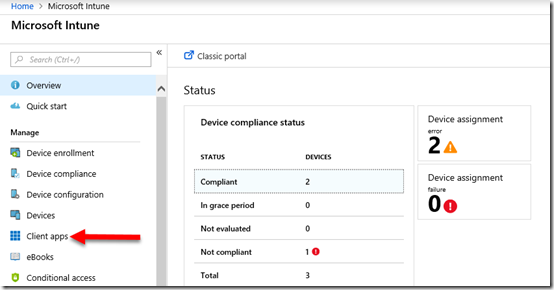
Navigate to Intune in the Azure portal and select Client apps from the main menu as shown above.

image

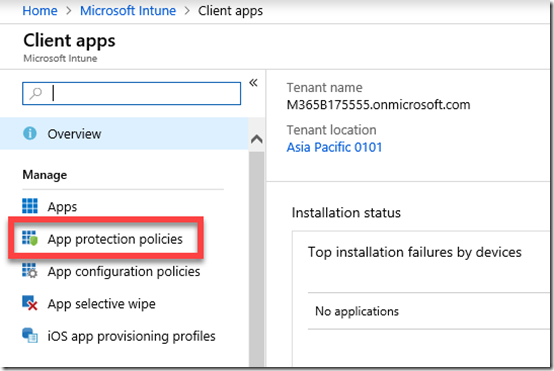
On the blade that appears, select App protection policies as shown.

image

This should display the application policies with the same names as you see in the Microsoft 365 admin center. Here are only application policies, device policies are elsewhere in Intune.

Select your Application policy for Windows 10.

image

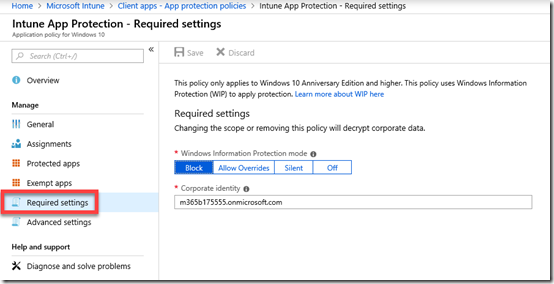
From the blade that appears select Required settings as shown. On the right will be displayed the state of Windows Information Protection.

If WIP is enabled, the option here will be Block.

image

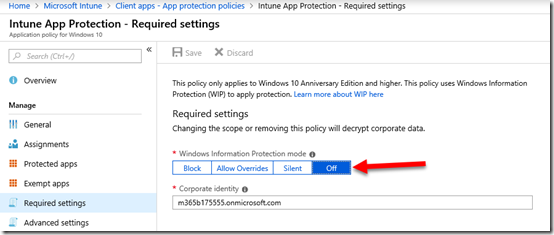
However, now you have changed the policy via the Microsoft 365 admin center the setting should be Off as shown above.

This confirms that WIP is now disabled in our environment.

image

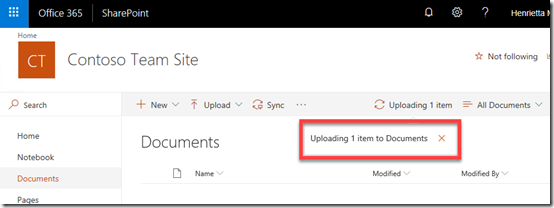
If you now return to SharePoint on the workstation, and assuming the policy has synced to the desktop, the upload of the file should work.

image

Along with everything else that was blocked, including viewing PDFs.

Thus, to overcome the WIP issues with Microsoft 365 Business out of the box, you will probably need to change the Application Policy for Windows 10  as shown above.

How do you correctly configure WIP for your environment to take advantage of all the protection it offers? Stay tuned for an upcoming article on just that.

Enrolling an iOS device into Intune

Before you can actually enrol an iOS device into Intune you typically need to complete the following preliminary steps:

Add an Apple management certificate to Intune

Set up an iOS Intune device compliance policy

Set up an iOS Intune device configuration policy

With all this done, you can now actually configure the device to be managed by Intune.

image

We’ll be using a newly wiped and configured iPhone as shown above in this walk through.

image

Note here, that this phone has both Facetime and the Safari browser on the device and available. After the device has been enrolled in Intune they will both be removed as part of the configuration policies that gets applied.

image

To do Mobile Device Management (MDM) for the device with Intune the user will need to download the Company Portal app and then run it.

image

There will be a prompt for a user login. This will be the user’s Office 365 credentials typically.

image

The device will also need to be connected to the Internet so it can verify these credentials and continue.

image

The user will now be prompted to put the device under management by selecting the Begin as shown above.

image

The user will then receive notification about what putting a device under management will mean as seen above.

In this scenario, we are assuming it is a bring your own device (BYOD).

image

The user will be given further instructions and then be required to press the Continue button.

image

The process will now try and open the Microsoft Intune portal in a browser. The user will need to select Allow to continue.

image

They will now be taken to a screen and prompted to install a new management profile by selecting the Install button in the top right.

This profile is the one that will be controlled by Intune and provide security over company data on this device.

image

The user will need to select Install again to continue.

image

They will then receive a warning about a third party certificate being installed as shown. This a certificate from Intune so the user should select Install in the top right to continue.

image

The user will be prompted to confirm that they wish their phone to be enabled for remote management.

They should select Trust to continue.

image

The management profile will complete installation. To finish this process select Done in the top right corner.

image

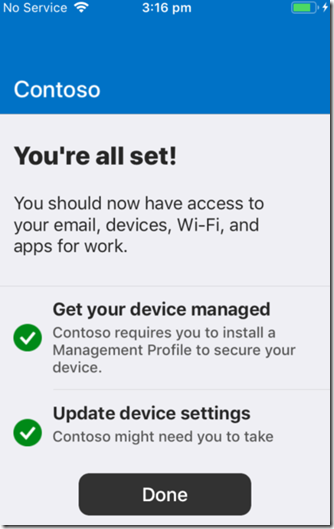
The user will be taken back to the Intune Company Portal app, where they will be prompted to continue. They should also now see that the device is now managed.

Select the Continue option.

image

The device settings will be checked. This is effectively running the compliance policy from Intune over the device to ensure it can be enrolled and meets the requirements to be considered to have the appropriate settings enabled and configured.

image

The process should complete without warnings or errors. This then indicates that the device is compliant and now has the configuration policies applied to it from Intune.

Select Done to continue.

image

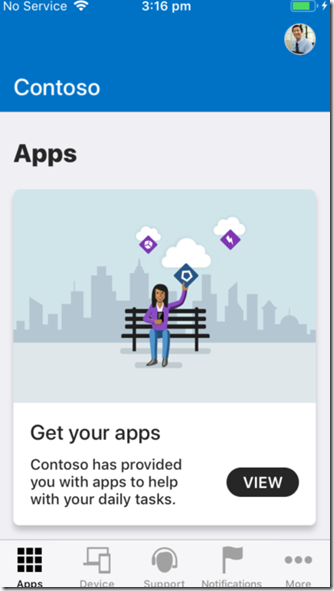
The user will now see the Apps menu of the Company Portal app as shown above. They can return and use some of the other functionality in the app at any time but for now, simply close the app.

image

If you now look closely at the home page of the enrolled device now above, you will see, per the Intune Configuration policies that have been applied, both Facetime and Safari are no longer available on the device.

image

If an administrator now looks in the Intune portal they will see the device that has just been enrolled.

Select it to get more details.

image

They should see a summary of the device as well as a number of controls for the device across the top on the right.

image

If they select the Device compliance option from the menu on the left they will see the compliance policies that have been applied to the device and their state.

image

If they select Device configuration, they’ll see all the configuration policies that have been applied to this device and their current state.

You can select any of these policies on the right to get more information.

image

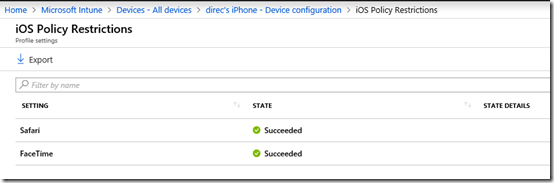
When you do you’ll see all the settings that have been applied as part of that policy. Here, you’ll see the policies for Facetime and Safari have been successfully applied (i.e. to be made unavailable on the device).

So, that’s how you put an iOS device under management using Intune. Doing so give you greater control over what is done on the and also the ability to do things like remotely wipe that device if required. A future article will show you how these management task can be accomplished on the the device.

Setting up an iOS Intune device configuration policy

Before you set up any iOS device configuration policy in Intune it is best practice to ensure:

You have added an Apple management certificate to Intune

and

You have set up an iOS Intune device compliance policy

with those two tasks complete you can now create an iOS device configuration policy. A configuration policy applies settings and configurations to the iOS device joined to this environment.

image

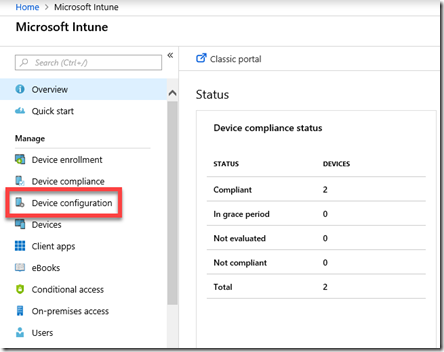
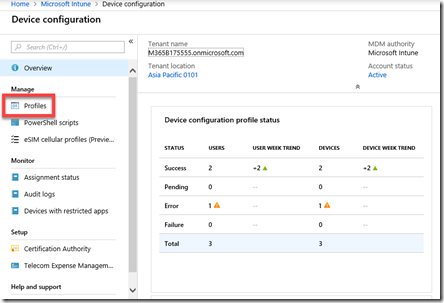
Open the Azure portal as an administrator and navigate to Intune. From the menu that appears on the left select Device configuration as shown above.

image

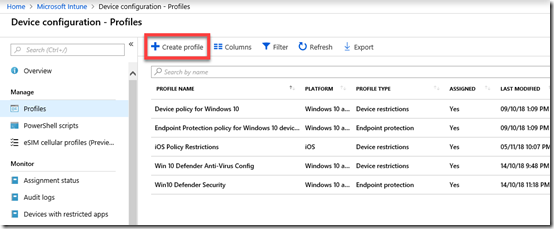
Next select Profiles from the menu on the left as shown above.

image

Here you will see any profiles that already exist. To create a new policy simply select Create policy from the menu bar across the top as shown.

image

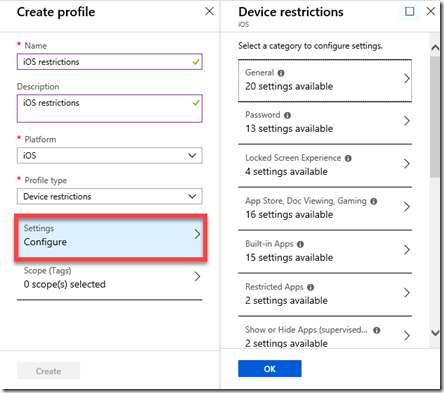
Gove the policy a Name and Description. Select iOS as the platform.

image

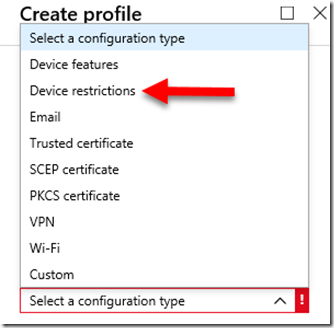
You’ll see that there are lots of different configuration types you can select to create configuration policies for. In this case we’ll select Device restrictions as an example of how to configure a policy, but remember there at least 9 options here you need to consider.

Remember, you can have multiple policies if you desire as well a number of the different configuration type policies if you want.

image

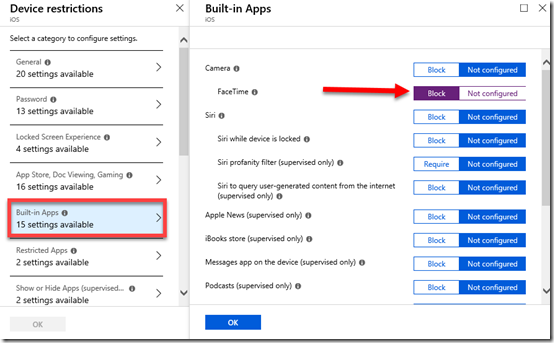
If you now select Settings towards the bottom of the window as shown above, you will see the numerous range of configuration options you can set for devices.

image

In this case I’ll simply illustrate changing one setting by selecting Built-in Apps and then Blocking Facetime as shown above.

Make sure you select OK at the bottom of any screen on which you make changes.

image

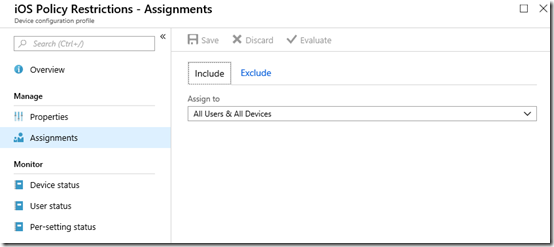
The final step once you have made all your selections and Saved the policy, is to assign the policy. Here I have assigned it to All Users & Devices as shown.

image

You can revisit and make changes to your policy at any time by navigating to it and selecting it.

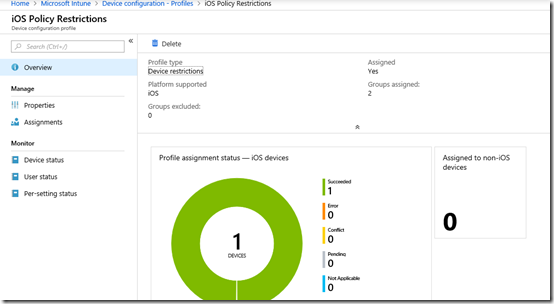
The options at the bottom of the menu on the left above: Device status, User Status and Per-setting status will again give you a summary of how this policy has been applied to devices.

Once we have all this in place we can now start joining actual devices to this environment so they can be manged. When we do that, they will be checked against the compliance policy and then have any configuration policies applied.

I’ll cover the process of adding devices to this environment in an upcoming article.

Setting up an iOS Intune device compliance policy

Once you have added an Apple certificate to allow device management for iOS as I have detailed previously here:

Adding an Apple Certificate to Intune

the next step in the process to get your iOS device managed is to create a specific iOS compliance policy in Intune.

A compliance policy is basically a set of rules that the device must follow to be considered compliant. If the device fails these rules then it is considered noncompliant and you are able to take action on that such as excluding it from connecting to your corporate data. Compliance for all devices is checked regularly.

image

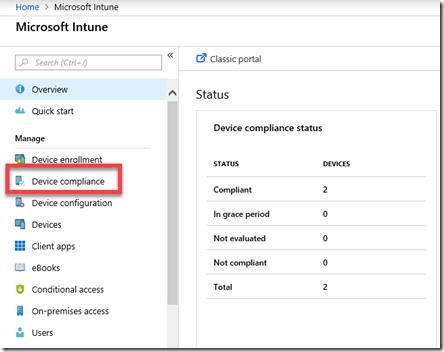
To create this compliance policy you’ll need to login to the Azure portal and navigate to the Intune service. Once there, you’ll find an option in the menu Device Compliance as shown above, that you’ll need to select.

image

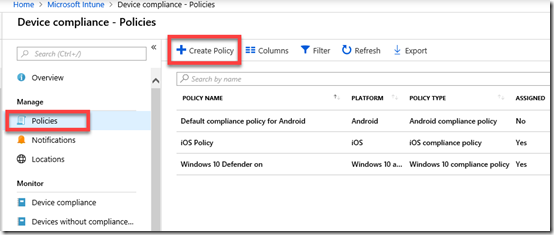
You’ll then need to select Policies on the left and the Create Policy option from the menu on the right that appears as shown above.

You may also see number of other existing policies here for different platforms. Note, that it is possible to have multiple compliance policies for the same platform if desired.

image

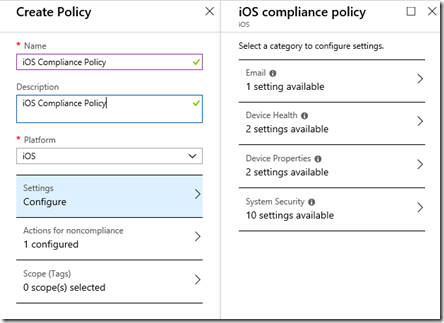
You’ll now need to give the new iOS compliance policy a Name, Description and select the Platform as iOS as shown above.

You’ll then need to select the Settings option below this to configure compliance rules. When you do so another blade will appear on the right with four categories: Email, Device Health, Device Properties and System Security as shown above.

image

You can configure as many options as you like here but I’m going to cover what I consider the basics for iOS compliance.

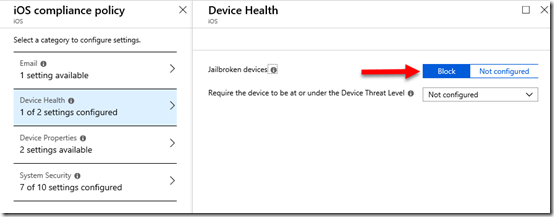
In Device Health, set Jailbroken devices to Block as shown above.

image

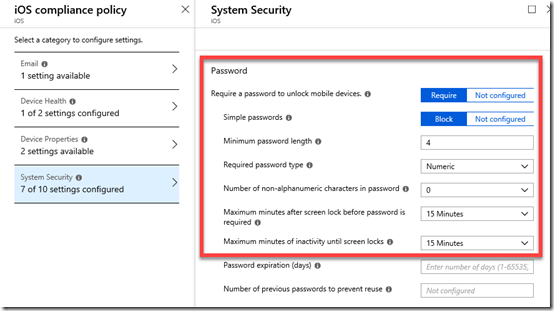
In System Security set the Password options as shown above.

Make sure you select OK at the bottom of each setting to update your preferences.

image

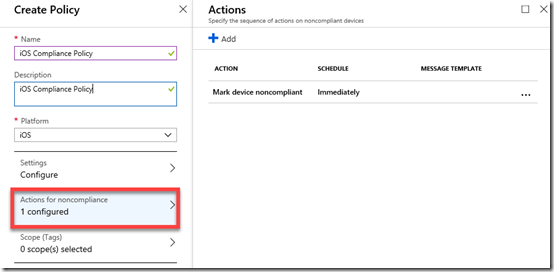
If you go into the Actions for noncompliance you’ll see there is currently a default option to Mark device noncompliant.

image

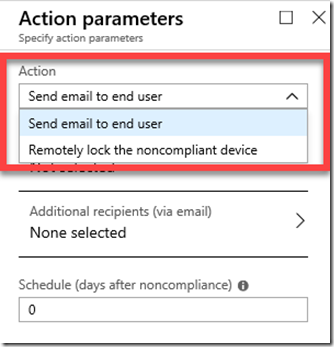
You can add more actions here, to Send email to end user and/or Remotely lock the noncompliant device if you wish.

When you have finished making your change, ensure that you Save the policy.

image

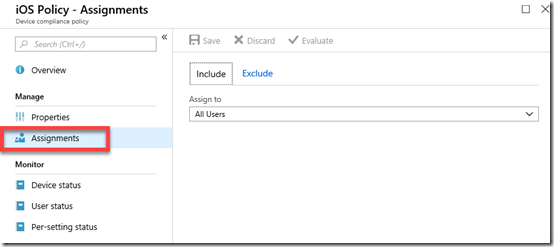
Now that the new iOS compliance policy has been created you’ll need to apply that policy to a group of users. To do this, select the policy you just created from the list of compliance policies. Then select the Assignments option from the menu on the left.

It is probably easiest to apply this new policy to all users but you can certainly select a group of users as well as exclude user if you wish.

Once again, when you have made you selection, ensure you Save any changes to have the policy applied to these users.

image

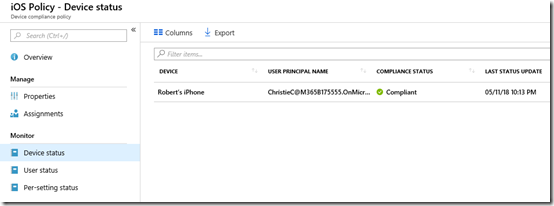
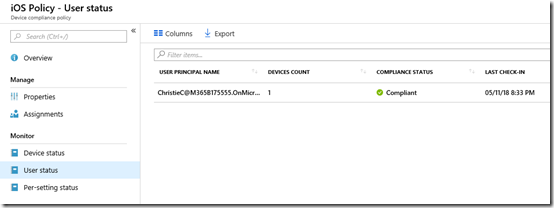
When devices connect to the tenant, they will be evaluated to be compliant or not. When this occurs, you can again examine the options at the bottom of the policy to see the device status as shown above. This will tell you whether connected devices are compliant (here they are).

image

You can also get the status by user, because remember, some users may have multiple devices.

image

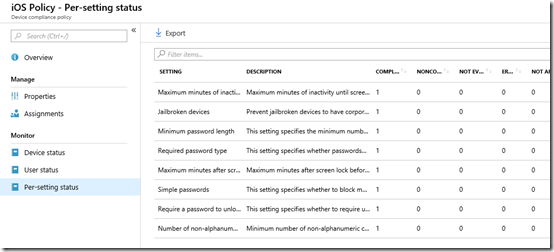
Finally, you can also examine the per-setting status. This is handy if a device has failed compliance and you want to know exactly what setting(s) have caused this failure.

image

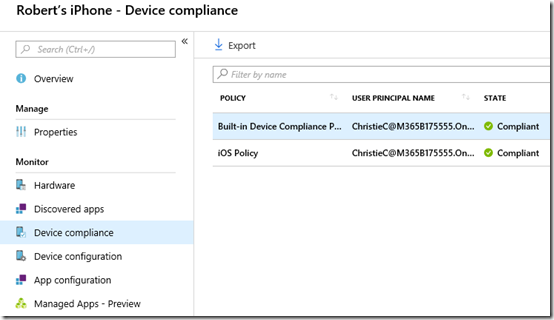
You can also see the compliance by examining the individual device in Intune as shown above.

You’ll see here that there is in fact a default compliance policy as well as any your have created.

Selecting the Built-in Device Compliance Policy will show you its settings like so:

image

Basically, the Built-in Compliance Policy simply checks whether device is active, the user exists in the tenant and another compliance policy has been assigned. Thus, the device won’t be considered compliant by default until we create at least one compliant policy for the platform.

image

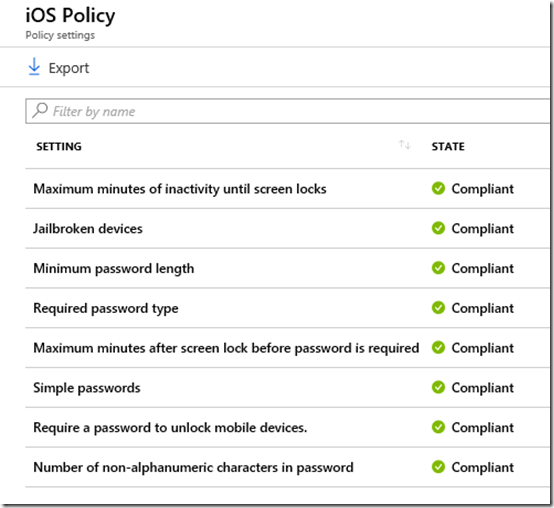
If you instead select any of the custom compliance policies that you created you will see whether each individual setting is considered compliant in that policy as shown above.

So, creating a device compliance policy is important when we wish to use Intune to manage devices. You need to create a compliance policy for each platform with the settings against which devices will be continually checked. This will ensure that devices connecting to your environment maintain the settings you desire.

The next step will be setting up device configuration policies to actually configure how the device operates. That will be covered in an upcoming article.

Adding an Apple Certificate to Intune

When you use Intune to manage your Apple devices you’ll need to add a push certification to allow control of the device. If you don’t do this, then you’ll get error messages about failing to join when you try and enrol the device using the Intune Company Portal App on the device.

image

To add a management certificate you’ll firstly need to login to the Azure portal as an administrator. You’ll then need to navigate to Intune.

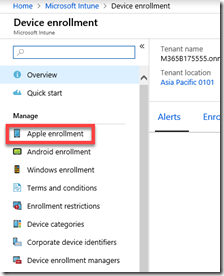
Once there, select Device enrollment from the menu.

image

Next select Apple enrollment from the new menu that appears.

image

When you do this a new window should appear on the right. Select the top option, Apple MDM Push certificate.

image

You will see the enrolment status at the top of the page. If this is a new tenant, the status will show Not set up as shown above.

image

Scroll down the windows to commence the set up process.

Place a check in the I agree box in section 1.

Then select Download your CSR from section 2.

image

Save this certificate file on your local machine. Make a note of this location as you’ll need to upload it soon.

image

Scroll down to section 3 and select the hyperlink Create your MDM push Certificate.

image

This will open a new browser window and ask you to login using an Apple ID. if you don’t have one of these yet, you’ll need to create one. If you are doing this on behalf of a company it is best practice to use an Apple ID that is linked to the business rather than the individual.

image

Once you have logged in, you’ll see any certificates that you have already created.

Select the Create Certificate button in the top right.

image

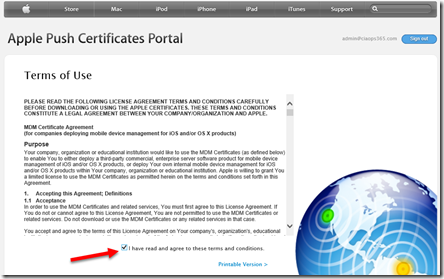
Accept the terms and conditions.

image

Browse to the location where you downloaded the certificate file from Intune previously. Select the file. Then select the Upload button.

image

In a moment you should now see that a new certificate has been created for you. It is important to note that certificate last for 12 months, after which time it will be required to be replaced or renewed.

Select the Download button to copy the new Apple management certificate to your machine.

image

Save this Apple management certificate on your local machine and remember where it is located.

image

Return to the Azure portal and the setup in Intune.

In section 4 enter the Apple ID that you used when you created the certificate.

In section 5 browse to the Apple management certificate you just downloaded.

When complete, select the Upload button at the bottom of the page.

image

In a few moments you see a message from the Azure portal indicating that the certificate has been successfully uploaded.

image

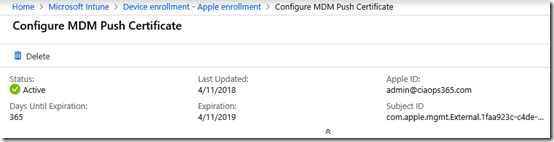
If you now scroll to the top of the page in Azure you should see that the status is now Active as shown above.

You have now successfully uploaded and configured an Apple management certificate into Intune. You can now proceed to enrol your Apple devices into Intune management. Just remember, that this certificate is valid for 12 months, after which time you’ll need to renew it.

Windows Autopilot Deployment heading to Azure portal

image

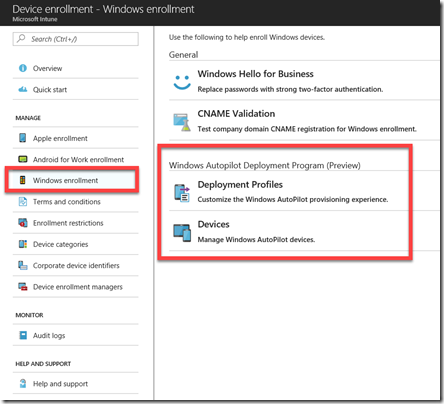
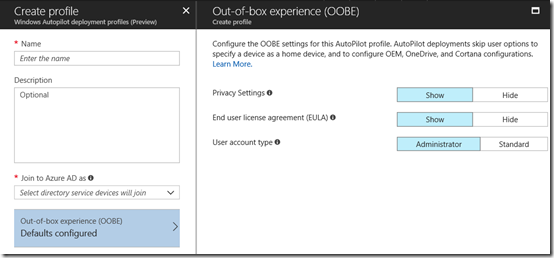
If you go to Intune in the Azure Portal, then select Device enrollment, then Windows enrollment, you see some new options for Windows Autopilot deployment as shown above.

If you need a refresher on where the settings where originally check out my previous article:

Introduction to Windows Autopilot

image

The above is what the deployment profiles option look like when you go there.

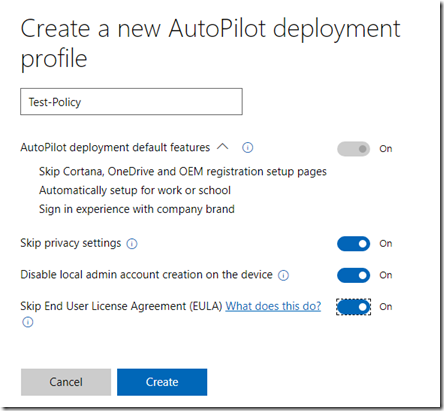
Here’s what it looks like in the original Business portal.

image

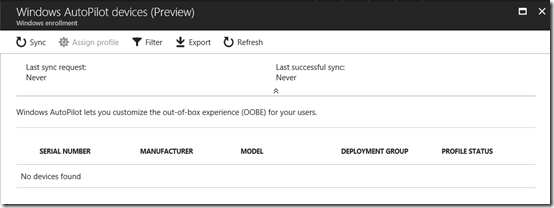
There isn’t a place to upload the machine identification file as yet in Azure as you can see here:

image

However, I would assume that it is coming.

So, keep your eyes posted to the Azure portal for more additions for Windows Autopilot.

Adding Apple MDM push certificate to Intune

When you start using Intune with services like Microsoft 365 Enterprise or stand alone you’ll need to add an Apple MDM push certificate to allow iOS devices to be managed by Intune. If you don’t, you’ll get errors when you try and add these devices.

Here’s how you create and add an Apple certificate to Intune.

clip_image001

When you initially go into Intune via the Azure portal you’ll need to set the Mobile Device Management Authority as shown above. Simply select the option for Intune MDM Authority and the Choose button to save the choice.

clip_image001[6]

In the list of Intune options, under the Manage heading, select Device enrollment.

clip_image001[8]

From the blade that appears, select Apple enrollment from the menu and the right side will then show a number of boxes.

clip_image001[10]

Select the box in the top left that should have the heading Apple MDM Push Certificate.

clip_image001[12]

Another blade will open. Under Step 1, select the Download your CSR hyperlink.

This will prompt you to save a file called IntuneCSR.csr to your computer.

clip_image001[14]

In Step 2, select the hyperlink Create your own MDM push certificate.

image

This will open a new tab in your browser and take you to the above Apple site. You’ll need to have or create an Apple ID to login here.

clip_image001[16]

You’ll need to accept the Terms of Use.

clip_image001[18]

You’ll need to create a new certificate. To do so, select the option to Browse at the bottom of the window as shown above.

Navigate to the certificate file you downloaded from the Intune portal previously.

Then select Upload.

clip_image001[20]

Next, select to Download the certificate created by the Apple site.

clip_image001[22]

Return to the Intune portal and insert the Apple ID you used to create the certificate in Step 3.

In Step 4, upload the Apple certificate.

When complete, select the Upload button at the bottom of the page.

clip_image001[24]

When you now look at the Intune portal the Apple MDM Push Certificates should now show a green tick, as shown above. This will now allow you to place iOS devices under Intune management.

image