Disabling Office Macros via ASR to Meet Essential Eight Requirements

Using M365 Business Premium

The Essential Eight Mitigation Strategy #3 – Configure Microsoft Office Macro Settings requires organizations to disable Office macros by default for users without a demonstrated business need.1In cloud-only environments using Microsoft 365 Business Premium and Microsoft Intune, this can be achieved through multiple complementary approaches: 

  1. Configuration Profiles (Settings Catalog or Imported Administrative Templates) 
  1. Attack Surface Reduction (ASR) Rules 
  1. Microsoft Defender for Endpoint capabilities (included in Business Premium) 

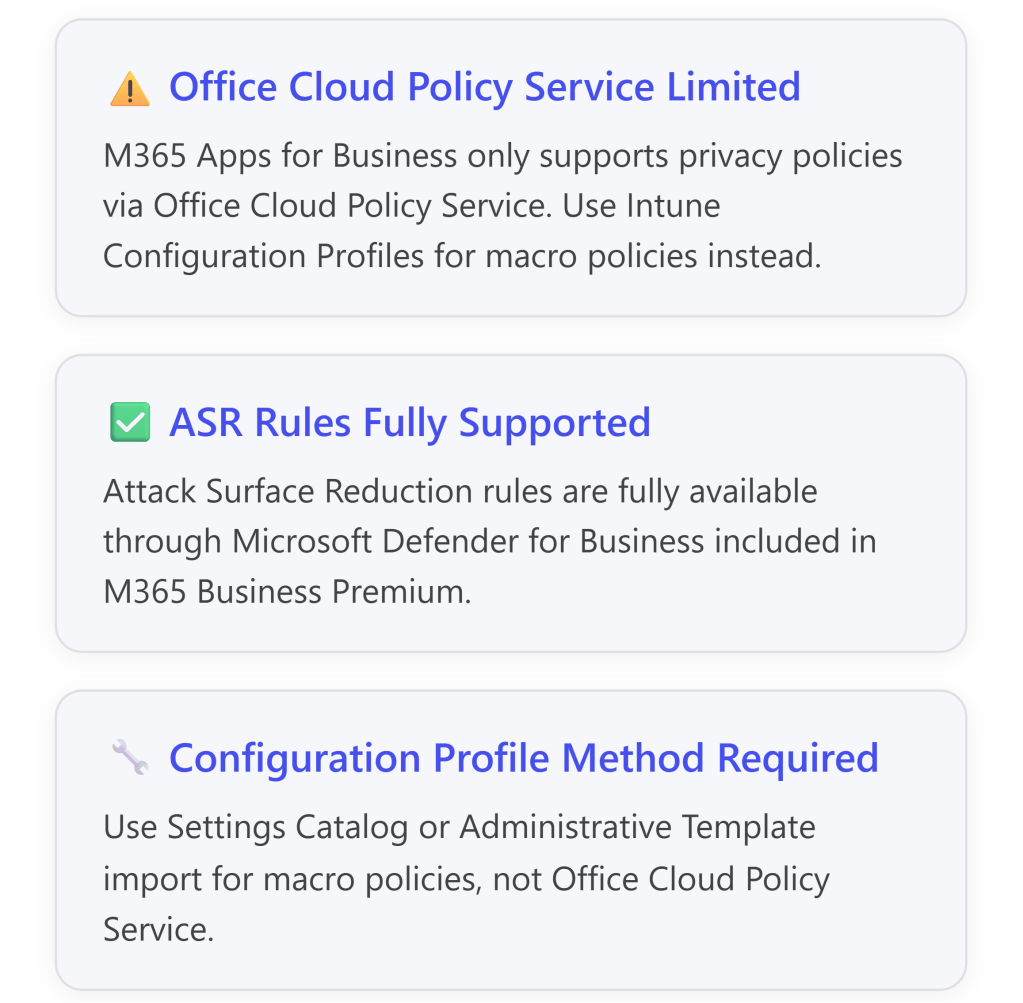
However, there is an important limitation: Microsoft 365 Business Premium includes Microsoft 365 Apps for Business, which has limited support for the Office Cloud Policy Service—only privacy-related policies are supported.2For full macro control policies, you must use Configuration Profiles in Intune instead.3 


Understanding Essential Eight Macro Security Requirements 

Essential Eight Maturity Level Requirements 

The Australian Cyber Security Centre (ACSC) Essential Eight framework defines specific controls for Microsoft Office macro security:4 

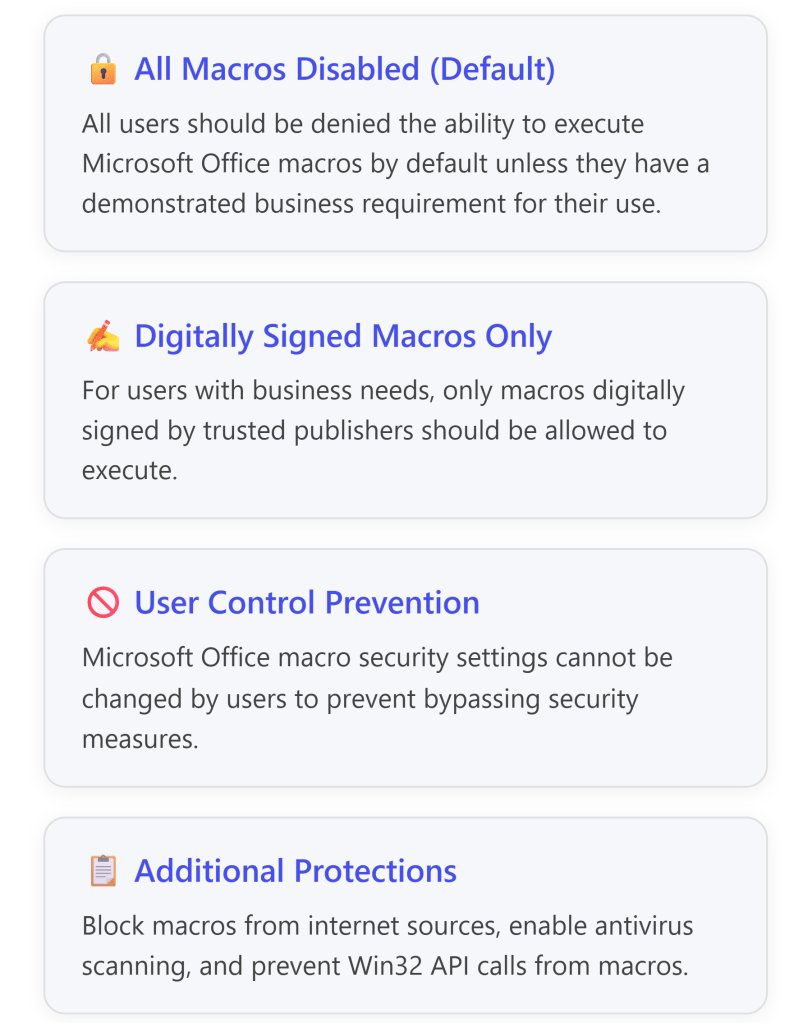
Key ISM Controls (March 2025) 

The Essential Eight implementation addresses multiple Information Security Manual (ISM) controls:5 

ISM Control Requirement Implementation Method 
ISM-1671 Macros disabled for users without business requirement Configure “Disable VBA for Office applications” policy 
ISM-1488 Block macros from internet sources Enable “Block macros from running in Office files from the internet” 
ISM-1675 Disable Trust Bar for unsigned macros Configure “Disable Trust Bar Notification for unsigned applications” 
ISM-1672 Enable macro antivirus scanning Set “Macro Runtime Scan Scope” to “Enable for all documents” 
ISM-1673 Block Win32 API calls from macros Deploy ASR rule 92E97FA1-2EDF-4476-BDD6-9DD0B4DDDC7B 
ISM-1489 Prevent users from changing macro settings Deploy policies via Intune (users cannot modify) 

Microsoft 365 Business Premium Capabilities for Macro Control 

What’s Included in Business Premium 

Microsoft 365 Business Premium includes: 

  • Microsoft Intune for device management 
  • Microsoft Defender for Business (includes Attack Surface Reduction) 
  • Microsoft 365 Apps for Business (desktop applications) 

Important Licensing Limitations 

⚠️ Critical Consideration: The Office Cloud Policy Service (config.office.com) has limited functionality with Microsoft 365 Apps for Business: 

  • Only privacy control policies are supported6 
  • Full macro security policies are NOT supported via Office Cloud Policy Service for Business licenses7 
  • You must use Intune Configuration Profiles (Settings Catalog or Administrative Templates) instead 

For full Office Cloud Policy Service support, you would need Microsoft 365 Apps for Enterprise licenses.8 


Implementation Approach: Configuration Profiles in Intune 

Method 1: Import Pre-Built ACSC Hardening Policy (Recommended) 

Microsoft provides pre-built configuration profiles aligned with ACSC guidance. This is the fastest and most reliable method for Essential Eight compliance. 

Step-by-Step: Import ACSC Office Hardening Policy 

Detailed Steps:9 

  1. Create Target User Group 
  • Create an Azure AD security group for “All Office Users” 
  • This group will receive Office apps and hardening policies 
  1. Download ACSC Policy Template 
  • Download the ACSC Office Hardening Guidelines JSON file10 
  1. Import to Intune 
  • Sign in to Microsoft Intune admin center: https://intune.microsoft.com[^1] 
  • Navigate to: Devices > Windows > Configuration profiles > Create 
  • Select: Import Policy 
  • Name: “ACSC Office Hardening – All Macros Disabled” 
  • Browse for the downloaded JSON file 
  • Click Save11 
  1. Import OLE Prevention Script 
  • Navigate to: Devices > Scripts > Add > Windows 10 and later 
  • Name: “OLE Package Prevention” 
  • Configure: 
  • Run script using logged-on credentials: Yes 
  • Enforce script signature check: No 
  • Run in 64-bit PowerShell: No12 
  • Assign to: All Office Users group13 
  1. Assign the Policy 
  • In the imported policy, go to Assignments 
  • Included groups: Select “All Office Users” 
  • Review + Save 

Method 2: Manual Configuration Using Settings Catalog 

If you prefer granular control, you can manually configure macro policies using Intune’s Settings Catalog. 

Step-by-Step: Create Custom Macro Blocking Policy 

  1. Create New Settings Catalog Policy 
  • Navigate to: Microsoft Intune admin center (intune.microsoft.com) 
  • Go to: Devices > Configuration policies > Create > New Policy 
  • Platform: Windows 10 and later 
  • Profile type: Settings catalog 
  • Name: “Office Macro Security – Disable All Macros” 
  1. Configure Settings for Each Office Application 

The following settings must be configured for each Office application (Word, Excel, PowerPoint, Access, Outlook):14 15 

Microsoft Office 2016 (Global Settings) 

Setting Path Configuration 
Microsoft Office 2016 > Security Settings  
Automation Security Enabled 
– Set Automation Security level Disable macros by default 
Disable VBA for Office applications Enabled 
Security Settings > Trust Center  
Allow mix of policy and user locations Disabled 

Microsoft Excel 2016 

Setting Path Configuration 
Excel Options > Security > Trust Center  
VBA Macro Notification Settings Enabled 
– VBA Macro Notification Disable all without notification 
Block macros from running in Office files from the Internet Enabled 
Trust access to Visual Basic Project Disabled 
Turn off trusted documents Enabled 
Turn off Trusted Documents on the network Enabled 
Excel Options > Security > Trust Center > Trusted Locations  
Allow Trusted Locations on the network Disabled 
Disable all trusted locations Enabled 

Microsoft Word 2016 

Setting Path Configuration 
Word Options > Security > Trust Center  
VBA Macro Notification Settings Enabled 
– VBA Macro Notification Disable all without notification 
Block macros from running in Office files from the Internet Enabled 
Trust access to Visual Basic Project Disabled 
Turn off trusted documents Enabled 
Turn off Trusted Documents on the network Enabled 
Word Options > Security > Trust Center > Trusted Locations  
Allow Trusted Locations on the network Disabled 
Disable all trusted locations Enabled 

Microsoft PowerPoint 2016 

Setting Path Configuration 
PowerPoint Options > Security > Trust Center  
VBA Macro Notification Settings Enabled 
– VBA Macro Notification Disable all without notification 
Block macros from running in Office files from the Internet Enabled 
Trust access to Visual Basic Project Disabled 
Turn off trusted documents Enabled 
Turn off Trusted Documents on the network Enabled 
PowerPoint Options > Security > Trust Center > Trusted Locations  
Allow Trusted Locations on the network Disabled 
Disable all trusted locations Enabled 

Microsoft Access 2016 

Setting Path Configuration 
Application Settings > Security > Trust Center  
VBA Macro Notification Settings Enabled 
– VBA Macro Notification Disable all without notification 
Block macros from running in Office files from the Internet Enabled 
Turn off trusted documents Enabled 
Turn off Trusted Documents on the network Enabled 
Application Settings > Security > Trust Center > Trusted Locations  
Allow Trusted Locations on the network Disabled 
Disable all trusted locations Enabled 

Microsoft Outlook 2016 

Setting Path Configuration 
Security > Trust Center  
Apply macro security settings to macros, add-ins and additional actions Enabled 
Security settings for macros Enabled 
– Security Level Never warn, disable all 
  1. Assign the Policy 
  • Assignments: Select your target user or device groups 
  • Review + Create 

Attack Surface Reduction (ASR) Rules for Essential Eight Compliance 

Can ASR Rules Meet Essential Eight Requirements? 

Yes, partially. Windows Attack Surface Reduction rules provide critical additional protections that complement macro blocking policies and help meet Essential Eight requirements.16 17 

ASR rules are included with Microsoft 365 Business Premium via Microsoft Defender for Business and can be deployed through Intune.18 

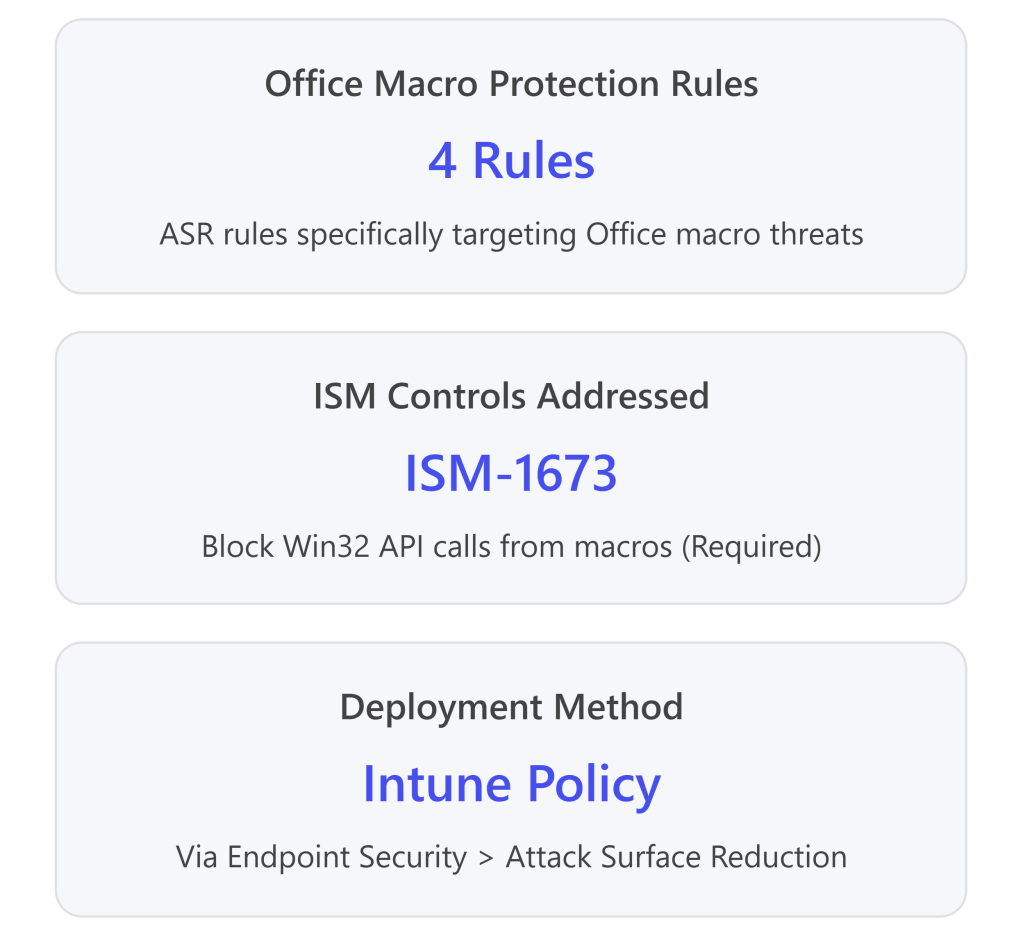
Essential Eight-Relevant ASR Rules 

The following ASR rules directly support Essential Eight mitigation strategies:19 20 

ASR Rules for Office Macro Security 

ASR Rule Name GUID Essential Eight Alignment ISM Control 
Block Win32 API calls from Office macros 92e97fa1-2edf-4476-bdd6-9dd0b4dddc7b ✅ Required – Prevents macros from making dangerous system calls ISM-1673 
Block Office applications from creating child processes d4f940ab-401b-4efc-aadc-ad5f3c50688a ✅ Recommended – Prevents macro-launched executables User App Hardening 
Block Office applications from creating executable content 3b576869-a4ec-4529-8536-b80a7769e899 ✅ Recommended – Prevents macros from creating .exe files User App Hardening 
Block Office applications from injecting code into other processes 75668c1f-73b5-4cf0-bb93-3ecf5cb7cc84 ✅ Recommended – Prevents code injection attacks User App Hardening 
Block Office communication applications from creating child processes 26190899-1602-49e8-8b27-eb1d0a1ce869 ✅ Recommended – Protects Outlook from exploitation User App Hardening 

Step-by-Step: Deploy ASR Rules via Intune 

Detailed Implementation Steps:21 

  1. Navigate to ASR Policy Creation 
  • Go to: Endpoint security > Attack surface reduction 
  • Click: Create Policy22 
  1. Configure Policy Basics 
  • Platform: Windows 10, Windows 11, and Windows Server 
  • Profile: Attack Surface Reduction Rules 
  • Name: “Essential Eight – Office ASR Rules” 
  • Description: “ASR rules aligned with ACSC Essential Eight requirements” 
  1. Configure ASR Rules 

For each of the Essential Eight-relevant rules, configure the mode:23 

ASR Rule Initial Mode Production Mode 
Block Win32 API calls from Office macros Audit Block (Required for ISM-1673) 
Block Office applications from creating child processes Audit Block 
Block Office applications from creating executable content Audit Block 
Block Office applications from injecting code into other processes Audit Block 
Block Office communication applications from creating child processes Audit Block 

Mode Definitions: 

  • Not Configured (0): Rule is disabled 
  • Block (1): Rule is enforced 
  • Audit (2): Rule logs events but doesn’t block 
  • Warn (6): User receives warning but can bypass24 
  1. Assign the Policy 
  • Assignments
  • Included groups: “All Windows Devices” or specific pilot groups 
  • Excluded groups: Any test or exception groups 
  • Click Next and Create 
  1. Testing and Deployment Strategy 

⚠️ Important: ASR rules should be thoroughly tested before full enforcement:25 

  • Week 1-2: Deploy all rules in Audit mode 
  • Week 3-4: Review Microsoft Defender for Endpoint logs for blocked activity 
  • Week 5+: Switch rules to Block mode for full enforcement 
  • Monitor for false positives and create exclusions as needed 

Alternative: Manual ASR Deployment via Graph API 

For advanced deployments, you can use Microsoft Graph API to deploy ASR policies programmatically:26 

Step-by-Step: 

  1. Navigate to Graph Explorer 
  • Sign in with administrator credentials 
  • Grant necessary permissions 
  1. Create POST Request 
  • Method: POST 
  • Schema: Beta 
  1. Use ACSC Windows Hardening JSON 
  • Copy the JSON content and paste into the request body 
  • Modify the policy name if needed 
  • Execute the POST request 
  1. Assign Policy 
  • Use Graph API or Intune portal to assign the created policy to your device groups 

Monitoring and Validation 

Verifying Policy Application 

After deploying policies, verify they’re working correctly: 

  1. Check Policy Status in Intune 
  • Navigate to: Devices > Monitor > Device configuration 
  • Review deployment status for your macro policies 
  • Check for any errors or conflicts28 
  1. Test on End-User Device 
  • Have a test user attempt to open a macro-enabled Office file 
  • Verify that macros are blocked and no prompt appears 
  • Check that Trust Center settings are grayed out (not user-modifiable) 
  1. Review Microsoft Defender for Endpoint 

If you have Defender for Endpoint (included in Business Premium), monitor for macro-related events:29 

  • Endpoint behavioral sensors collect macro execution attempts 
  • Cloud security analytics translate signals into insights 
  • Threat intelligence identifies attacker techniques 
  • Review alerts in the Microsoft 365 Defender portal (security.microsoft.com) 
  1. Validate ASR Rule Effectiveness 
  • Navigate to: Microsoft 365 Defender portal > Reports > Attack surface reduction rules 
  • Review triggered events for each ASR rule 
  • Identify false positives and create exclusions if needed 

Exception Management: Allowing Trusted Macros 

Some users may have legitimate business requirements for macros. The Essential Eight framework accommodates this through Trusted Publishers or Trusted Locations.30 

Option 1: Trusted Publishers (Recommended) 

Trusted Publishers use digital signatures to verify macro authenticity. This is the preferred method for Essential Eight compliance.31 

Step-by-Step: Enable Trusted Publishers 

  1. Create Exception Group 
  • Create Azure AD group: “Office Macro Users – Trusted Publishers” 
  • Add users with legitimate macro needs32 
  1. Download Trusted Publisher Policy 
  1. Import to Intune 
  • Navigate to: Devices > Configuration profiles > Import Policy 
  • Browse for downloaded JSON file 
  • Name: “ACSC Office – Trusted Publishers Enabled” 
  • Assign to: “Office Macro Users – Trusted Publishers” group33 
  1. Exclude from Macro Blocking Policy 
  • Edit your “All Macros Disabled” policy 
  • Go to Assignments 
  • Excluded groups: Add “Office Macro Users – Trusted Publishers”34 
  1. Deploy Trusted Publisher Certificates 

For each approved macro publisher:35 

  • Navigate to: Devices > Configuration profiles > Create 
  • Profile type: Trusted certificate 
  • Upload the publisher’s code-signing certificate 
  • Assign to: “Office Macro Users – Trusted Publishers” group 

Certificate Requirements:36 

  • Must use V3 signature scheme (more secure) 
  • Certificate must be from a trusted Certificate Authority 
  • Each publisher should have a separate policy for easier management 
  1. Macro Vetting Process 

Before signing any macros:37 

  • Execute macros on an isolated test device with ACSC hardening applied 
  • Verify no malicious behavior 
  • Use Microsoft Defender Antivirus scanning (automatic with ACSC policies) 
  • Consider third-party macro scanning tools for additional validation 

Comprehensive Policy Summary Table 

Configuration Profile Settings 

Policy Category Setting Configuration Purpose 
VBA Macro Execution Disable VBA for Office applications Enabled Disables VBA engine globally38 
 VBA Macro Notification Settings Disable all without notification Blocks all macros silently39 
Internet Macros Block macros from Internet sources Enabled Prevents macros from untrusted sources40 
Automation Security Automation Security Level Disable macros by default Prevents COM automation attacks41 
Trust Center Turn off trusted documents Enabled Prevents trust bypass via document trust42 
 Turn off Trusted Documents on network Enabled Prevents network trust bypass43 
 Disable all trusted locations Enabled Blocks trusted location bypass44 
 Allow mix of policy and user locations Disabled Prevents user-defined trust45 
 Trust access to VBA Project Disabled Blocks programmatic VBA access46 
Macro Scanning Macro Runtime Scan Scope Enable for all documents Enables Defender AV scanning47 

Attack Surface Reduction Rules 

ASR Rule GUID Mode Purpose 
Block Win32 API calls from Office macros 92e97fa1-2edf-4476-bdd6-9dd0b4dddc7b Block Prevents dangerous API calls (ISM-1673)48 
Block Office apps creating child processes d4f940ab-401b-4efc-aadc-ad5f3c50688a Block Prevents macro-launched executables49 
Block Office apps creating executable content 3b576869-a4ec-4529-8536-b80a7769e899 Block Prevents .exe creation50 
Block Office apps injecting code 75668c1f-73b5-4cf0-bb93-3ecf5cb7cc84 Block Prevents process injection51 
Block Outlook creating child processes 26190899-1602-49e8-8b27-eb1d0a1ce869 Block Protects email client52 

Key Limitations and Considerations 

Microsoft 365 Business Premium Constraints 

Testing Recommendations 

  1. Pilot Deployment: Test policies with a small group before organization-wide rollout53 
  1. Audit Mode First: Deploy ASR rules in Audit mode for 2-4 weeks before enforcement54 
  1. User Communication: Notify users about macro blocking to reduce helpdesk calls 
  1. Exception Process: Establish clear process for macro exception requests 
  1. Regular Review: Validate Trusted Publisher certificates annually55 

Complete Implementation Checklist 

  • Phase 1: Preparation 
  • Create Azure AD security groups (“All Office Users”, “Macro Exception Users”) 
  • Document current macro usage across organization 
  • Establish exception approval process 
  • Communicate changes to end users 
  • Phase 2: Baseline Policy Deployment 
  • Download ACSC Office Hardening policy from GitHub 
  • Import policy to Intune Configuration Profiles 
  • Download and import OLE prevention PowerShell script 
  • Assign policies to pilot group 
  • Test policy application on pilot devices 
  • Phase 3: ASR Rule Deployment 
  • Create ASR policy in Endpoint Security 
  • Configure 5 Office-related ASR rules in Audit mode 
  • Assign to pilot group 
  • Monitor events in Microsoft 365 Defender for 2-4 weeks 
  • Phase 4: Production Rollout 
  • Review audit logs for false positives 
  • Create ASR exclusions if needed 
  • Switch ASR rules to Block mode 
  • Expand deployment to all users 
  • Configure Trusted Publisher policies for exception users 
  • Phase 5: Ongoing Management 
  • Monitor Defender for Endpoint alerts 
  • Review exception requests quarterly 
  • Validate Trusted Publisher certificates annually 
  • Update policies as new ISM controls are released 

Conclusion 

Meeting the Essential Eight requirements for disabling Office macros in a cloud-only environment with Microsoft 365 Business Premium is achievable through: 

  1. Intune Configuration Profiles: Disable macros at the Office application level using Settings Catalog or imported administrative templates 
  1. Attack Surface Reduction Rules: Deploy complementary ASR rules to block macro-related attack behaviors 
  1. Exception Management: Use Trusted Publishers for users with legitimate macro needs 
  1. Continuous Monitoring: Leverage Microsoft Defender for Endpoint for visibility and alerting 

While Office Cloud Policy Service has limitations with Business Premium, Intune Configuration Profiles provide full macro control capabilities needed for Essential Eight compliance. ASR rules successfully accommodate Essential Eight requirements by providing the necessary technical controls, particularly ISM-1673 (blocking Win32 API calls from macros). 

The combination of these approaches provides defense-in-depth aligned with ACSC guidance and enables organizations to achieve Essential Eight Maturity Level 3 for macro security. 


References 

Microsoft Official Documentation 

Microsoft Learn – Essential Eight Guidance 

  • Essential Eight configure Microsoft Office macro settings 
  • Site: Microsoft Learn 

Microsoft Learn – Essential Eight User Application Hardening 

  • Essential Eight user application hardening 
  • Site: Microsoft Learn 

Microsoft Learn – Intune Office Policies 

  • Policies for Microsoft 365 Apps – Microsoft Intune 
  • Site: Microsoft Learn 

Microsoft Learn – Office Cloud Policy Service Overview 

  • Overview of Cloud Policy service for Microsoft 365 
  • Site: Microsoft Learn 

Microsoft Learn – Attack Surface Reduction Rules Reference 

  • Attack surface reduction rules reference – Microsoft Defender for Endpoint 
  • Site: Microsoft Learn 

Microsoft Learn – Manage ASR with Intune 

  • Manage attack surface reduction settings with Microsoft Intune 
  • Site: Microsoft Learn 

Microsoft Intune Admin Center 

  • Microsoft Intune admin center 
  • Site: Microsoft Intune 

Australian Cyber Security Centre (ACSC) Guidance 

Cyber.gov.au – Restricting Microsoft Office Macros 

  • Restricting Microsoft Office macros 
  • Site: Australian Cyber Security Centre (ACSC) 

Cyber.gov.au – Guidelines for System Hardening 

  • Guidelines for System Hardening 
  • Site: Australian Cyber Security Centre (ACSC) 

Cyber.gov.au – Hardening Microsoft 365 and Office 

  • Hardening Microsoft 365, Office 2021, Office 2019, and Office 2016 
  • Site: Australian Cyber Security Centre (ACSC) 

Cyber.gov.au – Microsoft Office Macro Security 

  • Microsoft Office Macro Security 
  • Site: Australian Cyber Security Centre (ACSC) 

Cyber.gov.au – Essential Eight Assessment Process Guide 

  • Essential Eight assessment process guide 
  • Site: Australian Cyber Security Centre (ACSC) 

Cyber.gov.au – Technical Example: Configure Macro Settings 

  • Technical example: Configure macro settings 
  • Site: Australian Cyber Security Centre (ACSC) 

ASD Blueprint for Secure Cloud 

ASD Blueprint – Office Hardening All Macros Disabled 

  • ASD Office hardening – all macros disabled 
  • Site: ASD’s Blueprint for Secure Cloud 

ASD Blueprint – Microsoft Office Macro Hardening Design 

  • Microsoft Office macro hardening 
  • Site: ASD’s Blueprint for Secure Cloud 

ASD Blueprint – Restrict Microsoft Office Macros 

  • Restrict Microsoft Office macros 
  • Site: ASD’s Blueprint for Secure Cloud 

GitHub Repositories and Templates 

Microsoft GitHub – ACSC Office Hardening Guidelines 

  • ACSC Office Hardening Guidelines (JSON) 
  • Site: GitHub – Microsoft 

Microsoft GitHub – OLE Prevention PowerShell Script 

  • OfficeMacroHardening-PreventActivationofOLE.ps1 
  • Site: GitHub – Microsoft 

Microsoft GitHub – ACSC Windows Hardening ASR Policy 

  • ACSC Windows Hardening Guidelines – Attack Surface Reduction policy (JSON) 
  • Site: GitHub – Microsoft 

GitHub – ACSC Essential 8 Office Hardening Module 

  • benjamin-robertson/acsc_e8_office_hardening 
  • Site: GitHub – Community 

Community and Technical Resources 

Reddit – Office 365 Community Discussion 

  • 365 Business Premium – GPO or config.office.com 
  • Site: Reddit – r/Office365 

Practical365 – Office Cloud Policy Service 

  • Block Macro Execution with Office Cloud Policy Service (OCPS) 
  • Site: Practical365 

Mr T-Bone’s Blog – Intune Office Policies 

  • How to use policies for Office apps in Intune 
  • Site: Mr T-Bone´s Blog 

Helge Klein – Blocking Office Macros 

  • Blocking Office Macros, Managing Windows & macOS via Intune 
  • Site: Helge Klein 

T-Minus365 – Deploy ASR Rules 

  • Deploy Attack Surface Reduction Rules from Microsoft Intune 
  • Site: T-Minus365 

Azure with Tom – Implementing ASR Policies 

  • Implementing Attack Surface Reduction Policies 
  • Site: Azure with Tom 

Additional Resources 

Microsoft Graph API – Graph Explorer 

  • Graph Explorer for API Testing 
  • Site: Microsoft Developer 

Microsoft 365 Defender Portal 

  • Microsoft 365 Defender Security Portal 
  • Site: Microsoft 365 Defender 

CISA – Disable VBA Macros Guidance 

  • Disable Visual Basic for Applications (VBA) Macros (CM0056) 
  • Site: Cybersecurity and Infrastructure Security Agency (CISA) 

Implementing a Phased Rollout of Conditional Access Policies Requiring Device Compliance in Microsoft 365

Overview

Implementing Conditional Access policies requiring device compliance in Microsoft 365 requires careful planning and a phased approach to minimize disruption while maintaining security. This comprehensive guide provides step-by-step instructions specifically tailored for small businesses.

1. Prerequisites and Initial Setup

Required Licenses

  • Microsoft Entra ID P1 or P2 – Required for Conditional Access
  • Microsoft Intune – Required for device compliance management
  • Microsoft 365 Business Premium or higher for small businesses

Essential Preparations

  1. Configure Emergency Access Accounts
    • Create at least two emergency access (break-glass) accounts
    • Exclude these accounts from ALL Conditional Access policies
    • Store credentials securely and separately
  2. Create Device Compliance Policies First
    • Define minimum OS version requirements
    • Set encryption requirements
    • Configure password/PIN requirements
    • Establish jailbreak/root detection settings
  3. Enable User Registration for MFA
    • Allow users to register authentication methods before enforcing policies
    • Communicate registration requirements to all users

2. Phased Rollout Strategy

Phase 1: Foundation (Weeks 1-2)

Objective: Establish baseline security and prepare infrastructure

  1. Create policies in Report-Only Mode
  2. Block legacy authentication protocols
  3. Secure the MFA registration page
  4. Target privileged accounts first with phishing-resistant MFA

Phase 2: Pilot Testing (Weeks 2-4)

Objective: Test with limited user groups

Pilot Group Selection

  • Start with 5-10% of your organization
  • Include IT staff and willing early adopters
  • Avoid executives and VIPs initially
  • Ensure representation from different departments

Creating the Policy in Report-Only Mode

  1. Navigate to Microsoft Entra admin centerConditional AccessPolicies
  2. Create new policy with these settings:
    • Name: “Require Device Compliance – Pilot”
    • Users: Select pilot group
    • Cloud apps: Start with non-critical apps
    • Grant: Require device to be marked as compliant
    • Enable policy: Report-only

Phase 3: Gradual Expansion (Weeks 4-8)

Objective: Progressively include more users and applications

Automated Phased Rollout Approach

If using the Conditional Access Optimization Agent (requires Microsoft Security Copilot):

  1. The agent automatically creates a 5-phase rollout plan
  2. Groups are assigned based on risk and impact analysis
  3. Automatic progression between phases based on success metrics
  4. Built-in safeguards pause rollout if sign-in success rate drops below 90%

Manual Phased Rollout Approach

  1. Phase 3a: Add 25% more users (low-risk departments)
  2. Phase 3b: Add another 25% (medium-risk departments)
  3. Phase 3c: Add remaining standard users
  4. Phase 3d: Include executives and VIPs
  5. Phase 3e: Apply to all cloud applications

Phase 4: Full Deployment (Week 8+)

  1. Switch policy from Report-only to On
  2. Monitor for 2 weeks before removing report-only policies
  3. Clean up redundant or test policies

3. Monitoring Strategies

Real-Time Monitoring Tools

A. Sign-in Logs Analysis

  1. Navigate to Microsoft Entra admin centerMonitoring & healthSign-in logs
  2. Filter by:
    • Conditional Access status
    • Failure reasons
    • Affected users
  3. Review the Report-only tab for policy impact without enforcement

B. Conditional Access Insights Workbook

Requires Azure Monitor subscription:

  • Provides aggregate view of policy impacts
  • Identifies potential issues before enforcement
  • Shows user impact analysis

C. Device Compliance Dashboard

  1. Access via Intune admin centerReportsDevice compliance
  2. Monitor:
    • Compliance status by policy
    • Non-compliant device trends
    • Error patterns in compliance evaluation

Key Metrics to Track

  • Sign-in success rate: Should remain above 90%
  • Device compliance rate: Target 95%+ before full enforcement
  • Help desk tickets: Monitor for unusual spikes
  • User productivity impact: Track application access patterns

4. Rollback Procedures

Immediate Rollback Options

Option 1: Disable the Policy

  1. Navigate to the Conditional Access policy
  2. Change Enable policy from “On” to “Off”
  3. Takes effect within minutes for new sign-ins

Option 2: Switch to Report-Only Mode

  1. Edit the policy
  2. Change Enable policy to “Report-only”
  3. Maintains visibility while removing enforcement

Option 3: Exclude Affected Users/Groups

  1. Edit policy → AssignmentsUsers
  2. Under Exclude, add affected users or groups
  3. Use sparingly and temporarily

Grace Period Configuration

Configure grace periods in Intune compliance policies:

  1. Navigate to Intune admin centerDevicesCompliance policies
  2. Edit policy → Actions for noncompliance
  3. Set grace period (recommended: 3-7 days for initial rollout)
  4. Users maintain access during grace period while fixing compliance issues

Recovery from Deleted Policies

  • Deleted policies can be recovered within 30 days
  • Access soft-deleted policies through Microsoft Entra admin center
  • Restore maintains original configuration and assignments

5. Best Practices and Recommendations

Communication Strategy

  1. Pre-deployment: 2 weeks advance notice with requirements
  2. During pilot: Weekly updates to pilot users
  3. Rollout phases: 48-hour notice before including new groups
  4. Post-deployment: Success confirmation and support resources

Testing Checklist

  • ✓ Test with multiple device platforms (Windows, iOS, Android)
  • ✓ Verify enrollment process for new devices
  • ✓ Confirm excluded accounts remain accessible
  • ✓ Test rollback procedures in development environment
  • ✓ Validate help desk escalation procedures

Common Pitfalls to Avoid

  1. Not excluding emergency accounts – Can result in complete lockout
  2. Skipping report-only mode – Misses opportunity to identify issues
  3. Moving too quickly between phases – Insufficient time to identify problems
  4. Inadequate user communication – Leads to confusion and resistance
  5. Not monitoring device check-in intervals – Compliance updates may be delayed

PowerShell Monitoring Example


# Connect to Microsoft Graph
Connect-MgGraph -Scopes "Policy.Read.All"

# Get all Conditional Access policies
$policies = Get-MgIdentityConditionalAccessPolicy

# Filter for device compliance policies
$compliancePolicies = $policies | Where-Object { 
    $_.GrantControls.BuiltInControls -contains "compliantDevice" 
}

# Display policy status
$compliancePolicies | Format-Table DisplayName, State, CreatedDateTime

Comprehensive Guide to Microsoft Autopilot v2 Deployment in Microsoft 365 Business

Microsoft’s Windows Autopilot is a cloud-based suite of technologies designed to streamline the deployment and configuration of new Windows devices for organizations[1]. This guide provides a detailed look at the latest updates to Windows Autopilot – specifically the new Autopilot v2 (officially called Windows Autopilot Device Preparation) – and offers step-by-step instructions for implementing it in a Microsoft 365 Business environment. We will cover the core concepts, new features in Autopilot v2, benefits for businesses, the implementation process (from prerequisites to deployment), troubleshooting tips, and best practices for managing devices with Autopilot v2.

1. Overview of Microsoft Autopilot and Its Purpose

Windows Autopilot simplifies the Windows device lifecycle from initial deployment through end-of-life. It leverages cloud services (like Microsoft Intune and Microsoft Entra ID) to pre-configure devices out-of-box without traditional imaging. When a user unboxes a new Windows 10/11 device and connects to the internet, Autopilot can automatically join it to Azure/Microsoft Entra ID, enroll it in Intune (MDM), apply corporate policies, install required apps, and tailor the out-of-box experience (OOBE) to the organization[1][1]. This zero-touch deployment means IT personnel no longer need to manually image or set up each PC, drastically reducing deployment time and IT overhead[2]. In short, Autopilot’s purpose is to get new devices “business-ready” with minimal effort, offering benefits such as:

  • Reduced IT Effort – No need to maintain custom images for every model; devices use the OEM’s factory image and are configured via cloud policies[1][1].
  • Faster Deployment – Users only perform a few quick steps (like network connection and sign-in), and everything else is automated, so employees can start working sooner[1].
  • Consistency & Compliance – Ensures each device receives standard configurations, security policies, and applications, so they immediately meet organizational standards upon first use[2].
  • Lifecycle Management – Autopilot can also streamline device resets, repurposing for new users, or recovery scenarios (for example, using Autopilot Reset to wipe and redeploy a device)[1].

2. Latest Updates: Introduction of Autopilot v2 (Device Preparation)

Microsoft has recently introduced a next-generation Autopilot deployment experience called Windows Autopilot Device Preparation (commonly referred to as Autopilot v2). This new version is essentially a re-architected Autopilot aimed at simplifying and improving deployments based on customer feedback[3]. Autopilot v2 offers new capabilities and architectural changes that enhance consistency, speed, and reliability of device provisioning. Below is an overview of what’s new in Autopilot v2:

  • No Hardware Hash Import Required: Unlike the classic Autopilot (v1) which required IT admins or OEMs to register devices in Autopilot (upload device IDs/hardware hashes) beforehand, Autopilot v2 eliminates this step[4]. Devices do not need to be pre-registered in Intune; instead, enrollment can be triggered simply by the user logging in with their work account. This streamlines onboarding by removing the tedious hardware hash import process[3]. (If a device is already registered in the old Autopilot, the classic profile will take precedence – so using v2 means not importing the device beforehand[5].)
  • Cloud-Only (Entra ID) Join: Autopilot v2 currently supports Microsoft Entra ID (Azure AD) join only – it’s designed for cloud-based identity scenarios. Hybrid Azure AD Join (on-prem AD) is not supported in v2 at this time[3]. This focus on cloud join aligns with modern, cloud-first management in Microsoft 365 Business environments.
  • Single Unified Deployment Profile: The new Autopilot Device Preparation uses a single profile to define all deployment settings and OOBE customization, rather than separate “Deployment” and “ESP” profiles as in legacy Autopilot[3]. This unified profile encapsulates join type, user account type, and OOBE preferences, plus it lets you directly select which apps and scripts should install during the setup phase.
  • Enrollment Time Grouping: Autopilot v2 introduces an “Enrollment Time Grouping” mechanism. When a user signs in during OOBE, the device is automatically added to a specified Azure AD group on the fly, and any applications or configurations assigned to that group are immediately applied[5][5]. This replaces the old dependence on dynamic device groups (which could introduce delays while membership queries run). Result: faster and more predictable delivery of apps/policies during provisioning[5].
  • Selective App Installation (OOBE): With Autopilot v1, all targeted device apps would try to install during the initial device setup, possibly slowing things down. In Autopilot v2, the admin can pick up to 10 essential apps (Win32, MSI, Store apps, etc.) to install during OOBE; any apps not selected will be deferred until after the user reaches the desktop[3][6]. By limiting to 10 critical apps, Microsoft aimed to increase success rates and speed (as their telemetry showed ~90% of deployments use 10 or fewer apps initially)[6].
  • PowerShell Scripts Support in ESP: Autopilot v2 can also execute PowerShell scripts during the Enrollment Status Page (ESP) phase of setup[3]. This means custom configuration scripts can run as part of provisioning before the device is handed to the user – a capability that simplifies advanced setup tasks (like configuring registry settings, installing agent software, etc., via script).
  • Improved Progress & UX: The OOBE experience is updated – Autopilot v2 provides a simplified progress display (percentage complete) during provisioning[6]. Users can clearly see that the device is installing apps/configurations. Once the critical steps are done, it informs the user that setup is complete and they can start using the device[6][6]. (Because the device isn’t identified as Autopilot-managed until after the user sign-in, some initial Windows setup screens like EULA or privacy settings may appear in Autopilot v2 that were hidden in v1[3]. These are automatically suppressed only after the Autopilot policy arrives during login.)
  • Near Real-Time Deployment Reporting: Autopilot v2 greatly enhances monitoring. Intune now offers an Autopilot deployment report that shows status per device in near real time[6]. Administrators can see which devices have completed Autopilot, which stage they’re in, and detailed results for each selected app and script (success/failure), as well as overall deployment duration[5][5]. This granular reporting makes troubleshooting easier, as you can immediately identify if (for example) a particular app failed to install during OOBE[5][5].
  • Availability in Government Clouds: The new Device Preparation approach is available in GCC High and DoD government cloud environments[6][5], which was not possible with Autopilot previously. This broadens Autopilot use to more regulated customers and is one reason Microsoft undertook this redesign (Autopilot v2 originated as a project to meet government cloud requirements and then expanded to all customers)[7].

The table below summarizes key differences between Autopilot v1 (classic) and Autopilot v2:

Feature/CapabilityAutopilot v1 (Classic)Autopilot v2 (Device Preparation)
Device preregistration (Hardware hash upload)Required (devices must be registered in Autopilot device list before use)[4]Not required (user can enroll device directly; device should not be pre-added, or v2 profile won’t apply)[5]
Supported join typesAzure AD Join; Hybrid Azure AD Join (with Intune Connector)[3]Azure/Microsoft Entra ID Join only (no on-prem AD support yet)[3]
Self-Deploying / Pre-provisioning (White Glove)Supported (TPM attestation-based self-deploy; technician pre-provision mode available)Not supported in initial release[3] (future support is planned for these scenarios)
Deployment profilesSeparate Deployment Profile + ESP Profile (configuration split)Single Device Preparation Policy (one profile for all settings: join, account type, OOBE, app selection)[3]
App installation during OOBEInstalls all required apps targeted to device (could be many; admin chooses which are “blocking”)Installs selected apps only (up to 10) during OOBE; non-selected apps wait until after OOBE[3][6]
PowerShell scripts in OOBENot natively supported in ESP (workarounds needed)Supported – can run PowerShell scripts during provisioning (via device prep profile)[3]
Policy application in OOBESome device policies (Wi-Fi, certs, etc.) could block in ESP; user-targeted configs had limited supportDevice policies synced at OOBE (not blocking)[3]; user-targeted policies/apps install after user reaches desktop[3]
Out-of-Box experience (UI)Branding and many Windows setup screens are skipped (when profile is applied from the start of OOBE)Some Windows setup screens appear by default (since no profile until sign-in)[3]; afterwards, shows new progress bar and completion summary[6]
Reporting & MonitoringBasic tracking via Enrollment Status Page; limited real-time infoDetailed deployment report in Intune with near real-time status of apps, scripts, and device info[5]

Why these updates? The changes in Autopilot v2 address common pain points from Autopilot v1. By removing the dependency on upfront registration and dynamic groups, Microsoft has made provisioning more robust and “hands-off”. The new architecture “locks in” the admin’s intended config at enrollment time and provides better error handling and reporting[6][6]. In summary, Autopilot v2 is simpler, faster, more observable, and more reliable – the guiding principles of its design[5] – making device onboarding easier for both IT admins and end-users.

3. Benefits of Using Autopilot v2 in a Microsoft 365 Business Environment

Implementing Autopilot v2 brings significant advantages, especially for organizations using Microsoft 365 Business or Business Premium (which include Intune for device management). Here are the key benefits:

  • Ease of Deployment – Less IT Effort: Autopilot v2’s no-registration model is ideal for businesses that procure devices ad-hoc or in small batches. IT admins no longer need to collect hardware hashes or coordinate with OEMs to register devices. A user can unbox a new Windows 11 device, connect to the internet, and sign in with their work account to trigger enrollment. This self-service enrollment reduces the workload on IT staff, which is especially valuable for small IT teams.
  • Faster Device Setup: By limiting installation to essential apps during OOBE and using enrollment time grouping, Autopilot v2 gets devices ready more quickly. End-users see a shorter setup time before reaching the desktop. They can start working sooner with all critical tools in place (e.g. Office apps, security software, etc. installed during setup)[7][7]. Non-critical apps or large software can install in the background later, avoiding long waits up-front.
  • Improved Reliability and Fewer Errors: The new deployment process is designed to “fail fast” with better error details[6]. If something is going to go wrong (for example, an app that fails to install), Autopilot v2 surfaces that information quickly in the Intune report and does not leave the user guessing. The enrollment time grouping also avoids timing issues that could occur with dynamic Azure AD groups. Overall, this means higher success rates for device provisioning and less troubleshooting compared to the old Autopilot. In addition, by standardizing on cloud join only, many potential complexities (like on-prem domain connectivity during OOBE) are removed.
  • Enhanced User Experience: Autopilot v2 provides a more transparent and reassuring experience to employees receiving new devices. The OOBE progress bar with a percentage complete indicator lets users know that the device is configuring (rather than appearing to be stuck). Once the critical setup is done, Autopilot informs the user that the device is ready to go[6]. This clarity can reduce helpdesk calls from users unsure if they should wait or reboot during setup. Also, because devices are delivered pre-configured with corporate settings and apps, users can be productive on Day 1 without needing IT to personally assist.
  • Better Monitoring for IT: In Microsoft 365 Business environments, often a single admin oversees device management. The Autopilot deployment report in Intune gives that admin a real-time dashboard to monitor deployments. They can see if a new laptop issued to an employee enrolled successfully, which apps/scripts ran, and if any step failed[5][5]. For any errors, the admin can drill down immediately and troubleshoot (for instance, if an app didn’t install, they know to check that installer or assign it differently). This reduces guesswork and allows proactive support, contributing to a smoother deployment process across the organization.
  • Security and Control: Autopilot v2 includes support for corporate device identification. By uploading known device identifiers (e.g., serial numbers) into Intune and enabling enrollment restrictions, a business can ensure only company-owned devices enroll via Autopilot[4][4]. This prevents personal or unauthorized devices from accidentally being enrolled. Although this requires a bit of setup (covered below), it gives small organizations an easy way to enforce that Autopilot v2 is used only for approved hardware, adding an extra layer of security and compliance. Furthermore, Autopilot v2 automatically makes the Azure AD account a standard user by default (not local admin), which improves security on the endpoint[5].

In summary, Autopilot v2 is well-suited for Microsoft 365 Business scenarios: it’s cloud-first and user-driven, aligning with the needs of modern SMBs that may not have complex on-prem infrastructure. It lowers the barrier to deploying new devices (no imaging or device ID admin work) while improving the speed, consistency, and security of device provisioning.

4. Implementing Autopilot v2: Step-by-Step Guide

In this section, we’ll walk through how to implement Windows Autopilot Device Preparation (Autopilot v2) in your Microsoft 365 Business/Intune environment. The process involves: verifying prerequisites, configuring Intune with the new profile and required settings, and then enrolling devices. Each step is detailed below.

4.1 Prerequisites and Initial Setup

Before enabling Autopilot v2, ensure the following prerequisites are met:

  1. Windows Version Requirements: Autopilot v2 requires Windows 11. Supported versions are Windows 11 22H2 or 23H2 with the latest updates (specifically, installing KB5035942 or later)[3][5], or any later version (Windows 11 24H2+). New devices should be shipped with a compatible Windows 11 build (or be updated to one) to use Autopilot v2. Windows 10 devices cannot use Autopilot v2; they would fall back to the classic Autopilot method.
  2. Microsoft Intune: You need an Intune subscription (Microsoft Endpoint Manager) as part of your M365 Business. Intune will serve as the Mobile Device Management (MDM) service to manage Autopilot profiles and device enrollment.
  3. Azure AD/Microsoft Entra ID: Devices will be Azure AD joined. Ensure your users have Microsoft Entra ID accounts with appropriate Intune licenses (e.g., Microsoft 365 Business Premium includes Intune licensing) and that automatic MDM enrollment is enabled for Azure AD join. In Azure AD, under Mobility (MDM/MAM), Microsoft Intune should be set to Automatically enroll corporate devices for your users.
  4. No Pre-Registration of Devices: Do not import the device hardware IDs into the Intune Autopilot devices list for devices you plan to enroll with v2. If you previously obtained a hardware hash (.CSV) from your device or your hardware vendor registered the device to your tenant, you should deregister those devices to allow Autopilot v2 to take over[5]. (Autopilot v2 will not apply if an Autopilot deployment profile from v1 is already assigned to the device.)
  5. Intune Connector (If Hybrid not needed): Since Autopilot v2 doesn’t support Hybrid AD join, you do not need the Intune Connector for Active Directory for these devices. (If you have the connector running for other hybrid-join Autopilot scenarios, that’s fine; it simply won’t be used for v2 deployments.)
  6. Network and Access: New devices must have internet connectivity during OOBE (Ethernet or Wi-Fi accessible from the initial setup). Ensure that the network allows connection to Azure AD and Intune endpoints. If using Wi-Fi, users will need to join a Wi-Fi network in the first OOBE steps. (Consider using a provisioning SSID or instructing users to connect to an available network.)
  7. Plan for Device Identification (Optional but Recommended): Decide if you will restrict Autopilot enrollment to corporate-owned devices only. For better control (and to prevent personal device enrollment), it’s best practice to use Intune’s enrollment restrictions to block personal Windows enrollments and use Corporate device identifiers to flag your devices. We will cover how to set this up in the steps below. If you plan to use this, gather a list of device serial numbers (and manufacturers/models) for the PCs you intend to enroll.

4.2 Configuring the Autopilot v2 (Device Preparation) Profile in Intune

Once prerequisites are in place, the core setup work is done in Microsoft Intune. This involves creating Azure AD groups and then creating a Device Preparation profile (Autopilot v2 profile) and configuring it. Follow these steps:

1. Create Azure AD Groups for Autopilot: We need two security groups to manage Autopilot v2 deployment:

  • User Group – contains the users who will be enrolling devices via Autopilot v2.
  • Device Group – will dynamically receive devices at enrollment time and be used to assign apps/policies.

In the Azure AD or Intune portal, navigate to “Groups” and create a new group for users. For example, “Autopilot Device Preparation – Users”. Add all relevant user accounts (e.g., all employees or the subset who will use Autopilot) to this group[4]. Use Assigned membership for explicit control.

Next, create another security group for devices, e.g., “Autopilot Device Preparation – Devices”. Set this as a Dynamic Device group if possible, or Assigned (we will be adding devices automatically via the profile). An interesting detail: Intune’s Autopilot v2 mechanism uses an application identity called “Intune Provisioning Client” to add devices to this group during enrollment[4]. You can assign that as the owner of the group (though Intune may handle this automatically when the profile is used).

2. Create the Device Preparation (Autopilot v2) Profile: In the Intune admin center, go to Devices > Windows > Windows Enrollment (or Endpoint Management > Enrollment). There should be a section for “Windows Autopilot Device Preparation (Preview)” or “Device Preparation Policies”. Choose to Create a new profile/policy[4].

  • Name and Group Assignment: Give the profile a clear name (e.g., “Autopilot Device Prep Policy – Cloud PCs”). For the target group, select the Device group created in step 1 as the group to assign devices to at enrollment[4]. (In some interfaces, you might first choose the device group in the profile so the system knows where to add devices.)
  • Deployment Mode: Choose User-Driven (since user-driven Azure AD join is the scenario for M365 Business). Autopilot v2 also has an “Automatic” mode intended for Windows 365 Cloud PCs or scenarios without user interaction, but for physical devices in a business, user-driven is typical.
  • Join Type: Select Azure AD (Microsoft Entra ID) join. (This is the only option in v2 currently – Hybrid AD join is not available).
  • User Account Type: Choose whether the end user should be a standard user or local admin on the device. Best practice is to select Standard (non-admin) to enforce least privilege[5]. (In classic Autopilot, this was an option in the deployment profile as well. Autopilot v2 defaults to standard user by design, but confirm the setting if presented.)
  • Out-of-box Experience (OOBE) Settings: Configure the OOBE customization settings as desired:
    • You can typically configure Language/Region (or set to default to device’s settings), Privacy settings, End-User License Agreement (EULA) acceptance, and whether users see the option to configure for personal use vs. organization. Note: In Autopilot v2, some of these screens may not be fully suppressible as they are in v1, but set your preferences here. For instance, you might hide the privacy settings screen and accept EULA automatically to streamline user experience.
    • If the profile interface allows it, enable “Skip user enrollment if device is known corporate” or similar, to avoid the personal/work question (this ties in with using corporate identifiers).
    • Optionally, set a device naming template if available. However, Autopilot v2 may not support custom naming at this stage (and users can be given the ability to name the device during setup)[3]. Check Intune’s settings; if not present, plan to rename devices via Intune policy later if needed.
  • Applications & Scripts (Device Preparation): Select the apps and PowerShell scripts that you want to be installed during the device provisioning (OOBE) phase[4]. Intune will present a list of existing apps and scripts you’ve added to Intune. Here, pick only your critical or required applications – remember the limit is 10 apps max for the OOBE phase. Common choices are:
    • Company Portal (for user self-service and additional app access)[4].
    • Microsoft 365 Apps (Office suite)[4].
    • Endpoint protection software (antivirus/EDR agent, if not already part of Windows).
    • Any other crucial line-of-business app that the user needs immediately. Also select any PowerShell onboarding scripts you want to run (for example, a script to set a custom registry or install a specific agent that’s not packaged as an app). These selected items will be tracked in the deployment. (Make sure any app you select is assigned in Intune to the device group we created, or available for all devices – more on app assignment in the next step.)
  • Assign the Profile: Finally, assign the Device Preparation profile to the User group created in step 1[4]. This targeting means any user in that group who signs into a Windows 11 device during OOBE will trigger this Autopilot profile. (The device will get added to the specified device group, and the selected apps will install.)

Save/create the profile. At this point, Intune has the Autopilot v2 policy in place, waiting to apply at next enrollment for your user group.

3. Assign Required Applications to Device Group: Creating the profile in step 2 defines which apps should install, but Intune still needs those apps to be deployed as “Required” to the device group for them to actually push down. In Intune:

  • Go to Apps > Windows (or Apps section in MEM portal).
  • For each critical app you included in the profile (Company Portal, Office, etc.), check its Properties > Assignments. Make sure to assign the app to the Autopilot Devices group (as Required installation)[4]. For example, set Company Portal – Required for [Autopilot Device Preparation – Devices][4].
  • Repeat for Microsoft 365 Apps and any other selected application[4]. If you created a PowerShell script configuration in Intune, ensure that script is assigned to the device group as well.

Essentially, this step ensures Intune knows to push those apps to any device that appears in the devices group. Autopilot v2 will add the new device to the group during enrollment, and Intune will then immediately start installing those required apps. (Without this step, the profile alone wouldn’t install apps, since the profile itself only “flags” which apps to wait for but the apps still need to be assigned to devices.)

4. Configure Enrollment Restrictions (Optional – Corporate-only): If you want to block personal devices from enrolling (so that only corporately owned devices can use Autopilot), set up an enrollment restriction in Intune:

  • In Intune portal, navigate to Devices > Enrollment restrictions.
  • Create a new Device Type or Platform restriction policy (or edit the existing default one) for Windows. Under Personal device enrollment, set Personally owned Windows enrollment to Blocked[4].
  • Assign this restriction to All Users (or at least all users in the Autopilot user group)[4].

This means if a user tries to Azure AD join a device that Intune doesn’t recognize as corporate, the enrollment will be refused. This is a good security measure, but it requires the next step (uploading corporate identifiers) to work smoothly with Autopilot v2.

5. Upload Corporate Device Identifiers: With personal devices blocked, you must tell Intune which devices are corporate. Since we are not pre-registering the full Autopilot hardware hash, Intune can rely on manufacturer, model, and serial number to recognize a device as corporate-owned during Autopilot v2 enrollment. To upload these identifiers:

  • Gather device info: For each new device, obtain the serial number, plus the manufacturer and model strings. You can get this from order information or by running a command on the device (e.g., on an example device, run wmic csproduct get vendor,name,identifyingnumber to output vendor (manufacturer), name (model), and identifying number (serial)[4]). Many OEMs provide this info in packing lists or you can scan a barcode from the box.
  • Prepare CSV: Create a CSV file with columns for Manufacturer, Model, Serial Number. List each device’s information on a separate line[4]. For example:\ Dell Inc.,Latitude 7440,ABCDEFG1234\ Microsoft Corporation,Surface Pro 9,1234567890\ (Use the exact strings as reported by the device/OEM to avoid mismatches.)
  • Upload in Intune: In the Intune admin center, go to Devices > Enrollment > Corporate device identifiers. Choose Add then Upload CSV. Select the format “Manufacturer, model, and serial number (Windows only)”[4] and upload your CSV file. Once processed, Intune will list those identifiers as corporate.

With this in place, when a user signs in on a device, Intune checks the device’s hardware info. If it matches one of these entries, it’s flagged as corporate-owned and allowed to enroll despite the personal device block[4][4]. If it’s not in the list, the enrollment will be blocked (the user will get a message that enrolling personal devices is not allowed). Important: Until you have corporate identifiers set up, do not enable the personal device block, or Autopilot device preparation will fail for new devices[6][6]. Always upload the identifiers first or simultaneously.

At this stage, you have completed the Intune configuration for Autopilot v2. You have:

  • A user group allowed to use Autopilot.
  • A device preparation profile linking that user group to a device group, with chosen settings and apps.
  • Required apps assigned to deploy.
  • Optional restrictions in place to ensure only known devices will enroll.

4.3 Enrollment and Device Setup Process (Using Autopilot v2)

With the above configuration done, the actual device enrollment process is straightforward for the end-user. Here’s what to expect when adding a new device to your Microsoft 365 environment via Autopilot v2:

  1. Out-of-Box Experience (Initial Screens): When the device is turned on for the first time (or after a factory reset), the Windows OOBE begins. The user will select their region and keyboard (unless the profile pre-configured these). The device will prompt for a network connection. The user should connect to the internet (Ethernet or Wi-Fi). Once connected, the device might check for updates briefly, then reach the “Sign in” screen.
  2. User Sign-In (Azure AD): The user enters their work or school (Microsoft Entra ID/Azure AD) credentials – i.e., their Microsoft 365 Business account email and password. This is the trigger for Autopilot Device Preparation. Upon signing in, the device joins your organization’s Azure AD. Because the user is in the “Autopilot Users” group and an Autopilot Device Preparation profile is active, Intune will now kick off the device preparation process in the background.
  3. Device Preparation Phase (ESP): After credentials are verified, the user sees the Enrollment Status Page (ESP) which now reflects “Device preparation” steps. In Autopilot v2, the ESP will show the progress of the configuration. A key difference in v2 is the presence of a percentage progress indicator that gives a clearer idea of progress[6]. Behind the scenes, several things happen:
    • The device is automatically added to the specified Device group (“Autopilot Device Preparation – Devices”) in Azure AD[5]. The “Intune Provisioning Agent” does this within seconds of the user signing in.
    • Intune immediately starts deploying the selected applications and PowerShell scripts to the device (those that were marked for installation during OOBE). The ESP screen will typically list the device setup steps, which may include device configuration, app installation, etc. The apps you marked as required (Company Portal, Office, etc.) will download and install one by one. Their status can often be viewed on the screen (e.g., “Installing Office 365… 50%”).
    • Any device configuration policies assigned to the device group (e.g., configuration profiles or compliance policies you set to target that group) will also begin to apply. Note: Autopilot v2 does not pause for all policies to complete; it mainly ensures the selected apps and scripts complete. Policies will apply in parallel or afterwards without blocking the ESP[3].
    • If you enabled BitLocker or other encryption policies, those might kick off during this phase as well (depending on your Intune configuration for encryption on Azure AD join).
    • The user remains at the ESP screen until the critical steps finish. With the 10-app limit and no dynamic group delay, this phase should complete relatively quickly (typically a few minutes to perhaps an hour for large Office downloads on slower connections). The progress bar will reach 100%.
  4. Completion and First Desktop Launch: Once the selected apps and scripts have finished deploying, Autopilot signals that device setup is complete. The ESP will indicate it’s done, and the user will be allowed to proceed to log on to Windows (or it may automatically log them in if credentials were cached from step 2). In Autopilot v2, a final screen can notify the user that critical setup is finished and they can start using the device[6]. The user then arrives at the Windows desktop.
  5. Post-Enrolment (Background tasks): Now the device is fully Azure AD joined and enrolled in Intune as a managed device. Any remaining apps or policies that were not part of the initial device preparation will continue to install in the background. For example, if you targeted some less critical user-specific apps (say, OneDrive client or Webex) via user groups, those will download via Intune management without interrupting the user. The user can begin working, and they’ll likely see additional apps appearing or software finishing installations within the first hour of use.
  6. Verification: The IT admin can verify the device in the Intune portal. It should appear under Devices with the user assigned, and compliance/policies applying. The Autopilot deployment report in Intune will show this device’s status as successful if all selected apps/scripts succeeded, or flagged if any failures occurred[5]. The user should see applications like Office, Teams, Outlook, and the Company Portal already installed on the Start Menu[4]. If all looks good, the device is effectively ready and managed.

4.4 Troubleshooting Common Issues in Autopilot v2

While Autopilot v2 is designed to be simpler and more reliable, you may encounter some issues during setup. Here are common issues and how to address them:

  • Device is blocked as “personal” during enrollment: If you enabled the enrollment restriction to block personal devices, a new device might fail to enroll at user sign-in with a message that personal devices are not allowed. This typically means Intune did not recognize the device as corporate. Ensure you have uploaded the correct device serial, model, and manufacturer under corporate identifiers before the user attempts enrollment[4]. Typos or mismatches (e.g., “HP Inc.” vs “Hewlett-Packard”) can cause the check to fail. If an expected corporate device was blocked, double-check its identifier in Intune and re-upload if needed, then have the user try again (after a reset). If you cannot get the identifiers loaded in time, you may temporarily toggle the restriction to allow personal Windows enrollments to let the device through, then re-enable once fixed.
  • Autopilot profile not applying (device does standard Azure AD join without ESP): This can happen if the user is not in the group assigned to the Autopilot Device Prep profile, or if the device was already registered with a classic Autopilot profile. To troubleshoot:
    • Verify that the user who is signing in is indeed a member of the Autopilot Users group that you targeted. If not, add them and try again.
    • Check Intune’s Autopilot devices list. If the device’s hardware hash was previously imported and has an old deployment profile assigned, the device might be using Autopilot v1 behavior (which could skip the ESP or conflict). Solution: Remove the device from the Autopilot devices list (deregister it) so that v2 can proceed[5].
    • Also ensure the device meets OS requirements. If someone somehow tried with an out-of-date Windows 10, the new profile wouldn’t apply.
  • One of the apps failed to install during OOBE: If an app (or script) that was selected in the profile fails, the Autopilot ESP might show an error or might eventually time out. Autopilot v2 doesn’t explicitly block on policies, but it does expect the chosen apps to install. If an app installation fails (perhaps due to an MSI error or content download issue), the user may eventually be allowed to log in, but Intune’s deployment report will mark the deployment as failed for that device[5]. Use the Autopilot deployment report in Intune to see which app or step failed[5]. Then:
    • Check the Intune app assignment for that app. For instance, was the app installer file reachable and valid? Did it have correct detection rules? Remedy any packaging error.
    • If the issue was network (e.g., large app timed out), consider not deploying that app during OOBE (remove it from the profile’s selected apps so it installs later instead).
    • The user can still proceed to work after skipping the failed step (in many cases), but you’ll want to push the necessary app afterward or instruct the user to install via Company Portal if possible.
  • User sees unexpected OOBE screens (e.g., personal vs organization choice): As noted, Autopilot v2 can show some default Windows setup prompts that classic Autopilot hid. For example, early in OOBE the user might be asked “Is this a personal or work device?” If they see this, they should select Work/School (which leads to the Azure AD sign-in). Similarly, the user might have to accept the Windows 11 license agreement. To avoid confusion, prepare users with guidance that they may see a couple of extra screens and how to proceed. Once the user signs in, the rest will be automated. In future, after the device prep profile applies, those screens might not appear on subsequent resets, but on first run they can. This is expected behavior, not a failure.
  • Autopilot deployment hangs or takes too long: If the process seems stuck on the ESP for an inordinate time:
    • Check if it’s downloading a large update or app. Sometimes Windows might be applying a critical update in the background. If internet is slow, Office download (which can be ~2GB) might simply be taking time. If possible, ensure a faster connection or use Ethernet for initial setup.
    • If it’s truly hung (no progress increase for a long period), you may need to power cycle. The good news is Autopilot v2 is resilient – it has more retry logic for applying the profile[8]. On reboot, it often picks up where it left off, or attempts the step again. Frequent hanging might indicate a problematic step (again, refer to Intune’s report).
    • Ensure the device’s time and region were set correctly; incorrect time can cause Azure AD token issues. Autopilot v2 does try to sync time more reliably during ESP[8].
  • Post-enrollment policy issues: Because Autopilot v2 doesn’t wait for all policies, you might notice things like BitLocker taking place only after login, or certain configurations applying slightly later. This is normal. However, if certain device configurations never apply, verify that those policies are targeted correctly (likely to the device group). If they were user-targeted, they should apply after the user logs in. If something isn’t applying at all, treat it as a standard Intune troubleshooting case (e.g., check for scope tags, licensing, or conflicts).

Overall, many issues can be avoided by testing Autopilot v2 on a pilot device before mass rollout. Run through the deployment yourself with a test user and device to catch any application installation failures or unexpected prompts, and adjust your profile or process accordingly.

5. Best Practices for Maintaining and Managing Autopilot v2 Devices

After deploying devices with Windows Autopilot Device Preparation, your work isn’t done – you’ll want to manage and maintain those devices for the long term. Here are some best practices to ensure ongoing success:

  • Establish Clear Autopilot Processes: Because Autopilot v2 and v1 may coexist (for different use cases), document your process. For example, decide: will all new devices use Autopilot v2 going forward, or only certain ones? Communicate to your procurement and IT teams that new devices should not be registered via the old process. If you buy through an OEM with Autopilot registration service, pause that for devices you’ll enroll via v2 to avoid conflicts.
  • Keep Windows and Intune Updated: Autopilot v2 capabilities may expand with new Windows releases and Intune updates. Ensure devices get Windows quality updates regularly (this keeps the Autopilot agent up-to-date and compatible). Watch Microsoft Intune release notes for any Autopilot-related improvements or changes. For instance, if/when Microsoft enables features like self-deploying or hybrid join in Autopilot v2, it will likely come via an update[6] – staying current allows you to take advantage.
  • Limit and Optimize Apps in the Profile: Be strategic about the apps you include during the autopilot phase. The 10-app limit forces some discipline – include only truly essential software that users need immediately or that is required for security/compliance. Everything else can install later via normal Intune assignment or be made available in Company Portal. This ensures the provisioning is quick and has fewer chances to fail. Also prefer Win32 packaged apps for reliability and to avoid Windows Store dependencies during OOBE[2]. In general, simpler is better for the OOBE phase.
  • Use Device Categories/Tags if Needed: Intune supports tagging devices during enrollment (in classic Autopilot, there was “Convert all targeted devices to Autopilot” and grouping by order ID). In Autopilot v2, since devices aren’t pre-registered, you might use dynamic groups or naming conventions post-enrollment to organize devices (e.g., by department or location). Consider leveraging Azure AD group rules or Intune filters if you need to deploy different apps to different sets of devices after enrollment.
  • Monitor Deployment Reports and Logs: Take advantage of the new Autopilot deployment report in Intune for each rollout[5]. After onboarding a batch of new devices, review the report to see if any had issues (e.g., maybe one device’s Office install failed due to a network glitch). Address any failures proactively (rerun a script, push a missed app, etc.). Additionally, know that users or IT can export Autopilot logs easily from the device if needed[5] (there’s a troubleshooting option during the OOBE or via pressing certain key combos). Collecting logs can help Microsoft support or your IT team diagnose deeper issues.
  • Maintain Corporate Identifier Lists: If you’re using the corporate device identifiers method, keep your Azure AD device inventory synchronized with Intune’s list. For every new device coming in, add its identifiers. For devices being retired or sold, you might remove their identifiers. Also, coordinate this with the enrollment restriction – e.g., if a top executive wants to enroll their personal device and you have blocking enabled, you’d need to explicitly allow or bypass that (possibly by not applying the restriction to that user or by adding the device as corporate through some means). Regularly update the CSV as you purchase hardware to avoid last-minute scrambling when a user is setting up a new PC.
  • Plan for Feature Gaps: Recognize the current limitations of Autopilot v2 and plan accordingly:
    • If you require Hybrid AD Join (joining on-prem AD) for certain devices, those devices should continue using the classic Autopilot (with hardware hash and Intune Connector) for now, since v2 can’t do it[3].
    • If you utilize Autopilot Pre-Provisioning (White Glove) via IT staff or partner to pre-setup devices before handing to users (common for larger orgs or complex setups), note that Autopilot v2 doesn’t support that yet[3]. You might use Autopilot v1 for those scenarios until Microsoft adds it to v2.
    • Self-Deploying Mode (for kiosks or shared devices that enroll without user credentials) is also not in v2 presently[3]. Continue using classic Autopilot with TPM attestation for kiosk devices as needed. It’s perfectly fine to run both Autopilot methods side-by-side; just carefully target which devices or user groups use which method. Microsoft is likely to close these gaps in future updates, so keep an eye on announcements.
  • End-User Training and Communication: Even though Autopilot is automated, let your end-users know what to expect. Provide a one-page instruction with their new laptop: e.g., “1) Connect to Wi-Fi, 2) Log in with your work account, 3) Wait while we set up your device (about 15-30 minutes), 4) You’ll see a screen telling you when it’s ready.” Setting expectations helps reduce support tickets. Also inform them that the device will be managed by the company (which is standard, but transparency helps trust).
  • Device Management Post-Deployment: After Autopilot enrollment, manage the devices like any Intune-managed endpoints. Set up compliance policies (for OS version, AV status, etc.), Windows Update rings or feature update policies to keep them up-to-date, and use Intune’s Endpoint analytics or Windows Update for Business reports to track device health. Autopilot has done the job of onboarding; from then on, treat the devices as part of your standard device management lifecycle. For instance, if a device is reassigned to a new user, you can invoke Autopilot Reset via Intune to wipe user data and redo the OOBE for the new user—Autopilot v2 will once again apply (just ensure the new user is in the correct group).
  • Continuous Improvement: Gather feedback from users about the Autopilot process. If many report that a certain app wasn’t ready or some setting was missing on first login, adjust your Autopilot profile or Intune assignments. Autopilot v2’s flexibility allows you to tweak which apps/scripts are in the initial provision vs. post-login. Aim to find the right balance where devices are secure and usable as soon as possible, without overloading the provisioning. Also consider pilot testing Windows 11 feature updates early, since Autopilot behavior can change or improve with new releases (for example, a future Windows 11 update might reduce the appearance of some initial screens in Autopilot v2, etc.).

By following these best practices, you’ll ensure that your organization continues to benefit from Autopilot v2’s efficiencies long after the initial setup. The result is a modern device deployment strategy with minimal hassle, aligned to the cloud-first, zero-touch ethos of Microsoft 365.


Conclusion: Microsoft Autopilot v2 (Windows Autopilot Device Preparation) represents a significant step forward in simplifying device onboarding. By leveraging it in your Microsoft 365 Business environment, you can add new Windows 11 devices with ease – end-users take them out of the box, log in, and within minutes have a fully configured, policy-compliant workstation. The latest updates bring more reliability, insight, and speed to this process, making life easier for IT admins and employees alike. By understanding the new features, following the implementation steps, and adhering to best practices outlined in this guide, you can successfully deploy Autopilot v2 and streamline your device deployment workflow[4][5]. Happy deploying!

References

[1] Overview of Windows Autopilot | Microsoft Learn

[2] Windows Autopilot Best Practices: 2025 Updated

[3] Intune Autopilot V1 vs Intune Autopilot V2- What is changing?

[4] How to Set Up Autopilot Device Preparation in Microsoft Intune

[5] Overview of Windows Autopilot device preparation

[6] Announcing new Windows Autopilot onboarding experience for government …

[7] What’s new in Microsoft Intune: January 2025

[8] What’s new in Windows Autopilot | Microsoft Learn

iPhone Onboarding into M365 Business Premium: Step-by-Step Guide

bp1

Overview:
This guide provides a comprehensive checklist for onboarding an iPhone into Microsoft 365 Business Premium (which includes Microsoft Intune) so that the device is fully managed and protected. It covers initial setup, detailed step-by-step enrollment procedures, specific security configurations, ongoing management tasks, and compliance considerations. By following this checklist, your organisation can ensure iPhones are enrolled in Mobile Device Management (MDM), secured with best-practice policies, and compliant with relevant standards.


Prerequisites and Preparation

Before enrolling an iPhone in M365 Business Premium/Intune, make sure the following prerequisites are in place:

  • Licenses and Accounts:

    • The user must have a valid Microsoft 365 Business Premium license (which includes Intune). Ensure the user’s account has an Intune license assigned[1].

    • You must have appropriate admin roles in Intune (e.g. Intune Administrator or Policy and Profile Manager) to perform the setup.
  • Device Requirements:

    • The iPhone should be running a supported iOS version (iOS 14.0 or later is required for Intune enrollment)[1][2]. Newer iOS versions are recommended.

    • The device should be factory reset or not previously MDM-enrolled. Remove any existing management profiles or accounts from the iPhone. (On the device, check Settings > General > Device Management; if a management profile is listed, remove it before proceeding[2].)
  • Network and Apps:

    • The iPhone has a reliable Wi-Fi or mobile data connection (maintain connectivity throughout the enrollment)[1].

    • The Safari browser (built-in) should be available for profile installation during enrollment[1].

    • Install the Intune Company Portal app from the Apple App Store on the iPhone[1]. This app is used for user-driven enrollment and device compliance checks.
  • MDM Setup in Microsoft 365:

    • Set MDM Authority: Verify that Intune is enabled as the Mobile Device Management authority in your tenant (for new M365 tenants this is usually already the case).

    • Apple MDM Push Certificate (APNs): Set up an Apple Push Notification Service certificate in Intune before any iOS device enrollment[2]. This certificate allows Intune to manage Apple devices.

    • In the Intune admin center, navigate to Devices > Enroll devices > Apple enrollment > Apple MDM Push certificate. Follow the steps to create and download a Certificate Signing Request (CSR), then upload it to Apple’s Push Certificates Portal to obtain the APNs certificate, and finally upload that certificate to Intune[1][1].

    • Note: The APNs certificate must be renewed annually. It’s tied to an Apple ID (use a company Apple ID email account for this). Intune will warn you as the expiration approaches; renew the certificate before it expires to avoid losing the ability to manage iOS devices[2].
  • Apple Business Manager (for Corporate Devices):
    If your organisation uses Apple Business Manager (ABM) or Apple School Manager for corporate-owned iPhones, integrate it with Intune for Automated Device Enrollment (formerly DEP). This allows zero-touch setup of devices that are purchased through Apple and makes them supervised (giving greater management control).

    • Ensure devices are added to your ABM account (either by purchasing through ABM or via Apple Configurator for existing devices).

    • In Intune, go to Devices > iOS/iPadOS > Enrollment Program Tokens and create an ABM token by uploading the key from Intune to Apple and vice versa[3][3].

    • Create an enrollment profile in Intune and assign it to the ABM devices (specify supervision, MDM user affinity, etc.)[3][3].

    • Outcome: When a new or erased iPhone is turned on, it will automatically enroll into Intune during setup with the defined management profile[3]. (If you are not using ABM, or for BYOD scenarios, you will use the Company Portal method described below.)
  • Intune Groups and Policies Preparation:

    • Set up Azure AD groups for device or user targeting (for example, a group for “Managed iPhone Users”). This will help in assigning policies and apps.

    • Draft your Compliance Policy and Configuration Profiles for iOS in Intune ahead of time (detailed in the security configuration section). Having these in place ensures that once the device enrolls, it will automatically receive the required settings and be evaluated for compliance[4].

    • Optionally, prepare Company Portal branding and Terms of Use in Intune to show a corporate welcome or usage policy to users during enrollment (this can include an acceptable use policy for mobile devices).
  • User Communication:

    • Plan a communication to the end user (if user-assisted enrollment) explaining the enrollment steps and why device management is needed. End-user guides or an enrollment workshop can improve success rates. Make sure users are aware of what data IT can and cannot see on managed personal devices (privacy notice).

    • Training: Be ready to provide help or training on using the Company Portal app, accessing work resources, and any changes in device behavior after enrollment (such as needing a stronger passcode) – this helps user adoption.

With these prerequisites complete, you are ready to onboard the iPhone into Intune (M365 Business Premium) with full management and security.


Initial Onboarding Steps

Follow these steps to enroll the iPhone in Microsoft 365 Business Premium’s management (Intune):

1. Configure Intune for iOS Management (Admin Task)

  • Intune Portal Access: Sign in to the https://endpoint.microsoft.com with an administrator account.

  • Verify Prerequisites: Double-check that the Apple MDM Push Certificate is configured in Intune[1] and that the user account is properly licensed for Intune (M365 Business Premium assigned)[1].

  • Device Enrollment Restrictions: Optionally, review enrollment restrictions under Devices > Enroll devices > Enrollment restrictions. You can restrict which platforms can enroll (ensure iOS is allowed) or limit enrollment to certain OS versions, device ownership types, etc[2][2]. For example, you might block very old iOS versions or limit personal device enrollments if desired.

2. Create Compliance and Configuration Policies (Admin Task)
Before or immediately after enrollment, apply security configurations by creating policies in Intune. This ensures the device will be fully protected as soon as it’s managed. Key policies include:

  • Device Compliance Policy for iOS: Define the minimum requirements the iPhone must meet to be considered compliant[2]. For instance: require a device passcode, block jailbroken devices, require encryption (on iOS, setting a passcode automatically enables encryption)[2], enforce a minimum OS version, and set other security rules (detailed in the next section). Once created, assign this policy to the relevant user/device group. This policy will evaluate the iPhone after enrollment and mark it as Compliant or Non-compliant according to your rules.

  • Configuration Profiles: Set up any device configuration profiles needed. Examples:

    • Device Restrictions profile: to enforce specific settings (like disallowing backup to iCloud for corporate data, blocking installation of untrusted apps, or preventing removal of the management profile for supervised corporate devices).

    • Wi-Fi or Email profiles: to automatically configure company Wi-Fi networks or email accounts on the device[5] (note: for email, Intune can deploy a managed email profile; requiring the device to use that ensures email is accessed securely[5]).

    • App Deployment: Prepare required app deployments (e.g., Outlook, Teams, OneDrive) or app protections. In Intune, you can assign Managed Apps to the device or user group so they install during or after enrollment.
  • App Protection Policies (MAM): (Optional, mostly for BYOD scenarios) If some users won’t fully enroll devices, you could use App Protection Policies to protect company data at the application level[6][6]. However, since this scenario is for fully managed devices, we assume full enrollment. Still, Intune MAM policies can add an extra layer of data protection for corporate apps (e.g. requiring a PIN in Outlook, blocking data transfer to personal apps)[6][6].

    By setting these policies now, you ensure that as soon as the device is enrolled, Intune will apply all the security requirements automatically.

3. Initiate iPhone Enrollment
Now it’s time to enroll the device. There are two primary enrollment methods depending on ownership:

  • (A) Corporate-Owned Device – Automated Enrollment via Apple Business Manager:
    If the iPhone is company-owned and has been added to Apple Business Manager (ABM):

    • Turn on or reset the iPhone. During the initial setup wizard, after choosing language/region and network, the device will contact Apple’s deployment service and recognize that it is assigned to your organisation’s MDM (Intune).

    • You will see a screen indicating the device will be automatically configured by your organisation. Continue with the prompts. The device will enroll itself over the air into Intune with the settings from the enrollment profile you assigned (no need to manually download a profile)[3][3].

    • Sign in with the user’s work or school (Microsoft Entra/Azure AD) account when prompted. This will register the device to that user in Intune (user affinity) and complete the enrollment.

    • Once finished, the iPhone will be in supervised mode (granting enhanced control) and the Company Portal app may be pre-installed as part of the process. The user might still need to open Company Portal to finalize compliance checks.

      ABM enrollment streamlines the process – it’s largely automatic after initial setup, and the device is fully managed from the start.

  • (B) BYOD or Non-ABM Device – User-Driven Enrollment via Company Portal:
    For personal or non-ABM devices, use the Intune Company Portal app:

    1. On the iPhone, launch the Company Portal app (which was installed earlier).

    2. Sign in with the user’s work Microsoft 365 credentials (email and password). The app will identify that the device is not managed and will begin the enrollment process.

    3. Follow the on-screen prompts in Company Portal. The user will typically tap Begin or Enroll to start. Privacy information is shown; the user should review what the company can and cannot see.

    4. Download Management Profile: The Company Portal will redirect to the Safari browser to download a management configuration profile. When prompted “This website is trying to download a configuration profile”, the user should tap Allow. A message will confirm the profile is downloaded. [2]

    5. Install Management Profile: After the profile is downloaded, the user must go to the iPhone Settings app to install it (Apple requires manual installation for profiles on user-enrolled devices). In Settings, a new item “Profile Downloaded” will appear near the top – tap this, or navigate to General > VPN & Device Management, then under “Downloaded Profile” select the Intune management profile.

    6. Tap Install. The device may prompt for the phone’s passcode to authorize profile installation. A warning about device management will be shown – the user should confirm by tapping Install again, and then Trust when asked to trust the remote management. Now the Intune MDM profile is installed on the iPhone[2]. Tap Done when finished.

    7. Return to the Company Portal app (or the Safari page) to continue any final steps. The Company Portal will complete the enrollment and register the device with Intune.

      The device is now enrolled in Intune as a managed device (in a state often called “MDM enrolled”). The Company Portal app will show the device status and any compliance requirements.

    (Choose the method above that fits the scenario. Both achieve an enrolled, managed iPhone in Intune, but the user experience differs.)

4. Verify Enrollment and Compliance
After enrollment, verify that the iPhone appears in Intune and meets compliance:

  • In the Intune Admin Center, go to Devices > iOS/iPadOS > All devices (or Devices > All devices) and confirm the iPhone is listed, assigned to the correct user, and shows as “Compliant” or “Not compliant”. Initial status might be not compliant until policies apply.

  • Intune will automatically deploy the compliance policy and evaluate the device. If any compliance requirement is not met, the Company Portal will notify the user of what needs to be done. For example, if your policy requires a PIN/passcode or a stronger password, the user will be prompted to set a device passcode to meet the policy[2]. The Company Portal app can guide the user through resolving issues (e.g., setting a new PIN, removing a jailbreak, updating iOS to a required version).

  • Once all conditions are satisfied, the device status in Intune will update to Compliant, meaning it adheres to your organisation’s security rules and can access resources. The user now has access to corporate email, Teams, OneDrive, etc. on the device (or will shortly, once those apps are installed and the device syncs policies).

    Tip: In Intune, you can check Device Compliance > Reports for a compliance overview and drill down into the specific device to see any settings that are not met. Ensure that the device has checked in recently (an initial check-in happens during enrollment).

5. Apply Security Configurations and Policies
Many security settings should already be active thanks to the compliance and configuration profiles applied in Step 2. However, ensure the following configurations are in place (some of these are automatically enforced via the compliance policy, but it’s good to review):

  • Passcode Policy: The iPhone must have a lock screen passcode that meets your requirements. Intune compliance can require a password to unlock the device[5]. Typically, enforce a strong passcode (e.g. at least 6 digits or an alphanumeric code, no simple sequences). You can block simple PINs like “1234” or “111111”[5] and require a mix of characters if using alphanumeric.

  • Device Encryption: iOS devices encrypt all data when a passcode is set. By requiring a passcode, you are also ensuring the device storage is encrypted[5]. No additional action is needed for encryption beyond the passcode requirement (there’s no separate encryption setting on iPhone; it’s automatic).

  • Jailbreak Detection: The compliance policy should mark jailbroken (rooted) devices as noncompliant, effectively blocking them[5][6]. This protects against devices that might be compromised. Intune can’t run on a jailbroken device without being detected – if a device is jailbroken, the user should remove the jailbreak or use a different device.

  • OS Version Requirements: Enforce a minimum OS version (and optionally block specific older OS builds). For example, if you require at least iOS 16.0 for security features, set that in the compliance policy; any device below that will be noncompliant until updated[2][5]. You can also specify a maximum OS version if needed (usually leave this unset unless a future iOS update is known incompatible with some app).

  • Threat Level / Defender Integration: If using Microsoft Defender for Endpoint (MDE), integrate it with Intune compliance. In Intune’s compliance policy for iOS, you can require the device to be at or below a certain threat level as reported by a Mobile Threat Defense solution. With Defender for Endpoint on iOS, you could set “Require the device to be at or under the machine risk score” to, say, Low or Medium[5]. Devices with higher risk (malware detected, etc.) would become noncompliant automatically. (This requires Defender for Endpoint to be deployed on the device – see step 6.)

  • App Configuration: Verify that any necessary managed apps (such as Outlook, Teams, OneDrive, or custom apps) have been installed or are available for the user to install via Company Portal. For email, if you deployed a managed email profile, ensure it’s functioning (the user should see the work email account in Mail app or Outlook configured).

  • Device Restrictions: If you created a device restrictions profile (for supervised devices), ensure settings like prohibiting USB data transfers when locked (USB restricted mode), disabling the ability to factory reset or enroll in other MDM, etc., are applied according to your needs. These settings help lock down corporate devices further. BYOD devices typically wouldn’t have heavy restrictions beyond compliance requirements, to respect user privacy.

    The security configurations above collectively harden the iPhone and align it with corporate policy and compliance standards. Intune will continuously enforce these settings; if the user tries to disable them (for example, removing their passcode), Intune will mark the device noncompliant and can take action.

6. Enable Conditional Access (Enforce Compliance)
To protect company data, set up Conditional Access policies in Azure AD (Entra ID) that require device compliance for accessing cloud resources (like Exchange Online email, SharePoint, Teams, etc.)
[6][7]. This step ensures that only managed and compliant iPhones can actually use company apps/data:

  • Go to the Azure AD or Microsoft Entra admin center (Azure AD > Security > Conditional Access). Create a policy named, for example, “Require compliant device for mobile access.”

  • Assignments: Target all users or a group of users (e.g., all staff using mobile devices). For cloud apps, select the key services (or “All cloud apps” for a broad policy) that should be protected – typically include Exchange Online, SharePoint Online, Microsoft Teams, etc.[7].

  • Conditions: Scope the policy to apply to mobile platforms (iOS and Android) if you only want to enforce on mobiles[6][6]. You can also include or exclude device states as needed.

  • Controls (Grant): Select “Require device to be marked as compliant” as a requirement for access[6]. You might combine this with “Require multi-factor authentication” or other controls for additional security, but requiring compliance means the device must be Intune-enrolled and meeting all policy rules to get a token to cloud services.

  • Enable the policy. Now, if a user tries to sign into, say, Outlook on an iPhone that is not enrolled or not compliant, they will be blocked and told their device does not meet requirements. This effectively forces users to enroll and adhere to policies to use company data.

  • Note: M365 Business Premium includes Azure AD Premium P1, so Conditional Access is available with this license level. Make sure to exclude any emergency/break-glass admin accounts from CA policies[7] to avoid locking out all admins inadvertently.

    With Conditional Access in place, you have closed the loop: device compliance status (from Intune) is now gating access to company resources. This significantly strengthens security.

7. Deploy Defender for Endpoint on iOS (Optional but Recommended)
Microsoft 365 Business Premium includes Microsoft Defender for Business, which covers Defender for Endpoint (Plan 1) for devices including iOS. Installing Microsoft Defender for Endpoint (MDE) on the iPhone can provide additional threat protection:

  • In Intune (Endpoint Manager), navigate to Apps > iOS/iPadOS and add the Microsoft Defender for Endpoint app (available in the App Store) as a managed app. Assign it to the iPhones/user group for deployment. Alternatively, instruct the user to install Microsoft Defender from the App Store.

  • Once installed, the user should open the Defender app and sign in with their work account to onboard the device. Intune can also deploy a device configuration for Defender if needed (or use an App Configuration policy) to streamline onboarding.

  • Defender for Endpoint on iOS provides anti-phishing, malicious website blocking, and even some MTD capabilities[8]. All threats or alerts from the device will be visible in the Microsoft 365 Defender Security portal alongside other endpoints[8][8].

  • Ensure that in the Defender portal (security.microsoft.com), the device shows up as onboarded. You can also integrate Defender risk signals with Intune compliance (as noted in step 5 for device threat level).

  • This extra layer helps catch things like unsafe network connections or malicious apps/websites on the iPhone, complementing Intune’s device controls[8].

    Caution: Don’t run multiple endpoint protection agents on iOS concurrently (e.g., two MTD apps), as it may cause conflicts[8]. Defender for Endpoint acts as a local VPN on the device to monitor traffic (it’s an on-device VPN, not sending data through an external server)[8]. This is normal and by design for it to function.

8. Finishing Up and User Guidance

  • Make sure the user can access all needed resources and apps on the iPhone now. They should be able to open Outlook for email (or the iOS Mail app if that’s managed), Teams for chat, etc., with no Conditional Access blocks.

  • Educate the user on Company Portal: The Company Portal app will show device compliance status and any pending actions. Encourage users to periodically open it or pay attention to its notifications. For example, if their device falls out of compliance (maybe their OS is outdated), Company Portal will alert them and instruct how to fix it.

  • Advise the user on how to get support if they encounter issues – e.g., whom to contact in IT for device problems or questions.

  • Document that the device has been onboarded (update your asset inventory or MDM device list if you maintain a separate register outside Intune). Especially for corporate-owned devices, record serial numbers and who the device is issued to.

At this stage, the iPhone is successfully onboarded into Microsoft 365 Business Premium’s management. It is receiving policies from Intune, is protected by compliance and conditional access, and (if configured) has additional threat protection. The next section covers ongoing management to keep the device secure and compliant over time.


Security Configurations and Compliance Policies for iPhone

(This section details the key security settings that should be implemented as part of the onboarding, many of which we applied via compliance policy in the steps above. Use it as a reference checklist to ensure nothing is missed.)

Device Compliance Policy – Key Settings: When creating the iOS compliance policy in Intune, consider including these settings to enforce security baselines (in addition to any organisational requirements):

  • Require a Passcode: Ensure “Require a password to unlock mobile devices” is set to Require[5]. This forces the user to have a lock screen passcode. As noted, this also enables device encryption on iPhones. Configure related passcode settings:

    • Block Simple Passwords: Set to Block to disallow easy PINs like 1234[5].

    • Minimum Password Length: Recommend at least 6 digits (or more if using alphanumeric).

    • Password Type: Consider Numeric (which allows numeric or stronger) or Alphanumeric if you want to require letters too[5]. Alphanumeric passwords are more secure but less convenient on phones – many orgs choose Numeric with a length of 6+ as a balance.

    • Password Expiration: You can set passwords to expire after e.g. 90 days to prompt users to change them periodically[5]. (Some organisations skip this on mobile devices, relying on device biometric unlocks and compliance rules.)

    • Auto-Lock: Use “Maximum minutes of inactivity until screen locks” to something like 5 minutes or less[5], so devices auto-lock quickly when not in use. And “Maximum minutes after screen lock before password is required” to Immediately or a few minutes[5]. This ensures the passcode is needed promptly after lock.
  • Device Health:

    • Jailbreak (Rooted) Device Detection: Set “Mark noncompliant if Jailbroken” to Block such devices[5]. This will flag any jailbroken iPhone as noncompliant and Intune/Conditional Access can then prevent it from accessing corporate data[5].

    • Require Device to be Free of Threats: If using a Mobile Threat Defense like Defender, set Maximum Allowed Device Threat Level to Low (or Secured) to only allow devices with no detected threats[5]. This ties into the threat assessment from Defender for Endpoint.
  • Operating System Requirements:

    • Minimum OS Version: Set the least allowed iOS version. For example, if your org supports iOS 16 and above, put 16.0 here[5]. Devices running older iOS will then show as noncompliant until updated. This helps enforce that users apply iOS updates.

    • Maximum OS Version: Generally leave this blank unless you have a specific reason (e.g., a new iOS version is known to break a critical app – then you could temporarily block it by setting max version to one below). If used, be sure to update this when the new OS is vetted, otherwise devices will become noncompliant after upgrading past the max[5].

    • Minimum OS Build: Rarely used, but you could specify a minimum build number if a particular security patch is required.
  • Device Encryption:

    • On iOS, encryption is automatically tied to having a passcode (data at rest is encrypted with hardware AES). Intune doesn’t have a separate “require encryption” toggle for iOS because of this. Just ensure the passcode requirement is in place. (For reference, the compliance policy setting “Encryption of data storage on device” is applicable to Android/Windows; on iOS it’s not separately configurable – it’s fulfilled by having a passcode).
  • System Security and Other Settings:

    • Device Security Compliance: Consider enabling “Microsoft Defender for Endpoint device risk” in compliance if you deploy Defender. For instance, Require the device risk score to be at most Low[5]. This integrates threat evaluation.

    • Block Cloud Backup of Org Data: While not a compliance setting per se, you might enforce via App Protection or device config that certain app data (like Office 365 data) isn’t backed up to iCloud. This can be configured in an App Protection Policy (MAM) by blocking “backup to iCloud”[6] for managed apps. On supervised devices, a Device Restrictions profile can disable iCloud backup entirely, but that may be too restrictive for BYOD.

    • Disable Jailbreak Detection Evasion: (Supervised only) There are settings to prevent the user from turning off features like USB Restricted Mode (which blocks accessory connections if device is locked for an hour) – ensure those are enabled by default on iOS 12+ so that if someone tries to jailbreak via a USB exploit, it’s harder. Intune doesn’t expose every one of these as separate toggles, but keeping device up-to-date and supervised mode helps.

Conditional Access Policy: (As covered in step 6) After configuring compliance, create Conditional Access rules to enforce that devices must be compliant to access corporate cloud apps[6]. This connects the device’s compliance state with real-time access control and is crucial for security. Also consider requiring MFA on new devices or for sensitive apps, even if compliant.

Information Protection Policies: Beyond device config, ensure the rest of M365 security baseline is addressed (though out of scope of device onboarding, it’s worth mentioning): Enable MFA for all users[9], use data loss prevention (DLP) policies for sensitive data in emails/SharePoint, and use sensitivity labels if needed. These complement device security by protecting data at other levels.

Compliance Standards and Regulatory Policies: Intune’s device compliance features help organizations adhere to regulations like HIPAA, GDPR, ISO 27001, etc., by enforcing encryption, access control, and monitoring of devices[10]. For example, HIPAA requires safeguarding of ePHI – by mandating passcodes, encryption, and the ability to wipe a lost device, you are implementing required safeguards. If your organisation has specific regulatory needs, review those and adjust compliance policies accordingly (e.g., shorter device lock times for highly sensitive environments, or specific audit logging requirements). Intune itself is compliant with many standards, and it provides you tools (reports, logs, enforcement) to maintain compliance. Always document your policies and how they map to any regulatory requirement for audit purposes.


Ongoing Management and Maintenance

Onboarding is just the first step. To keep the iPhone managed and protected over time, perform these ongoing tasks and checks:

  • Monitor Device Compliance: Regularly review the device’s compliance status in Intune. Intune provides compliance reports and dashboards – for example, see if any devices are listed as not compliant and why. Common issues might be an expired OS version, or a user who removed their passcode. Use Intune > Devices > Monitor > Compliance status to get an overview. If a device is noncompliant, Intune can be configured with automatic actions (like send the user a notification, or even retire the device after X days of non-compliance). Take appropriate action: contact the user to resolve the issue or remediate from the admin side. Maintaining compliance is an ongoing process, not a one-time set-and-forget[6][6].

  • Update Management: Keep the iPhone’s OS up to date. New iOS releases often contain important security fixes. Intune can manage iOS updates for supervised devices using iOS Update Policies[11]. You can schedule updates to install during off-hours or at next check-in, and even defer or push specific versions[11][11]. For unsupervised BYOD devices, Intune can’t force-install OS updates, but you should encourage users to update promptly. Consider setting “mark device noncompliant if OS is older than X” to prompt them. In Company Portal, users can see if their OS is out of compliance and update. Also update required apps via Intune app deployments (Intune can push app updates for VPP or line-of-business apps; App Store apps update through the App Store automatically unless restricted).

  • Renew Certificates and Tokens: Mark your calendar for important renewals. The Apple MDM Push (APNs) certificate needs renewal every year[2]. Do this in the Intune portal > Tenant Administration > Connectors and Tokens > Apple MDM Push certificate, and also renew the token with Apple. If you integrated Apple Business Manager, the ABM token in Intune (Enrollment Program token) expires every 1–3 years (as set when you created it, up to 5 years max). Ensure it’s renewed via Devices > iOS/iPadOS > Enrollment program tokens before expiry, or devices will fail to enroll. Similarly, if using the Volume Purchase Program (VPP) for deploying apps or Apple Volume Content, renew those tokens annually.

  • Policy and Profile Maintenance: Periodically re-evaluate your Intune compliance and configuration profiles. You might strengthen policies over time (for instance, raising minimum iOS version as older ones become unsupported, or adjusting password length requirements). Intune will automatically prompt devices to comply with any new settings. Remove or update profiles that are no longer needed. Keep an eye on new Intune features or iOS capabilities that you can take advantage of (for example, new settings in Apple’s iOS Security Configuration Framework updates).

  • Conditional Access and Azure AD Monitoring: Check Azure AD sign-in logs for blocked sign-in attempts due to device non-compliance or other conditions. This can reveal if users are attempting to bypass policy (e.g., using an unmanaged device). Adjust conditional access policies if needed (for example, if you onboard additional cloud apps or if certain scenarios require exceptions). Azure AD’s Sign-in logs and Policy failures can be filtered to show failures due to CA, which is useful for troubleshooting.

  • Incident Response – Lost or Stolen Device: Have a process in place for lost or stolen iPhones. In Intune, you can issue a Remote Wipe (factory reset) or a Selective Wipe (corporate data removal) for a managed device. For corporate-owned devices, usually a full wipe (erase) is appropriate to protect data[12]. For BYOD, you might do a selective wipe which removes the Intune management profile and all company data/apps but leaves personal data intact[12]. Train your helpdesk or IT staff how to execute a wipe from the Intune portal (Devices > [select device] > Wipe). Also consider enabling Activation Lock bypass for supervised devices (Intune can display the bypass code if needed to reactivate a wiped device). Ensure users know to report lost devices immediately.

  • Device Lifecycle Management: If the device is replaced or the user leaves the organisation, you should retire the device from Intune. Intune’s Retire action will remove managed apps and data and the management profile. For corporate devices that will be reassigned, you may then wipe and re-enroll them for the new user. Always keep your Intune device inventory up to date—remove or retire devices that are no longer in use or haven’t checked in for a long time, to maintain security hygiene (Intune can have an auto-cleanup rule for devices inactive for X days).

  • Audit and Compliance Reporting: Periodically audit the Intune settings against your compliance requirements. Intune supports logging and reports for changes and device events. The Microsoft 365 compliance center can also show device compliance as part of broader compliance posture. If your organisation needs to demonstrate compliance (for example, for a certification or audit), maintain documentation of your Intune compliance policy settings and results. Intune aligns with data protection and regulatory compliance commitments by offering these controls[10], but you should verify and record that devices are indeed compliant. Use Intune’s compliance reports, or export device compliance data, to have evidence that all devices have encryption, passwords, etc., as required by policy.

  • User Support and Training: Continue to educate users about security best practices on their iPhone. For example, remind them not to install untrusted apps, to beware of phishing texts or emails (which Defender for Endpoint can help mitigate), and to keep their device in their possession. Provide an updated user guide if things change (e.g., if you roll out a new VPN solution or a new required app). Empower users via the Company Portal app to manage certain aspects: they can use it to check compliance, initiate a manual check-in, or even remotely locate or lock their device if you enable those features. Well-informed users are partners in security, not just endpoints to manage.

  • Stay Updated on Intune and iOS Features: Microsoft Intune and iOS both release frequent updates with new capabilities. For instance, Apple might introduce new MDM controls in a future iOS version (like enhanced VPN controls, or new restrictions) – keep an eye on Intune release notes and plan to implement new beneficial settings. Likewise, Apple’s hardware changes (e.g., eSIM management, new authentication methods) could be relevant. Keeping your device management practices current ensures you maintain a strong security posture.


By following this step-by-step checklist, your organisation will have a fully managed iPhone that is protected by Microsoft 365 Business Premium’s security features and compliant with your policies. The device will be under robust management: from initial enrollment with Intune, through enforced security configurations (passcode, encryption, jailbreak protection, etc.), to continuous compliance monitoring and conditional access enforcement.

In summary, M365 Business Premium provides the tools (Intune, Azure AD Conditional Access, Defender for Endpoint) to manage iPhones in a holistic way. Implementing these steps enables you to: protect corporate data on mobile devices, prevent unauthorized access with conditional compliance requirements, and simplify user onboarding while respecting user privacy on personal devices. Regular maintenance and user communication ensure that the iPhone remains secure throughout its lifecycle in your environment.

References

[1] Enroll iOS iPadOS devices in Intune: Complete Guide – Prajwal Desai

[2] Enroll iOS/iPadOS Devices in Intune Step by Step Guide

[3] Tutorial – Use Apple Business Manager to enroll iOS/iPadOS devices in …

[4] Microsoft 365 Device Management / Intune best practices checklist

[5] iOS/iPadOS device compliance settings in Microsoft Intune

[6] Enforce device compliance and app protection policies on BYOD with M365 …

[7] Enforce device compliance with Conditional Access – Microsoft Entra ID

[8] Microsoft Defender for Endpoint on iOS

[9] Microsoft 365 for business security best practices

[10] memdocs/memdocs/intune/fundamentals/compliance-in-intune.md at main …

[11] Use Microsoft Intune to manage software updates for supervised iOS …

[12] Manage devices enrolled in Mobile Device Management in Microsoft 365

Securing Microsoft Edge Browser with M365 Business Premium: Best Practices & Deployment Guide

bp1

Microsoft Edge is a modern, secure-by-default browser, but organizations can further harden it using tools in Microsoft 365 Business Premium – especially Microsoft Intune – to protect users and data. This post outlines best practice security settings for Microsoft Edge and details how to deploy and manage these settings across a fleet of devices using Intune. We also cover ongoing management, monitoring, and user awareness to ensure maximum day-to-day protection.


Introduction: Why Secure Edge with Intune

Microsoft Edge for Business provides a dedicated work browser experience that is secure by default, separating work and personal browsing data to prevent leaks[6]. It includes robust built-in security features (like Microsoft Defender SmartScreen) and supports enterprise controls. However, to achieve a consistent security posture across all devices, IT administrators should enforce configurations via Intune. Microsoft Intune (part of M365 Business Premium) allows centralized management of Edge’s security settings on Windows PCs, Macs, and mobile devices. By leveraging Intune policies, security baselines, and integration with other Microsoft 365 security tools, organizations can:

  • Enforce security best practices on every Edge browser used for work (e.g. enable phishing protection, restrict unsafe features).
  • Deploy these settings at scale to all managed endpoints (Windows, macOS, mobile) in a uniform way.
  • Ensure compliance with organizational security requirements and industry recommendations.
  • Monitor and update Edge configurations over time, responding to new threats and updates.

In the sections below, we’ll first explore the key Edge browser security settings and best practices. Then we’ll provide a step-by-step guide to implement these via Intune, discuss deployment to multiple devices, and cover management, updates, and user training.


Best Practice Security Settings for Microsoft Edge

To secure Edge browsers in an enterprise environment, administrators should focus on several critical security areas. Microsoft provides an Edge security baseline – a template of recommended settings – which we will use as a reference for best practices. This baseline reflects the latest security team recommendations for Edge’s configuration[1]. Below is a summary of key Edge security settings and their recommended state (as per Microsoft’s baseline and industry best practices), along with their purpose:

Security Setting Recommended Configuration Purpose / Protection
Microsoft Defender SmartScreen Enabled (On) Blocks access to phishing sites, malicious downloads, and other threats in real-time.
SmartScreen – Potentially Unwanted Apps (PUA) Enabled (On) Blocks download of adware, browser hijackers, and other low-reputation apps.
SmartScreen Bypass Disallow user bypass Prevents users from clicking through warning pages for malicious sites or files.
Typosquatting Checker Enabled Warns users if they mistype URLs and helps avoid look-alike malicious sites.
Site Isolation (Strict Site Per Process) Enabled (On) Isolates each website in its own process, mitigating spectre-type attacks between sites.
Legacy Browser Mode (IE mode) Disabled unless needed Avoids using Internet Explorer mode except for approved legacy sites, reducing exposure to older insecure web technologies.
HTTP/Legacy Authentication Disable Basic auth Blocks legacy HTTP Basic authentication to prevent sending credentials in cleartext; only allow modern auth (NTLM/Kerberos).
Browser Extensions Restrict add-ons (block unapproved) Block all unauthorized extensions – by default, no extensions are allowed unless whitelisted. This prevents installation of malicious or unvetted add-ons which could hijack the browser.
Legacy Extension Points Enabled (Block legacy hooks) Blocks old-style extension injection points, preventing malware from using unsupported methods to hook into Edge.
Application Bound Encryption Enabled Encrypts browser data tied to user identity or device, adding a layer of protection for stored credentials/cookies.
Insecure Network Requests Blocked Blocks requests from HTTP websites to local or more secure network resources (protects against cross-network attack vectors).
TLS/Encryption Protocols Enforce TLS 1.2+ Ensure only modern TLS versions (1.2 or 1.3) are used, preventing fallback to deprecated 1.0/1.1 protocols that have known weaknesses.
Password Manager / Autofill Configured securely Consider disabling password save for sensitive accounts or ensure saved passwords are protected by OS credentials. (The baseline doesn’t disable it entirely, but organizations may choose to manage this depending on policy.)
Automatic Updates Enabled (Auto-update Edge) Allow Edge to update itself automatically on all devices for timely security patches. Do not disable the built-in update mechanism.

As shown above, Microsoft’s Edge security baseline already sets most of these configurations to the recommended values by default.[1] By using this baseline (or configuring equivalent settings manually), you achieve a hardened browser configuration that significantly reduces risk.

Below we further explain some of these best practices and why they are important:

  • SmartScreen & Phishing Protection:
    Microsoft Defender SmartScreen is a cloud-based URL and app reputation service built into Edge. Enabling SmartScreen (with no user bypass) is critical – it provides industry-leading protection against phishing websites, malicious drive-by downloads, and other web threats
    [2][1]. SmartScreen will block known dangerous sites and files, and with Potentially Unwanted App blocking enabled, Edge also prevents users from inadvertently downloading unwanted software like adware[1]. The baseline sets SmartScreen and PUA blocking on, and even stops users from bypassing the warnings[1], ensuring maximum protection.
  • Typosquatting Checker:
    This feature warns users if they mistype a popular URL (for example, “micros0ft.com” instead of “microsoft.com”) and might have landed on a fraudulent look-alike site. Enabling typo protection helps prevent credential theft via spoofed domains
    [2]. The Edge security baseline enables this by default[1].
  • Site Isolation:
    Site Isolation (also known as strict site-per-process) forces each website to run in a separate browser process. This is a defense against attacks like Spectre, which attempt to read data across sites via speculative execution vulnerabilities. With site isolation enabled, a malicious site cannot easily access data from other sites’ sessions
    [7][3]. Microsoft’s baseline now enables full site isolation for every site (earlier versions had it off, but it’s enabled in newer baseline versions)[3].
  • Legacy Content (Internet Explorer Mode):
    Edge can use IE mode for legacy web apps, but IE’s outdated rendering can pose security risks. Best practice is to minimize the use of IE mode. The baseline disables loading unconfigured sites in IE mode
    [1] and hides the “Reload in IE mode” button[1], so IE is only used for sites explicitly configured by IT. This reduces exposure to old ActiveX or insecure controls. Only enable IE mode for trusted internal sites that absolutely require it.
  • Encryption and Network Protections:
    Edge and Windows support modern encryption protocols. Force strong encryption by disallowing legacy protocols. The baseline, for instance, disables old TLS 1.0/1.1 (Edge already deprecated these by default) and ensures TLS 1.2 is the minimum
    [7]. It also disables HTTP Basic authentication in the browser[1] – Basic auth sends credentials in plaintext and should be avoided in favor of NTLM or OAuth flows[1]. Additionally, Edge baseline disables insecure cross-network requests (Private Network Access)[1], which stops public websites from reaching into internal resources by default – mitigating certain CSRF and lateral movement scenarios.
  • Extensions Management:
    Browser extensions can greatly increase productivity but also introduce risk. Malicious or poorly made extensions might redirect users to phishing sites, inject ads or scripts, or steal data
    [7]. A best practice is to allow only approved extensions. The Intune Edge baseline helps here by including a setting to block all extensions by default[1]. Administrators can then maintain an allow-list of specific extensions if needed (by specifying permitted extension IDs and leaving others blocked). This way, users can’t install random add-ons – reducing malware and data leak risks. If your organization needs certain extensions (password managers, etc.), explicitly approve those and keep the list minimal and reviewed.
  • Legacy Plug-ins and Code:
    Edge has a setting to block legacy extension points (legacy plug-in APIs or injection mechanisms used by older apps/malware). The baseline keeps this blocking enabled
    [1] to prevent any unsupported mechanism from loading into Edge’s process. This hardening measure protects against malware that tries to use outdated hooks to compromise the browser.
  • Application Bound Encryption:
    Newer versions of Edge support Application Bound Encryption, which ties data encryption to the application context or user’s corporate identity. The security baseline enables this by default
    [1]. In effect, it ensures certain sensitive data that Edge stores (like cookies or credentials) are additionally encrypted such that only Edge (or only the user’s profile) can use them. This reduces the risk of sensitive browser data being stolen and used outside the browser, even if the underlying OS is compromised.
  • Auto-Updates for Edge:
    Keeping Edge up-to-date is one of the simplest yet most vital security practices. Microsoft Edge receives frequent security updates (aligned with a 4-week stable channel cycle). Allow Edge to update automatically in your environment. By default, Edge’s internal updater will periodically check and install updates
    [5]. Intune can enforce the update check frequency if needed (via Edge Update policies)[5], but generally the key is: do not disable or delay Edge updates. Ensuring all users run the latest Edge version means known browser vulnerabilities are patched and the latest protections are active. We will discuss later how Intune can help monitor or enforce update compliance.

By implementing the above settings, you establish a strong defensive baseline for web browsing. Next, we’ll describe how to use Intune to configure these settings across all your devices in a scalable way.


Implementing Edge Security Policies with Intune

Microsoft Intune (part of the Endpoint Manager) is the primary tool to enforce the Edge configurations described. Intune offers multiple methods to deploy browser policies:

  1. Security Baselines – Microsoft provides a pre-packaged Microsoft Edge Security Baseline profile in Intune. This is a template with a comprehensive set of recommended settings (many of which we summarized above) that you can deploy with minimal effort. The baseline ensures a default secure posture for Edge aligned with Microsoft security team guidance[1].
  2. Configuration Profiles – For more granular control or to implement settings not in the baseline, Intune allows custom Configuration Profiles. Using the Settings Catalog or Administrative Templates in Intune, admins can configure individual Edge policies (analogous to Group Policy settings) and deploy them. This can supplement or fine-tune the baseline.

We’ll focus first on using the Edge Security Baseline, as it covers best practices out-of-the-box.

Using the Microsoft Edge Security Baseline in Intune

Intune’s Security Baseline for Edge is the fastest way to apply a broad set of hardened settings to Edge browsers. It includes dozens of configurations with Microsoft’s recommended defaults. Follow these steps to create and deploy an Edge baseline profile:

  1. Open Endpoint Security > Security Baselines in Intune: Sign in to the https://endpoint.microsoft.com/ and navigate to Endpoint security > Security baselines. You’ll see a list of available baseline templates (Windows 10, Defender for Endpoint, Microsoft Edge, etc.)[3].
  2. Select the Edge baseline and create a profile: Choose Microsoft Edge (version 112 and later) from the list (this is the Edge for Windows 10/11 baseline)[3]. Click + Create profile. Give the profile a name (e.g. “Edge Browser Security Baseline”) and optional description[3].
  3. Review and configure settings: On creation, you can review the baseline’s settings groups. By default, all settings are set to Microsoft’s recommended value (as summarized in the table above). You can leave them as-is for a standard deployment. Optionally, you may customize specific settings – for example, if you want to allow a particular extension or adjust a policy, you can modify that before deployment. Intune’s interface lets you expand categories (Security, Privacy, Extensions, etc.) and see each setting and its default[3]. Insights (lightbulb icons) may be available next to settings to indicate how many other organizations enable a setting, which can guide you[3].
  4. Assign the baseline profile to device groups: Once the profile is ready, proceed to the Assignments step. Select one or more Azure AD groups containing the target users or devices to include[3]. For example, you might assign it to an “All Corporate Devices” group. (You can also exclude certain groups if necessary, e.g., a pilot or IT testing group.) Note: The Edge baseline contains both computer and user settings, and Intune will handle applying them appropriately. At least one group must be assigned, otherwise the profile won’t deploy[3].
  5. Finish and deploy: Click Review + create and then Create. As soon as you create the baseline profile, Intune will push it to all devices in the assigned groups[3]. Managed PCs will receive the settings policy over the air. Users might need to restart Edge for certain policies to take effect immediately, but many settings apply dynamically.

Tip: It’s recommended to test new baselines on a small set of devices before broad deployment. Intune allows creating multiple baseline profiles – you could assign a baseline first to a pilot group, verify the impact, then roll out to everyone[3]. You can also duplicate a baseline profile and update it (e.g., when a new baseline version is released) for testing before replacing the old one[3].

  1. Monitor deployment status: After deployment, you can check Intune > Endpoint security > Security baselines > [Your Edge baseline] > Device status to see a report of devices and whether the policy succeeded, is pending, or has errors. A successful status indicates the device has applied the Edge settings. We’ll cover more on monitoring in a later section.

Using the security baseline is often the best method, as it bundles all essential settings. However, you might want to adjust or add policies outside the baseline. For instance, maybe you want to configure a new Edge setting that the current baseline doesn’t include, or you want a slightly different value for a particular setting. This is where custom configuration profiles come in.

Custom Edge Configuration via Settings Catalog (Optional)

Intune’s Settings Catalog provides access to all available Edge policies (equivalent to the Chrome/Edge ADMX settings) that you can configure in a profile. This approach is useful if you need to:

  • Add settings beyond what the baseline covers (for example, a brand-new Edge feature or a less common setting).
  • Relax or tighten a baseline setting for specific groups (e.g., allow a certain extension for developers while baseline blocks all others).
  • Manage Edge settings on platforms like macOS (the Windows baseline might not apply there, so you’d create a separate macOS configuration profile for Edge).

To create a custom Edge policy profile:

  1. In the Intune admin center, go to Devices > Configuration profiles and create a new profile. Choose the appropriate platform (Windows 10/11, macOS, etc.) and pick Settings Catalog as the profile type.
  2. Under Configuration settings, click Add settings. Search for “Edge” to see categories of Edge browser settings. Intune lists hundreds of available settings derived from the Edge administrative template.
  3. Select the desired settings and set their values. For example, to enforce extension blocking manually: find “Control which extensions cannot be installed” and add it, then set it to Enabled and specify “*” (block all) as the prohibited extensions list[1]. Likewise, you can configure SmartScreen (Enable Microsoft Defender SmartScreen = Enabled)[1], “Prevent bypass of SmartScreen warnings” (Enabled)[1], “Enable site isolation” (Enabled) etc., matching the best practices discussed. Each setting in the catalog includes a description of what it does, and often a link to documentation.
  4. Once you’ve configured all needed settings, assign the profile to your device/user groups similar to the baseline assignment. Intune will deploy these settings to those devices.
  5. Monitor the profile deployment under the profile’s Device status, and resolve any conflicts. (If a device has both a baseline and a custom profile with overlapping settings, ensure they are consistent. Intune will mark a conflict if two policies set the same setting differently. It’s usually best to avoid duplicates – you can stick mostly to baseline OR custom for a particular setting, but not both with different values.)

Using the Settings Catalog approach requires more manual work to select and configure each setting, but it provides flexibility. Many organizations will start with the Edge security baseline (for broad coverage) and layer any additional needed settings via a small custom profile.

Intune App Protection (MAM) for Edge on Mobile

In addition to device configuration profiles (which apply to managed devices), M365 Business Premium allows App Protection Policies for scenarios where you manage only the app (Edge) on a mobile device. For example, if employees access corporate web apps via Edge on their personal phone (without enrolling the phone in Intune), you can use Intune’s MAM (Mobile Application Management) policies on Edge for iOS/Android.

These policies can require a PIN to open the app, prevent data from Edge being copied to personal apps, require Edge to open links from corporate emails, etc. Edge for Business on mobile can be managed such that corporate data viewed in the browser is containerized and protected[6]. If this scenario applies, configure an App Protection Policy targeting the Edge app for your user group – enabling features like app-level encryption, disable “Save-as” for files, block screenshots, and so on, to secure corporate web access on unmanaged devices[6]. This extends your Edge security to BYOD cases.


Deploying Policies Across Your Device Fleet

Deploying the Edge security settings across a fleet is straightforward with Intune once the profiles (baseline or custom) are set up. Here are some best practices for fleet-wide deployment:

  • Organize devices into Azure AD groups: Intune assignments are group-based. Ensure all company endpoints are members of a group (or multiple groups) that you target with the Edge policy. Many admins use an “All Managed Devices” dynamic group. Alternatively, separate groups by platform if you have different profiles for Windows vs. macOS.
  • Include new devices automatically: If using dynamic device groups (e.g., all devices with a specific enrollment tag or all Windows 10 devices), any new device enrolled into Intune will automatically receive the Edge policies shortly after enrollment. This is useful for autopilot scenarios – when a new PC is set up, it joins Intune and moments later the Edge hardening policy is applied, ensuring compliance from day one.
  • User vs Device targeting: The Edge baseline can be assigned to device groups (then user settings in it apply to any user on those devices) or to user groups (then when that user logs into any managed device, the settings apply). Microsoft documentation notes that you may need multiple profiles if you want to cover both device-targeted and user-targeted scenarios[3]. However, for simplicity, many organizations assign Edge policies to devices (since browsers are generally used on company devices). Choose the approach that fits your management model.
  • Monitoring deployment: After a broad deployment, use Intune’s reports to ensure all devices have received the policies. Under Reports > Endpoint security or under the baseline profile’s per-setting status, you can identify if any device is in error or conflict. Ideally, all managed devices should show the Edge profile status as “Succeeded”. Any failures should be investigated (e.g., perhaps a PC is offline, or a setting is not applicable to Windows Home edition, etc.).
  • Policy refresh: Intune-managed devices typically check in and refresh policies periodically (every ~8 hours by default, with some variance). If a device is powered off or offline, it will get the Edge policy next time it comes online and syncs. You can expedite testing on a specific device by using “Sync” from the Intune portal (or Company Portal app) for that device.

By thoughtfully targeting groups and monitoring, you can achieve near 100% coverage of your fleet with these Edge security settings. This ensures every user’s browser adheres to your security standards, whether they are in the office or remote.


Managing User Access and Identities in Edge

Securing the browser also involves managing how users access corporate resources through Edge and what they can do with their accounts:

  • Require Azure AD Sign-In for Edge (Work Profile): Encourage or enforce that users sign into Edge with their work (Entra ID/Azure AD) account. This turns on “Edge for Business” mode automatically, separating work browsing from any personal profiles[6]. When signed-in, enterprise policies (like the ones deployed via Intune) are enforced on that profile. You can use Azure AD Conditional Access policies to ensure that only compliant, domain-joined, or Intune-managed devices can access certain resources – indirectly this means they must use the managed Edge (or other compliant apps) to log in. For example, a Conditional Access policy could block access to Office 365 from unmanaged browsers, guiding users to use their Intune-managed device with Edge.
  • Multiple Profile Control: Edge allows multiple browser profiles (e.g., personal and work). Admins can set policies to limit the mixing of profiles, such as disabling the ability to add additional profiles or at least controlling sign-in modes. One policy of interest is ”BrowserSignin” which can force users to sign into Edge with a work account or block personal sign-in. Coupled with “Enterprise Profile Separation”, this ensures work content stays in the work profile. While not always enforced in Business Premium environments, these settings can be considered if data separation is a concern.
  • Permissions and Capabilities: Through Intune’s Edge settings, you can also manage specific browser capabilities for users:
    • For instance, you might disable the Edge Password Manager or Form Autofill for highly sensitive environments, or require a primary password. The security baseline doesn’t outright disable password saving, but it’s something to review based on your org’s password management strategy.
    • You can restrict printing or saving of work data via Edge if needed (e.g., disable printing from Edge to avoid physical data leakage, or restrict downloads to only certain locations).
    • Manage Favorites and data sync: Corporate Entra ID accounts can sync Edge favorites, history, etc. to Microsoft cloud. This is generally useful and encrypted, but some orgs might disable cloud sync for confidentiality. Intune can control that (“Allow syncing of browsing data” policy).
  • Conditional Access App Control: For web apps, Azure AD Conditional Access can integrate with Defender for Cloud Apps to apply session controls in Edge (e.g., preventing downloads of sensitive files via the browser for unmanaged sessions). This is more of an Azure AD/M365 E5 feature, but mentionable as an additional layer if Business Premium customers opt for add-ons: effectively, even if a user is in Edge, the access can be limited by cloud policy if certain risk conditions are met.

In summary, leverage Intune and Azure AD to ensure that Edge is used in a managed, authenticated context. By tying Edge usage to the user’s corporate identity, you gain better control (policies follow the user) and visibility (logs of sign-ins, conditional access reports). Edge for Business will keep personal and work browsing separate[6], reducing the chance of corporate data mixing with personal accounts.


Monitoring and Compliance

After deploying security policies, ongoing monitoring is crucial to maintain Edge’s secure state across all devices.

  • Intune Policy Compliance: Intune provides compliance and configuration reports. Regularly review the Device compliance dashboard in Intune. While Edge settings themselves are configuration profiles (not “compliance policies” in Intune’s terminology), a device’s overall compliance can be tied to whether required settings are in place. For example, you might create a Custom Compliance Policy that checks if a particular registry key (set by the Edge policy) exists, though this is advanced. More straightforward: check each managed device in Intune – under Device Configuration > Setting status, verify that no Edge setting is in error or conflict. Any misapplied setting should be fixed promptly.
  • Security Baseline Compliance: If you used the Edge baseline, Intune has a dedicated report for baseline compliance. It will show each setting and how many devices deviated or had issues. Pay attention to any settings showing non-compliance. Perhaps a user changed something or a machine is missing the policy. Intune can’t usually be “undone” by the user (since these are enforced), but a user might install an unsupported extension if they found a workaround, etc. If an Edge policy was misapplied (e.g., due to concurrent GPO in Hybrid AD scenarios), Intune will flag a conflict.
  • Defender for Endpoint Signals: M365 Business Premium includes Defender for Endpoint (Plan 1). If onboarded, Defender for Endpoint will monitor browser threats. Edge is tightly integrated with Defender – SmartScreen blocks, for instance, are reported. Check the Microsoft 365 Security Center for any alerts related to Edge, such as attempts to visit malicious sites that were blocked. While Plan 1 might not have full Threat & Vulnerability Management, it will still log detected threats. If you see repeated SmartScreen blocks for certain users, that might prompt further training or investigation.
  • Browser Update Compliance: Ensure all devices are running a recent version of Edge. Because Edge auto-updates, this is generally the case if internet access is available. For compliance, you can use Intune Proactive Remediations (a scripting feature) or a reports to see Edge versions installed. If some devices fell behind (perhaps auto-update was disabled or failed), Intune can push an update. One method is to deploy the latest Edge installer as a Win32 app to those devices, but normally enabling auto-update is simpler. Consider implementing the Edge Update policy via Intune that sets Auto-update check period override to a reasonable interval (e.g., every 4 hours)[5], to ensure frequent update checks. Intune doesn’t have a native “Edge version compliance” policy, but you could use Azure AD or Endpoint analytics to query versions.
  • Logging and Auditing: Edge itself produces logs/events for policy enforcement. For example, if an extension is blocked by policy, that event can be found in the Event Viewer under Applications and Services Logs -> Microsoft -> Edge. In a security audit, you might review such logs or use a log aggregator. However, this is typically only done if investigating an incident. Day-to-day, rely on Intune and Defender dashboards for a high-level view.
  • User Feedback Loops: Sometimes users will report an issue (e.g., “I can’t install an extension” or “Edge won’t let me bypass a certificate warning”). These reports are actually signs that your security policies are working! Nonetheless, monitor helpdesk tickets or user feedback to identify if a policy is too restrictive or causing workflow issues. For instance, if a developer legitimately needs a certain extension, you might adjust the allowed list. Monitoring isn’t just technical – it’s also listening to user impact and balancing security with usability.

By actively monitoring these areas, you can verify that your Edge security measures remain effective and that all devices stay in line with the policy. It’s far easier to address compliance drift or new threats early than to remediate after a breach.


Keeping Edge Up-to-Date and Patched

Maintaining the latest browser version is a non-negotiable aspect of browser security. New Edge releases often patch security vulnerabilities and introduce improved defenses. Here’s how to manage updates:

  • Built-in Auto-Update: Microsoft Edge’s built-in updater is the primary mechanism to get updates. By design, Edge will automatically download and install updates in the background for users, without needing full admin rights. This should be kept enabled in all environments. The good news is that, on a standard Windows install, users typically cannot easily disable Edge updates (especially if governed by Intune policies). Verify that no Intune policy or GPO is inadvertently turning off updates. The default (no special policy) is that Edge checks for updates approximately every 12 hours[5]. You can shorten this interval via policy if needed[5].
  • Intune Management of Updates: While there isn’t a dedicated “Edge update” slider in Intune like there is for Windows Update, you can deploy Edge update configurations via Administrative Templates. For instance, using Intune’s administrative template for Edge, set “Update policy override default” or “Target Channel override” if you want to lock Edge to a particular channel (Stable vs. Extended Stable). Small businesses usually stay on the Stable channel. You might also configure “Allow Edge browser to automatically update” (should be enabled) and “Restore failed updates” (Edge can rollback if an update fails, which is fine). Intune can enforce that Edge continues to update itself normally.
  • Forced Updates: In scenarios where a critical fix is out and you want to ensure users restart Edge to apply it, you can send a notice or use Intune’s endpoint analytics messaging or a toast notification script. There is no native Intune button to “reboot all Edge browsers,” because it’s generally not needed (Edge will eventually enforce a restart after update, and users often restart the browser daily). However, in high-security environments, you might instruct users to restart Edge or even schedule a device reboot after a major security update rollout.
  • Update Compliance Monitoring: As part of monitoring, review the Edge versions in use. Microsoft’s Security Center or Defender for Endpoint Threat & Vulnerability Management (TVM)—if you had it—would list outdated browsers as vulnerabilities. Without TVM, you can still periodically generate a report using a script: for example, an Intune Proactive Remediation script can query the version of msedge.exe on devices and report it. Ensure it’s at the expected version (e.g., if the current version is 114.x, no one should be on 112.x). If some devices are lagging significantly, investigate if their update service is broken or if they are rarely online.
  • Edge on Mac and Mobile: Don’t forget non-Windows platforms. Edge on Mac updates via Microsoft AutoUpdate (MAU). Intune on macOS can enforce MAU settings. Edge on iOS/Android updates via the respective app stores – ensure your mobile application management doesn’t block app updates. Generally, encourage users to keep apps updated, possibly using Apple’s managed App Store updates or the Google Play Enterprise management for controlled devices.

In summary, let Edge do its job with automatic updates, and use Intune policies only to monitor or fine-tune if necessary. Keeping browsers patched closes the door on many vulnerabilities attackers might exploit.


Integration with the Microsoft 365 Security Ecosystem

One advantage of standardizing on Edge and Intune is tight integration with other M365 security features. Here are ways the Edge security initiative ties into your broader security landscape:

  • Microsoft Defender for Endpoint (MDE): As mentioned, Edge shares threat intelligence with Defender. For example, SmartScreen phishing blocks in Edge provide signals to your Security Operations Center via Defender[2]. If a user encounters a malicious site, it’s logged and can be correlated with other alerts. MDE can also do web content filtering for any browser, but it has enhanced controls with Edge (e.g., it can block access to certain categories on Edge specifically if configured). With Business Premium’s MDE P1, you at least get basic web threat monitoring. If upgraded to P2, you get vulnerability management that covers Edge settings and version as part of the endpoint’s security score.
  • Microsoft Purview (Data Loss Prevention): Edge has native hooks for Microsoft Purview DLP on endpoints[2]. If your subscription includes Purview DLP (E5 Compliance or an add-on – note: Business Premium might not include full DLP, except possibly for Office apps), Edge can enforce DLP policies such as blocking copy-paste of sensitive info into web forms or preventing uploads of classified files to unsanctioned websites. This is an area to explore if data exfiltration via web is a concern. Even without full DLP, Edge allows basic controls like printing or download restrictions for trusted vs. untrusted sites if you configure it.
  • Azure AD Conditional Access: We touched on this under user access, but to reiterate, CA policies can ensure that only devices with Intune policies (compliant devices) access corporate cloud resources. This means even if a user tries a different browser or an unmanaged machine, they’d be blocked. You can specifically target “Browser” as a client app in Conditional Access rules. If you want to enforce Edge usage, one indirect method is to only allow browsers that support integrated Windows authentication or conditional access authentication contexts – in practice, Edge (and Chrome with a plugin) are the primary ones that do. Many orgs simply require “Require device to be marked as compliant” for web app access, which covers Edge since on an Intune-managed device Edge will be compliant.
  • Global Secure Access / Secure Web Gateway: Microsoft has introduced Microsoft Defender for Cloud Apps and Azure AD Application Proxy, etc., for securing access. While beyond the scope of this report, note that Edge for Business can work with Microsoft’s SSE (Security Service Edge) offerings (such as Global Secure Access) to route traffic through cloud security gateways. In a Business Premium context, you might not have these advanced features, but the ecosystem is ready to integrate if you do invest in them.
  • Logging and Analytics: By using Edge enterprise policies, you gain visibility. For example, signs of abnormal browser usage (mass downloads, visiting risky sites) may surface in logs that feed into Microsoft Sentinel or other SIEM solutions. If you have Sentinel, there are data connectors for Office 365 and Azure AD that, together with Defender logs, can be used to analyze browser usage patterns for anomalies.

In short, securing Edge is not an isolated task – it reinforces and benefits from all other security layers in Microsoft 365. The identity protection, endpoint protection, and information protection features all intersect at the browser. Taking advantage of these integrations can elevate your security posture beyond just configuring Edge settings.


User Education and Awareness

No security configuration is complete without addressing the human factor. While Intune and Edge can enforce many protections, users should be educated on safe browsing practices to complement these technical measures:

  • Train employees to recognize browser warnings: Ensure users understand that Edge’s warnings (Smartscreen blocks, certificate errors) are serious. They should not try to circumvent them. In fact, you have disabled bypass for most warnings in policy[1], but explain why. For example, if Edge shows a red phishing warning, the user should know not to proceed (and in our setup, they can’t). Teaching them the importance of those warnings will reduce any temptation to find workarounds.
  • Phishing awareness: Regular security awareness training should include spotting phishing attempts, not just in email but on the web. Users should be cautious when entering credentials into web pages. Edge will help by identifying known phish sites and showing the domain clearly, but user vigilance is still key. Encourage them to report suspicious web pages to IT.
  • Extensions caution: Since you blocked extensions by default, users might ask “Why can’t I install this add-on?” Educate them that unapproved extensions can pose risks, and there’s a process to request an extension to be allowed if it’s business-critical. This manages expectations and prevents users from attempting to use unmanaged browsers to get an extension (a risk in itself).
  • Personal vs Work browsing: Remind users to separate their work and personal web activities. With Edge’s profile separation, it’s easier – work stuff in the work profile (with your policies active) and personal stuff in a personal profile/browser. Users should avoid logging into work sites on personal browsers or devices, as those wouldn’t have Intune protections. Similarly, discourage them from doing personal sensitive transactions on their work browser session.
  • Policy transparency: Let users know what protections are in place. For instance, inform them that certain file downloads might be blocked if deemed dangerous, certain websites are off-limits, etc. This can prevent frustration and foster a security culture. Many users feel better knowing the organization is actively protecting them with modern tools, as long as they’re aware of the “rules of the road.”
  • Reporting issues: Encourage users to promptly report if they encounter a website needed for work that is being blocked or not functioning due to the browser settings. There may be cases where a line-of-business web app uses an outdated control that got blocked. Rather than the user trying unsafe tweaks, they should alert IT. You can then assess and possibly adjust policy for that site (e.g., allow an exception for an internal site in IE mode if absolutely required, or add a certain URL to Trusted Sites via policy, etc.). A feedback loop helps maintain security without hampering productivity.

Security awareness training should be an ongoing effort – it reinforces that technology alone isn’t a silver bullet. By combining a locked-down Edge configuration with educated, security-conscious users, your defense-in-depth is much stronger.


Ongoing Maintenance and Policy Review

Finally, securing Edge is not a one-time set-and-forget task. Regular maintenance and review will ensure your policies remain effective and up-to-date:

  • Stay updated on Edge baseline changes: Microsoft periodically updates the security baseline for Edge (e.g., with each major release or annually). New settings might be added as security features evolve. For example, in version 128 of Edge’s baseline Microsoft added and removed some settings to keep the recommendations current[4]. When Intune offers a new baseline version, review the change log. Plan to update your baseline profiles to the latest version after testing[3]. New settings could include additional protections you want, and outdated ones might be deprecated.
  • Evaluate new Edge features: Microsoft Edge is continuously improving, including security features (like Enhanced Security Mode, which was introduced to mitigate memory vulnerabilities by disabling JIT for untrusted sites[2]). Keep an eye on Edge release notes. If a new feature could benefit security, consider enabling it via Intune policy. For instance, Enhanced Security Mode can be enforced (it’s the feature that provides extra protection on unfamiliar sites by using hardware-enforced security). The same goes for upcoming features like Edge network isolation improvements, or integration with Windows Defender Smart App Control – as these come, adjust your policies.
  • Revisit exceptions and allowances: Over time, you might grant some exceptions (e.g., allow a specific extension or enable an old protocol for a specific system). Maintain a documented list of these and revisit them periodically. Aim to tighten exceptions if possible (maybe that legacy system got updated and you can remove the exception now). The goal should be to converge back to baseline standards after temporary needs pass.
  • Audit configurations: Perform an audit at least annually (if not quarterly) of your Edge Intune configuration. This means reviewing Intune profiles to ensure they align with current best practices, verifying all device groups are covered, and cleaning up any unused profiles. Microsoft’s documentation and compliance toolkit can help compare your settings with the recommended baseline.
  • Security incidents review: If there were any security incidents or near-misses involving browsers (e.g., a malware download was caught, or a user fell for a phishing page), analyze if additional Edge controls could prevent those in the future. Maybe enabling a stricter download policy, or integrating a threat feed. Use incidents as learning opportunities to refine policy.
  • User feedback and usability: Check in with user representatives or run surveys to gauge if the Edge policies impede work in any way and if so, is there a justified trade-off or a safe adjustment. Browser security is critical, but sometimes overly harsh measures (like completely blocking all downloads) might not be suitable for all roles. Adjust with caution, always weighing risk vs reward.
  • Documentation: Keep your own documentation of what settings are deployed and why. This helps for continuity (e.g., if another admin takes over, or if you liaise with compliance officers). Document any rationale for non-standard configurations.

By maintaining vigilance and adapting to new developments, you’ll ensure that your Edge browsers remain a strong link in your security chain rather than a weak point.


Conclusion

Microsoft Edge is a key application through which users interact with the internet and corporate resources, making it a critical component to secure. By leveraging Microsoft 365 Business Premium’s capabilities – especially Intune – you can transform Edge into a highly secure enterprise browser with minimal impact on user productivity. We covered how to apply best practice settings (like SmartScreen, site isolation, extension control, and more) uniformly via Intune, using the built-in Edge security baseline as a foundation[1]. We walked through deploying these configurations to all devices and highlighted the importance of keeping the browser updated and integrated with other security measures like Defender for Endpoint and Conditional Access.

In addition to technical enforcement, we emphasized user education and ongoing management: a secure configuration today must be maintained tomorrow through updates, policy reviews, and training. Security is an ongoing process, and using the rich toolset in M365 Business Premium, administrators can continuously monitor compliance and address new threats as they arise.

By following the guidance in this report, your organization can confidently provide users with a safe, protected browsing experience in Microsoft Edge – one that shields them from threats, protects sensitive data, and meets the highest security standards in day-to-day work. With Intune and M365 Business Premium, enterprise-grade Edge security is within reach for organizations of all sizes, delivered in a cloud-manageable and scalable way.

References

[1] List of settings for the Microsoft Edge security baseline in Intune …

[2] Microsoft Edge for Business Recommended Configuration Settings

[3] Configure security baseline policies in Microsoft Intune

[4] Edge Browser Security Latest Best Practices Released by Microsoft

[5] Best practice to enforce updates on Microsoft Edge to have the latest …

[6] Secure your corporate data using Microsoft Edge for Business

[7] Deploying a Microsoft Edge security Baseline with Intune

Reading from the CIAOPS Best Practices repo

I’ve recently upload a new JSON configuration file to my Best Practices repo on Github that you can deploy to Intune using PowerShell. You can find it here:

https://github.com/directorcia/bp/blob/main/Intune/Policies/ConfigurationProfiles/SettingsCatalog/odfb.json

The first thing to realise if you want to read this directly in from the repo is that you’ll need to use the raw version of that file which you can find here:

https://raw.githubusercontent.com/directorcia/bp/main/Intune/Policies/ConfigurationProfiles/SettingsCatalog/odfb.json

You will then need to use the command:

$query = invoke-webrequest -method GET -ContentType “application/json” -uri $url -UseBasicParsing

which will store the result in a variable called $query. Of course, you will need to assign the raw URL to the variable $url also.

Once executed if you look at $query.content you should then find a copy of JSON file you can then use to create a policy with PowerShell in Intune.

You can read all of the JSON files in my Best Practices repo in this way and use them to easily deploy to your environment.

Controlling local user group membership with Intune

I recently outlined how to

Control local admin on a device with LAPS and Intune

Once you have LAPS in place I suggested that you want to eliminate any local device administrators as a best practice. You can achieve this via a policy in Intune.

The first step in the process is going to be to determine any local administrator accounts and what they are doing in your environment. A good starting point is this KQL query to look for local admin activity in your device fleet:

DeviceLogonEvents
| where TimeGenerated >= ago(7d)
| where IsLocalAdmin == true
| summarize count() by DeviceName, AccountName,LogonType
| sort by AccountName

That will, of course, only show you logon activity by an account that is a local administrator. For dormant local admin accounts you are going to need to do more work to flush them out. However, the query will at least show you active local admin accounts that maybe impacted by any changes made using something like LAPS.

image

To set a policy to control local groups on Windows devices, login to the Intune management portal and select Endpoint security and Account protection, as shown above. Create a new policy for Windows 10 and later and select Local user group membership as the Profile.

image

Give your policy a meaningful name and continue.

Select the local group (here Administrators), select the action (here Remove) and Manual for the User selection type.

image

When you select the Add users hyperlink in the Selected users/groups field you will see the above blade appear. In here, you’ll find a number of different methods of identifying users. If you have a list of local device admins then you can add them here.

Once you have entered all the users you wish to remove from the local device administrators group, complete the policy and assign it to the audience you wish.

The policy will then roll out to your environment and the changes will be made to the local group membership. In this case, it will remove local users from the local device administrator group so they can no longer administrate the device.

Remember, there are lots of options here. You could different policies for different users and/or devices. You could create policies to not only remove but also add. An example maybe where you wish an Entra ID user to be a local administrator of box. In that case, simply select the option to Add the user from Entra ID to the local administrators group. There is a lot of flexibility here with this policy.

Typically, once your policy has completed and there are no more local administrators you can remove the policy, as hopefully no more local accounts will be created with devices being joined directly to Entra ID. However, you may wish to retain it for if new devices are joined to your environment, especially if you don’t use Autopilot.

In summary then, the process so far, is:

1. Create compliance policies and update devices to be compliant

2. Implement LAPS to control the local device admin account that cannot be deleted

3. Remove all other accounts from local administrator group on devices

Typically, these steps will have no impact on users working with their devices and it commences the process of implementing a consistent environment and making it more secure.

You can read more about this particular policy here:

Manage local groups on Windows devices


Start with Intune Compliance policies

I see many people struggle to get started with Intune and Device Management in Microsoft 365. My recommendation is always to start with configuring Compliance policies. Doing so will give you:

1. A device inventory

2. A list of devices that fail to meet the minimum standards set for connection to corporate data

However, the major benefit is that, by default, Intune Compliance Policies make no change to any of the device or impact users productivity. In effect, Compliance Policies simply READ the status of a device and make NO changes.

Screenshot 2023-09-14 102330

You’ll find Compliance Policies under Devices in the Intune portal as shown above.

Typically, you’ll create at least one Compliance Policy for each different operating systems you have in your environment (i.e. for Windows, iOS, Android, etc). You can, of course, have as many different Compliance Policies as you desire, potentially targeted at different users and or devices. However, the policies you have, the more maintenance and troubleshooting will be required. It is therefore recommended to stick with a single Compliance Policy for each operating system.

Screenshot 2023-09-14 102823

During the policy creation you’ll see a screen as shown above in which you can set actions for devices that fail compliance. You will not that, by default, the only taken is simply to mark the devices as non compliant. That is the only action take. You can add more actions if you want, but importantly, by default, the only action taken is simply to mark devices as non compliant.

Once you have created and assigned the Compliance Policy the machines covered that policy will be evaluated and results reported back to Intune.

Screenshot 2023-09-14 103209

If devices are found that are not compliant, then you can take action to make them compliant before allowing them to access corporate data.

Above all, using compliance policies is a great way to get an inventory of all the devices in your environment and report their configuration. Of course, these Compliance Policies will continue to be evaluated regularly in case anything changes on the device.

The recommendation then is to start with Compliance Policies to take an inventory of your device fleet before proceeding further with Device management. If you want to read more about Modern Device Management then read my series of blog posts starting here:

https://blog.ciaops.com/2020/09/26/modern-device-management-with-microsoft-365-business-premium-part-1/