PowerShell script to check Outlook mail rules

image

After I finished the recent PowerShell script to check for Exchange style mailbox forwards I received some motivate from Robert Pearman to develop a script to also go and check what the Outlook rules are doing for Office 365 mailboxes.

Taking what Robert provided I decided to extend my initial script to report on what I consider suspect Outlook mail rules. Here’s my thinking:

– Firstly there are going to potentially be lots and lots of Outlook rules when you look across all mailboxes in Office 365, so I decided to focus on actions that one could deem to more suspicious than others. I settled on the following rule actions as ones to check: forward to, redirect to, copy to folder, delete message, forward as attachment to and send text message notification to.

–  Turns out you can create an Outlook rule that forwards, redirects and fowards as an attachment messages to alternate email addresses. A bad party could set this up to send themselves emails from a compromised mailbox.

– If a rule copies rather than moves a message then that to me is also suspicious. Why would you want two copies of the same email message in different locations in your inbox unless you aren’t in full full control of the inbox and someone is squirrelling away messages to a location the owner never created?

– If a rule deletes a message then there is a chance that a bad actor is trying to prevent the mailbox owner from seeing something.

– If a rule notifies someone via SMS that may be the fingerprint of a bad actor trying to keep tabs on a mailbox.

I will also admit, that there are plenty of situations where the above situations are the results of legitimately configured inbox rules. However, for the reasons I have indicated, I believe the actions to warrant the most inspection.

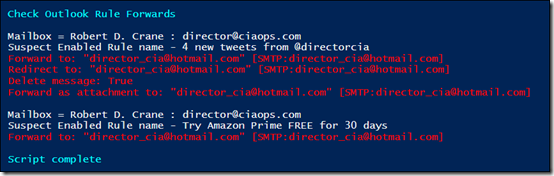
As you can see from the above image, the script will do what it did before and check the mailbox rules to see if there are any forwardings as before but now the script will also dig through each mailbox and throw up warnings when a suspect rule is enabled or disabled for a user.

Once you have located any suspect rules, you can then start digging further to see whether there is a business justification for such. If not, then you may have a compromised mailbox on your hands.

You’ll find the updated script at:

https://github.com/directorcia/Office365/blob/master/o365-exo-fwd-chk.ps1

and remember to keep coming back as I’ll continue to update and extend it over time. if you have any feedback on this script of suggestion for things you’d like to see please let me know so I can look at developing them. Thanks again to Robert Pearman for this input on this.

Enabling Office 365 mailbox auditing

You may not be aware that by default Office 365 mailbox auditing isn’t turned on. Don’t believe me? Well check out this article, especially the first paragraph:

Enable mailbox auditing in Office 365

which says:

In Office 365, you can turn on mailbox audit logging to log mailbox access by mailbox owners, delegates, and administrators. By default, mailbox auditing in Office 365 isn’t turned on. That means mailbox auditing events won’t appear in the results when you search the Office 365 audit log for mailbox activity. But after you turn on mailbox audit logging for a user mailbox, you can search the audit log for mailbox activity. Additionally, when mailbox audit logging is turned on, some actions performed by administrators, delegates, and owners are logged by default.

If you want to check your own tenant then connect to Exchange Online with PowerShell and run this command:

get-mailbox | select userprincipalname,auditenabled

You’ll probably see that all the mailboxes don’t have auditing enabled.

To enable auditing, simply run this command:

Get-Mailbox -ResultSize Unlimited | Set-Mailbox -AuditEnabled $true

and then run the first command again to verify it is now enabled for all mailboxes.

You also need to appreciate that out of the box, not all items are audited and you may need to adjust these options, also using PowerShell. The options you can audit for are:

Mailbox auditing actions

I’ll cover how to set these in an upcoming article.

Configuring an Office 365 SPAM filtering policy with PowerShell

I recently wrote an article that shows you how to configure the spam policy in Office 365 using the web interface. If you missed that you can find it here:

Configuring an Office 365 SPAM filtering policy

Doing this multiple times via the web interface is a lot of work. A better approach is to use PowerShell. So once, how have connected to Exchange Online PowerShell, run these two commands:

$policyparams = @{
“name” = “Configured Policy”;
‘Bulkspamaction’ =  ‘movetojmf’;
‘bulkthreshold’ =  ‘7’;
‘highconfidencespamaction’ =  ‘movetojmf’;
‘inlinesafetytipsenabled’ = $true;
‘markasspambulkmail’ = ‘on’;
‘increasescorewithimagelinks’ = ‘off’
‘increasescorewithnumericips’ = ‘on’
‘increasescorewithredirecttootherport’ = ‘on’
‘increasescorewithbizorinfourls’ = ‘on’;
‘markasspamemptymessages’ =’on’;
‘markasspamjavascriptinhtml’ = ‘on’;
‘markasspamframesinhtml’ = ‘on’;
‘markasspamobjecttagsinhtml’ = ‘on’;
‘markasspamembedtagsinhtml’ =’on’;
‘markasspamformtagsinhtml’ = ‘on’;
‘markasspamwebbugsinhtml’ = ‘on’;
‘markasspamsensitivewordlist’ = ‘on’;
‘markasspamspfrecordhardfail’ = ‘on’;
‘markasspamfromaddressauthfail’ = ‘on’;
‘markasspamndrbackscatter’ = ‘on’;
‘phishspamaction’ = ‘movetojmf’;
‘spamaction’ = ‘movetojmf’;
‘zapenabled’ = $true
}

new-hostedcontentfilterpolicy @policyparams

The first basically sets up an array of all the parameters you are going to see into the spam policy. It makes it easier to adjust if you need to.

The second command creates a new policy based off this array that will be called ‘Configured Policy’.

However, after running these two commands you aren’t quite done yet because you have created the policy BUT you actually need to create a rule that uses this policy to do that use the following:

$ruleparams = @{
‘name’ = ‘Configured Recipients’;
‘hostedcontentfilterpolicy’ = ‘Configured Policy’;
## this needs to match the above policy name
‘recipientdomainis’ = ‘domain.com’;
## this needs to match the domains you wish to protect in your tenant
‘Enabled’ = $true
}

New-hostedcontentfilterrule @ruleparams

You’ll need to ensure the policy names match as noted and you include the domains you wish to protect.

image

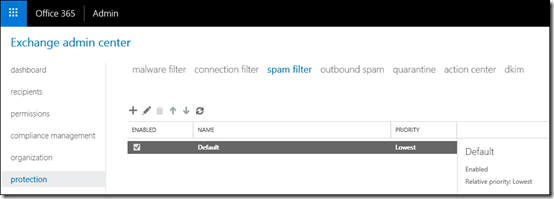
Once this has been completed, if you go and look in your Exchange Admin area, under protection and spam filter, you should see a new policy called ‘Configured Recipients’ that was created by the above script commands.

Save the script away and run it as many times as you need. That should make life easier!

Configuring an Office 365 SPAM filtering policy

A common complaint I hear about Office 365 from IT Professionals is that it doesn’t filter spam as well as other third party solutions. My immediate question at that point is always “Well, have you actually gone in and configured ANY of the spam settings in Office 365 to improve your results?” to which the answer is always No. Thus, if you don’t take the time to customise what you get out of the box you’ll only get an out of the box solution which is probably not what you want! Thus, some configuration is required for EVERY Office 365 tenant to improve its spam filtering abilities.

The out of the box spam settings for Office 365 are not configured in an aggressive manner and you should go in and make changes from the defaults I would suggest. Here’s how to do that.

image

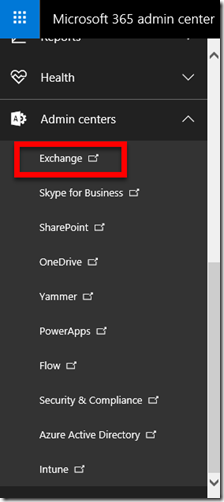
You’ll firstly need to login to the Office 365 portal as an administrator with rights to make changes. You’ll need to then navigate to the Office 365 Admin Center and select from the Admin centers on menu on the left hand side. You’ll find the Admin centers option right at the bottom.

From the list of options that now appear select Exchange as shown above.

image

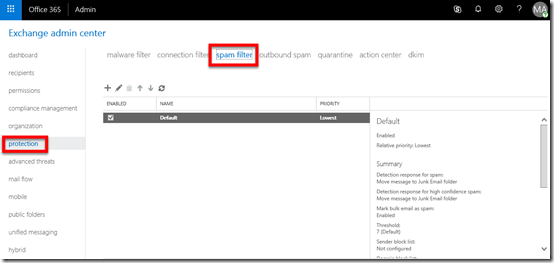
This will take you to the Exchange Admin center as shown above. In here select the protection option on the left and then spam filter on the right.

You will then typically see a single policy called Default.

image

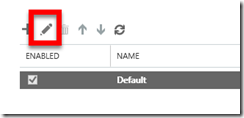
With this default policy selected, press the edit button (pencil) from the menu to view what settings this default policy has.

SNAGHTML58800d3

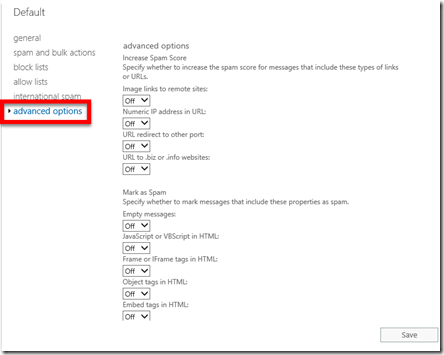
Select the different menu options on the left to view all the settings. Most you will see, like in the advanced settings shown above, are set to off.

You can of course edit this default policy, however it is better practice to go back to the list of policies and create a new one and leave the default one in place.

image

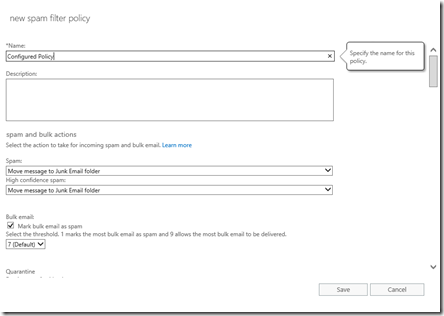
When you create a new policy using the plus button (+) a new dialog will appear like show above.

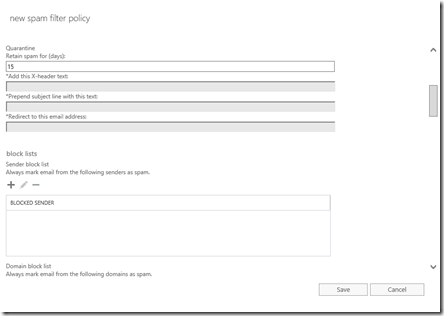
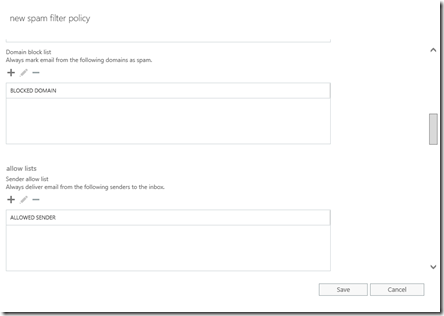
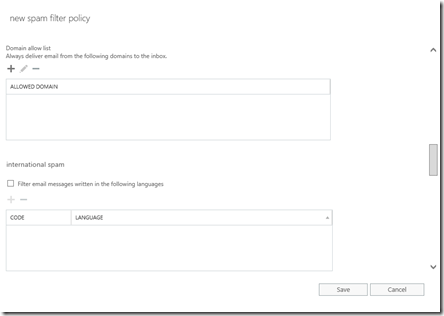
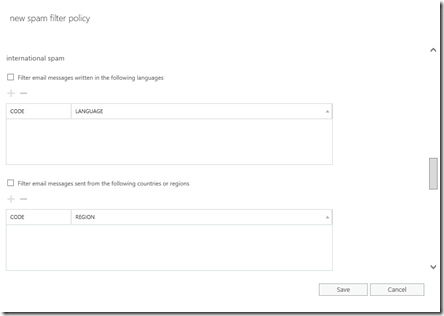
Give the new policy a name and now scroll through the settings to configure them for your needs.

image

image

image

image

image

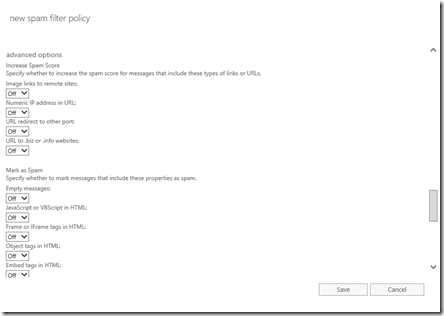
When you reach the advanced options towards the bottom you’ll see a number of options that can set on or off. The crowd sourced results I obtained for these were:

Image links to remote sites = OFF

Numeric IP addresses = ON

URL redirect to other port = ON

URL to .biz or .info websites = ON

Empty messages = ON

Javascript or VBScript in HTML = ON

Frame or iFrame tags in HTML = ON

Object tags in HTML = ON

Embed tags in HTML = ON

Form tags in HTML = ON

Web bugs in HTML = ON

Apply sensitive word list = ON

SPF record hard fail = ON

Conditional sender ID hard fail = ON

NDR backscatter = ON

image

You can then set whether the policy will simply run in test mode if you wish.

image

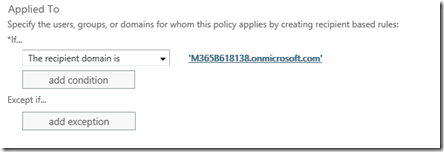
The final option is to determine where this policy will apply. Normally you want this across all your domains and users but as you see, you can have different policies for different users and domains if you wish.

All you now need to do is save the policy and start monitoring the results.

Hopefully, you can now see that out of the box Office 365 does take a very relaxed approached to spam which is not uncommon for most spam protection products. You can, and should, of course go in and configure the available options to be more restrictive. When you do this you will of course get much better results.

This post showed you how to make spam filter setting via the web interface, a much better and more consistent approach across many tenants is to do this using PowerShell. Look out for an upcoming article on this.

SPAM filtering Office 365–Help shape a best practice

image

I hear a lot of people say that they don’t find Office 365 anti-spam filtering as good as other providers. My reply to that is – “Have you ever actually gone in and configured the settings from what is there by default?”. Unsurprisingly, the answer is always No.

The out of the box spam settings you get with Office 365 are designed for the “average” and probably configured for the least business interruption (i.e. less aggressive classification of what is spam). Thus, to get the optimal level of filtering you desire, it is recommended that you go and set the options the way that you want.

I have configured my tenant for the way I wish to handle spam but that is probably not exactly the best place for people to start. So with that in mind I thought that I’d call on the power of the crowd and offer up a survey were people can nominate what they consider to be major indicators of spam, based on the policy options that Microsoft provide. You’ll find that survey here:

http://bit.ly/o365spam

which I encourage you to fill out and share with everyone else.

The idea is that once the results are in I report back on an overall “best practices” starting policy that the majority would feel comfortable with. I can then also show you how to exactly configure that in Office 365.

So please take a moment to complete the survey and share you expertise and thought on the ‘best practice’ approach of configure anti-spam policies in Office 365.

You can find the details on the specific advanced spam filtering options in Office 365 here:

http://technet.microsoft.com/en-us/library/jj200750(v=exchg.150).aspx

Recalling message options in Office 365 OWA

image

There are many times when you want to recall a message you have sent in Outlook or Outlook Web Access (OWA). Generally, you should reconcile yourself to the fact that you won’t be able to achieve this but there is an option in OWA that you can set to allow you to ‘Undo’ you send.

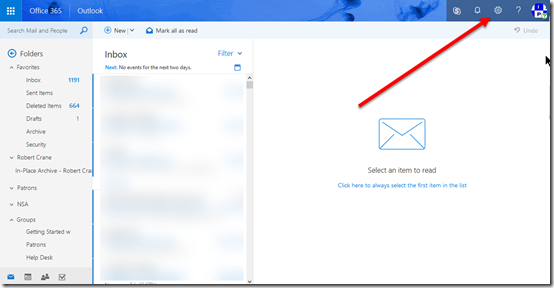
To enable ‘Undo send’ in OWA navigate to OWA in your browser and select the Cog in the top right as shown above.

image

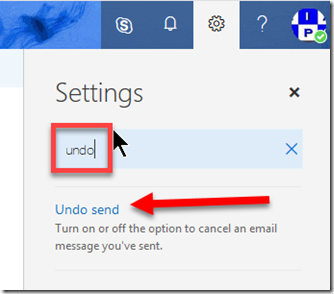
In the search box that appears type ‘undo’ and this should display the Undo send option as shown. Click on this result to navigate to the setting.

image

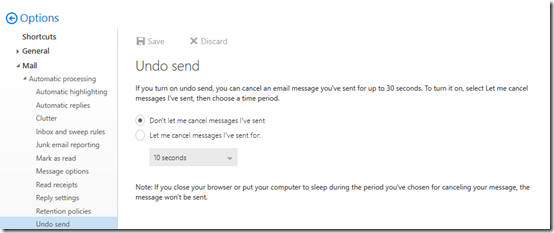
In most cases the Undo send option will be disabled as shown above. To enable simple select the Let me cancel messages I’ve sent for option.

image

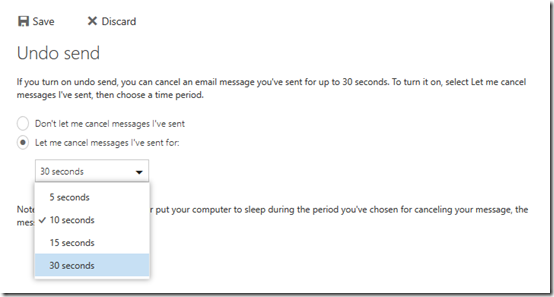
By default, the time you have to undo the send is only 10 seconds so you may want to extend this to the maximum of 30 seconds by selecting that option from the pull down.

image

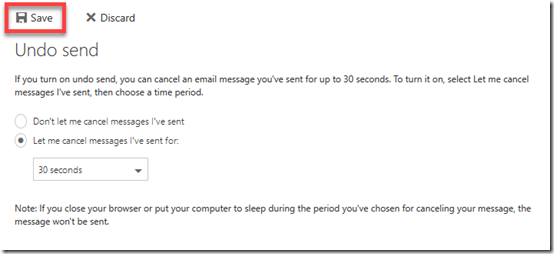
After you have made these changes make sure you select the Save button at the top to update your preferences.

With this option now configured at least you might have the ability to undo a sent email before it goes out. Again, this may not always work but at least now you have an option.

Understanding Office 365 Groups and Teams

A while ago I wrote an article that detailed:

Where to put data in Office 365

and in typical fashion, technology has now moved on. This means that I need to revisit the concept of where you should be putting inside Office 365.

We of course now need to remember that we have new locations like Microsoft Teams and Staffhub, as well as improved locations like Office 365 Groups to house our business data. So let my try and broadly explain the the data locations that are currently available to you in Office 365.
image

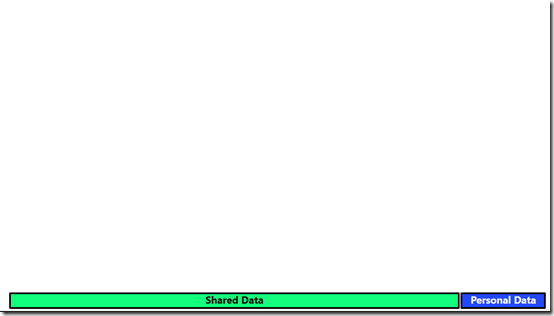
Let’s start by considering the two major types of data we have to deal with in today’s businesses. As the above slide shows, we can typically categorise data it shared and personal. Personal data is typically created and owned by a single user in the business. Personal data is also only shared between a handful of people at most. By contrast, shared data is data that is not owned by any single individual and typically needs to be seen across a wide wide audience.

You also typically tend to find that shared data is a much greater percentage of the overall amount of data as illustrated by the size of the bars above. From here on in, we’ll consider shared data locations being green and private data locations being blue. We will also consider shared data locations to be on the left while personal data locations will be on the right.
image

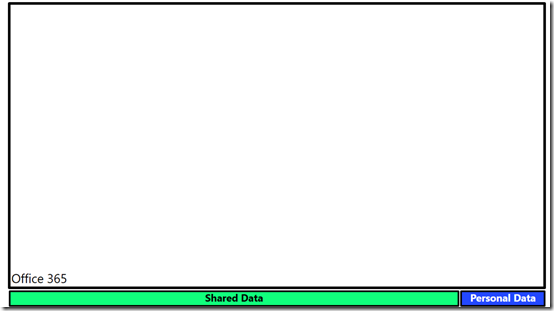
Office 365 provides us a location into which we can store all business data, whether shared or personal. It is the box into which everything will live, both shared and personal.
image

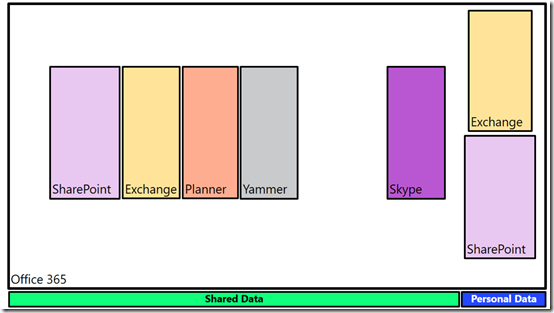
We store business data inside a number of serviceswithin Office 365. These include Exchange for emails, SharePoint for files, Planner for tasks, Yammer for social conversations and Skype for meetings.

You’ll notice that the majority of these services are designed for the storage of shared data, however both Exchange and SharePoint have the ability to store both shared and personal data. Thus, they appear twice in the above slide as locations in which we can store data.
image

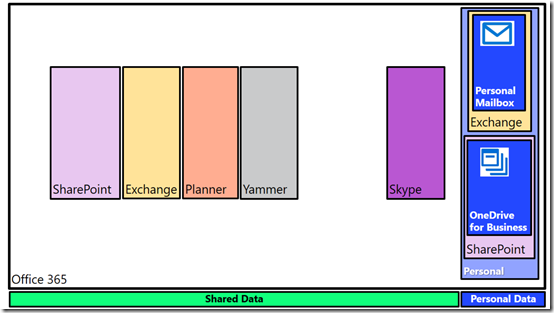
Into the personal data location for Exchange we place a users individual mailbox. This is designed for them to receive emails from outside the organisation and also typically from individuals inside the business. A personal mailbox is not a good location for generic email addresses like accounts@ or info@. It is designed for personal correspondence to and from an individual.

Likewise, SharePoint provides the OneDrive for Business location designed for a user’s personal files. These files are owned by the user and typically shared with a very small number of people. OneDrive for Business is NOT designed as a file server replacement, it is designed as repository for an individual users to store files they typically have on their desktop, on their local hard disk, or on an external USB drive or a home directory on a network.

Thus, Office 365, thanks to both Exchange and SharePoint, provide each and every licensed user a distinct location in which to save their own own personal information. Because that information is still within the Office 365 environment it remain secure and compliant as well as being easy to manage for the business owners.
image

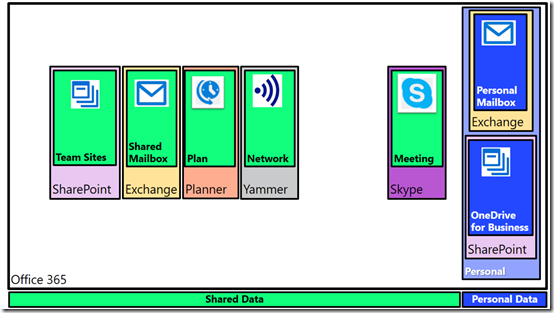
Now Exchange and SharePoint also provide locations to save shared data into. Exchange provides this via shared mailboxes. Best practice is for shared mailboxes to be things like info@, sales@, etc that may need to be shared between a number of people and will also persist beyond any individual currently performing that task.

Likewise, SharePoint provides Team Sites as a location to save information into that all people in the business can access. You can of course provide custom security around all shared Office 365 services as needed.

However now in this space of shared data in Office 365, you get additional locations to store your information. Services like Planner allow the organisation of tasks and schedules across a team. Yammer allows the business to get out of email and work in an enterprise social network. Not only does that reduce email overload for users but because information is shared publically, it makes it more searchable and shareable. Finally, Skype for Business allows people in the business to meet virtually. They can chat, conduct meetings, share desktops, whiteboards, files and more.

Each one of these shared locations can be used stand alone if desired. Thus, you can have a Team Site to fill a single need. Likewise, you can use Skype as a way of chatting to people. As I have written about before:

The modern way of collaboration

To get a job done these days, people need more than stand alone tools. They need all the power of the individual services that Office 365 provides but they need them rolled together in a single place that is easy to work with.
image

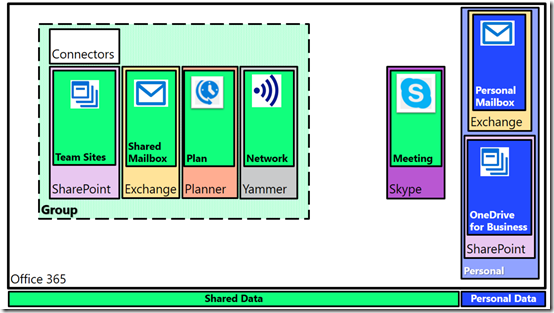
Enter Office 365 Groups. If you combine a SharePoint Team Site, an Exchange shared mailbox, a Planner plan and a Yammer network you get an Office 365 Group. However, an Office 365 Group also provides you with an additional service, called ‘Connectors’, that allows you to bring information from services outside your business (i.e. Facebook, Twitter and more) directly into the Office 365 Group.

You can create as many Office 365 Groups as you need and when you do each one will get its own dedicated SharePoint Team Site, Exchange shared mailbox, Planner plan and Yammer network. You can also still have each service stand alone, like a stand alone Team Site, but each Office 365 Group you create automatically provisions all the individual services inside it and links them together.

Why might you still need a stand alone service like a Team Site?  Maybe you just want a single location to put all your brochures for people to sent to customers. That function might not need email or plans or chat, so you simply provision a stand alone Team Site to perform that function. However, when the people who create those brochures need to actually collaborate, then an Office 365 Group makes sense and you can mix and match as needed.

Again, it is totally up to you how and when you use these services. You may choose to only use stand alone services and no Groups. Likewise, you may choose to only use Groups. The choice if yours. That’s the flexibility Office 365 provides
image

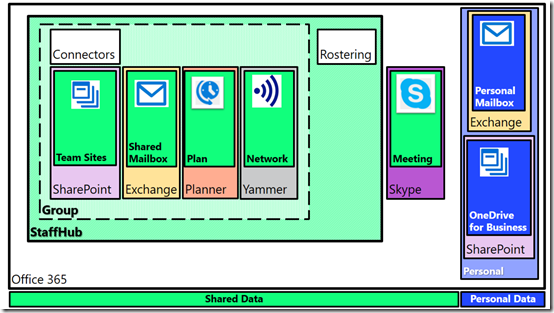
If we now take an Office 365 group and add a Rostering service we get Staffhub. So when you create a new Staffhub for your business to manage rostering and employee times you also get a dedicated SharePoint Team Site, Exchange mailbox, Planner plan, and Yammer network. Do you have to use them all? Of course not, but they are provisioned automatically for you when you create a Staffhub because chances are that you will find use for the services.

Imagine you need to create a roster for your business. You will also probably need to share documents with your staff about their duties. That’s where the SharePoint Team Site fits in. There also probably be the need for staff to chat about their work. That’s where Yammer comes in. Hopefully, you get the idea here is that when you create a Staffhub or Office 365 Group Microsoft automatically gives you a range of stand alone services integrated together because the chances are you’ll find a need for them. It’s bundling at its best!

Again, you don’t need to use them all immediately, but they are there from the start, ready for your to use, whenever you need.
image

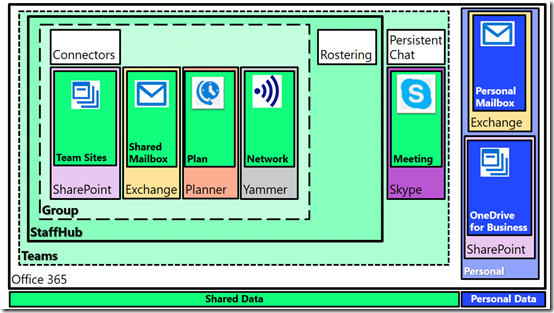
Finally, if we ingrate Skype for Business and add persistent chat to our Staffhub resources (that were a superset of Office 365 Group resources) we get a Microsoft Team.

As with Staffhub, when you create a new Microsoft Team you get everything Staffhub provided plus additional integrated services. If all you want to use is persistent chat then you can use that but again, chances are you are going to need more options down the track so they are automatically provisioned for you.

Everything in Office 365 is built on core services like Exchange for email, SharePoint for files and Skype for Business for communications. You can use each of these services stand alone or you can combine them together in an Office 365 Group, a Staffhub or Microsoft Team.

Of course, there is more planning involved than what I have laid out here when it comes to collaboration but I hope that I’ve made things a bit clearer and shown you all the options Office 365 provides you for storing your information. The trend today is certainly to provisioning something like a Microsoft Team first to give you everything you want immediately, even if you don’t use it all. However, the choice is yours. Go with a single service or go with them all. Do what makes the most sense for your business today and don’t too much about what will happen down the track as you can easily scale up into all the options that Office 365 provides, because typically, you’ll find that what you want is already provisioned thanks to Office 365 Groups, Staffhub and Microsoft Teams.