Connect Windows 10 to Azure AD

image

One of things that really excites me about Windows 10 is its ability to be directly joined to an Azure Active Directory. I think this ability is a major change in the way identity for desktops is going to be managed going forward.

The way that you facilitate a Windows 10 machine doing just that is to firstly go into your Azure AD and select the Configure option as shown above.

image

You then scroll down to the devices area and ensure that the Users may Azure AD join devices is either set to All or Selected, as shown above.

image

Then you go to the Windows 10 machine you wish to join to Azure AD and select Settings.

image

Then select About from the bottom of the menu options on the left.

image

Then on the right hand side select the link Connect to cloud as shown above.

image

From the window that appears select Continue.

image

Enter the credential of a user permitted to connect to your Azure AD and select Sign In.

A few moments later the process is complete and the Windows 10 machine is joined to Azure AD.

image

If you then check back in your Azure AD and select the user who completed the join and then select the Devices option from the options across the top. That should display a list of Windows 10 machines that are now connected as shown above.

image

To remove the device from Azure AD simply visit the Settings | About page again and this time select the link Disconnect from the organisation. You’ll be prompted to Disconnect as shown above.

image

You’ll then need to enter the credential for a local machine administrator (i.e. a users with admin privileges on the Windows 10 desktop).

Enter OK to proceed.

image

The last step will then be to restart the machine to complete the separation process, much like you would when joining an on premises AD.

So there you have it, joining an Azure AD is very simple on a Windows 10 desktop. Look out for more articles on Windows 10 and Azure AD soon.

Creating a Domain Controller in Azure

Setting up a Domain Controller (DC) in Azure is a little different than on premises. This post is by no means an extensive guide or best practices document on doing that. It is however designed to give you the basics so you can get up and running quickly.

image

I am going to assume you are starting totally fresh here. The first task is to create a new Azure network in the location that you desire. For more details on doing this see:

Tutorial: Create a Cloud-Only Virtual network in Azure

image

The next step is to run an Azure virtual machine that will be your Domain Controller. The only step that is slightly different from the norm is that you need to select the virtual network you created previously in the Region/Affinity Group/Virtual network option as shown above.

You then continue on as normal and create the virtual machine and allow it start up.

For more information on creating an Azure virtual machine see:

How to Create a Custom Virtual Machine

image

Before you connect to the new virtual machine that will be you file server you need to add an additional hard disk to it. From the list of virtual machines you have in Azure select your new machine. Then select the Add button at the bottom of the page. From the menu that appears select Attach empty disk.

image

Complete the details for the additional disk and save the configuration. For more information on adding an additional disk to a virtual machine see:

How to attach a data disk to a Windows virtual machine

image

When you log into the virtual machine you’ll see that it already has a dynamic IP address (here 10.0.0.4). This comes from the virtual network you created previously. It is important that you DON’T assign static IP addresses to Azure virtual machines, even in the case of a domain controller. All Azure virtual machines should ONLY have dynamically assigned IP addresses.

image

If you look at the storage layout of your new virtual machine you’ll see a C: and D:. Beware, D: drive is a temporary drive that gets erased and recreated on reboot. Thus, the only stuff you want on there is temporary stuff like the page file. Good practice is not to have the Active Directory databases on the boot partition, because if that becomes inaccessible then bye bye AD, unless you have a backup. This is the reason why we attached an additional disk to our new virtual machine.

image

Everything now is pretty as it would be with on premises equipment. Go into the Windows Disk Management console and initialise the new disk.

image

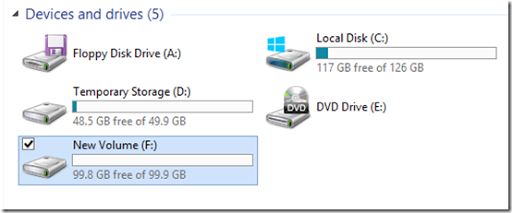
Create a new volume on this additional disk and format it. At the end you should have a drive letter you can access. Here, F:.
image

If you again view the storage configuration of your virtual machine you should see a new disk (here F:) which will be the destination for the AD database.

image

Things remain the same when you configure your server to be a domain controller. Simply go in and add the role as you would normally.

image

Allow the configuration to complete.

image

Once the role has been enabled you now need to raise the server to being a domain controller exactly how you would on premises. The only difference is that you should re-locate the AD DS database, log files and SYSVOL to the disk you added (here F:).

image

Just before you complete the process of raising the server to be a domain controller, you’ll see the above warning about a domain controller requiring a static IP address. Again, in Azure this DOES NOT apply. In Azure we want all servers to have dynamic IP addresses.

image

Once you Domain Controller is running go into the DNS manager, right mouse click on the DNS server (here the domain controller) and select properties. In the Forwarders tab remove any IP address listed.

image

The last step is to go back and edit the properties of your virtual network. In the Configure tab for the network you will find the option for dns servers as shown above. Add the IP address and machine name here and save it. Although, the IP address assigned is dynamic it is on a extended lease so it should effectively ‘remain’ static. if you do power up and down your DC regularly for testing like I do, simply ensure that your DC is the first machine your fire up on that virtual network.

So now you have an Azure hosted Windows Domain Controller (DC) without too much additional fuss.

image

So now, if I want to add another Azure virtual machine into this network and onto the domain, I simply run up an Azure virtual machine as normal. When you do you’ll see it get a different IP address (here 10.0.0.5, while the DC is 10.0.0.4).

image

Then, as you would anywhere else, simply add that machine to the domain. You’ll be prompted for administrator credentials to verify the domain join.

image

If that is all you now have a second machine on this domain.

So in summary, the key points with a Windows Domain Controller in Azure is:

– Add an extra disk and install the AD database, logs and SYSVOL here

– Don’t give DC a static IP address

– Assign the DC IP address to the DNS setting in the virtual network configuration.

For more details on doing this see:

Install a new Active Directory forest on an Azure virtual network

Free Third Tier Azure webinar tomorrow

I have been fortunate enough to be invited to participate in free webinar hosted by Third Tier titled;

Getting Started with Azure and Making Money Doing It

Amy, Susan welcome Robert Crane to the webinar series. Robert has been a long time SMB IT professional well known for his SharePoint, Office 365 and now his Azure expertise. If you think that Azure is just another hosting platform you are so wrong. Azure is your future with Microsoft and it’s a whole new world. Robert will share with us his tips and a path to success with Azure.

More importantly, the webinar is being hosted by two rockstars in the community, Amy Babinchak and Susan Bradley.

Amy Babinchak is the owner of Third Tier and Harbor Computer Services (an MSP). She is also a Microsoft MVP in Small and Medium Business Server. Susan Bradley is a Microsoft Enterprise Security MVP and forensic accountant. Both Amy and Susan have a passion for excellence in small business IT. These webinars will be chatty with each bringing their experience and technical expertise to the table.

The best thing is that the webinar is scheduled in the daylight! At least for me. Here in Sydney Australia the webinar runs from 10am – 11am on Thursday 23rd of July.

So if you are interested in learning about how you can make Azure your business and learn from the likes of Amy and Susan, with some occasional input from me, then check out the webinar. Remember, it is free to attend!

I hope to see you there tomorrow.

Creating Custom App tiles in Office 365

image

If you select the ‘waffle’ in the top left corner of Office 365 (the 9 dots), you’ll see a list of your applications as shown above. This menu is known as the App launcher. Most users will simply see their Office 365 apps. What you might not appreciate is that you can add your own apps to this list a number of different ways.

image

The easiest way is to login to the Office 365 console as an administrator. In the top right you’ll find a link for the business name (here Contoso). Select this.

image

On the screen that appears select Custom Tiles from the menu on the left hand side.

image

Then select the + icon to add a new entry.

image

Enter the details for the new tile and select Submit.

image

You should then see you new listing (here, CIAOPS).

image

The new app is available for all users to add to their own App launcher. To do this, select ‘waffle’ in the top left (the 9 dots). When the App launcher appears select the My apps link at the bottom of the page as shown above.

image

They will now see a list of all the app available to be ‘pinned’ to their App launcher. The ones at the top are the ones already on the launcher and the ones at the bottom are those that can be added.

image

To add a new app to the launcher simply mouse over it and select the ellipse (3 dots) in the top right corner. Then from the menu that appears select Pin to app launcher.

image

Now when the ‘waffle’ is selected you’ll see the app displayed on the launcher as shown above. When you select the new app it will open is a new browser tab.

The other way is via the Azure Single Sign On Web portal. I covered how to set that up in a previous post that you need to review:

Configuring an Azure SSO Portal

image

When the portal is complete it should look something like that shown above for users.

image

Now when that same user goes to modify their own App launcher via the previously detailed method they will see the custom app just added above via the the admin portal (the CIAOPS App) but also all the other already configured in the Azure SSO portal.

image

They can then add any of these Azure SSO apps to their App launcher using the previously detailed method (in this case Linkedin).

When they select this new app, added from Azure AD SSO portal, it will function the same as it does inside the actual Azure AD SSO portal. It will log them into that web based app automatically without the need for entry of a login and password.

You can now customise the Office 365 App launcher to include any web based app and if you also enable the Azure AD SSO portal you can take advantage of automated login for these apps. That makes life a lost easier and more productive for users.

Need to Know podcast–Episode 85

I’m joined once again by Tas Gray as well as Long Tran from AxiomIT to talk Office 365. In this episode we talk about using Azure AD that is part of all Office 365 subscriptions to manage identity for third party applications. We also talk about using Azure Active Directory Single Sign on portal as a better way to manage web application access in a business.

You can listen to this episode at:

http://ciaops.podbean.com/e/episode-85-tas-gray-and-long-tran/

or subscribe to this and all episodes in iTunes at:

https://itunes.apple.com/au/podcast/ciaops-need-to-know-podcasts/id406891445?mt=2

The podcast is also available on Stitcher at:

http://www.stitcher.com/podcast/ciaops/need-to-know-podcast?refid=stpr

Don’t forget to give the show a rating as well as send me any feedback or suggestions you may have for the show. I’m also on the hunt for some co-presenters so if you are interested on being a regular part of the show please contact me.

Resources

Skype for Business preview

PowerShell for Office 365

Changing Office 365 plans

Azure AD Connect gets released

Office 2016 for Mac is here

Skype for Business Windows Phone app

Cloud Business Blueprint

Azure AD Connect tool – the basics

Azure AD Connect tool–the basics

Microsoft recently announced that Azure AD Connect has come out of preview and is now generally available. This now means that Azure AD Connect is the preferred tool for synchronizing on premises AD to Office 365 replacing DIRSYNC and Azure AD Sync Services.

I detailed how to install the preview of Azure AD Connect here:

https://blog.ciaops.com/2015/06/azure-ad-connect-previewinstall.html

and the process is pretty much identical for the released version so I’ll only detail the express install here. Refer to my previous post if you need more details of all the options available but not really required for Office 365.

image

The first thing you’ll need to do to configure synchronisation with your on premises AD and Office 365  is login to the Office 365 portal as an administrator. You’ll then need to select the Users area and then the Active Users.

At the top of the page you’ll find an option Active Directory synchronization as shown above. Here you select the Set up hyperlink.

image

On the page that is displayed you need to select the option to Activate synchronization as shown above.

image

You’ll be promoted to confirm that you wish to Activate.

image

After which you should now see that synchronization is activated.

image

Next, you’ll need to downloaded the released version of Azure AD Connect which you can do from here:

http://www.microsoft.com/en-us/download/details.aspx?id=47594

image

After you have downloaded the software you can install it. It is best practice to install Azure AD Connect onto a member server in your domain but installation on the domain controller is supported.

image

At the Welcome screen select Continue in the lower right.

image

In this case we simply want to configure synchronisation with Office 365 so select Use express settings. If you want to learn about the other options available to you with azure AD Connect check out the following documentation:

https://azure.microsoft.com/en-gb/documentation/articles/active-directory-aadconnect/

The express options will automatically:

– Configure synchronization of identities in the current AD forest

– Configure password synchronization from on premise AD to Azure AD

– Start an initial synchronization

– Synchronize all attributes

image

The installation will now commence.

image

You’ll be prompted for your Azure AD credentials, these are the credentials for the Office 365 global administrator account that will be used to connect to Office 365. Remember, Office 365 allows you to have accounts that are global administrators without them having to have a license for the Office 365 services.

image

The account details you provided will now be verified.

image

You’ll now be prompted for credentials for a local on premise administrator for your AD.

image

These credentials will be verified and you’ll now see a summary of the actions that will take place.

image

You’ll then see SQL Express being installed as part of Azure AD Connect.

image

You’ll then see the Synchronization Service being configured.

image

Then the Directory connector.

image

You should then see it connecting to you Office 365 tenant.

image

Then your local AD (here kumoalliance.org)image


image

Finally, you should see the Microsoft Online Services Sign-in Assistant restarting.

image

You should then receive a message that the process is complete.

image

After a short while, if you compare you local on premises AD users

image

to those in Office you should find local users have synchronised to Office 365 as expected. You will see their status as Synced with Active Directory as shown above.

image

As usual, the synced users won’t have been assigned an Office 365 license. You’ll need to do this via the browser or PowerShell to allow users access to Office 365 services.

image

If you look at the machine you just installed Azure AD Connect onto you’ll see the above new program group as shown above.

image

If select Synchronization Service from this list you’ll be taken to the sync troubleshooting tool to help you see what is happening underneath the covers and perform and diagnostics.

image

If you need to force a synchronisation at any stage navigate to:

\program files\microsoft azure ad sync\bin

image

and run the file

directorysyncclientcmd.exe

So there you have it. No more DIRSYNC. No more Azure AD Sync Services. Azure AD Connect is you preferred option when it comes to syncing an on premises AD to Office 365.

Getting Started with Azure updated

Just wanted to let everyone know that I have updated both my Introduction to Azure course as well as my Office 365 bootcamp offering. You can find both of these products on my publications page at:

http://www.ciaops.com/publications

Because both of these products are changing so rapidly I am trying to keep them as current as possible. Once you purchase the products you will continue to be eligible for updates for the life of that product.

So what is typically updated? For the Azure course I’ve added another video plus access to my Azure OneNote notebook that is full of tutorials, information, links and more. For the Office 365 bootcamp I’ve updated the training OneNote files, the notes for the 70-347 and 70-346 certification exams.

The benefit of OneNote notebooks is that you can use them on any device. If you save them to OneDrive or SharePoint they can also automatically sync across all the devices. You can also use them offline and most importantly they are fully searchable. It is for this reason that I use these notebooks every day in my business to keep track of everything.

By purchasing these, or any of my publications, you are helping me stay in business and allow me to focus on providing more information into these products. Of course all these products are free to subscribers of my Cloud Business Blueprint community. which also provides a heap more for your investment. I encourage you to also check that out if you are keen on taking your cloud business further.

Save time, save effort and help me create the best information sources for products like Office 365 and Azure by supporting my publications. For those people that have already done so, I thank you for your support.

Controlling Office 365 integrated applications

Unfortunately, average users tend to click ‘Yes’ a lot more than they really should. If they could but restrain themselves somewhat the world would have far less viruses. BUT, we know they just can’t help themselves sometimes and administrators and IT Pros are left to clean up the damage.

In the the world of security, prevention is far easier and cheaper than the cure so taking pro-active steps to control when users allow third party applications access to their data can be handy. Office 365 provides the administrator the ability to do just this via Azure Active Directory that is included free with all Office 365 subscriptions. Here’s how.

image

Firstly, login to your Office 365 admin center.

image

In the bottom left select Azure AD.

If you haven’t already enabled Azure AD as part of your Office 365 tenant (which is free), see my previous post:

Enabling your Office 365 Azure AD

image

Select the Active Directory option on the left and then select the name of your directory (there should only be one).

image

Select the configure tab from the options across the top.

image

Scroll down until you locate the integrated applications area towards the bottom. here you can disable (by changing to No) all users ability to add integrated applications and have those applications access the users data.

image

If you make a change you’ll need to select the Save button at the bottom of the page that appears to update the directory with the new configuration.

With these options configured administrators can have piece of mind that none of their users can add applications from places like the SharePoint Store that could access Office 365 data and potentially cause information leakage or worse.