Need to Know Podcast–Episode 105

Join myself and Marc as we catch up on all the latest Azure news and discuss Marc’s recent blog posts on updates that have recently come to Azure. We cover off some updates to SQL, Microsoft’s new documentation service and more. Plenty of really great content aimed at keeping you right up to date with everything Azure and in the Microsoft cloud.

As always don’t forget to send us your questions and feedback as well as leaving review to help grow our audience. We appreciate you taking the time to listen.

or can listen to this episode at:

http://ciaops.podbean.com/e/episode-105-azure-updates/

or subscribe to this and all episodes in iTunes at:

https://itunes.apple.com/au/podcast/ciaops-need-to-know-podcasts/id406891445?mt=2

The podcast is also available on Stitcher at:

http://www.stitcher.com/podcast/ciaops/need-to-know-podcast?refid=stpr

Don’t forget to give the show a rating as well as send me any feedback or suggestions you may have for the show.

Resources

Marc Kean on Twitter

Robert Crane on Twitter

Azure news week 22 (Marc Kean)

Use PowerShell for Windows updates

Azure tenant subscription accounts

Azure Enterprise enrolment hierarchy

Office 365 Azure

https://docs.com/d/embed/D25193685-5871-8149-4450-000618648953%7eMd4186d87-61d5-259a-4d26-00a8bd86cfff

I’ve been doing a lot of presenting around Azure and Office 365 of late and there is a lack of appreciation that when you sign up for Office 365 you automatically receive a free (limited) Azure account.

The difference between the available versions of Azure can be found here:

Azure AD Editions feature comparison – https://blog.ciaops.com/2015/08/azure-ad-editions-feature-comparison.html

How to enable the free version of Azure with Office 365 I have covered here:

Enabling your Office 365 Azure AD – https://blog.ciaops.com/2015/01/enabling-your-office-365-azure-ad.html

This free Azure account allows you to perform some basic functions such as:

Configuring an Azure Single Sign On portal – https://blog.ciaops.com/2015/02/configuring-azure-sso-portal.html

Enabling self-service password resets in Office 365 – https://blog.ciaops.com/2015/02/enabling-self-service-password-resets.html

Using Azure AD B2B sharing with SharePoint Online – https://blog.ciaops.com/2015/11/using-azure-ad-b2b-sharing-with.html

The above presentation on Office 365 Azure provides a good overview of what is possible with Azure from Office 365 that most people don’t even realise is available.

The real message is that you need to think of Office 365 and Azure together, especially in the SMB space. You START with Office 365 to get a free Azure tenant AND then you add a paid subscription of Azure and build from there. You DON’T start with Azure first and add Office 365 as that creates two separate tenants. Always, Office 365 first and then Azure but I’ll cover more about that in upcoming pos

Need to Know Podcast–Episode 103

Join myself and co-host, Azure Technical Specialist Marc Kean, as we take a closer look at the backup options available from Azure. We speak about things such as Azure Backup for files and folders, backup for applications and especially Azure Site Recovery. There is of course coverage of the latest cloud news from the world of Microsoft as well as details about technologies such as Azure Resources Manager.

As always don’t forget to send us you questions and feedback as well as leaving review to help grow our audience. We appreciate you taking the time to listen.

or can listen to this episode at:

http://ciaops.podbean.com/e/episode-103-azure-backup-and-recovery/

or subscribe to this and all episodes in iTunes at:

https://itunes.apple.com/au/podcast/ciaops-need-to-know-podcasts/id406891445?mt=2

The podcast is also available on Stitcher at:

http://www.stitcher.com/podcast/ciaops/need-to-know-podcast?refid=stpr

Don’t forget to give the show a rating as well as send me anyfeedback or suggestions you may have for the show.

Resources

Marc Kean

Robert Crane

Windows 10 app for OneDrive

Skype for Business for Mac

Microsoft Gigjam

Azure Recovery Service Vault goes GA

Azure Cool Storage

Azure Backup for Files and Folders

Azure Backup for Applications

ARM Azure Site Recovery [VIDEO] – Part 1

ARM Azure Site Recovery [VIDEO] – Part 2

Azure Backup for Applications

In a previous article I showed how the first step into Azure is typically to use Azure backup for files and folders. I also covered off how you can restore files via that method. That backup method works great for static files and folders on a network but what about applications such as SQL, SharePoint, Exchange, etc where important data also resides? You typically can’t backup the data because it is ‘in use’ by the application. In most cases you need a special ‘agent’ that allows the data inside these applications to be backed up even when the data is in use. Luckily, Azure provides that with a service called Azure backup for applications.

This walk through covers how to use Azure Backup for applications with Azure Resource Manager. if you are looking for how to do this in the older ‘classic’ Azure Service Manager check out my previous article on that topic:

Azure Backup Server for Applications configuration

Azure backup for applications is an extension of Azure backup for files and folders. You’ll back the data up into the same Azure Backup Vault that I detailed how to create in a previous article. What I’ll therefore show you here now is how to set up Azure backup for applications.
image

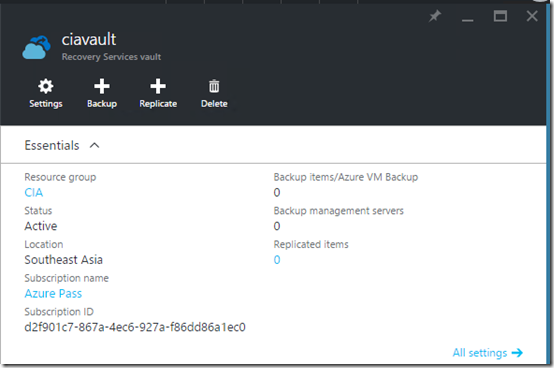
You’ll need to navigate back to the Azure Recovery Vault in the new Azure portal. When you do you should see a screen similar to that shown above. Select the Backup button at the top of the page.
image

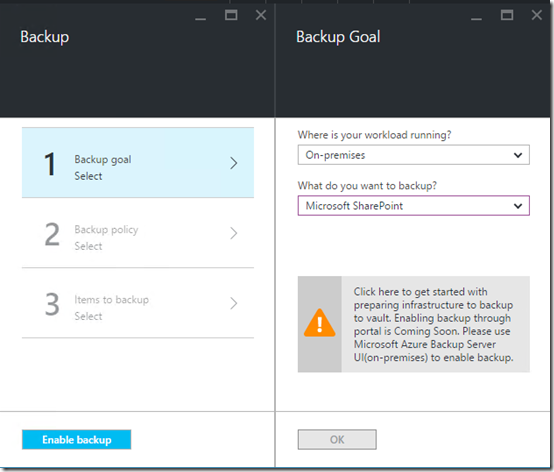
You’ll now be prompted to work through the steps required to configure the Azure backup. For the option Where is your workload running? Select On-premises from the selections available. For the option What do you want to backup select either Microsoft SharePoint, Microsoft SQL or Microsoft Exchange (i.e. an application).

When you do you’ll see a warning message appear below prompting you to click on it to get started. Do so.
image

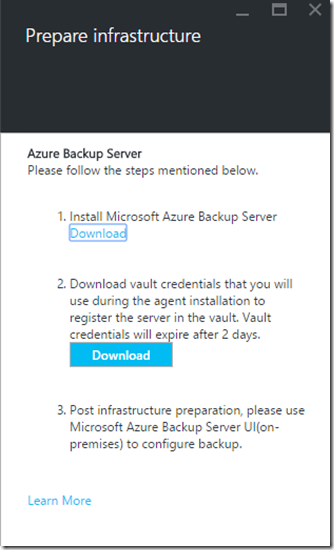
You’ll be taken to the Prepare Infrastructure blade as shown above. You’ll now need to download the dedicated Azure Backup software. This is different from what was used with Azure Backup for files. It is in fact a version of Microsoft Data Protection Manager (DPM). To download the DPM software select the Download link. This will open a browser windows to:

https://www.microsoft.com/en-us/download/details.aspx?id=49170
image

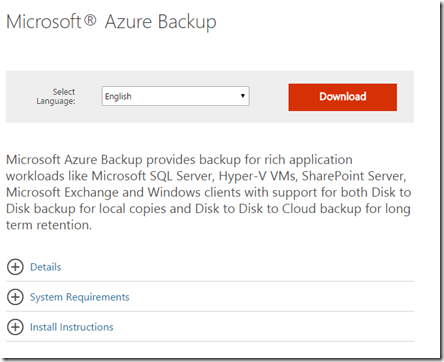
You are now taken to the download page for the Azure Backup for applications software as shown above. Select the Download button to continue.

image

You’ll need to select all the components and download them to the machine on which you plan to install the software. You’ll note that this software is much larger (at 3GB) than that for Azure Backup for files and folder, that is because this Microsoft Data Protection Manager.

image

Once the software has downloaded, kick off the setup and select Next to continue.

image

Select the location where the files can be extracted. Typically, just accept the default and press Next to continue.

image

Select Extract to expand the compressed files from the download.

image

You should now see the files being extracted as shown above.

image

Ensure the Execute setup.exe is select and press the Finish button.

image

The above splash screen should now appear. Select the Microsoft Azure Backup option under the Install column in the top left.

image

You may see some additional software components being installed as shown above.

image

Select Next at the Welcome screen to continue.
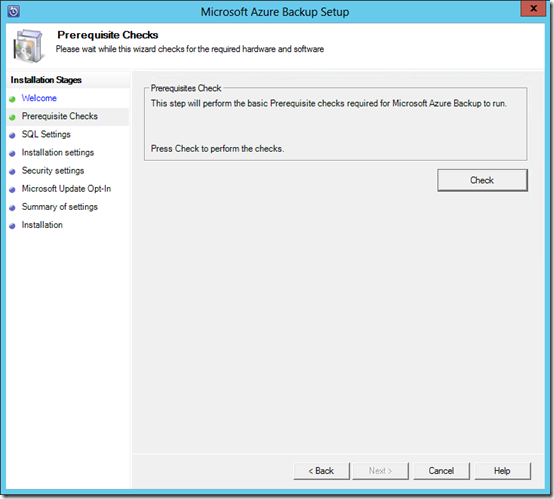
image

Select the Check button in the top right to verify the current computer meets the requirements for the Azure Backup software.

image

Hopefully everything is in order and the check are passed as shown above.

Select Next to continue.

image

The backup software will need to store its data in an SQL database. You can either elect to install a new version of this or use an existing version. Typically, you’ll allow the installation to create a instance of SQL server and install the SQL software.

Select the Check and Install button in the top right to continue.
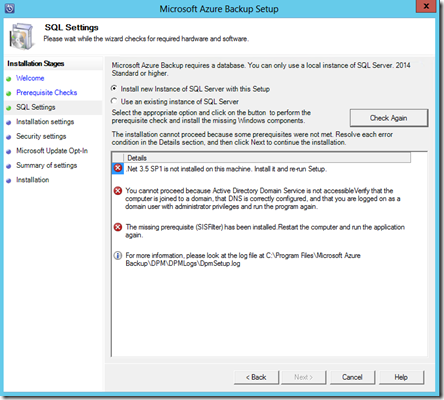
image

For Azure Backup software to install successfully you’ll need to ensure you have .Net 3.5 SP1 as well as ensuring that the machine can access a Domain Controller. Typically this means it is a member server in the network attached to the Domain Controller. You can install the software on a Domain Controller if you wish but you may need to take additional steps to accomplish this. Here is an article on this:

https://technet.microsoft.com/en-us/library/ff399416.aspx

image

If however, there are no red flags you should see a summary of the confirmation as shown above. Select Next to continue.
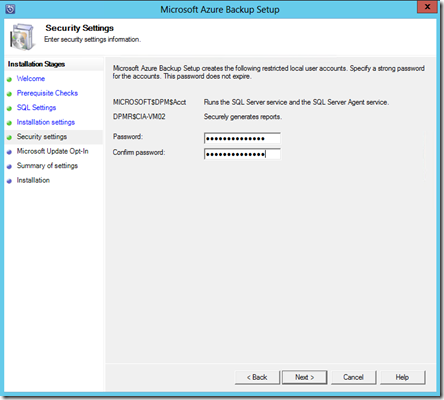
image

You’ll now need to specify a password that will be tied to a system account for the installed software. Enter and appropriate password and select Next to continue.
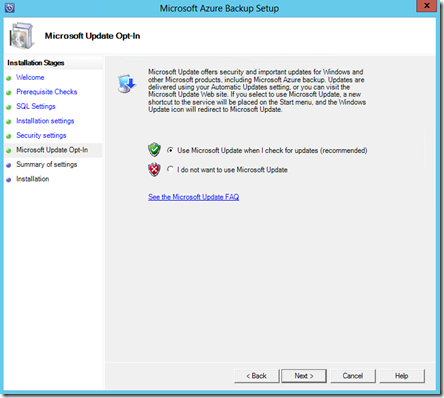
image

Typically select the option to allow Microsoft updates and select Next to continue.
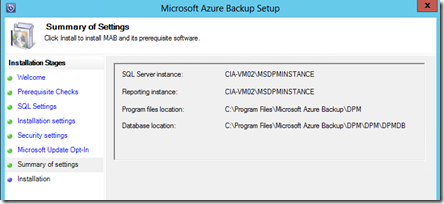
image

You will now see a summary of the installation. If all is good, select Next to continue.

image

The first step in the installation process will be the registration of the software with the Azure Recovery vault. You’ll need to browse to the location of the downloaded vault credentials. These will then be validated as shown above.

Select Next to continue.

image

As with the Azure Backup for files and folders, you’ll now need to enter or generate a strong passphrase to use to provide encryption of the backed up data.

Remember that you need to save this pass phrase in a location independent of the machine that you are currently using. If you lose the password you will be unable to restore the data you backup here, so best practice is to ensure you have multiple copies of the password.

Select Next to continue.
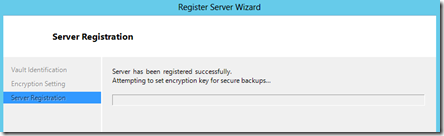
image

The registration process will now complete.

image

The installation process will then continue with the installation and configuration of SQL Server as shown above. The process will then proceed to complete the installation of the Azure Backup for applications.

image

When the process is complete you should all tasks have been completed successfully.

Press Close to complete the process.

image

You should see two icon now displayed on the desktop, one for the Azure Backup for applications program and one for an Azure Backup for applications PowerShell environment. Select the Azure Backup for applications program to launch the software.

image

You should now see Azure Backup for applications (basically Microsoft Data Protection Manager) as shown above.

Future articles will cover how to use this software to actually backup and restore from network locations.

In summary, if you are looking to backup more than files and folders to Azure you need to install Azure Backup for applications which means basically installed the Microsoft Data Protection software on a server in the network which is connected to an Azure Recovery Services vault configure using Azure Resource Manager.

For more details about using Azure Backup for applications see:

Preparing to back up workloads using Azure Backup Server

SBS to Azure event in Perth

I am happy to announce that I’m heading back to Perth on June 2, 2016 to speak at a Microsoft SBS to Azure event. You can register here:

https://msevents.microsoft.com/CUI/EventDetail.aspx?EventID=1032778010&Culture=en-AU&community=0

it is a morning session focused on giving you an overview of how to successfully transition a standard SBS environment to Azure and Office 365. You get plenty of strategy, demos and hopefully your questions answered.

I hope to see you there.

Enabling Azure Remote App

You can think of Azure Remote App as basically Remote Desktop Services (RDS) as a service. At this point in time you will need to enable Azure Remote App using the ‘classic’ portal. Here’s how you do it.

image

Firstly, login to the Azure portal and scroll down the options on the left until you identify the option for Remote App that appears like:

image

Select this.

image

Typically, when you select this you will see that no current RemoteApp collection has been configured as shown above.

Select the Create a RemoteApp Collection link.

image

This will display the configuration dialog as shown above. Enter a collection name, region, plan and template image.

The region is the data center in which you wish to host this Remote App service. Typically you’ll want to select the region that is closest to you.

There are currently four pricing tiers and you can find more information about these here:

Azure Remote App pricing plans

Typically you’ll want to select the Standard or Premium Plan.

You can then select from the template image to use for the remote server. You have the choice of a number of preconfigured images or you can use your own if it has been suitably prepared. In this case the Office Professional Plus (30-day trial) will be select to provide Office applications to users.

When ready, select the Create RemoteApp Collection at the bottom of the page.

image

You should now see that RemoteApp collection has commenced creation as shown above. This process will take 15 – 30 minutes typically.

image

You’ll see that there is also the option to create a RemoteApp collection with a Virtual Network. This allows the RDS server to be placed on an existing Azure LAN so it can share other Azure resources. This article won’t cover this specifically, it will be covered in an upcoming article.

image

You may also see that by default you receive a 30 day trial of RemoteApp. If you want to upgrade to paid subscriptions immediately ensure you select the option provided at the top of the screen as shown above.

image

After the service has been enabled you will a check mark as shown above. Select the service name to view the settings.

image

Under the User Access option you will a list of any users who have access. You can add users that have Microsoft Account or if they are part of the Azure tenant already.

image

Under the Publishing option you can see all the applications that will be available to users. These applications are those that are currently on the virtual machine image used.

image

You can make additional options available by selecting the Publish button and either manually entering the directory path or you can select from the start menu as shown above.

image

Users can then use the appropriate RemoteApp application on their device to access this instance of RemoteApp and run the applications. Above is an example of the Windows 10 Universal App. Remote App device clients can be downloaded from:

https://www.remoteapp.windowsazure.com/en/

That has been only a basic overview of how to get RemoteApp up and running in Azure. Look out for more upcoming articles on RemoteApp including deeper dives into configuration and management.

Creating an Azure Resource Group using PowerShell

At the beginning of my recent post about creating an Azure files backup using Azure Resource Manager (ARM) and the Azure portal I detailed how to create an Azure Resource Group. This is of course not the only way that you can create an Azure Resource Group, you can also use PowerShell.

Before you use PowerShell make sure you have read my article:

Connecting to Azure Resource Manager via PowerShell

and you follow the steps outline to connect to your Azure Resource Manager account.

image

If we look at the Azure portal we see there is currently only one Resource Group called CIA.

image

Once connected to the Azure tenant with PowerShell run the command:

new-azurermresourcegroup –name “name” –location “data-center”

where you need to enter the desired “name” and “datacenter” here I have chosen to create a new Azure Resource group called cia2 located in the Australia East data center (“australiaeast”).

image

Once the command has completed successfully, if you now return to Azure portal and refresh the Resource Group display you should see a new Azure Resource Group has been created as shown above with the name you selected (here cia2)

You can now use this Azure Resource Group to put all sorts of resources into. I’ll cover more on how to do that specifically with PowerShell in an upcoming article, however, that’s how easy it is to create an Azure Resource Group using PowerShell.

Creating a Basic LAN in Azure

I’ve just uploaded a video presentation I gave a while back on creating a basics LAN in Azure. The process uses the Azure Service Manager portal to do this in a ‘classic’ cloud deployment. Note, this is not the same as with the Azure Resource Manager (ARM). I’ll be doing something around that soon.

Hopefully, this will give you a basic idea of what’s involved in creating a LAN in Azure.