
Microsoft Defender for Business is a security solution designed for small and medium businesses to protect against cyber threats. When issues arise, a systematic troubleshooting approach helps identify root causes and resolve problems efficiently. This guide provides a step-by-step process to troubleshoot common Defender for Business issues, highlights where to find relevant logs and alerts, and suggests advanced techniques for complex situations. All steps are factual and based on Microsoft’s latest guidance as of 2025.
Table of Contents
- common-issues-and-symptoms
- key-locations-for-logs-and-alerts
- step-by-step-troubleshooting-process
- identify-the-issue-and-gather-information
- check-the-microsoft-365-defender-portal-for-alerts
- verify-device-status-and-protection-settings
- examine-device-logs-event-viewer
- resolve-configuration-or-policy-issues
- verify-issue-resolution
- escalate-to-advanced-troubleshooting-if-needed
- advanced-troubleshooting-techniques
- best-practices-to-prevent-future-issues
- additional-resources-and-support
Common Issues and Symptoms

These are some typical problems administrators encounter with Defender for Business:
- Setup and Onboarding Failures: The initial setup or device onboarding process fails. An error like “Something went wrong, and we couldn’t complete your setup” may appear, indicating a configuration channel or integration issue (often with Intune)[1]. Devices that should be onboarded don’t show up in the portal.
- Devices Showing As Unprotected: In the Microsoft Defender portal, you might see notifications that certain devices are not protected even though they were onboarded[1]. This often happens when real-time protection is turned off (for instance, if a non-Microsoft antivirus is running, it may disable Microsoft Defender’s real-time protection).
- Mobile Device Onboarding Issues: Users cannot onboard their iOS or Android devices using the Microsoft Defender app. A symptom is that mobile enrollment doesn’t complete, possibly due to provisioning not finished on the backend[1]. For example, if the portal shows a message “Hang on! We’re preparing new spaces for your data…”, it means the Defender for Business service is still provisioning mobile support (which can take up to 24 hours) and devices cannot be added until provisioning is complete[1].
- Defender App Errors on Mobile: The Microsoft Defender app on mobile devices may crash or show errors. Users report issues like app not updating threats or not connecting. (Microsoft provides separate troubleshooting guides for the mobile Defender for Endpoint app on Android/iOS in such cases[1].)
- Policy Conflicts: If you have multiple security management tools, you might see conflicting policies. For instance, an admin who was managing devices via Intune and then enabled Defender for Business’s simplified configuration could encounter conflicts where settings in Intune and Defender for Business overlap or contradict[1]. This can result in devices flipping between policy states or compliance errors.
- Intune Integration Errors: During the setup process, an error indicating an integration issue between Defender for Business and Microsoft Intune might occur[1]. This often requires enabling certain settings (detailed in Step 5 below) to establish a proper configuration channel.
- Onboarding or Reporting Delays: A device appears to onboard successfully but doesn’t show up in the portal or is missing from the device list even after some time. This could indicate a communication issue where the device is not reporting in. It might be caused by connectivity problems or by an issue with the Microsoft Defender for Endpoint service (sensor) on the device.
- Performance or Scan Issues: (Less common with Defender for Business, but possible) – Devices might experience high CPU or scans get stuck, which could indicate an issue with Defender Antivirus on the endpoint that needs further diagnosis (this overlaps with Defender for Endpoint troubleshooting).
Understanding which of these scenarios matches your situation will guide where to look first. Next, we’ll cover where to find the logs and alerts that contain clues for diagnosis.
Key Locations for Logs and Alerts
Effective troubleshooting relies on checking both cloud portal alerts and on-device logs. Microsoft Defender for Business provides information in multiple places:
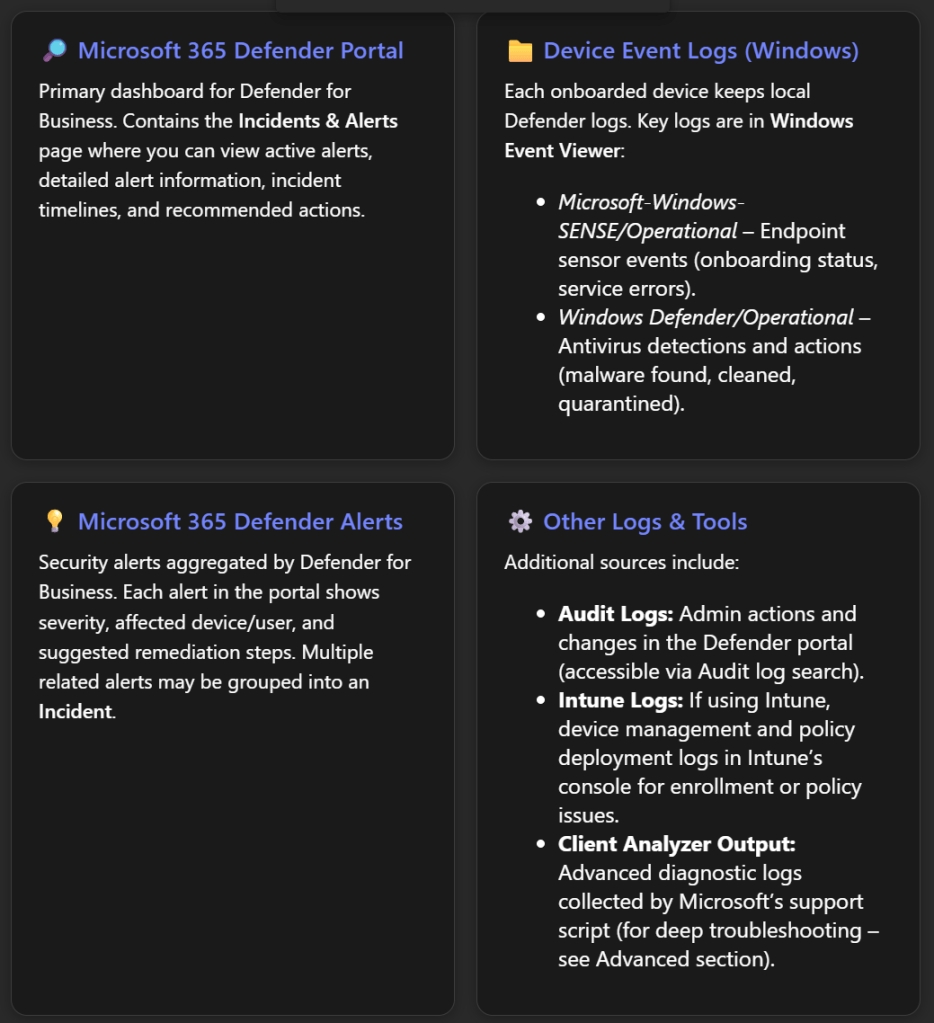
Microsoft 365 Defender Portal (security.microsoft.com): This is the cloud portal where Defender for Business is managed. The Incidents & alerts section is especially important. Here you can monitor all security incidents and alerts in one place[2]. For each alert, you can click to see details in a flyout pane – including the alert title, severity, affected assets (devices or users), and timestamps[2]. The portal often provides recommended actions or one-click remediation for certain alerts[2]. It’s the first place to check if you suspect Defender is detecting threats or if something triggered an alert that correlates with the issue.
Device Logs via Windows Event Viewer: On each Windows device protected by Defender for Business, Windows keeps local event logs for Defender components. Access these by opening Event Viewer (Start > eventvwr.msc). Key logs include:
- Microsoft-Windows-SENSE/Operational – This log records events from the Defender for Endpoint sensor (“SENSE” is the internal code name for the sensor)[3]. If a device isn’t showing up in the portal or has onboarding issues, this log is crucial. It contains events for service start/stop, onboarding success/failure, and connectivity to the cloud. For example, Event ID 6 means the service isn’t onboarded (no onboarding info found), which indicates the device failed to onboard and needs the onboarding script rerun[3]. Event ID 3 means the service failed to start entirely[3], and Event ID 5 means it couldn’t connect to the cloud (network issue)[3]. We will discuss how to interpret and act on these later.
- Windows Defender/Operational – This is the standard Windows Defender Antivirus log under Applications and Services Logs > Microsoft > Windows > Windows Defender > Operational. It logs malware detections and actions taken on the device[4]. For troubleshooting, this log is helpful if you suspect Defender’s real-time protection or scans are causing an issue or to confirm if a threat was detected on a device. You might see events like “Malware detected” (Event ID 1116) or “Malware action taken” (Event ID 1117) which correspond to threats found and actions (like quarantine) taken[4]. This can explain, for instance, if a file was blocked and that’s impacting a user’s work.
- Other system logs: Standard Windows logs (System, Application) might also record errors (for example, if a service fails or crashes, or if there are network connectivity issues that could affect Defender).
Alerts in Microsoft 365 Defender: Defender for Business surfaces alerts in the portal for various issues, not only malware. For example, if real-time protection is turned off on a device, the portal will flag that device as not fully protected[1]. If a device hasn’t reported in for a long time, it might show in the device inventory with a stale last-seen timestamp. Additionally, if an advanced attack is detected, multiple alerts will be correlated as an incident; an incident might be tagged with “Attack disruption” if Defender automatically contained devices to stop the spread[2] – such context can validate if an ongoing security issue is causing what you’re observing.
Intune or Endpoint Manager (if applicable): Since Defender for Business can integrate with Intune (Endpoint Manager) for device management and policy deployment, some issues (especially around onboarding and policy conflicts) may require checking Intune logs:
- In Intune admin center, review the device’s Enrollment status and Device configuration profiles (for instance, if a security profile failed to apply, it could cause Defender settings to not take effect).
- Intune’s Troubleshooting + support blade for a device can show error codes if a policy (like onboarding profile) failed.
- If there’s a known integration issue (like the one mentioned earlier), ensure the Intune connection and settings are enabled as described in the next sections.
Advanced Hunting and Audit (for advanced users): If you have access to Microsoft 365 Defender’s advanced hunting (which might require an upgraded license beyond Defender for Business’s standard features), you could query logs (e.g., DeviceEvents, AlertEvents) for deeper investigation. Also, the Audit Logs in the Defender portal record configuration changes (useful to see if someone changed a policy right before issues started).
Now, with an understanding of where to get information, let’s proceed with a systematic troubleshooting process.
Step-by-Step Troubleshooting Process
The following steps outline a logical process to troubleshoot issues in Microsoft Defender for Business. Adjust the steps as needed based on the specific symptoms you are encountering.
Step 1: Identify the Issue and Gather Information
Before jumping into configuration changes, clearly define the problem. Understanding the nature of the issue will focus your investigation:
- What are the symptoms? For example, “Device X is not appearing in the Defender portal”, “Users are getting no protection on their phones”, or “We see an alert that one device isn’t protected”, etc.
- When did it start? Did it coincide with any changes (onboarding new devices, changing policies, installing another antivirus, etc.)?
- Who or what is affected? A single device, multiple devices, all mobile devices, a specific user?
- Any error messages? Note any message in the portal or on the device. For instance, an error code during setup, or the portal banner saying “some devices aren’t protected”[1]. These messages often hint at the cause.
Gathering this context will guide you on where to look first. For example, an issue with one device might mean checking that device’s status and logs, whereas a widespread issue might suggest a configuration problem affecting many devices.
Step 2: Check the Microsoft 365 Defender Portal for Alerts
Log in to the Microsoft 365 Defender portal (https://security.microsoft.com) with appropriate admin credentials. This centralized portal often surfaces the problem:
- Go to Incidents & alerts: In the left navigation pane, click “Incidents & alerts”, then select “Alerts” (or “Incidents” for grouped alerts)[2]. Look for any recent alerts that correspond to your issue. For example, if a device isn’t protected or hasn’t reported, there may be an alert about that device.
- Review alert details: If you see relevant alerts, click on one to open the details flyout. Check the alert title and description – these describe what triggered it (e.g. “Real-time protection disabled on Device123” or “Malware detected and quarantined”). Note the severity (Informational, Low, Medium, High) and the affected device or user[2]. The portal will list the device name and perhaps the user associated with it.
- Take recommended actions: The alert flyout often includes recommended actions or a direct link to “Open incident page” or “Take action”. For instance, for a malware alert, it may suggest running a scan or isolating the device. For a configuration alert (like real-time protection off), it might recommend turning it back on. Make note of these suggestions as they directly address the issue described[2].
- Check the device inventory: Still in the Defender portal, navigate to Devices (under Assets). Find the device in question. The device page can show its onboarding status, last seen time, OS, and any outstanding issues. If the device is missing entirely, that confirms an onboarding problem – skip to Step 4 to troubleshoot that.
- **Inspect *Incidents***: If multiple alerts have been triggered around the same time or on the same device, the portal might have grouped them into an *Incident* (visible under the Incidents tab). Open the incident to see a timeline of what happened. This can give a broader context especially if a security threat is involved (e.g. an incident might show that a malware was detected and then real-time protection was turned off – indicating the malware might have attempted to disable Defender).
Example: Suppose the portal shows an alert “Real-time protection was turned off on DeviceXYZ”. This is a clear indicator – the device is onboarded but not actively protecting in real-time[1]. The recommended action would likely be to turn real-time protection back on. Alternatively, if an alert says “New malware found on DeviceXYZ”, you’d know the issue is a threat detection, and the portal might guide you to remediate or confirm that malware was handled. In both cases, you’ve gathered an essential clue before even touching the device.
If you do not see any alert or indicator in the portal related to your problem, the issue might not be something Defender is reporting on (for example, if the problem is an onboarding failure, there may not be an alert – the device just isn’t present at all). In such cases, proceed to the next steps.
Step 3: Verify Device Status and Protection Settings
Next, ensure that the devices in question are configured correctly and not in a state that would cause issues:
- Confirm onboarding completion: If a device doesn’t appear in the portal’s device list, ensure that the onboarding process was done on that device. Re-run the onboarding script or package on the device if needed. (Defender for Business devices are typically onboarded via the local script, Intune, Group Policy, etc. If this step wasn’t done or failed, the device won’t show up in the portal.)
- Check provisioning status for mobile: If the issue is with mobile devices (Android/iOS) not onboarding, verify that Defender for Business provisioning is complete. As mentioned, the portal (under Devices) might show a message “preparing new spaces for your data” if the service setup is still ongoing[1]. Provisioning can take up to 24 hours for a new tenant. If you see that message, the best course is to wait until it disappears (i.e., until provisioning finishes) before troubleshooting further. Once provisioning is done, the portal will prompt to onboard devices, and then users should be able to add their mobile devices normally[1].

- Verify real-time protection setting: On any Windows device showing “not protected” in the portal, log onto that device and open Windows Security > Virus & threat protection. Check if Real-time protection is on. If it’s off and cannot be turned on, check if another antivirus is installed. By design, onboarding a device running a third-party AV can cause Defender’s real-time protection to be automatically disabled to avoid conflict[1]. In Defender for Business, Microsoft expects Defender Antivirus to be active alongside the service for best protection (“better together” scenario)[1]. If a third-party AV is present, decide if you will remove it or live with Defender in passive mode (which reduces protection and triggers those alerts). Ideally, ensure Microsoft Defender Antivirus is enabled.
- Policy configuration review: If you suspect a policy conflict or misconfiguration, review the policies applied:
- In the Microsoft 365 Defender portal, go to Endpoints > Settings > Rules & policies (or in Intune’s Endpoint security if that’s used). Ensure that you haven’t defined contradictory policies in multiple places. For example, if Intune had a policy disabling something but Defender for Business’s simplified setup has another setting, prefer one system. In a known scenario, an admin had Intune policies and then used the simplified Defender for Business policies concurrently, leading to conflicts[1]. The resolution was to delete or turn off the redundant policies in Intune and let Defender for Business policies take precedence (or vice versa) to eliminate conflicts[1].
- Also verify tamper protection status – by default, tamper protection is on (preventing unauthorized changes to Defender settings). If someone turned it off for troubleshooting and forgot to re-enable, settings could be changed without notice.
- Intune onboarding profile (if applicable): If devices were onboarded via Intune (which should be the case if you connected Defender for Business with Intune), check the Endpoint security > Microsoft Defender for Endpoint section in Intune. Ensure there’s an onboarding profile and that those devices show as onboarded. If a device is stuck in a pending state, you may need to re-enroll or manually onboard.
By verifying these settings, you either fix simple oversights (like turning real-time protection back on) or gather evidence of a deeper issue (for example, confirming a device is properly onboarded, yet still not visible, implying a reporting issue, or confirming there’s a policy conflict that needs resolution in the next step).
Step 4: Examine Device Logs (Event Viewer)
If the issue is not yet resolved by the above steps, or if you need more insight into why something is wrong, dive into the device’s event logs for Microsoft Defender. Perform these checks on an affected device (or a sample of affected devices if multiple):
- Open Event Viewer (Local logs): On the Windows device, press Win + R, type
eventvwr.mscand hit Enter. Navigate to Applications and Services Logs > Microsoft > Windows and scroll through the sub-folders. - Check “SENSE” Operational log: Locate Microsoft > Windows > SENSE > Operational and click it to open the Microsoft Defender for Endpoint service log[3]. Look for recent Error or Warning events in the list:
- Event ID 3: “Microsoft Defender for Endpoint service failed to start.” This means the sensor service didn’t fully start on boot[3]. Check if the
Senseservice is running (in Services.msc). If not, an OS issue or missing prerequisites might be at fault. - Event ID 5: “Failed to connect to the server at \.” This indicates the endpoint could not reach the Defender cloud service URLs[3]. This can be a network or proxy issue – ensure the device has internet access and that security.microsoft.com and related endpoints are not blocked by firewall or proxy.
- Event ID 6: “Service isn’t onboarded and no onboarding parameters were found.” This tells us the device never got the onboarding info – effectively it’s not onboarded in the service[3]. Possibly the onboarding script never ran successfully. Solution: rerun onboarding and ensure it completes (the event will change to ID 11 on success).
- Event ID 7: “Service failed to read onboarding parameters”[3] – similar to ID 6, means something went wrong reading the config. Redeploy the onboarding package.
- Other SENSE events might point to registry permission issues or feature missing (e.g., Event ID 15 could mean the SENSE service couldn’t start due to ELAM driver off or missing components – those cases are rare on modern systems, but the event description will usually suggest enabling a feature or a Windows update[5][5]).
- Event ID 3: “Microsoft Defender for Endpoint service failed to start.” This means the sensor service didn’t fully start on boot[3]. Check if the
- Check “Windows Defender” Operational log: Next, open Microsoft > Windows > Windows Defender > Operational. Look for recent entries, especially around the time the issue occurred:
- If the issue is related to threat detection or a failed update, you might see events in the 1000-2000 range (these correspond to malware detection events and update events).
- For example, Event ID 1116 (
MALWAREPROTECTION_STATE_MALWARE_DETECTED) means malware was detected, and ID 1117 means an action was taken on malware[4]. These confirm whether Defender actually caught something malicious, which might have triggered further issues. - You might also see events indicating if the user or admin turned settings off. Event ID 5001-5004 range often relates to settings changes (like if real-time protection was disabled, it might log an event).
- Additional log locations: If troubleshooting a device connectivity or performance issue, also check the System log in Event Viewer for any relevant entries (e.g., Service Control Manager errors if the Defender service failed repeatedly). Also, the Security log might show Audit failures if, for example, Defender attempted an action.
- Analyze patterns: If multiple devices have issues, compare logs. Are they all failing to contact the service (Event ID 5)? That could point to a common network issue. Are they all showing not onboarded (ID 6/7)? Maybe the onboarding instruction wasn’t applied to that group of devices or a script was misconfigured.
By scrutinizing Event Viewer, you gather concrete evidence of what’s happening at the device level. For instance, you might confirm “Device A isn’t in the portal because it has been failing to reach the Defender service due to proxy errors – as Event ID 5 shows.” Or “Device B had an event indicating onboarding never completed (Event 6), explaining why it’s missing from portal – need to re-onboard.” This will directly inform the fix.
Step 5: Resolve Configuration or Policy Issues
Armed with the information from the portal (Step 2), settings review (Step 3), and device logs (Step 4), you can now take targeted actions to fix the issue.
Depending on what you found, apply the relevant resolution below:
- If Real-Time Protection Was Off: Re-enable it. In the Defender portal, ensure that your Next-generation protection policy has Real-time protection set to On. If a third-party antivirus is present and you want Defender active, consider uninstalling the third-party AV or check if it’s possible to run them side by side. Microsoft recommends using Defender AV alongside Defender for Business for optimal protection[1]. Once real-time protection is on, the portal should update and the “not protected” alert will clear.
- If Devices Weren’t Onboarded Successfully: Re-initiate the onboarding:
- For devices managed by Intune, you can trigger a re-enrollment or use the onboarding package again via a script/live response.
- If using local scripts, run the onboarding script as Administrator on the PC. After running, check Event Viewer again for Event ID 11 (“Onboarding completed”)[3].
- For any devices still not appearing, consider running the Microsoft Defender for Endpoint Client Analyzer on those machines – it’s a diagnostic tool that can identify issues (discussed in Advanced section).
- If Event Logs Show Connectivity Errors (ID 5, 15): Ensure the device has internet access to Defender endpoints. Make sure no firewall is blocking:
- URLs like
*.security.microsoft.com,*windows.comrelated to Defender cloud. Proxy settings might need to allow the Defender service through. See Microsoft’s documentation on Defender for Endpoint network connections for required URLs. - After adjusting network settings, force the device to check in (you can reboot the device or restart the
Senseservice and watch Event Viewer to see if it connects successfully).
- URLs like
- If Policy Conflicts are Detected: Decide on one policy source:
- Option 1: Use Defender for Business’s simplified configuration exclusively. This means removing or disabling parallel Intune endpoint security policies that configure AV or Firewall or Device Security, to avoid overlap[1].
- Option 2: Use Intune (Endpoint Manager) for all device security policies and avoid using the simplified settings in Defender for Business. In this case, go to the Defender portal settings and turn off the features you are managing elsewhere.
- In practice, if you saw conflicts, a quick remedy is to delete duplicate policies. For example, if Intune had an Antivirus policy and Defender for Business also has one, pick one to keep. Microsoft’s guidance for a situation where an admin uses both was to delete existing Intune policies to resolve conflicts[1].
- After aligning policies, give it some time for devices to update their policy and then check if the conflict alerts disappear.
- If Integration with Intune Failed (Setup Error): Follow Microsoft’s recommended fix which involves three steps[1][1]:
- In the Defender for Business portal, go to Settings > Endpoints > Advanced Features and ensure Microsoft Intune connection is toggled On[1].
- Still under Settings > Endpoints, find Configuration management > Enforcement scope. Make sure Windows devices are selected to be managed by Defender for Endpoint (Defender for Business)[1]. This allows Defender to actually enforce policies on Windows clients.
- In the Intune (Microsoft Endpoint Manager) portal, navigate to Endpoint security > Microsoft Defender for Endpoint. Enable the setting “Allow Microsoft Defender for Endpoint to enforce Endpoint Security Configurations” (set to On)[1]. This allows Intune to hand off certain security configuration enforcement to Defender for Business’s authority. These steps establish the necessary channels so that Defender for Business and Intune work in harmony. After doing this, retry the setup or onboarding that failed. The previous error message about the configuration channel should not recur.
- If Onboarding Still Fails or Device Shows Errors: If after trying to onboard, the device still logs errors like Event 7 or 15 indicating issues, consider these:
- Run the onboarding with local admin rights (ensure no permission issues).
- Update the device’s Windows to latest patches (sometimes older Windows builds have known issues resolved in updates).
- As a last resort, you can try an alternate onboarding method (e.g., if script fails, try via Group Policy or vice versa).
- Microsoft also suggests if Security Management (the feature that allows Defender for Business to manage devices without full Intune enrollment) is causing trouble, you can temporarily manually onboard the device to the full Defender for Endpoint service using a local script as a workaround[1]. Then offboard and try again once conditions are corrected.
- If a Threat Was Detected (Malware Incident): Ensure it’s fully remediated:
- In the portal, check the Action Center (there is an Action center in Defender portal under “Actions & submissions”) to see if there are pending remediation actions (like undo quarantine, etc.).
- Run a full scan on the device through the portal or locally.
- Once threats are removed, verify if any residual impact remains (e.g., sometimes malware can turn off services – ensure the Windows Security app shows all green).
Perform the relevant fixes and monitor the outcome. Many changes (policy changes, enabling features) may take effect within minutes, but some might take an hour or more to propagate to all devices. You can speed up policy application by instructing devices to sync with Intune (if managed) or simply rebooting them.
Step 6: Verify Issue Resolution
After applying fixes, confirm that the issue is resolved:
- Check the portal again: Go back to the Microsoft 365 Defender portal’s Incidents & alerts and Devices pages.
- If there was an alert (e.g., device not protected), it should now clear or show as Resolved. Many alerts auto-resolve once the condition is fixed (for instance, turning real-time protection on will clear that alert after the next device check-in).
- If you removed conflicts or fixed onboarding, any incident or alert about those should disappear. The device should now appear in the Devices list if it was missing, and its status should be healthy (no warnings).
- If a malware incident was being shown, ensure it’s marked Remediated or Mitigated. You might need to mark it as resolved if it doesn’t automatically.
- Confirm on the device: For device-specific issues, physically check the device:
- Open Windows Security and verify no warning icons are present.
- In Event Viewer, see if new events are positive. For example, Event ID 11 in SENSE log (“Onboarding completed”) confirms success[3]. Or Event ID 1122 in Windows Defender log might show a threat was removed.
- If you restarted services or the system, ensure they stay running (the
Senseservice should be running and set to automatic).
- Test functionality: Perform a quick test relevant to the issue:
- If mobile devices couldn’t onboard, try onboarding one now that provisioning is fixed.
- If real-time protection was off, intentionally place a test EICAR anti-malware file on the machine to see if Defender catches it (it should, if real-time protection is truly working).
- If devices were not reporting, force a machine to check in (by running
MpCmdRun -SignatureUpdateto also check connectivity). - These tests confirm that not only is the specific symptom gone, but the underlying protection is functioning as expected.
If everything looks good, congratulations – the immediate issue is resolved. Make sure to document what the cause was and how it was fixed, for future reference.
Step 7: Escalate to Advanced Troubleshooting if Needed
If the problem persists despite the above steps, or if logs are pointing to something unclear, it may require advanced troubleshooting:
- Multiple attempts failed? For example, if a device still won’t onboard after trying everything, or an alert keeps returning with no obvious cause, then it’s time to dig deeper.
- Use the Microsoft Defender Client Analyzer: Microsoft provides a Client Analyzer tool for Defender for Endpoint that collects extensive logs and configurations. In a Defender for Business context, you can run this tool via a Live Response session. Live Response is a feature that lets you run commands on a remote device from the Defender portal (available if the device is onboarded). You can upload the Client Analyzer scripts and execute them to gather a diagnostic package[6][6]. This package can highlight misconfigurations or environmental issues. For Windows, the script
MDELiveAnalyzer.ps1(and related modules likeMDELiveAnalyzerAV.ps1for AV-specific logs) will produce a zip file with results[6][6]. Review its findings for any errors (or provide it to Microsoft support). - Enable Troubleshooting Mode (if performance issue): If the issue is performance-related (e.g., you suspect Defender’s antivirus is causing an application to crash or high CPU), Microsoft Defender for Endpoint has a Troubleshooting mode that can temporarily relax certain protections for testing. This is more applicable to Defender for Endpoint P2, but if accessible, enabling troubleshooting mode on a device allows you to see if the problem still occurs without certain protections, thereby identifying if Defender was the culprit. Remember to turn it off afterwards.
- Consult Microsoft Documentation: Sometimes a specific error or event ID might be documented in Microsoft’s knowledge base. For instance, Microsoft has a page listing Defender Antivirus event IDs and common error codes – check those if you have a particular code.
- Community and Support Forums: It can be useful to see if others have hit the same issue. The Microsoft Tech Community forums or sites like Reddit (e.g., r/DefenderATP) might have threads. (For example, missing incidents/alerts were discussed on forums and might simply be a UI issue or permission issue in some cases.)
- Open a Support Case: When all else fails, engage Microsoft Support. Defender for Business is a paid service; you can open a ticket through your Microsoft 365 admin portal. Provide them with:
- A description of the issue and steps you’ve taken.
- Logs (Event Viewer exports, the Client Analyzer output).
- Tenant ID and device details, if requested. Microsoft’s support can analyze backend data and guide further. They may identify if it’s a known bug or something environment-specific.
Escalating ensures that more complex or rare issues (like a service bug, or a weird compatibility issue) are handled by those with deeper insight or patching ability.
Advanced Troubleshooting Techniques
For administrators comfortable with deeper analysis, here are a few advanced techniques and tools to troubleshoot Defender for Business issues:
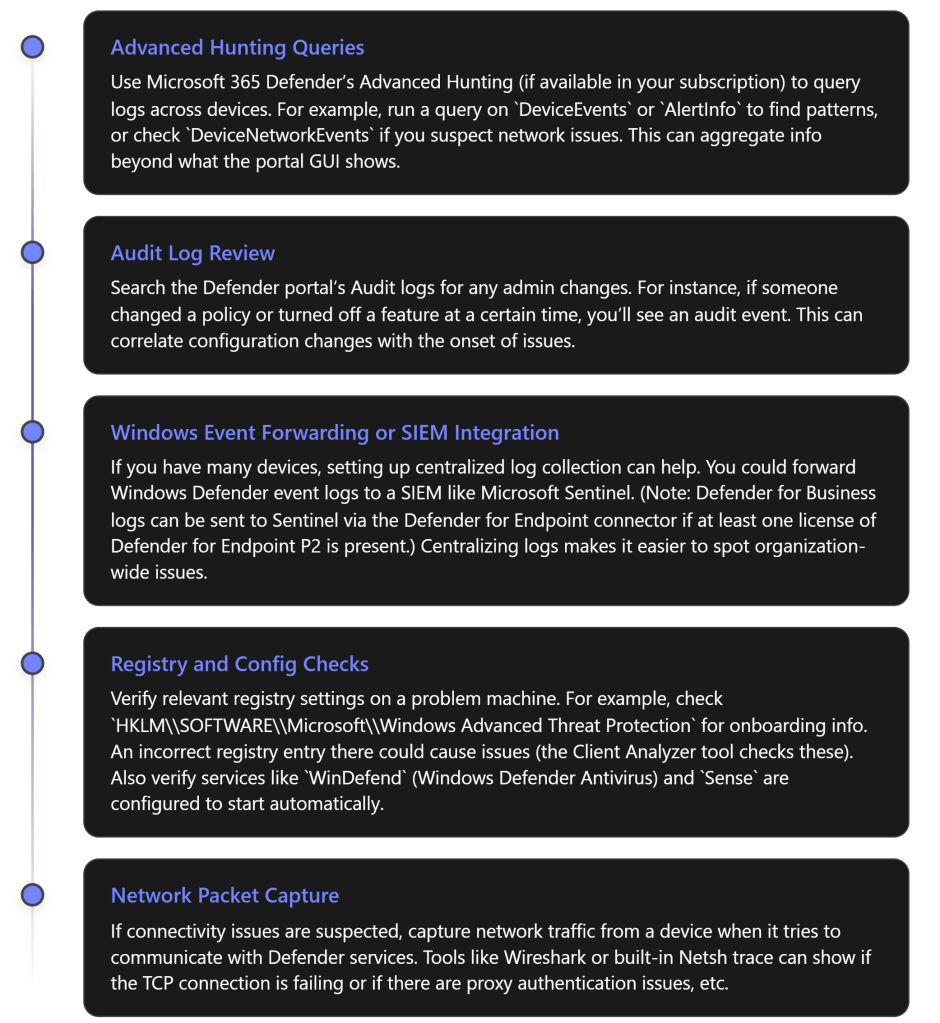
Advanced Hunting: This is a query-based hunting tool available in Microsoft 365 Defender. If your tenant has it, you can run Kusto-style queries to search for events. For example, to find all devices that had real-time protection off, you could query the DeviceHealthStatus table for that signal. Or search DeviceTimeline for specific event IDs across machines. It’s powerful for finding hidden patterns (like if a certain update caused multiple devices to onboard late or if a specific error code appears on many machines).
Audit Logs: Especially useful if the issue might be due to an admin change. The audit log will show events like policy changes, onboarding package generated, settings toggled, who did it and when. It helps answer “did anything change right before this issue?” For instance, if an admin offboarded devices by mistake, the audit log would show that.
Integrations and Log Forwarding: Many enterprises use a SIEM for unified logging. While Defender for Business is a more streamlined product, its data can be integrated into solutions like Sentinel (with some licensing caveats)[7]. Even without Sentinel, you could use Windows Event Forwarding to send important Defender events to a central server. That way, you can spot if all devices are throwing error X in their logs. This is beyond immediate troubleshooting, but helps in ongoing monitoring and advanced analysis.
Deep Configuration Checks: Sometimes group policies or registry values can interfere. Ensure no Group Policy is disabling Windows Defender (check Turn off Windows Defender Antivirus policy). Verify that the device’s time and region settings are correct (an odd one, but significant time skew can cause cloud communication issues).
Use Troubleshooting Mode: Microsoft introduced a troubleshooting mode for Defender which, when enabled on a device, disables certain protections for a short window so you can, for example, install software that was being blocked or see if performance improves. After testing, it auto-resets. This is advanced and should be used carefully, but it’s another tool in the toolbox.
Using these advanced techniques can provide deeper insights or confirm whether the issue lies within Defender for Business or outside of it (for example, a network device blocking traffic). Always ensure that after advanced troubleshooting, you return the system to a fully secured state (re-enable anything you turned off, etc.).
Best Practices to Prevent Future Issues
Prevention and proper management can reduce the likelihood of Defender for Business issues:
- Keep Defender Components Updated: Microsoft Defender AV updates its engine and intelligence regularly (multiple times a day for threat definitions). Ensure your devices are getting these updates automatically (they usually do via Windows Update or Microsoft Update service). Also, keep the OS patched so that the Defender for Endpoint agent (built into Windows 10/11) is up-to-date. New updates often fix known bugs or improve stability.
- Use a Single Source for Policy: Avoid mixing multiple security management platforms for the same settings. If you’re using Defender for Business’s built-in policies, try not to also set those via Intune or Group Policy. Conversely, if you require the advanced control of Intune, consider using Microsoft Defender for Endpoint Plan 1 or 2 with Intune instead of Defender for Business’s simplified model. Consistency prevents conflicts.
- Monitor the Portal Regularly: Make it a routine to check the Defender portal’s dashboard or set up email notifications for high-severity alerts. Early detection of an issue (like devices being marked unhealthy or a series of failed updates) can let you address it before it becomes a larger problem.
- Educate Users on Defender Apps: If your users install the Defender app on mobile, ensure they know how to keep it updated and what it should do. Sometimes user confusion (like ignoring the onboarding prompt or not granting the app permissions) can look like a “technical issue”. Provide a simple guide for them if needed.
- Test Changes in a Pilot: If you plan to change configurations (e.g., enable a new attack surface reduction rule, or integrate with a new management tool), test with a small set of devices/users first. Make sure those pilot devices don’t report new issues before rolling out more broadly.
- Use “Better Together” Features: Microsoft often touts “better together” benefits – for example, using Defender Antivirus with Defender for Business for coordinated protection[1]. Embrace these recommendations. Features like Automatic Attack Disruption will contain devices during a detected attack[2], but only if all parts of the stack are active. Understand what features are available in your SKU and use them; missing out on a feature could mean missing a warning sign that something’s wrong.
- Maintain Proper Licensing: Defender for Business is targeted for up to 300 users. If your org grows or needs more advanced features, consider upgrading to Microsoft Defender for Endpoint plans. This ensures you’re not hitting any platform limits and you get features like advanced hunting, threat analytics, etc., which can actually make troubleshooting easier by providing more data.
- Document and Share Knowledge: Keep an internal wiki or document for your IT team about past issues and fixes. For example, note down “In Aug 2025, devices had conflict because both Intune and Defender portal policies were applied – resolved by turning off Intune policy X.” This way, if something similar recurs or a new team member encounters it, the solution is readily available.
By following best practices, you reduce misconfigurations and are quicker to catch problems, making the overall experience with Microsoft Defender for Business smoother and more reliable.
Additional Resources and Support
For further information and help on Microsoft Defender for Business:
- Official Microsoft Learn Documentation: Microsoft’s docs are very useful. The page “Microsoft Defender for Business troubleshooting” on Microsoft Learn covers many of the issues we discussed (setup failures, device protection, mobile onboarding, policy conflicts) with step-by-step guidance[1][1]. The “View and manage incidents in Defender for Business” page explains how to use the portal to handle alerts and incidents[2]. These should be your first reference for any new or unclear issues.
- Microsoft Tech Community & Forums: The Defender for Business community forum is a great place to see if others have similar questions. Microsoft MVPs and engineers often post walkthroughs and answer questions. For example, blogs like Jeffrey Appel’s have detailed guides on Defender for Endpoint/Business features and troubleshooting (common deployment mistakes, troubleshooting modes, etc.)[8].
- Support Tickets: As mentioned, don’t hesitate to use your support contract. Through the Microsoft 365 admin center, you can start a service request. Provide detailed info and severity (e.g., if a security feature is non-functional, treat it with high importance).
- Training and Workshops: Microsoft occasionally offers workshops or webinars on their security products. These can provide deeper insight into using the product effectively (e.g., a session on “Managing alerts and incidents” or “Endpoint protection best practices”). Keep an eye on the Microsoft Security community for such opportunities.
- Up-to-date Security Blog: Microsoft’s Security blog and announcements (for example, on the TechCommunity) can have news of new features or known issues. A recent blog might announce a new logging improvement or a known issue being fixed in the next update – which could be directly relevant to troubleshooting.
In summary, Microsoft Defender for Business is a powerful solution, and with the step-by-step approach above, you can systematically troubleshoot issues that come up. Starting from the portal’s alerts, verifying configurations, checking device logs, and then applying fixes will resolve most common problems. And for more complex cases, Microsoft’s support and documentation ecosystem is there to assist. By understanding where to find information (both in the product and in documentation), you’ll be well-equipped to keep your business devices secure and healthy.
References
[1] Microsoft Defender for Business troubleshooting
[2] View and manage incidents in Microsoft Defender for Business
[3] Review events and errors using Event Viewer
[4] windows 10 – How to find specifics of what Defender detected in real …
[5] Troubleshoot Microsoft Defender for Endpoint onboarding issues
[6] Collect support logs in Microsoft Defender for Endpoint using live …
[7] Microsoft 365 Defender for Business logs into Microsoft Sentinel
[8] Common mistakes during Microsoft Defender for Endpoint deployments


