Using the Defender for Endpoint API and PowerShell

*** If the script here brings back no results take a look at my updated article – https://blog.ciaops.com/2023/05/15/using-the-defender-for-endpoint-api-and-powershell-updated/


The Microsoft Defender for Endpoint API is now available. More details can be found here:

https://docs.microsoft.com/en-us/microsoft-365/security/defender-endpoint/management-apis?view=o365-worldwide

Those APIs will enable you to automate workflows and innovate based on Defender for Endpoint capabilities.

In essence, you can now manipulate Defender for Endpoint capabilities using a tool like PowerShell. I’ll show you how to get started.

The first thing you’ll need to do is create an Azure AD app in the destination tenant. I’ve covered off how to do this via the web interface here:

https://blog.ciaops.com/2019/04/17/using-interactive-powershell-to-access-the-microsoft-graph/

and using a PowerShell script I wrote here:

https://blog.ciaops.com/2020/04/18/using-the-microsoft-graph-with-multiple-tenants/

You’ll also need to provide this Azure AD app the appropriate permissions in the Defender for Endpoint API (as well as have a license for Defender for Endpoint in your tenant). To do this, navigate to the Azure AD app you just created and follow the process to add an API permission (you’ll see this process in the above blog posts).

image

You’ll need to however select APIs my organization uses from the menu, and then search for WindowsDefenderATP as shown above to locate the right API.

image

Now select Application permissions on the right from the screen that appears as shown above.

If you have a look at the:

Export software vulnerabilities assessment per device

You’ll see in permissions:

image

You’ll see the permission required for this process is Vulnerability.Read.All.

image

Search for, and select this Vulnerability.Read.All permission in the list as shown above and select it. Scroll down to the bottom of the page and select the Add permissions button to complete the process.

image

Select the Grant admin consent for <tenant> option at the top now to apply these permissions you have just selected to add to this Azure AD app.

In summary, an Azure AD app is used to provide access to the Defender for Endpoint API. This access also requires the appropriate permissions be assigned to that Azure AD app for the Defender for Endpoint API.

When the Azure AD app was initially created the following parameters should have been available:

1. Client (or Application) ID

2. Tenant ID

3. Client (or Application secret)

You’ll need to enter these into the script I have created here:

https://github.com/directorcia/Office365/blob/master/endpoint-api-svbm.ps1

around line 20:

image

Ensure your values these are kept secure! I have discussed ways of doing this using the Azure Keyvault or encrypted XML files previously.

image

After inserting your own Azure AD app values into the script, and running the script you should see the results like that shown above. The output is a list of software vulnerabilities by machine in your Defender for Endpoint environment sorted by machine name and last seen timestamp.

The Defender for Endpoint API has lots of options as you can see here:

https://docs.microsoft.com/en-us/microsoft-365/security/defender-endpoint/exposed-apis-list?view=o365-worldwide#in-this-section

You may need to repeat the process of assigning permissions to your Azure AD app to execute other API commands remember. However, being able to access this information via an API makes it easy to import into things like Power BI and Power Automate as well as access multiple tenant with a single script. Hopefully, this article give you a place to start accessing all the Defender for Endpoint information programmatically.

Exchange user best practices script

image

I’ve created a new Exchange user best practices summary script which you can find at:

https://github.com/directorcia/Office365/blob/master/o365-mx-usr-all.ps1

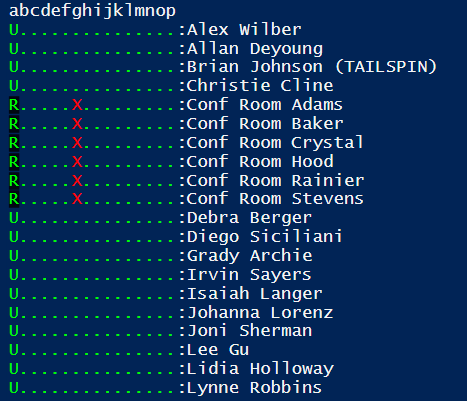
The idea with this script is to give you a quick visual summary of your user mailboxes to ensure they conform to best practices.

When you run the script without any command line options you will see the above output. Each row is a user with their name at the end of the line. The entries on the right provide you an indication of settings status. A green dot is for good and a red X is for bad. You will see this creates a matrix of settings for each mailbox. These settings are designated by a letter (currently a through p). These letters correspond to the following settings:

a = Mailbox type: S = Shared, R = Resource, U = User
b = Enabled
c = Inactive
d = Remote PowerShell Enabled
e = Retain Deleted Items for at least 30 days
f = Deliver to Mailbox and Forward
g = Litigation Hold Enabled
h = Archive Mailbox Status
i = Auto-expanding Archive Enabled
j = Hidden From Address Lists Enabled
k = POP Enabled
l = IMAP Enabled
m = EWS Enabled
n = EWS Allow Outlook
o = EWS Allow Mac Outlook
p = Mailbox Audit Enabled

image

If you use the –verbose command line option, you’ll get additional information about the script operation as you see above.

If you use the –debug command line option, a log file of the script process will be created in the parent directory.

If you use the –prompt command line option, the script will wait after each user for you to press ENTER.

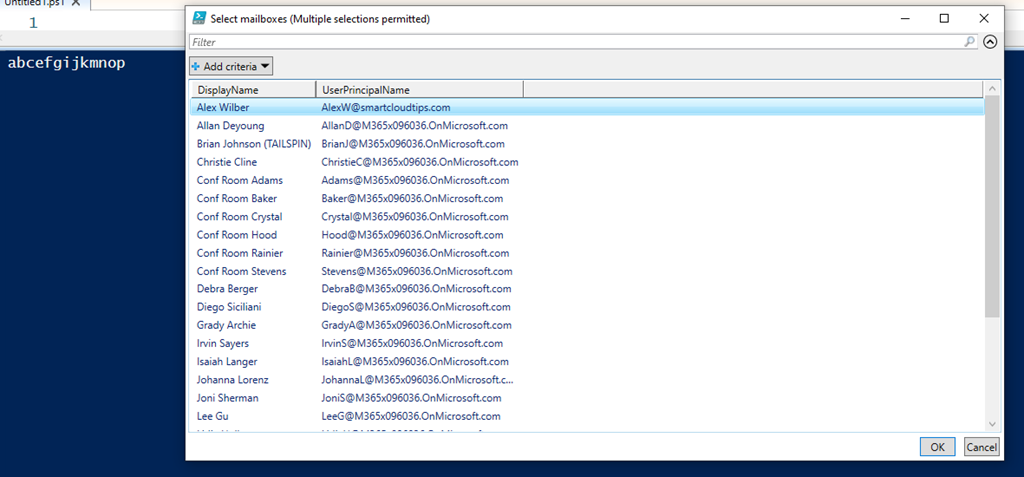
If you use the –select command line option, the script will prompt you to select the users you wish to display.

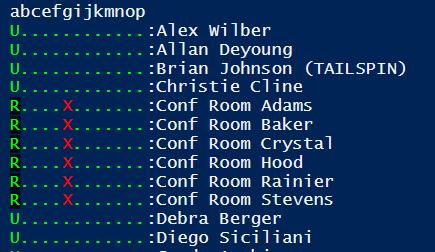
If you also specify any letter from, currently, a through p on the command line, those settings will not be checked by the script. Thus, specifying dhl on the command line will not check or display Remote PowerShell Enabled (setting = d), Archive Mailbox Status (setting = h) or IMAP enabled (setting = l).

Thus:

.\o365-mx-usr-all.ps1 dhl

will display:

image

(note: no d, h or l in the output)

and

.\o365-mx-usr-all.ps1 dhl –select

will display:

image

no d, h or l settings as well as prompting for selection of users to check and display.

The script requires that you are connected to Exchange Online first via PowerShell prior and this can be done using my script:

https://github.com/directorcia/Office365/blob/master/o365-connect-exo.ps1

In summary then, this script when run without any command line options is designed to give you a quick reference to your user mailboxes and whether they have best practice settings enabled. You can also run the script with number of different command line options to create a log, individually select users and settings to test as well as pause after each user if desired.

I’ll continue to update and improve this script over time so make sure you follow my Office 365 GitHub repository, which you can find here:.

https://github.com/directorcia/Office365/

Prevent alerts from DiscoverySearchMailbox

image

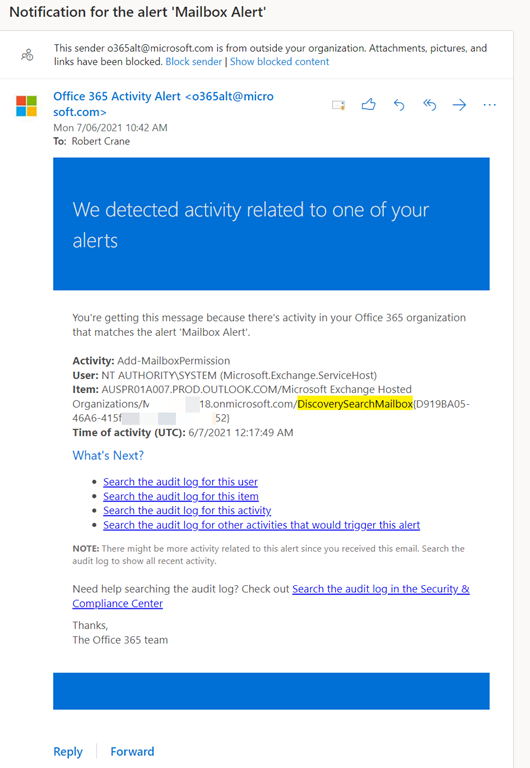
When you set up bulk alerting for mailboxes you may end up enabling alerts for system mailboxes like DiscoverySearchMailbox as shown above. This will mean receiving regular alerts about changes to that mailbox by the system. This basically means Exchange Online is performing some expected administrative process on a mailbox, which triggers a configured alert.

To reduce the noise caused by these alerts you can do the following to disable it:

image

Firstly connect to Exchange Online using PowerShell. My script for that is here:

https://github.com/directorcia/Office365/blob/master/o365-connect-exo.ps1

next run the command to find any DiscoverySearchMailbox

get-mailbox -ResultSize unlimited | Where-Object {$_.name -MATCH “Discovery”} | Select-Object alias, displayname, auditenabled

which should give you a result like shown above.

$dsm = get-mailbox -ResultSize unlimited | Where-Object {$_.name -MATCH “Discovery”}

Run the above command to save the mailbox details to a variable. Then run:

set-mailbox -identity $dsm.alias -AuditEnabled $false

to disable auditing for that mailbox.

image

if you now re-run

get-mailbox -ResultSize unlimited | Where-Object {$_.name -MATCH “Discovery”} | Select-Object alias, displayname, auditenabled

you should find that the auditing is now disabled for that mailbox as shown above.

Connect to SharePoint PnP using PowerShell

The SharePoint PnP module is a handy way to get access to more granular aspects of the SharePoint Online that the standard administration modules doesn’t. You’ll find more details about the module here:

PnP PowerShell

image

I’ve created a free script to allow you to connect to SharePoint Online PnP that supports MFA logins. You’ll find the script here:

https://github.com/directorcia/Office365/blob/master/o365-connect-pnp.ps1

When you run this script it will firstly connect to Microsoft Online so it can determine what the correct name of your tenant is. Next, it will use this to connect to the SharePoint Online administration service to determine all the SharePoint sites you have in your tenant. It will then allow you to select from a list of all these site after which it will connect to your selection using SharePoint PnP.

image

The first time a connection is made to SharePoint PnP it will require you to accept a swag of permissions as shown above. These are required to allow SharePoint PnP to perform it administration role, so you’ll need to accept these. You’ll only need to this once for each user that needs to use SharePoint PnP PowerShell.

Once connected you can perform any of the SharePoint PnP commands:

SharePoint PnP commands documentation

Azure Cloud Shell now available in Microsoft 365

image

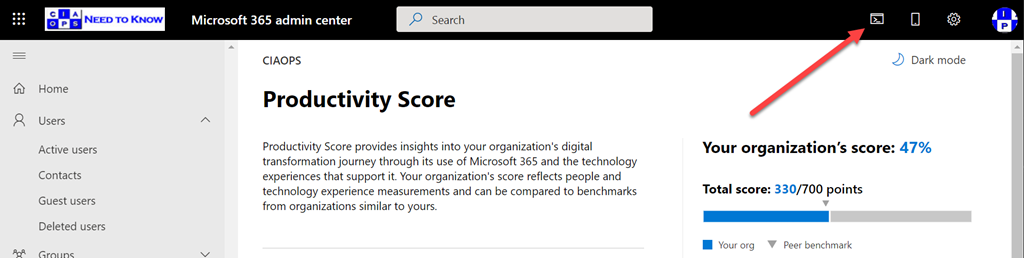
If you take a close look at your Microsoft 365 admin center, as shown above, you might see a new icon in the top right. The Azure Cloud shell is now available right from here.

image

If you select that, you’ll then see a PowerShell style window appear at the bottom of page as shown above. Here you can run all your favourite scripts directly in a browser!

I’ve covered the Azure Cloud Shell in previous articles:

Azure Cloud Shell

Connecting to Exchange Online with Azure Cloud Shell

and you can read the Microsoft documentation here:

Overview of Azure Cloud Shell

The only limitation seems to me is that you need an active Azure subscription tied to your Microsoft 365 environment because Azure Cloud Shell does need some storage to operate. But who doesn’t have an Azure subscription in their tenant these days right?

Deploy Office 365 and Azure together

(Hint, this is another reason to ALWAYS sell an Azure subscription when you sell Microsoft 365 if you are a reseller).

Hopefully, Microsoft might allow some included storage in the future for those without an Azure subscription.

Having the ability to run PowerShell directly from the browser with Microsoft 365 is a super handy addition and hopefully the functionality will keep extending with this.

Reviewing Windows 10 Audit Policy Settings

I have spoken about things like Attack Surface Reduction (ASR) for Windows 10 and how easy they are to implement to improve the security of Windows 10:

Attack surface reduction for Windows 10

Another very important aspect of securing Windows 10 environments is to ensure that the audit policy settings are appropriate to capture the right information to help with any investigation. To that end, I have a free scripts available at:

https://github.com/directorcia/Office365/blob/master/win10-audit-get.ps1

which will show you the current audit policy settings in your environment like so:

image

As you can see from the above screen gab, many audit settings are not enabled out of the box. Please note, you’ll need to run the script as an administrator for it be able to report the audit policy settings.

You’ll find the best practice recommendations for audit policy settings from Microsoft:

Audit Policy Recommendations

and government departments like the Australian Cyber Security Center:

Hardening Microsoft Windows 10 version 1909 Workstations

Look for the section heading – Audit Event management in the above page.

As always, there are number of different ways to enable these best practice audit policy settings on your Windows 10 devices. To my mind using Microsoft Endpoint Manager that comes with offerings like Microsoft 365 Business Premium is the easiest.

image

And the quickest way to do this inside Microsoft Endpoint Manager is simply to apply the Windows 10 Security Baseline policies as shown above. To read more about this capability visit:

Use security baselines to configure Windows 10 devices in Intune

In fact, the results from my script are based on the settings found in the Windows 10 Security Baseline policy.

To read more about these security audit policies for Windows 10 I encourage you to take a look at:

Advanced security audit policy settings

and remember, you can configure these settings at the command line if you need to using the:

auditpol

command, which is exactly what I used in my script to extract the current settings. However, deploying them using Microsoft Manager for Endpoint and baseline policies is going to be far easier across a fleet of devices.

Issues creating Endpoint Security Policies using the Microsoft Graph

I swear it was all working and now BOOM, it doesn’t! Using PowerShell I had been creating Endpoint Security policies but now those same policies were still being created but WITHOUT the configuration settings I had configured.

You can try this for yourself if you wish, without needing to code. Firstly visit the Microsoft Graph Explorer and authenticate.

image

Change the method to POST, set the API to beta and use the URL = https://graph.microsoft.com/beta/deviceManagement/templates/6cc38b89-6087-49c5-9fcf-a9b8c2eca81d/createInstance

Then in the Request body use the following:

https://gist.github.com/directorcia/6d8d2e5199c32b22b6fe782739447dc4

If you do you’ll find a new Endpoint Security Attack Surface Reduction – ASR rule has been created like so:

image

If you look at settings for this policy you’ll see:

image

all the settings are Not configured!

So, no errors during the POST but no settings! Strange.

SNAGHTMLbd6028e

If however you return to the Request body and change the word value to settingDelta as shown above and then run the same query.

image

Now, the Endpoint Security policy is created and the settings are configured.

So in summary, don’t use value any more it seems with the request body, use settingsDelta.

PowerShell with Azure Conditional Access

Recently, I did a video demonstrating how PowerShell can be used to automate Endpoint Management:

PowerShell with Endpoint Manager

I’ve now also created a video demonstrating how to automate Azure Conditional Access using PowerShell. As before, I am only making these scripts available via the CIAOPS Paton program.

In this video you’ll see me automatically backup up both Conditional Access locations and policies, then apply best practices locations and policies, finally restore the original policies, all using scripting.

Again, these scripts are not free and part of the CIAOPS Paton program. You’ll find my free stuff at https://www.github.com/directorcia.