Incentivising Microsoft Teams contributions with Power Automate

One of the most important parts of technology adoption is incentivising people. One simple way to do this is to acknowledge their contributions in Microsoft Teams. I’ve spoken about this before using something like:

Custom Praise badges in Microsoft Teams

The challenge there is, that this is a manual process. How can the same be achieved the same kind of thing using automation I recently wondered?

What if you could automatically determine the number of chat messages that someone posted into Microsoft Teams, and then acknowledge the highest contributors with a custom ‘thank you’ message? Here’s how I managed to do just that using the Microsoft Graph and Power Automate.

The core information needed about messages posted in Microsoft Teams will come the Microsoft Graph, specifically:

getTeamsUserActivityUserDetail

The first step in this process will be to create an Azure AD application in the tenant, which I have detailed previously:

https://blog.ciaops.com/2019/04/17/using-interactive-powershell-to-access-the-microsoft-graph/

the credentials for this Azure AD application will then need to be uploaded into Azure Key Vault as I have covered here:

Uploading Graph credentials to Azure Key Vault

You’ll also need to set the API permissions for this application to :

image

Reports.Read.All

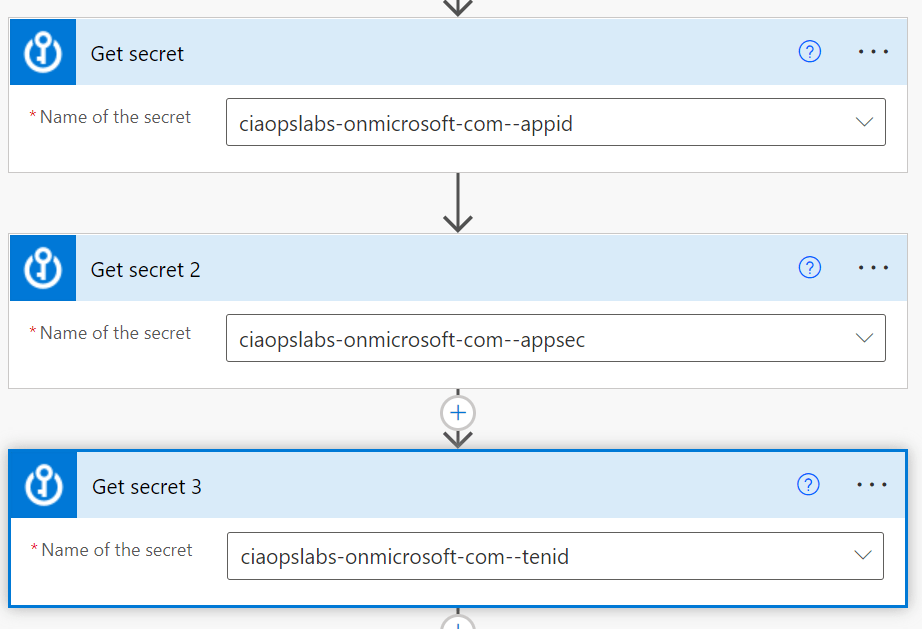
 You’ll need to trigger your Flow the way that suits you. Typically you’d schedule it to run on the first of each month. You’ll then need to use the Get secret action from the Azure Key Vault as shown above. You should also note that this is a premium connectors, so you’ll need an appropriate Power Platform license to use this.

image

Next, will be the HTTP action that also a premium connector. The URI to use here will be:

https://graph.microsoft.com/beta/reports/getTeamsUserActivityUserDetail(period=’D30’)?$format=application/json

The D30 parameter determines how many previous days to consider. Valid options for the number of days is 7,30, 90, 180 according to the documentation.

The security parameters come from the Azure Key Vault Get secret actions.

image

The data returned from this HTTP action will be in JSON format, so that is fed into the Parse JSON action as shown above.

One tricky things about parsing json is to get the right schema. When I first attempted this I received this error:

“message”: “Invalid type. Expected String but got Null.”,

After some digging I found that sometimes the lastactivitydate parameter returned a string or NULL value. Thus, I need to modify the original JSON for that parameter to accommodate both potential results:

“lastActivityDate”: {
     “type”: [
         “string”,
         “null”
     ]
},

Here the whole working JSON schema I used:

{
     “type”: “object”,
     “properties”: {
         “value”: {
             “type”: “array”,
             “items”: {
                 “type”: “object”,
                 “properties”: {
                     “reportRefreshDate”: {
                         “type”: “string”
                     },
                     “userId”: {
                         “type”: “string”
                     },
                     “userPrincipalName”: {
                         “type”: “string”
                     },
                     “lastActivityDate”: {
                         “type”: [
                             “string”,
                             “null”
                         ]
                     },
                     “isDeleted”: {
                         “type”: “boolean”
                     },
                     “deletedDate”: {},
                     “assignedProducts”: {
                         “type”: “array”
                     },
                     “teamChatMessageCount”: {
                         “type”: “integer”
                     },
                     “privateChatMessageCount”: {
                         “type”: “integer”
                     },
                     “callCount”: {
                         “type”: “integer”
                     },
                     “meetingCount”: {
                         “type”: “integer”
                     },
                     “meetingsOrganizedCount”: {
                         “type”: “integer”
                     },
                     “meetingsAttendedCount”: {
                         “type”: “integer”
                     },
                     “adHocMeetingsOrganizedCount”: {
                         “type”: “integer”
                     },
                     “adHocMeetingsAttendedCount”: {
                         “type”: “integer”
                     },
                     “scheduledOneTimeMeetingsOrganizedCount”: {
                         “type”: “integer”
                     },
                     “scheduledOneTimeMeetingsAttendedCount”: {
                         “type”: “integer”
                     },
                     “scheduledRecurringMeetingsOrganizedCount”: {
                         “type”: “integer”
                     },
                     “scheduledRecurringMeetingsAttendedCount”: {
                         “type”: “integer”
                     },
                     “audioDuration”: {
                         “type”: “string”
                     },
                     “videoDuration”: {
                         “type”: “string”
                     },
                     “screenShareDuration”: {
                         “type”: “string”
                     },
                     “hasOtherAction”: {
                         “type”: “boolean”
                     },
                     “urgentMessages”: {
                         “type”: “integer”
                     },
                     “postMessages”: {
                         “type”: “integer”
                     },
                     “replyMessages”: {
                         “type”: “integer”
                     },
                     “isLicensed”: {
                         “type”: “boolean”
                     },
                     “reportPeriod”: {
                         “type”: “string”
                     }
                 },
                 “required”: [
                     “reportRefreshDate”,
                     “userId”,
                     “userPrincipalName”,
                     “lastActivityDate”,
                     “isDeleted”,
                     “deletedDate”,
                     “assignedProducts”,
                     “teamChatMessageCount”,
                     “privateChatMessageCount”,
                     “callCount”,
                     “meetingCount”,
                     “meetingsOrganizedCount”,
                     “meetingsAttendedCount”,
                     “adHocMeetingsOrganizedCount”,
                     “adHocMeetingsAttendedCount”,
                     “scheduledOneTimeMeetingsOrganizedCount”,
                     “scheduledOneTimeMeetingsAttendedCount”,
                     “scheduledRecurringMeetingsOrganizedCount”,
                     “scheduledRecurringMeetingsAttendedCount”,
                     “audioDuration”,
                     “videoDuration”,
                     “screenShareDuration”,
                     “hasOtherAction”,
                     “urgentMessages”,
                     “postMessages”,
                     “replyMessages”,
                     “isLicensed”,
                     “reportPeriod”
                 ]
             }
         }
     }
}

image

I filtered the results produced to firstly remove users with zero messages and then I removed specific users (in this case me) from the results using the two Filter action shown above.

image

One of the limitations I found during this development process was that Flows are not very good at sorting information. It would have been nice if I could have just sorted my results from largest to smallest. I solved this but firstly creating a temporary variable into which I would store the highest number of chat messages. I then looped through all the remaining results using the Apply to Each action shown above, and set this variable to the greatest value found throughout the results.

image

I then employed another Filter action again to remove any results that didn’t match this maximum value.

The next challenge came when considering external users, who have a UPN in the format of:

user_domain.com#EXT#tenant.onmicrosoft.com

Turns out the the Power Automate lookup actions don’t seem to work using these type of UPNs, they only work with an email address apparently!

image

To solve this, I now created two more variables to use when extracting the external users email address.

image

I need to extract and create a user email address before using it in the Search for users (V2) action. To do this I used two functions inside two Set variable actions. The first is:

slice(items(‘Apply_to_each_2’)?[‘userPrincipalName’],0,lastIndexOf(items(‘Apply_to_each_2’)?[‘userPrincipalName’],’#EXT’))

which removes anything from the #EXT and beyond. This typically leaves the format of:

user_domain.com

The second function is:

replace(variables(‘EmailAddress’),’_’,’@’)

that replaces the underscore character with an “at” symbol. The output after both of these functions complete is the users full email address which I can then feed into the Search for users (V2) action to locate my user(s).

image

Now that I have the user information I can use it with the Get an @mention token for a user action and then post a message with that @mention and anything else into the Team to publicly recognise the user(s) using the Post message in a chat or channel action.

image

The end result is a nice message, like shown above, that acknowledges the user(s) for their contribution in the Microsoft Team. Best part is that now it is automated it’ll do all the hard work for you going forward!

The moral of the story here is that Power Automate combined with the Microsoft Graph can achieve just about anything you want. Yes, it does a little bit of setting up with an Azure AD application, Keyvault and so on but they are typically only once off. There is also some advanced techniques when it comes to the JSON parameters but once you start working with, it becomes easier. In short, none of that should put you off from what is possible with the Microsoft Cloud environment and putting the technology to work for you to give you more freedom and improve your business processes.

Escalating to multiple roles using Privileged Identity Management

Privileged Identity Management or PIM, is great way to ensure that users are not given standing administrative access. Instead, with PIM, these rights can be requested, approved and removed in an automated and audited way.

In the scenario where a user may need administrative rights to multiple services at the same time, say Exchange Online administration and SharePoint Online administration together, you can achieve this by using the capability in Azure AD to assign multiple roles to an Azure AD group. You then have users go through the PIM process to become members of that group. When they do, they automatically get access to the roles that are part of that group. Once PIM deactivated them, they are removed from that group and lose those permissions.

This video take you through that process.

https://www.youtube.com/watch?v=mAA1KjxjAuQ

remember, to achieve this you’ll need to have an Azure AD P2 assigned and that currently this feature is in preview.

For more information consult the following documentation from Microsoft:

Management capabilities for Privileged Access groups


CIAOPS Need to Know Microsoft 365 Webinar – March

laptop-eyes-technology-computer

Join me for the free monthly CIAOPS Need to Know webinar. Along with all the Microsoft Cloud news we’ll be taking a look at Power BI.

Shortly after registering you should receive an automated email from Microsoft Teams confirming your registration, including all the event details as well as a calendar invite.

You can register for the regular monthly webinar here:

March Webinar Registrations

(If you are having issues with the above link copy and paste – https://bit.ly/n2k2203 – into your browser)

The details are:

CIAOPS Need to Know Webinar – March 2022
Friday 25th of March 2022
11.00am – 12.00am Sydney Time

All sessions are recorded and posted to the CIAOPS Academy.

The CIAOPS Need to Know Webinars are free to attend but if you want to receive the recording of the session you need to sign up as a CIAOPS patron which you can do here:

http://www.ciaopspatron.com

or purchase them individually at:

http://www.ciaopsacademy.com/

Also feel free at any stage to email me directly via director@ciaops.com with your webinar topic suggestions.

I’d also appreciate you sharing information about this webinar with anyone you feel may benefit from the session and I look forward to seeing you there.

Automated user tenant access control

image

If you ever used an on premises Active Directory (AD) you may be aware of the setting, shown above, that allows you to set users login times. This was typically done to prevent users logging in after hours, say from 9pm to 6am.

Unfortunately, with Azure AD there is no direct equivalent setting but we can create something similar quickly and easily using Power Automate.

image

The first step in this process is to create a new Azure AD security group that will contain the users who will be prevented from accessing the tenant. You can also create this security group in the Microsoft 365 portal but it is better to do it in Azure as you’ll need to get the ObjectID for this group as highlighted above. There is also no need to actually put any users into this group as they’ll be added dynamically by Power Automate.

image

To prevent access to the tenant you’ll need to create a Conditional Access policy as shown above. This will require you to have a license for Azure AD Premium P1 or P2 for each user. Microsoft 365 Business Premium already includes Azure AD P1, so if that is already in the environment you need nothing additional.

Give this new Conditional Access policy a name and set it to include just the Azure AD security group created previously. It is also best practice to exclude at least one administration account to prevent you from being ‘locked out’ of your tenant. Ensure that All cloud apps is selected and that Block access is configured, as shown above. Finally, turn this Conditional Access policy On.

With no members in this Azure AD Security group, no one will be restricted from accessing the tenant.

image

Next, create a List in SharePoint that contains a list of users you want to be blocked. You can achieve this by adding the Person field to the list in question. This will basically allow you to enter users who are in your tenant by doing a lookup from Azure AD.

image

Create a new Flow and use the Recurrence action to trigger it as shown above. Select an appropriate time once a day when users will be prevented from accessing the tenant, say 9pm.

image

Add the Get items action as shown above next. Configure this action to retrieve from the list of users from the SharePoint list just created.

image

Then use the Apply to each action to loop through all the users returned by this Get items as shown above.

image

Inside the Apply to each action use the Get user profile (V2) action as shown, with the users email address, which is effectively their Azure AD identity.

image

Also inside the Apply to each action add the Add user to group action as shown above. Populate this action with the ObjectID of the Azure AD security group obtained at the start and the Id from the Get user profile (V2) action.

image

Now test the Flow manually to ensure it works correctly.

image

Once the Flow completes, the users in the list in SharePoint should now appear in the Azure AD security group as shown above.

image

Now when a user on that list attempts to login, because they are part of a security group that is part of a blocking Conditional access policy, they will no longer have access to the tenant.

image

To allow access again for users simply create another scheduled Flow executing at say 6am that uses the Get group members action and then a Remove Member from group action inside an Apply to each action as shown above. In essence, this removes all users from the Azure AD security group that is part of the blocking Conditional Access policy, resulting in those users no longer being blocked from accessing the tenant.

image

Run this Flow manually and ensure it completes,

image

and you should find that Azure AD security group to be empty, as shown above.

image

The users in the list who were previously blocked,  should now be able to access the tenant as normal. Left to its own devices, users in the SharePoint list will have their access blocked from 9pm to 6am each day now.

This automation is very quick and easy to set up. It can solve the challenge of ‘forcing’ users to take a break from work after hours, rather than being ‘on’, aiding their mental health and making them more productive when they do work. It could be used to improve security but allowing account to only operate during ‘business hours’ and limiting attacks after hours, which is when many attacks happen.

This process could be extended and enhanced to provide more granular options to suit any need as well as alerting. However, hopefully, it demonstrates how easy it is to solve business challenges thanks to the Power Platform and the integration of Microsoft 365. Remember, the only extra you need is Azure AD Premium P1 to enforce Conditional Access, something already part of Microsoft 365 Business Premium.