Microsoft Intune now has the ability to run ‘on demand’ PowerShell scripts on devices. My video above takes you through the basics of uploading your scripts to Intune and then executing them on a device.
The direct video URL is:
Information about SharePoint, Microsoft 365, Azure, Mobility and Productivity from the Computer Information Agency
Microsoft Intune now has the ability to run ‘on demand’ PowerShell scripts on devices. My video above takes you through the basics of uploading your scripts to Intune and then executing them on a device.
The direct video URL is:
Application control is a great way to make your Windows devices more secure. However, it can be challenging to create and roll out policies. The good news is that you can apply Application Control using Intune policies. I made this video:
https://www.youtube.com/watch?v=gh0wRZGjnd4
in which I run through the whole process from end to end. I also cover off some of the challenges using this approach as well as some handy troubleshoot tips, especially how to successfully remove the Application Control settings if needed.
Follow along for an easy way to deploy Application Control across your Windows devices using Intune.
Join me for all the news an updates from Microsoft Build as well as a look at the Microsoft Package Manager, Winget.
This episode was recorded using Microsoft Teams and produced with Camtasia 2023.
You can listen directly to this episode at:
https://ciaops.podbean.com/e/episode-303-winget/
Subscribe via iTunes at:
https://itunes.apple.com/au/podcast/ciaops-need-to-know-podcasts/id406891445?mt=2
The podcast is also available on Stitcher at:
http://www.stitcher.com/podcast/ciaops/need-to-know-podcast?refid=stpr
Don’t forget to give the show a rating as well as send me any feedback or suggestions you may have for the show
Brought to you by www.ciaopspatron.com
Resources
YouTube edition of this podcast
Expanding IT value in Windows 11 Enterprise and Intune
Microsoft Mesh: Transforming how people come together in the modern workplace
Hardening Windows Clients with Microsoft Intune and Defender for Endpoint
Cyber Signals: Shifting tactics fuel surge in business email compromise
Automatically disrupt adversary-in-the-middle (AiTM) attacks with XDR
News and updates from the Microsoft Cloud and then a deep dive into Compliance policies in Intune. Have a listen and let me know what you think.
You can listen directly to this episode at:
https://ciaops.podbean.com/e/episode-301-compliance-policies/
Subscribe via iTunes at:
https://itunes.apple.com/au/podcast/ciaops-need-to-know-podcasts/id406891445?mt=2
The podcast is also available on Stitcher at:
http://www.stitcher.com/podcast/ciaops/need-to-know-podcast?refid=stpr
Don’t forget to give the show a rating as well as send me any feedback or suggestions you may have for the show
This episode was recorded using Microsoft Teams and produced with Camtasia 2023.
Brought to you by www.ciaopspatron.com
Resources
YouTube edition of this podcast
Windows 365 Frontline available in public preview
OneNote: Your Digital Notebook, Reimagined with Copilot
Quick Wins to Strengthen Your Azure AD Security
Automating and Streamlining Vulnerability Management for Your Clients
Phone Link for iOS is now rolling out to all Windows 11 customers
Introducing cloud.microsoft: a unified domain for Microsoft 365 apps and service
Centrally manage multiple Microsoft Sentinel workspaces with workspace manager
Announcing Windows LAPS management through Microsoft Intune
Practice Assessments for Microsoft Certifications
Profanity filtering control for live captions in Teams meetings
In a recent article:
Getting Endpoint Privilege Management working
I detailed how to get the basics of Endpoint Privilege Management working using settings policies.
The next step in the process is to get the rules policies working in conjunction with this. The scenario will be that we want to only allow a single application to be run with elevated privileges on a device. Here, that application will be Adobe Acrobat installer.
As before, we’ll need to go back into https://intune.microsoft.com under the Endpoint Security menu option as shown above.

We’ll firstly need to edit the original Settings policy from the previous article and change the Default elevation response to Deny all requests as shown above. This will block any request to elevate by default.

Next, we’ll need to create a new policy with the Profile set to Elevation rules policy as shown above.

As always, we need to give this new policy a name.

On the following screen select Edit instance on the right as shown above.

On the blade that appears from the right, you’ll need to give the Rule a name and then a description if you wish.
For the Elevate type I have selected User confirmed rather than automatic as well as requiring Validation to be a Business justification as shown.
Next is the actual file name for the Acrobat Reader installer which is acrordr2300120064_en_US.exe in the File name field.

To get the file hash I used the PowerShell command get-filehash as shown above.

The remaining details were obtained from the properties of the file, as shown above.
I then saved this Rule and completed the creation of the policy using the standard process, ensuring I applied it to teh appropriate group in my environment.
Once again, you need to wait until the policies have been pushed out to all devices.

With the policies deployed, if I now right mouse click on the Acrobat Reader installation file and select Run with elevated privileges I see,

that the configured app is identified in the dialog and I need to provide a business justification for the installation as was configured in the rules policy.


Once that has been completed the application installs as normal.

The Adobe Reader application runs on the device once the installation is completed as shown above.

If I try and install another application by using the run with elevated privileges option (here, on the file officesetup.exe), it is blocked as shown above because the default setting policy is deny all. To allow this, another rule for that specific file would need to be created in the policy.
This means that you can now create a default Privilege Management settings policy to deny all requests to elevate and then have specific rules to only allow pre-defined applications to be run as administrator on the device. Remember, all this can be done without needing to have a local administrator on the device.
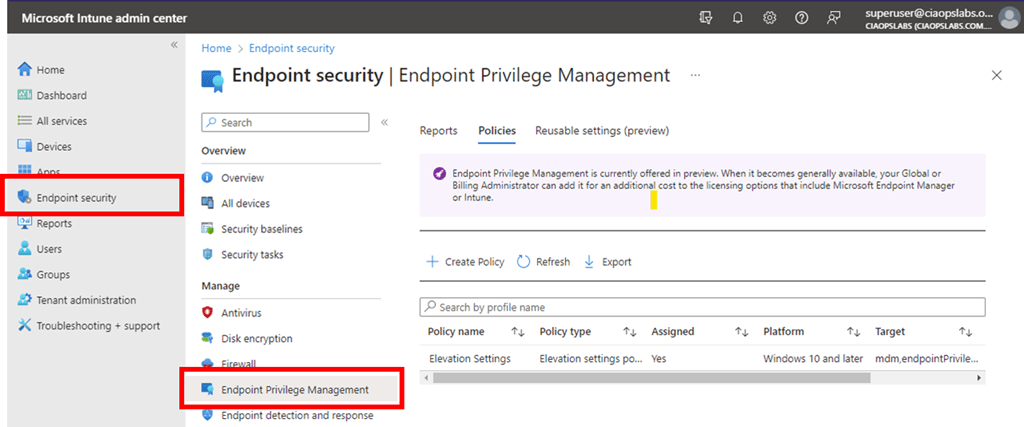
If you are not aware yet, Endpoint Privilege Management is now available in public preview.

You can find it in https://intune.microsoft.com under the Endpoint Security menu option as shown above.

You’ll firstly need to use the Create Policy menu option, as shown to create a policy for your environment.
Select Windows 10 and later for the Platform (only option currently available).
Select Elevation settings policy for the Profile.
Select Create to continue.

As always, give the new policy a name and select Next to continue.

The most important thing here is to ensure that the option Endpoint Privilege Management is set to Enabled as shown above.
In this case, the Default elevation response is set to Require user confirmation.
Select Next to continue.
Continue through the rest of the policy as normal, ensuring you assign this policy to an appropriate group in your organisation.

You can then select on the new policy to view it and then select View report to see the results of how the policy has been applied in your environment.
It is important to ensure your workstations are at the appropriate update level. At the moment that is:

The policy will NOT work until you are at this level.

The above shows the client I used was Win 10 22H2 Build 19045.2788.

When the policy is applied successfully to the device you will find a new directory C:\Programs Files\Microsoft EPM agent is created as shown above.

If you look inside that directory you will see the above structure.

With these files now on the device, you can right mouse click on an executable and you should now see the option Run with elevated access as shown above.

When you select that option you will now be prompted, per the policy options, to enter a confirmation as shown above.
You can find documentation from Microsoft here:
This article shows you how to use Intune to block the Command Prompt on Windows devices using a Configuration profile.

Navigate to https://endpoint.microsoft.com and select Device from the menu on the left as shown above.
Then, select Windows on the right.

Select Configuration profiles from the menu on the left as shown.

Select Create profile.
Then select the Platform as Windows 10 and later.
Select the Profile type as Templates.
From the list of templates select Custom.
Select Create in the bottom right.

Give the policy a name and select Next to continue.

Select Add.

In the OMA-URI settings enter the following as shown above:
Name = Block Command Prompt
Description = Block Command Prompt
OMA-URI = ./user/vendor/MSFT/Policy/Config/ADMX_ShellCommandpromptRegeditTools/DisableCMD
Data type = String
Value =
<enabled/>
<data id=”DisableCMDScripts” value=”1″/>
Ensure you enter these exactly as shown, anything else will prevent the policy working as expected.
Press Save.

You should now see the item you just entered displayed as shown above.
Select Next to continue.

Assign the policy to a group. Here it is being assigned to all Windows devices.
Select Next to continue.

You will now see a summary. Ensure the Configuration settings has the above set before selecting the Create button to complete the policy.

You should now see that the policy has been created and listed with all other Configuration profile policies as shown above.
You can edit this policy at any stage simply by selecting it.

You now need to wait until the policy is deployed successfully to devices. You can check the status of this by viewing the Device status for the policy as shown above.

If you open the Command Prompt on a device where the policy is deployed you will see the above message.
This article shows you how to use Intune to block Registry editing on Windows devices using a Configuration profile.
Navigate to https://endpoint.microsoft.com and select Device from the menu on the left as shown above.
Then, select Windows on the right.
Select Configuration profiles from the menu on the left as shown.

Select Create profile.
Then select the Platform as Windows 10 and later.
Select the Profile type as Templates.
From the list of templates select Custom.
Select Create in the bottom right.

Give the policy a name and select Next to continue.

Select Add.

In the OMA-URI settings enter the following as shown above:
Name = Block Registry
Description = Block Registry
OMA-URI = ./user/vendor/MSFT/Policy/Config/ADMX_ShellCommandpromptRegeditTools/DisableRegedit
Data type = String
Value =
<enabled/>
<data id=”DisableRegeditMode” value=”2″/>
Ensure you enter these exactly as shown, anything else will prevent the policy working as expected.
Press Save.

You should now see the item you just entered displayed as shown above.
Select Next to continue.

Assign the policy to a group. Here it is being assigned to all Windows devices.
Select Next to continue.

You will now see a summary. Ensure the Configuration settings has the above set before selecting the Create button to complete the policy.

You should now see that the policy has been created and listed with all other Configuration profile policies as shown above.
You can edit this policy at any stage simply by selecting it.

You now need to wait until the policy is deployed successfully to devices. You can check the status of this by viewing the Device status for the policy as shown above.

If you now try and make a change to the registry on a device where the policy is deployed you will see the following message.

