Use AI to provide better spam protection and detection with exchange online

image

Let’s break down how AI enhances spam and phishing protection within Microsoft Exchange Online Protection (EOP) and Microsoft Defender for Office 365 (MDO), along with configuration examples.

How AI Powers Spam/Phishing Protection in Exchange Online

Instead of just relying on static rules (like blocking specific keywords or known bad IPs), AI (specifically Machine Learning models) introduces several powerful capabilities:

  1. Advanced Pattern Recognition: AI models analyze vast amounts of global email data (billions of messages daily) from Microsoft’s network. They identify subtle and evolving patterns associated with spam, phishing, malware, and impersonation attempts that rule-based systems would miss. This includes:

    • Linguistic Analysis: Understanding the nuances of language, tone, urgency cues, grammatical errors common in phishing, and topic shifts often used to bypass simple filters.

    • Structural Analysis: Examining message headers, sending infrastructure reputation, URL structures, attachment types, and email formatting anomalies.

    • Behavioural Analysis: Learning normal communication patterns for your organization and flagging deviations (e.g., a sudden email from the “CEO” asking for gift cards, which is out of character).
  2. Adaptive Learning: Spammers constantly change tactics. AI models continuously learn and adapt to these new threats in near real-time, significantly reducing the window of vulnerability compared to waiting for manual rule updates. When new spam campaigns emerge, the models retrain based on newly classified samples.

  3. Contextual Understanding: AI helps differentiate between legitimate and malicious use of similar content. For example, an “invoice” email from a known supplier vs. a generic “invoice” from an unknown sender with a suspicious link. AI considers sender reputation, recipient history, link destinations, etc.

  4. Impersonation Detection (MDO): This is heavily AI-driven.

    • User Impersonation: Mailbox Intelligence learns the frequent contacts and communication style of protected users (e.g., executives). It flags emails claiming to be from that user but originating externally or exhibiting unusual patterns.

    • Domain Impersonation: AI detects attempts to use domains that look very similar to your own (e.g., yourc0mpany.com instead of yourcompany.com) or legitimate external domains (e.g., spoofing a well-known supplier).
  5. Enhanced Heuristics & Reputation: AI refines the calculation of Spam Confidence Levels (SCL) and Bulk Complaint Levels (BCL) by incorporating more complex signals than just IP/domain blocklists. It considers the “neighborhood” of sending IPs, historical sending behavior, and feedback loops (user submissions, junk reports).

  6. Zero-Hour Auto Purge (ZAP): Even if a malicious email initially bypasses filters and lands in an inbox, AI continues analyzing signals. If the message is later identified as spam or phishing (often through updated AI models or user reports), ZAP can automatically pull it from user mailboxes.

Specific Configuration Examples (Using the Microsoft 365 Defender Portal)

Most AI capabilities are inherently part of the features. You don’t toggle “AI On/Off,” but you configure the policies that leverage AI.

Prerequisites:

  • Access to the Microsoft 365 Defender portal (https://security.microsoft.com).

  • Appropriate permissions (e.g., Security Administrator, Global Administrator).

  • Note: Some advanced features (like Impersonation, Safe Links, Safe Attachments) require Microsoft Defender for Office 365 Plan 1 or Plan 2 licenses, beyond the basic EOP included with Exchange Online.

Example 1: Tuning Anti-Spam Inbound Policy (Leverages AI for SCL)

AI determines the SCL score based on numerous factors. You configure the actions based on those AI-determined scores.

  1. Navigate to Email & collaboration > Policies & rules > Threat policies > Anti-spam.

  2. Select the Anti-spam inbound policy (Default) or click Create policy > Inbound for a custom policy.

  3. In the policy settings, locate the Bulk email threshold & spam properties section and click Edit actions.

  4. Spam Confidence Level (SCL) Actions:
    • Spam: Action: Move message to Junk Email folder (Recommended Default). SCL levels typically 5, 6.

    • High confidence spam: Action: Quarantine message (Recommended). SCL levels typically 7, 8, 9. You could choose Redirect message to email address, Delete message, or Move message to Junk Email folder. Quarantine is generally safest.

    • AI Impact: The determination of which message gets an SCL of 5 vs. 7 vs. 9 is heavily AI-driven based on content, sender, structure, etc.
  5. Bulk Complaint Level (BCL) Threshold: Set a threshold (e.g., 6 or 7). Messages exceeding this BCL (often unwanted marketing mail) will take the specified action (e.g., Move message to Junk Email folder). AI helps differentiate bulk from true spam.

  6. Zero-hour auto purge (ZAP): Ensure “Enable for spam messages” and “Enable for phishing messages” are turned On. This allows AI to retroactively remove messages.

  7. Save the changes.

Example 2: Configuring Anti-Phishing Policy (Leverages AI for Impersonation & Spoofing)

Requires MDO licenses for advanced features.

  1. Navigate to Email & collaboration > Policies & rules > Threat policies > Anti-phishing.

  2. Click Create to make a new policy (recommended) or edit the Default policy.

  3. Phishing threshold & protection:
    • Enable spoof intelligence: Ensure this is On. AI helps identify and classify spoofing attempts (legitimate vs. malicious). You can review/override its findings later under “Spoof intelligence insight”.

    • Impersonation Protection (Key AI Area):
      • Click Edit next to Users to protect. Click Manage sender(s) and add email addresses of key personnel (CEO, CFO, HR Managers, up to 350). AI (Mailbox Intelligence) learns their communication patterns.

      • Click Edit next to Domains to protect. Add your own company domains and consider adding custom domains that are visually similar or frequently targeted. AI flags emails spoofing these domains or using lookalike domains.
      • Enable Mailbox Intelligence: Ensure this is On. This activates the AI learning for the protected users’ contact graphs and communication patterns.

      • Enable intelligence for impersonation protection: Ensure this is On. Uses AI to improve detection based on learned senders/patterns.
    • Actions: Configure actions for detected impersonation (User/Domain) and spoofing. Recommended actions often include Quarantine the message or Redirect message to administrator address and displaying safety tips.
  4. Advanced phishing thresholds: Set the level (e.g., 2: Aggressive, 3: More aggressive, 4: Most aggressive). Higher levels use more sensitive AI/ML models but might increase false positives. Start with 1: Standard or 2: Aggressive and monitor.

  5. Assign the policy to specific users, groups, or the entire domain.

  6. Save the policy.

Example 3: Enabling Safe Links & Safe Attachments (Leverages AI for Analysis)

Requires MDO licenses. These features use sandboxing (detonation) and URL reputation checks, heavily augmented by AI analysis.

  1. Safe Attachments:

    • Navigate to Email & collaboration > Policies & rules > Threat policies > Safe Attachments.

    • Click Create or edit an existing policy.

    • Choose an action like Block (blocks email with detected malware) or Dynamic Delivery (delivers email body immediately, attaches placeholder until attachment scan completes – often preferred for user experience).

    • Enable Redirect messages with detected attachments and specify an admin mailbox for review if desired.

    • Apply the policy to users/groups/domains.

    • AI Impact: AI models perform static analysis before detonation and analyze the behavior of the file during detonation in the sandbox to identify novel/zero-day malware.
  2. Safe Links:

    • Navigate to Email & collaboration > Policies & rules > Threat policies > Safe Links.

    • Click Create or edit an existing policy.

    • Ensure On: Safe Links checks a list of known, malicious links when users click links in email is selected under URL & click protection settings.

    • Enable Apply Safe Links to email messages.

    • Enable Apply real-time URL scanning for suspicious links and links that point to files. (This uses AI and other heuristics).

    • Configure Wait for URL scanning to complete before delivering the message (more secure, slight delay) or leave it off (less secure, no delay).

    • Choose actions for malicious URLs within Microsoft Teams and Office 365 Apps if applicable.

    • Configure Do not rewrite the following URLs for any trusted internal/external sites that break due to rewriting (use sparingly).

    • Apply the policy to users/groups/domains.

    • AI Impact: AI powers the reputation lookups and real-time scanning analysis of URLs, identifying phishing sites, malware hosts, and command-and-control servers even if they aren’t on a static blocklist yet.

Key Takeaways:

  • AI is Integrated: You configure features like Anti-Spam, Anti-Phishing, Safe Links/Attachments, and AI works behind the scenes within those features.

  • MDO is Crucial: The most advanced AI-driven protections (impersonation, advanced phishing detection, Safe Links/Attachments) require Microsoft Defender for Office 365 licenses.

  • Configuration is Tuning: You adjust thresholds (SCL, BCL), enable specific protections (Impersonation), and define actions (Quarantine, Junk, Delete).

  • Monitor & Adapt: Regularly review quarantine, user submissions (use the Report Message Add-in!), and threat reports in the Defender portal to fine-tune policies and understand how AI is performing in your environment. Feedback helps the AI models learn.

By leveraging these AI-powered features and configuring them appropriately, you can significantly improve your organization’s defense against increasingly sophisticated spam and phishing attacks in Exchange Online.

New mailbox logging settings

Screenshot 2025-01-16 165155

CISA released a Microsoft Expanded Cloud Logs Implementation Playbook that I recommend Microsoft 365 administrators take a look at.

“This playbook provides an overview of the newly introduced logs in Microsoft Purview Audit (Standard), which enable organizations to conduct forensic and compliance investigations by accessing critical events, such as mail items accessed, mail items sent, and user searches in SharePoint Online and Exchange Online. In addition, the playbook also discusses significant events in other M365 services such as Teams. Lastly, administration/enabling actions and ingestion of these logs to Microsoft Sentinel and Splunk Security Information and Event Management (SIEM) systems are covered in detail.”

“Default enablement is defined at a license level. For example, Auditing (Standard or Premium) is enabled by default for E3/E5/G3/G5 licenses. Some licenses, such as M365 Business Basic, M365 Business Standard, M365 Business Premium, and trial license accounts do provide access to Audit but do not currently have auditing enabled by default. These licenses will have Audit enabled by default in the future. If you are leveraging one of these license types, the steps below can be utilized to ensure that all audit features are enabled.”

Thus, if you are using ANY Microsoft 365 license in my books you want to ensure all the logging available to you is enabled for all user, regardless of Microsoft does.

The playbook will take you what needs to be done. Most of it relates to:

Mailbox actions for user mailboxes and shared mailboxes

with the most important being around the MailItemsAccessed setting, but there are others.

The most important thing to remember is that most of these settings cannot be set in the web portal and can only be set using PowerShell commands like:

Set-Mailbox – @{Add=“SearchQueryInitiated”}

Apart from these settings the playbook has lots of additional handy information that will help with the security of your Microsoft 365 environment and this makes it a recommended read for all administrators.

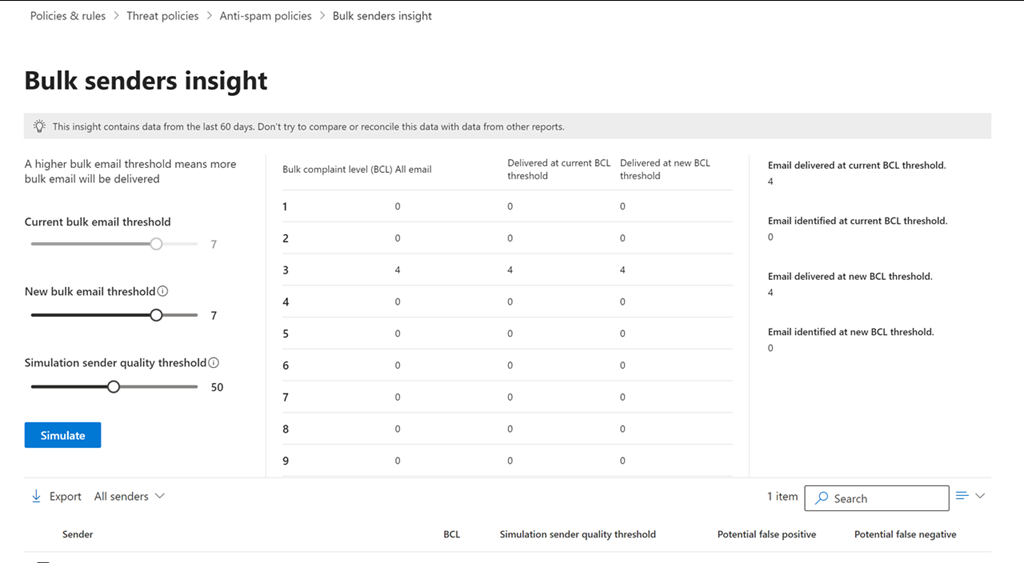
Bulk senders insight in Exchange Online

image

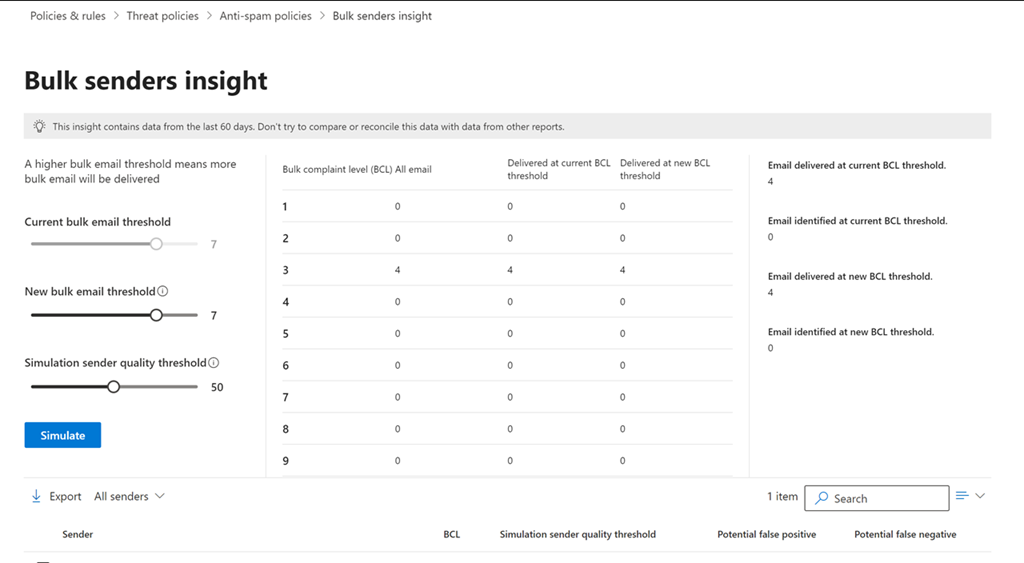
If you navigate to

https://security.microsoft.com/senderinsights

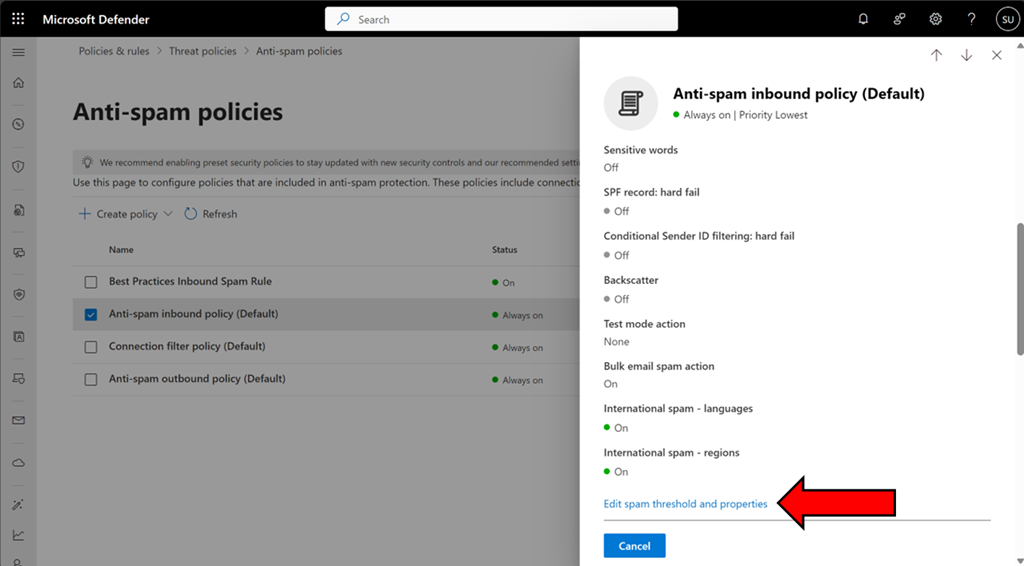
you should see the above Bulk senders insight console. You can also get to this if you select an Exchange Online anti spam policy like so:

image

and scrolling down the dialog that appears on the right and selecting Edit spam threshold and properties as shown above.

image

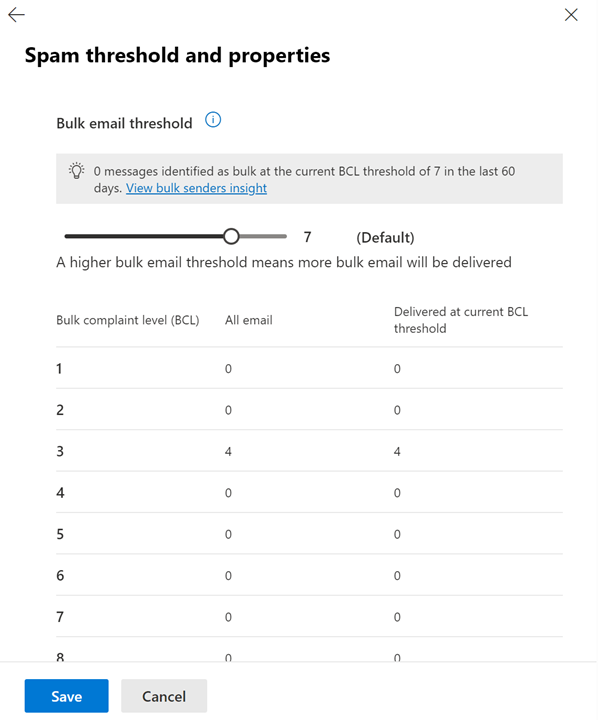
and then scroll up to the top of the dialog as shown above.

You can read more about this capability here:

https://learn.microsoft.com/en-us/defender-office-365/anti-spam-bulk-senders-insight

image

You can adjust the sliders on the left and then select the Simulate button to report on the emails that would be caught by this new level before actually applying to the policy. The list below will also show those that have been caught so you know exactly which emails would be caught if this change was made to the BCL level in a spam policy setting.

This now a handy way to fine tune the BCL settings inside Exchange Online antispam policies.

Disable Linkedin integrations in Microsoft 365

The first place to disable Linkedin integration in Microsoft 365 is inside the Azure portal.

image

Navigate to Microsoft Entra ID, then select Users as shown above.

image

Select User settings on the left and set the Linkedin account connections to No.

Remember to Save your settings before existing this page.

image

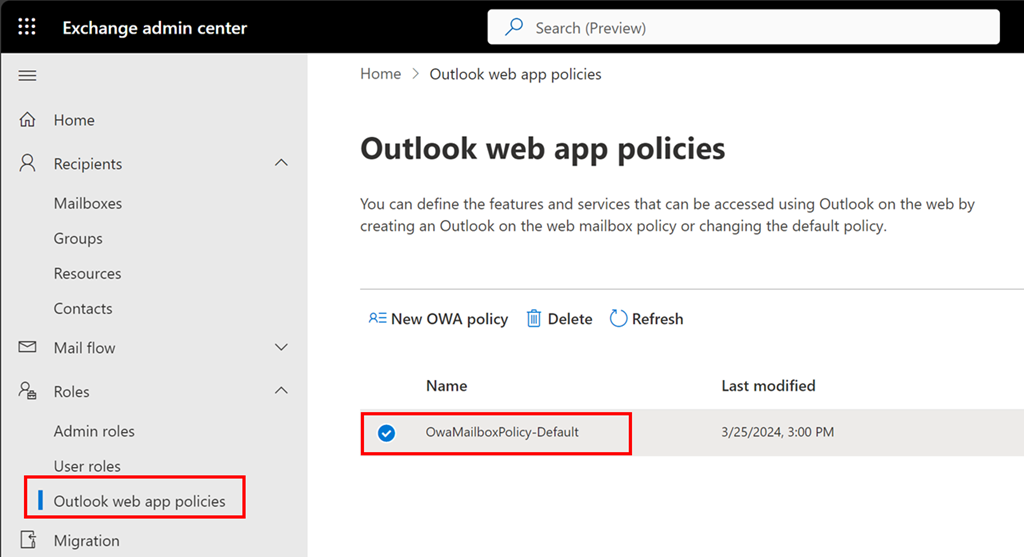
Now navigate to the Exchange Online administration portal. Expand the Roles option on the left and then select Outlook Web Apps policies.

Typically, there will only be one OWA policy as shown above. If there are more, then you will need to repeat this process with each.

Select the policy name, here OwaMailboxPolicy-Default..

image

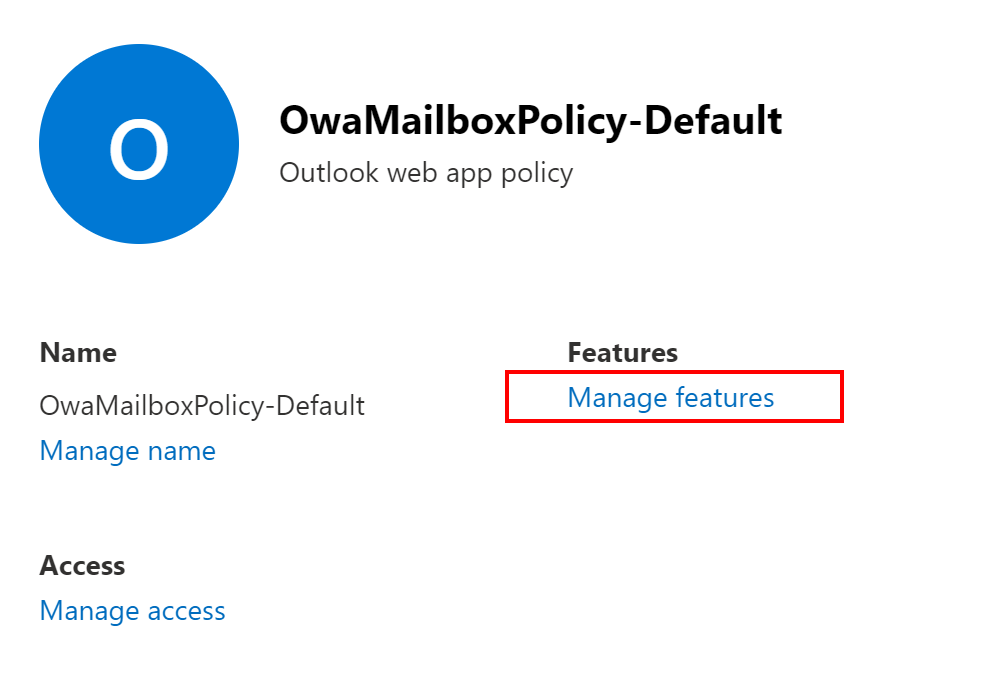
From the window that appears on the right select Manage features as shown above.

image

Ensure Linkedin contact sync is unselected as shown above.

Save your settings before you exit.

Defender for Office 365 Anti-phishing policies can protect externals as well!

image

My experience with most Microsoft 365 environments I see is that they fail to make use of all the features that are provided. None more so when it comes to security. For example, most people don’t seem to appreciate that the Defender for Office 365 (which is part of Business Premium) provides impersonation protection for internal AND external email addresses!  It just needs to be configured. The details are here:

Impersonation settings in anti-phishing policies in Microsoft Defender for Office 365

and as it says there:

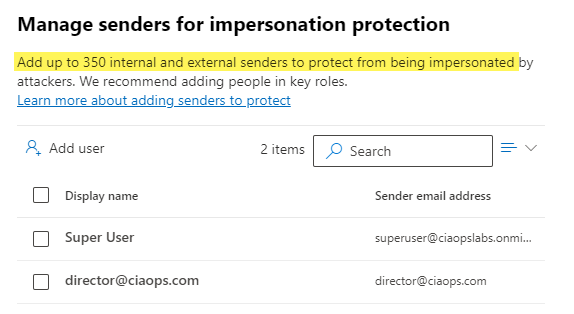
You can use protected users to add internal and external sender email addresses to protect from impersonation.

but it is important to note:

User impersonation protection does not work if the sender and recipient have previously communicated via email. If the sender and recipient have never communicated via email, the message can be identified as an impersonation attempt.

This means, you want to get the configuration of important external email addresses in place as soon as possible so any impersonation against those users can be evaluated. It is too late to do after an internal user is communicating with a scam (impersonated) domain.

You will also see that you can also configure protection for external domains, rather than just specific email addresses, for impersonation evaluation.This means that if the users inside the tenant deal with an important business that has its own email email, that is NOT part of that tenant, you can enter that domain in here. Makes a lot sense when you are working with a business regularly that is doing stuff like invoicing, e-commerce or the like (honestly anything at all really).

Let’s say that I work with a business who’s domain is ciaops.com. By enabling this impersonation protection early, if users in the tenant receive email from c1aops.com then it is far more likely to be detected because the system is looking of for spoofing of that custom external domain I entered in the policy.

Thus, if you have Microsoft Defender for Office 365 in your environment (and you do if you have Microsoft 365 Business Premium), then you can provide an extra level of protection by configuring the Anti-Phishing policy for impersonation settings for both your important internal AND external usera and domains (i.e. people and businesses you work with regularly). You should do that as early as possible to provide the maximum protection the policy can provide. They key is that someone has to add in the unique email addresses or domains into the policy, they are not added automatically, even internal email address. They ALL have to be added to the policy.

image

You can protect up to 350 unique email addresses and 50 unique domains, which is probably more that enough to cover everything a smaller business would need for internal and external users. Unfortunately, I rarely see this great capability enabled. It’s available if you have Microsoft Defender for Office 365 so go configure it and reduce the risk to the users in the tenant. Easy!

CIAOPS Need to Know Microsoft 365 Webinar – May

laptop-eyes-technology-computer

Join me for the free monthly CIAOPS Need to Know webinar. Along with all the Microsoft Cloud news we’ll be taking a look at Exchange Online protection.

Shortly after registering you should receive an automated email from Microsoft Teams confirming your registration, including all the event details as well as a calendar invite.

You can register for the regular monthly webinar here:

May Webinar Registrations

(If you are having issues with the above link copy and paste – https://bit.ly/n2k2305

The details are:

CIAOPS Need to Know Webinar – May 2023
Friday 26th of May 2023
11.00am – 12.00am Sydney Time

All sessions are recorded and posted to the CIAOPS Academy.

The CIAOPS Need to Know Webinars are free to attend but if you want to receive the recording of the session you need to sign up as a CIAOPS patron which you can do here:

http://www.ciaopspatron.com

or purchase them individually at:

http://www.ciaopsacademy.com/

Also feel free at any stage to email me directly via director@ciaops.com with your webinar topic suggestions.

I’d also appreciate you sharing information about this webinar with anyone you feel may benefit from the session and I look forward to seeing you there.

Exchange Online Spam Filters

This video provides an introduction to Exchange Online Spam policies. particularly Inbound and Outbound policies plus Connect Filter Policies. You’ll see how to view the existing policies, make changes to these policies as well as create new ones using the Microsoft 365 Security Administration console.