Stop Azure Billing Surprises: How to Set Up Budget and Cost Alerts for Copilot Chat, Copilot Cowork and Azure AI

image

One of the biggest concerns I hear from people experimenting with Microsoft Copilot, Copilot Cowork, Azure AI Foundry, Azure OpenAI and other Azure services is:

“How do I stop unexpected Azure charges?”

This concern is becoming even more important as more Microsoft AI services move to a consumption-based pricing model. Features such as Copilot Cowork can consume Azure resources behind the scenes, and without monitoring in place, costs can creep up before you realise it.

The good news is that Azure provides built-in tools to help you stay in control. With about 10 minutes of configuration, you can create budget alerts and anomaly detection that will notify you before costs become a problem.

Here’s how I recommend every Azure user configure cost controls.

Why This Matters

Many Azure services charge based on usage. Examples include:

  • Microsoft 365 Copilot PAYG features

  • Copilot Cowork

  • Azure AI Foundry

  • Azure OpenAI

  • Azure AI Search

  • Virtual Machines

  • Storage services

  • Networking services

The danger isn’t usually the individual cost. The danger is forgetting something is running or not noticing a new workload starts consuming more resources than expected.

A few simple alerts can provide an early warning long before a large bill arrives.

Step 1: Create a Monthly Budget

Start by opening the Azure portal and navigating to:

Cost Management + Billing
→ Cost Management
→ Budgets

Select:

+ Add
Configure the Budget

Enter a meaningful name such as:

Monthly Azure Budget

Choose:

Reset Period = Monthly

Set the start date to today or the first day of the current month.

Now decide on a budget amount.

For most users I suggest:

  • AU$50 for light experimentation

  • AU$100 for regular testing

  • AU$200 for heavier AI workloads

If you’re just getting started with Copilot Cowork or Azure AI services, AU$100 per month is a sensible starting point.

Click Next to configure alerts.

Step 2: Create Budget Alerts

Budget alerts notify you when your spending reaches specific percentages of your budget.

Rather than waiting until you hit the limit, configure several warning levels.

Alert 1

Create:

Type: Actual Cost
Threshold: 50%

If your budget is AU$100 you’ll receive an alert at AU$50.

Alert 2

Create:

Type: Actual Cost
Threshold: 75%

You’ll receive an alert at AU$75.

Alert 3

Create:

Type: Actual Cost
Threshold: 90%

This provides a final warning before reaching your budget.

Alert 4

This is the most important alert.

Create:

Type: Forecast Cost
Threshold: 100%

Forecast alerts use Azure’s spending predictions.

This means Azure can tell you:

“At your current spend rate, you’re likely to exceed your budget before the end of the month.”

This often gives you warning before you actually spend the money.

Configure Email Notifications

For each alert enter your email address:

admin@yourdomain.com

You can add multiple recipients if needed.

Unless you’re planning advanced automation, leave:

Action Group = None

Email notifications are sufficient for most users.

Once all four alerts have been configured, create the budget.

Step 3: Configure Cost Anomaly Alerts

Budget alerts are excellent for gradual overspending.

However, they won’t necessarily detect sudden spending spikes.

That’s where anomaly alerts come in.

Navigate to:

Cost Management + Billing
→ Cost Management
→ Cost Alerts

Select:

+ Add
Configure the Alert

Choose:

Alert Type = Anomaly

For the view select:

Daily anomaly by resource group

This tells Azure to look for unusual spending patterns across your subscription.

Configure the Notification

Use a descriptive subject such as:

Cost anomaly detected in Azure subscription

Add your notification email address:

admin@yourdomain.com

Optionally enter a custom message such as:

Review Azure spending immediately and investigate the source of the anomaly.

Create the alert.

How Anomaly Detection Helps

Imagine your Azure environment normally costs:

AU$2 per day

Then one day:

  • A GPU virtual machine is left running

  • An Azure AI deployment starts processing large workloads

  • Azure AI Search is accidentally overprovisioned

  • Copilot-related services begin consuming significantly more resources

Azure notices the unusual increase and generates an alert.

Instead of discovering the issue weeks later, you’ll know almost immediately.

Step 4: Identify What Is Actually Spending Money

Once alerts are configured, the next step is understanding where your money is going.

Open:

Cost Management
→ Cost Analysis

Change:

Group By = Resource Group

to:

Group By = Resource

This simple change provides much more useful information.

Instead of seeing:

copilot-rg

you’ll see the actual resources generating costs such as:

  • Azure AI Search

  • Storage Accounts

  • AI Deployments

  • Virtual Machines

  • Managed Disks

  • Public IP Addresses

This makes troubleshooting much easier.

Step 5: Don’t Forget Compute Services

The most common cause of unexpected charges is running compute resources.

Pay particular attention to:

  • Virtual Machines

  • Azure AI Foundry deployments

  • Azure AI Search services

  • GPU resources

  • Azure OpenAI deployments

Where possible, enable automatic shutdown on virtual machines and remove unused resources.

Final Thoughts

The rise of AI services such as Copilot Cowork means more organisations will encounter consumption-based Azure costs. That’s not a reason to avoid these tools. It simply means spending should be monitored in the same way we monitor security, backups and availability.

The combination of:

  • Monthly budget alerts

  • Forecast alerts

  • Cost anomaly detection

  • Regular cost analysis reviews

provides an effective safety net for most users.

If you’re experimenting with Copilot Cowork, Azure AI Foundry or any other Azure AI services, I strongly recommend configuring these controls before you start serious testing. A few minutes of setup today can save a lot of surprises at the end of the month.


Copilot Cowork Just Hit GA — and CSP-Managed Tenants Are Hitting a Billing Wall

copilot-cowork-csp-billing-header

Why “Your organization is managed by your solution provider” appears, why the customer’s own Azure subscription won’t save you, and the exact partner-side fix.


The symptom

Here’s a scenario that is going to land on a lot of MSP desks over the coming weeks. You have a client who has been happily using Microsoft 365 Copilot Cowork while it was in preview. They love it. They want to roll it out to more people. Then Cowork moves into General Availability, and suddenly they can’t add any new users to it. When they go digging in the Microsoft 365 admin centre, into the Copilot section to sort out billing, they are met with this brick wall:

The exact message

“Your organization is managed by your solution provider. Copilot credit setup for organizations managed by a solution provider must be set up by your provider. Contact your provider to enable consumption-based AI services for your organization.” The kicker is that this particular client already has a perfectly good pay-as-you-go Azure subscription sitting in their tenant. So the natural reaction is: I have an Azure subscription, I have billing, why is Microsoft telling me to phone a friend? The short version is that this is not a bug, it is not a permissions problem, and it is not something the client can click their way out of. It is a commerce-channel issue, and the resolution lives with whoever holds the CSP relationship — which, for most of us reading this, means it lives with us.

What actually changed at GA

When Cowork was in preview, the gloves were off — people could use it without the full commercial billing plumbing being in place. At GA, Microsoft moved Cowork behind what they call usage-based billing, powered by Copilot Credits. This is the same consumption model that sits alongside fixed per-user Copilot licensing. Worth noting precisely: as it stands today, this usage-based billing method only applies to Copilot Cowork and the Work IQ API — it is not the whole Copilot estate. Microsoft has said more agents and services will be folded into this model over time, but right now Cowork is the headline reason an MSP will trip over this.

How the new billing model is wired up

Usage-based billing is managed from a new node in the Microsoft 365 admin centre: Copilot, then Cost Management. That is where an admin activates a default spending policy, sets monthly and per-user spending limits, configures alert thresholds, and — critically — chooses a billing method. The billing method is an Azure subscription. Copilot Credits are drawn against that subscription on a pay-as-you-go basis (with optional pre-purchase plans layered on top for discounting, but ignore that for now). So the whole thing hinges on one question: which Azure subscription is allowed to be the billing method? And that is exactly where a CSP-managed tenant comes unstuck.

Why the client’s existing Azure subscription doesn’t help

This is the bit that catches people out, so it is worth being precise. The client genuinely has an Azure subscription. But the Copilot Cost Management setup, in a CSP-managed tenant, will not let them attach it — because that subscription is almost certainly on the wrong commerce channel. When a tenant is managed under the Cloud Solution Provider program, Microsoft routes all consumption commerce — Azure, marketplace, and now these AI services — through the partner’s Microsoft Partner Agreement billing account. A subscription the customer signed up for directly (a credit-card MOSP or direct Microsoft Customer Agreement Azure sub) is a completely separate billing relationship that the partner does not own. The commerce platform sees the tenant flag that says “this org is CSP-managed”, looks for a billing source on the partner channel, doesn’t find one, and throws up the “managed by your solution provider” gate. The presence of some other Azure subscription in the tenant is irrelevant to that check.

The mental model: who owns the commerce channel

If you keep one diagram in your head, make it this one. A CSP-managed customer’s consumption billing has to originate from an Azure plan that the partner provisions under their Microsoft Partner Agreement. The Azure plan gives the customer access to Azure services at pay-as-you-go rates under a Microsoft Customer Agreement, and the resulting Azure subscription lives in the customer tenant but invoices back to the partner. That partner-channel subscription is the only thing the Copilot Cost Management billing-method picker will accept for a CSP tenant. Here is how the three channels compare:

– Billing channel
– Who owns it
– Works as Cowork billing method in a CSP tenant?

Direct / MOSP Azure (customer’s own credit card)
The customer

No — wrong channel, not visible to the CSP gate

Direct Microsoft Customer Agreement (Azure direct)
The customer

No — tenant is flagged CSP-managed, so this is bypassed

Azure plan under Microsoft Partner Agreement (CSP)
The partner (you)

Yes — this is the channel the gate is looking for

The fix, step by step (partner side)

Assuming you are the CSP for this client, the resolution is to provision an Azure plan and an Azure subscription for them through the partner channel, then point Copilot Cost Management at it. Work through these in order:

  • Confirm the Microsoft Customer Agreement is accepted. In Partner Center, open Customers, select the customer, and check the Microsoft Customer Agreement status on their Account page. You cannot purchase an Azure plan until the MCA is in place — invite them to sign it directly with Microsoft if it isn’t.

  • Purchase the Azure plan. In Partner Center, with the customer selected, choose Add products, set Segment to Commercial, find Azure plan, add to cart, Review and Buy. If the customer already has an active Azure plan, skip to the next step.

  • Create an Azure subscription under that Azure plan. Sign in to the Azure portal with your Partner Center (Admin agent) credentials, making sure you are in your partner directory, not the customer’s. Go to Cost Management + Billing, pick the billing scope for the account where the customer sits, open Customers, select the customer, then All billing subscriptions, and choose Add. Pick a Usage based / Azure subscription with the plan set to Microsoft Azure Plan, then Review and create.

  • Lean on AOBO for the Azure rights. Subscriptions you create through CSP grant Admin-on-Behalf-of, which gives any Admin agent in your partner tenant Owner rights on that subscription automatically. That satisfies the setup wizard’s requirement for Owner or Contributor on the Azure subscription and resource group — no extra role assignment needed.

  • Configure usage-based billing in the customer’s M365 admin centre. Go to Copilot, then Cost Management, and select Get Started. In the Billing method section choose the new CSP Azure subscription. Set a sensible monthly spending limit, a per-user spending limit, and alert recipients and thresholds, then Activate. The Cowork block clears and you can add users again.

Prerequisites worth double-checking before you start

Setup will fail at the last hurdle if any of these are missing, so confirm them up front:

  • On the Microsoft 365 side, the person running the Cost Management setup needs Global administrator or Billing administrator. AI administrator and License administrator can create spending policies and manage limits, but they cannot set or change the billing method.

  • The tenant must have at least one SharePoint licence, or a licence that includes SharePoint. This is a real prerequisite for the Copilot billing node, and easy to overlook on a lean tenant.

  • You need Owner or Contributor on both the Azure subscription and a resource group in it. Via CSP and AOBO this is automatic, but if you have deliberately stripped AOBO and are using Lighthouse or directory accounts instead, make sure the identity doing the setup actually has those rights.

  • An Azure resource group must exist in the subscription — the wizard can create one for you during setup if needed.

Direct CSP vs indirect reseller — know which one you are

There is an important fork here. If you are a direct-bill CSP partner, you hold the Microsoft Partner Agreement billing account yourself and you run every step above in your own Partner Center. If you are an indirect reseller sitting underneath a distributor or indirect provider, you do not own that billing account — the Azure plan purchase is initiated through your indirect provider’s flow, not your own Partner Center billing scope. In that case you coordinate with your distributor to get the Azure plan provisioned, and then you can still handle the Azure subscription creation and the customer-side Cost Management configuration. And if it turns out a completely different provider holds the CSP relationship for this client, then none of this is yours to fix directly — that provider has to provision the Azure plan, or the CSP relationship needs to be transferred to you first.

Gotchas and things I’d watch

A few practical landmines that are easy to step on with this new model:

  • Budgets notify, they don’t stop. A budget on a billing policy triggers email alerts at the thresholds you set, but by default it does not enforce a hard cap or interrupt service. If you want a genuine ceiling, use the monthly spending limit and per-user limits in the Cost Management spending policy, which can actually cut access when hit.

  • Set a per-user limit on day one. The whole point of consumption billing is that a single enthusiastic user can run up real spend. The per-user monthly limit is optional in the wizard, but for an MSP managing someone else’s bill, treat it as mandatory.

  • Region selection is sticky. When you create the billing policy you choose a region that determines where tenant ID and usage data are stored, and you cannot edit the subscription or resource group tied to a policy afterwards. Get it right the first time.

  • Turning pay-as-you-go off is not instant. Disconnecting a service from a billing policy can take up to two hours to actually stop users, so don’t panic if access lingers briefly after you flip it off.

  • Pre-purchase plans layer on top, they are not an either/or. If cost predictability matters, a Copilot Credit pre-purchase plan gives discounted credits that are consumed first, with pay-as-you-go catching any overage. You don’t have to choose one or the other.

The takeaway

This is going to be a recurring support ticket. Cowork going GA is good news, but the GA billing model assumes the customer can attach their own Azure subscription — and for CSP-managed tenants that assumption simply doesn’t hold, no matter how many Azure subscriptions are already sitting in the tenant. The fix is entirely on the partner side: provision an Azure plan and subscription through the CSP channel, then point Copilot Cost Management at it. If you manage Microsoft 365 customers through CSP and any of them are using Cowork, get ahead of this now, because the moment GA flips the billing requirement on, their ability to add users stops until you’ve done the plumbing. As always, plan it, test it on one tenant, and document the steps so your L1 team can repeat them.

Can MSPs Actually Bill for Copilot Cowork?

image

I’ve been mulling over a question that doesn’t get asked enough, and I think it deserves a hard look: when Copilot Cowork lands with pay-as-you-go billing, do small and midsize MSPs actually have the skills to handle it? Not the product. The billing. Because from where I sit, that’s the part most of us are least prepared for.

For years, the SMB MSP model has run on something beautifully predictable: per-seat licensing. A client has thirty users, you sell thirty licences, you mark them up, and everyone knows what next month’s invoice looks like before it arrives. That predictability is the whole foundation. It’s what lets you quote a managed services agreement with a straight face. Consumption billing pulls that foundation out from under you.

We’ve Never Had to Read This Kind of Meter

PAYG is a different animal. Usage goes up and down. Costs follow. Suddenly you’re not selling a fixed thing, you’re selling access to a meter that ticks based on what people actually do inside Copilot. And here’s the uncomfortable truth — most of us have never had to read a meter like this before. We don’t have the muscle for it.

Think about the questions a client will ask the moment their first variable bill arrives. Why was it higher this month? Which users drove that? Was it worth it? If your answer is a shrug and a forwarded Microsoft invoice, you’ve got a problem. You need to pull the usage data, make sense of it, and explain it in plain English. That’s not a skill most SMB MSPs have built, because we’ve never needed it.

Configuring It Is the Easy Part

Turning Copilot Cowork on through the admin centre isn’t the hard bit. Microsoft will make that straightforward enough. The hard bit is everything that wraps around it — setting spending limits so a client doesn’t get a nasty surprise, deciding who gets access, and putting guardrails in place before usage runs away from you.

Then comes reporting, which is where I think the real gap shows. Can you stand in front of a client at the monthly meeting and show them, clearly, what they consumed and what they got for it? You’ll be living in the Microsoft 365 admin centre and the usage reports, and you may well end up pulling that data into Excel — perhaps asking Copilot itself to summarise the month’s consumption into something a business owner can read in thirty seconds. If you can’t produce that story, the client will assume the worst.

This Is a Discipline We Have to Learn

What worries me isn’t the technology. It’s that consumption billing is a genuine discipline, and it’s one the SMB MSP world has largely skipped. The cloud providers have been doing variable billing for years. Most of us serving small business have not. We’ve been comfortable in fixed-price land, and Cowork is going to ask us to grow up fast.

So I’d put the question back to you honestly. Could your business take on a client with Copilot Cowork tomorrow, configure it sensibly, manage the spend, and report on it with confidence? If there’s hesitation in that answer, you’re not behind — you’re normal. But the MSPs who close that gap early, who learn to read the meter and tell the story, are the ones who’ll own this conversation. The rest will be forwarding invoices and hoping nobody asks why.

Copilot Credit Pre-Purchase Plans

Ok, deep breath before we start. In. Out. Let’s start.

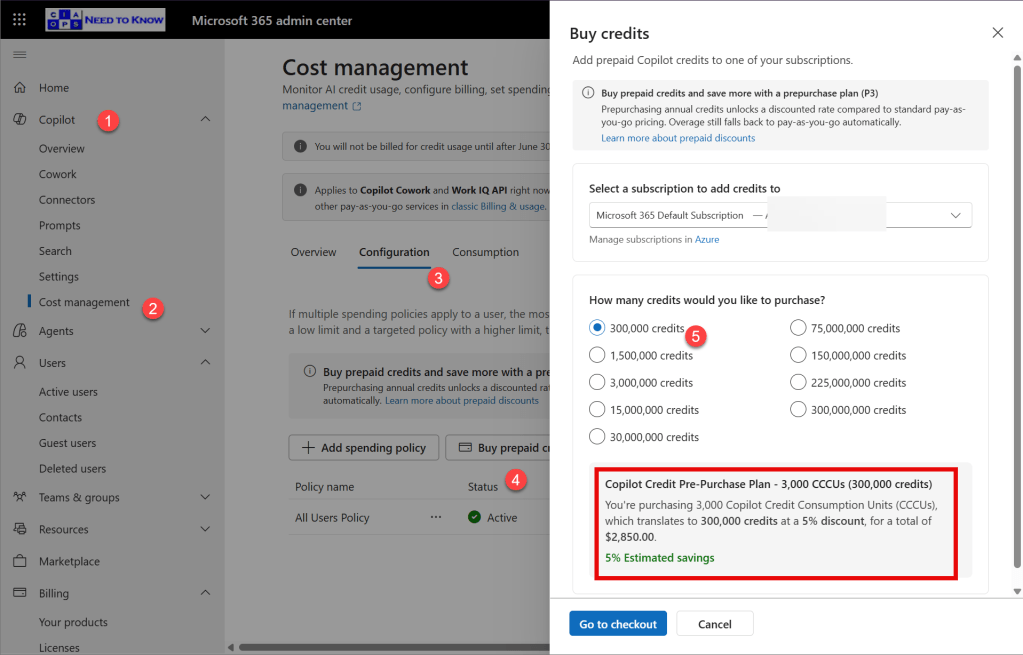
If you want to purchase Copilot Credits for use with Cowork you’’ll need access to https://admin.microsoft.com. Then you’ll need to navigate to Copilot | Cost Management | Configuration. You’ll then need to select Buy prepaid credits.  Then you need to select a Subscription, then How many credits you want from the table that displays.

Upon selection, you’ll be shown the price and then you can pay via the Checkout.

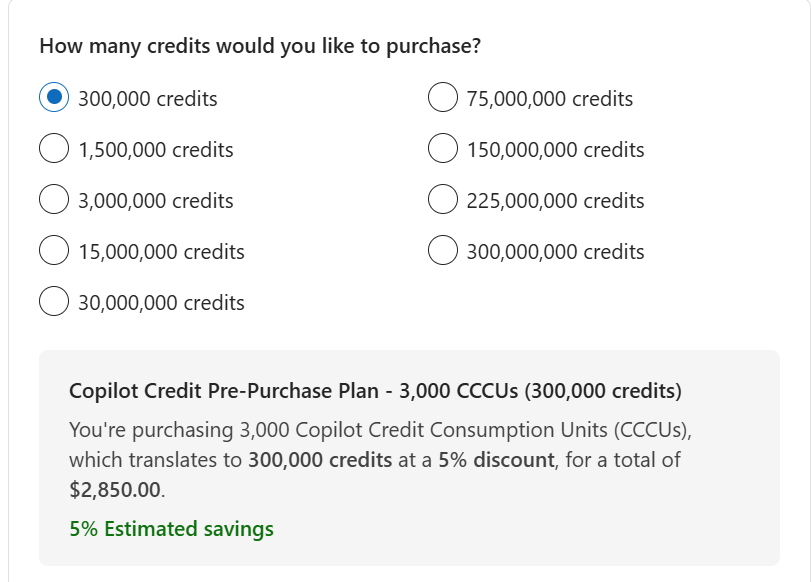
If you look closely you’ll also see this.

So, billing is measured in CCCUs. 1 x CCCU = 100 credits. CCCU means Copilot Credit Commit Unit.

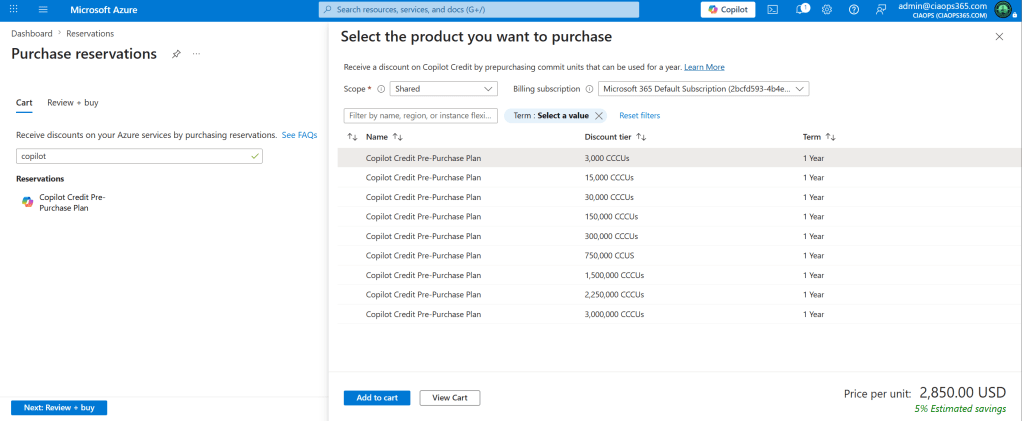
Given that this PAYG style billing is applied against an existing Azure subscription, if you go into the Azure portal and locate Reservations you find another location where you can pay:

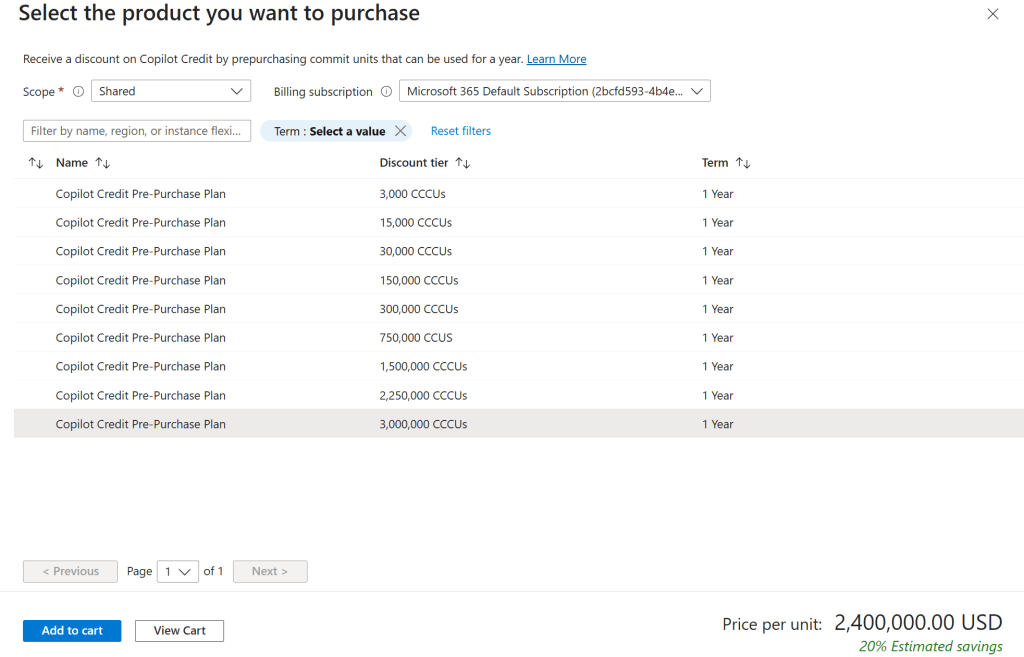
Again, here, we have Copilot Credit Pre-Purchase Plans measured in CCCUs.

At the lowest prepaid tier you get 5% discount and at the pre-paid top tier you get a 20% discount, with remaining tiers in between these two. Any overage returns to be being billed with no discount at the base rate.

If you now look at how usage is reported, you see it is reported in Copilot Credits, not CCCUs. So CCCUs appear to be a billing construct only.

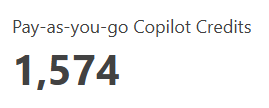
Thus, if we focus on just the Copilot Credits (not CCCUs) we get the Microsoft quoted US$0.01 per Copilot Credit. Thus, the above consumption cost becomes 1,574 x US$0.01 = US$15.74 in real money.

Thus, to enable Copilot Cowork going forward you will need:

– M365 License (e.g. M365 Business Premium)

– M365 Copilot license (to enable premium Copilot capabilities like Cowork)

– An Azure subscription for Copilot Cowork to be billed against

– Cowork consumption and billing is tenant wide, not per user

That will bill Copilot Cowork at a PAYG rate of $0.01 per Copilot Credit. A simple average would be to assume each Cowork interaction will consume around 400 credits. That is, around US$4 every time ANY user uses Cowork. This is because Cowork interactions vary on how many credits they use based on their complexity of the request and actions taken.

You can pre-purchase Copilot Cowork credits at average discounted rates starting from US$0.0095 down to $0.0080 (i.e. 5 – 20% discount) for a fixed annual commitment.

Annual pre-paid Copilot Cowork credits are measured in Copilot Credit Commit Units (CCCUs) which have the ratio of 100 credits per 1 CCCU. The entry level CCCU is 3,000 which provides 300,000 credits across all users in the tenant.

These credits can be purchased from the M365 admin portal or the Azure portal (vis Reservations).

An administrator can restrict Copilot Cowork in various ways to control costs but that is the subject for additional post.

….. and we are done. Breath. In. Out.

Keeping tabs on Azure costs via email

A common concern that holds many back from using all the resources available in Azure is consumption billing aka being billed for what you use rather than a flat fee as you get with Microsoft 365 services.

Here’s a way to keep an eye on those costs daily via email.

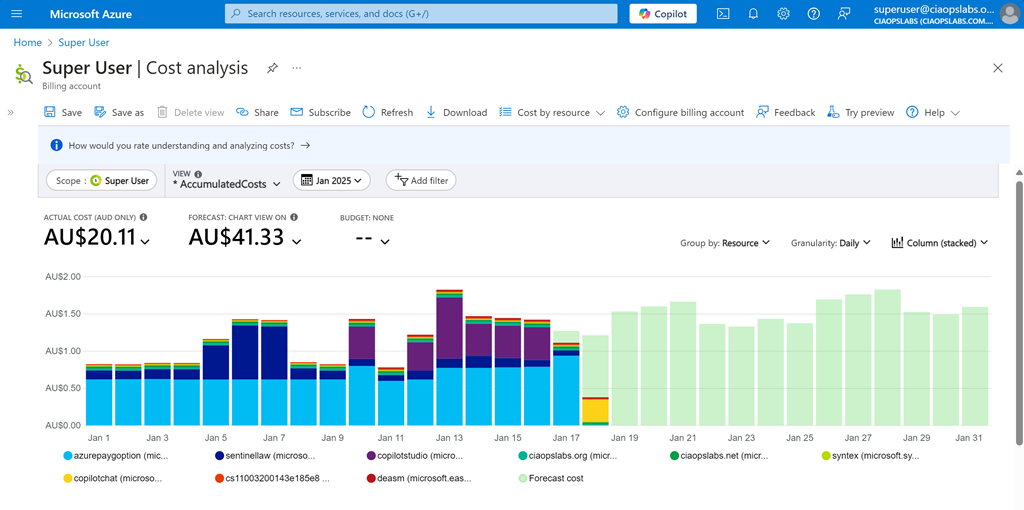
Firstly, login to the Azure portal as an administrator and then navigate to Cost Management + Billing. Next, you want to set up the report that you want to see daily.

Screenshot 2025-01-19 094010

For me I want to see Cost Analysis for the current monthly with accumulated costs, grouped by resource, granularity daily and as a stacked column as shown above. When you have it the way you want select the Save option on the menu at the top of the page.

Screenshot 2025-01-19 095243

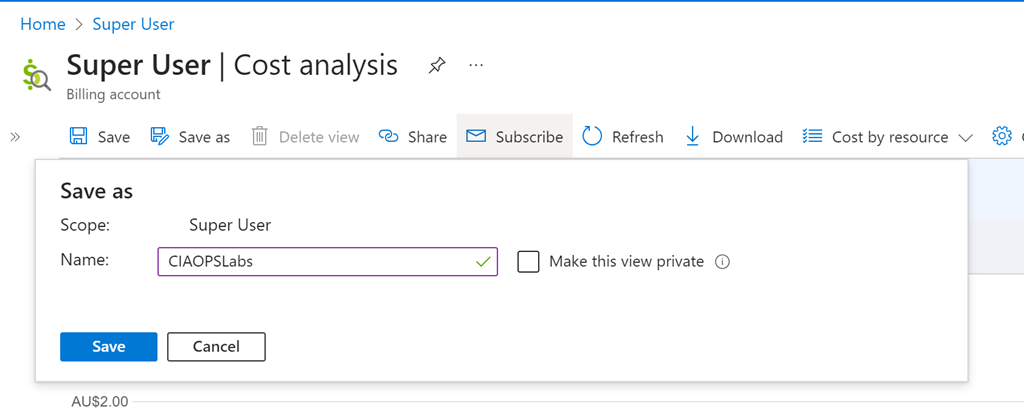
You’ll be asked for a name, as you see above. Select Save when complete. 

Screenshot 2025-01-19 095532

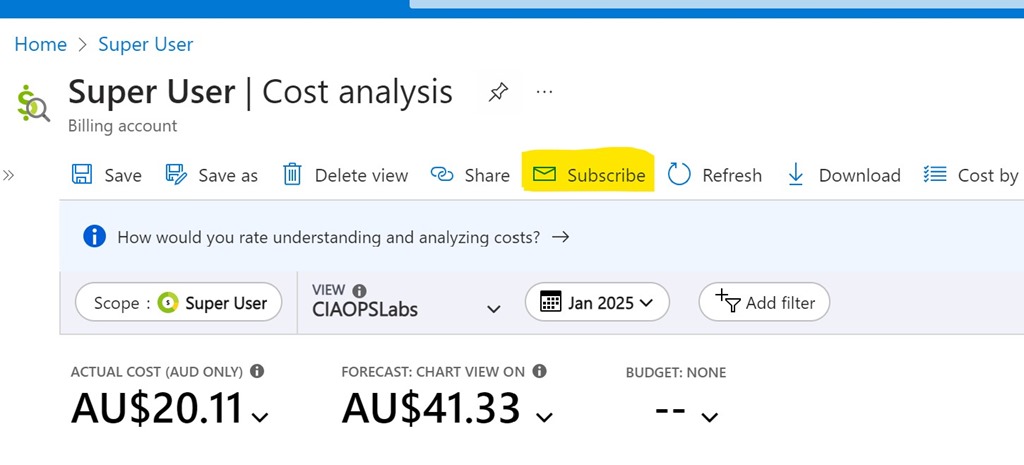
Also on the menu at the top, now select Subscribe as shown above.

Screenshot 2025-01-19 095742

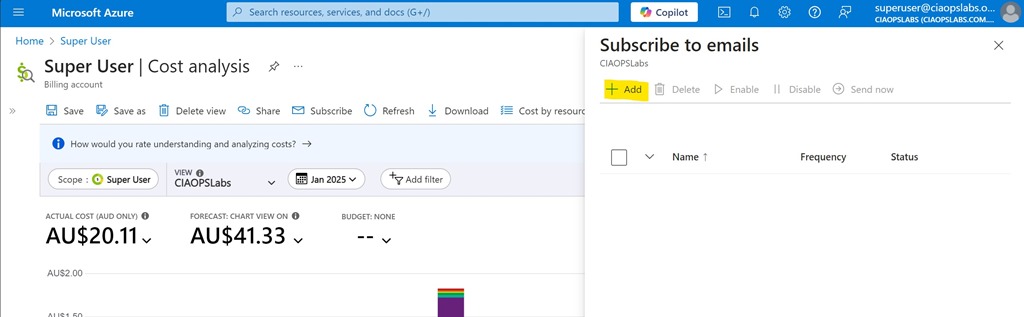
Select the Add option from the Subscribe to emails option that appears on the right as shown above.

Screenshot 2025-01-19 100019

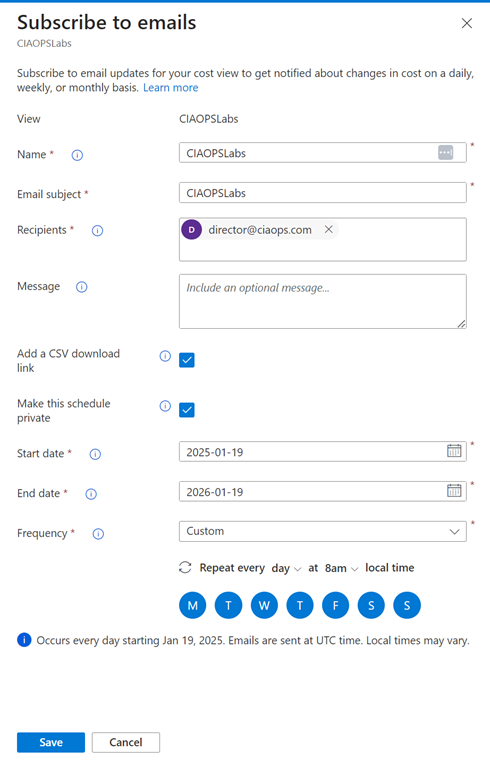
You should see the View you just saved at the top. Now complete the rest of the fields as desired. Personally, I select the option to include a CSV and want the report every day. The only challenge is that you can only specify a maximum end date 12 months out from the day you configure this. You’ll need to return annually to update this.

Screenshot 2025-01-19 100354

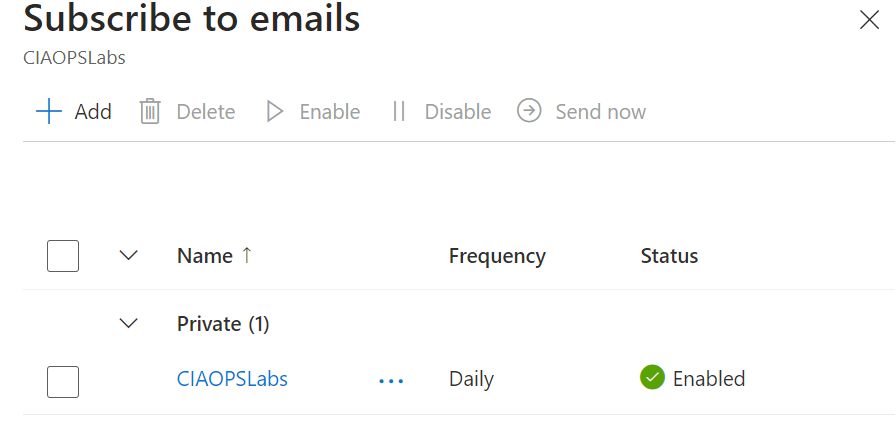
Select Save at the bottom of screen and you should now see your configuration listed as shown above.

Screenshot 2025-01-19 100809

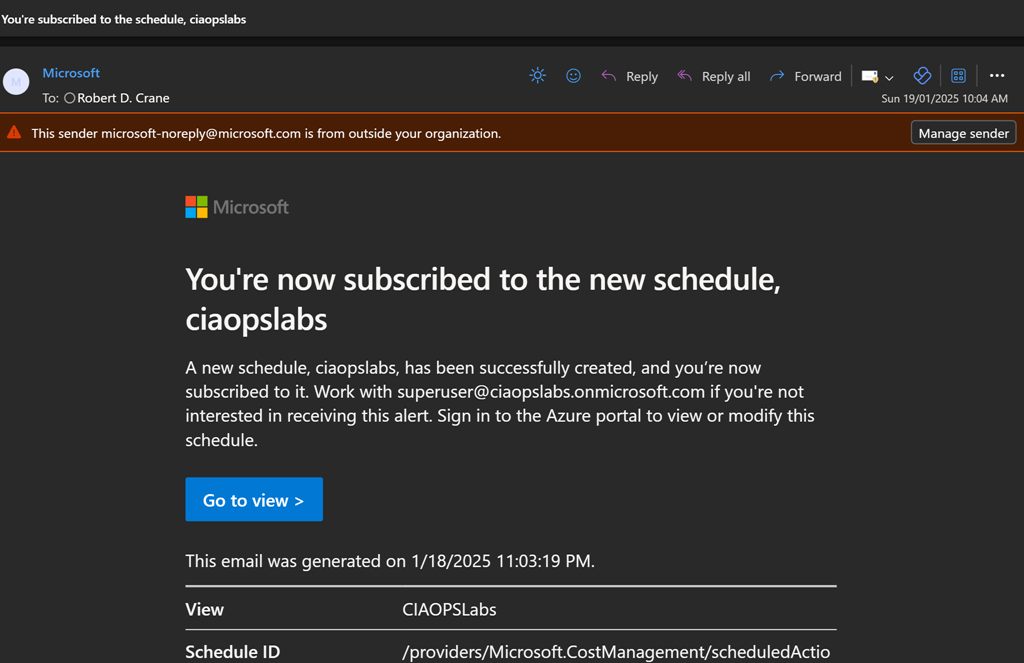
You’ll get a summary email confirming these settings as shown above.

Screenshot 2025-01-19 100531

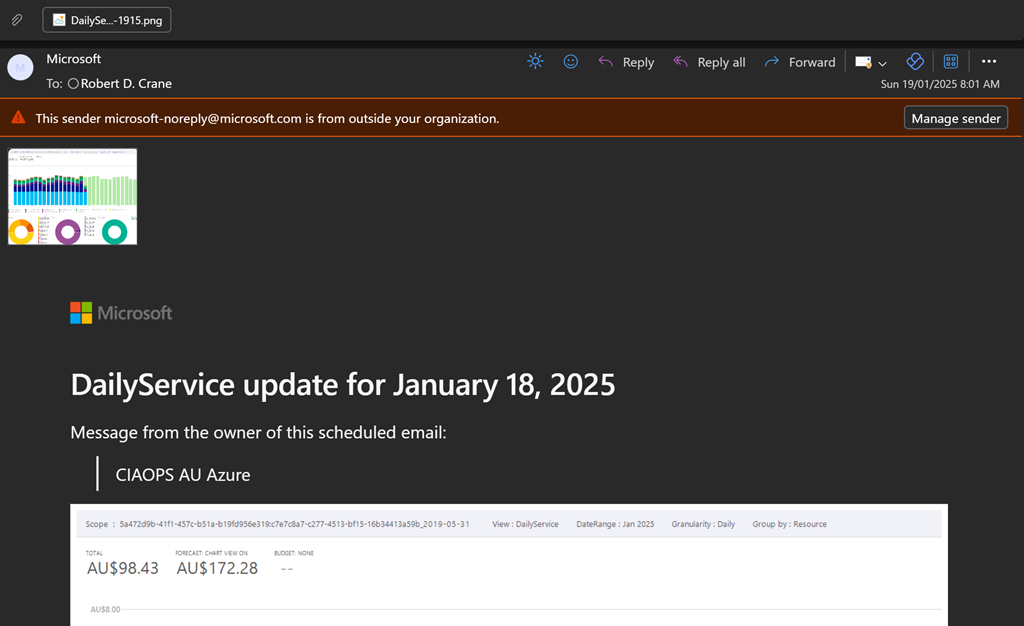
You should now start receiving a summary email on at the frequency your selected as shown above. You’ll see a screen shot of the report and a CSV attachment if you elected to include that.

Hopefully, this option provides greater piece of mind when it comes to monitoring costs with Azure. Remember, you can create as many subscription reports as you want to see a range of different details if desired.

Why can’t I delete a Power Platform PAYG billing plan?

*** Update 5 Feb 2025: Delete billing plan is now available. Developers were working on the back end causing the issue.

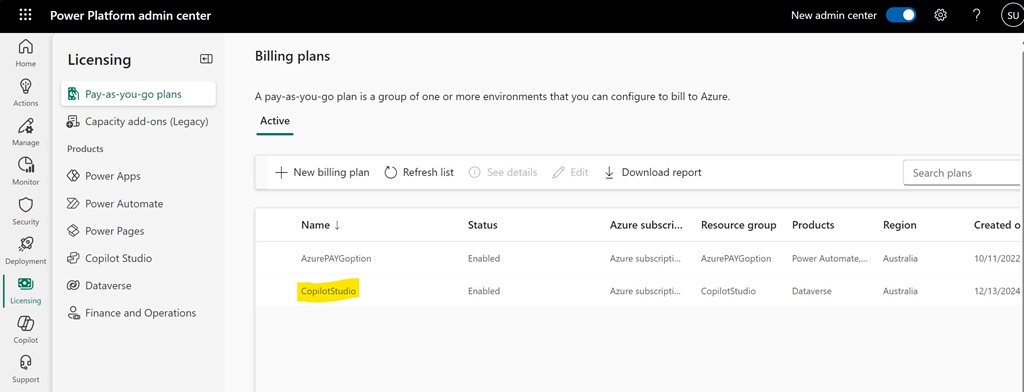
Screenshot 2025-01-17 154952

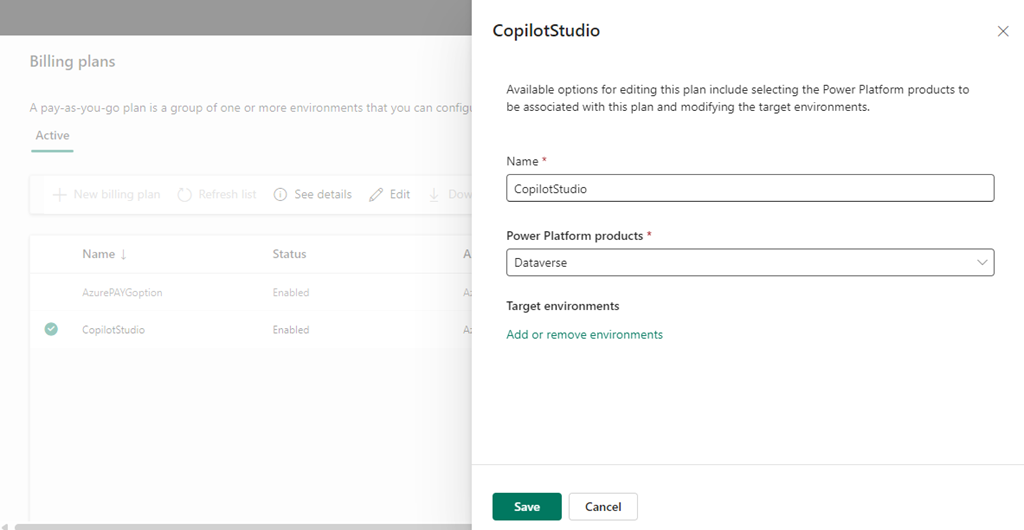
I want to delete the Power Platform PAYG Billing plan called CopilotStudio as seen above.

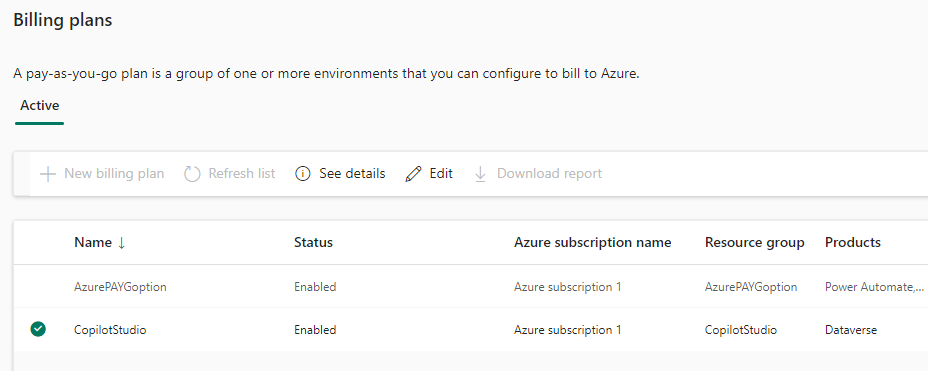
Screenshot 2025-01-17 155309

If I select the pla, as shown above, the the options See details and Edit are available only.

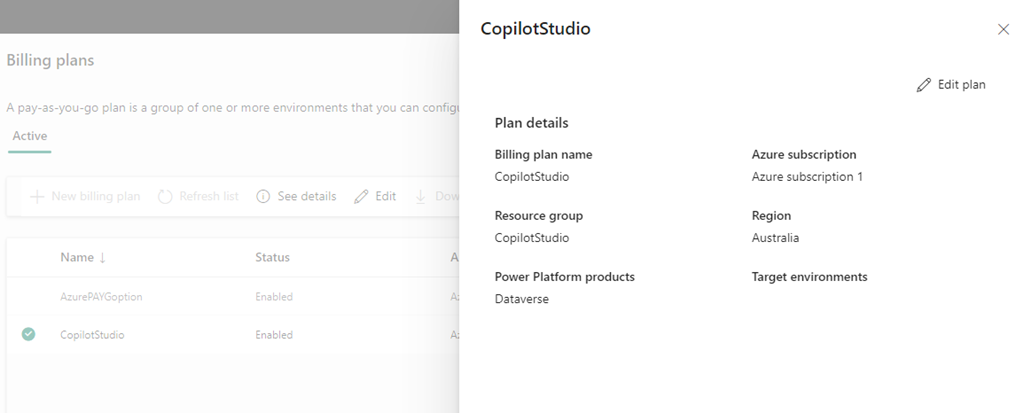
Screenshot 2025-01-17 155502

If I Select See details the above information is shown but with no delete option.

Screenshot 2025-01-17 155808

Selecting Edit plan displays the above, again with no Delete option.

The billing plan has no environments inside it.

Originally, the PAYG Billing plan was tied to an Azure Resource Group that has also now been removed. Yet, the billing plan remains?

Where is the delete option? Anyone know?

Power Platform PAYG configuration

I have spoken about how to

Set up PAYG for Power Platform

I was therefore puzzled when I saw this error in a Flow I created with premium connectors recently

Screenshot 2022-10-11 105235

“… does not have a standard service plan adequate for non-Standard connection”

It was my understanding that Power Platform PAYG would handle this. However, when you read the following documentation it says:

Only production or sandbox environments are available to add to billing policies at this time. Trial environments, developer environments, Dataverse for Teams environments, and default environments cannot be added.

Ok, that means I need to create a new Power Platform Environment and add that to the Power Platform PAYG billing policy.

image

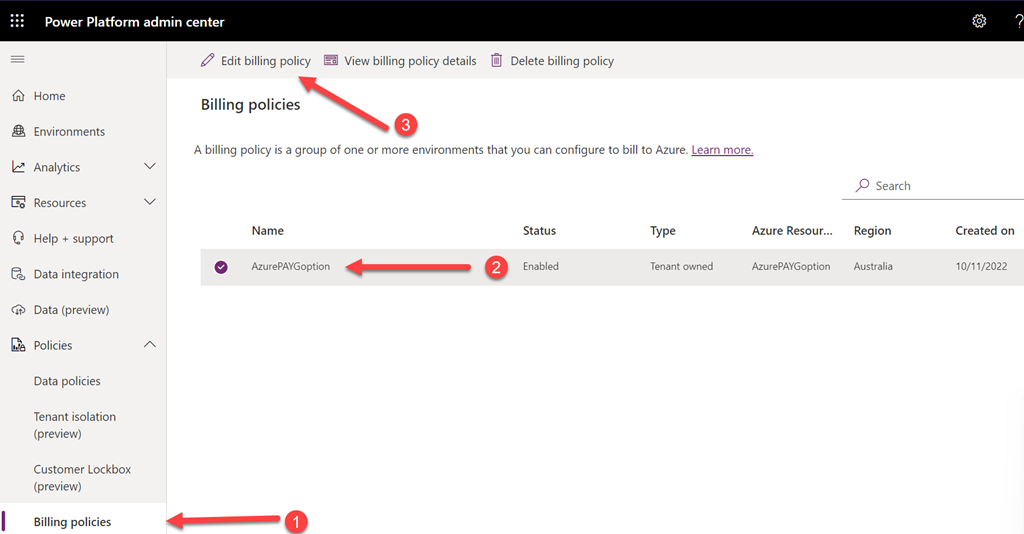
So into the Power Platform Admin center I went. Selecting Billing policies from the Policies option on the left. The direct URL is:

https://admin.powerplatform.microsoft.com/billingpolicies

I then selected the PAYG billing policy I had previously created and then I selected Edit billing policy at the top of the page.

image

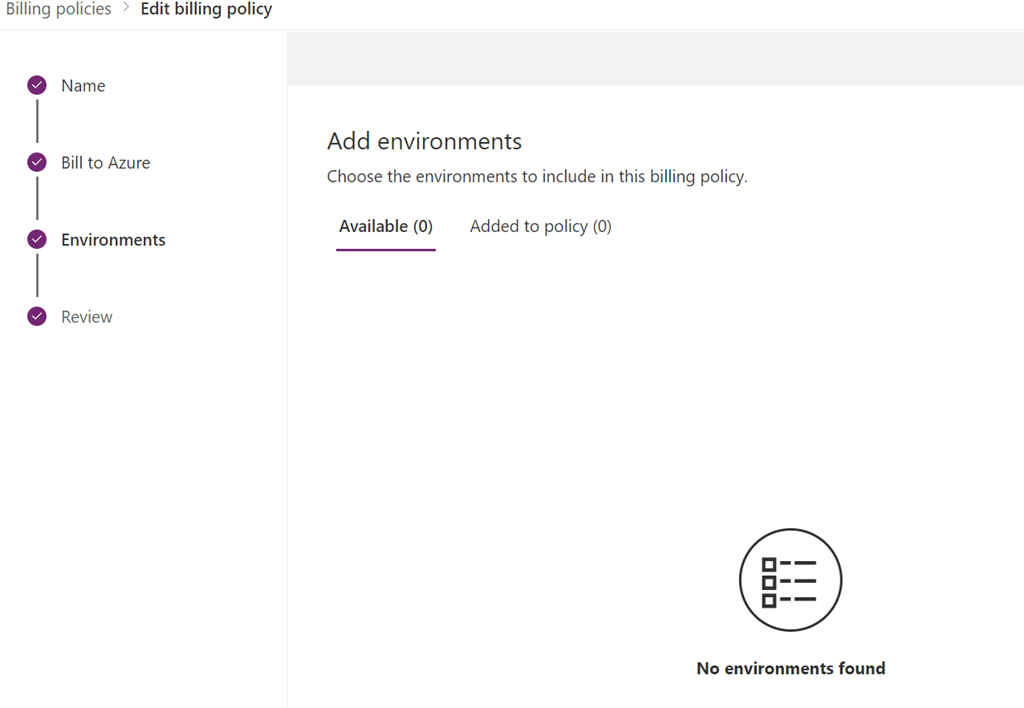
Sure enough, in the Environments section (shown above) I had nothing in there, so no billing was actually happening against the PAYG policy.

image

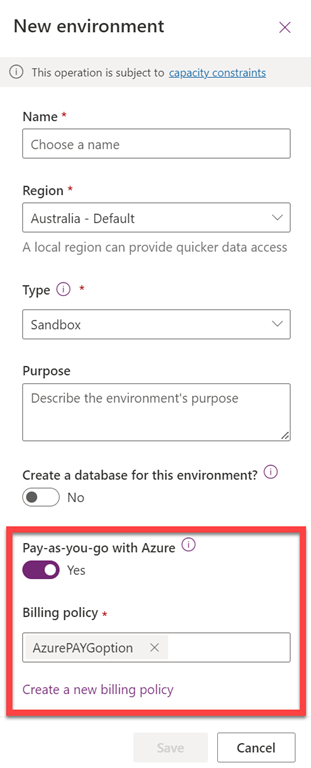
If I now create a New environment in the Power Platform you can see down the bottom there the option to use Pay-as-you-go with Azure. Here you can select an existing PAYG policy as well as create a new one if desired.

With a new environment created, I exported and imported the Flow I had created previously in the default environment into this new environment with PAYG billing now enabled

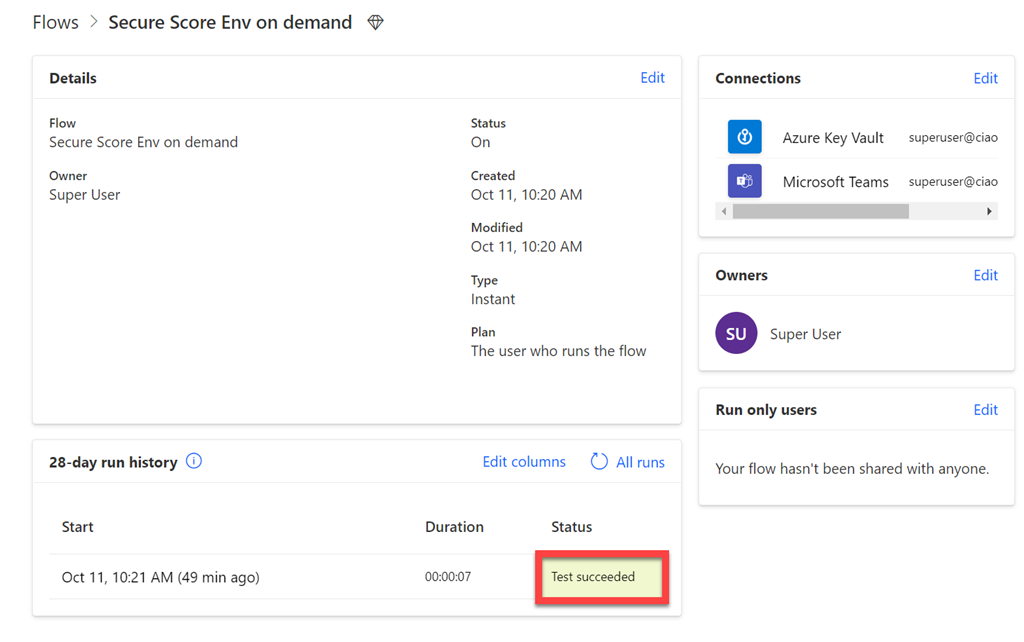
image

and it ran successfully! Yeah!

So the moral of the story with the Power Platform pay as you go option is that it will not work against the default environment, you need to create a new environment and specify the PAYG option at the point of creation.

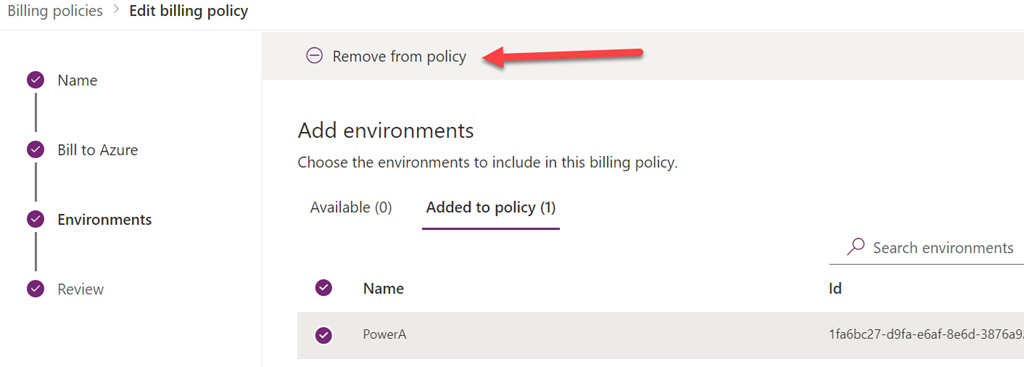
image

It is also possible to remove the environment you added to the PAYG policy at any point by editing the policy and selecting Remove from policy as shown above at the Environments stage after selecting the environment in the Added to policy menu option.

Get your Azure invoice emailed to you

image

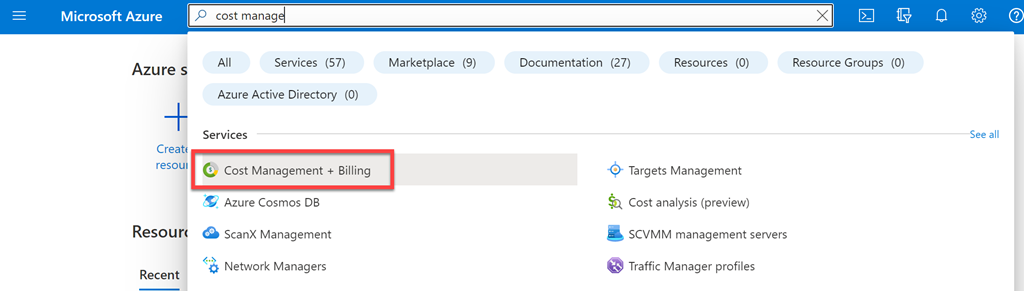
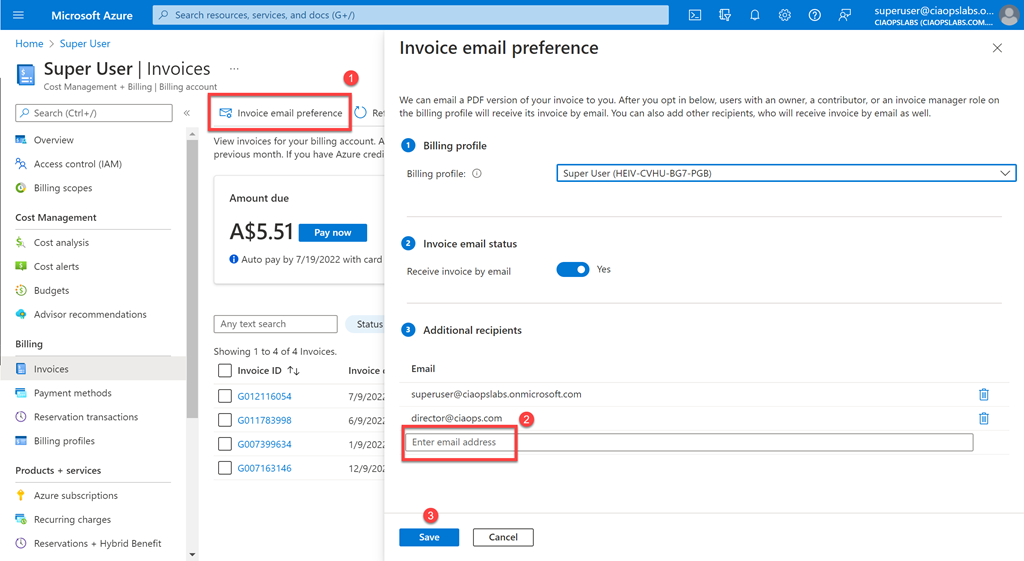
If you need a copy of the Azure invoice emailed to you then you can configure that inside your Azure portal be navigating firstly to the Cost Management + Billing.

image

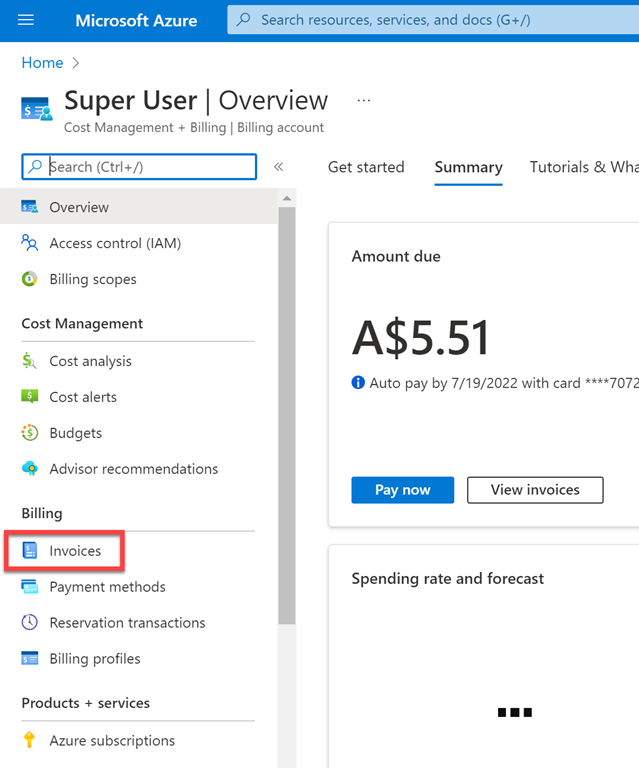
Then select Invoices from the menu on the left.

image

Finally, select Invoice email preferences from the menu on the right then enter the desired email address on the right in the dialog that appears. Remember to save your changes and from now on that email address will receive a copy of your Azure invoice monthly.