Microsoft Purview Customer Key is an advanced encryption feature that lets organisations bring their own encryption keys to Microsoft 365. It adds a customer-managed layer of encryption for data at rest across services like Exchange Online, SharePoint, OneDrive, Teams, and Windows 365, on top of the platform’s standard BitLocker and service-side encryption[1][1]. In a small-to-medium business (SMB) scenario using Microsoft 365 Business Premium as the base license, implementing Customer Key can strengthen data protection and compliance – but it requires careful setup, the right licensing, and ongoing management. This report explains what Customer Key is, how it works, how to set it up and use it effectively in an SMB, and compares relevant licensing (with all prices in Australian dollars).

What is Microsoft Purview Customer Key?
Microsoft Purview Customer Key is a “Bring Your Own Key” encryption solution for Microsoft 365. It allows an organisation to provide and control the root encryption keys used to encrypt data-at-rest in Microsoft’s datacenters[1]. In practical terms, you generate or supply cryptographic keys (via Azure Key Vault) and configure Microsoft 365 to use them for encrypting your data (Exchange mailboxes, SharePoint/OneDrive files, Teams chats, etc.) on top of the platform’s built-in encryption.
Key points:
- Extra layer of encryption: All Microsoft 365 customer data is already encrypted at rest using methods like BitLocker and Distributed Key Manager. Customer Key adds a customer-managed layer of encryption on top[1]. This means even if someone had physical access to Microsoft’s storage, they would need your keys to decrypt the content. It’s important to note that Customer Key is not designed to keep Microsoft’s services from accessing data – you still allow Microsoft to use the keys to deliver functionality (search, spam filtering, etc.)[1]. Instead, it’s there to meet compliance requirements for key ownership and control.
- Services covered: Customer Key can encrypt data across Exchange Online (mailboxes), SharePoint Online, OneDrive for Business, Teams (chat messages and related content), and Windows 365 Cloud PC disks[1][1]. In effect, almost all major M365 workloads can be covered. (It doesn’t apply to on-premises servers or certain online services like Viva Engage or Planner which aren’t supported[1].) You create encryption policies to specify which data to encrypt with your keys (more on this in the policy section).
- Compliance and control: By controlling the encryption keys, your organisation meets strict regulatory demands (common in finance, healthcare, government, etc.) for controlling data encryption. You can demonstrate that only your organisation (via your key management) can ultimately unlock the data[1]. It also means you have a “kill switch” — if you revoke or delete your keys, the data encrypted with them becomes unreadable (Microsoft calls this cryptographic deletion)[1]. For example, if you end a contract and need to ensure data is wiped, or if a security event demands immediate locking down of data, you could revoke access to keys to render the cloud-stored data inaccessible.
- Azure Key Vault integration: The keys themselves are stored in Azure Key Vault (or Azure Dedicated HSM). You maintain two independent Azure Key Vaults (in two separate Azure subscriptions) each containing a key. Microsoft 365 always uses both keys (one primary, one secondary) so that if one is lost or inaccessible, the other can still decrypt data[2]. The keys never leave your vault; Microsoft services call Azure Key Vault to use them (wrap/unwrap operations) when needed. Because of this design, if you remove the keys or if the Azure subscription is terminated, the data in Microsoft 365 cannot be decrypted by anyone[1].
Customer Key vs. Customer Lockbox: It’s worth noting the difference between Customer Key and Customer Lockbox (another Purview feature often mentioned with compliance). Customer Lockbox controls support access to content (it forces Microsoft support engineers to get your approval before accessing any of your content). Customer Key, on the other hand, controls encryption keys for data at rest. They address different aspects of data protection.
Licensing Requirements and Options
To use Customer Key, your organisation must have the appropriate Microsoft 365 licensing. It is an advanced feature primarily meant for E5-level compliance customers. The Microsoft documentation explicitly states that Microsoft 365 and Office 365 plans which include the Customer Key feature are:
- Office 365 E5 – (enterprise plan with full security/compliance)
- Microsoft 365 E5 – (enterprise bundle including O365 E5 + Windows + EMS)
- Microsoft 365 E5 Compliance add-on – (the add-on suite for compliance & information protection)
- Microsoft 365 E5 Information Protection & Governance add-on – (a subset of E5 Compliance focused on info protection)
- Microsoft 365 Security and Compliance for F1/F3 (Frontline Workers) – (special SKUs for frontline if applicable)
- (Earlier Office 365 Advanced Compliance SKUs also supported it historically)
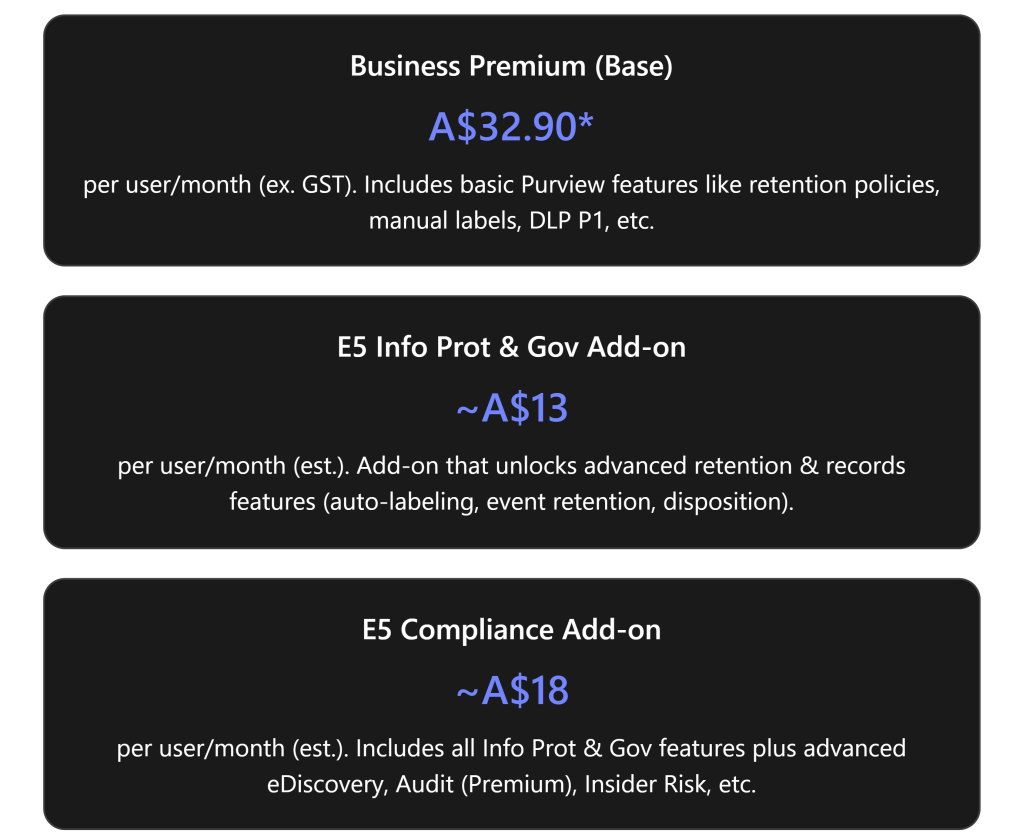
Business-oriented SMB plans on their own do not include Customer Key. Microsoft 365 Business Premium (BP) on its own does not offer Customer Key, as it lacks the advanced compliance bundle[2]. However, Microsoft introduced new add-on options in 2025 to bridge this gap for SMBs:
- E5 Compliance Add-on for Business Premium: As of late August 2025, Business Premium customers (up to 300 users) are eligible to purchase the Microsoft 365 E5 Compliance add-on to get the same advanced compliance features available to E5 enterprises[3]. This add-on includes Purview Information Protection, Data Loss Prevention, eDiscovery Premium, Insider Risk Management – and critically, it includes Customer Key as part of the Information Protection & Governance features. This is a big change, since previously (earlier in 2025) Business Premium wasn’t an eligible base for Customer Key and similar features[4][4]. Now an SMB can extend their Business Premium with the compliance add-on rather than upgrading fully to E5.
- E5 Information Protection & Governance Add-on: Microsoft also offers a smaller add-on focused just on the information protection and governance features (which would include Customer Key) for enterprise customers (often attached to E3 plans). In practice, the E5 Compliance add-on is more comprehensive (it bundles the Info Protection & Governance plus other compliance tools) and Microsoft is positioning that as the go-to for Business Premium. So, an SMB will likely consider the E5 Compliance suite as the way to get Customer Key on top of Business Premium, rather than the narrower Info Protection add-on (which historically targeted E3 commercial customers).
The table below compares license options relevant to Customer Key, including indicative pricing in Australia (AUD) and whether Customer Key is included:
| Plan or Add-on | Purview Customer Key? | Price (AUD)* | Notes |
|---|---|---|---|
| Microsoft 365 Business Premium | ❌ Not included | AU$32.90 per user/month1 | Base SMB plan (up to 300 users) with core security & compliance, but excludes advanced Purview features like Customer Key. |
| + E5 Compliance Add-on (for Business Premium) | ✔️ Included via add-on | + ~AU$20 per user/month2 | Adds the Microsoft 365 E5 Compliance suite to Business Premium, enabling Customer Key and other advanced Purview features. |
| Office 365 E3 / Microsoft 365 E3 | ❌ Not included | AU$53.30 per user/month3 | Enterprise plan without E5’s advanced compliance. Needs add-ons (E5 Compliance or Info Prot) to get Customer Key. |
| Office 365 E5 / Microsoft 365 E5 | ✔️ Included | AU$81.90 per user/month3 | Enterprise plan with full compliance capabilities. Customer Key is included out-of-the-box. |
| Microsoft 365 E5 Compliance Add-on (for E3 or eligible plans) | ✔️ Included | AU$~20 per user/month2 | Adds full Purview compliance suite to E3 (or now Business Premium). Similar content as BP + E5 Compliance above. |
*Prices exclude GST. 1Annual commitment pricing. 2Approximate add-on price (E5 Compliance is about US$12 ≈ AU$18; UK pricing ~£8, some AU partners quote ~$23). 3Enterprise price with annual commitment.
Licensing summary: If you are an SMB on Business Premium and you need Customer Key, the practical path is to purchase the Microsoft 365 E5 Compliance add-on for your users. This elevates those users’ compliance capabilities to E5 level (so they also get things like Unlimited Audit (Audit Premium), Insider Risk Management, etc. in addition to Customer Key[4][4]). Ensure that every user/mailbox you plan to encrypt with Customer Key has the required license. For example, if you apply Customer Key to all mailboxes, essentially all those mailbox users must have the add-on or an E5 license. (Shared mailboxes don’t need separate licenses as long as the user mailboxes meet requirements[1].)
Add-on vs Full E5? From a cost perspective, Business Premium (AU$32.90) + E5 Compliance add-on (~AU$20) comes to roughly AU$53 per user/month, which is significantly cheaper than full M365 E5 (AU$81.90)[5][5]. You don’t get everything E5 includes (for example, E5 Compliance add-on doesn’t include Power BI Pro or voice features), but for pure compliance needs, the add-on covers the bases. This is a cost-effective route for an SMB to use Customer Key without an enterprise plan. Keep in mind Business Premium is capped at 300 users; beyond that, you’d be in enterprise licensing territory anyway.
Step-by-Step Setup of Customer Key for an SMB
Enabling Customer Key is a multi-step process that involves preparation in Azure and configuration in Microsoft 365. Below is a step-by-step guide tailored for an SMB administrator:

Important Warnings: Microsoft emphasizes using extreme caution with Customer Key administration because errors can have tenant-wide impact[2]. For example, do not delete or expire your keys. If both keys are deleted (and past recovery period) or become unavailable, all data encrypted by them is effectively gone forever. Likewise, rotating (rolling) keys must be done by adding new keys and updating the policy, not by deleting old keys until new ones are in effect. Always follow Microsoft’s guidance for key rotation and retirement to avoid data loss. It’s wise to test the process in a non-production environment if possible.
Additionally, plan for continuity: The requirement for two keys in two vaults is to ensure that if one key is accidentally removed or one Azure subscription is compromised, the other key still keeps data accessible[2]. Make sure your IT staff understands the split responsibility and have processes to coordinate any key changes. Enforce strict RBAC – e.g., no single admin should casually have rights to delete both keys.
Configuring Policies and Using Customer Key Effectively
Once Customer Key is set up, you will mainly interact with it through Data Encryption Policies (DEPs). Using it effectively means aligning the encryption policies with your data protection needs and maintaining the keys/policies properly over time.
Data Encryption Policy Configuration
When configured, a Data Encryption Policy ties together your Azure Key Vault keys with specific data in Microsoft 365. Here’s a breakdown of the policy types and how an SMB might use them:
| Encryption Policy Type | Scope & Data Covered | Use in an SMB Scenario |
|---|---|---|
| Multi-Workload DEP (Tenant-wide) | This policy encrypts data across multiple Microsoft 365 workloads for all users in the tenant. It covers: Exchange Online mailboxes (unless a mailbox has its own DEP) Teams content (chats in 1:1, group, meeting chats; Teams meeting recordings stored in Teams; Teams chat attachments and media) Microsoft Purview Information Protection metadata (e.g. Exact Data Match hashes) Other service data like Cortana suggestions, some Copilot interactions, etc. Note: It does not cover SharePoint/OneDrive files (those need a separate policy). | For most SMBs, you will create one multi-workload DEP and assign it to the whole tenant. This ensures that all mailboxes and Teams chats are encrypted with your keys. It’s the broadest and simplest approach – one policy protecting most data. After setup, all new emails and Teams messages are encrypted with Customer Key automatically, and existing data is re-encrypted in background. This meets general compliance needs for data-at-rest across communications. |
| Mailbox-specific DEP (Exchange Online) | An encryption policy applied to specific mailbox(es). You can create up to 50 of these in a tenant. When a mailbox has a mailbox-specific DEP, it uses that DEP’s keys instead of the tenant-wide policy keys. You might use this to segregate encryption for different sets of users. (Each mailbox can only have one DEP at a time.) | SMBs might not need this at all unless you have a particular reason to use different keys for different mailboxes. One example: a subset of mailboxes contain highly sensitive data (e.g. HR or executive emails) and you want the ability to revoke their key without affecting everyone else. In that case, you could issue a separate key and policy for those mailboxes. Generally, if one key/policy covers your compliance needs, you can skip mailbox-specific policies. They are more common in larger enterprises with complex segregation needs. |
| SharePoint DEP (SharePoint Online/OneDrive) | This policy encrypts files and content stored in SharePoint sites and OneDrive for Business. You can have one SharePoint DEP per geo (for multi-geo tenants) or just one per tenant if you operate in a single region. All files in SharePoint/OneDrive will be encrypted with the two keys you specify. | Even SMBs should create a SharePoint DEP to cover files. For a single-geo SMB tenant, you will create one SharePoint encryption policy and activate it. This ensures your SharePoint documents, OneDrive files, Teams files (since Teams files are stored in SharePoint) are all protected by your keys. After enabling, any document at rest in SharePoint/OD4B is encrypted using your Customer Key. Without this, your Exchange and Teams data might be encrypted by Customer Key, but files would still be using Microsoft-managed keys – so for full coverage, implement the SharePoint DEP too. |
When planning policy assignment, lean towards simplicity: most small organisations will use one tenant-wide multi-workload policy and one SharePoint/OneDrive policy. That covers everything with two sets of keys (often you’d actually use the same two physical keys for both policies, which is fine – you’ll just register them twice, once in the Exchange policy, once in SharePoint). Only consider mailbox-specific policies if you have a distinct need (they add complexity – e.g. tracking which user is on which key).
After enabling, verify that new data is being encrypted. You can send a test email and then use Exchange PowerShell to check that the mailbox has an encryption policy applied. Similarly, upload a file to SharePoint and use the admin portal to confirm encryption status. In normal operation, Customer Key is transparent to end-users and admins – things like search, eDiscovery, DLP, etc., continue to work normally (Microsoft’s services request the key when needed behind the scenes). The main visible difference is in compliance admin centers where it will show that customer-managed keys are used.
Effective Use and Best Practices
To use Customer Key effectively in an SMB, consider the following guidelines and scenarios:
- Formalize Key Management Procedures: Treat your Customer Keys as crown jewels. Develop an internal process for managing them – who can access Azure Key Vault, how and when keys would be rotated, and under what circumstances you would revoke keys. Microsoft does not require frequent rotation (in fact, frequent rotation is not necessary and could be disruptive if not done carefully). If you do rotate (e.g. annually), you’ll generate new keys and update policies to use the new keys (while keeping old keys until all data is re-wrapped). Always backup keys before changes. Document these steps so that if IT personnel change, the incoming team can manage the encryption without mishap.
- Monitor Key Expiry and Status: As noted, keys should have no expiration. However, configure Azure Monitor alerts for your Key Vault to alert if a key is accidentally set with an expiry or if a key is deleted. Azure will have soft-delete enabled (90 days), so you have a safety net if someone mistakenly deletes a key – but you must notice it and restore it within that retention. It’s wise to periodically verify that both your primary and secondary keys are in good standing (not expired, not scheduled for deletion).
- Leverage “cryptographic deletion” carefully: One powerful aspect of Customer Key is the ability to render data permanently unreadable by revoking your keys. For example, some organisations in highly regulated industries might choose to revoke keys if they detect a certain kind of breach, essentially locking down data. In an SMB context, a scenario might be contract termination or legal requirement to purge data – rather than relying on Microsoft’s deletion, you could revoke the keys to ensure data is inaccessible (Microsoft calls this a Customer Key data purge path[1] – after revocation, Microsoft deletes its copy of the encryption key (the service’s availability key), making the encrypted data undecipherable). Use this ability with extreme caution: it’s irreversible unless you resume key access. If you do need to intentionally purge, follow Microsoft’s procedure (usually, you would open a support request to confirm data purge after key revocation to satisfy compliance).
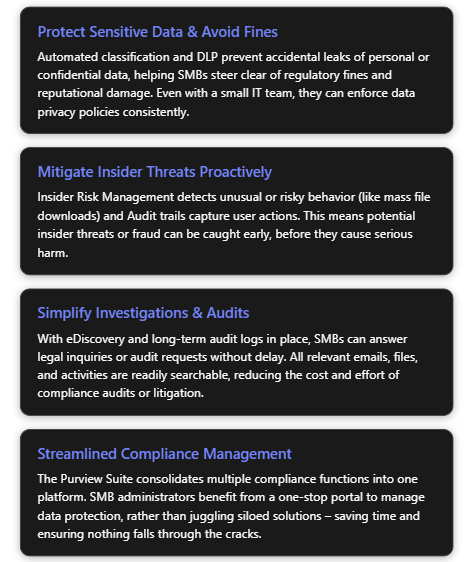
- Combine with other Purview controls: Customer Key is one piece of a broader data protection strategy. It works well in tandem with Sensitivity Labels and Data Loss Prevention (DLP). For example, you might use sensitivity labels to classify and protect content (with rights management), and at the service level, Customer Key ensures the stored data is encrypted with your keys. The presence of Customer Key is mostly opaque to those other features (they function normally), but having it in place gives an extra assurance that even if a file is not individually protected by a label, it’s still encrypted at rest by your key. Continue to enforce least privilege access, strong identity security (MFA, etc.), and DLP policies to prevent leaks – Customer Key does not prevent data leaks by itself; it only secures stored data.
- Licensing compliance: If you add or remove users in your organisation, remember the licensing aspect. Any user whose mailbox or files are protected via Customer Key should be licensed appropriately (e.g., if you hire new employees into a department whose mailbox is under a Customer Key policy, assign them the E5 Compliance add-on license as part of onboarding). Microsoft’s licensing docs indicate that if a user isn’t properly licensed but the data encryption policy is applied, it could be a violation of terms. In practice, the technical system doesn’t instantly block encryption, but you want to stay in compliance and also ensure support entitlement if issues arise.
- Testing and drills: In an SMB, it’s rare to have to rotate or recover keys, but it is worth testing these in a non-production setting. If you have a demo tenant or even within your tenant a pilot (with a test mailbox and a test key policy), try performing a key rotation (e.g., add a new key version and updating the DEP to use it) to get familiar. Also, simulate a recovery: take a vaulted key backup, delete a key (then recover it from soft delete or via backup) to ensure your team knows the procedure. This can pay dividends in a crisis scenario.
Finally, keep an eye on Microsoft’s documentation and announcements. Customer Key, being a part of Microsoft Purview, can evolve. For instance, Microsoft might extend Customer Key to cover new workloads in the future or provide admin center tooling to simplify management (today it’s a bit PowerShell-heavy). As an SMB, leverage the Microsoft 365 Compliance Center which now has sections for Customer Key – it provides guidance and status in the UI for the setup process. The UI can tell you, for example, if your keys are properly configured, and it can initiate some of the steps (like enabling SharePoint encryption).
Conclusion
Microsoft Purview Customer Key empowers organisations – including SMBs on Business Premium – to control their own encryption keys for data in Microsoft 365, offering an advanced level of compliance and data sovereignty. In an SMB scenario, implementing Customer Key must be done with planning and precision: you need the right licensing (Business Premium with an E5 Compliance add-on, or equivalent), two Azure Key Vaults with carefully managed keys, and the know-how to create encryption policies and maintain them. The effort is non-trivial, but the payoff is strong control over your data’s confidentiality.
For a Business Premium customer in Australia, the cost to enable Customer Key would include the licensing upgrade (~AU$20 extra per user/month for the compliance add-on) and minor Azure costs (Key Vault charges of only a few dollars per month for HSM key storage and operations)[2][6]. With these in place, an SMB can achieve a level of data protection comparable to large enterprises, ensuring that even within Microsoft’s cloud, your data is under your own key.
References
[1] Microsoft 365 Business Plans and Pricing | Microsoft 365
[2] Set up Customer Key – Microsoft Purview | Microsoft Learn
[3] Microsoft 365 E5 Compliance now available as an add-on for Microsoft …
[4] Microsoft 365 E5 Compliance: Business Premium no longer eligible …


")
")
")
")

")
")
