Modern enterprises use Intune compliance policies to enforce best practice security settings on iPhones and iPads. The provided JSON defines an iOS compliance policy intended to ensure devices meet strong security standards. Below, we evaluate each setting in this policy, explain its purpose and options, and verify that it aligns with best practices for maximum security. We also discuss how these settings map to industry guidelines (like CIS benchmarks and Microsoft’s Zero Trust model) and the implications of deviating from them. Finally, we consider integration with other security measures and recommendations for maintaining the policy over time.
Key Security Controls in the Compliance Policy
The following sections break down each policy setting in detail, describing what it does, the available options, and why its configured value is considered a security best practice.
1. Managed Email Profile Requirement
Setting: Require managed email profile on the device.\ Policy Value: Required (Not Not Configured).\ Purpose & Options: This setting ensures that only an Intune-managed email account/profile is present on the device. If set to “Require”, the device is noncompliant unless the email account is deployed via Intune’s managed configuration[1]. The default Not configured option means any email setup is allowed (no compliance enforcement)[1]. By requiring a managed email profile, Intune can verify the corporate email account is set up with the proper security (enforced encryption, sync settings, etc.) and not tampered with by the user. If a user already added the email account manually, they must remove it and let Intune deploy it; otherwise the device is marked noncompliant[1].
Why it’s a Best Practice: Requiring a managed email profile protects corporate email data on the device. It prevents scenarios where a user might have a work email account configured outside of Intune’s control (which could bypass policies for encryption or remote wipe). With this requirement, IT can ensure the email account uses approved settings and can be wiped if the device is lost or compromised[1]. In short, it enforces secure configuration of the email app in line with company policy. Not using this setting (allowing unmanaged email) could lead to insecure email storage or difficulty revoking access in a breach. Making it required aligns with strong security practices, especially if email contains sensitive data.
Trade-offs: One consideration is user experience: if a user sets up email on their own before enrollment, Intune will flag the device until that profile is removed[1]. IT should educate users to let Intune handle email setup. In BYOD scenarios where employees prefer using native Mail app with personal settings, this requirement might seem intrusive. However, for maximum security of corporate email, this best practice is recommended. It follows the Zero Trust principle of only permitting managed, compliant apps for corporate data.
2. Device Health: Jailbreak Detection
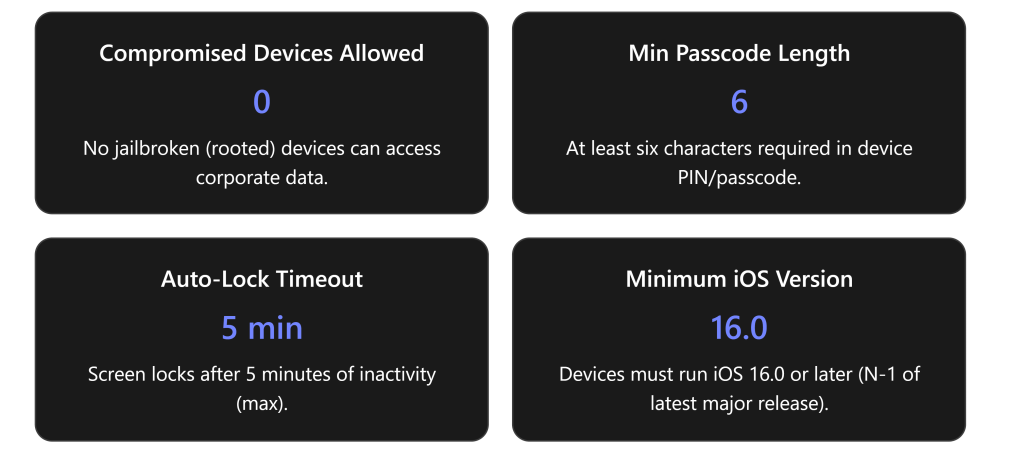
Setting: Mark jailbroken (rooted) devices as compliant or not.\ Policy Value: Block (mark as not compliant if device is jailbroken)[1].\ Purpose & Options: This control checks if the iOS device is jailbroken (i.e., has been modified to remove Apple’s security restrictions). Options are Not configured (ignore jailbreak status) or Block (flag jailbroken devices as noncompliant)[1]. By blocking, Intune will consider any jailbroken device as noncompliant, preventing it from accessing company resources through Conditional Access. There’s no “allow” option – the default is simply not to evaluate, but best practice is to evaluate and block.
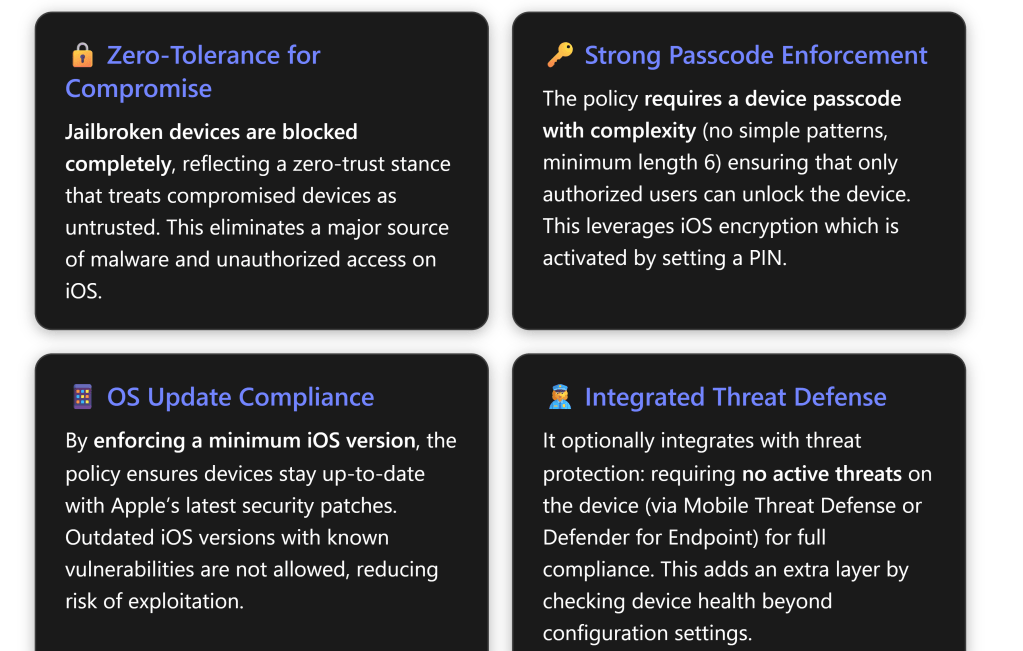
Why it’s a Best Practice: Jailbroken devices are high risk and should never be allowed in a secure environment[2]. Jailbreaking bypasses many of Apple’s built-in security controls (code signing, sandboxing, etc.), making the device more vulnerable to malware, data theft, and unauthorized access[2][2]. An attacker or the user could install apps from outside the App Store, escalate privileges, or disable security features on a jailbroken phone. By marking these devices noncompliant, Intune enforces a zero-tolerance policy for compromised devices – aligning with Zero Trust (“assume breach”) by treating them as untrusted[2]. Microsoft explicitly notes that jailbroken iOS devices “bypass built-in security controls, making them more vulnerable”[2]. This setting is easy to implement and has low user impact (legitimate users typically don’t jailbreak), but provides a big security payoff[2].
Allowing jailbroken devices (by not blocking) would be contrary to security best practices. Many security frameworks (CIS, NIST) recommend disallowing rooted/jailbroken devices on corporate networks. For example, the Microsoft 365 Government guidance includes ensuring no jailbroken devices can connect. In our policy, “Block” is absolutely a best practice, as it ensures compliance = device integrity. Any device that is detected as jailbroken will be stopped from accessing company data, protecting against threats that target weakened devices.
Additional Note: Intune’s detection is not foolproof against the latest jailbreak methods, but it catches common indicators. To improve detection (especially in iOS 16+), Location Services may be required (as noted by Microsoft Intune experts) – Intune can use location data to enhance jailbreak detection reliability. As part of maintaining this policy, ensure users have not disabled any phone settings that would hinder jailbreak checks (an Intune advisory suggests keeping certain system settings enabled for detection, though Intune prompts the user if needed).
3. Device Health: Threat Level (Mobile Threat Defense)
Setting: Maximum allowed device threat level, as evaluated by a Mobile Threat Defense (MTD) service.\ Policy Value: Secured (No threats allowed) – if an MTD integration is in use.\ Purpose & Options: This setting works in conjunction with a Mobile Threat Defense solution (like Microsoft Defender for Endpoint on iOS, or third-party MTD apps such as Lookout, MobileIron Threat Defense, etc.). It lets you choose the highest acceptable risk level reported by that threat detection service for the device to still be compliant[1]. The options typically are: Secured (no threats), Low, Medium, High, or Not configured[1]. For example, “Low” means the device can have only low-severity threats (as determined by MTD) and still be compliant, but anything medium or high would make it noncompliant[1]. “Secured” is the most stringent – it means any threat at all triggers noncompliance[1]. Not configured would ignore MTD signals entirely.
In the context of a strong security policy, setting this to Secured means even minor threats (low severity malware, suspicious apps, etc.) cause the device to be blocked[1]. This is indeed what our policy does, assuming an MTD is in place. (If no MTD service is connected to Intune, this setting wouldn’t apply; but the JSON likely has it set anticipating integration with something like Defender.)
Why it’s a Best Practice: Mobile Threat Defense adds dynamic security posture info that pure device settings can’t cover. By requiring a Secured threat level, the policy ensures that only devices with a completely clean bill of health (no detected threats) can access corporate data[1]. This is aligned with a high-security or “Level 3” compliance approach[3]. Microsoft’s High Security baseline for iOS specifically recommends requiring the device to be at the highest security threat level (Secured) if you have an MTD solution[3][3]. The rationale is that even “low” threats can represent footholds or unresolved issues that, in a highly targeted environment, could be exploited. For example, a sideloaded app flagged as low-risk adware might be harmless – or it might be a beachhead for a later attack. A Secured-only stance means any threat is unacceptable until remediated.
This stringent setting makes sense for organizations that prioritize security over convenience, especially those facing sophisticated threats. Users with malicious apps or malware must clean their device (usually the MTD app will instruct them to remove the threat) before they regain access. It’s a preventative control against mobile malware, man-in-the-middle attacks, OS exploits, etc., as identified by the MTD tool.
Options and Balance: Some organizations without an MTD solution leave this Not configured, which effectively ignores device threat level. While simpler, that misses an opportunity to enforce malware scanning compliance. Others might set it to Low or Medium to allow minor issues without disruption. However, for maximum security, “Secured” is ideal – it is explicitly called out in Microsoft’s level 3 (high security) recommendations[3]. It’s worth noting that using this setting requires deploying an MTD app on the devices (such as the Microsoft Defender app for Endpoint on iOS or a partner app). For our strong security baseline, it’s implied that such a solution is in place or planned, which is why Secured is chosen.
If not implemented: If your organization does not use any MTD/Defender for mobile, this setting would typically be left not configured in the policy (since there’s no data to evaluate). In that case, you rely on the other controls (like jailbreak detection, OS version, etc.) alone. But to truly maximize security, incorporating threat defense is recommended. Should you decide to integrate it later, this policy value can be enforced to immediately leverage it.
4. Device Properties: Minimum OS Version
Setting: Minimum iOS operating system version allowed.\ Policy Value: iOS 16.0 (for example) – i.e., devices must be on iOS 16.0 or above.\ Purpose & Options: This compliance rule sets the oldest OS version that is considered compliant. Any device running an iOS version lower than this minimum will be flagged as noncompliant[1]. The admin specifies a version string (e.g. “16.0”). Available options: you provide a version – or leave Not configured to not enforce a minimum[1][1]. When enforced, if a device is below the required version, Intune will prompt the user with instructions to update iOS and will block corporate access until they do[1]. This ensures devices aren’t running outdated iOS releases that may lack important security fixes.
Why it’s a Best Practice: Requiring a minimum OS version is crucial because older iOS versions can have known vulnerabilities. Apple regularly releases security updates for iOS; attackers often target issues that have been patched in newer releases. By setting (and updating) a minimum version, the organization essentially says “we don’t allow devices that haven’t applied critical updates from the last X months/year.” This particular policy uses iOS 16.0 as the baseline (assuming iOS 17 is current, this corresponds to “N-1”, one major version behind the latest)[3]. Microsoft’s guidance is to match the minimum to the earliest supported iOS version for Microsoft 365 apps, typically the last major version minus one[3]. For example, if iOS 17 is current, Microsoft 365 apps might support iOS 16 and above – so requiring at least 16.x is sensible[3]. In the JSON provided, the exact version might differ depending on when it was authored (e.g., if created when iOS 15 was current, it might require >= iOS 14). The principle remains: enforce updates.
This is absolutely a best practice for strong security. It’s reflected in frameworks like the CIS iOS Benchmark, which suggests devices should run the latest iOS or within one version of it (and definitely not run deprecated versions). By enforcing a minimum OS, devices with obsolete software (and thus unpatched vulnerabilities) are barred from corporate access. Users will have to upgrade their OS, which improves overall security posture across all devices.
Management Considerations: The admin should periodically raise this minimum as new iOS versions come out and older ones reach end-of-support or become insecure. For instance, if currently set to 16.0, once iOS 18 is released and proven stable, one might bump minimum to 17.0. Microsoft recommends tracking Apple’s security updates and adjusting the compliance rule accordingly[3][3]. Not doing so could eventually allow devices that are far behind on patches.
One challenge: older devices that cannot update to newer iOS will fall out of compliance. This is intended – such devices likely shouldn’t access sensitive data if they can’t be updated. However, it may require exceptions or phased enforcement if, say, some users have hardware stuck on an older version. In a maximum security mindset, those devices would ideally be replaced or not allowed for corporate use.
Maximum OS Version (Not Used): The policy JSON might also have fields for a Maximum OS Version, but in best-practice compliance this is often Not configured (or left empty) unless there’s a specific need to block newer versions. Maximum OS version is usually used to prevent devices from updating beyond a tested version—often for app compatibility reasons, not for security. It’s generally not a security best practice to block newer OS outright, since newer OS releases tend to improve security (except perhaps temporarily until your IT tests them). So likely, the JSON leaves osMaximumVersion unset (or uses it only in special scenarios). Our focus for strong security is on minimum version – ensuring updates are applied.
5. Device Properties: Minimum OS Build (Rapid Security Response)
Setting: Minimum allowed OS build number.\ Policy Value: Possibly set to enforce Rapid Security Response patches (or Not Configured).\ Purpose & Options: This lesser-used setting specifies the minimum iOS build number a device must have[1]. Apple’s Rapid Security Response (RSR) updates increment the build without changing the major/minor iOS version (for example, iOS 16.5 with RSR might have a build like 20F74). By setting a minimum build, an organization can require that RSR (or other minor security patches) are applied. If a device’s build is lower (meaning it’s missing some security patch), it will be noncompliant[1]. Options are to set a specific build string or leave Not configured. The JSON may include a build requirement if it aims to enforce RSR updates.
Why it’s a Best Practice: Apple now provides critical security patches through RSR updates that don’t change the iOS version. For example, in iOS 16 and 17, RSR patches address urgent vulnerabilities. If your compliance policy only checks the iOS version (e.g., 16.0) and not the build, a device could technically be on 16.0 but missing many patches (if Apple released 16.0.1, 16.0.2, etc. or RSR patches). By specifying a minimum build that corresponds to the latest security patch, you tighten the update requirement further. This is definitely a security best practice for organizations that want to be extremely proactive on patching. Microsoft’s documentation suggests using this feature to ensure devices have applied supplemental security updates[1].
In practice, not all organizations use this, since it requires tracking the exact build numbers of patches. But since our scenario is “strong security”, if the JSON included a minimum build, it indicates they want to enforce even minor patches. For example, if Apple released an RSR to fix a WebKit zero-day, the policy could set the minimum build to the version after that patch. This would block devices that hadn’t applied the RSR (even if their iOS “version” number is technically compliant). This is above and beyond baseline – it aligns with high-security environments (perhaps those concerned with zero-day exploits).
Configuration: If the policy JSON doesn’t explicitly set this, that suggests using the OS version alone. But given best practices, we would recommend configuring it when feasible. The policy author might update it whenever a critical patch is out. By doing so, they compel users to install not just major iOS updates but also the latest security patches that Apple provides, achieving maximum security coverage.
Maximum OS Build: Similarly, an admin could set a maximum build if they wanted to freeze at a certain patch level, but again, that’s not common for security – more for controlling rollouts. Most likely, osMaximumBuildVersion is not set in a best-practice policy (unless temporarily used to delay adoption of a problematic update).
6. Microsoft Defender for Endpoint – Device Risk Score
Setting: Maximum allowed machine risk score (Defender for Endpoint integration).\ Policy Value: Clear (only “Clear” risk is acceptable; anything higher is noncompliant).\ Purpose & Options: This setting is similar in spirit to the MTD threat level, but specifically for organizations using Microsoft Defender for Endpoint (MDE) on iOS. MDE can assess a device’s security risk based on factors like OS vulnerabilities, compliance, and any detected threats (MDE on mobile can flag malicious websites, phishing attempts, or device vulnerabilities). The risk scores are typically Clear, Low, Medium, High (Clear meaning no known risks). In Intune, you can require the device’s MDE-reported risk to be at or below a certain level for compliance[1]. Our policy sets this to Clear, the strictest option, meaning the device must have zero risk findings by Defender to be compliant[3]. If Defender finds anything that raises the risk to Low, Medium, or High, the device will be marked noncompliant. The alternative options would be allowing Low or Medium risk, or Not configured (ignoring Defender’s risk signal).
Why it’s a Best Practice: Requiring a “Clear” risk score from MDE is indeed a high-security best practice, consistent with a zero-tolerance approach to potential threats. It ensures that any device with even a minor security issue flagged by Defender (perhaps an outdated OS, or a known vulnerable app, or malware) is not allowed until that issue is resolved. Microsoft’s Level 3 (High Security) guidance for iOS explicitly adds this requirement on top of the baseline Level 2 settings[3]. They note that this setting should be used if you have Defender for Endpoint, to enforce the highest device risk standard[3].
Defender for Endpoint might mark risk as Medium for something like “OS version is two updates behind” or “phishing site access attempt detected” – with this compliance policy, those events would push the device out of compliance immediately. This is a very security-conscious stance: it leverages Microsoft’s threat intelligence on the device’s state in real time. It’s analogous to having an agent that can say “this phone might be compromised or misconfigured” and acting on that instantly.
Combining MDE risk with the earlier MTD setting might sound redundant, but some organizations use one or the other, or even both for layered security. (Defender for Endpoint can serve as an MTD on iOS in many ways, though iOS’s version of MDE is somewhat limited compared to on Windows – it primarily focuses on network/phishing protection and compliance, since iOS sandboxing limits AV-style scanning.)
In summary, this policy’s choice of Clear means only perfectly healthy devices (as judged by Defender) pass the bar. This is the most secure option and is considered best practice when maximum security is the goal and Defender for Endpoint is part of the toolset[3]. Not configuring it or allowing higher risk might be chosen in lower-tier security configurations to reduce friction, but those introduce more risk.
Note: If an organization doesn’t use Defender for Endpoint on iOS, this setting would be not configured (similar to the MTD case). But since this is a best practice profile, it likely assumes the use of Defender (or some MTD). Microsoft even states that you don’t have to deploy both an MTD and Defender – either can provide the signal[3]. In our context, either “Device Threat Level: Secured” (MTD) or “MDE risk: Clear” (Defender) or both could be in play. Both being set is belt-and-suspenders (and requires both agents), but would indeed ensure no stone unturned for device threats.
7. System Security: Require a Device Passcode
Setting: Device must have a password/PIN to unlock.\ Policy Value: Require (device must be protected by a passcode)[1].\ Purpose & Options: This fundamental setting mandates that the user has set a lock screen passcode (which can be a PIN, password, or biometric with fallback to PIN). Options are Require or Not configured (which effectively means no compliance check on passcode)[1]. By requiring a password, Intune ensures the device is not left unlocked or protected only by swipe (no security). On iOS, any device with a passcode automatically has full-device encryption enabled in hardware[1], so this setting also ensures device encryption is active (since iOS ties encryption to having a PIN/password). If a user had no passcode, Intune will continuously prompt them to set one until they do (the docs note users are prompted every 15 minutes to create a PIN after this policy applies)[1].
Why it’s a Best Practice: It’s hard to overstate – requiring a device passcode is one of the most basic and critical security practices for any mobile device. Without a PIN/Password, if a device is lost or stolen, an attacker has immediate access to all data on it. With our policy, a device lacking a passcode is noncompliant and will be blocked from company resources; plus Intune will nag the user to secure their device[1]. This aligns with essentially every security framework (CIS, NIST, etc.): devices must use authentication for unlock. For instance, the CIS Apple iOS Benchmark requires a passcode be set and complex[4], and the first step in Zero Trust device security is to ensure devices are not openly accessible.
By enforcing this, the policy also leverages iOS’s data encryption. Apple hardware encryption kicks in once a PIN is set, meaning data at rest on the phone is protected by strong encryption tied to the PIN (or biometric)[1]. Our policy thereby guarantees that any device with company data has that data encrypted (which might be an explicit compliance requirement under regulations like GDPR, etc., met implicitly through this control). Microsoft notes this in their docs: “iOS devices that use a password are encrypted”[1] – so requiring the password achieves encryption without a separate setting.
No Password = Not Allowed: The default without this enforcement would be to allow devices even if they had no lock. That is definitely not acceptable for strong security. Thus “Require” is absolutely best practice. This is reflected in Microsoft’s baseline (they configure “Require” for password in even the moderate level)[3]. An Intune compliance policy without this would be considered dangerously lax.
User Impact: Users will be forced to set a PIN if they didn’t have one, which is a minimal ask and now common practice. Some might wonder if Face ID/Touch ID counts – actually, biometrics on iOS still require a PIN as backup, so as long as a PIN is set (which it must be to enable Face/Touch ID), this compliance is satisfied. Therefore biometric users are fine – they won’t have to enter PIN often, but the device is still secure. There’s essentially no drawback, except perhaps initial setup inconvenience. Given the stakes (device access control), this is non-negotiable for any security-conscious org.
8. System Security: Disallow Simple Passcodes
Setting: Block the use of simple passcodes (like repeating or sequential numbers).\ Policy Value: Block (simple passwords are not allowed)[1].\ Purpose & Options: When this compliance rule is Blocked, Intune will treat the device as noncompliant if the user sets an overly simple passcode. “Simple” in iOS typically means patterns like 1111, 1234, 0000, 1212, or other trivial sequences/repeats[5]. If Not configured (the default), the user could potentially use such easy PINs[1]. By blocking simple values, the user must choose a more complex PIN that is not a common pattern. iOS itself has a concept of “Simple Passcode” in configuration profiles – disabling simple means iOS will enforce that complexity when the user creates a PIN.
Why it’s a Best Practice: Simple PINs are easily guessable – they drastically reduce the security of the device. For example, an attacker who steals a phone can easily try “0000” or “1234” first. Many users unfortunately choose these because they’re easy to remember. According to CIS benchmarks, repeating or sequential characters should be disallowed for device PINs[5]. The rationale: “Simple passcodes include repeating, ascending, or descending sequences that are more easily guessed.”[5]. Our policy adheres to that guidance by blocking them.
This restriction significantly increases the effective strength of a 6-digit PIN. There are 1 million possible 6-digit combinations (000000–999999). If simple patterns were allowed, a large portion of users might use one of perhaps 20 very common patterns, which an attacker would certainly attempt first. Blocking those forces diversity. Apple’s own configuration documentation encourages disabling simple values for stronger security in managed deployments.
From a best-practice standpoint, this setting complements the minimum length: it’s not enough to require a PIN, you also require it to have some complexity. It aligns with the principle of using hard-to-guess passwords. In Microsoft’s recommended configuration, they set “simple passwords: Block” even at the enhanced (Level 2) security tier[3]. It’s essentially a baseline requirement when enforcing passcode policies.
User Impact: If a user attempts to set a passcode like 123456, the device (with Intune policy applied) will not accept it. They’ll be required to choose a more complex PIN (e.g., 865309 or some non-pattern). Generally this is a minor inconvenience for a major gain in security. Over time, users typically adapt and choose something memorable yet not straight-line. Admins might provide guidance or passcode creation rules as part of user education.
Bottom line: Blocking simple passcodes is definitely best practice for strong security, eliminating the weakest PIN choices and significantly improving resistance to brute-force guessing[5].
9. System Security: Minimum Passcode Length
Setting: The minimum number of characters/digits in the device passcode.\ Policy Value: 6 characters (minimum).\ Purpose & Options: This sets how long the PIN/password must be at minimum. Intune allows configuring any length, but common values are 4 (very weak), 6 (moderate), or higher for actual passwords. Microsoft supports 4 and up for PIN, but 6 is the recommended minimum for modern iOS devices[3]. The policy here uses 6, meaning a 4-digit PIN would be noncompliant – the user must use six or more digits/characters. Options: an admin could set 8, 10, etc., depending on desired security, or leave Not configured (no minimum beyond iOS’s default, which is 4). By enforcing 6, we go beyond the default low bar.
Why it’s a Best Practice: Historically, iPhones allowed a 4-digit PIN. But security research and standards (like CIS) have since moved to 6 as a minimum to provide better security against guessing. A 4-digit PIN has only 10,000 combinations; a 6-digit PIN has 1,000,000 – that’s a two-order-of-magnitude increase in security. Per the CIS iOS benchmark: “Ensure minimum passcode length is at least 6 or greater”[4]. Their rationale: six characters provides reasonable assurance against passcode attacks[4]. Many organizations choose 6 because it strikes a balance between security and usability on a mobile device. Our policy’s value of 6 is aligned with both CIS and Microsoft’s guidance (the Level 2 baseline uses 6 as a default example)[3].
For even stronger security, some high-security environments might require 8 or more (especially if using alphanumeric passcodes). But requiring more than 6 digits on a phone can significantly hurt usability—users might start writing down passcodes if they’re too long/complex. Six is considered a sweet spot: it’s the default for modern iPhones now (when you set a PIN on a new iPhone, Apple asks for 6 by default, indicating Apple’s own move toward better security). Attackers faced with a 6-digit PIN and 10-attempt limit (with device wipe after 10, if enabled by MDM separately) have virtually no chance to brute force offline, and online (on-device) guessing is rate-limited.
Thus, setting 6 as minimum is best practice. It ensures no one can set a 4-digit code (which is too weak by today’s standards)[4]. Some orgs might even consider this the bare minimum and opt for more, but 6 is widely accepted as a baseline for strong mobile security.
Note: The policy says “Organizations should update this setting to match their password policy” in Microsoft’s template[3]. If an org’s policy says 8, they should use 8. But for most, 6 is likely the standard for mobile. The key is: we have a defined minimum > 0. Not setting a minimum (or setting it to 4) would not be best practice. Our profile doing 6 shows it’s aiming for solid security but also keeping user convenience somewhat in mind (since they didn’t jump to, say, 8).
User Impact: Users with a 4-digit PIN (if any exist nowadays) would be forced to change to 6 digits. Most users likely already use 6 due to OS nudges. If they use an alphanumeric password, it must be at least 6 characters. Generally acceptable for users – 6-digit PINs are now common and quick to enter (especially since many use Face ID/Touch ID primarily and only enter the PIN occasionally).
In summary, min length = 6 is a best practice baseline for strong security on iOS, aligning with known guidelines[4].
10. System Security: Required Passcode Type
Setting: Type/complexity of passcode required (numeric, alphanumeric, etc.).\ Policy Value: Numeric (PIN can be purely numeric digits)[3].\ Purpose & Options: Intune allows specifying what kind of characters the device password must contain. The typical options are Numeric (numbers only), Alphanumeric (must include both letters and numbers), or ** device default/Not configured**[1]. If set to Alphanumeric, the user must create a passcode that has at least one letter and one number (and they can include symbols if they want). If Numeric (as our policy), the user can just use digits (no letter required)[1]. Apple’s default on iPhones is actually a 6-digit numeric PIN unless changed to a custom alphanumeric code by the user. So our policy’s Numeric requirement means “we will accept the standard PIN format” – we’re not forcing letters. We are however also blocking simple patterns and requiring length 6, so it’s a complex numeric PIN effectively.
Why it’s configured this way: You might wonder, wouldn’t Alphanumeric be more secure? In pure theory, yes – an alphanumeric password of the same length is stronger than numeric. However, forcing alphanumeric on mobile can impact usability significantly. Typing a complex alphanumeric password every unlock (or even occasionally) is burdensome for users, especially if Face/Touch ID fails or after reboots. Many organizations compromise by allowing a strong numeric PIN, which still provides good security given the other controls (length and device auto-wipe on excessive attempts, etc.). Microsoft’s Level 2 (enhanced) security guidance actually shows Numeric as the recommended setting, with a note “orgs should match their policy”[3]. At Level 3 (high security), Microsoft did not explicitly change it to Alphanumeric in the example (they kept focus on expiration)[3], which implies even high-security profiles might stick to numeric but compensate by other means (like requiring very long numeric or frequent changes).
Is Numeric a best practice? It is a reasonable best practice for most cases: a 6-digit random numeric PIN, especially with the simple sequence restriction and limited attempts, is quite secure. Consider that iOS will erase or lockout after 10 failed tries (if that’s enabled via a separate device configuration profile, which often accompanies compliance). That means an attacker can’t even brute force all 1,000,000 possibilities – they get at most 10 guesses, which is a 0.001% chance if the PIN is random. In contrast, forcing an alphanumeric password might encourage users to use something shorter but with a letter, or they might write it down, etc. The policy likely chose Numeric 6 to maximize adoption and compliance while still being strong. This is consistent with many corporate mobile security policies and the CIS benchmarks (which do not require alphanumeric for mobile, just a strong PIN).
However, for maximum security, an organization might opt for Alphanumeric with a higher minimum length (e.g., 8 or more). That would make unlocking even harder to brute force (though again, iOS has built-in brute force mitigations). Our analysis is that the provided policy is striking a balance: it’s implementing strong security that users will realistically follow. Numeric is called best practice in many guides because trying to impose full computer-style passwords on phones can backfire (users might not comply or might resort to insecure behaviors to cope).
Conclusion on Type: The chosen value Numeric with other constraints is a best practice for most secure deployments. It definitely improves on a scenario where you let device default (which might allow 4-digit numeric or weak patterns if not otherwise blocked). It also reflects real-world use: most users are used to a PIN on phones. For a security-maximal stance, one could argue Alphanumeric is better, but given that our policy already covers length, complexity, and other factors, numeric is justified. So yes, this setting as configured is consistent with a best-practice approach (and one endorsed by Microsoft’s own templates)[3].
If an organization’s policy says “all device passwords must have letters and numbers”, Intune can enforce that by switching this to Alphanumeric. That would be even stricter. But one must weigh usability. If after deployment it’s found that numeric PINs are being compromised (which is unlikely if other controls are in place), then revisiting this could be an enhancement. For now, our strong security policy uses numeric and relies on sufficient length and non-sequence to ensure strength.
11. System Security: Minimum Special Characters
Setting: Minimum number of non-alphanumeric characters required in the passcode.\ Policy Value: 0 (since the policy only requires numeric, this isn’t applicable).\ Purpose & Options: This setting only matters if Alphanumeric passwords are required. It lets you enforce that a certain number of characters like ! @ # $ % (symbols) be included[1]. For example, you could require at least 1 special character to avoid passwords that are just letters and numbers. In our policy, because passcode type is Numeric, any value here would be moot – a numeric PIN won’t have symbols or letters at all. It’s likely left at 0 or not configured. If the JSON has it, it’s probably 0. We mention it for completeness.
Why it’s configured this way: In a maximum security scenario with alphanumeric passwords, one might set this to 1 or more for complexity. But since the policy chose Numeric, there’s no expectation of symbols. Setting it to 0 simply means no additional symbol requirement (the default). That’s appropriate here.
If the organization later decided to move to alphanumeric passcodes, increasing this to 1 would then make sense (to avoid users picking simple alphabetic words or just letters+numbers without any symbol). But as things stand, this setting isn’t contributing to security in the numeric-PIN context, and it doesn’t detract either—it’s effectively neutral.
In summary, 0 is fine given numeric PINs. If Alphanumeric were enforced, best practice would be at least 1 special char to ensure complexity (especially if minimum length is not very high). But since we are not requiring letters at all, this is not a factor.
(It’s worth noting iOS on its own does not require special chars in PINs by default; this is purely an extra hardening option available through MDM for password-type codes.)
12. System Security: Maximum Inactivity Time (Auto-Lock)
Setting: Maximum minutes of inactivity before the device screen locks.\ Policy Value: 5 minutes.\ Purpose & Options: This compliance rule ensures that the device is set to auto-lock after no more than X minutes of user inactivity[1]. The policy value of 5 minutes means the user’s Auto-Lock (in iOS Settings) must be 5 minutes or less. If a user tried to set “Never” or something longer than 5, Intune would mark the device noncompliant. Options range from “Immediately” (which is essentially 0 minutes) up through various durations (1, 2, 3, 4, 5, 15 minutes, etc.)[1]. Not configured would not enforce any particular lock timeout.
Why it’s a Best Practice: Limiting the auto-lock timer reduces the window of opportunity for an unauthorized person to snatch an unlocked device or for someone to access it if the user leaves it unattended. 5 minutes of inactivity is a common security recommendation for maximum idle time on mobile devices. Many security standards suggest 5 minutes or less; some high-security environments even use 2 or 3 minutes. Microsoft’s enhanced security example uses 5 minutes for iOS[3]. This strikes a balance between security and usability: the phone will lock fairly quickly when not in use, but not so instantly that it frustrates the user while actively reading something. Without this, a user might set their phone to never lock or to a very long timeout (some users do this for convenience), which is risky because it means the phone could be picked up and used without any authentication if the user leaves it on a desk, etc.
By enforcing 5 minutes, the policy ensures devices lock themselves in a timely manner. That way, even if a user forgets to lock their screen, it won’t sit accessible for more than 5 minutes. Combined with requiring a passcode immediately on unlock (next setting), this means after those 5 minutes, the device will demand the PIN again. This is definitely best practice: both NIST and CIS guidelines emphasize automatic locking. For instance, older U.S. DoD STIGs for mobile mandated a 15-minute or shorter lock; many organizations choose 5 to be safer. It aligns with the concept of least privilege and time-based access — you only stay unlocked as long as needed, then secure the device.
User Impact: Users might notice their screen going black quicker. But 5 minutes is usually not too intrusive; many users have that as default. (In fact, iOS itself often limits how long you can set auto-lock: on some devices, if certain features like managed email or Exchange policies are present, “Never” is not an option. Often the max is 5 minutes unless on power or such. This is partly an OS limitation for security.) So, in practice, this likely doesn’t bother most. If someone had it set to 10 or “Never” before, Intune compliance will force it down to 5.
From security perspective, 5 minutes or even less is recommended. One could tighten to 1 or 2 minutes if ultra-secure, but that might annoy users who have to constantly wake their phone. So 5 is a solid compromise that’s considered a best practice in many mobile security benchmarks (some regulatory templates use 5 as a standard).
13. System Security: Grace Period to Require Passcode
Setting: Maximum time after screen lock before the password is required again.\ Policy Value: 5 minutes (set equal to the auto-lock time).\ Purpose & Options: This setting (often called “Require Password after X minutes”) defines if the device was just locked, how soon it requires the PIN to unlock again[1]. iOS has a feature where you can set “require passcode immediately” or after a short delay (like if you lock the phone and then wake it again within, say, 1 minute, you might not need to re-enter the PIN). Security policies often mandate that the passcode be required immediately or very shortly after lock. In our policy, they set 5 minutes. That likely means if the device locks (say due to inactivity or user pressing power button), and the user comes back within 4 minutes, they might not need to re-enter PIN (depending on iOS setting). But beyond 5 minutes, it will always ask. Options range from Immediately up to several minutes or hours[1]. The default not configured would allow whatever the user sets (which could be 15 minutes grace, for example).
Why it’s a Best Practice: Ideally, you want the device to require the passcode as soon as it’s locked or very soon after, to prevent someone from quickly waking it and bypassing PIN if the lock was recent. By setting 5 minutes, the policy still gives a small usability convenience window (the user who locks and unlocks within 5 min might not need to re-enter PIN) but otherwise will always prompt. Many security pros recommend “Immediately” for maximum security, which means always enter PIN on unlock (except when using biometric, which counts as entering it). Our policy uses 5 minutes, likely to align with the auto-lock setting. In effect, this combination means: if the device auto-locks after 5 minutes of idle, and this setting is 5, then effectively whenever the auto-lock kicks in, the PIN will be needed (because by the time 5 min of inactivity passed and it locked, the grace period equals that, so PIN required). If the user manually locks the device and hands it to someone within less than 5 minutes, theoretically they could open it without PIN—unless the device was set by the user to require immediately. Often, MDM policies when set equal like this cause the device to default to immediate requirement (need to double-check iOS behavior, but generally the shorter of the two times rules the actual experience).
In high-security configurations, it’s common to set this to Immediately[1]. If I recall, the CIS benchmark for iOS suggests require passcode immediately or very short delay. But 5 minutes is still within a reasonable security range. The key is, they did not leave it open-ended. They explicitly capped it. This ensures a uniform security posture: you won’t have some devices where user set “require passcode after 15 minutes” (which is the max Apple allows for grace) quietly lurking.
Because our policy aligns these 5-minute values, the practical effect is close to immediate requirement after idle timeout. This is a best practice given usability considerations. It means if a device was locked due to inactivity, it always needs a PIN to get back in (no free unlock). Only in the edge case of manual lock/unlock within 5 min would it not prompt. One might tighten this to 1 minute or Immediately for more security, at cost of convenience.
Conclusion: Having any requirement (not “Not configured”) is the main best practice. 5 minutes is a reasonable secure choice, matching common guidance (for instance, U.K. NCSC guidance suggests short lock times with immediate PIN on resume). For an ultra-secure mode, immediate would be even better – but what’s chosen here is still within best practice range. It certainly is far superior to letting a device sit unlocked or accessible without PIN for long periods. So it checks the box of strong security.
14. System Security: Password Expiration
Setting: Days until the device passcode must be changed.\ Policy Value: 365 days (1 year).\ Purpose & Options: This compliance setting forces the user to change their device PIN/password after a certain number of days[1]. In our policy, it’s set to 365, meaning roughly once a year the user will be required to pick a new passcode. Options can range from as low as 30 days to as high as e.g. 730 days, or Not configured (no forced change). If configured, when the passcode age reaches that threshold, Intune will mark the device noncompliant until the user updates their passcode to a new one they haven’t used recently. iOS doesn’t natively expire device PINs on its own, but Intune’s compliance checking can detect the age based on last set time (which on managed devices it can query).
Why it’s a Best Practice: Password (or PIN) rotation requirements have long been part of security policies to mitigate the risk of compromised credentials. For mobile device PINs, it’s somewhat less common to enforce changes compared to network passwords, but in high-security contexts it is done. Microsoft’s Level 3 high-security recommendation for iOS adds a 365-day expiration whereas the lower level didn’t have any expiration[3]. This suggests that in Microsoft’s view, annual PIN change is a reasonable step for the highest security tier. The thinking is: if somehow a PIN was compromised or observed by someone, forcing a change periodically limits how long that knowledge is useful. It also ensures that users are not using the same device PIN indefinitely for many years (which could become stale or known to ex-employees, etc.).
Modern security guidance (like NIST SP 800-63 and others) has moved away from frequent password changes for user accounts, unless there’s evidence of compromise. However, device PINs are a slightly different story – they are shorter and could be considered less robust than an account password. Requiring a yearly change is a light-touch expiration policy (some orgs might do 90 days for devices, but that’s fairly aggressive). One year balances security and user burden. It’s essentially saying “refresh your device key annually”. That is considered acceptable in strong security environments, and not too onerous for users (once a year).
Why not more often? Changing too frequently (like every 30 or 90 days) might degrade security because users could choose weaker or very similar PINs when forced often. Once a year is enough that it could thwart an attacker who learned an old PIN, while not making users circumvent policies. Our policy’s 365-day expiry thus fits a best practice approach that’s also reflected in the high-security baseline by Microsoft[3].
Trade-offs: Some argue that if a PIN is strong and not compromised, forcing a change isn’t necessary and can even be counterproductive by encouraging patterns (like PIN ending in year, etc.). But given this is for maximum security, the conservative choice is to require changes periodically. The user impact is minimal (entering a new PIN once a year and remembering it). Intune will alert the user when their PIN is “expired” by compliance rules, guiding them to update it.
Conclusion: While not every company enforces device PIN expiration, as a strong security best practice it does add an extra layer. Our profile’s inclusion of 365-day expiration is consistent with an environment that doesn’t want any credential (even a device unlock code) to remain static forever[3]. It’s a best practice in the context of high security, and we agree with its use here.
15. System Security: Prevent Reuse of Previous Passcodes
Setting: Number of recent passcodes disallowed when setting a new one.\ Policy Value: 5 (cannot reuse any of the last 5 passcodes).\ Purpose & Options: This goes hand-in-hand with the expiration policy. It specifies how many of the user’s most recent passcodes are remembered and blocked from being reused[1]. With a value of 5, when the user is forced to change their PIN, they cannot cycle back to any of their last 5 previously used PINs. Options are any number, typically 1–24, or Not configured (no memory of old PINs, meaning user could alternate between two PINs). Our policy chooses 5, which is a common default for preventing trivial reuse.
Why it’s a Best Practice: If you require password changes, you must also prevent immediate reuse of the same password, otherwise users might just swap between two favorites (like “111111” to “222222” and back to “111111”). By remembering 5, the policy ensures the user can’t just flip between a small set of PINs[1]. They will have to come up with new ones for at least 5 cycles. This promotes better security because it increases the chance that an old compromised PIN isn’t reused. It also encourages users to not just recycle – hopefully each time they choose something unique (at least in a series of 6 or more unique PINs).
The number “5” is somewhat arbitrary but is a standard in many policies (Active Directory password policy often uses 5 or 24). Microsoft’s high-security iOS example uses 365 days expiry but did not explicitly list the history count – likely they do set something, and 5 is often a baseline. CIS benchmarks for mobile device management also suggest preventing at least last 5 passcodes on reuse to avoid alternating patterns.
In short, since our policy does expiration, having a history requirement is necessary to fulfill the intent of expiration. 5 is a reasonable balance (some might choose 3 or 5; some stricter orgs might say 10). Using 5 is consistent with best practices to ensure credential freshness.
User Impact: Minimal – it only matters when changing the PIN. The user just has to pick something they haven’t used recently. Given a year has passed between changes, many might not even remember their 5 PINs ago. If they try something too similar or the same as last time, Intune/iOS will reject it and they’ll choose another. It’s a minor inconvenience but an important piece of enforcing genuine password updates.
Therefore, this setting, as configured, is indeed part of the best practice approach to maintain passcode integrity over time. Without it, the expiration policy would be weaker (users could rotate among two favorites endlessly).
16. Device Security: Restricted Apps
Setting: Block compliance if certain apps are installed (by bundle ID).\ Policy Value: Not configured (no specific restricted apps listed in baseline).\ Purpose & Options: This feature lets admins name particular iOS apps (by their unique bundle identifier) that are not allowed on devices. If a device has any of those apps installed, it’s marked noncompliant[1]. Typically, organizations use this to block known risky apps (e.g., apps that violate policy, known malware apps if any, or maybe unsanctioned third-party app stores, etc.). The JSON policy can include a list of bundle IDs under “restrictedApps”. In a general best-practice baseline, it’s often left empty because the choice of apps is very organization-specific.
Why it’s (not) configured here: Our policy is designed for broad strong security, and doesn’t enumerate any banned apps by default. This makes sense – there isn’t a one-size-fits-all list of iOS apps to block for compliance. However, an organization may decide to add apps to this list over time. For instance, if a certain VPN app or remote-control app is considered insecure, they might add its bundle ID. Or if an app is known to be a root/jailbreak tool, they could list it (though if the device was jailbroken the other control already catches it).
Is this a best practice? The best practice approach is to use this setting judiciously to mitigate specific risks. It’s not a required element of every compliance policy. Many high-security orgs do add a few disallowed apps (for example, maybe banning “Tor Browser” or “Cydia” store which only appears on jailbroken devices) as an extra safety net. In our evaluation, since none are listed, we assume default. That’s fine – it’s better to have no blanket restrictions than to accidentally restrict benign apps. We consider it neutral in terms of the policy’s strength.
However, we mention it because as an additional enhancement (Sub-question 10), an organization could identify and restrict certain apps for even stronger security. For example, if you deem that users should not have any unmanaged cloud storage apps or unapproved messaging apps that could leak data, you could list them here. Each added app tightens security but at the cost of user freedom. Best practice is to ban only those apps that pose a clear security threat or violate compliance (e.g., an antivirus app that conflicts with corporate one, or a known malicious app). Given the evolving threat landscape, administrators should review if any emerging malicious apps on iOS should be flagged.
Conclusion on apps: No specific app restrictions are in the base policy, which is fine as a starting point. It’s something to keep in mind as a customizable part of compliance. The policy as provided is still best practice without any entries here, since all other critical areas are covered.
If not used, this setting doesn’t affect compliance. If used, it can enhance security by targeting specific risks. In a max security regime, you might see it used to enforce that only managed apps are present or that certain blacklisted apps never exist. That would be an additional layer on top of our current policy.
Comparison to Industry Best Practices and Additional Considerations
All the settings above align well with known industry standards for mobile security. Many of them map directly to controls in the CIS (Center for Internet Security) Apple iOS Benchmark or government mobility guidelines, as noted. For example, CIS iOS guidance calls for a mandatory passcode with minimum length 6 and no simple sequences[4][5], exactly what we see in this policy. The Australian Cyber Security Centre and others similarly advise requiring device PIN and up-to-date OS for BYOD scenarios – again reflected here.
Critically, these compliance rules implement the device-side of a Zero Trust model: only devices that are fully trusted (secured, managed, up-to-date) can access corporate data. They work in tandem with Conditional Access policies which would, for instance, block noncompliant devices from email or SharePoint. The combination ensures that even if a user’s credentials are stolen, an attacker still couldn’t use an old, insecure phone to get in, because the device would fail compliance checks.
Potential Drawbacks or Limitations: There are few downsides to these strong settings, but an organization should be aware of user impact and operational factors:
- User Experience: Some users might initially face more prompts (e.g., to update iOS or change their PIN). Proper communication and IT support can mitigate frustration. Over time, users generally accept these as standard policy, especially as mobile security awareness grows.
- Device Exclusions: Very strict OS version rules might exclude older devices. For instance, an employee with an iPhone that cannot upgrade to iOS 16 will be locked out. This is intentional for security, but the organization should have a plan (perhaps providing updated devices or carving out a temporary exception group if absolutely needed for certain users – though exceptions weaken security).
- Biometric vs PIN: Our policy doesn’t explicitly mention biometrics; Intune doesn’t control whether Face ID/Touch ID is used – it just cares that a PIN is set. Some security frameworks require biometrics be enabled or disabled. Here we implicitly allow them (since iOS uses them as convenience on top of PIN). This is usually fine and even preferable (biometrics add another factor, though not explicitly checked by compliance). If an organization wanted to disallow Touch/Face ID (some high-security orgs do, fearing spoofing/legal issues), that would be a device configuration profile setting, not a compliance setting. As is, allowing biometrics is generally acceptable and helps usability without hurting security.
- Reliance on Additional Tools: Two of our settings (device threat level, MDE risk) rely on having additional security apps (MTD/Defender) deployed. If those aren’t actually present, those settings do nothing (or we’d not configure them). If they are present, great – we get that extra protection. Organizations need the licensing (Defender for Endpoint or third-party) and deployment in place. For Business Premium (which the repository name hints at), Microsoft Defender for Endpoint is included, so it makes sense to use it. Without it, one could drop those settings and still have a solid compliance core.
- Maintenance Effort: As mentioned, minimum OS version and build must be kept updated. This policy is not “set and forget” – admins should bump the minimum OS every so often. For example, when iOS 18 comes and is tested, require at least 17.0. And if major vulnerabilities hit, possibly use the build number rule to enforce rapid patch adoption. This requires tracking Apple’s release cycle and possibly editing the JSON or using Intune UI periodically. That is the price of staying secure: complacency can make a “best practice” policy become outdated. A device compliance policy from 2 years ago that still only requires iOS 14 would be behind the times now. So, regular reviews are needed (Recommendation: review quarterly or with each iOS release).
- Conditional Access dependency: The compliance policy by itself just marks devices. To actually block access, one must have Azure AD Conditional Access policies that require device to be compliant for certain apps/data. It sounds like context, but worth noting: to realize the “best practice” outcome (no insecure device gets in), you must pair this with CA. That is presumably in place if they’re talking about Intune compliance (since that’s how it enforces). If not properly configured, a noncompliant device might still access data – so ensure CA policies are set (e.g., “Require compliant device” for all cloud apps or at least email/O365 apps).
- Monitoring and Response: IT should watch compliance reports. For example, if a device shows as noncompliant due to, say, “Jailbroken = true,” that’s a serious red flag – follow up with the user, as it could indicate a compromise or at least a policy violation. Similarly, devices not updating OS should be followed up on – perhaps the user clicked “later” on updates; a gentle nudge or help might be needed. The compliance policy can even be set to send a notification after X days of noncompliance (e.g., email user if after 1 week they still aren’t updated). Those actions for noncompliance are configured in Intune (outside the JSON’s main rule set) and are part of maintaining compliance. Best practice is to at least immediately mark noncompliant[3] (which we do) and possibly notify and eventually retire the device if prolonged.
Other Additional Security Settings (if we wanted to enhance further):
- Device Encryption: On iOS, as noted, encryption is automatic with a passcode. So we don’t need a separate compliance check for “encryption enabled” (unlike on Android, where that’s a setting). This is covered by requiring a PIN.
- Device must be corporate-owned or supervised: Intune compliance policies don’t directly enforce device ownership type. But some orgs might only allow “Corporate” devices to enroll. Not applicable as a JSON setting here, but worth noting as a broader practice: supervised (DEP) iOS devices have more control. If this policy were for corporate-managed iPhones, they likely are supervised, which allows even stricter config (but that’s beyond compliance realm). For BYOD, this policy is about as good as you can do without going to app protection only.
- Screen capture or backup restrictions: Those are more Mobile Device Configuration policies (not compliance). For example, one might disallow iCloud backups or require Managed Open-In to control data flow. Those are implemented via Configuration Profiles, not via compliance. So they’re out of scope for this JSON, but they would complement security. Our compliance policy is focusing on device health and basics.
- Jailbreak enhanced detection: Ensure Intune’s device settings (like location services) are correctly set if needed, as mentioned, to improve jailbreak detection. Possibly communicate to users that for security, they shouldn’t disable certain settings.
Default iOS vs This Policy: By default, an iPhone imposes very few of these restrictions on its own. Out of the box: a passcode is optional (though encouraged), simple PINs are allowed (and even default to 6-digit but could be 111111), auto-lock could be set to Never, and obviously no concept of compliance. So compared to that, this Intune policy greatly elevates the security of any enrolled device. It essentially brings an unmanaged iPhone up to enterprise-grade security standards:
- If a user never set a PIN, now they must.
- If they chose a weak PIN, now they must strengthen it.
- If they ignore OS updates, now they have to update.
- If they somehow tampered (jailbroke) the device, now it gets quarantined.
- All these improvements happen without significantly hindering normal use of the phone for legitimate tasks – it mostly works in the background or at setup time.
Recent Updates or Changes in Best Practices: The mobile threat landscape evolves, but as of the current date, these settings remain the gold standard fundamentals. One new element in iOS security is the Rapid Security Response updates, which we’ve covered by possibly using the build version check. Also, the emergence of advanced phishing on mobile has made tools like Defender for Endpoint on mobile more important – hence integrating compliance with device risk (which our policy does) is a newer best practice (a few years ago, not many enforced MTD risk in compliance, now it’s recommended for higher security). The policy reflects up-to-2025 thinking (for instance, including Defender integration[3], which is relatively new).
Apple iOS 17 and 18 haven’t introduced new compliance settings, but one might keep an eye on things like Lockdown Mode (extreme security mode in iOS) – not an Intune compliance check currently, but in the future perhaps there could be compliance checks for that for highest-risk users. For now, our policy covers the known critical areas.
Integration with Other Security Measures: Lastly, it’s worth noting how this compliance policy fits into the overall security puzzle:
- It should be used alongside App Protection Policies (MAM) for scenarios where devices aren’t enrolled or to add additional protection inside managed apps (especially for BYOD, where you might want to protect data even if a compliance gap occurs).
- It complements Conditional Access as discussed.
- It relies on Intune device enrollment – which itself requires user buy-in (users must enroll their device in Intune Company Portal). Communicating the why (“we have these policies to keep company data safe and keep your device safe too”) can help with user acceptance.
- These compliance settings also generate a posture that can be fed into a Zero Trust dashboard or risk-based access solutions.
Maintaining and Updating Over Time:\ To ensure these settings remain effective, an organization should:
- Update OS requirements regularly: As mentioned, keep track of iOS releases and set a schedule to bump the minimum version after verifying app compatibility. A good practice is to lag one major version behind current (N-1)[3], and possibly enforce minor updates within that via build numbers after major security fixes.
- Monitor compliance reports: Use Intune’s reporting to identify devices frequently falling out of compliance. If a particular setting is commonly an issue (say many devices show as noncompliant due to pending OS update), consider if users need more time or if you need to adjust communication. But don’t drop the setting; rather, help users meet it.
- Adjust to new threats: If new types of threats emerge, consider employing additional controls. For example, if a certain malicious app trend appears, use the Restricted Apps setting to block those by ID. Or if SIM swapping/ESIM vulnerabilities become a concern, maybe integrate carrier checks if available.
- Train users: Make sure users know how to maintain compliance: e.g., how to update iOS, how to reset their PIN if they forget the new one after change, etc. Empower them to do these proactively.
- Review password policy alignment: Ensure the mobile PIN requirements align with your overall corporate password policy framework. If the company moves to passwordless or other auth, device PIN is separate but analogous – keep it strong.
- Consider feedback: If users have issues (for instance, some older device struggling after OS update), have a process for exceptions or support. Security is the priority, but occasionally a justified exception might be temporarily granted (with maybe extra monitoring). Intune allows scoping policies to groups, so you could have a separate compliance policy for a small group of legacy devices with slightly lower requirements, if absolutely needed, rather than weakening it for all.
In conclusion, each setting in the iOS Intune compliance JSON is indeed aligned with best practices for strong security on mobile devices. Together, they create a layered defense: device integrity, OS integrity, and user authentication security are all enforced. This significantly lowers the risk of data breaches via lost or compromised iPhones/iPads. By understanding and following these settings, the organization ensures that only secure, healthy devices are trusted – a cornerstone of modern enterprise security. [2][3]
References
[1] iOS/iPadOS device compliance settings in Microsoft Intune
[2] Jailbroken/Rooted Devices | Microsoft Zero Trust Workshop
[3] iOS/iPadOS device compliance security configurations – Microsoft Intune
[4] 2.4.3 Ensure ‘Minimum passcode length’ is set to a value of ‘6… – Tenable
[5] 2.4.1 Ensure ‘Allow simple value’ is set to ‘Disabled’ | Tenable®