A while ago I wrote an article on:
Using the Microsoft Graph with multiple tenants
which showed you how to embed a ‘static’ Azure AD application in all the tenants you wish. I then showed how to give those ‘static’ Azure AD applications, in all those tenants, the appropriate permissions to access various tenant configuration settings in this article:
Reporting on multiple tenants with the Microsoft Graph
This meant that you could now run Microsoft Graph requests across all those tenants, securely and without needing a login to each tenant.
Recently, I also wrote about the:
Attack Surface Reduction rules for Windows 10
and how to set these in an automated way via PowerShell. I’m now going to bring these two concepts together and show you how to deploy an Attack Surface Reduction (ASR) policy into Microsoft Endpoint Manager across multiple tenants WITHOUT the need to login to each to do it!
Before you can do all this you’ll need to embed an Azure AD App into all the desired tenants. The information to do this I have previously covered here:
Using the Microsoft Graph with multiple tenants
Once you have an Azure AD application inside your tenants you can continue to use this for continued configuration processes like this. Thus, you only need to add an Azure AD application to the desired tenants once. You can then simply re-use it as needed.
With the Azure AD application in place, the next step is to provide the appropriate permissions for that Azure AD application to do to what it needs. In the case of working with ASR the Azure AD application will need the following Graph API permissions:
Read and write Microsoft Intune Device Configuration and Policies
and
Read Microsoft Intune Device Configuration and Policies
You can add these manually which I have covered off previously here:
Using interactive PowerShell to access the Microsoft Graph
However, I have also made available an automated tool to do this.
In this case, my pre-existing Azure AD application is called ciaops-S6 as shown above.
In this first tenant, you see that there are current no API permissions associated with my Azure AD application.
In the second tenant, there are already existing permissions as you can see above, but they currently don’t include the ones I want detailed above, so they will also need to be added here.
What I want to achieve for both tenants, is to add these two Graph API permissions:
- Read and write Microsoft Intune Device Configuration and Policies
- Read Microsoft Intune Device Configuration and Policies
to my existing Azure AD application, while also leaving any existing permission in place.
You’ll need to visit my Office 365 GitHub repository and down the program:
https://github.com/directorcia/Office365/blob/master/graph-adapp-per.exe
You’ll need to put the graph-adapp.per.exe in the same directory as the XML configuration files for the tenant, as shown above. Then you’ll need to run:
graph-adapp-per.exe 89a0934cc6064c1a95caffdaec4e5429
The 89a0934cc6064c1a95caffdaec4e5429 parameter tells my program which permissions you wish to add to the existing Azure AD application.
The program will check whether the Azure AD PowerShell has been loaded. If not, it will terminate.
In this case enter A when prompted to ADD permission to those that exist.
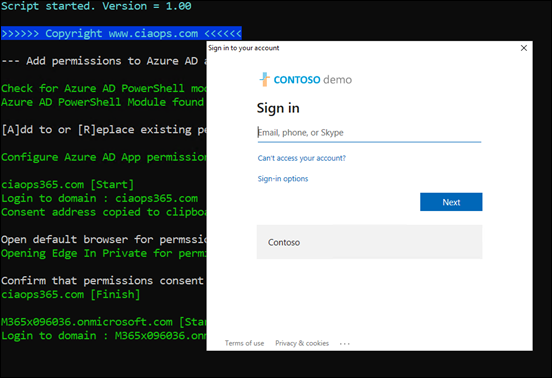
You’ll then be prompted to login as an administrator to the first tenant. This is required once for each tenant because you are ADDING permissions to an existing Azure AD application. Once these permissions have been added, you won’t need to repeat for any access to the same properties. For example, say you later on want to configure the Microsoft EndPoint Manager Firewall policy, you won’t need to complete this permissions step because what you are doing here adds the same permissions you need to do the Firewall policy.
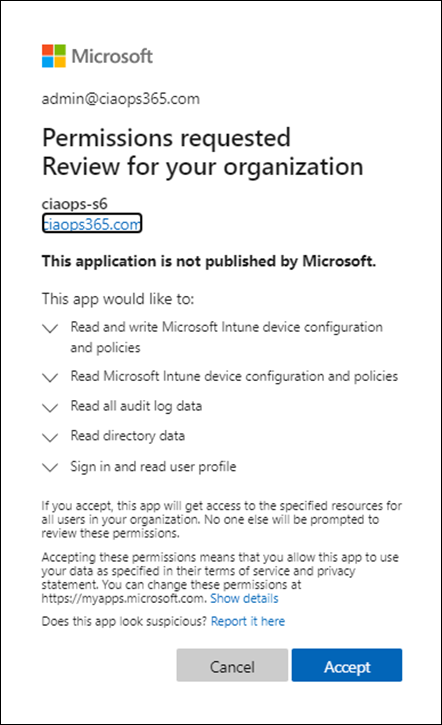
The required permissions are added and you will be then prompted to ‘consent’ to these. Unfortunately, I can only find a way to do this via a browser. Selecting Y here will open a browser in-private mode and allow you to complete consent. The required ‘consent’ URL is also copied to the clipboard, so if you already have the tenant open is a browser somewhere, just paste the clipboard there to complete ‘consent’ like so:
You should now see the permissions request as shown above that you need to Accept. What you see will vary slightly. You will always see:
- Read and write Microsoft Intune Device Configuration and Policies
- Read Microsoft Intune Device Configuration and Policies
as these are new permissions. However, if you have existing rights, as this first tenant did, you will also see those.
Simply select Accept to continue.
If you now return to the program, you’ll be prompted to confirm that ‘consent’ has been completed. Enter Y to continue.
That will complete the first tenant and then commence the same process on all subsequent tenants as shown above.
The only difference you’ll probably see is the list of permissions you need to accept. This is because, in this case, the option to ADD permissions was selected. The above shows you the prompt from the second tenant in this example which started off with no permissions for the existing Azure AD application.
Once the program is complete, it will pause as ask you to hit ENTER as shown.
If you now look at the API permissions for the Azure AD application that was added you should see that they now have:
- Read and write Microsoft Intune Device Configuration and Policies
- Read Microsoft Intune Device Configuration and Policies
As shown above.
And if you check an Azure AD application that already had permissions, like the second example here shown above, you will see that the appropriate permissions have been added to any that previously existed.
Remember, you only need to go through this process when you want to ADD permissions to your Azure AD application. As mentioned, now that these permissions have been added to the Azure AD application you can work with just about any EndPoint Manager configuration for the tenant.
Now that the permissions are in place, the next step in the process is to run the program to add the ASR policy to EndPoint Manager for the tenant. To do that you’ll need to download the following program from my Office 365 GitHub repository:
https://github.com/directorcia/Office365/blob/master/graph-asr-set.exe
and copy into the same directory you have been using as shown above. That is the one with all the tenant configuration files.
Run the program:
graph-asr-set.ps1
The program will run and work through the required tenants without any prompts.
You will see the policy settings for each tenant, as shown above, as a confirmation.
If you return to Microsoft EndPoint manager for the tenants and refresh that ASR policy listing as shown above, you should a new ASR policy as shown.
If you scroll down to the Configuration settings:
You will see that the individual settings have been configured.
The only you’ll need to do manually, is to actually assign this policy to your environment as shown above. I have chosen not to do this automatically for all users and or devices in the tenant, because there may need to some tweaking of the individual settings as applying to a test group first to ensure there are no issues. Maybe in a future iteration I’ll look at providing that option.
If you run the graph-asr-set.ps1 program again, it will create an additional policy of the same name with the same settings. Another to-do item will be a program to adjust an existing script.
If for some reason you wish to remove ALL the permissions from your Azure AD application in ALL your tenants, use the command:
graph-adapp-per.ps1 693cb755244848a2a556025710cec086
Youi can also, of course, do this manually via the portal as well as selectively by the same method if you wish. However, I see no major not to leave the permissions in place, having gone to all that trouble, so you can make additional configuration changes later on (without the need to login to the tenants as I will again point out!)
So there you have it! An automated way to set ASR policies in Microsoft EndPoint Manager, across multiple tenants, without individually logging in, using the Microsoft Graph.


One thought on “Automating the deployment of an Attack Surface Reduction policy across multiple tenants”