This article is a part of a series. The previous article can be found here:
All the Guards – Part 3 (Device Guard)
In this article I’m going to focus on the next component:
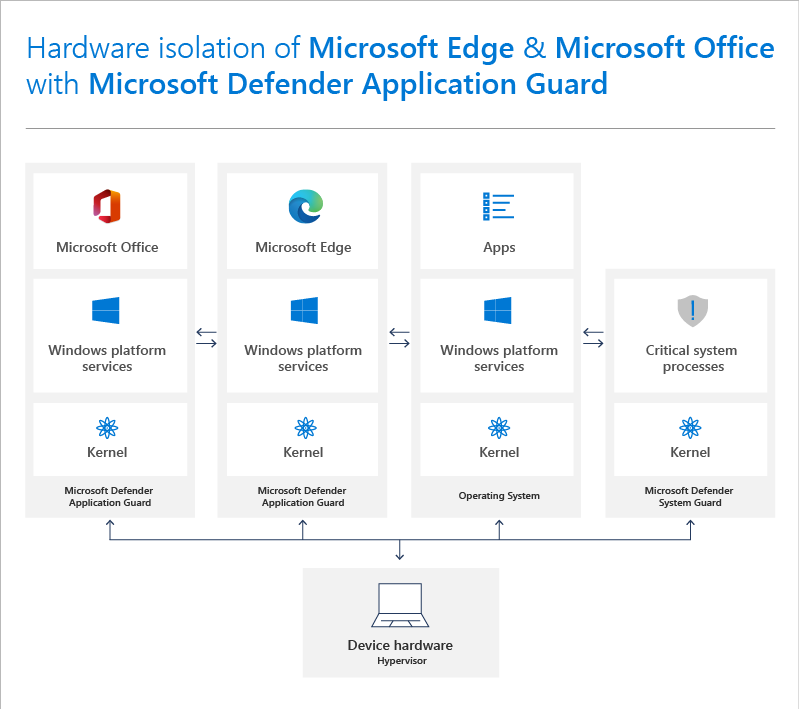
System Guard
Windows Defender System Guard reorganizes the existing Windows 10 system integrity features under one roof and sets up the next set of investments in Windows security. It’s designed to make these security guarantees:
– Protect and maintain the integrity of the system as it starts up
– Protect and maintain the integrity of the system after it’s running
– Validate that system integrity has truly been maintained through local and remote attestation

As Windows 10 boots, a series of integrity measurements are taken by Windows Defender System Guard using the device’s Trusted Platform Module 2.0 (TPM). This process and data are hardware isolated away from Windows to help ensure that the measurement data is not subject to the type of tampering that could happen if the platform was compromised. From here, the measurements can be used to determine the integrity of the device’s firmware, hardware configuration state, and Windows boot-related components, just to name a few. After the system boots, Windows Defender System Guard signs and seals these measurements using the TPM, and, upon request a management system, like Intune or System Center Configuration Manager, can acquire them for remote analysis. From here the management system can take a series of actions, such as denying the device access to resources, if Windows Defender System Guard indicates that the device lacks integrity.
At the end of the Windows boot process, System Guard will start the system’s antimalware solution which scans all third party drivers, at which point the system boot process is completed. In the end, Windows Defender System Guard helps ensure that the system securely boots with integrity and that it hasn’t been compromised before the remainder of your system defenses start.
At the end of the Windows boot process, System Guard will start the system’s antimalware solution which scans all third party drivers, at which point the system boot process is completed. In the end, Windows Defender System Guard helps ensure that the system securely boots with integrity and that it hasn’t been compromised before the remainder of your system defenses start.

Windows Defender System Guard: How a hardware-based root of trust helps protect Windows 10
To enable System Guard Secure launch, the platform must meet all the baseline requirements for Device Guard, Credential Guard, and Virtualization Based Security.
System requirements for System Guard
There are various ways that you can enable System Guard detailed here:
System Guard Secure Launch and SMM protection
You can also use Microsoft Endpoint Manager | Windows 10 Security Baseline | Device Guard:
![]()
To verify that System Guard is running, once again run msinfo32 at the command prompt:
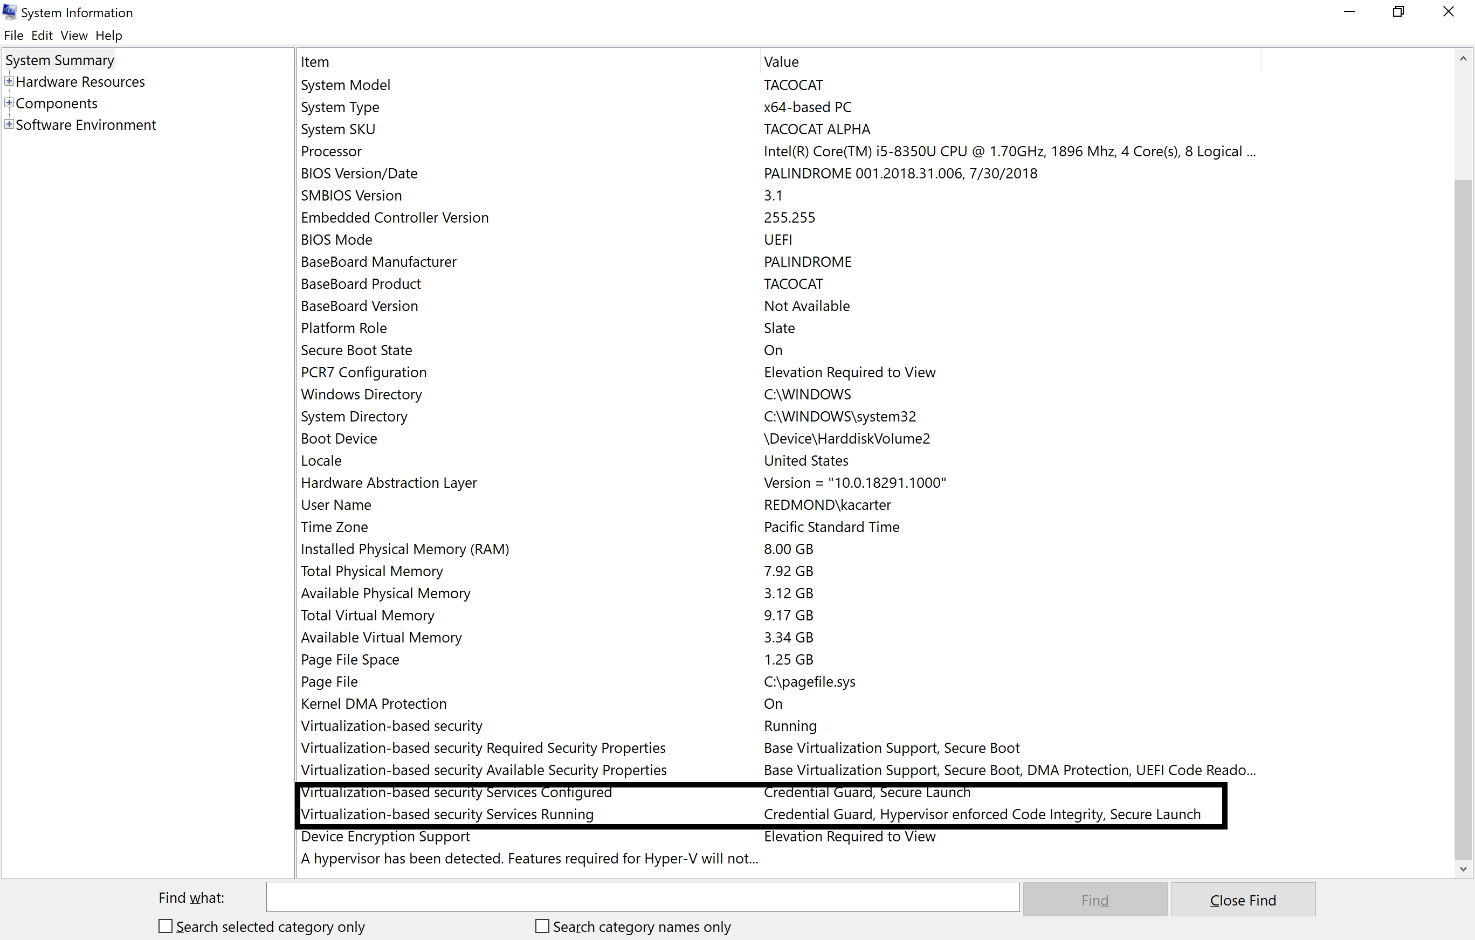
You should see the text Secure Launch in the text for the options Virtualization-based Security Services Running and Virtualization-based Security Services Configured as shown above.
If you also look at the items running in Task Manager you should see one called Secure System as shown:

While I was investigating Secure Launch on my Surface PC’s I found that it wasn’t launching for some reason. Here is the reason why I received from the surface team about why this is on these devices:
We actually don’t support Secure Launch but we have the same/similar protection built into the Surface firmware regardless. It’s one of the main arguments of why most Surface devices don’t fall under the “Secure Core PC” definition
Secure Core PCs – https://www.microsoft.com/en-us/windowsforbusiness/windows10-secured-core-computers
Secure Launch is required because of the variety of OEM firmware versions that became to cumbersome to manage statically for Windows to verify that it hadn’t been tampered with. Secure Launch uses Dynamic Root of Trust Management which is a creative approach for the OS to “learn” what a clean firmware looks like and then make sure it doesn’t get maliciously changed.
The Surface firmware (since its first party) can still be measured statically and Windows can validate whether its been tampered with or not.
SMM (System Management Mode) is a set of highly privileged instructions that the CPU can use to the OS, firmware and key resources. OEM firmware uses SMM for a number of different process (updates, firmware changes, offline servicing using AMT, etc). SMM Protection does not add much value for Surface since we limit our SMM instruction set to just 2 or 3 key handlers which wouldn’t allow a hacker to exploit much.
1) DRTM
Dynamic Root of Trust Measurements (DRTM) is a security feature that must be supported by the SoC and TPM to ensure the boot chain is trusted at each stage. DRTM provides for checking of each stage of UEFI boot by fully checking the code with measurement in the TPM. The SoC supports DRTM by providing special instructions that prevent other cores from running except the core the boot is running on, to address UEFI DXE extensions that may have been installed.
ProX supports DRTM, but Pro7 and Laptop3 use a different mechanism to ensure the integrity of the trust chain. It isn’t just a measurement that is checked before the first UEFI phase; the first UEFI Phase is verified using a Microsoft signature that is fused into the Soc at the factory. Each phase of UEFI verifies the signature of the next phase through the OS boot loader. Only code authorized by Microsoft is able to execute in the boot chain.
2) SMM Protection
System Management Mode (SMM) Protection is used to prevent malicious low level code from accessing resources out of their bounds. Pro7 and Laptop3 support all of the SMM Protections that ICL supports. Kernel mode drivers that access SMM use SMM interrupts (SMI). Reducing the available attack surface is import; defense in depth. Surface reduces the attack surface by reducing the number of SMI handlers on Surface devices, to two handlers; the realtime clock and UEFI variables.
The main thing I suggest you check for in regards to Secure Guard being enabled is the Secure System process in the Task Manager.
The concept of Secure System and Secure Launch seem to used inter changeably in places resulting in confusion along with the fact that Surface PC’s take a different approach to System Guard/Secure launch. Unfortunately, I have not been able to track down a consistent explanation of all of this so I hope you at least have a better idea of what System Guard is and does, plus maybe how to enable it if you wanted.
In Part 5 of this series I’ll take a look at:
Credential Guard