Blocked files types in OWA

Outlook Web Access maintain a list of allowed and blocked file types. These are contained in a policy for each user. To determine what this policy is with PowerShell, the first thing you’ll need to do is connect to Exchange Online. I have made that easy for you by creating a script to connect using the new Exchange Online V2 PowerShell module. you will find that script here:

https://github.com/directorcia/Office365/blob/master/o365-connect-exov2.ps1

Once you have connected, run the following commands:

$casmailbox=Get-CASMailbox <user email address>
$owapolicyname = $casmailbox.OwaMailboxPolicy
$owapolicyname

This should display something like:

image

which gives us the policy name.

Next run the command:

$policy = Get-OwaMailboxPolicy $owapolicyname

to get the settings/values of that policy.

To view the allowed file list run the commands:

$allowedFileTypes = $policy.AllowedFileTypes

$allowedFileTypes

which should show something like:

image

To view the blocked file list run the commands:

$blockedfiletypes = $policy.BlockedFileTypes
$blockedfiletypes

image

The next question is, can you adjust these lists? Yes you can. You basically do that by adjusting the list of extensions variable (here $blockedfiletypes) via something like:

$blockedFileTypes.Remove(“.XXX”)

and reapplying that to the policy like:

Set-OwaMailboxPolicy $policy -BlockedFileTypes $blockedFileTypes

and if you want to extend the list just use add instead of remove in the above command prior to applying it to the policy.

Microsoft is making additions to the BlockedFileTypes list from April 2020:

What file extensions will be added to the BlockedFileTypes list with this change?
The following extensions are used by the Python scripting language:


“.py”, “.pyc”, “.pyo”, “.pyw”, “.pyz”, “.pyzw”


The following extensions are used by the PowerShell scripting language:


“.ps1”, “.ps1xml”, “.ps2”, “.ps2xml”, “.psc1”, “.psc2”, “.psd1”, “.psdm1”, “.cdxml”, “.pssc”


The following extension is used by Windows ClickOnce


“.appref-ms”


The following extension is used by Microsoft Data Access Components (MDAC)


“.udl”


The following extension is used by the Windows sandbox


“.wsb”


The following extensions are used for digital certificates:


“.cer”, “.crt”, “.der”


The following extensions are used by the Java programming language:


“.jar”, “.jnlp”


The following extensions are used by various applications. While the associated vulnerabilities have been patched (for years, in most cases), they are being blocked for the benefit of organizations that might still have older versions of the application software in use:


“.appcontent-ms”, “.settingcontent-ms”, “.cnt”, “.hpj”, “.website”, “.webpnp”, “.mcf”, “.printerexport”, “.pl”, “.theme”, “.vbp”, “.xbap”, “.xll”, “.xnk”, “.msu”, “.diagcab”, “.grp”

The list in my test tenant right now is:

Blocked File Types:

.settingcontent-ms
.printerexport
.appcontent-ms
.appref-ms
.vsmacros
.website
.msh2xml
.msh1xml
.diagcab
.webpnp
.ps2xml
.ps1xml
.mshxml
.gadget
.theme
.psdm1
.mhtml
.cdxml
.xbap
.vhdx
.pyzw
.pssc
.psd1
.psc2
.psc1
.msh2
.msh1
.jnlp
.aspx
.xnk
.xml
.xll
.wsh
.wsf
.wsc
.wsb
.vsw
.vst
.vss
.vhd
.vbs
.vbp
.vbe
.url
.udl
.tmp
.shs
.shb
.sct
.scr
.scf
.reg
.pyz
.pyw
.pyo
.pyc
.pst
.ps2
.ps1
.prg
.prf
.plg
.pif
.pcd
.ops
.msu
.mst
.msp
.msi
.msh
.msc
.mht
.mdz
.mdw
.mdt
.mde
.mdb
.mda
.mcf
.maw
.mav
.mau
.mat
.mas
.mar
.maq
.mam
.mag
.maf
.mad
.lnk
.ksh
.jse
.jar
.its
.isp
.ins
.inf
.htc
.hta
.hpj
.hlp
.grp
.fxp
.exe
.der
.csh
.crt
.cpl
.com
.cnt
.cmd
.chm
.cer
.bat
.bas
.asx
.asp
.app
.adp
.ade
.ws
.vb
.py
.pl
.js


and Allowed File Types is:

.rpmsg
.xlsx
.xlsm
.xlsb
.tiff
.pptx
.pptm
.ppsx
.ppsm
.docx
.docm
.zip
.xls
.wmv
.wma
.wav
.vsd
.txt
.tif
.rtf
.pub
.ppt
.png
.pdf
.one
.mp3
.jpg
.gif
.doc
.bmp
.avi


Your mileage may vary.
Remove known bad emails from tenant

Microsoft has a technology in Exchange Online known as ZAP. It will basically move known malicious emails, even after they may have initially been delivered to a mailbox. You can read more about the the technology here:

Zero-hour auto purge protection against spam and malware

ZAP however, is a ‘reactive’ security technology requiring knowledge of malicious content prior to taking action. There will therefore be cases when malicious content can get delivered to a mailbox, especially if the attack is relative new in the wild, simply because it has not yet been identified.  Hopefully, users have been trained so they can report any suspicious material that they do find, as I have detailed here:

Improved security is a shared responsibility

You can also enable an alert that notifies when someone reports an email. When that happens, you may want to check through all the other mailboxes to see whether that malicious email occurs elsewhere. If the payload is indeed malicious, you may wish to take the pro-active step of deleting that bad email from all users inboxes.

You can achieve this using two steps:

1. Create a content search to locate the suspect item in your tenant

2. Use PowerShell to delete the discovered items

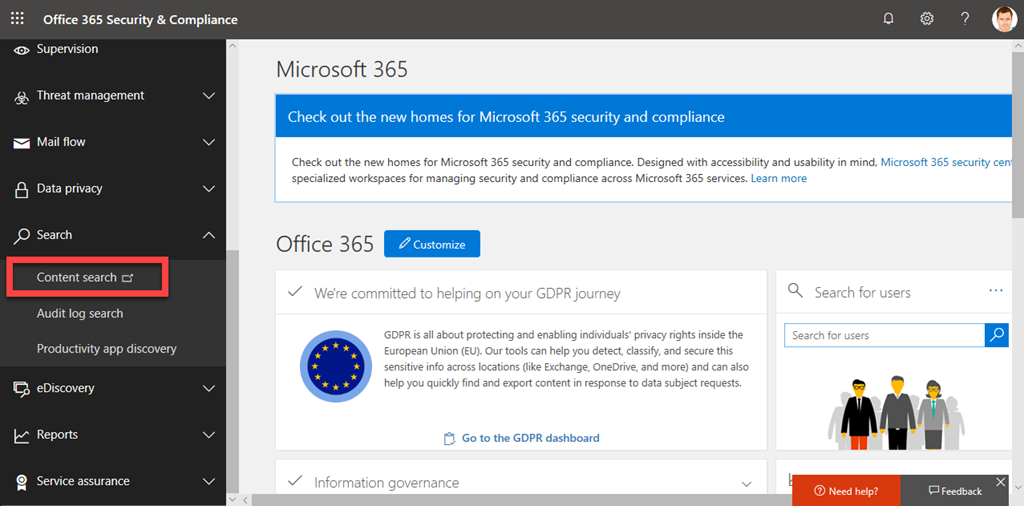
Step one is to login to the Microsoft 365 tenant as an administrator and visit the Security and Compliance Center like so:

image

Select Content Search from under the Search option on the left.

Before you create a new search, you’ll need to find something unique about the item you are searching for.

image

In the case above, with this dodgy email, I’ll do a search based on the senders email but I could as easily do one on the mis-spelled subject ‘Alart’. All you need is something unique.

image

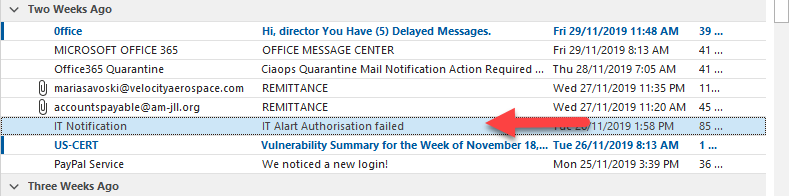
If I look in my inbox I can see this email listed as shown.

image

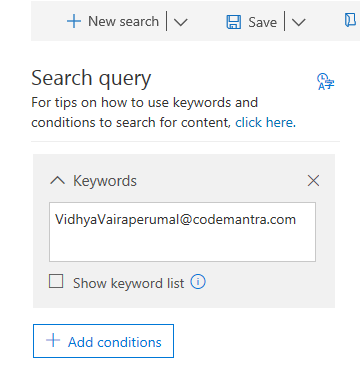
I create a new Content Search and use the unique criteria in the keywords as shown above.

image

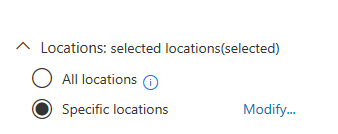
Below this I can limit where the search is conducted. In this case, I will specify messages, as that is what I am looking for. You can get quite granular here if you need to. Just select Modify and specify the location you wish to search. Remember, the more places you search the longer it will take to return results.

image

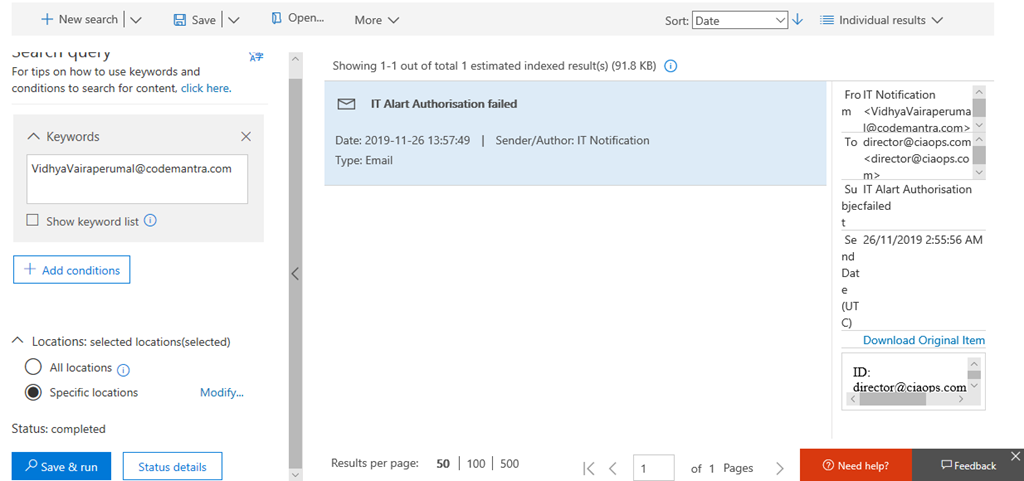
Once you have crafted your search, select Save & run in the lower left. After a short while, you should see the results. In this case, I have only found the one result, which is the item in my inbox. Make sure you check the items that are returned as it is these items that will be deleted! You may need to adjust your search to get exactly the results you wish.

Next, you’ll need to fire up PowerShell and connect to the Microsoft Security and Compliance Center for you tenant. I have a script that you can use here if you have MFA:

https://github.com/directorcia/Office365/blob/master/o365-connect-mfa-sac.ps1

and if you don’t (shame on you):

https://github.com/directorcia/Office365/blob/master/o365-connect-sac.ps1

Once you have successfully connected you need to run the following line of PowerShell:

New-ComplianceSearchAction -SearchName “<Content search query name>” -Purge -PurgeType SoftDelete

for a ‘soft delete’ of the item (i.e. recoverable). Or

New-ComplianceSearchAction -SearchName “<Content search query name>” -Purge -PurgeType HardDelete

for a ‘hard delete’ (i.e. non-recoverable). You’ll also need to change <Content search query name> to match the name you gave the Content Search when you created it.

image

You should now see a prompt, as shown above, asking you to confirm your actions. Generally, you’ll select Yes to All here.

image

This will kick off the process of deleting the content you have found. Note, this process is not immediate. It may take a little while to work through all the locations.

image

When the process is complete, as shown above, that item no longer appears in mailboxes.

That’s how you run your own ZAP!

Check your journaling rules

One of challenges with security is that there are lots of places to check and secure but only one vulnerability required for compromise. Most compromises happen at the user level but there are also other places that you may want to keep an eye. One of the is the journaling rules in Exchange Online.

Now, journaling rules can only generally be configured by an administrator. According to:

https://docs.microsoft.com/en-us/exchange/security-and-compliance/journaling/journaling

“Journaling can help your organization respond to legal, regulatory, and organizational compliance requirements by recording inbound and outbound email communications.”

That means it maybe possible to record email traffic and forward it to another location. That may mean for example, a rogue administrator setting up a journaling rule to send the CEO’s emails to their own private external email box.

Defending against rogue admin is tough and requires some planning. The least that you could do is check any existing journaling rules and ensure that only required ones appear.

image

You can do this by visiting the Exchange Online Admin Center. From here select Compliance Management then journal rules as shown above.

As you can see there are no journal rules in this tenant and it is my experience that most tenants don’t use journaling at all. That doesn’t mean there isn’t legitimate reasons for having journaling rules. All I’m saying is that you should check what you have and ensure it is right.

As always, I find that using PowerShell is a much quicker way to report on this using the command:

get-journalrule

The reason which checking journaling is important, is because as I understand it, journaling won’t show up in the audit logs for the tenant. This means that once it was surreptitiously enabled, it could run unreported in the background, collecting information unknown to everyone? That is a bad thing.

The best solution against rogue administrators in general is Privileged Access Management (PAM) in Office 365:

Configuring Privileged Access Management

which is typically only included in advanced Microsoft 365 licensing like E5. This, unfortunately, puts it beyond the reach of many. So, for the time being, keep an eye on your journaling rules and check to see where they maybe sending your information.


The insecurity of shared mailboxes

Shared mailboxes are a really handy component of Microsoft 365 in that they allow multiple users to access a single mailbox. This works really well for generic accounts like info@, accounts@, etc. However, there are some security issues with these that I don’t think many people are aware of.

The first point to note is that shared mailboxes in Microsoft 365 actually have a login and password. Thus, they can be accessed directly using these details. Don’t believe me? Well check out the following documentation:

https://docs.microsoft.com/en-us/office365/admin/email/create-a-shared-mailbox?view=o365-worldwide#block-sign-in-for-the-shared-mailbox-account

which says:

“Every shared mailbox has a corresponding user account. Notice how you weren’t asked to provide a password when you created the shared mailbox? The account has a password, but it’s system-generated (unknown). You aren’t supposed to use the account to log in to the shared mailbox”

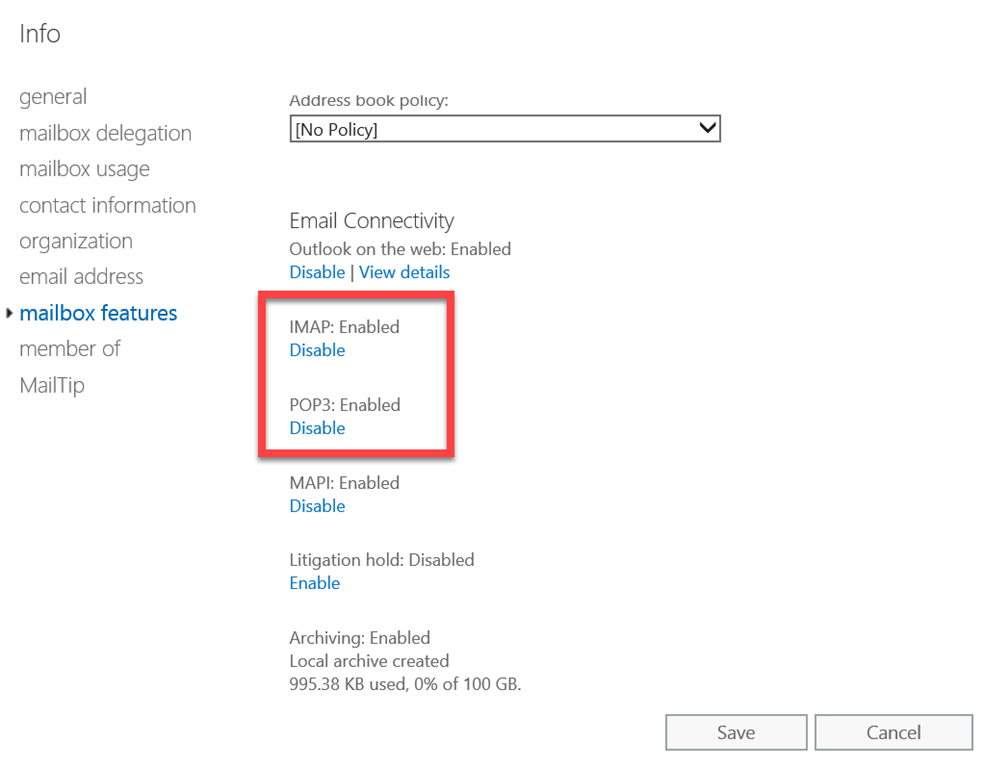
So, by default, when you create a shared mailbox you are actually creating an account with a system password in your environment. No so bad you think right? Well, the problem is that, by default, IMAP and POP3 are enabled on all mailboxes, including shared ones.

image

Some actually use this IMAP ability to be able to open shared mailboxes on mobile devices, however doing this comes with a huge risk in my books.

Why? Well, if IMAP is enabled, that means basic authentication is enabled and that is bad as I have said previously:

Disable basic auth to improve Office 365 security

You may feel an unknown system or complex password on a shared mailbox is good enough but to remote bad actors running automated cracking programs against accounts on your tenant, it is only a matter of time until they generate a matching password for that shared mailbox. Once they have that, boom, they’re into that mailbox. From that foothold, they can then launch all types of attacks, but the most likely being phishing your users. It’s all down hill from there!

If you use shared mailboxes on mobile devices, this means you have to know the password for the shared mailbox prior to configuration on the mobile device. Because the shared mailbox has an account, it can have it’s password changed. That means, if you want to use shared mailboxes on mobile devices, you reset the password for the shared mailbox so you know it. You then give that to users so they can configure access on their phones. Anyone else see a problem here? You are providing multiple people access to a single resource with a shared password. What is a shared password? It ain’t a secret for sure now is it? So, what happens when a user leaves the business? I’ll bet most businesses don’t go and reset the password on all the shared mailboxes that user had access to. This means you now have someone outside your business who has a login (shared mailbox email address) and password to a resource in your tenant.

Here’s a scenario where that came back to bite the business. A disgruntled user was terminated and their individual login account was disabled. After the user has fired, they connected back into a shared mailbox directly using IMAP and started sending all sorts of nasty emails to all staff from this mailbox. Now if they had been smart, they would have done this from an anonymous IP address, not one assigned to them from their ISP so we could track them down. However, the damage was done. Why? All because access to the shared mailbox was permitted by insecure protocols and shared passwords.

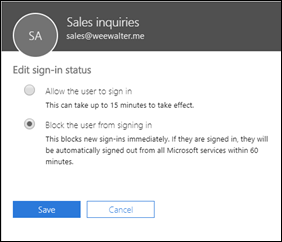
Edit sign-in status flyout in the M365 admin center

As with most things security, it is pretty easy to protect yourself from this BUT it requires changing the defaults. The easiest way is to:

Block sign-in for the shared mailbox account

along with disabling IMAP, POP and basic auth. Yes, I fully appreciate that may have productivity ramifications, so you need to balance up the risk. However, given how easily this can be exploited, and the damage it could to the business, I’d rather be in the safe and secure camp than the ‘it’ll never happen to us’ blind faith camp personally. Anything that allows anonymous external users the ability to access accounts externally and allows them to keep guessing passwords as you can with IMAP spray attacks is very, very bad in my books. If you read this article:

https://www.proofpoint.com/us/threat-insight/post/threat-actors-leverage-credential-dumps-phishing-and-legacy-email-protocols

make sure you note the very last paragraph which says:

Update, March 21, 2019: This post has been updated to reflect specific cases in which IMAP-based password-spraying attacks were successful, particularly as threat actors targeted shared service accounts, (e.g., hr@company[.]com or helpdesk@company[.]com) or exploited weaknesses in MFA implementations and third-party email client logins.” 

So please, secure your shared mailboxes NOW! If you really, really need shared mailbox access on mobile devices I would suggest you use Office 365 groups instead until Microsoft enables shared mailboxes natively on mobile devices (which is on the roadmap).

Email message traces in Office 365

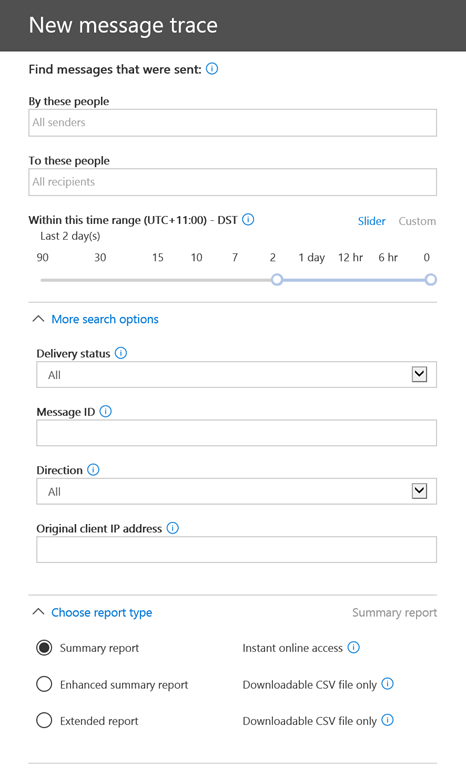
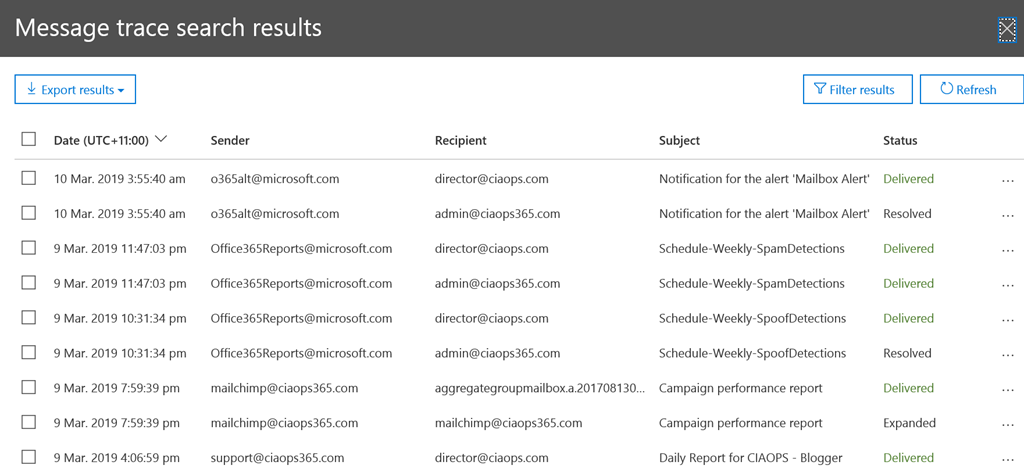
A very common need these days is to do an email message trace. This can be done the old way in the Exchange Online Admin center or the new way via Mail Flow in the Security and Compliance center.

image

You simply enter the details and then run a search.

image

and the output looks like the above, where you can also drill in and get more detail.

image

As with all things Office 365, you can achieve the exact same thing using PowerShell as I have shown above. The code to achieve this is quite straight forward but I have uploaded it to my GitHub repo to save you the trouble:

https://github.com/directorcia/Office365/blob/master/o365-msgtrace.ps1

Where PowerShell comes into its own is when you need to a variety of tasks, perhaps an investigation of a breach. Using PowerShell you can easily dump all the information to CSV for further analysis rather than having to root it out in the web interface.

Reporting mailbox logins

Before much of what is covered here is possible you need to ensure you have enabled all the logging in your Office 365 tenant. I’ve covered how to do that here:

Enabling Office 365 mailbox auditing

Enable mailbox auditing in Exchange Online

Enable activity auditing in Office 365

Once you have done that you will be able to track what’s going on in your tenant much better.

In the situation of a compromised mailbox, a bad actor has control of it using legitimate credentials. This eliminates looking for failed logins, because there won’t be any. It also makes the finding the bad actor tougher because their access is most likely mixed in with the legitimate user.

The place to start is to run an audit log search as I have detailed here:

Searching the Office 365 activity log for failed logins

image

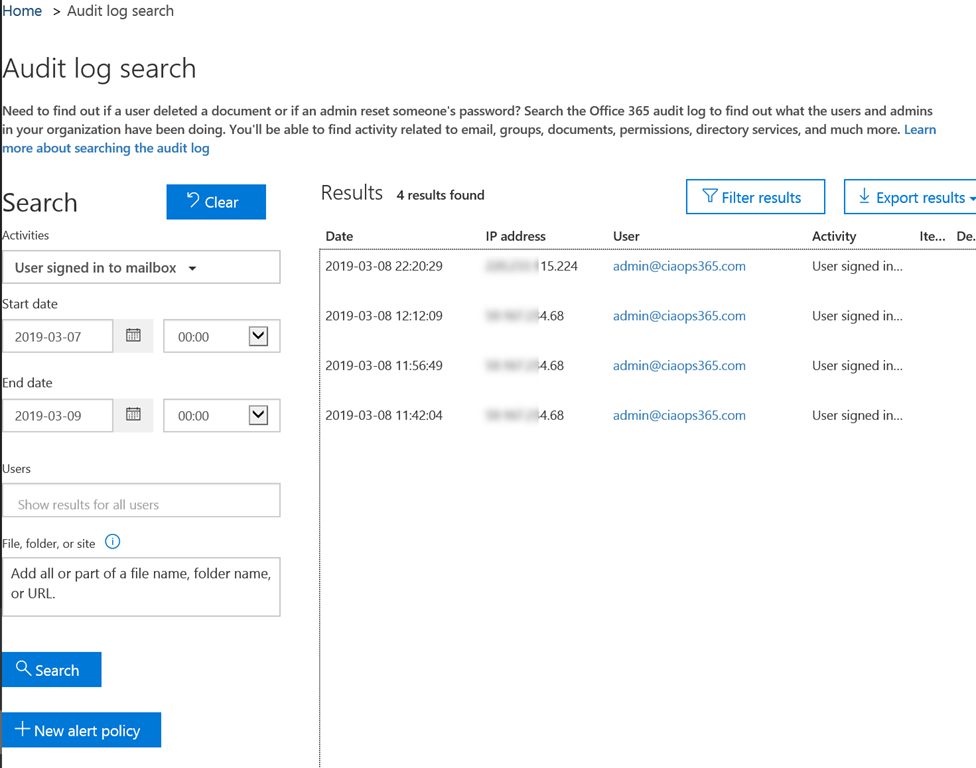
However, as I mentioned, we can no longer search for failed logins, we need to use a different search criteria. I would suggest that you instead run a search using the attribute “User signed in to mailbox” as shown above. That will produce something like shown for all users. Problem with this is that times and dates are in UTC not local time and it is cumbersome to manipulate in a web page. You can of course manipulate by exporting the results to a spreadsheet for more control.

image

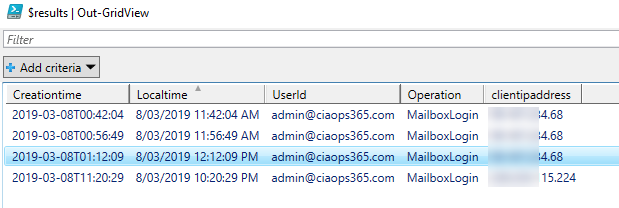
Unsurprisingly, I feel PowerShell offers a much better solution to check the logs and report as you can see above. The script to do this I have made freely available at my Github repo here:

https://github.com/directorcia/Office365/blob/master/o365-mblogin-audit.ps1

Basically, it will search the Audit log for Exchange Items that are Mailbox logins and send that output to a nice table via the Out-Grid command. As you can see, using Out-Grid you can now easily sort by time by clicking the column heading, and thanks to the script, the times are local not UTC!

By default, the script will check the last 48 hours but you can easily modify that to suit your needs by either entering the scope in hours or entering a start and end date in the variables at the top of the script.

With this output I can now look for suspect IPs that login into the mailbox and begin hunting from there. However, remember, all of this relies on you enable your auditing BEFORE you need it. So, if you haven’t enabled it, go do it now! You’ll find scripts to enable the logs also in my Office 365 repo here:

https://github.com/directorcia/office365

Monitor outbound spam as well

image

Hopefully everyone is well aware of the need to protect Office 365 email from inbound spam, however what are you doing about outbound spam?

Hopefully, no bad actor gains access to your environment BUT if they did and they started using you accounts to send spam email how would know?

image

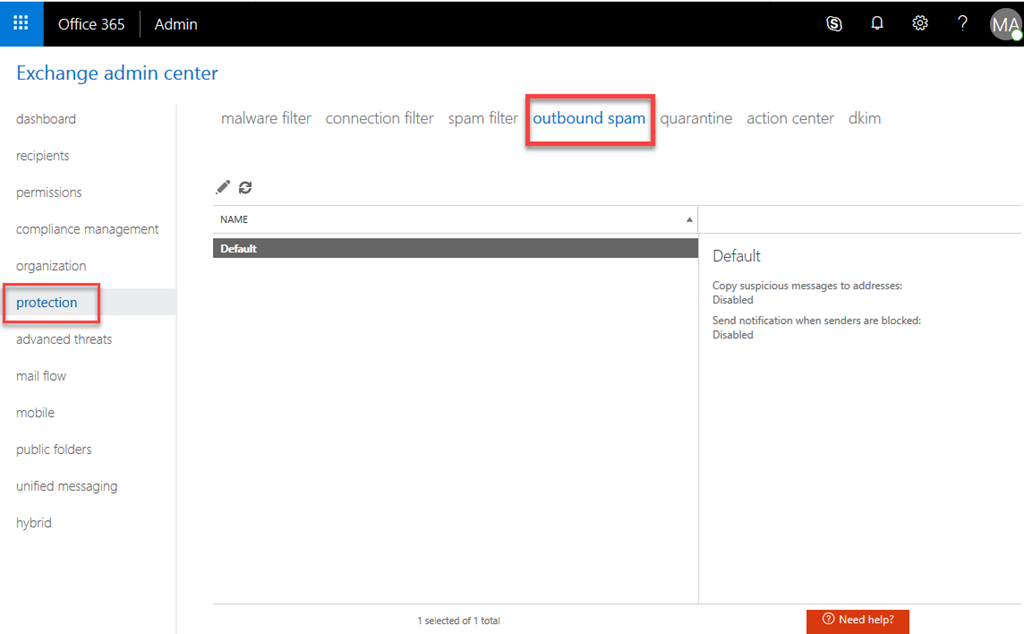
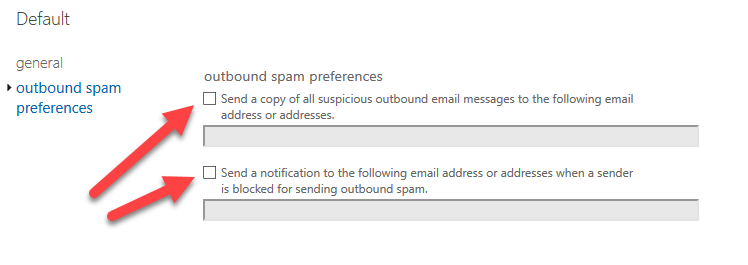
For this reason, I suggest that it is a good idea to go into the Exchange Administration console, select Protection, then Outbound spam. Edit the default policy (that’s really your only option), then select outbound spam protection on the left hand side. Then I suggest you should enable the option to send an email when there is a suspicious outbound email to somewhere that is monitored.

That obviously, won’t stop outbound spam but it should at least give you a heads up that it is happening.

Example of Office 365 ATP Safe Links in action

image

The above is a very typical example of a phishing email. You’ll notice when you mouse over the link in the email it wants to re-directed you to a non-descript and malicious (non-Office 365) link.

image

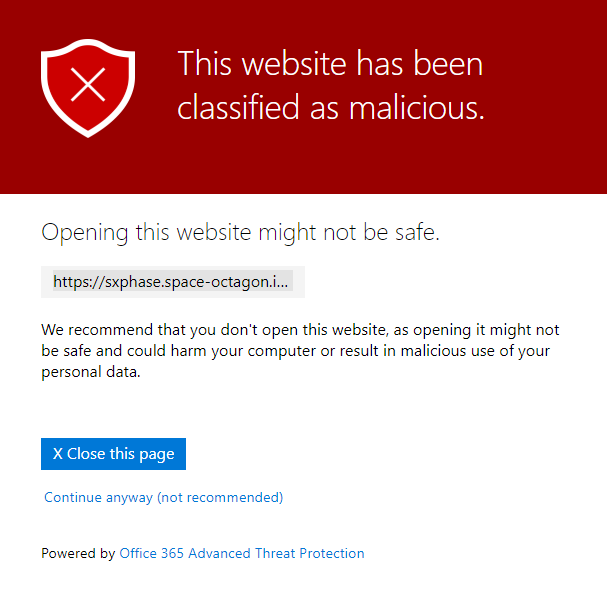
Now, because I’ve configured Office 365 ATP (Advanced Threat Protection) Safe Links in my tenant, when I do click that link in the email I am taken to the above page that warns me that this is bad.

image

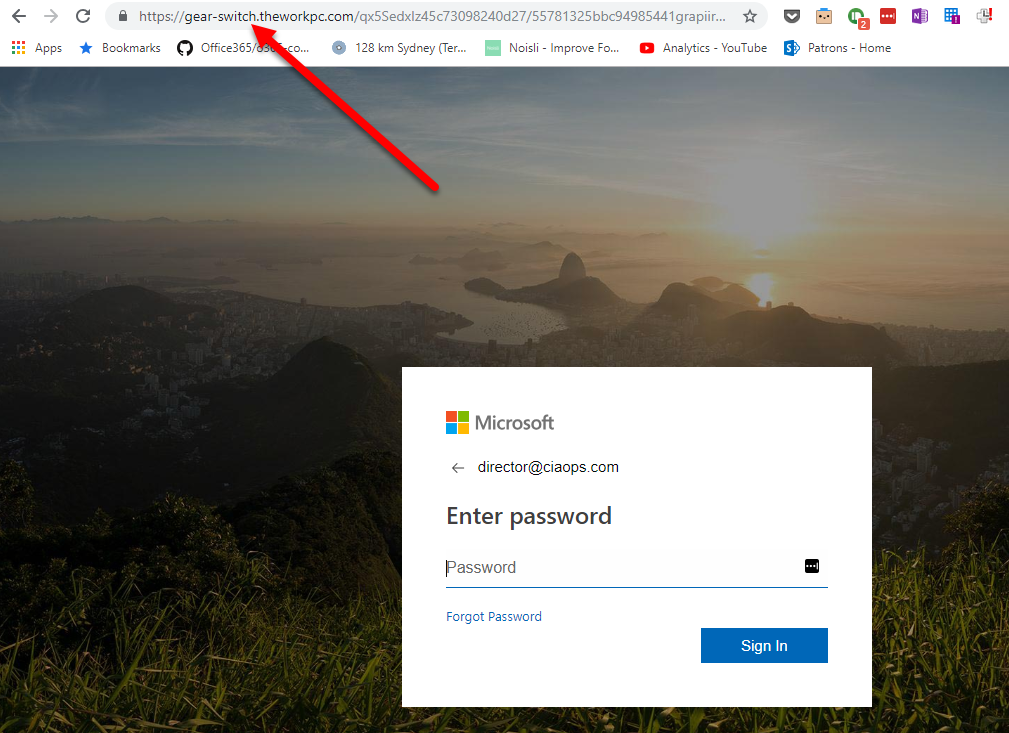
Because I have configured my own Office 365 ATP Safe Links to allow click past this warning just for myself, if I continue on to the ultimate destination page, I see something that looks like a very convincing default Office 365 login page, with my email address already filled in. The idea is, I type my password, thinking this is legitimate and then bingo, I’m phished.

You will also notice that the ultimate URL is also different from the one in the initial email. An attempt to hide the attack using redirection.

image

So let’s see how effective Office 365 ATP Safe Links is at detecting these kinds of attacks compared to other vendors.

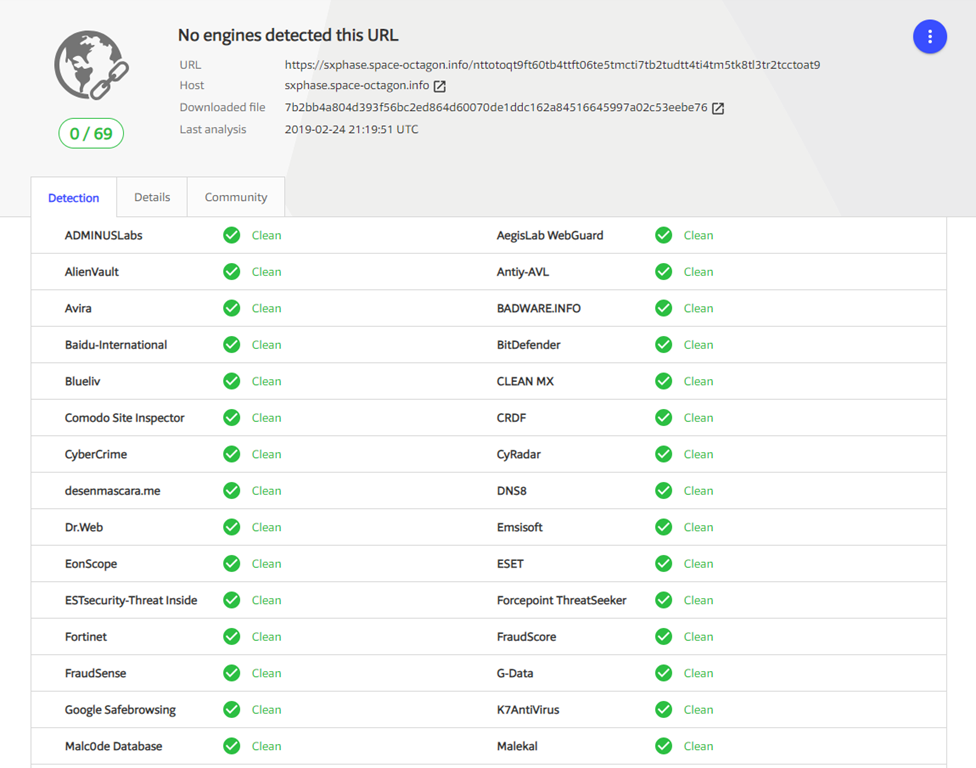
If I plug the initial URL, that was contained in the email, into Virustotal.com I see the above report. None, yes that is zero, of the third party AV providers have detected this initial link to be a malicious link as yet. Not even Google Safebrowsing! Of course, Office 365 ATP did detect it as malicious if you are keeping score.

image

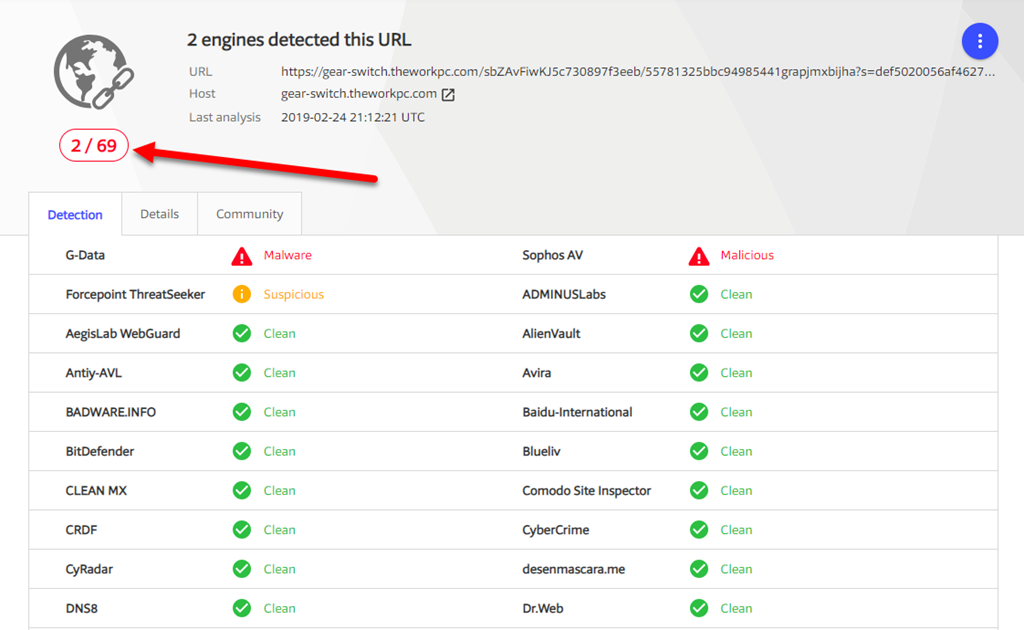
If I now plug in the ultimate destination URL of the attack I do see some confirmation from other vendors that the site is malicious. However, only 2 of 69 vendors (i.e. only about 3%) also rate that link as malicious.

So Office 365 ATP Safe Links was able to identify this link as malicious and potentially block user access (with appropriate configuration). Few other vendors have yet even detected it to be an issue at this stage. That makes Office 365 ATP quite pro-active.

We all know that there are no absolutes in security and no system is ever perfect. However, given the size of the signals coming into Office 365 in regards to threats, their ability to provide early warning is as good or if not better that anything else out there on the market today in my opinion. This is why I recommend Office 365 ATP as a ‘must have’ for all Office 365 tenants. If you have Microsoft 365 Business today, you already have Office 365 ATP. So make sure it is correctly configured and you should feel much more comfortable about the reduced risk you face from phishing.