Impact of AI on SMB MSP Help Desks and the Role of Microsoft 365 Copilot

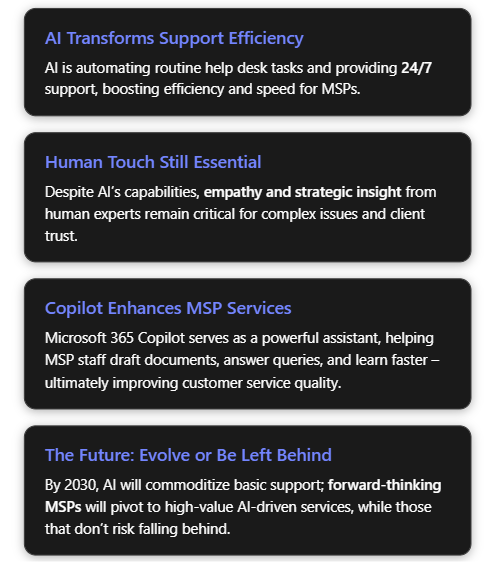
Introduction and Background

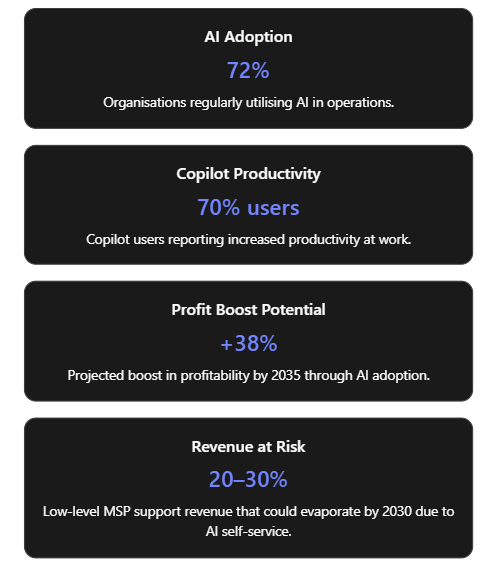
Managed Service Providers (MSPs) serving small-to-medium businesses (SMBs) typically operate help desks that handle IT support requests, from password resets to system troubleshooting. Traditionally, these support desks rely on human technicians available only during business hours, which can mean delays and higher costs. Today, artificial intelligence (AI) is revolutionising this model by introducing intelligent automation and chat-based agents that can work tirelessly around the clock[1][1]. AI-driven service desks leverage machine learning and natural language processing to handle routine tasks (like password resets or basic user queries) with minimal human intervention[1]. This transformation is happening rapidly: as of mid-2020s, an estimated 72% of organisations are regularly utilising AI technologies in their operations[2]. The surge of generative AI (exemplified by OpenAI’s ChatGPT and Microsoft’s Copilot) has shown how AI can converse with users, analyse large data context, and generate content, making it extremely relevant to customer support scenarios.

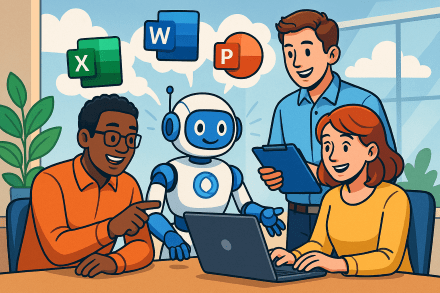
Microsoft 365 Copilot is one high-profile example of this AI wave. Introduced in early 2023 as an AI assistant across Microsoft’s productivity apps[3], Copilot combines large language models with an organisation’s own data through Microsoft Graph. For MSPs, tools like Copilot represent an opportunity to augment their help desk teams with AI capabilities within the familiar Microsoft 365 environment, ensuring data remains secure and context-specific[4]. In the following sections, we examine the positive and negative impacts of AI on SMB-focused MSP help desks, explore how MSPs can utilise Microsoft 365 Copilot to enhance service delivery, and project the long-term changes AI may bring to MSP support operations.

Positive Impacts of AI on MSP Help Desks

AI is bringing a multitude of benefits to help desk operations for MSPs, especially those serving SMB clients. Below are some of the most significant advantages, with examples:

  • 24/7 Availability and Faster Response: AI-powered virtual agents (chatbots or voice assistants) can handle inquiries at any time, providing immediate responses even outside normal working hours. This round-the-clock coverage ensures no customer request has to wait until the next business day, significantly reducing response times[1]. For example, an AI service desk chatbot can instantly address a password reset request at midnight, whereas a human technician might not see it until morning. The result is improved customer satisfaction due to swift, always-on support[1][1].
  • Automation of Routine Tasks: AI excels at handling repetitive, well-defined tasks, which frees up human technicians for more complex issues. Tasks like password resets, account unlocks, software installations, and ticket categorisation can be largely automated. An AI service desk can use chatbots with natural language understanding to guide users through common troubleshooting steps and resolve simple requests without human intervention[1][1]. One industry report notes that AI-driven chatbots are now capable of resolving many Level-1 support issues (e.g. password resets or printer glitches) on their own[5]. This automation not only reduces the workload on human staff but also lowers operational costs (since fewer manual labour hours are spent on low-value tasks)[1].
  • Improved Efficiency and Cost Reduction: By automating the mundane tasks and expediting issue resolution, AI can dramatically increase the efficiency of help desk operations. Routine incidents get resolved faster, and more tickets can be handled concurrently. This efficiency translates to cost savings – MSPs can support more customers without a linear increase in headcount. A 2025 analysis of IT service management tools indicates that incorporating AI (for example, using machine learning to categorise tickets or recommend solutions) can save hundreds of man-hours each month for an MSP’s service team[6][6]. These savings come from faster ticket handling and fewer repetitive manual interventions. In fact, AI’s contribution to productivity is so significant that an Accenture study projected AI technologies could boost profitability in the IT sector by up to 38% by 2035[6], reflecting efficiency gains.
  • Scalability of Support Operations: AI allows MSP help desks to scale up support capacity quickly without a proportional increase in staff. Because AI agents can handle multiple queries simultaneously and don’t tire, MSPs can on-board new clients or handle surge periods (such as a major incident affecting many users at once) more easily[1]. For instance, if dozens of customers report an email outage at the same time, an AI system could handle all incoming queries in parallel – something a limited human team would struggle with. This scalability ensures service quality remains high even as the customer base grows or during peak demand.
  • Consistency and Knowledge Retention: AI tools provide consistent answers based on the knowledge they’ve been trained on. They don’t forget procedures or skip troubleshooting steps, which means more uniform service quality. If an AI is integrated with a knowledge base, it will tap the same repository of solutions every time, leading to standardized resolutions. Moreover, modern AI agents can maintain context across a conversation and even across sessions. By 2025, advanced AI service desk agents were capable of keeping track of past interactions with a client, so the customer doesn’t have to repeat information if they come back with a related issue[7]. This contextual continuity makes support interactions smoother and more personalized, even when handled by AI.
  • Proactive Issue Resolution: AI’s predictive analytics capabilities enable proactive support rather than just reactive. Machine learning models can analyze patterns in system logs and past tickets to predict incidents before they occur. For example, AI can flag that a server’s behavior is trending towards failure or that a certain user’s laptop hard drive shows signs of impending crash, prompting preemptive maintenance. MSPs are leveraging AI to perform predictive health checks – e.g. automatically identifying anomaly patterns that precede network outages or using predictive models to schedule patches at optimal times before any disruption[6][7]. This results in fewer incidents for the help desk to deal with and reduced downtime for customers. AI can also intelligently prioritize tickets that are at risk of violating SLA (service level agreement) times by learning from historical data[6], ensuring critical issues get speedy attention.
  • Enhanced Customer Experience and Personalisation: Counterintuitively, AI can help deliver a more personalized support experience for clients. By analysing customer data and past interactions, AI systems can tailor responses or suggest solutions that are particularly relevant to that client’s history and environment[7]. For example, an AI might recognize that a certain client frequently has issues with their email system and proactively suggest steps or upgrades to preempt those issues. AI chatbots can also dynamically adjust their language tone and complexity to match the user’s skill level or emotional state. Some advanced service desk AI can detect sentiment – if a user sounds frustrated, the system can route the conversation to a human or respond in a more empathetic tone automatically[1][1]. Multilingual support is another boon: AI agents can fluently support multiple languages, enabling an MSP to serve diverse or global customers without needing native speakers of every language on staff[7]. All these features drive up customer satisfaction, as clients feel their needs are anticipated and understood. Surveys have shown faster service and 24/7 availability via AI lead to higher customer happiness ratings on support interactions[1].
  • Allowing Human Focus on Complex Tasks: Perhaps the most important benefit is that by offloading simple queries to AI, human support engineers have more bandwidth for complex problem-solving and value-added work. Rather than spending all day on password resets and setting up new accounts, the human team members can focus on high-priority incidents, strategic planning for clients, or learning new technologies. MSP technicians can devote attention to issues that truly require human creativity and expertise (like diagnosing novel problems or providing consulting advice to improve a client’s infrastructure) while the AI handles the “busy work.” This not only improves morale and utilisation of skilled engineers, but it also delivers better outcomes for customers when serious issues arise, because the team isn’t bogged down with minor tasks. As one service desk expert put it, with **AI handling Level-1 tickets, MSPs can redeploy their technicians to activities that more directly **“impact the business”, such as planning IT strategy or digital transformation initiatives for clients[6]. In other words, AI raises the ceiling of what the support team can achieve.

In summary, AI empowers SMB-focused MSPs to provide faster, more efficient, and more consistent support services to their customers. It reduces wait times, solves many problems instantly, and lets the human team shine where they are needed most. Many MSPs report that incorporating AI service desk tools has led to higher customer satisfaction and improved service quality due to these factors[1].

Challenges and Risks of AI in Help Desk Operations

Despite the clear advantages, the integration of AI into help desk operations is not without challenges. It’s important to acknowledge the potential drawbacks, risks, and limitations that come with relying on AI for customer support:

  • Lack of Empathy and Human Touch: One of the most cited limitations of AI-based support is the absence of genuine empathy. AI lacks emotional intelligence – it cannot truly understand or share human feelings. While AI can be programmed to recognise certain keywords or even tone of voice indicating frustration, its responses may still feel canned or unempathetic. Customers dealing with stressful IT outages or complex problems often value a human who can listen and show understanding. An AI, no matter how advanced, may respond to an angry or anxious customer with overly formal or generic language, missing the mark in addressing the customer’s emotional state[7]. Over-reliance on AI chatbots can lead to customers feeling that the service is impersonal. For example, if a client is upset about recurring issues, an AI might continue to give factual solutions without acknowledging the client’s frustration, potentially aggravating the situation[7][7]. **In short, AI’s inability to *“read between the lines”* or pick up subtle cues can result in a poor customer experience in sensitive scenarios**[7].
  • Handling of Complex or Novel Issues: AI systems are typically trained on existing data and known problem scenarios. They can struggle when faced with a completely new, unfamiliar problem, or one that requires creative thinking and multidisciplinary knowledge. A human technician might be able to use intuition or past analogies to tackle an odd issue, whereas an AI could be stumped if the problem doesn’t match its training data. Additionally, many complex support issues involve nuanced judgement calls – understanding business impact, making decisions with incomplete information, or balancing multiple factors. AI’s problem-solving is limited to patterns it has seen; it might give incorrect answers (or no answer) if confronted with ambiguity or a need for outside-the-box troubleshooting. This is related to the phenomenon of AI “hallucinations” in generative models, where an AI might produce a confident-sounding but completely incorrect solution if it doesn’t actually know the answer. Without human oversight, such errors could mislead customers. Thus, MSPs must be cautious: AI is a great first-line tool, but complex cases still demand human expertise and critical thinking[1].
  • Impersonal Interaction & Client Relationship Concerns: While AI can simulate conversation, many clients can tell when they’re dealing with a bot versus a human. For longer-term client relationships (which are crucial in the MSP industry), solely interacting through AI might not build the personal rapport that comes from human interaction. Clients often appreciate knowing there’s a real person who understands their business on the other end. If an MSP over-automates the help desk, some clients might feel alienated or think the MSP is “just treating them like a ticket number.” As noted earlier, AI responses can be correct but impersonal, lacking the warmth or context a human would provide[7]. Over time, this could impact customer loyalty. MSPs thus need to strike a balance – using AI for efficiency while maintaining human touchpoints to nurture client relationships[7].
  • Potential for Errors and Misinformation: AI systems are not infallible. They might misunderstand a user’s question (especially if phrased unconventionally), or access outdated/incomplete data, leading to wrong answers. If an AI-driven support agent gives an incorrect troubleshooting step, it could potentially make a problem worse (imagine an AI telling a user to run a wrong command that causes data loss). Without a human double-check, these errors could slip through. Moreover, advanced generative AI might sometimes fabricate plausible-sounding answers (hallucinations) that are entirely wrong. Ensuring the AI is thoroughly tested and paired with validation steps (or easy escalation to humans) is critical. Essentially, relying solely on AI without human oversight introduces a risk of incorrect solutions, which could harm customer trust or even violate compliance if the AI gives advice that doesn’t meet regulatory standards.
  • Data Security and Privacy Risks: AI helpdesk implementations often require feeding customer data, system logs, and issue details into AI models. If not managed carefully, this raises privacy and security concerns. For example, sending sensitive information to an external AI service (like a cloud-based chatbot) could inadvertently expose that data. There have been cautionary tales – such as incidents where employees used public AI tools (e.g., ChatGPT) with confidential data and caused breaches of privacy[4][4]. MSPs must ensure that any AI they use is compliant with data protection regulations and that clients’ data is handled safely (encrypted in transit and at rest, access-controlled, and not retained or used for AI training without consent)[8][8]. Another aspect is ensuring the AI only has access to information it should. In Microsoft 365 Copilot’s case, it respects the organisation’s permission structure[4], but if an MSP used a more generic AI, they must guard against information bleed between clients. AI systems also need constant monitoring for unusual activities or potential vulnerabilities, as malicious actors might attempt to manipulate AI or exploit it to gain information[8][8]. In summary, introducing AI means MSPs have to double-down on cybersecurity and privacy audits around their support tools.
  • Integration and Technical Compatibility Issues: Deploying AI into an existing MSP environment is not simply “plug-and-play.” Many MSPs manage a heterogeneous mix of client systems, some legacy and some modern. AI tools may struggle to integrate with older software or disparate platforms[7]. For instance, an AI that works great with cloud-based ticket data may not access information from a client’s on-premises legacy database without custom integration. Data might exist in silos (separate systems for ticketing, monitoring, knowledge base, etc.), and connecting all these for the AI to have a full picture can be challenging[7]. MSPs might need to invest significant effort to unify data sources or update infrastructure to be AI-ready. During integration, there could be temporary disruptions or a need to reconfigure workflows, which in the short term can hamper productivity or confuse support staff[7][7]. For smaller MSPs, lacking in-house AI/ML expertise, integrating and maintaining an AI solution can be a notable hurdle, potentially requiring new hires or partnerships.
  • Over-reliance and Skill Erosion: There is a softer risk as well: if an organisation leans too heavily on AI, their human team might lose opportunities to practice and sharpen their own skills on simpler issues. New support technicians often “learn the ropes” by handling common Level-1 problems and gradually taking on more complex ones. If AI takes all the easy tickets, junior staff might not develop a breadth of experience, which could slow their growth. Additionally, there’s the strategic risk of over-relying on AI for decision-making. AI can provide data-driven recommendations, but it doesn’t understand business strategy or ethics at a high level[7][7]. MSP managers must be careful not to substitute AI outputs for their own judgement, especially in decisions about how to service clients or allocate resources. Important decisions still require human insight – AI might suggest a purely cost-efficient solution, but a human leader will consider client relationships, long-term implications, and ethical aspects that AI would miss[7][7].
  • Customer Pushback and Change Management: Finally, some end-users simply prefer human interaction. If an MSP suddenly routes all calls to a bot, some customers might react negatively, perceiving it as a downgrade in service quality. There can be a transition period where customers need to be educated on how to use the new AI chatbot or voice menu. Ensuring a smooth handoff to a human agent on request is vital to avoid frustration. MSPs have to manage this change carefully, communicating the benefits of the new system (such as faster answers) while assuring clients that humans are still in the loop and reachable when needed.

In essence, while AI brings remarkable capabilities to help desks, it is not a panacea. The human element remains crucial: to provide empathy, handle exceptions, verify AI outputs, and maintain strategic oversight[7][7]. Many experts stress that the optimal model is a hybrid approach – AI and humans working together, where AI handles the heavy lifting but humans guide the overall service and step in for the nuanced parts[7][7]. MSPs venturing into AI-powered support must invest in training their staff to work alongside AI, update processes for quality control, and maintain open channels for customers to reach real people when necessary. Striking the right balance will mitigate the risks and ensure AI augments rather than alienates.

To summarise the trade-offs, the table below contrasts AI service desks with traditional human support on key factors:

AspectAI Service DeskHuman Helpdesk Agent
Response TimeInstant responses to queries[1]Varies based on availability (can be minutes to hours)[1]
Availability24/7 continuous operation[1]Limited to business/support hours[1]
Consistency/AccuracyHigh on well-known issues (follows predefined solutions exactly)[1]Strong on complex troubleshooting; can adapt when a known solution fails[1]
Personalisation & EmpathyLimited emotional understanding; responses feel robotic if issue is nuanced[1]Natural empathy and personal touch; can adjust tone and approach to the individual[1]
ScalabilityEasily handles many simultaneous requests (no queue for simple issues)[1]Scalability limited by team size; multiple requests can strain capacity
CostLower marginal cost per ticket (after implementation)[1]Higher ongoing cost (salaries, training for staff)[1]

Table: AI vs Human Support – Both have strengths; best results often come from combining them.

Using Microsoft 365 Copilot in an SMB MSP Environment

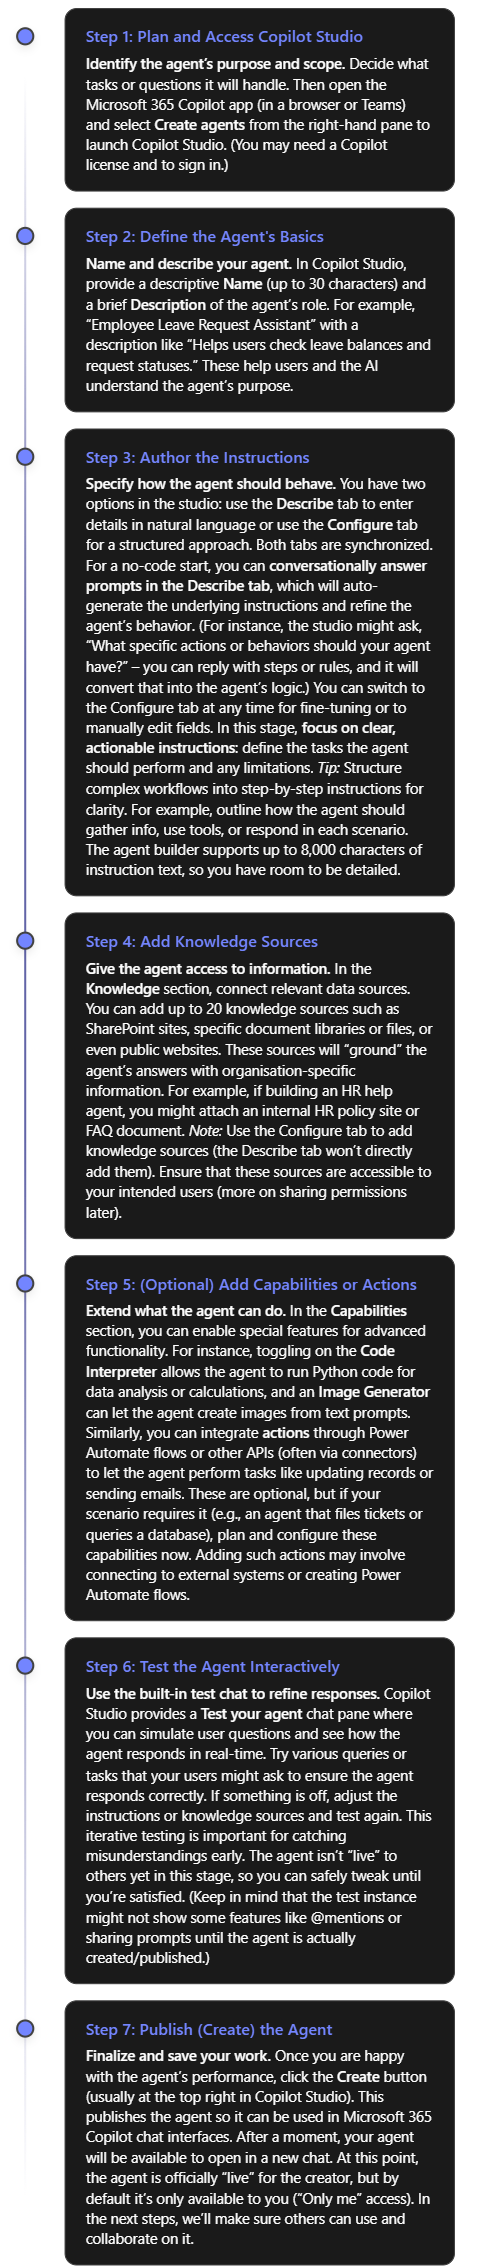
Microsoft 365 Copilot is a cutting-edge AI assistant that MSPs can leverage internally to enhance help desk and support operations. Copilot integrates with tools like Teams, Outlook, Word, PowerPoint, and more – common applications that MSP staff use daily – and supercharges them with AI capabilities. Here are several ways an SMB-focused MSP can use M365 Copilot to take advantage of AI and provide better customer service:

  • Real-time assistance during support calls (Teams Copilot): Copilot in Microsoft Teams can act as a real-time aide for support engineers. For example, during a live call or chat with a customer, a support agent can ask Copilot in Teams contextual questions to get information or troubleshooting steps without leaving the conversation. One MSP Head-of-Support shared that “Copilot in Teams can answer specific questions about a call with a user… providing relevant information and suggestions during or after the call”, saving the team time they’d otherwise spend searching manuals or past tickets[9]. The agent can even ask Copilot to summarize what was discussed in a meeting or call, and it will pull the key details for reference. This means the technician stays focused on the customer instead of frantically flipping through knowledge base articles. The information Copilot provides can be directly added to ticket notes, making documentation faster and more accurate[9]. Ultimately, this leads to quicker resolutions and more thorough records of what was done to fix an issue.
  • Faster documentation and knowledge base creation (Word Copilot): Documentation is a big part of MSP support – writing up how-to guides, knowledge base articles, and incident reports. Copilot in Word helps by drafting and editing documentation alongside the engineer. Support staff can simply prompt Copilot, e.g., “Draft a knowledge base article on how to connect to the new VPN,” and Copilot will generate a first draft by pulling relevant info from existing SharePoint files or previous emails[3][3]. In one use case, an MSP team uses Copilot to create and update technical docs like user guides and policy documents; it “helps us write faster, better, and more consistently, by suggesting improvements and corrections”[9]. Copilot ensures the writing is clear and grammatically sound, and it can even check for company-specific terminology consistency. It also speeds up reviews by highlighting errors or inconsistencies and proposing fixes[9]. The result is up-to-date documentation produced in a fraction of the time it used to take, which means customers and junior staff have access to current, high-quality guidance sooner.
  • Streamlining employee training and support tutorials (PowerPoint Copilot): Training new support staff or educating end-users often involves creating presentations or guides. Copilot in PowerPoint can transform written instructions or outlines into slide decks complete with suggested images and formatting. An MSP support team described using Copilot in PowerPoint to auto-generate training slides for common troubleshooting procedures[9]. They would input the steps or a rough outline of resolving a certain issue, and Copilot would produce a coherent slide deck with graphics, which they could then fine-tune. Copilot even fetches appropriate stock images based on content to make slides more engaging[9], eliminating the need to manually search for visuals. This capability lets the MSP rapidly produce professional training materials or client-facing “how-to” guides. For example, after deploying a new software for a client, the MSP could quickly whip up an end-user training presentation with Copilot’s help, ensuring the client’s staff can get up to speed faster.
  • Accelerating research and problem-solving (Edge Copilot): Often, support engineers need to research unfamiliar problems or learn about a new technology. Copilot in Microsoft Edge (the browser) can serve as a research assistant by providing contextual web answers and learning resources. Instead of doing a generic web search and sifting through results, a tech can ask Copilot in Edge something like, “How do I resolve error code X in Windows 11?” and get a distilled answer or relevant documentation links right away[9]. Copilot in Edge was noted to “provide the most relevant and reliable information from trusted sources…almost replacing Google search” for one MSP’s technical team[9]. It can also suggest useful tutorials or forums to visit for deeper learning. This reduces the time spent hunting for solutions online and helps the support team solve issues faster. It’s especially useful for SMB MSPs who cover a broad range of technologies with lean teams – Copilot extends their knowledge by quickly tapping into the vast information on the web.
  • Enhancing customer communications (Outlook Copilot & Teams Chat): Communications with customers – whether updates on an issue, reports, or even drafting an outage notification – can be improved with Copilot. In Outlook, Copilot can summarize long email threads and draft responses. Imagine an MSP engineer inherits a complex email chain about a persistent problem; Copilot can summarize what has been discussed, highlight the different viewpoints or concerns from each person, and even point out unanswered questions[3]. This allows the engineer to grasp the situation quickly without reading every email in detail. Then, the engineer can ask Copilot to draft a reply email that addresses those points – for instance, “write a response thanking the client for their patience and summarizing the next steps we will take to fix the issue.” Copilot will generate a polished, professional email in seconds, which the engineer can review and send[3]. This is a huge time-saver and ensures communication is clear and well-formulated. In Microsoft Teams chats, Business Chat (Copilot Chat) can pull together data from multiple sources to answer a question or produce an update. An MSP manager could ask, “Copilot, generate a brief status update for Client X’s network outage yesterday,” and it could gather info from the technician’s notes, the outage Teams thread, and the incident ticket to produce a cohesive update message for the client. By using Copilot for these tasks, MSPs can respond to clients more quickly and with well-structured communications, improving professionalism and client confidence in the support they receive[3][3].
  • Knowledge integration and context: Because Microsoft 365 Copilot works within the MSP’s tenant and on top of its data (documents, emails, calendars, tickets, etc.), it can connect dots that might be missed otherwise. For example, if a customer asks, “Have we dealt with this printer issue before?”, an engineer could query Business Chat, which might pull evidence from a past meeting note, a SharePoint document with troubleshooting steps, and a previous ticket log, all summarized in one answer[3][3]. This kind of integrated insight is incredibly valuable for institutional knowledge – the MSP effectively gains an AI that knows all the past projects and can surface the right info on demand. It means faster resolution and demonstrating to customers that “institutional memory” (even as staff come and go) is retained.

Overall, Microsoft 365 Copilot acts as a force-multiplier for MSP support teams. It doesn’t replace the engineers, but rather augments their abilities – handling the grunt work of drafting, searching, and summarising so that the human experts can focus on decision-making and problem-solving. By using Copilot internally, an MSP can deliver answers and solutions to customers more quickly, with communications that are well-crafted and documentation that is up-to-date. It also helps train and onboard new team members, as Copilot can quickly bring them up to speed on procedures and past knowledge.

From the customer’s perspective, the use of Copilot by their MSP translates to better service: faster turnaround on tickets, more thorough documentation provided for solutions, and generally a more proactive support approach. For example, customers might start receiving helpful self-service guides or troubleshooting steps that the MSP created in half the time using Copilot – so issues get resolved with fewer back-and-forth interactions.

It’s important to note that Copilot operates within the Microsoft 365 security and compliance framework, meaning data stays within the tenant’s boundaries. This addresses some of the privacy concerns of using AI in support. Unlike generic AI tools, Copilot will only show content that the MSP and its users have permission to access[4]. This feature is crucial when dealing with multiple client data sets and sensitive information; it ensures that leveraging AI does not inadvertently leak information between contexts.

In conclusion, adopting Microsoft 365 Copilot allows an SMB MSP to ride the AI wave in a controlled, enterprise-friendly manner. It directly boosts the productivity of the support team and helps standardise best practices across the organisation. As AI becomes a bigger part of daily work, tools like Copilot give MSPs a head start in using these capabilities to benefit their customers, without having to build an AI from scratch.

Long-Term Outlook: The Future of MSP Support in the AI Era

Looking ahead, the influence of AI on MSP-provided support is only expected to grow. Industry observers predict significant changes in how MSPs operate over the next 5–10 years as AI technologies mature. Here are some key projections for the longer-term impact of AI on MSPs and their help desks:

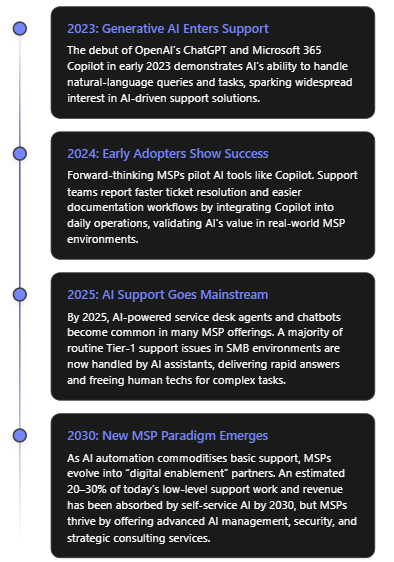
  • Commoditisation of Basic Services: Over the long term, many basic IT support services are likely to become commoditised or bundled into software. For instance, routine monitoring, patch management, and straightforward troubleshooting might be almost entirely automated by AI systems. Microsoft and other vendors are increasingly building AI “co-pilots” directly into their products (as indicated by features rolling out in tools by 2025), allowing end-users to self-serve solutions that once required an MSP’s intervention[5][5]. As a result, MSPs may find that the traditional revenue from things like alert monitoring or simple ticket resolution diminishes. In fact, experts predict that by 2030, about a quarter of the current low-complexity ticket volume will vanish – either resolved automatically by AI or handled by intuitive user-facing AI assistants[5]. This means MSPs must prepare for possible pressure on the classic “all-you-can-eat” support contracts, as clients question paying for tasks that AI can do cheaply[5]. We may see pricing models shift from per-seat or per-ticket to outcome-based agreements where the focus is on uptime and results (with AI silently doing much of the work in the background)[5].
  • New High-Value Services and Roles: On the flip side, AI will open entirely new service opportunities for MSPs who adapt. Just as some revenue streams shrink, others will grow or emerge. Key areas poised for expansion include:
    • AI Oversight and Management: Businesses will need help deploying, tuning, and governing AI systems. MSPs can provide services like training AI on custom data, monitoring AI performance, and ensuring compliance (preventing biased outcomes or data leakage). One new role mentioned is managing “prompt engineering” and data quality to avoid AI errors like hallucinations[5]. MSPs could bundle services to regularly check AI outputs, update the knowledge base the AI draws from, and keep the AI models secure and up-to-date.
    • AI-Enhanced Security Services: The cybersecurity landscape is escalating as both attackers and defenders leverage AI. MSPs can develop AI-driven security operation center (SOC) services, using advanced AI to detect anomalies and respond to threats faster than any human could[5]. Conversely, they must counter AI-empowered cyber attacks. This arms race creates demand for MSP-led managed security services (like “MDR 2.0” – Managed Detection & Response with AI) that incorporate AI tools to protect clients[5]. Many MSPs are already exploring such offerings as a higher-margin, value-add service.
    • Strategic AI Consulting: As AI pervades business processes, clients (especially SMBs) will turn to their MSPs for guidance on how to integrate AI into their operations. MSPs can evolve into consultants for AI adoption, advising on the right AI tools, data strategies, and process changes for each client. They might conduct AI readiness assessments and help implement AI in areas beyond IT support – such as in analytics or workflow automation – effectively becoming a “virtual CIO for AI” for small businesses[5][5].
    • Data Engineering and Integration: With AI’s hunger for data, MSPs might offer services to clean, organise, and integrate client data so that AI systems perform well. For instance, consolidating a client’s disparate databases and migrating data to cloud platforms where AI can access it. This ensures the client’s AI (or Copilot-like systems) have high-quality data to work with, improving outcomes[2]. It’s a natural extension of the MSP’s role in managing infrastructure and could become a significant service line (data pipelines, data lakes, etc., managed for SMBs).
    • Industry-specific AI Solutions: MSPs might develop expertise in specific verticals (e.g., healthcare, legal, manufacturing) and provide custom AI solutions tuned to those domains[5]. For example, an MSP could offer an AI toolset for medical offices that assists with compliance (HIPAA) and automates patient IT support with knowledge of healthcare workflows. These niche AI services could command premium prices and differentiate MSPs in the market.
  • Evolution of MSP Workforce Skills: The skill profile of MSP staff will evolve. The level-1 help desk role may largely transform into an AI-supported custodian role, where instead of manually doing the work, the technician monitors AI outputs and handles exceptions. There will be greater demand for skills in AI and data analytics. We’ll see MSPs investing in training their people on AI administration, scripting/automation, and interpreting AI-driven insights. Some positions might shift from pure technical troubleshooting to roles like “Automation Specialist” or “AI Systems Analyst.” At the same time, soft skills (like client relationship management) become even more important for humans since they’ll often be stepping in primarily for the complex or sensitive interactions. MSPs that encourage their staff to upskill in AI will stay ahead. As one playbook suggests, MSPs should “upskill NOC engineers in Python, MLOps, and prompt-engineering” to thrive in the coming years[5].
  • Business Model and Competitive Landscape Changes: AI may lower the barrier for some IT services, meaning MSPs face new competition (for example, a product vendor might bundle AI support directly, or a client might rely on a generic AI service instead of calling the MSP for minor issues). To stay competitive, MSPs will likely transition from being pure “IT fixers” to become more like a partner in continuous improvement for clients’ technology. Contracts might include AI as part of the service – for example, MSPs offering a proprietary AI helpdesk portal to clients as a selling point. The overall managed services market might actually expand as even very small businesses can afford AI-augmented support (increasing the TAM – total addressable market)[5]. Rather than needing a large IT team, a five-person company could engage an MSP that uses AI to give them enterprise-grade support experience. So there’s a scenario where AI helps MSPs scale down-market to micro businesses and also up-market by handling more endpoints per engineer than before. Analysts foresee that MSPs could morph into “Managed Digital Enablement Providers”, focusing not just on keeping the lights on, but on actively enabling new tech capabilities (like AI) for clients[5]. The MSPs who embrace this and market themselves as such will stand out.
  • MSPs remain indispensable (if they adapt): A looming question is whether AI will eventually make MSPs obsolete, as some pessimists suggest. However, the consensus in the industry is that MSPs will continue to play a critical role, but it will be a changed role. AI is a tool – a powerful one – but it still requires configuration, oversight, and alignment with business goals. MSPs are perfectly positioned to fill that need for their clients. The human element – strategic planning, empathy, complex integration, and handling novel challenges – will keep MSPs relevant. In fact, AI could make MSPs more valuable by enabling them to deliver higher-level outcomes. Those MSPs that fail to incorporate AI may find themselves undercut on price and losing clients to more efficient competitors, akin to “the taxi fleet in the age of Uber” – still around but losing ground[5]. On the other hand, those that invest in AI capabilities can differentiate and potentially command higher margins (e.g., an MSP known for its advanced AI-based services can justify premium pricing and will be attractive to investors as well)[5]. Already, by 2025, MSP industry experts note that buyers looking to acquire or partner with MSPs ask about their AI adoption plan – no strategy often leads to a devaluation, whereas a clear AI roadmap is seen as a sign of an innovative, future-proof MSP[5][5].

In summary, the long-term impact of AI on MSP support is a shift in the MSP value proposition rather than a demise. Routine support chores will increasingly be handled by AI, which is “the new normal” of service delivery. Simultaneously, MSPs will gravitate towards roles of AI enablers, advisors, and security guardians for their clients. By embracing this evolution, MSPs can actually improve their service quality and deepen client relationships – using AI not as a competitor, but as a powerful ally. The MSP of the future might spend less time resetting passwords and more time advising a client’s executive team on technology strategy with AI-generated insights. Those who adapt early will likely lead the market, while those slow to change may struggle.

Ultimately, AI is a force-multiplier, not a wholesale replacement for managed services[5]. The most successful MSPs will be the ones that figure out how to blend AI with human expertise, providing a seamless, efficient service that still feels personal and trustworthy. As we move toward 2030 and beyond, an MSP’s ability to harness AI – for their own operations and for their clients’ benefit – will be a key determinant of their success in the industry.

References

[1] AI Service Desk: Advantages, Risks and Creative Usages

[2] How MSPs Can Help Organizations Adopt M365 Copilot & AI

[3] Introducing Copilot for Microsoft 365 | Microsoft 365 Blog

[4] The Practical MSP Guide to Microsoft 365 Copilot

[5] AI & Agentic AI in Managed Services: Threat or Catalyst?

[6] How AI help MSPs increase their bottom line in 2025 – ManageEngine

[7] What AI Gets Right (and Wrong) About Running an MSP in 2025 and Beyond

[8] Exploring the Risks of Generative AI in IT Helpdesks: Mitigating Risks

[9] How Copilot for Microsoft 365 Enhances Service Desk Efficiency: Alex’s …

CIA Brief 20250824

image

What’s New in Microsoft Intune: August 2025 –

https://techcommunity.microsoft.com/blog/microsoftintuneblog/what%E2%80%99s-new-in-microsoft-intune-august-2025/4445612

OneNote for Windows 10 support is ending –

https://techcommunity.microsoft.com/blog/microsoft365insiderblog/onenote-for-windows-10-support-is-ending/4445230

Think before you Click(Fix): Analyzing the ClickFix social engineering technique –

https://www.microsoft.com/en-us/security/blog/2025/08/21/think-before-you-clickfix-analyzing-the-clickfix-social-engineering-technique/

Microsoft Sentinel’s New Data Lake: Cut Costs & Boost Threat Detection –

https://techcommunity.microsoft.com/blog/microsoft-security-blog/microsoft-sentinel%E2%80%99s-new-data-lake-cut-costs–boost-threat-detection/4445281

Identify Defender for Endpoint Onboarding Method using PowerShell – Part 2 –

https://techcommunity.microsoft.com/blog/coreinfrastructureandsecurityblog/identify-defender-for-endpoint-onboarding-method-using-powershell—part-2/4445263

Microsoft Elevate: Putting people first –

https://blogs.microsoft.com/on-the-issues/2025/07/09/elevate/

Introducing new SharePoint Site Header & Footer Enhancements –

https://techcommunity.microsoft.com/blog/spblog/introducing-new-sharepoint-site-header–footer-enhancements/4444261

Deep Dive: DLP Incidents, Alerts & Events – Part 1 –

https://techcommunity.microsoft.com/blog/microsoft-security-blog/deep-dive-dlp-incidents-alerts–events—part-1/4443691

Deep Dive: DLP Incidents, Alerts & Events – Part 2 –

https://techcommunity.microsoft.com/blog/microsoft-security-blog/deep-dive-dlp-incidents-alerts–events—part-2/4443700

After hours

We’re Not Ready for Superintelligence– https://www.youtube.com/watch?v=5KVDDfAkRgc

Editorial

If you found this valuable, the I’d appreciate a ‘like’ or perhaps a donation at https://ko-fi.com/ciaops. This helps me know that people enjoy what I have created and provides resources to allow me to create more content. If you have any feedback or suggestions around this, I’m all ears. You can also find me via email director@ciaops.com and on X (Twitter) at https://www.twitter.com/directorcia.

If you want to be part of a dedicated Microsoft Cloud community with information and interactions daily, then consider becoming a CIAOPS Patron – www.ciaopspatron.com.

Watch out for the next CIA Brief next week

Need to Know podcast–Episode 352

In this episode of the CIAOPS “Need to Know” podcast, we dive into the latest updates across Microsoft 365, GitHub Copilot, and SMB-focused strategies for scaling IT services. From new Teams features to deep dives into DLP alerts and co-partnering models for MSPs, this episode is packed with insights for IT professionals and small business tech leaders looking to stay ahead of the curve. I also take a look at building an agent to help you work with frameworks like the ASD Blueprint for Secure Cloud.

Brought to you by www.ciaopspatron.com

you can listen directly to this episode at:

https://ciaops.podbean.com/e/episode-352-agents-to-the-rescue/

Subscribe via iTunes at:

https://itunes.apple.com/au/podcast/ciaops-need-to-know-podcasts/id406891445?mt=2

or Spotify:

https://open.spotify.com/show/7ejj00cOuw8977GnnE2lPb

Don’t forget to give the show a rating as well as send me any feedback or suggestions you may have for the show.

Resources

CIAOPS Need to Know podcast – CIAOPS – Need to Know podcasts | CIAOPS

X – https://www.twitter.com/directorcia

Join my Teams shared channel – Join my Teams Shared Channel – CIAOPS

CIAOPS Merch store – CIAOPS

Become a CIAOPS Patron – CIAOPS Patron

CIAOPS Blog – CIAOPS – Information about SharePoint, Microsoft 365, Azure, Mobility and Productivity from the Computer Information Agency

CIAOPS Brief – CIA Brief – CIAOPS

CIAOPS Labs – CIAOPS Labs – The Special Activities Division of the CIAOPS

Support CIAOPS – https://ko-fi.com/ciaops

Get your M365 questions answered via email

Microsoft 365 & GitHub Copilot Updates
GPT-5 in Microsoft 365 Copilot:
https://www.microsoft.com/en-us/microsoft-365/blog/2025/08/07/available-today-gpt-5-in-microsoft-365-copilot/

GPT-5 Public Preview for GitHub Copilot: https://github.blog/changelog/2025-08-07-openai-gpt-5-is-now-in-public-preview-for-github-copilot/

Microsoft Teams & UX Enhancements

Mic Volume Indicator in Teams: https://techcommunity.microsoft.com/blog/Microsoft365InsiderBlog/new-microphone-volume-indicator-in-teams/4442879

Pull Print in Universal Print: https://techcommunity.microsoft.com/blog/windows-itpro-blog/pull-print-is-now-available-in-universal-print/4441608

Audio Overview in Word via Copilot: https://techcommunity.microsoft.com/blog/Microsoft365InsiderBlog/listen-to-an-audio-overview-of-a-document-with-microsoft-365-copilot-in-word/4439362

Hidden OneDrive Features: https://techcommunity.microsoft.com/blog/microsoft365insiderblog/get-the-most-out-of-onedrive-with-these-little-known-features/4435197

SharePoint Header/Footer Enhancements: https://techcommunity.microsoft.com/blog/spblog/introducing-new-sharepoint-site-header–footer-enhancements/4444261

Security & Compliance

DLP Alerts Deep Dive (Part 1 & 2): https://techcommunity.microsoft.com/blog/microsoft-security-blog/deep-dive-dlp-incidents-alerts–events—part-1/4443691

https://techcommunity.microsoft.com/blog/microsoft-security-blog/deep-dive-dlp-incidents-alerts–events—part-2/4443700

Security Exposure Management Ninja Training: https://techcommunity.microsoft.com/blog/securityexposuremanagement/microsoft-security-exposure-management-ninja-training/4444285

Microsoft Entra Internet Access & Shadow AI Protection: https://techcommunity.microsoft.com/blog/microsoft-entra-blog/uncover-shadow-ai-block-threats-and-protect-data-with-microsoft-entra-internet-a/4440787

ASD Blueprint for Secure Cloud – https://blueprint.asd.gov.au/

CIA Brief 20250817

image

Microsoft Security Exposure Management Ninja Training –

https://techcommunity.microsoft.com/blog/securityexposuremanagement/microsoft-security-exposure-management-ninja-training/4444285

New pen tools and Draw tab customization in Word, Excel, and PowerPoint for Windows –

https://techcommunity.microsoft.com/blog/microsoft365insiderblog/new-pen-tools-and-draw-tab-customization-in-word-excel-and-powerpoint-for-window/4433543

Improved margins in OneNote for Android and iOS –

https://techcommunity.microsoft.com/blog/Microsoft365InsiderBlog/improved-margins-in-onenote-for-android-and-ios/4441604

New microphone volume indicator in Teams –

https://techcommunity.microsoft.com/blog/Microsoft365InsiderBlog/new-microphone-volume-indicator-in-teams/4442879

Get the most out of OneDrive with these little-known features! –

https://techcommunity.microsoft.com/blog/microsoft365insiderblog/get-the-most-out-of-onedrive-with-these-little-known-features/4435197

Dow’s 125-year legacy: Innovating with AI to secure a long future –

https://www.microsoft.com/en-us/security/blog/2025/08/12/dows-125-year-legacy-innovating-with-ai-to-secure-a-long-future/

Pull print is now available in Universal Print –

https://techcommunity.microsoft.com/blog/windows-itpro-blog/pull-print-is-now-available-in-universal-print/4441608

Paste text only in OneNote on Windows, for Mac, and for the web –

https://techcommunity.microsoft.com/blog/microsoft365insiderblog/paste-text-only-in-onenote-on-windows-for-mac-and-for-the-web/4441132

Microsoft Teams – Manage meeting access with confidence –

https://www.youtube.com/watch?v=fGvVREwX33E

New pen tools and Draw tab customization in Word, Excel, and PowerPoint for Windows –

https://techcommunity.microsoft.com/blog/microsoft365insiderblog/new-pen-tools-and-draw-tab-customization-in-word-excel-and-powerpoint-for-window/4433543

How Fulton County Schools use Copilot Chat to empower student innovation –

https://www.microsoft.com/en-us/education/blog/2025/08/how-fulton-county-schools-use-copilot-chat-to-empower-student-innovation/

After hours

AI Is About to Get Physical– https://www.youtube.com/watch?v=3WZNxNr7kS8

Editorial

If you found this valuable, the I’d appreciate a ‘like’ or perhaps a donation at https://ko-fi.com/ciaops. This helps me know that people enjoy what I have created and provides resources to allow me to create more content. If you have any feedback or suggestions around this, I’m all ears. You can also find me via email director@ciaops.com and on X (Twitter) at https://www.twitter.com/directorcia.

If you want to be part of a dedicated Microsoft Cloud community with information and interactions daily, then consider becoming a CIAOPS Patron – www.ciaopspatron.com.

Watch out for the next CIA Brief next week

Building a Collaborative Microsoft 365 Copilot Agent: A Step-by-Step Guide

Creating a Microsoft 365 Copilot agent (a custom AI assistant within Microsoft 365 Copilot) can dramatically streamline workflows. These agents are essentially customised versions of Copilot that combine specific instructions, knowledge, and skills to perform defined tasks or scenarios[1]. The goal here is to build an agent that multiple team members can collaboratively develop and easily maintain – even if the original creator leaves the business. This report provides:

  • Step-by-step guidelines to create a Copilot agent (using no-code/low-code tools).
  • Best practices for multi-user collaboration, including managing edit permissions.
  • Documentation and version control strategies for long-term maintainability.
  • Additional tips to ensure the agent remains robust and easy to update.

Step-by-Step Guide: Creating a Microsoft 365 Copilot Agent

To build your Copilot agent without code, you will use Microsoft 365 Copilot Studio’s Agent Builder. This tool provides a guided interface to define the agent’s behavior, knowledge, and appearance. Follow these steps to create your agent:

As a result of the steps above, you have a working Copilot agent with its name, description, instructions, and any connected data sources or capabilities configured. You built this agent in plain language and refined it with no code required, thanks to Copilot Studio’s declarative authoring interface[2].

Before rolling it out broadly, double-check the agent’s responses for accuracy and tone, especially if it’s using internal knowledge. Also verify that the knowledge sources cover the expected questions. (If the agent couldn’t answer a question in testing, you might need to add a missing document or adjust instructions.)

Note: Microsoft also provides pre-built templates in Copilot Studio that you can use as a starting point (for example, templates for an IT help desk bot, a sales assistant, etc.)[2]. Using a template can jump-start your project with common instructions and sample prompts already filled in, which you can then modify to suit your needs.


Collaborative Development and Access Management

One key to long-term maintainability is ensuring multiple people can access and work on the agent. You don’t want the agent tied solely to its creator. Microsoft 365 Copilot supports this through agent sharing and permission controls. Here’s how to enable collaboration and manage who can use or edit the agent:

  • Share the Agent for Co-Authoring: After creating the agent, the original author can invite colleagues as co-authors (editors). In Copilot Studio, use the Share menu on the agent and add specific users by name or email for “collaborative authoring” access[3]. (You can only add individuals for edit access, not groups, and those users must be within your organisation.) Once shared, these teammates are granted the necessary roles (Environment Maker/Bot Contributor in the underlying Power Platform environment) automatically so they can modify the agent[3]. Within a few minutes, the agent will appear in their Copilot Studio interface as well. Now your agent effectively has multiple owners — if one person leaves, others still have full editing rights.
  • Ensure Proper Permissions: When sharing for co-authoring, make sure the colleagues have appropriate permissions in the environment. Copilot Studio will handle most of this via the roles mentioned, but it’s good for an admin to know who has edit access. By design, editors can do everything the owner can: edit content, configure settings, and share the agent further. Viewers (users who are granted use but not edit rights) cannot make changes[4]. Use Editor roles for co-authors and Viewer roles for end users as needed to control access[4]. For example, you may grant your whole team viewer access to use the agent, but only a smaller group of power users get editor access to change it. (The platform currently only allows assigning Editor permission to individuals, not to a security group, for safety[4].)
  • Collaborative Editing in Real-Time: Once multiple people have edit access, Copilot Studio supports concurrent editing of the agent’s topics (the conversational flows or content nodes). The interface will show an “Editing” indicator with the co-authors’ avatars next to any topic being worked on[3]. This helps avoid stepping on each other’s toes. If two people do happen to edit the same piece at once, Copilot Studio prevents accidental overwrites by detecting the conflict and offering choices: you can discard your changes or save a copy of the topic[3]. For instance, if you and a colleague unknowingly both edited the FAQ topic, and they saved first, when you go to save, the system might tell you a newer version exists. You could then choose to keep your version as a separate copy, review differences, and merge as appropriate. This built-in change management ensures that multi-author collaboration is safe and manageable.
  • Sharing the Agent for Use: In addition to co-authors, you likely want to share the finished agent with other employees so they can use it in Copilot. You can share the agent via a link or through your tenant’s app catalog. In Copilot Studio’s share settings, choose who can chat with (use) the agent. Options include “Anyone in your organization” or specific security groups[5]. For example, you might initially share it with just the IT department group for a pilot, or with everyone if it’s broadly useful. When a user adds the shared agent, it will show up in their Microsoft 365 Copilot interface for them to interact with. Note that sharing for use does not grant edit rights – it only allows using the agent[5]. Keep the sharing scope to “Only me” if it’s a draft not ready for others, but otherwise switch it to an appropriate audience so the agent isn’t locked to one person’s account[5].
  • Manage Underlying Resources: If your agent uses additional resources like Power Automate flows (actions) or certain connectors that require separate permissions, remember to share those as well. Sharing an agent itself does not automatically share any connected flow or data source with co-authors[3]. For example, if the agent triggers a Power Automate flow to update a SharePoint list, you must go into that flow and add your colleagues as co-owners there too[3]. Otherwise, they might be able to edit the agent’s conversation, but not open or modify the flow. Similarly, ensure any SharePoint sites or files used as knowledge sources have the right sharing settings for your team. A good practice is to use common team-owned resources (not one person’s private OneDrive file) for any knowledge source, so access can be managed by the team or admins.
  • Administrative Oversight: Because these agents become part of your organisation’s tools, administrators have oversight of shared agents. In the Microsoft 365 admin center (under Integrated Apps > Shared Agents), admins can see a list of all agents that have been shared, along with their creators, status, and who they’re shared with[1]. This means if the original creator does leave the company, an admin can identify any orphaned agents and reassign ownership or manage them as needed. Admins can also block or disable an agent if it’s deemed insecure or no longer appropriate[1]. This governance is useful for ensuring continuity and compliance – your agent isn’t tied entirely to one user’s account. From a planning perspective, it’s wise to have at least two people with full access to every mission-critical agent (one primary and one backup person), plus ensure your IT admin team is aware of the agent’s existence.

By following these practices, you create a safety net around your Copilot agent. Multiple team members can improve or update it, and no single individual is irreplaceable for its maintenance. Should someone exit the team, the remaining editors (or an admin) can continue where they left off.


Documentation and Version Control Practices

Even with a collaborative platform, it’s important to document the agent’s design and maintain version control as if it were any other important piece of software. This ensures that knowledge about how the agent works is not lost and changes can be tracked over time. Here are key practices:

  • Create a Design & Usage Document: Begin a living document (e.g. in OneNote or a SharePoint wiki) that describes the agent in detail. This should include the agent’s purpose, the problems it solves, and its scope (what it will and won’t do). Document the instructions or logic you gave it – you might even copy the core parts of the agent’s instruction text into this document for reference. Also list the knowledge sources connected (e.g. “SharePoint site X – HR Policies”) and any capabilities/flows added. This way, if a new colleague takes over the agent, they can quickly understand its configuration and dependencies. Include screenshots of the agent’s setup from Copilot Studio if helpful. If the agent goes through iterations, note what changed in each version (“Changelog: e.g. Added new Q\&A section on 2025-08-16 to cover Covid policies”). This documentation will be invaluable if the original creator is not available to explain the agent’s behavior down the line.
  • Use Source Control for Agent Configuration (ALM): Treat the agent as a configurable solution that can be exported and versioned. Microsoft 365 Copilot agents built in Copilot Studio actually reside in the Power Platform environment, which means you can leverage Power Platform’s Application Lifecycle Management (ALM) features. Specifically, you can export the agent as a solution package and store that file for version control[6]. Using Copilot Studio, create a solution in the environment, add the agent to it, and export it as an unzip-able file. This exported solution contains the agent’s definition (topics, flows, etc.). You can keep these solution files in a source repository (like a GitHub or Azure DevOps repo) to track changes over time, similar to how you’d version code. Whenever you make significant updates to the agent, export an updated solution file (with a version number or date in the filename) and commit it to the repository. This provides a backup and a history. In case of any issue or if you need to restore or compare a previous version, you can import an older solution file into a sandbox environment[6]. Microsoft’s guidance explicitly supports moving agents between environments using this export/import method, which can double as a backup mechanism[6].
  • Implement CI/CD for Complex Projects (Optional): If your organisation has the capacity, you can integrate the agent development into a Continuous Integration/Continuous Deployment process. Using tools like Azure DevOps or GitHub Actions, you can automate the export/import of agent solutions between Dev, Test, and Prod environments. This kind of pipeline ensures that all changes are logged and pass through proper testing stages. Microsoft recommends maintaining healthy ALM processes with versioning and deployment automation for Copilot agents, just as you would for other software[7]. For example, you might do initial editing in a development environment, export the solution, have it reviewed in code review (even though it’s mostly configuration, you can still check the diff on the solution components), then import into a production environment for the live agent. This way, any change is traceable. While not every team will need full DevOps for a simple Copilot agent, this approach becomes crucial if your agent grows in complexity or business importance.
  • **Consider the Microsoft 365 *Agents SDK* for Code-Based Projects:** Another approach to maintainability is building the agent via code. Microsoft offers an Agents SDK that allows developers to create Copilot agents using languages like C#, JavaScript, or Python, and integrate custom AI logic (with frameworks like Semantic Kernel or LangChain)[8]. This is a more advanced route, but it has the advantage that your agent’s logic lives in code files that can be fully managed in source control. If your team has software engineers, they could use the SDK to implement the agent with standard dev practices (unit testing, code reviews, git version control, etc.). This isn’t a no-code solution, but it’s worth mentioning for completeness: a coded agent can be as collaborative and maintainable as any other software project. The SDK supports quick scaffolding of projects and deployment to Copilot, so you could even migrate a no-code agent to a coded one later if needed[8]. Only pursue this if you need functionality beyond what Copilot Studio offers or want deeper integration/testing – for most cases, the no-code approach is sufficient.
  • Keep the Documentation Updated: Whichever development path you choose, continuously update your documentation when changes occur. If a new knowledge source is added or a new capability toggled on, note it in the doc. Also record any design rationale (“We disabled the image generator on 2025-09-01 due to misuse”) so future maintainers understand past decisions. Good documentation ensures that even if original creators or key contributors leave, anyone new can come up to speed quickly by reading the material.

By maintaining both a digital paper trail (documents) and technical version control (solution exports or code repositories), you safeguard the project’s knowledge. This prevents the “single point of failure” scenario where only one person knows how the agent really works. It also makes onboarding new team members to work on the agent much easier.


Additional Tips for a Robust, Maintainable Agent

Finally, here are additional recommendations to ensure your Copilot agent remains reliable and easy to manage in the long run:

  • Define a Clear Scope and Boundaries: A common pitfall is trying to make one agent do too much. It’s often better to have a focused agent that excels at a specific set of tasks than a catch-all that becomes hard to maintain. Clearly state what user needs the agent addresses. If later you find the scope creeping beyond original intentions (for example, your HR bot is suddenly expected to handle IT helpdesk questions), consider creating a separate agent for the new domain or using multi-agent orchestration, rather than overloading one agent. This keeps each agent simpler to troubleshoot and update. Also use the agent’s instructions to explicitly guard against out-of-scope requests (e.g., instruct it to politely decline questions unrelated to its domain) so that maintenance remains focused.
  • Follow Best Practices in Instruction Design: Well-structured instructions not only help the AI give correct answers, but also make the agent’s logic easier for humans to understand later. Use clear and action-oriented language in your instructions and avoid unnecessary complexity[9]. For example, instead of a vague instruction like “help with leaves,” write a specific rule: “If user asks about leave status, retrieve their leave request record from SharePoint and display the status.” Break down the agent’s workflow into ordered steps where necessary (using bullet or numbered lists in the instructions)[9]. This modular approach (goal → action → outcome for each step) acts like commenting your code – it will be much easier for someone else to modify the behavior if they can follow a logical sequence. Additionally, include a couple of example user queries and desired responses in the instructions (few-shot examples) for clarity, especially if the agent’s task is complex. This reduces ambiguity for both the AI and future editors.
  • Test Thoroughly and Collect Feedback: Continuous testing is key to robustness. Even after deployment, encourage users (or the team internally) to provide feedback if the agent gives an incorrect or confusing response. Periodically review the agent’s performance: pose new questions to it or check logs (if available) to see how it’s handling real queries. Microsoft 365 Copilot doesn’t yet provide full conversation logs to admins, but you can glean some insight via any integrated telemetry. If you have access to Azure Application Insights or the Power Platform CoE kit, use them – Microsoft suggests integrating these to monitor usage, performance, and errors for Copilot agents[7]. For example, Application Insights can track how often certain flows are called or if errors occur, and the Power Platform Center of Excellence toolkit can inventory your agent and its usage metrics[7]. Monitoring tools help you catch issues early (like an action failing because of a permissions error) and measure the agent’s value (how often it’s used, peak times, etc.). Use this data to guide maintenance priorities.
  • Implement Governance and Compliance Checks: Since Copilot agents can access organisational data, ensure that all security and compliance requirements are met. From a maintainability perspective, this means the agent should be built in accordance with IT policies (e.g., respecting Data Loss Prevention rules, not exposing sensitive info). Work with your admin to double-check that the agent’s knowledge sources and actions comply with company policy. Also, have a plan for regular review of content – for instance, if one of the knowledge base documents the agent relies on is updated or replaced, update the agent’s knowledge source to point to the new info. Remove any knowledge source that is outdated or no longer approved. Keeping the agent’s inputs current and compliant will prevent headaches (or forced takedowns) later on.
  • Plan for Handover: Since the question specifically addresses if the original creator leaves, plan for a smooth handover. This includes everything we’ve discussed (multiple editors, documentation, version history). Additionally, consider a short training session or demo for the team members who will inherit the agent. Walk them through the agent’s flows in Copilot Studio, show how to edit a topic, how to republish updates, etc. This will give them confidence to manage it. Also, make sure the agent’s ownership is updated if needed. Currently, the original creator remains the “Owner” in the system. If that person’s account is to be deactivated, it may be wise to have an admin transfer any relevant assets or at least note that co-owners are in place. Since admins can see the creator’s name on the agent, proactively communicate to IT that the agent has co-owners who will take over maintenance. This can avoid a scenario where an admin might accidentally disable an agent assuming no one can maintain it.
  • Regular Maintenance Schedule: Treat the agent as a product that needs occasional maintenance. Every few months (or whatever cadence fits your business), review if the agent’s knowledge or instructions need updates. For example, if processes changed or new common questions have emerged, update the agent to cover them. Also verify that all co-authors still have access and that their permissions are up to date (especially if your company uses role-based access that might change with team reorgs). A little proactive upkeep will keep the agent effective and prevent it from becoming obsolete or broken without anyone noticing.

By following the above tips, your Microsoft 365 Copilot agent will be well-positioned to serve users over the long term, regardless of team changes. You’ve built it with a collaborative mindset, documented its inner workings, and set up processes to manage changes responsibly. This not only makes the agent easy to edit and enhance by multiple people, but also ensures it continues to deliver value even as your organisation evolves.


Conclusion: Building a Copilot agent that stands the test of time requires forethought in both technology and teamwork. Using Microsoft’s no-code Copilot Studio, you can quickly create a powerful assistant tailored to your needs. Equally important is opening up the project to your colleagues, setting the right permissions so it’s a shared effort. Invest in documentation and consider leveraging export/import or even coding options to keep control of the agent’s “source.” And always design with clarity and governance in mind. By doing so, you create not just a bot, but a maintainable asset for your organisation – one that any qualified team member can pick up and continue improving, long after the original creator’s tenure. With these steps and best practices, your Copilot agent will remain helpful, accurate, and up-to-date, no matter who comes or goes on the team.

References

[1] Manage shared agents for Microsoft 365 Copilot – Microsoft 365 admin

[2] Use the Copilot Studio Agent Builder to Build Agents

[3] Share agents with other users – Microsoft Copilot Studio

[4] Control how agents are shared – Microsoft Copilot Studio

[5] Publish and Manage Copilot Studio Agent Builder Agents

[6] Export and import agents using solutions – Microsoft Copilot Studio

[7] Phase 4: Testing, deployment, and launch – learn.microsoft.com

[8] Create and deploy an agent with Microsoft 365 Agents SDK

[9] Write effective instructions for declarative agents

Comprehensive Guide to Microsoft Autopilot v2 Deployment in Microsoft 365 Business

Microsoft’s Windows Autopilot is a cloud-based suite of technologies designed to streamline the deployment and configuration of new Windows devices for organizations[1]. This guide provides a detailed look at the latest updates to Windows Autopilot – specifically the new Autopilot v2 (officially called Windows Autopilot Device Preparation) – and offers step-by-step instructions for implementing it in a Microsoft 365 Business environment. We will cover the core concepts, new features in Autopilot v2, benefits for businesses, the implementation process (from prerequisites to deployment), troubleshooting tips, and best practices for managing devices with Autopilot v2.

1. Overview of Microsoft Autopilot and Its Purpose

Windows Autopilot simplifies the Windows device lifecycle from initial deployment through end-of-life. It leverages cloud services (like Microsoft Intune and Microsoft Entra ID) to pre-configure devices out-of-box without traditional imaging. When a user unboxes a new Windows 10/11 device and connects to the internet, Autopilot can automatically join it to Azure/Microsoft Entra ID, enroll it in Intune (MDM), apply corporate policies, install required apps, and tailor the out-of-box experience (OOBE) to the organization[1][1]. This zero-touch deployment means IT personnel no longer need to manually image or set up each PC, drastically reducing deployment time and IT overhead[2]. In short, Autopilot’s purpose is to get new devices “business-ready” with minimal effort, offering benefits such as:

  • Reduced IT Effort – No need to maintain custom images for every model; devices use the OEM’s factory image and are configured via cloud policies[1][1].
  • Faster Deployment – Users only perform a few quick steps (like network connection and sign-in), and everything else is automated, so employees can start working sooner[1].
  • Consistency & Compliance – Ensures each device receives standard configurations, security policies, and applications, so they immediately meet organizational standards upon first use[2].
  • Lifecycle Management – Autopilot can also streamline device resets, repurposing for new users, or recovery scenarios (for example, using Autopilot Reset to wipe and redeploy a device)[1].

2. Latest Updates: Introduction of Autopilot v2 (Device Preparation)

Microsoft has recently introduced a next-generation Autopilot deployment experience called Windows Autopilot Device Preparation (commonly referred to as Autopilot v2). This new version is essentially a re-architected Autopilot aimed at simplifying and improving deployments based on customer feedback[3]. Autopilot v2 offers new capabilities and architectural changes that enhance consistency, speed, and reliability of device provisioning. Below is an overview of what’s new in Autopilot v2:

  • No Hardware Hash Import Required: Unlike the classic Autopilot (v1) which required IT admins or OEMs to register devices in Autopilot (upload device IDs/hardware hashes) beforehand, Autopilot v2 eliminates this step[4]. Devices do not need to be pre-registered in Intune; instead, enrollment can be triggered simply by the user logging in with their work account. This streamlines onboarding by removing the tedious hardware hash import process[3]. (If a device is already registered in the old Autopilot, the classic profile will take precedence – so using v2 means not importing the device beforehand[5].)
  • Cloud-Only (Entra ID) Join: Autopilot v2 currently supports Microsoft Entra ID (Azure AD) join only – it’s designed for cloud-based identity scenarios. Hybrid Azure AD Join (on-prem AD) is not supported in v2 at this time[3]. This focus on cloud join aligns with modern, cloud-first management in Microsoft 365 Business environments.
  • Single Unified Deployment Profile: The new Autopilot Device Preparation uses a single profile to define all deployment settings and OOBE customization, rather than separate “Deployment” and “ESP” profiles as in legacy Autopilot[3]. This unified profile encapsulates join type, user account type, and OOBE preferences, plus it lets you directly select which apps and scripts should install during the setup phase.
  • Enrollment Time Grouping: Autopilot v2 introduces an “Enrollment Time Grouping” mechanism. When a user signs in during OOBE, the device is automatically added to a specified Azure AD group on the fly, and any applications or configurations assigned to that group are immediately applied[5][5]. This replaces the old dependence on dynamic device groups (which could introduce delays while membership queries run). Result: faster and more predictable delivery of apps/policies during provisioning[5].
  • Selective App Installation (OOBE): With Autopilot v1, all targeted device apps would try to install during the initial device setup, possibly slowing things down. In Autopilot v2, the admin can pick up to 10 essential apps (Win32, MSI, Store apps, etc.) to install during OOBE; any apps not selected will be deferred until after the user reaches the desktop[3][6]. By limiting to 10 critical apps, Microsoft aimed to increase success rates and speed (as their telemetry showed ~90% of deployments use 10 or fewer apps initially)[6].
  • PowerShell Scripts Support in ESP: Autopilot v2 can also execute PowerShell scripts during the Enrollment Status Page (ESP) phase of setup[3]. This means custom configuration scripts can run as part of provisioning before the device is handed to the user – a capability that simplifies advanced setup tasks (like configuring registry settings, installing agent software, etc., via script).
  • Improved Progress & UX: The OOBE experience is updated – Autopilot v2 provides a simplified progress display (percentage complete) during provisioning[6]. Users can clearly see that the device is installing apps/configurations. Once the critical steps are done, it informs the user that setup is complete and they can start using the device[6][6]. (Because the device isn’t identified as Autopilot-managed until after the user sign-in, some initial Windows setup screens like EULA or privacy settings may appear in Autopilot v2 that were hidden in v1[3]. These are automatically suppressed only after the Autopilot policy arrives during login.)
  • Near Real-Time Deployment Reporting: Autopilot v2 greatly enhances monitoring. Intune now offers an Autopilot deployment report that shows status per device in near real time[6]. Administrators can see which devices have completed Autopilot, which stage they’re in, and detailed results for each selected app and script (success/failure), as well as overall deployment duration[5][5]. This granular reporting makes troubleshooting easier, as you can immediately identify if (for example) a particular app failed to install during OOBE[5][5].
  • Availability in Government Clouds: The new Device Preparation approach is available in GCC High and DoD government cloud environments[6][5], which was not possible with Autopilot previously. This broadens Autopilot use to more regulated customers and is one reason Microsoft undertook this redesign (Autopilot v2 originated as a project to meet government cloud requirements and then expanded to all customers)[7].

The table below summarizes key differences between Autopilot v1 (classic) and Autopilot v2:

Feature/CapabilityAutopilot v1 (Classic)Autopilot v2 (Device Preparation)
Device preregistration (Hardware hash upload)Required (devices must be registered in Autopilot device list before use)[4]Not required (user can enroll device directly; device should not be pre-added, or v2 profile won’t apply)[5]
Supported join typesAzure AD Join; Hybrid Azure AD Join (with Intune Connector)[3]Azure/Microsoft Entra ID Join only (no on-prem AD support yet)[3]
Self-Deploying / Pre-provisioning (White Glove)Supported (TPM attestation-based self-deploy; technician pre-provision mode available)Not supported in initial release[3] (future support is planned for these scenarios)
Deployment profilesSeparate Deployment Profile + ESP Profile (configuration split)Single Device Preparation Policy (one profile for all settings: join, account type, OOBE, app selection)[3]
App installation during OOBEInstalls all required apps targeted to device (could be many; admin chooses which are “blocking”)Installs selected apps only (up to 10) during OOBE; non-selected apps wait until after OOBE[3][6]
PowerShell scripts in OOBENot natively supported in ESP (workarounds needed)Supported – can run PowerShell scripts during provisioning (via device prep profile)[3]
Policy application in OOBESome device policies (Wi-Fi, certs, etc.) could block in ESP; user-targeted configs had limited supportDevice policies synced at OOBE (not blocking)[3]; user-targeted policies/apps install after user reaches desktop[3]
Out-of-Box experience (UI)Branding and many Windows setup screens are skipped (when profile is applied from the start of OOBE)Some Windows setup screens appear by default (since no profile until sign-in)[3]; afterwards, shows new progress bar and completion summary[6]
Reporting & MonitoringBasic tracking via Enrollment Status Page; limited real-time infoDetailed deployment report in Intune with near real-time status of apps, scripts, and device info[5]

Why these updates? The changes in Autopilot v2 address common pain points from Autopilot v1. By removing the dependency on upfront registration and dynamic groups, Microsoft has made provisioning more robust and “hands-off”. The new architecture “locks in” the admin’s intended config at enrollment time and provides better error handling and reporting[6][6]. In summary, Autopilot v2 is simpler, faster, more observable, and more reliable – the guiding principles of its design[5] – making device onboarding easier for both IT admins and end-users.

3. Benefits of Using Autopilot v2 in a Microsoft 365 Business Environment

Implementing Autopilot v2 brings significant advantages, especially for organizations using Microsoft 365 Business or Business Premium (which include Intune for device management). Here are the key benefits:

  • Ease of Deployment – Less IT Effort: Autopilot v2’s no-registration model is ideal for businesses that procure devices ad-hoc or in small batches. IT admins no longer need to collect hardware hashes or coordinate with OEMs to register devices. A user can unbox a new Windows 11 device, connect to the internet, and sign in with their work account to trigger enrollment. This self-service enrollment reduces the workload on IT staff, which is especially valuable for small IT teams.
  • Faster Device Setup: By limiting installation to essential apps during OOBE and using enrollment time grouping, Autopilot v2 gets devices ready more quickly. End-users see a shorter setup time before reaching the desktop. They can start working sooner with all critical tools in place (e.g. Office apps, security software, etc. installed during setup)[7][7]. Non-critical apps or large software can install in the background later, avoiding long waits up-front.
  • Improved Reliability and Fewer Errors: The new deployment process is designed to “fail fast” with better error details[6]. If something is going to go wrong (for example, an app that fails to install), Autopilot v2 surfaces that information quickly in the Intune report and does not leave the user guessing. The enrollment time grouping also avoids timing issues that could occur with dynamic Azure AD groups. Overall, this means higher success rates for device provisioning and less troubleshooting compared to the old Autopilot. In addition, by standardizing on cloud join only, many potential complexities (like on-prem domain connectivity during OOBE) are removed.
  • Enhanced User Experience: Autopilot v2 provides a more transparent and reassuring experience to employees receiving new devices. The OOBE progress bar with a percentage complete indicator lets users know that the device is configuring (rather than appearing to be stuck). Once the critical setup is done, Autopilot informs the user that the device is ready to go[6]. This clarity can reduce helpdesk calls from users unsure if they should wait or reboot during setup. Also, because devices are delivered pre-configured with corporate settings and apps, users can be productive on Day 1 without needing IT to personally assist.
  • Better Monitoring for IT: In Microsoft 365 Business environments, often a single admin oversees device management. The Autopilot deployment report in Intune gives that admin a real-time dashboard to monitor deployments. They can see if a new laptop issued to an employee enrolled successfully, which apps/scripts ran, and if any step failed[5][5]. For any errors, the admin can drill down immediately and troubleshoot (for instance, if an app didn’t install, they know to check that installer or assign it differently). This reduces guesswork and allows proactive support, contributing to a smoother deployment process across the organization.
  • Security and Control: Autopilot v2 includes support for corporate device identification. By uploading known device identifiers (e.g., serial numbers) into Intune and enabling enrollment restrictions, a business can ensure only company-owned devices enroll via Autopilot[4][4]. This prevents personal or unauthorized devices from accidentally being enrolled. Although this requires a bit of setup (covered below), it gives small organizations an easy way to enforce that Autopilot v2 is used only for approved hardware, adding an extra layer of security and compliance. Furthermore, Autopilot v2 automatically makes the Azure AD account a standard user by default (not local admin), which improves security on the endpoint[5].

In summary, Autopilot v2 is well-suited for Microsoft 365 Business scenarios: it’s cloud-first and user-driven, aligning with the needs of modern SMBs that may not have complex on-prem infrastructure. It lowers the barrier to deploying new devices (no imaging or device ID admin work) while improving the speed, consistency, and security of device provisioning.

4. Implementing Autopilot v2: Step-by-Step Guide

In this section, we’ll walk through how to implement Windows Autopilot Device Preparation (Autopilot v2) in your Microsoft 365 Business/Intune environment. The process involves: verifying prerequisites, configuring Intune with the new profile and required settings, and then enrolling devices. Each step is detailed below.

4.1 Prerequisites and Initial Setup

Before enabling Autopilot v2, ensure the following prerequisites are met:

  1. Windows Version Requirements: Autopilot v2 requires Windows 11. Supported versions are Windows 11 22H2 or 23H2 with the latest updates (specifically, installing KB5035942 or later)[3][5], or any later version (Windows 11 24H2+). New devices should be shipped with a compatible Windows 11 build (or be updated to one) to use Autopilot v2. Windows 10 devices cannot use Autopilot v2; they would fall back to the classic Autopilot method.
  2. Microsoft Intune: You need an Intune subscription (Microsoft Endpoint Manager) as part of your M365 Business. Intune will serve as the Mobile Device Management (MDM) service to manage Autopilot profiles and device enrollment.
  3. Azure AD/Microsoft Entra ID: Devices will be Azure AD joined. Ensure your users have Microsoft Entra ID accounts with appropriate Intune licenses (e.g., Microsoft 365 Business Premium includes Intune licensing) and that automatic MDM enrollment is enabled for Azure AD join. In Azure AD, under Mobility (MDM/MAM), Microsoft Intune should be set to Automatically enroll corporate devices for your users.
  4. No Pre-Registration of Devices: Do not import the device hardware IDs into the Intune Autopilot devices list for devices you plan to enroll with v2. If you previously obtained a hardware hash (.CSV) from your device or your hardware vendor registered the device to your tenant, you should deregister those devices to allow Autopilot v2 to take over[5]. (Autopilot v2 will not apply if an Autopilot deployment profile from v1 is already assigned to the device.)
  5. Intune Connector (If Hybrid not needed): Since Autopilot v2 doesn’t support Hybrid AD join, you do not need the Intune Connector for Active Directory for these devices. (If you have the connector running for other hybrid-join Autopilot scenarios, that’s fine; it simply won’t be used for v2 deployments.)
  6. Network and Access: New devices must have internet connectivity during OOBE (Ethernet or Wi-Fi accessible from the initial setup). Ensure that the network allows connection to Azure AD and Intune endpoints. If using Wi-Fi, users will need to join a Wi-Fi network in the first OOBE steps. (Consider using a provisioning SSID or instructing users to connect to an available network.)
  7. Plan for Device Identification (Optional but Recommended): Decide if you will restrict Autopilot enrollment to corporate-owned devices only. For better control (and to prevent personal device enrollment), it’s best practice to use Intune’s enrollment restrictions to block personal Windows enrollments and use Corporate device identifiers to flag your devices. We will cover how to set this up in the steps below. If you plan to use this, gather a list of device serial numbers (and manufacturers/models) for the PCs you intend to enroll.

4.2 Configuring the Autopilot v2 (Device Preparation) Profile in Intune

Once prerequisites are in place, the core setup work is done in Microsoft Intune. This involves creating Azure AD groups and then creating a Device Preparation profile (Autopilot v2 profile) and configuring it. Follow these steps:

1. Create Azure AD Groups for Autopilot: We need two security groups to manage Autopilot v2 deployment:

  • User Group – contains the users who will be enrolling devices via Autopilot v2.
  • Device Group – will dynamically receive devices at enrollment time and be used to assign apps/policies.

In the Azure AD or Intune portal, navigate to “Groups” and create a new group for users. For example, “Autopilot Device Preparation – Users”. Add all relevant user accounts (e.g., all employees or the subset who will use Autopilot) to this group[4]. Use Assigned membership for explicit control.

Next, create another security group for devices, e.g., “Autopilot Device Preparation – Devices”. Set this as a Dynamic Device group if possible, or Assigned (we will be adding devices automatically via the profile). An interesting detail: Intune’s Autopilot v2 mechanism uses an application identity called “Intune Provisioning Client” to add devices to this group during enrollment[4]. You can assign that as the owner of the group (though Intune may handle this automatically when the profile is used).

2. Create the Device Preparation (Autopilot v2) Profile: In the Intune admin center, go to Devices > Windows > Windows Enrollment (or Endpoint Management > Enrollment). There should be a section for “Windows Autopilot Device Preparation (Preview)” or “Device Preparation Policies”. Choose to Create a new profile/policy[4].

  • Name and Group Assignment: Give the profile a clear name (e.g., “Autopilot Device Prep Policy – Cloud PCs”). For the target group, select the Device group created in step 1 as the group to assign devices to at enrollment[4]. (In some interfaces, you might first choose the device group in the profile so the system knows where to add devices.)
  • Deployment Mode: Choose User-Driven (since user-driven Azure AD join is the scenario for M365 Business). Autopilot v2 also has an “Automatic” mode intended for Windows 365 Cloud PCs or scenarios without user interaction, but for physical devices in a business, user-driven is typical.
  • Join Type: Select Azure AD (Microsoft Entra ID) join. (This is the only option in v2 currently – Hybrid AD join is not available).
  • User Account Type: Choose whether the end user should be a standard user or local admin on the device. Best practice is to select Standard (non-admin) to enforce least privilege[5]. (In classic Autopilot, this was an option in the deployment profile as well. Autopilot v2 defaults to standard user by design, but confirm the setting if presented.)
  • Out-of-box Experience (OOBE) Settings: Configure the OOBE customization settings as desired:
    • You can typically configure Language/Region (or set to default to device’s settings), Privacy settings, End-User License Agreement (EULA) acceptance, and whether users see the option to configure for personal use vs. organization. Note: In Autopilot v2, some of these screens may not be fully suppressible as they are in v1, but set your preferences here. For instance, you might hide the privacy settings screen and accept EULA automatically to streamline user experience.
    • If the profile interface allows it, enable “Skip user enrollment if device is known corporate” or similar, to avoid the personal/work question (this ties in with using corporate identifiers).
    • Optionally, set a device naming template if available. However, Autopilot v2 may not support custom naming at this stage (and users can be given the ability to name the device during setup)[3]. Check Intune’s settings; if not present, plan to rename devices via Intune policy later if needed.
  • Applications & Scripts (Device Preparation): Select the apps and PowerShell scripts that you want to be installed during the device provisioning (OOBE) phase[4]. Intune will present a list of existing apps and scripts you’ve added to Intune. Here, pick only your critical or required applications – remember the limit is 10 apps max for the OOBE phase. Common choices are:
    • Company Portal (for user self-service and additional app access)[4].
    • Microsoft 365 Apps (Office suite)[4].
    • Endpoint protection software (antivirus/EDR agent, if not already part of Windows).
    • Any other crucial line-of-business app that the user needs immediately. Also select any PowerShell onboarding scripts you want to run (for example, a script to set a custom registry or install a specific agent that’s not packaged as an app). These selected items will be tracked in the deployment. (Make sure any app you select is assigned in Intune to the device group we created, or available for all devices – more on app assignment in the next step.)
  • Assign the Profile: Finally, assign the Device Preparation profile to the User group created in step 1[4]. This targeting means any user in that group who signs into a Windows 11 device during OOBE will trigger this Autopilot profile. (The device will get added to the specified device group, and the selected apps will install.)

Save/create the profile. At this point, Intune has the Autopilot v2 policy in place, waiting to apply at next enrollment for your user group.

3. Assign Required Applications to Device Group: Creating the profile in step 2 defines which apps should install, but Intune still needs those apps to be deployed as “Required” to the device group for them to actually push down. In Intune:

  • Go to Apps > Windows (or Apps section in MEM portal).
  • For each critical app you included in the profile (Company Portal, Office, etc.), check its Properties > Assignments. Make sure to assign the app to the Autopilot Devices group (as Required installation)[4]. For example, set Company Portal – Required for [Autopilot Device Preparation – Devices][4].
  • Repeat for Microsoft 365 Apps and any other selected application[4]. If you created a PowerShell script configuration in Intune, ensure that script is assigned to the device group as well.

Essentially, this step ensures Intune knows to push those apps to any device that appears in the devices group. Autopilot v2 will add the new device to the group during enrollment, and Intune will then immediately start installing those required apps. (Without this step, the profile alone wouldn’t install apps, since the profile itself only “flags” which apps to wait for but the apps still need to be assigned to devices.)

4. Configure Enrollment Restrictions (Optional – Corporate-only): If you want to block personal devices from enrolling (so that only corporately owned devices can use Autopilot), set up an enrollment restriction in Intune:

  • In Intune portal, navigate to Devices > Enrollment restrictions.
  • Create a new Device Type or Platform restriction policy (or edit the existing default one) for Windows. Under Personal device enrollment, set Personally owned Windows enrollment to Blocked[4].
  • Assign this restriction to All Users (or at least all users in the Autopilot user group)[4].

This means if a user tries to Azure AD join a device that Intune doesn’t recognize as corporate, the enrollment will be refused. This is a good security measure, but it requires the next step (uploading corporate identifiers) to work smoothly with Autopilot v2.

5. Upload Corporate Device Identifiers: With personal devices blocked, you must tell Intune which devices are corporate. Since we are not pre-registering the full Autopilot hardware hash, Intune can rely on manufacturer, model, and serial number to recognize a device as corporate-owned during Autopilot v2 enrollment. To upload these identifiers:

  • Gather device info: For each new device, obtain the serial number, plus the manufacturer and model strings. You can get this from order information or by running a command on the device (e.g., on an example device, run wmic csproduct get vendor,name,identifyingnumber to output vendor (manufacturer), name (model), and identifying number (serial)[4]). Many OEMs provide this info in packing lists or you can scan a barcode from the box.
  • Prepare CSV: Create a CSV file with columns for Manufacturer, Model, Serial Number. List each device’s information on a separate line[4]. For example:\ Dell Inc.,Latitude 7440,ABCDEFG1234\ Microsoft Corporation,Surface Pro 9,1234567890\ (Use the exact strings as reported by the device/OEM to avoid mismatches.)
  • Upload in Intune: In the Intune admin center, go to Devices > Enrollment > Corporate device identifiers. Choose Add then Upload CSV. Select the format “Manufacturer, model, and serial number (Windows only)”[4] and upload your CSV file. Once processed, Intune will list those identifiers as corporate.

With this in place, when a user signs in on a device, Intune checks the device’s hardware info. If it matches one of these entries, it’s flagged as corporate-owned and allowed to enroll despite the personal device block[4][4]. If it’s not in the list, the enrollment will be blocked (the user will get a message that enrolling personal devices is not allowed). Important: Until you have corporate identifiers set up, do not enable the personal device block, or Autopilot device preparation will fail for new devices[6][6]. Always upload the identifiers first or simultaneously.

At this stage, you have completed the Intune configuration for Autopilot v2. You have:

  • A user group allowed to use Autopilot.
  • A device preparation profile linking that user group to a device group, with chosen settings and apps.
  • Required apps assigned to deploy.
  • Optional restrictions in place to ensure only known devices will enroll.

4.3 Enrollment and Device Setup Process (Using Autopilot v2)

With the above configuration done, the actual device enrollment process is straightforward for the end-user. Here’s what to expect when adding a new device to your Microsoft 365 environment via Autopilot v2:

  1. Out-of-Box Experience (Initial Screens): When the device is turned on for the first time (or after a factory reset), the Windows OOBE begins. The user will select their region and keyboard (unless the profile pre-configured these). The device will prompt for a network connection. The user should connect to the internet (Ethernet or Wi-Fi). Once connected, the device might check for updates briefly, then reach the “Sign in” screen.
  2. User Sign-In (Azure AD): The user enters their work or school (Microsoft Entra ID/Azure AD) credentials – i.e., their Microsoft 365 Business account email and password. This is the trigger for Autopilot Device Preparation. Upon signing in, the device joins your organization’s Azure AD. Because the user is in the “Autopilot Users” group and an Autopilot Device Preparation profile is active, Intune will now kick off the device preparation process in the background.
  3. Device Preparation Phase (ESP): After credentials are verified, the user sees the Enrollment Status Page (ESP) which now reflects “Device preparation” steps. In Autopilot v2, the ESP will show the progress of the configuration. A key difference in v2 is the presence of a percentage progress indicator that gives a clearer idea of progress[6]. Behind the scenes, several things happen:
    • The device is automatically added to the specified Device group (“Autopilot Device Preparation – Devices”) in Azure AD[5]. The “Intune Provisioning Agent” does this within seconds of the user signing in.
    • Intune immediately starts deploying the selected applications and PowerShell scripts to the device (those that were marked for installation during OOBE). The ESP screen will typically list the device setup steps, which may include device configuration, app installation, etc. The apps you marked as required (Company Portal, Office, etc.) will download and install one by one. Their status can often be viewed on the screen (e.g., “Installing Office 365… 50%”).
    • Any device configuration policies assigned to the device group (e.g., configuration profiles or compliance policies you set to target that group) will also begin to apply. Note: Autopilot v2 does not pause for all policies to complete; it mainly ensures the selected apps and scripts complete. Policies will apply in parallel or afterwards without blocking the ESP[3].
    • If you enabled BitLocker or other encryption policies, those might kick off during this phase as well (depending on your Intune configuration for encryption on Azure AD join).
    • The user remains at the ESP screen until the critical steps finish. With the 10-app limit and no dynamic group delay, this phase should complete relatively quickly (typically a few minutes to perhaps an hour for large Office downloads on slower connections). The progress bar will reach 100%.
  4. Completion and First Desktop Launch: Once the selected apps and scripts have finished deploying, Autopilot signals that device setup is complete. The ESP will indicate it’s done, and the user will be allowed to proceed to log on to Windows (or it may automatically log them in if credentials were cached from step 2). In Autopilot v2, a final screen can notify the user that critical setup is finished and they can start using the device[6]. The user then arrives at the Windows desktop.
  5. Post-Enrolment (Background tasks): Now the device is fully Azure AD joined and enrolled in Intune as a managed device. Any remaining apps or policies that were not part of the initial device preparation will continue to install in the background. For example, if you targeted some less critical user-specific apps (say, OneDrive client or Webex) via user groups, those will download via Intune management without interrupting the user. The user can begin working, and they’ll likely see additional apps appearing or software finishing installations within the first hour of use.
  6. Verification: The IT admin can verify the device in the Intune portal. It should appear under Devices with the user assigned, and compliance/policies applying. The Autopilot deployment report in Intune will show this device’s status as successful if all selected apps/scripts succeeded, or flagged if any failures occurred[5]. The user should see applications like Office, Teams, Outlook, and the Company Portal already installed on the Start Menu[4]. If all looks good, the device is effectively ready and managed.

4.4 Troubleshooting Common Issues in Autopilot v2

While Autopilot v2 is designed to be simpler and more reliable, you may encounter some issues during setup. Here are common issues and how to address them:

  • Device is blocked as “personal” during enrollment: If you enabled the enrollment restriction to block personal devices, a new device might fail to enroll at user sign-in with a message that personal devices are not allowed. This typically means Intune did not recognize the device as corporate. Ensure you have uploaded the correct device serial, model, and manufacturer under corporate identifiers before the user attempts enrollment[4]. Typos or mismatches (e.g., “HP Inc.” vs “Hewlett-Packard”) can cause the check to fail. If an expected corporate device was blocked, double-check its identifier in Intune and re-upload if needed, then have the user try again (after a reset). If you cannot get the identifiers loaded in time, you may temporarily toggle the restriction to allow personal Windows enrollments to let the device through, then re-enable once fixed.
  • Autopilot profile not applying (device does standard Azure AD join without ESP): This can happen if the user is not in the group assigned to the Autopilot Device Prep profile, or if the device was already registered with a classic Autopilot profile. To troubleshoot:
    • Verify that the user who is signing in is indeed a member of the Autopilot Users group that you targeted. If not, add them and try again.
    • Check Intune’s Autopilot devices list. If the device’s hardware hash was previously imported and has an old deployment profile assigned, the device might be using Autopilot v1 behavior (which could skip the ESP or conflict). Solution: Remove the device from the Autopilot devices list (deregister it) so that v2 can proceed[5].
    • Also ensure the device meets OS requirements. If someone somehow tried with an out-of-date Windows 10, the new profile wouldn’t apply.
  • One of the apps failed to install during OOBE: If an app (or script) that was selected in the profile fails, the Autopilot ESP might show an error or might eventually time out. Autopilot v2 doesn’t explicitly block on policies, but it does expect the chosen apps to install. If an app installation fails (perhaps due to an MSI error or content download issue), the user may eventually be allowed to log in, but Intune’s deployment report will mark the deployment as failed for that device[5]. Use the Autopilot deployment report in Intune to see which app or step failed[5]. Then:
    • Check the Intune app assignment for that app. For instance, was the app installer file reachable and valid? Did it have correct detection rules? Remedy any packaging error.
    • If the issue was network (e.g., large app timed out), consider not deploying that app during OOBE (remove it from the profile’s selected apps so it installs later instead).
    • The user can still proceed to work after skipping the failed step (in many cases), but you’ll want to push the necessary app afterward or instruct the user to install via Company Portal if possible.
  • User sees unexpected OOBE screens (e.g., personal vs organization choice): As noted, Autopilot v2 can show some default Windows setup prompts that classic Autopilot hid. For example, early in OOBE the user might be asked “Is this a personal or work device?” If they see this, they should select Work/School (which leads to the Azure AD sign-in). Similarly, the user might have to accept the Windows 11 license agreement. To avoid confusion, prepare users with guidance that they may see a couple of extra screens and how to proceed. Once the user signs in, the rest will be automated. In future, after the device prep profile applies, those screens might not appear on subsequent resets, but on first run they can. This is expected behavior, not a failure.
  • Autopilot deployment hangs or takes too long: If the process seems stuck on the ESP for an inordinate time:
    • Check if it’s downloading a large update or app. Sometimes Windows might be applying a critical update in the background. If internet is slow, Office download (which can be ~2GB) might simply be taking time. If possible, ensure a faster connection or use Ethernet for initial setup.
    • If it’s truly hung (no progress increase for a long period), you may need to power cycle. The good news is Autopilot v2 is resilient – it has more retry logic for applying the profile[8]. On reboot, it often picks up where it left off, or attempts the step again. Frequent hanging might indicate a problematic step (again, refer to Intune’s report).
    • Ensure the device’s time and region were set correctly; incorrect time can cause Azure AD token issues. Autopilot v2 does try to sync time more reliably during ESP[8].
  • Post-enrollment policy issues: Because Autopilot v2 doesn’t wait for all policies, you might notice things like BitLocker taking place only after login, or certain configurations applying slightly later. This is normal. However, if certain device configurations never apply, verify that those policies are targeted correctly (likely to the device group). If they were user-targeted, they should apply after the user logs in. If something isn’t applying at all, treat it as a standard Intune troubleshooting case (e.g., check for scope tags, licensing, or conflicts).

Overall, many issues can be avoided by testing Autopilot v2 on a pilot device before mass rollout. Run through the deployment yourself with a test user and device to catch any application installation failures or unexpected prompts, and adjust your profile or process accordingly.

5. Best Practices for Maintaining and Managing Autopilot v2 Devices

After deploying devices with Windows Autopilot Device Preparation, your work isn’t done – you’ll want to manage and maintain those devices for the long term. Here are some best practices to ensure ongoing success:

  • Establish Clear Autopilot Processes: Because Autopilot v2 and v1 may coexist (for different use cases), document your process. For example, decide: will all new devices use Autopilot v2 going forward, or only certain ones? Communicate to your procurement and IT teams that new devices should not be registered via the old process. If you buy through an OEM with Autopilot registration service, pause that for devices you’ll enroll via v2 to avoid conflicts.
  • Keep Windows and Intune Updated: Autopilot v2 capabilities may expand with new Windows releases and Intune updates. Ensure devices get Windows quality updates regularly (this keeps the Autopilot agent up-to-date and compatible). Watch Microsoft Intune release notes for any Autopilot-related improvements or changes. For instance, if/when Microsoft enables features like self-deploying or hybrid join in Autopilot v2, it will likely come via an update[6] – staying current allows you to take advantage.
  • Limit and Optimize Apps in the Profile: Be strategic about the apps you include during the autopilot phase. The 10-app limit forces some discipline – include only truly essential software that users need immediately or that is required for security/compliance. Everything else can install later via normal Intune assignment or be made available in Company Portal. This ensures the provisioning is quick and has fewer chances to fail. Also prefer Win32 packaged apps for reliability and to avoid Windows Store dependencies during OOBE[2]. In general, simpler is better for the OOBE phase.
  • Use Device Categories/Tags if Needed: Intune supports tagging devices during enrollment (in classic Autopilot, there was “Convert all targeted devices to Autopilot” and grouping by order ID). In Autopilot v2, since devices aren’t pre-registered, you might use dynamic groups or naming conventions post-enrollment to organize devices (e.g., by department or location). Consider leveraging Azure AD group rules or Intune filters if you need to deploy different apps to different sets of devices after enrollment.
  • Monitor Deployment Reports and Logs: Take advantage of the new Autopilot deployment report in Intune for each rollout[5]. After onboarding a batch of new devices, review the report to see if any had issues (e.g., maybe one device’s Office install failed due to a network glitch). Address any failures proactively (rerun a script, push a missed app, etc.). Additionally, know that users or IT can export Autopilot logs easily from the device if needed[5] (there’s a troubleshooting option during the OOBE or via pressing certain key combos). Collecting logs can help Microsoft support or your IT team diagnose deeper issues.
  • Maintain Corporate Identifier Lists: If you’re using the corporate device identifiers method, keep your Azure AD device inventory synchronized with Intune’s list. For every new device coming in, add its identifiers. For devices being retired or sold, you might remove their identifiers. Also, coordinate this with the enrollment restriction – e.g., if a top executive wants to enroll their personal device and you have blocking enabled, you’d need to explicitly allow or bypass that (possibly by not applying the restriction to that user or by adding the device as corporate through some means). Regularly update the CSV as you purchase hardware to avoid last-minute scrambling when a user is setting up a new PC.
  • Plan for Feature Gaps: Recognize the current limitations of Autopilot v2 and plan accordingly:
    • If you require Hybrid AD Join (joining on-prem AD) for certain devices, those devices should continue using the classic Autopilot (with hardware hash and Intune Connector) for now, since v2 can’t do it[3].
    • If you utilize Autopilot Pre-Provisioning (White Glove) via IT staff or partner to pre-setup devices before handing to users (common for larger orgs or complex setups), note that Autopilot v2 doesn’t support that yet[3]. You might use Autopilot v1 for those scenarios until Microsoft adds it to v2.
    • Self-Deploying Mode (for kiosks or shared devices that enroll without user credentials) is also not in v2 presently[3]. Continue using classic Autopilot with TPM attestation for kiosk devices as needed. It’s perfectly fine to run both Autopilot methods side-by-side; just carefully target which devices or user groups use which method. Microsoft is likely to close these gaps in future updates, so keep an eye on announcements.
  • End-User Training and Communication: Even though Autopilot is automated, let your end-users know what to expect. Provide a one-page instruction with their new laptop: e.g., “1) Connect to Wi-Fi, 2) Log in with your work account, 3) Wait while we set up your device (about 15-30 minutes), 4) You’ll see a screen telling you when it’s ready.” Setting expectations helps reduce support tickets. Also inform them that the device will be managed by the company (which is standard, but transparency helps trust).
  • Device Management Post-Deployment: After Autopilot enrollment, manage the devices like any Intune-managed endpoints. Set up compliance policies (for OS version, AV status, etc.), Windows Update rings or feature update policies to keep them up-to-date, and use Intune’s Endpoint analytics or Windows Update for Business reports to track device health. Autopilot has done the job of onboarding; from then on, treat the devices as part of your standard device management lifecycle. For instance, if a device is reassigned to a new user, you can invoke Autopilot Reset via Intune to wipe user data and redo the OOBE for the new user—Autopilot v2 will once again apply (just ensure the new user is in the correct group).
  • Continuous Improvement: Gather feedback from users about the Autopilot process. If many report that a certain app wasn’t ready or some setting was missing on first login, adjust your Autopilot profile or Intune assignments. Autopilot v2’s flexibility allows you to tweak which apps/scripts are in the initial provision vs. post-login. Aim to find the right balance where devices are secure and usable as soon as possible, without overloading the provisioning. Also consider pilot testing Windows 11 feature updates early, since Autopilot behavior can change or improve with new releases (for example, a future Windows 11 update might reduce the appearance of some initial screens in Autopilot v2, etc.).

By following these best practices, you’ll ensure that your organization continues to benefit from Autopilot v2’s efficiencies long after the initial setup. The result is a modern device deployment strategy with minimal hassle, aligned to the cloud-first, zero-touch ethos of Microsoft 365.


Conclusion: Microsoft Autopilot v2 (Windows Autopilot Device Preparation) represents a significant step forward in simplifying device onboarding. By leveraging it in your Microsoft 365 Business environment, you can add new Windows 11 devices with ease – end-users take them out of the box, log in, and within minutes have a fully configured, policy-compliant workstation. The latest updates bring more reliability, insight, and speed to this process, making life easier for IT admins and employees alike. By understanding the new features, following the implementation steps, and adhering to best practices outlined in this guide, you can successfully deploy Autopilot v2 and streamline your device deployment workflow[4][5]. Happy deploying!

References

[1] Overview of Windows Autopilot | Microsoft Learn

[2] Windows Autopilot Best Practices: 2025 Updated

[3] Intune Autopilot V1 vs Intune Autopilot V2- What is changing?

[4] How to Set Up Autopilot Device Preparation in Microsoft Intune

[5] Overview of Windows Autopilot device preparation

[6] Announcing new Windows Autopilot onboarding experience for government …

[7] What’s new in Microsoft Intune: January 2025

[8] What’s new in Windows Autopilot | Microsoft Learn

CIA Brief 20250809

image

Listen to an audio overview of a document with Microsoft 365 Copilot in Word –

https://techcommunity.microsoft.com/blog/Microsoft365InsiderBlog/listen-to-an-audio-overview-of-a-document-with-microsoft-365-copilot-in-word/4439362

Microsoft recognized as a Leader in the 2025 Gartner® Magic Quadrant™ for Enterprise Low-Code Application Platforms –

https://www.microsoft.com/en-us/power-platform/blog/power-apps/microsoft-recognized-as-a-leader-in-the-2025-gartner-magic-quadrant-for-enterprise-low-code-application-platforms/

Uncover shadow AI, block threats, and protect data with Microsoft Entra Internet Access –

https://techcommunity.microsoft.com/blog/microsoft-entra-blog/uncover-shadow-ai-block-threats-and-protect-data-with-microsoft-entra-internet-a/4440787

OpenAI GPT-5 is now in public preview for GitHub Copilot –

https://github.blog/changelog/2025-08-07-openai-gpt-5-is-now-in-public-preview-for-github-copilot/

Multi-tenant endpoint security policies distribution is now in Public Preview –

https://techcommunity.microsoft.com/blog/microsoftdefenderatpblog/multi-tenant-endpoint-security-policies-distribution-is-now-in-public-preview/4439929

Microsoft incorporates OpenAI’s GPT-5 into consumer, developer and enterprise offerings –

https://news.microsoft.com/source/features/ai/openai-gpt-5

Available today: GPT-5 in Microsoft 365 Copilot –

https://www.microsoft.com/en-us/microsoft-365/blog/2025/08/07/available-today-gpt-5-in-microsoft-365-copilot/

Empowering teen students to achieve more with Copilot Chat and Microsoft 365 Copilot –

https://www.microsoft.com/en-us/education/blog/2025/05/empowering-teen-students-to-achieve-more-with-copilot-chat-and-microsoft-365-copilot/

Breaking down silos: A unified approach to identity and network access security –

https://techcommunity.microsoft.com/blog/microsoft-entra-blog/breaking-down-silos-a-unified-approach-to-identity-and-network-access-security/4400196

Announcing Public Preview: Phishing Triage Agent in Microsoft Defender –

https://techcommunity.microsoft.com/blog/microsoftthreatprotectionblog/announcing-public-preview-phishing-triage-agent-in-microsoft-defender/4438301

Request more access in Word, Excel, and PowerPoint for the web –

https://techcommunity.microsoft.com/blog/Microsoft365InsiderBlog/request-more-access-in-word-excel-and-powerpoint-for-the-web/4429019

Elevate your protection with expanded Microsoft Defender Experts coverage –

https://techcommunity.microsoft.com/blog/microsoftsecurityexperts/elevate-your-protection-with-expanded-microsoft-defender-experts-coverage/4439134

Self-adaptive reasoning for science –

https://www.microsoft.com/en-us/research/blog/self-adaptive-reasoning-for-science/

Table Talk: Sentinel’s New ThreatIntel Tables Explained –

https://techcommunity.microsoft.com/blog/microsoftsentinelblog/table-talk-sentinel%E2%80%99s-new-threatintel-tables-explained/4440273

Hacking Made Easy, Patching Made Optional: A Modern Cyber Tragedy –

https://techcommunity.microsoft.com/blog/microsoft-security-blog/hacking-made-easy-patching-made-optional-a-modern-cyber-tragedy/4440267

Security leadership in the age of constant disruption –

https://blogs.windows.com/windowsexperience/2025/08/05/security-leadership-in-the-age-of-constant-disruption/

Project Ire autonomously identifies malware at scale –

https://www.microsoft.com/en-us/research/blog/project-ire-autonomously-identifies-malware-at-scale/

What’s New in Microsoft Teams | July 2025 –

https://techcommunity.microsoft.com/blog/microsoftteamsblog/what%E2%80%99s-new-in-microsoft-teams–july-2025/4438302

Microsoft Entra Suite delivers 131% ROI by unifying identity and network access –

https://www.microsoft.com/en-us/security/blog/2025/08/04/microsoft-entra-suite-delivers-131-roi-by-unifying-identity-and-network-access/

New governance tools for hybrid access and identity verification –

https://techcommunity.microsoft.com/blog/microsoft-entra-blog/new-governance-tools-for-hybrid-access-and-identity-verification/4422534

After hours

GPT-5: Our best model for work – https://www.youtube.com/watch?v=2jqS7JD0hrY

Editorial

If you found this valuable, the I’d appreciate a ‘like’ or perhaps a donation at https://ko-fi.com/ciaops. This helps me know that people enjoy what I have created and provides resources to allow me to create more content. If you have any feedback or suggestions around this, I’m all ears. You can also find me via email director@ciaops.com and on X (Twitter) at https://www.twitter.com/directorcia.

If you want to be part of a dedicated Microsoft Cloud community with information and interactions daily, then consider becoming a CIAOPS Patron – www.ciaopspatron.com.

Watch out for the next CIA Brief next week

Troubleshooting Microsoft Defender for Business: Step-by-Step Guide

Microsoft Defender for Business is a security solution designed for small and medium businesses to protect against cyber threats. When issues arise, a systematic troubleshooting approach helps identify root causes and resolve problems efficiently. This guide provides a step-by-step process to troubleshoot common Defender for Business issues, highlights where to find relevant logs and alerts, and suggests advanced techniques for complex situations. All steps are factual and based on Microsoft’s latest guidance as of 2025.

Table of Contents

  • common-issues-and-symptoms
  • key-locations-for-logs-and-alerts
  • step-by-step-troubleshooting-process
    1. identify-the-issue-and-gather-information
    2. check-the-microsoft-365-defender-portal-for-alerts
    3. verify-device-status-and-protection-settings
    4. examine-device-logs-event-viewer
    5. resolve-configuration-or-policy-issues
    6. verify-issue-resolution
    7. escalate-to-advanced-troubleshooting-if-needed
  • advanced-troubleshooting-techniques
  • best-practices-to-prevent-future-issues
  • additional-resources-and-support

Common Issues and Symptoms

These are some typical problems administrators encounter with Defender for Business:

  • Setup and Onboarding Failures: The initial setup or device onboarding process fails. An error like “Something went wrong, and we couldn’t complete your setup” may appear, indicating a configuration channel or integration issue (often with Intune)[1]. Devices that should be onboarded don’t show up in the portal.
  • Devices Showing As Unprotected: In the Microsoft Defender portal, you might see notifications that certain devices are not protected even though they were onboarded[1]. This often happens when real-time protection is turned off (for instance, if a non-Microsoft antivirus is running, it may disable Microsoft Defender’s real-time protection).
  • Mobile Device Onboarding Issues: Users cannot onboard their iOS or Android devices using the Microsoft Defender app. A symptom is that mobile enrollment doesn’t complete, possibly due to provisioning not finished on the backend[1]. For example, if the portal shows a message “Hang on! We’re preparing new spaces for your data…”, it means the Defender for Business service is still provisioning mobile support (which can take up to 24 hours) and devices cannot be added until provisioning is complete[1].
  • Defender App Errors on Mobile: The Microsoft Defender app on mobile devices may crash or show errors. Users report issues like app not updating threats or not connecting. (Microsoft provides separate troubleshooting guides for the mobile Defender for Endpoint app on Android/iOS in such cases[1].)
  • Policy Conflicts: If you have multiple security management tools, you might see conflicting policies. For instance, an admin who was managing devices via Intune and then enabled Defender for Business’s simplified configuration could encounter conflicts where settings in Intune and Defender for Business overlap or contradict[1]. This can result in devices flipping between policy states or compliance errors.
  • Intune Integration Errors: During the setup process, an error indicating an integration issue between Defender for Business and Microsoft Intune might occur[1]. This often requires enabling certain settings (detailed in Step 5 below) to establish a proper configuration channel.
  • Onboarding or Reporting Delays: A device appears to onboard successfully but doesn’t show up in the portal or is missing from the device list even after some time. This could indicate a communication issue where the device is not reporting in. It might be caused by connectivity problems or by an issue with the Microsoft Defender for Endpoint service (sensor) on the device.
  • Performance or Scan Issues: (Less common with Defender for Business, but possible) – Devices might experience high CPU or scans get stuck, which could indicate an issue with Defender Antivirus on the endpoint that needs further diagnosis (this overlaps with Defender for Endpoint troubleshooting).

Understanding which of these scenarios matches your situation will guide where to look first. Next, we’ll cover where to find the logs and alerts that contain clues for diagnosis.


Key Locations for Logs and Alerts

Effective troubleshooting relies on checking both cloud portal alerts and on-device logs. Microsoft Defender for Business provides information in multiple places:

Microsoft 365 Defender Portal (security.microsoft.com): This is the cloud portal where Defender for Business is managed. The Incidents & alerts section is especially important. Here you can monitor all security incidents and alerts in one place[2]. For each alert, you can click to see details in a flyout pane – including the alert title, severity, affected assets (devices or users), and timestamps[2]. The portal often provides recommended actions or one-click remediation for certain alerts[2]. It’s the first place to check if you suspect Defender is detecting threats or if something triggered an alert that correlates with the issue.

Device Logs via Windows Event Viewer: On each Windows device protected by Defender for Business, Windows keeps local event logs for Defender components. Access these by opening Event Viewer (Start > eventvwr.msc). Key logs include:

  • Microsoft-Windows-SENSE/Operational – This log records events from the Defender for Endpoint sensor (“SENSE” is the internal code name for the sensor)[3]. If a device isn’t showing up in the portal or has onboarding issues, this log is crucial. It contains events for service start/stop, onboarding success/failure, and connectivity to the cloud. For example, Event ID 6 means the service isn’t onboarded (no onboarding info found), which indicates the device failed to onboard and needs the onboarding script rerun[3]. Event ID 3 means the service failed to start entirely[3], and Event ID 5 means it couldn’t connect to the cloud (network issue)[3]. We will discuss how to interpret and act on these later.
  • Windows Defender/Operational – This is the standard Windows Defender Antivirus log under Applications and Services Logs > Microsoft > Windows > Windows Defender > Operational. It logs malware detections and actions taken on the device[4]. For troubleshooting, this log is helpful if you suspect Defender’s real-time protection or scans are causing an issue or to confirm if a threat was detected on a device. You might see events like “Malware detected” (Event ID 1116) or “Malware action taken” (Event ID 1117) which correspond to threats found and actions (like quarantine) taken[4]. This can explain, for instance, if a file was blocked and that’s impacting a user’s work.
  • Other system logs: Standard Windows logs (System, Application) might also record errors (for example, if a service fails or crashes, or if there are network connectivity issues that could affect Defender).

Alerts in Microsoft 365 Defender: Defender for Business surfaces alerts in the portal for various issues, not only malware. For example, if real-time protection is turned off on a device, the portal will flag that device as not fully protected[1]. If a device hasn’t reported in for a long time, it might show in the device inventory with a stale last-seen timestamp. Additionally, if an advanced attack is detected, multiple alerts will be correlated as an incident; an incident might be tagged with “Attack disruption” if Defender automatically contained devices to stop the spread[2] – such context can validate if an ongoing security issue is causing what you’re observing.

Intune or Endpoint Manager (if applicable): Since Defender for Business can integrate with Intune (Endpoint Manager) for device management and policy deployment, some issues (especially around onboarding and policy conflicts) may require checking Intune logs:

  • In Intune admin center, review the device’s Enrollment status and Device configuration profiles (for instance, if a security profile failed to apply, it could cause Defender settings to not take effect).
  • Intune’s Troubleshooting + support blade for a device can show error codes if a policy (like onboarding profile) failed.
  • If there’s a known integration issue (like the one mentioned earlier), ensure the Intune connection and settings are enabled as described in the next sections.

Advanced Hunting and Audit (for advanced users): If you have access to Microsoft 365 Defender’s advanced hunting (which might require an upgraded license beyond Defender for Business’s standard features), you could query logs (e.g., DeviceEvents, AlertEvents) for deeper investigation. Also, the Audit Logs in the Defender portal record configuration changes (useful to see if someone changed a policy right before issues started).

Now, with an understanding of where to get information, let’s proceed with a systematic troubleshooting process.


Step-by-Step Troubleshooting Process

The following steps outline a logical process to troubleshoot issues in Microsoft Defender for Business. Adjust the steps as needed based on the specific symptoms you are encountering.

Step 1: Identify the Issue and Gather Information

Before jumping into configuration changes, clearly define the problem. Understanding the nature of the issue will focus your investigation:

  • What are the symptoms? For example, “Device X is not appearing in the Defender portal”, “Users are getting no protection on their phones”, or “We see an alert that one device isn’t protected”, etc.
  • When did it start? Did it coincide with any changes (onboarding new devices, changing policies, installing another antivirus, etc.)?
  • Who or what is affected? A single device, multiple devices, all mobile devices, a specific user?
  • Any error messages? Note any message in the portal or on the device. For instance, an error code during setup, or the portal banner saying “some devices aren’t protected”[1]. These messages often hint at the cause.

Gathering this context will guide you on where to look first. For example, an issue with one device might mean checking that device’s status and logs, whereas a widespread issue might suggest a configuration problem affecting many devices.

Step 2: Check the Microsoft 365 Defender Portal for Alerts

Log in to the Microsoft 365 Defender portal (https://security.microsoft.com) with appropriate admin credentials. This centralized portal often surfaces the problem:

  1. Go to Incidents & alerts: In the left navigation pane, click “Incidents & alerts”, then select “Alerts” (or “Incidents” for grouped alerts)[2]. Look for any recent alerts that correspond to your issue. For example, if a device isn’t protected or hasn’t reported, there may be an alert about that device.
  2. Review alert details: If you see relevant alerts, click on one to open the details flyout. Check the alert title and description – these describe what triggered it (e.g. “Real-time protection disabled on Device123” or “Malware detected and quarantined”). Note the severity (Informational, Low, Medium, High) and the affected device or user[2]. The portal will list the device name and perhaps the user associated with it.
  3. Take recommended actions: The alert flyout often includes recommended actions or a direct link to “Open incident page” or “Take action”. For instance, for a malware alert, it may suggest running a scan or isolating the device. For a configuration alert (like real-time protection off), it might recommend turning it back on. Make note of these suggestions as they directly address the issue described[2].
  4. Check the device inventory: Still in the Defender portal, navigate to Devices (under Assets). Find the device in question. The device page can show its onboarding status, last seen time, OS, and any outstanding issues. If the device is missing entirely, that confirms an onboarding problem – skip to Step 4 to troubleshoot that.
  5. **Inspect *Incidents***: If multiple alerts have been triggered around the same time or on the same device, the portal might have grouped them into an *Incident* (visible under the Incidents tab). Open the incident to see a timeline of what happened. This can give a broader context especially if a security threat is involved (e.g. an incident might show that a malware was detected and then real-time protection was turned off – indicating the malware might have attempted to disable Defender).

Example: Suppose the portal shows an alert “Real-time protection was turned off on DeviceXYZ”. This is a clear indicator – the device is onboarded but not actively protecting in real-time[1]. The recommended action would likely be to turn real-time protection back on. Alternatively, if an alert says “New malware found on DeviceXYZ”, you’d know the issue is a threat detection, and the portal might guide you to remediate or confirm that malware was handled. In both cases, you’ve gathered an essential clue before even touching the device.

If you do not see any alert or indicator in the portal related to your problem, the issue might not be something Defender is reporting on (for example, if the problem is an onboarding failure, there may not be an alert – the device just isn’t present at all). In such cases, proceed to the next steps.

Step 3: Verify Device Status and Protection Settings

Next, ensure that the devices in question are configured correctly and not in a state that would cause issues:

  1. Confirm onboarding completion: If a device doesn’t appear in the portal’s device list, ensure that the onboarding process was done on that device. Re-run the onboarding script or package on the device if needed. (Defender for Business devices are typically onboarded via the local script, Intune, Group Policy, etc. If this step wasn’t done or failed, the device won’t show up in the portal.)
  2. Check provisioning status for mobile: If the issue is with mobile devices (Android/iOS) not onboarding, verify that Defender for Business provisioning is complete. As mentioned, the portal (under Devices) might show a message “preparing new spaces for your data” if the service setup is still ongoing[1]. Provisioning can take up to 24 hours for a new tenant. If you see that message, the best course is to wait until it disappears (i.e., until provisioning finishes) before troubleshooting further. Once provisioning is done, the portal will prompt to onboard devices, and then users should be able to add their mobile devices normally[1].
  1. Verify real-time protection setting: On any Windows device showing “not protected” in the portal, log onto that device and open Windows Security > Virus & threat protection. Check if Real-time protection is on. If it’s off and cannot be turned on, check if another antivirus is installed. By design, onboarding a device running a third-party AV can cause Defender’s real-time protection to be automatically disabled to avoid conflict[1]. In Defender for Business, Microsoft expects Defender Antivirus to be active alongside the service for best protection (“better together” scenario)[1]. If a third-party AV is present, decide if you will remove it or live with Defender in passive mode (which reduces protection and triggers those alerts). Ideally, ensure Microsoft Defender Antivirus is enabled.
  2. Policy configuration review: If you suspect a policy conflict or misconfiguration, review the policies applied:
    • In the Microsoft 365 Defender portal, go to Endpoints > Settings > Rules & policies (or in Intune’s Endpoint security if that’s used). Ensure that you haven’t defined contradictory policies in multiple places. For example, if Intune had a policy disabling something but Defender for Business’s simplified setup has another setting, prefer one system. In a known scenario, an admin had Intune policies and then used the simplified Defender for Business policies concurrently, leading to conflicts[1]. The resolution was to delete or turn off the redundant policies in Intune and let Defender for Business policies take precedence (or vice versa) to eliminate conflicts[1].
    • Also verify tamper protection status – by default, tamper protection is on (preventing unauthorized changes to Defender settings). If someone turned it off for troubleshooting and forgot to re-enable, settings could be changed without notice.
  3. Intune onboarding profile (if applicable): If devices were onboarded via Intune (which should be the case if you connected Defender for Business with Intune), check the Endpoint security > Microsoft Defender for Endpoint section in Intune. Ensure there’s an onboarding profile and that those devices show as onboarded. If a device is stuck in a pending state, you may need to re-enroll or manually onboard.

By verifying these settings, you either fix simple oversights (like turning real-time protection back on) or gather evidence of a deeper issue (for example, confirming a device is properly onboarded, yet still not visible, implying a reporting issue, or confirming there’s a policy conflict that needs resolution in the next step).

Step 4: Examine Device Logs (Event Viewer)

If the issue is not yet resolved by the above steps, or if you need more insight into why something is wrong, dive into the device’s event logs for Microsoft Defender. Perform these checks on an affected device (or a sample of affected devices if multiple):

  1. Open Event Viewer (Local logs): On the Windows device, press Win + R, type eventvwr.msc and hit Enter. Navigate to Applications and Services Logs > Microsoft > Windows and scroll through the sub-folders.
  2. Check “SENSE” Operational log: Locate Microsoft > Windows > SENSE > Operational and click it to open the Microsoft Defender for Endpoint service log[3]. Look for recent Error or Warning events in the list:
    • Event ID 3: “Microsoft Defender for Endpoint service failed to start.” This means the sensor service didn’t fully start on boot[3]. Check if the Sense service is running (in Services.msc). If not, an OS issue or missing prerequisites might be at fault.
    • Event ID 5: “Failed to connect to the server at \.” This indicates the endpoint could not reach the Defender cloud service URLs[3]. This can be a network or proxy issue – ensure the device has internet access and that security.microsoft.com and related endpoints are not blocked by firewall or proxy.
    • Event ID 6: “Service isn’t onboarded and no onboarding parameters were found.” This tells us the device never got the onboarding info – effectively it’s not onboarded in the service[3]. Possibly the onboarding script never ran successfully. Solution: rerun onboarding and ensure it completes (the event will change to ID 11 on success).
    • Event ID 7: “Service failed to read onboarding parameters”[3] – similar to ID 6, means something went wrong reading the config. Redeploy the onboarding package.
    • Other SENSE events might point to registry permission issues or feature missing (e.g., Event ID 15 could mean the SENSE service couldn’t start due to ELAM driver off or missing components – those cases are rare on modern systems, but the event description will usually suggest enabling a feature or a Windows update[5][5]).
    Each event has a description. Compare the event’s description against Microsoft’s documentation for Defender for Endpoint event IDs to get specific guidance[3][3]. Many event descriptions (like examples above) already hint at the resolution (e.g., check connectivity, redeploy scripts, etc.).
  3. Check “Windows Defender” Operational log: Next, open Microsoft > Windows > Windows Defender > Operational. Look for recent entries, especially around the time the issue occurred:
    • If the issue is related to threat detection or a failed update, you might see events in the 1000-2000 range (these correspond to malware detection events and update events).
    • For example, Event ID 1116 (MALWAREPROTECTION_STATE_MALWARE_DETECTED) means malware was detected, and ID 1117 means an action was taken on malware[4]. These confirm whether Defender actually caught something malicious, which might have triggered further issues.
    • You might also see events indicating if the user or admin turned settings off. Event ID 5001-5004 range often relates to settings changes (like if real-time protection was disabled, it might log an event).
    The Windows Defender log is more about security events than errors; if your problem is purely a configuration or onboarding issue, this log might not show anything unusual. But it’s useful to confirm if, say, Defender is working up to the point of detecting threats or if it’s completely silent (which could mean it’s not running at all on that device).
  4. Additional log locations: If troubleshooting a device connectivity or performance issue, also check the System log in Event Viewer for any relevant entries (e.g., Service Control Manager errors if the Defender service failed repeatedly). Also, the Security log might show Audit failures if, for example, Defender attempted an action.
  5. Analyze patterns: If multiple devices have issues, compare logs. Are they all failing to contact the service (Event ID 5)? That could point to a common network issue. Are they all showing not onboarded (ID 6/7)? Maybe the onboarding instruction wasn’t applied to that group of devices or a script was misconfigured.

By scrutinizing Event Viewer, you gather concrete evidence of what’s happening at the device level. For instance, you might confirm “Device A isn’t in the portal because it has been failing to reach the Defender service due to proxy errors – as Event ID 5 shows.” Or “Device B had an event indicating onboarding never completed (Event 6), explaining why it’s missing from portal – need to re-onboard.” This will directly inform the fix.

Step 5: Resolve Configuration or Policy Issues

Armed with the information from the portal (Step 2), settings review (Step 3), and device logs (Step 4), you can now take targeted actions to fix the issue.

Depending on what you found, apply the relevant resolution below:

  • If Real-Time Protection Was Off: Re-enable it. In the Defender portal, ensure that your Next-generation protection policy has Real-time protection set to On. If a third-party antivirus is present and you want Defender active, consider uninstalling the third-party AV or check if it’s possible to run them side by side. Microsoft recommends using Defender AV alongside Defender for Business for optimal protection[1]. Once real-time protection is on, the portal should update and the “not protected” alert will clear.
  • If Devices Weren’t Onboarded Successfully: Re-initiate the onboarding:
    • For devices managed by Intune, you can trigger a re-enrollment or use the onboarding package again via a script/live response.
    • If using local scripts, run the onboarding script as Administrator on the PC. After running, check Event Viewer again for Event ID 11 (“Onboarding completed”)[3].
    • For any devices still not appearing, consider running the Microsoft Defender for Endpoint Client Analyzer on those machines – it’s a diagnostic tool that can identify issues (discussed in Advanced section).
  • If Event Logs Show Connectivity Errors (ID 5, 15): Ensure the device has internet access to Defender endpoints. Make sure no firewall is blocking:
    • URLs like *.security.microsoft.com, *windows.com related to Defender cloud. Proxy settings might need to allow the Defender service through. See Microsoft’s documentation on Defender for Endpoint network connections for required URLs.
    • After adjusting network settings, force the device to check in (you can reboot the device or restart the Sense service and watch Event Viewer to see if it connects successfully).
  • If Policy Conflicts are Detected: Decide on one policy source:
    • Option 1: Use Defender for Business’s simplified configuration exclusively. This means removing or disabling parallel Intune endpoint security policies that configure AV or Firewall or Device Security, to avoid overlap[1].
    • Option 2: Use Intune (Endpoint Manager) for all device security policies and avoid using the simplified settings in Defender for Business. In this case, go to the Defender portal settings and turn off the features you are managing elsewhere.
    • In practice, if you saw conflicts, a quick remedy is to delete duplicate policies. For example, if Intune had an Antivirus policy and Defender for Business also has one, pick one to keep. Microsoft’s guidance for a situation where an admin uses both was to delete existing Intune policies to resolve conflicts[1].
    • After aligning policies, give it some time for devices to update their policy and then check if the conflict alerts disappear.
  • If Integration with Intune Failed (Setup Error): Follow Microsoft’s recommended fix which involves three steps[1][1]:
    1. In the Defender for Business portal, go to Settings > Endpoints > Advanced Features and ensure Microsoft Intune connection is toggled On[1].
    2. Still under Settings > Endpoints, find Configuration management > Enforcement scope. Make sure Windows devices are selected to be managed by Defender for Endpoint (Defender for Business)[1]. This allows Defender to actually enforce policies on Windows clients.
    3. In the Intune (Microsoft Endpoint Manager) portal, navigate to Endpoint security > Microsoft Defender for Endpoint. Enable the setting “Allow Microsoft Defender for Endpoint to enforce Endpoint Security Configurations” (set to On)[1]. This allows Intune to hand off certain security configuration enforcement to Defender for Business’s authority. These steps establish the necessary channels so that Defender for Business and Intune work in harmony. After doing this, retry the setup or onboarding that failed. The previous error message about the configuration channel should not recur.
  • If Onboarding Still Fails or Device Shows Errors: If after trying to onboard, the device still logs errors like Event 7 or 15 indicating issues, consider these:
    • Run the onboarding with local admin rights (ensure no permission issues).
    • Update the device’s Windows to latest patches (sometimes older Windows builds have known issues resolved in updates).
    • As a last resort, you can try an alternate onboarding method (e.g., if script fails, try via Group Policy or vice versa).
    • Microsoft also suggests if Security Management (the feature that allows Defender for Business to manage devices without full Intune enrollment) is causing trouble, you can temporarily manually onboard the device to the full Defender for Endpoint service using a local script as a workaround[1]. Then offboard and try again once conditions are corrected.
  • If a Threat Was Detected (Malware Incident): Ensure it’s fully remediated:
    • In the portal, check the Action Center (there is an Action center in Defender portal under “Actions & submissions”) to see if there are pending remediation actions (like undo quarantine, etc.).
    • Run a full scan on the device through the portal or locally.
    • Once threats are removed, verify if any residual impact remains (e.g., sometimes malware can turn off services – ensure the Windows Security app shows all green).

Perform the relevant fixes and monitor the outcome. Many changes (policy changes, enabling features) may take effect within minutes, but some might take an hour or more to propagate to all devices. You can speed up policy application by instructing devices to sync with Intune (if managed) or simply rebooting them.

Step 6: Verify Issue Resolution

After applying fixes, confirm that the issue is resolved:

  • Check the portal again: Go back to the Microsoft 365 Defender portal’s Incidents & alerts and Devices pages.
    • If there was an alert (e.g., device not protected), it should now clear or show as Resolved. Many alerts auto-resolve once the condition is fixed (for instance, turning real-time protection on will clear that alert after the next device check-in).
    • If you removed conflicts or fixed onboarding, any incident or alert about those should disappear. The device should now appear in the Devices list if it was missing, and its status should be healthy (no warnings).
    • If a malware incident was being shown, ensure it’s marked Remediated or Mitigated. You might need to mark it as resolved if it doesn’t automatically.
  • Confirm on the device: For device-specific issues, physically check the device:
    • Open Windows Security and verify no warning icons are present.
    • In Event Viewer, see if new events are positive. For example, Event ID 11 in SENSE log (“Onboarding completed”) confirms success[3]. Or Event ID 1122 in Windows Defender log might show a threat was removed.
    • If you restarted services or the system, ensure they stay running (the Sense service should be running and set to automatic).
  • Test functionality: Perform a quick test relevant to the issue:
    • If mobile devices couldn’t onboard, try onboarding one now that provisioning is fixed.
    • If real-time protection was off, intentionally place a test EICAR anti-malware file on the machine to see if Defender catches it (it should, if real-time protection is truly working).
    • If devices were not reporting, force a machine to check in (by running MpCmdRun -SignatureUpdate to also check connectivity).
    • These tests confirm that not only is the specific symptom gone, but the underlying protection is functioning as expected.

If everything looks good, congratulations – the immediate issue is resolved. Make sure to document what the cause was and how it was fixed, for future reference.

Step 7: Escalate to Advanced Troubleshooting if Needed

If the problem persists despite the above steps, or if logs are pointing to something unclear, it may require advanced troubleshooting:

  • Multiple attempts failed? For example, if a device still won’t onboard after trying everything, or an alert keeps returning with no obvious cause, then it’s time to dig deeper.
  • Use the Microsoft Defender Client Analyzer: Microsoft provides a Client Analyzer tool for Defender for Endpoint that collects extensive logs and configurations. In a Defender for Business context, you can run this tool via a Live Response session. Live Response is a feature that lets you run commands on a remote device from the Defender portal (available if the device is onboarded). You can upload the Client Analyzer scripts and execute them to gather a diagnostic package[6][6]. This package can highlight misconfigurations or environmental issues. For Windows, the script MDELiveAnalyzer.ps1 (and related modules like MDELiveAnalyzerAV.ps1 for AV-specific logs) will produce a zip file with results[6][6]. Review its findings for any errors (or provide it to Microsoft support).
  • Enable Troubleshooting Mode (if performance issue): If the issue is performance-related (e.g., you suspect Defender’s antivirus is causing an application to crash or high CPU), Microsoft Defender for Endpoint has a Troubleshooting mode that can temporarily relax certain protections for testing. This is more applicable to Defender for Endpoint P2, but if accessible, enabling troubleshooting mode on a device allows you to see if the problem still occurs without certain protections, thereby identifying if Defender was the culprit. Remember to turn it off afterwards.
  • Consult Microsoft Documentation: Sometimes a specific error or event ID might be documented in Microsoft’s knowledge base. For instance, Microsoft has a page listing Defender Antivirus event IDs and common error codes – check those if you have a particular code.
  • Community and Support Forums: It can be useful to see if others have hit the same issue. The Microsoft Tech Community forums or sites like Reddit (e.g., r/DefenderATP) might have threads. (For example, missing incidents/alerts were discussed on forums and might simply be a UI issue or permission issue in some cases.)
  • Open a Support Case: When all else fails, engage Microsoft Support. Defender for Business is a paid service; you can open a ticket through your Microsoft 365 admin portal. Provide them with:
    • A description of the issue and steps you’ve taken.
    • Logs (Event Viewer exports, the Client Analyzer output).
    • Tenant ID and device details, if requested. Microsoft’s support can analyze backend data and guide further. They may identify if it’s a known bug or something environment-specific.

Escalating ensures that more complex or rare issues (like a service bug, or a weird compatibility issue) are handled by those with deeper insight or patching ability.


Advanced Troubleshooting Techniques

For administrators comfortable with deeper analysis, here are a few advanced techniques and tools to troubleshoot Defender for Business issues:

Advanced Hunting: This is a query-based hunting tool available in Microsoft 365 Defender. If your tenant has it, you can run Kusto-style queries to search for events. For example, to find all devices that had real-time protection off, you could query the DeviceHealthStatus table for that signal. Or search DeviceTimeline for specific event IDs across machines. It’s powerful for finding hidden patterns (like if a certain update caused multiple devices to onboard late or if a specific error code appears on many machines).

Audit Logs: Especially useful if the issue might be due to an admin change. The audit log will show events like policy changes, onboarding package generated, settings toggled, who did it and when. It helps answer “did anything change right before this issue?” For instance, if an admin offboarded devices by mistake, the audit log would show that.

Integrations and Log Forwarding: Many enterprises use a SIEM for unified logging. While Defender for Business is a more streamlined product, its data can be integrated into solutions like Sentinel (with some licensing caveats)[7]. Even without Sentinel, you could use Windows Event Forwarding to send important Defender events to a central server. That way, you can spot if all devices are throwing error X in their logs. This is beyond immediate troubleshooting, but helps in ongoing monitoring and advanced analysis.

Deep Configuration Checks: Sometimes group policies or registry values can interfere. Ensure no Group Policy is disabling Windows Defender (check Turn off Windows Defender Antivirus policy). Verify that the device’s time and region settings are correct (an odd one, but significant time skew can cause cloud communication issues).

Use Troubleshooting Mode: Microsoft introduced a troubleshooting mode for Defender which, when enabled on a device, disables certain protections for a short window so you can, for example, install software that was being blocked or see if performance improves. After testing, it auto-resets. This is advanced and should be used carefully, but it’s another tool in the toolbox.

Using these advanced techniques can provide deeper insights or confirm whether the issue lies within Defender for Business or outside of it (for example, a network device blocking traffic). Always ensure that after advanced troubleshooting, you return the system to a fully secured state (re-enable anything you turned off, etc.).


Best Practices to Prevent Future Issues

Prevention and proper management can reduce the likelihood of Defender for Business issues:

  • Keep Defender Components Updated: Microsoft Defender AV updates its engine and intelligence regularly (multiple times a day for threat definitions). Ensure your devices are getting these updates automatically (they usually do via Windows Update or Microsoft Update service). Also, keep the OS patched so that the Defender for Endpoint agent (built into Windows 10/11) is up-to-date. New updates often fix known bugs or improve stability.
  • Use a Single Source for Policy: Avoid mixing multiple security management platforms for the same settings. If you’re using Defender for Business’s built-in policies, try not to also set those via Intune or Group Policy. Conversely, if you require the advanced control of Intune, consider using Microsoft Defender for Endpoint Plan 1 or 2 with Intune instead of Defender for Business’s simplified model. Consistency prevents conflicts.
  • Monitor the Portal Regularly: Make it a routine to check the Defender portal’s dashboard or set up email notifications for high-severity alerts. Early detection of an issue (like devices being marked unhealthy or a series of failed updates) can let you address it before it becomes a larger problem.
  • Educate Users on Defender Apps: If your users install the Defender app on mobile, ensure they know how to keep it updated and what it should do. Sometimes user confusion (like ignoring the onboarding prompt or not granting the app permissions) can look like a “technical issue”. Provide a simple guide for them if needed.
  • Test Changes in a Pilot: If you plan to change configurations (e.g., enable a new attack surface reduction rule, or integrate with a new management tool), test with a small set of devices/users first. Make sure those pilot devices don’t report new issues before rolling out more broadly.
  • Use “Better Together” Features: Microsoft often touts “better together” benefits – for example, using Defender Antivirus with Defender for Business for coordinated protection[1]. Embrace these recommendations. Features like Automatic Attack Disruption will contain devices during a detected attack[2], but only if all parts of the stack are active. Understand what features are available in your SKU and use them; missing out on a feature could mean missing a warning sign that something’s wrong.
  • Maintain Proper Licensing: Defender for Business is targeted for up to 300 users. If your org grows or needs more advanced features, consider upgrading to Microsoft Defender for Endpoint plans. This ensures you’re not hitting any platform limits and you get features like advanced hunting, threat analytics, etc., which can actually make troubleshooting easier by providing more data.
  • Document and Share Knowledge: Keep an internal wiki or document for your IT team about past issues and fixes. For example, note down “In Aug 2025, devices had conflict because both Intune and Defender portal policies were applied – resolved by turning off Intune policy X.” This way, if something similar recurs or a new team member encounters it, the solution is readily available.

By following best practices, you reduce misconfigurations and are quicker to catch problems, making the overall experience with Microsoft Defender for Business smoother and more reliable.


Additional Resources and Support

For further information and help on Microsoft Defender for Business:

  • Official Microsoft Learn Documentation: Microsoft’s docs are very useful. The page “Microsoft Defender for Business troubleshooting” on Microsoft Learn covers many of the issues we discussed (setup failures, device protection, mobile onboarding, policy conflicts) with step-by-step guidance[1][1]. The “View and manage incidents in Defender for Business” page explains how to use the portal to handle alerts and incidents[2]. These should be your first reference for any new or unclear issues.
  • Microsoft Tech Community & Forums: The Defender for Business community forum is a great place to see if others have similar questions. Microsoft MVPs and engineers often post walkthroughs and answer questions. For example, blogs like Jeffrey Appel’s have detailed guides on Defender for Endpoint/Business features and troubleshooting (common deployment mistakes, troubleshooting modes, etc.)[8].
  • Support Tickets: As mentioned, don’t hesitate to use your support contract. Through the Microsoft 365 admin center, you can start a service request. Provide detailed info and severity (e.g., if a security feature is non-functional, treat it with high importance).
  • Training and Workshops: Microsoft occasionally offers workshops or webinars on their security products. These can provide deeper insight into using the product effectively (e.g., a session on “Managing alerts and incidents” or “Endpoint protection best practices”). Keep an eye on the Microsoft Security community for such opportunities.
  • Up-to-date Security Blog: Microsoft’s Security blog and announcements (for example, on the TechCommunity) can have news of new features or known issues. A recent blog might announce a new logging improvement or a known issue being fixed in the next update – which could be directly relevant to troubleshooting.

In summary, Microsoft Defender for Business is a powerful solution, and with the step-by-step approach above, you can systematically troubleshoot issues that come up. Starting from the portal’s alerts, verifying configurations, checking device logs, and then applying fixes will resolve most common problems. And for more complex cases, Microsoft’s support and documentation ecosystem is there to assist. By understanding where to find information (both in the product and in documentation), you’ll be well-equipped to keep your business devices secure and healthy.

References

[1] Microsoft Defender for Business troubleshooting

[2] View and manage incidents in Microsoft Defender for Business

[3] Review events and errors using Event Viewer

[4] windows 10 – How to find specifics of what Defender detected in real …

[5] Troubleshoot Microsoft Defender for Endpoint onboarding issues

[6] Collect support logs in Microsoft Defender for Endpoint using live …

[7] Microsoft 365 Defender for Business logs into Microsoft Sentinel

[8] Common mistakes during Microsoft Defender for Endpoint deployments