
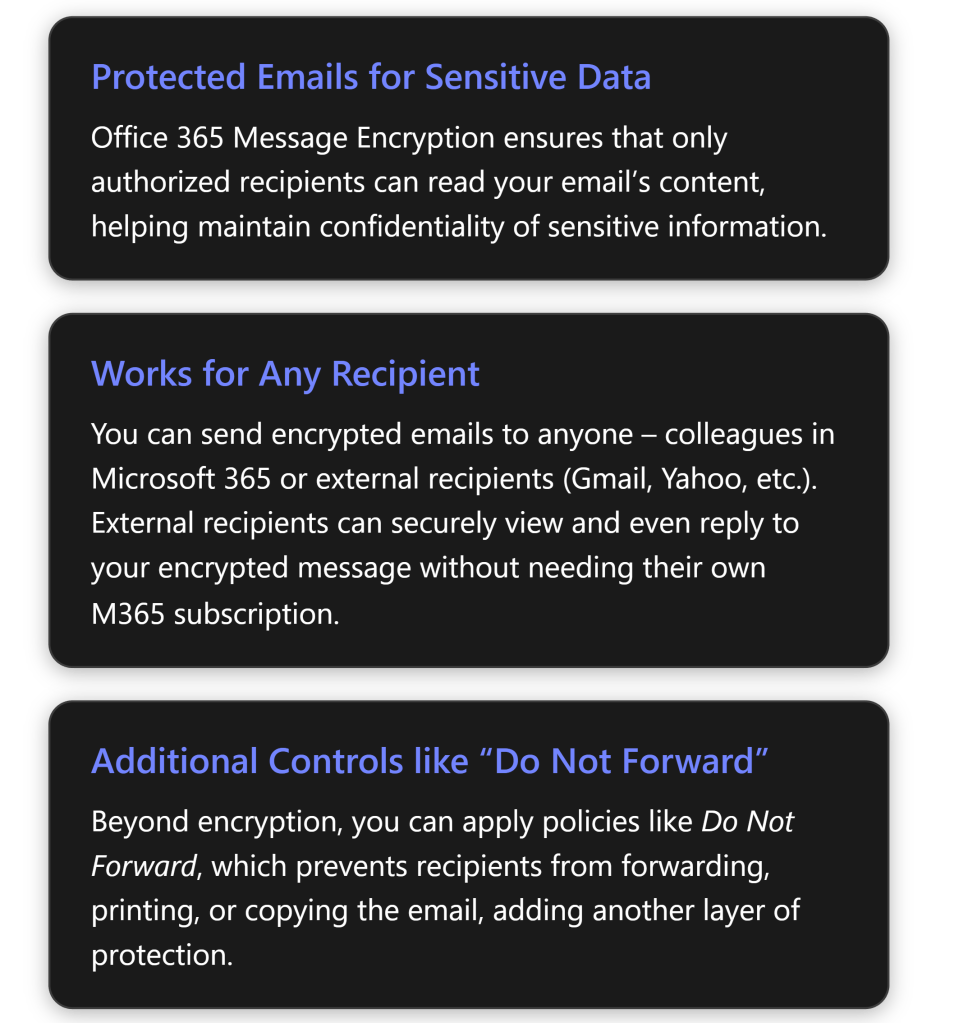
Office 365 Message Encryption (OME) is a Microsoft 365 feature that protects email content by converting it into indecipherable text that only authorized recipients can read[1]. Microsoft 365 Business Premium includes this capability, allowing you to send confidential emails that only intended recipients (inside or outside your organization) can access. This report provides a step-by-step guide to enable and use OME, and a complete walkthrough of sending and receiving encrypted emails for both Microsoft 365 users and external (non-M365) recipients, along with best practices and troubleshooting tips.
Prerequisites and Setup for Office Message Encryption
Before using OME, ensure your Microsoft 365 environment meets the requirements and is configured correctly:
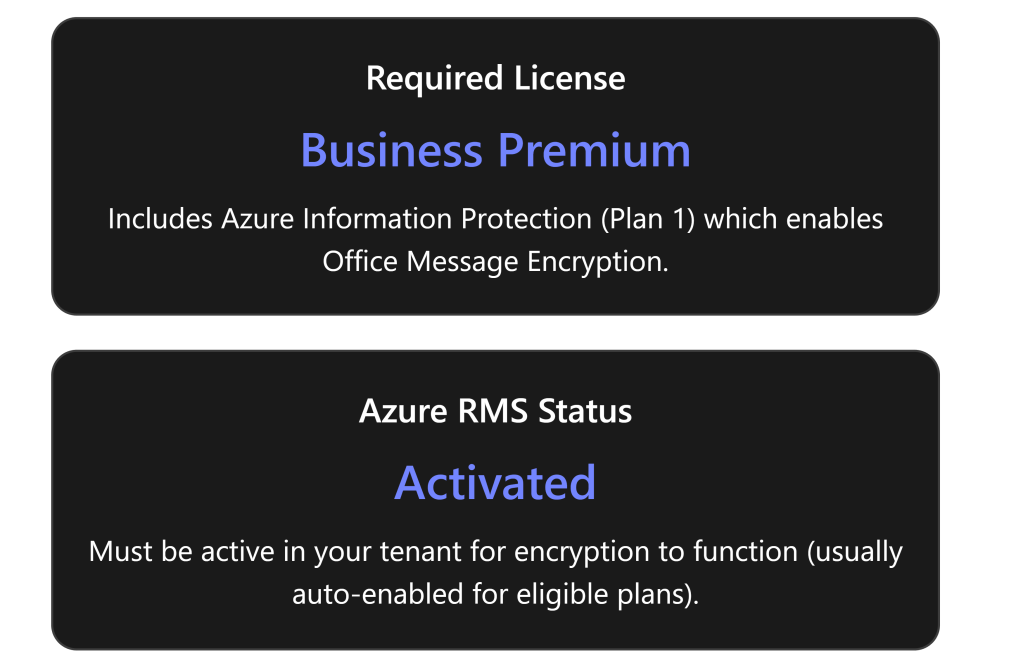
- Eligible Microsoft 365 Subscription: Microsoft 365 Business Premium includes Office Message Encryption rights out-of-the-box[2]. (It comes with Azure Information Protection Plan 1, which OME leverages.) Other plans that include OME are Office 365/M365 E3 and E5, Office 365 A1/A3/A5, etc.[2]. If you are on a plan like Business Standard or Exchange Online-only, you would need to add Azure Information Protection Plan 1 to get OME functionality[2]. Each user who will send encrypted emails must have a valid license that supports OME[2].
- Azure Rights Management (Azure RMS) Activation: OME is built on Azure RMS (the protection technology of Azure Information Protection)[3]. Azure RMS must be active in your tenant for encryption to work. In most cases, eligible subscriptions have Azure RMS automatically activated by Microsoft[3]. However, if it was turned off or not enabled, an administrator should activate it. You can activate Azure RMS via the Microsoft Purview compliance portal or Azure portal (the option “Activate” under Azure Information Protection)[3]. Once Azure RMS is active, Microsoft 365 automatically enables OME for your organization[3].
- Verify configuration (Admin step): As an admin, it’s good to verify that encryption is enabled. For example, you can use Exchange Online PowerShell to run
Get-IRMConfiguration; the output AzureRMSLicensingEnabled should be True (meaning OME is enabled in the tenant)[3][3]. If it’s False, runSet-IRMConfiguration -AzureRMSLicensingEnabled $trueto enable OME[3][3]. (By default this shouldn’t be needed for Business Premium, but it’s a useful check in troubleshooting scenarios.) - User mail client requirements: Users can send/view encrypted emails using Outlook on the web or recent versions of Outlook desktop/mobile. For the best experience (including the newer “encrypt-only” capabilities), users should have Outlook 365 (subscription version) or Outlook 2019/2021. Older Outlook clients (e.g. 2016) also support OME but may not support the newest policy (like encrypt-only) without updates[4]. Ensure Office is updated so that the “Encrypt” button or permission options appear in the client. In Outlook on the web (OWA), the Encrypt option is available in the compose toolbar by default; if not, an admin may need to ensure the OWA mailbox policy has IRM enabled[5] (this is usually true by default).
- (Optional) Configure automatic encryption policies: After ensuring OME is active, admins can set up policies to apply encryption automatically in certain cases. This isn’t required for basic usage (users can always manually encrypt an email), but it’s a useful configuration:
- Mail flow rules (transport rules) in Exchange Admin Center can automatically encrypt emails that match specific conditions. For example, an admin might create a rule to encrypt all emails sent externally or any email containing certain keywords (like “Confidential”)[1][1]. These rules use Microsoft Purview Message Encryption as the action to protect messages automatically.
- Sensitivity labels (from Microsoft Purview Information Protection) can be configured to apply encryption. In Business Premium, you can create labels such as “Confidential – Encrypt” that, when a user applies the label to an email, it automatically encrypts that message. This is a more user-friendly and consistent way to invoke encryption and can also enforce permissions (e.g., restrict forwarding).
- Branding (optional): Administrators can customize the appearance of encrypted mail notifications sent to external recipients. For instance, you can add your organization’s logo, custom title, or instructions to the encryption portal email template[6]. Branding is configured via PowerShell (
Set-OMEConfiguration) and is a best practice so that recipients recognize the secure message as coming from your company.
Sending Encrypted Emails (Step-by-Step Guide)
Once OME is enabled for your account, sending an encrypted email is straightforward. You do not need to manage any encryption keys yourself – the encryption is handled by Microsoft’s service in the background. Here’s how to send an encrypted email using Outlook:
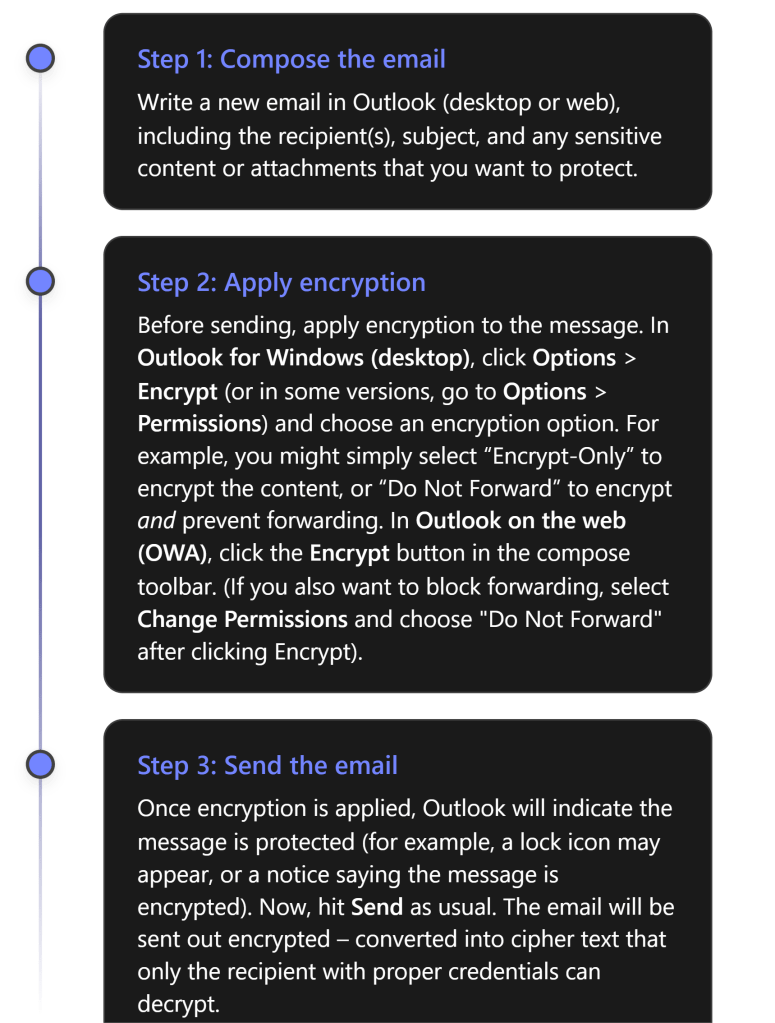
Encryption Options: When applying encryption in Step 2, you may have a few choices depending on your configuration:
- Encrypt-Only – Encrypts the email (and attachments) so that only authorized recipients can read it, but does not restrict what recipients can do with the content. Recipients could potentially copy or forward the content after decrypting, so use this when you want confidentiality but don’t need to restrict sharing.[4][4]
- Do Not Forward – Encrypts the email and applies Information Rights Management restrictions prohibiting the recipient from forwarding, printing, or copying the email’s content[6]. The recipient can read and reply, but cannot share it further. This is ideal for highly sensitive emails where you want to keep tight control.
- Sensitivity Labels – If your organization uses labels (like “Confidential”) configured to apply encryption, you might see those as options (for example, an email labeled Confidential might auto-encrypt and restrict to internal employees only). These will function similarly to the above, with preset scopes and restrictions defined by your admin.
Note: You do not need to exchange certificates or use special plugins to send encrypted mail using OME. As long as you have a supported M365 account with OME enabled, the feature is built into Outlook. This is much simpler than using S/MIME certificates, which require exchanging keys. With OME, just clicking “Encrypt” in Outlook is enough – Microsoft manages the encryption keys behind the scenes[6][6].
After sending, you might want to verify that your message was encrypted. In your Sent Items, the message should show an icon or text indicating it is protected. For instance, Outlook might display a small padlock icon or a banner “Do Not Forward” on the sent email if that was applied. Additionally, if you try to open the email from Sent Items, it may show that you (as sender) have full permissions. You can also double-check with a test recipient that they received an encrypted message (they will see indications on their side, described next).
Receiving and Opening Encrypted Emails
When a recipient gets an encrypted email, their experience will vary slightly depending on whether they are using a Microsoft 365/Outlook account or a third-party email service. We outline both scenarios below.
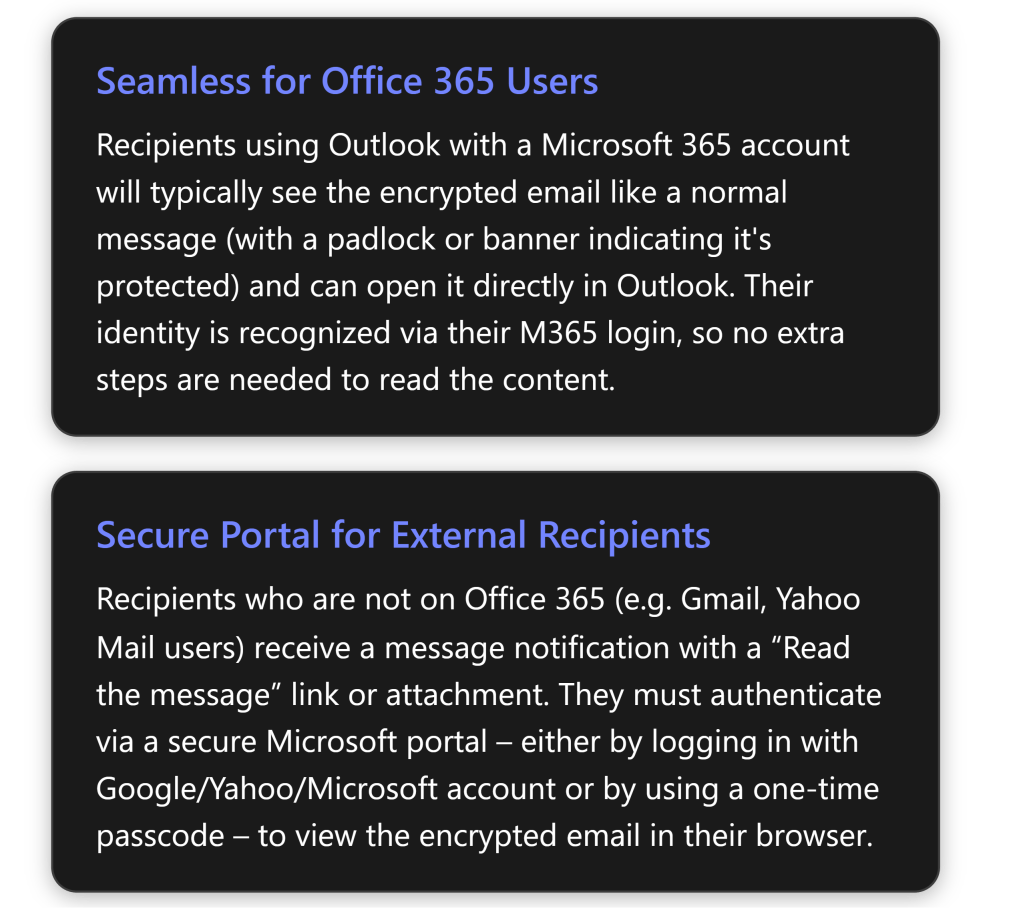
1. Microsoft 365/Office users (Internal or External with M365 accounts): If the recipient uses Outlook and has a Microsoft 365 account (either in your organization or another organization that uses Azure AD), the encrypted email arrives in their inbox like a regular email. In Outlook 2016 or later, they will see an alert in the Reading Pane that the message has restricted permissions[4] (for example, “Encrypt-Only” or “Do Not Forward” noted). They can simply open the email normally – Outlook will automatically retrieve the decryption key in the background using their credentials. After opening, the content is readable within Outlook just like any other email[4]. In short, for M365 users, reading an OME email is usually one-click: open it and read. For Outlook on the web or mobile, it’s similar – they click the message and, as long as they’re logged in with the authorized account, the message opens. (If by chance their client cannot display it directly – e.g., an older Outlook not fully updated – the email will instead contain a “Read Message” link guiding them to the web portal. But as of recent updates, Outlook 2019/M365 apps support the direct decrypt in the client for the Encrypt-Only policy[4].)
2. External or non-Microsoft recipients: If the recipient is outside M365 (for example, using Gmail, Yahoo, or any other email provider), they will receive an email letting them know you sent an encrypted message. The email will typically show your original subject line and a body message like: “\ has sent you a protected message” with a button or link that says “Read the message” (or an HTML attachment that they need to open)[6].
From the external recipient’s perspective, these are the steps to open an encrypted mail:
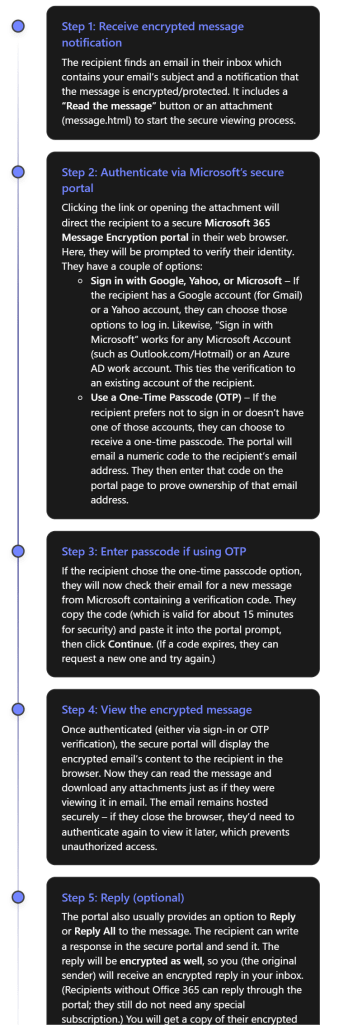
As seen above, Microsoft has designed OME so that even external recipients have a user-friendly (if slightly multi-step) way to access encrypted mail. They do not have to install anything; a web browser is enough. They either sign in with an existing email account or use a one-time code sent to their email[4][4]. Once that is done, they can read and even respond securely. This approach means you can confidently send sensitive data to clients or partners using Gmail, Yahoo, etc., and know that only they (not an unintended person) can read it.
Important: Certain parts of the email are not encrypted for practical reasons: the email subject line and metadata (sender, timestamp) are visible in the notification email. Only the body and attachments are encrypted. Therefore, as a best practice, do not put highly sensitive info in the subject line of an email – keep it generic and put details in the body or attachments which will be encrypted.
Also note, if an external recipient tries to forward the original notification email itself, it won’t help others read the message because only the intended recipient can authenticate to view the content. If you applied “Do Not Forward” protection, an external recipient cannot forward the content from the portal either (the portal will enforce no forwarding). If a Microsoft 365 recipient tries to forward a “Do Not Forward” encrypted email, the forwarded message will be unreadable to the new third-party, since they aren’t authorized – the system will either block it or send a protected email that the new recipient cannot open[6].
Best Practices for Using OME Effectively
Using Office Message Encryption adds security, but it’s important to use it correctly. Here are some best practices and tips:
- Train users and set expectations: Educate anyone sending encrypted emails on how OME works and when to use it (e.g. for personal data, financial info, confidential documents). Likewise, prepare external recipients if possible. For instance, if you’re emailing a client securely for the first time, you might call or text them beforehand, saying “You’ll receive a secure encrypted email from me with a link – it’s safe to open.” This helps external recipients not mistake your encrypted email for a phishing attempt.
- Use “Do Not Forward” for highly sensitive content: If you want to ensure the information doesn’t get re-shared, use the Do Not Forward option (or a similar rights-protected label). This way, even if a recipient’s account were compromised or someone was tempted to share the email, the protected content cannot be opened by unauthorized people[6]. It adds an extra layer beyond encryption alone.
- Avoid sensitive details in subject or preview text: As noted, the email subject is visible to anyone who might intercept the message (or just in the recipient’s inbox preview). Keep subjects generic and put sensitive info only in the encrypted body/attachments.
- Verify encryption on outgoing emails: When you send an encrypted email, double-check that Outlook shows it’s encrypted (look for the lock icon or a permissions message in the compose window)[6]. If you don’t see the encryption indicator, you may have missed a step. Also, you can send a test email to yourself (to a separate account) to see how the experience looks for recipients.
- Consider sensitivity labels for consistency: If your organization frequently encrypts emails, using sensitivity labels can make it easier and more standardized. For example, a label “Private – Recipients Only” could automatically encrypt and set Do Not Forward, in one click for the user. It ensures the correct policy is applied and also might apply visual markings to the email. Business Premium allows configuring such labels in the Purview compliance center.
- Be cautious with group emails: OME can encrypt emails sent to multiple people, but ensure each recipient is intended. If you send to a distribution list or a group, all members will be able to read it; if someone is later added to that group, they may not access past encrypted mail. For external groups, OME might not resolve all members. Ideally, send encrypted mail to individual addresses to maintain clarity over who can decrypt it.
- External recipient guidance: Some external recipients might struggle with the process (for example, the one-time passcode email might land in their spam folder or they may not realize they can use a Google login). Be ready to guide them. Microsoft’s support page “Open encrypted and protected messages” is a useful reference to share if someone has trouble.
- Remove encryption if needed: If you accidentally sent an email with encryption but later need to share the content openly, you (the sender) have the ability to remove encryption after sending. In Outlook, find the sent encrypted message, open it, go to File > Permissions (or Encrypt) and choose “Unrestricted Access” (for Outlook desktop)[6]. This essentially decrypts the message for all recipients, allowing them to view it without the special process. Use this carefully – it will make that content accessible just like a normal email.
- Leverage branding for trust: As mentioned, consider adding your organization’s branding to encrypted emails (logo, custom instructions)[6]. This helps recipients trust that the encryption message is legitimately from your company and not a phishing scam. The branding appears on the “Read the message” page and in the email that contains the link.
- Stay updated: Microsoft continually improves OME. For example, the “Encrypt-Only” mode was added to allow direct decryption in modern Outlook apps[4]. Keep your Outlook client updated to benefit from the latest improvements (e.g., some older versions required always using the web portal; newer versions can decrypt in-app). Similarly, stay informed via Microsoft 365 updates for any changes to the encryption experience.
Monitoring, Management, and Compliance Considerations
From an IT administration and compliance perspective, encrypted emails introduce some new considerations. Here’s how to manage and monitor OME usage in your organization and ensure compliance requirements are met:
- Tracking encrypted messages: Administrators may want to know when and how often users are sending encrypted emails (for example, to ensure policies are followed). Microsoft 365 provides an Encryption Report in the compliance center (Purview portal) that shows statistics and details of encrypted emails. In the Microsoft Purview portal, under Data Loss Prevention or Reports, you can find a report for Message Encryption usage[7]. This report can show which emails were encrypted, by whom, and if they were automatically encrypted by a rule or manually. It can typically be scheduled to be sent via email or viewed on demand[7]. Use this to monitor adoption and detect any anomalies (like an unusual spike in encrypted emails, which might indicate users handling a lot of sensitive info).
- Audit logs: Each time a user sends an encrypted email, an event is recorded in the Unified Audit Log in Microsoft 365 (if auditing is enabled). Admins can search the audit log for activities related to OME (such as the “Applied sensitivity label” event if labels are used, or mail flow rule events). There isn’t a special “encryption” event per se for each message, but the encryption report mentioned above is a higher-level view. If deeper investigation is needed (e.g., for a specific incident), administrators with proper permissions could also access the content (see eDiscovery below).
- eDiscovery and compliance searches: Encrypted emails are still stored in mailboxes (in an encrypted form). Compliance officers may worry: can we perform eDiscovery on encrypted content? The answer is yes – Microsoft Purview eDiscovery tools can decrypt encrypted emails so that compliance or legal reviewers can search and read them, provided the reviewer has the necessary permissions (specifically, the “RMS Decrypt” permission in Purview)[8][8]. In practice, during a content search or eDiscovery case, the system will decrypt the content of OME emails when exporting results or adding items to a review set, so that the reviewer can see the actual email text[8][8]. This ensures that using OME doesn’t impede your organization’s ability to fulfill legal discovery or compliance obligations, as long as authorized personnel are doing the searching.
- Data Protection and compliance standards: Using OME can help your organization comply with regulations that require protection of sensitive data in transit (such as GDPR, HIPAA for healthcare communications, or financial privacy laws). The encryption ensures that even if an email is inadvertently sent to the wrong party or intercepted, it cannot be read by unauthorized persons. That said, encryption is one piece of the puzzle – you should still enforce data loss prevention policies and train users on handling sensitive info. OME works in tandem with Data Loss Prevention (DLP) policies: for instance, a DLP policy detecting a credit card number could automatically trigger encryption of the email instead of blocking it, allowing the email to go out securely rather than in plain text[1].
- Advanced Message Encryption: For organizations with higher-end licenses (E5 or as an add-on), Advanced Message Encryption provides additional management capabilities. This includes the ability for admins to revoke access to a sent encrypted email or set it to expire after a certain time. For example, if an employee sent an encrypted email externally by mistake, an admin with Advanced Message Encryption could revoke that message, so that when the recipient tries to read it, they get a notice that the message is no longer available. Business Premium does not include Advanced Message Encryption (that’s an E5 feature), but it’s useful to know such features exist in case your compliance needs grow in the future.
- Ensuring availability of encryption features: If users report that they can’t find the Encrypt button or that encrypted emails aren’t opening, revisit the configuration:
- Make sure the user is logged into their Outlook with the correct account that has the Business Premium license. If not, have them sign out and sign back in with their licensed account[5][5].
- Check that the Outlook on the web policy has IRM enabled (an admin can do
Get-OwaMailboxPolicy -Identity OwaMailboxPolicy-Default | FL IRMEnabled. It should beTrue. If not, set it to true to expose the Encrypt option in OWA)[5]. - Ensure there are no older Active Directory Rights Management (on-premises AD RMS) configurations interfering – Microsoft’s OME will not work simultaneously with an old AD RMS setup. If you previously used AD RMS, you should migrate those keys to Azure RMS[3].
- Internal monitoring and scanning: Note that Exchange Online can still scan encrypted emails for malware and spam before encryption is applied. If you manually encrypt a message and send it, the content gets encrypted after it passes through the Outbox, meaning Microsoft’s server has the plaintext to scan for viruses. If an admin sets up an automatic encryption rule, it typically applies at the transport stage after other filters. So your use of OME shouldn’t reduce the effectiveness of Exchange Online Protection (EOP) for anti-malware. However, once encrypted, other systems (like a recipient’s email server or a journaling system outside Microsoft) can’t inspect the content. Keep this in mind if your enterprise routes mail through any gateway that needs to inspect content – you may need to allow that encryption happens at the final stage.
In summary, Microsoft 365 Business Premium provides a robust encryption capability for email. By configuring it properly and following the best practices above, you can greatly reduce the risk of sensitive information leaking via email, while still maintaining usability for your users and external contacts. Always balance security with practicality – use encryption when it’s truly needed (so users take it seriously), and make sure to support recipients who might be unfamiliar with the process. With OME, you empower users to protect data on their own, which is a powerful tool in your organization’s security arsenal.
Further Resources
For more information and support on Office 365 Message Encryption, consider these resources:
- Microsoft Learn – Email encryption in Microsoft 365: An overview of all email encryption options in M365, including OME, S/MIME, and IRM[9]. This is useful for understanding how OME compares to other encryption methods.
- Microsoft Learn – Set up Message Encryption: Step-by-step guidance for admins to enable and test OME in a tenant[3][3].
- Microsoft 365 Business Premium Training – Protect Email with OME: Microsoft offers a training module on using OME (protecting email) as part of their Business Premium documentation[1][1].
- Troubleshoot OME (Microsoft Support): Common issues and solutions if encrypted messages can’t be opened or the encrypt option is missing[5][5].
- User Guide – Send, View, and Reply to Encrypted Emails: Microsoft support article for end-users on how to send and read encrypted messages in Outlook[4][4] – this can be shared with new users or external recipients if they need guidance.
Each of these resources can provide deeper insights or up-to-date instructions as OME evolves. By following the steps and tips in this report, you should be well-equipped to configure Office Message Encryption in Microsoft 365 Business Premium and use it to securely send/receive sensitive emails with confidence. Enjoy the peace of mind that comes from that extra layer of security on your communications! [4][4]
References
[1] Send encrypted email with Microsoft 365 Business Premium – Microsoft …
[2] Message Encryption FAQ | Microsoft Learn
[3] Set up Microsoft Purview Message Encryption | Microsoft Learn
[4] Send, view, and reply to encrypted messages in Outlook for PC
[5] Resolve Microsoft Purview Message Encryption issues
[6] How to Encrypt Emails in Outlook and Office 365 — LazyAdmin
[7] O365 Encrypted Email – How can I tell which outgoing emails were …
