All the Guards–Part 6

This article is a part of a series. The previous article can be found here:

All the Guards – Part 5 (Credential Guard)

In this article I’m going to focus on the next component, which is:

Application Guard

For Microsoft Edge, Application Guard helps to isolate enterprise-defined untrusted sites, protecting your company while your employees browse the Internet. As an enterprise administrator, you define what is among trusted web sites, cloud resources, and internal networks. Everything not on your list is considered untrusted. If an employee goes to an untrusted site through either Microsoft Edge or Internet Explorer, Microsoft Edge opens the site in an isolated Hyper-V-enabled container.


For Microsoft Office, Application Guard helps prevents untrusted Word, PowerPoint and Excel files from accessing trusted resources. Application Guard opens untrusted files in an isolated Hyper-V-enabled container. The isolated Hyper-V container is separate from the host operating system. This container isolation means that if the untrusted site or file turns out to be malicious, the host device is protected, and the attacker can’t get to your enterprise data. For example, this approach makes the isolated container anonymous, so an attacker can’t get to your employee’s enterprise credentials.

Hardware isolation diagram

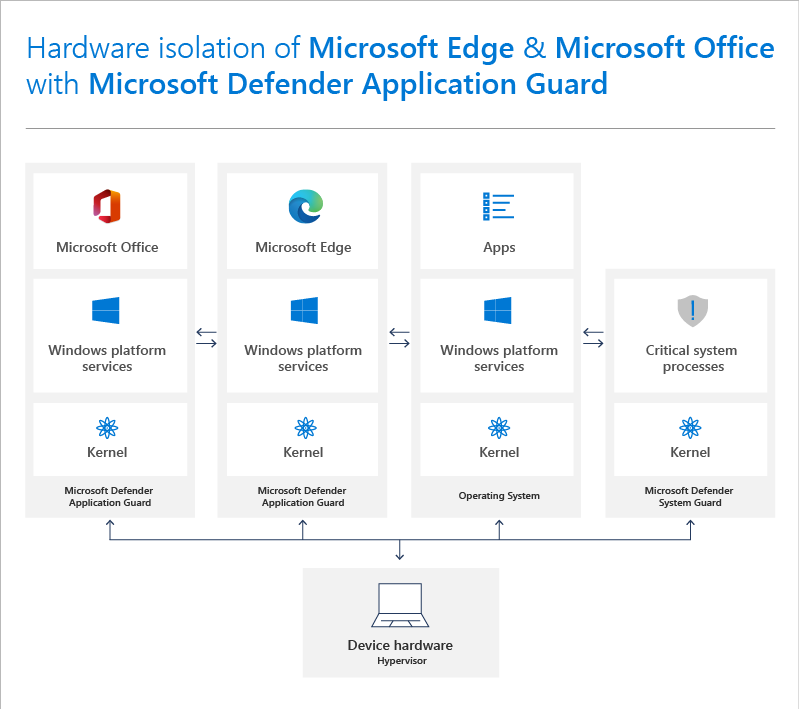
In essence, Application Guard provides an sandbox to use with your browser and Office. Untrusted web sites and documents are open in this sandbox to provide isolation from the rest of the system for security. You can implement Application Guard on both Windows 10 Pro and Enterprise out of the box as well as with Edge and other common browsers.

You can read about the specific:

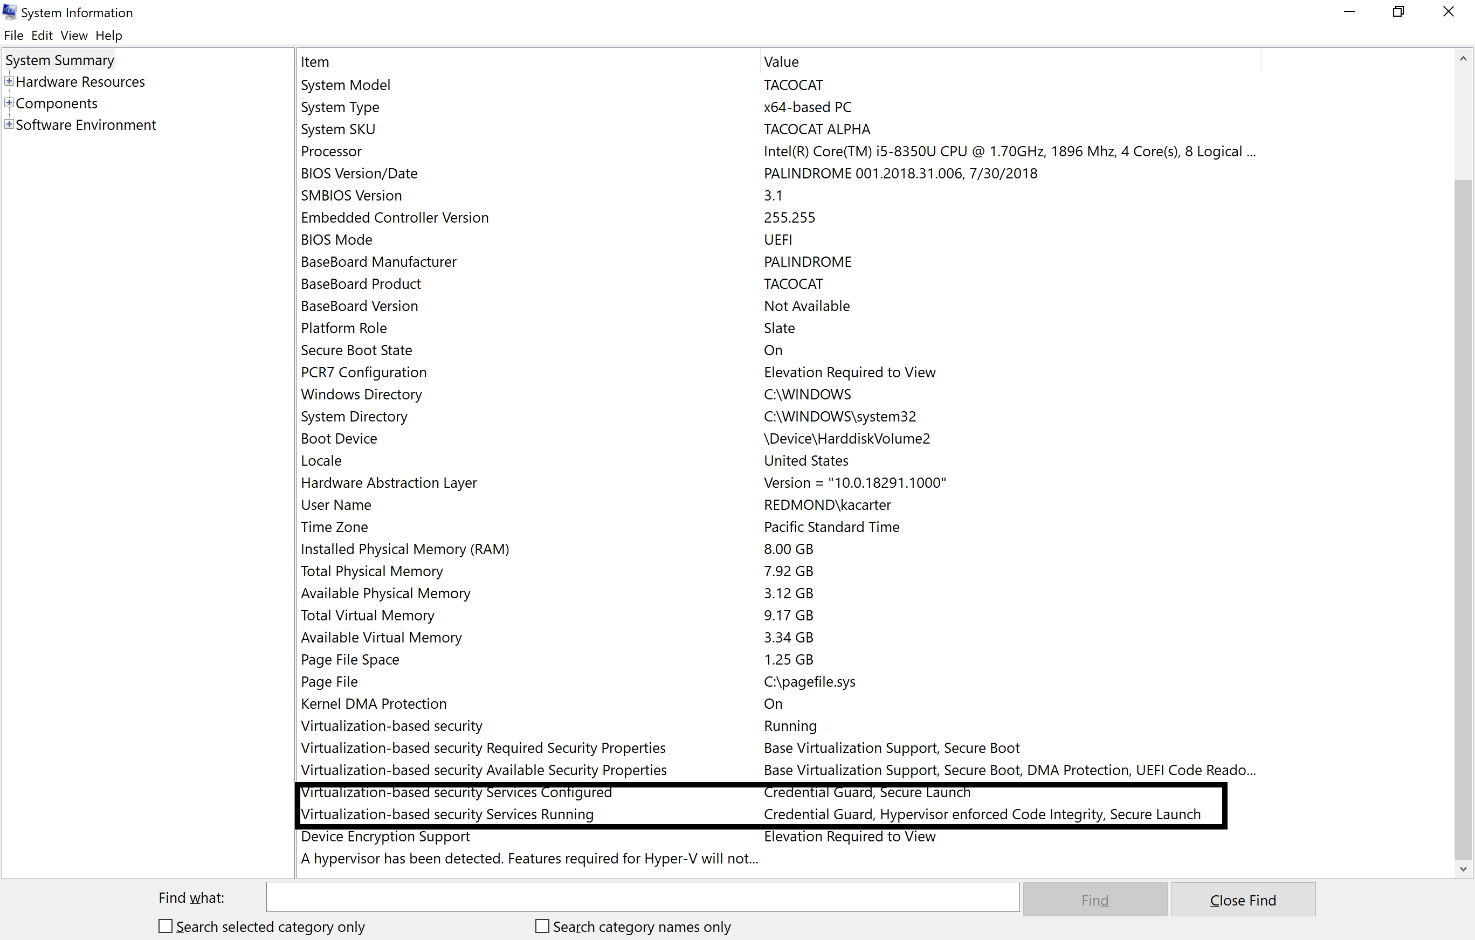
System Requirements for Microsoft Defender Application Guard

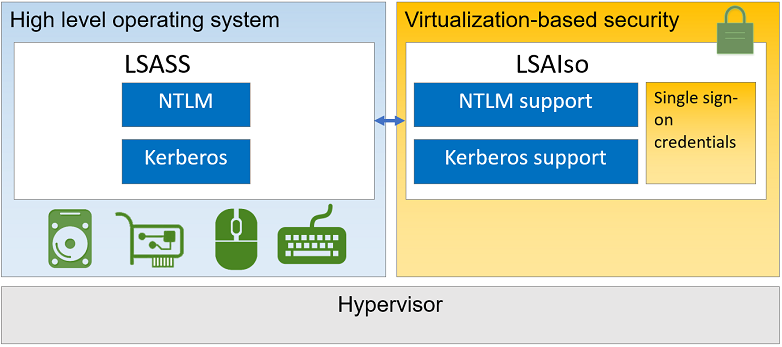
but in essence you’ll need the

Virtualization Based Security (VBS)

configured prior.

There are various ways to enable Application Guard and you’ll find these here:

Prepare to install Microsoft Defender Application Guard

Windows Features, turning on Microsoft Defender Application Guard

However, the easiest way is to enable Application Guard is by adding the Microsoft Defender Application Guard feature to Windows from the Control Panel as shown above.

If you are an administrator then you will also want to take a look at:

Application Guard for admins

Remember there is Application Guard for Edge and for Office:

Application Guard for Office

However, to use the Office version you’ll currently need Microsoft 365 E5.

Getting Application Guard to work as expected can be a tricky endeavour because it relies on things like Network Boundaries to define trusted and untrusted sites, which are determined by policy configurations. For all this, I suggest you take a look at my earlier article:

Getting Windows Defender Application Guard (WDAG) working

That article will also show you how to use the:

Windows Defender Application Guard Companion

which is really handy if you want to run Application Guard manually, which you’ll typically have to do unless you are using Windows 10 Enterprise.

Another handy resource is:

Frequently asked questions – Microsoft Defender Application Guard

To test your environment see:

Application Guard testing scenarios

Finally, here is a nice overall summary guide:

Windows 10 – All things about Application Guard

which importantly, provides the following troubleshooting tips:

  • To reset (clean up) a container and clear persistent data inside the container:
    • 1.  Open a command-line program and navigate to Windows/System32.
      2. Type wdagtool.exe cleanup. The container environment is reset, retaining only the employee-generated data.
      3. Type wdagtool.exe cleanup RESET_PERSISTENCE_LAYER. The container environment is reset, including discarding all employee-generated data.

Window Defender Application Guard is a great way to provide a sandbox for your browser as well as Office documents. The main limitation is that many of the automated features are only available if you are using Windows 10 Enterprise but that doesn’t stop you adopting Application Guard for your environment I would suggest, as any impact can easily be minimised for Windows 10 Pro environments.

Next up will be:

Exploit Guard

Need to Know podcast–Episode 272

In this episode MVP Kirsty McGrath shares her best practices and tips and tricks around delivering successful online learning. Note, we did have some technical issues with this episode, so it might sound a little different from what it normally does but don’t let that stop you from listening along to all the great material. I also give a quick update at head of the show, for everything happening with the Microsoft Cloud.

This episode was recorded using Microsoft Teams and produced with Camtasia 2020.

Brought to you by www.ciaopspatron.com

ake a listen and let us know what you think – feedback@needtoknow.cloud

You can listen directly to this episode at:

https://ciaops.podbean.com/e/episode-272-kirsty-mcgrath/

Subscribe via iTunes at:

https://itunes.apple.com/au/podcast/ciaops-need-to-know-podcasts/id406891445?mt=2

The podcast is also available on Stitcher at:

http://www.stitcher.com/podcast/ciaops/need-to-know-podcast?refid=stpr

Don’t forget to give the show a rating as well as send us any feedback or suggestions you may have for the show.

Resources

Kirsty McGrath – MVP, Twitter, Linkedin, Web, Sydney UG, Melbourne UG, Instagram

New pricing for Microsoft 365

Securing your Windows 365 Cloud PCs

Get started with Universal Print and Windows 365 Cloud PC

Welcome to the brand new Windows 365 Community!

Get Ready to Do More with Teams Meeting Recordings in Microsoft 365!

Microsoft Security Technical Content Library

Super Duper Secure Mode

Whitepaper-Transitioning-Asia-to-a-New-Normal-of-Work.pdf (microsoft.com)

Adapting workplace learning in the time of coronavirus (mckinsey.com)

https://www.howspace.com/resources/hybrid-learning-model

https://news.griffith.edu.au/2020/10/28/hybrid-remote-learning-models-still-needed-post-pandemic/

Richard E. Mayer – Wikipedia

https://www.youtube.com/watch?v=VD4oJGAgoMQ

https://www.wgu.edu/blog/what-is-cognitive-learning2003.html#close

Why Webinar Attendees Leave Early – a 1080 Group, LLC survey brief (thevirtualpresenter.com)

Hybrid Learning Transition Approaches | Microsoft Education

Live Online Learning Facilitator – The LPI

All the Guards–Part 5

This article is a part of a series. The previous article can be found here:

All the Guards – Part 4 (System Guard)

In this article I’m going to focus on the next component:

Credential Guard

Microsoft Defender Credential Guard protects against credential theft attacks. It isolates secrets so that only privileged system software can access them.

Credential Guard is a specific feature that is not part of Device Guard that aims to isolate and harden key system and user secrets against compromise, helping to minimize the impact and breadth of a Pass the Hash style attack in the event that malicious code is already running via a local or network based vector.

Credential Guard isolates credentials using Virtualization Based Security (VBS).

Prior to Windows 10, the LSA stored secrets used by the operating system in its process memory. With Windows Defender Credential Guard enabled, the LSA process in the operating system talks to a new component called the isolated LSA process that stores and protects those secrets. Data stored by the isolated LSA process is protected using virtualization-based security and is not accessible to the rest of the operating system. LSA uses remote procedure calls to communicate with the isolated LSA process

For security reasons, the isolated LSA process doesn’t host any device drivers. Instead, it only hosts a small subset of operating system binaries that are needed for security and nothing else. All of these binaries are signed with a certificate that is trusted by virtualization-based security and these signatures are validated before launching the file in the protected environment.

Windows Defender Credential Guard overview

Windows Defender Credential Guard Requirements

You can enable Credential Guard using various methods which are detailed here:

Manage Windows Defender Credential Guard

To verify that Credential Guard is running:

image

run the System Info app on you Windows 10 device

image

and look for the:

Virtualization-based security Service Configured

and

Virtualization-based security Service Running

to make sure you see Credential Guard in both as shown above.

If you look at your Task Manager you should see a task called lsalso.exe as shown above, which is the protected version of lsass.exe that Credential Guard sets up.

You should also review as some features and passwords could be impacted by protecting credentials per:

Considerations when using Windows Defender Credential Guard

There are also a few readiness tools for Credential Guard I found that may be handy:

Windows Defender Device Guard and Windows Defender Credential Guard hardware readiness tool

Device Guard and Credential Guard hardware readiness tool

Once you have Virtualization Based Security (VBS) and Secure boot enable on your system, you can take advantage of Windows Defender Credential Guard to isolate credentials and protect them.

In Part 6 we’ll take a look at:

Application Guard

All the Guards–Part 4

This article is a part of a series. The previous article can be found here:

All the Guards – Part 3 (Device Guard)

In this article I’m going to focus on the next component:

System Guard

Windows Defender System Guard reorganizes the existing Windows 10 system integrity features under one roof and sets up the next set of investments in Windows security. It’s designed to make these security guarantees:


– Protect and maintain the integrity of the system as it starts up
– Protect and maintain the integrity of the system after it’s running
–  Validate that system integrity has truly been maintained through local and remote attestation

Windows Defender System Guard

As Windows 10 boots, a series of integrity measurements are taken by Windows Defender System Guard using the device’s Trusted Platform Module 2.0 (TPM). This process and data are hardware isolated away from Windows to help ensure that the measurement data is not subject to the type of tampering that could happen if the platform was compromised. From here, the measurements can be used to determine the integrity of the device’s firmware, hardware configuration state, and Windows boot-related components, just to name a few. After the system boots, Windows Defender System Guard signs and seals these measurements using the TPM, and, upon request a management system, like Intune or System Center Configuration Manager, can acquire them for remote analysis. From here the management system can take a series of actions, such as denying the device access to resources, if Windows Defender System Guard indicates that the device lacks integrity.

At the end of the Windows boot process, System Guard will start the system’s antimalware solution which scans all third party drivers, at which point the system boot process is completed. In the end, Windows Defender System Guard helps ensure that the system securely boots with integrity and that it hasn’t been compromised before the remainder of your system defenses start.Virtual TPM and parts of Windows Defender Exploit Guard.

At the end of the Windows boot process, System Guard will start the system’s antimalware solution which scans all third party drivers, at which point the system boot process is completed. In the end, Windows Defender System Guard helps ensure that the system securely boots with integrity and that it hasn’t been compromised before the remainder of your system defenses start.

Device Health Attestation

Windows Defender System Guard: How a hardware-based root of trust helps protect Windows 10

To enable System Guard Secure launch, the platform must meet all the baseline requirements for Device Guard, Credential Guard, and Virtualization Based Security.

System requirements for System Guard

There are various ways that you can enable System Guard detailed here:

System Guard Secure Launch and SMM protection

You can also use Microsoft Endpoint Manager | Windows 10 Security Baseline | Device Guard:

To verify that System Guard is running, once again run msinfo32 at the command prompt:

Verifying Secure Launch is running in the Windows Security Center

You should see the text Secure Launch in the text for the options Virtualization-based Security Services Running and Virtualization-based Security Services Configured as shown above.

If you also look at the items running in Task Manager you should see one called Secure System as shown:

bearcnlnaexer.exe 
Secure System 
Nunmng 
Running 
44,744 K 
Not allowed 
Not allowed 
Microsott VVlnaows bearcn Indexer 
NT Kernel & System

While I was investigating Secure Launch on my Surface PC’s I found that it wasn’t launching for some reason. Here is the reason why I received from the surface team about why this is on these devices:

We actually don’t support Secure Launch but we have the same/similar protection built into the Surface firmware regardless. It’s one of the main arguments of why most Surface devices don’t fall under the “Secure Core PC” definition

Secure Core PCs – https://www.microsoft.com/en-us/windowsforbusiness/windows10-secured-core-computers

Secure Launch is required because of the variety of OEM firmware versions that became to cumbersome to manage statically for Windows to verify that it hadn’t been tampered with. Secure Launch uses Dynamic Root of Trust Management which is a creative approach for the OS to “learn” what a clean firmware looks like and then make sure it doesn’t get maliciously changed.

The Surface firmware (since its first party) can still be measured statically and Windows can validate whether its been tampered with or not.

SMM (System Management Mode) is a set of highly privileged instructions that the CPU can use to the OS, firmware and key resources. OEM firmware uses SMM for a number of different process (updates, firmware changes, offline servicing using AMT, etc). SMM Protection does not add much value for Surface since we limit our SMM instruction set to just 2 or 3 key handlers which wouldn’t allow a hacker to exploit much.

1) DRTM

Dynamic Root of Trust Measurements (DRTM) is a security feature that must be supported by the SoC and TPM to ensure the boot chain is trusted at each stage. DRTM provides for checking of each stage of UEFI boot by fully checking the code with measurement in the TPM. The SoC supports DRTM by providing special instructions that prevent other cores from running except the core the boot is running on, to address UEFI DXE extensions that may have been installed.

ProX supports DRTM, but Pro7 and Laptop3 use a different mechanism to ensure the integrity of the trust chain. It isn’t just a measurement that is checked before the first UEFI phase; the first UEFI Phase is verified using a Microsoft signature that is fused into the Soc at the factory. Each phase of UEFI verifies the signature of the next phase through the OS boot loader. Only code authorized by Microsoft is able to execute in the boot chain.

2) SMM Protection

System Management Mode (SMM) Protection is used to prevent malicious low level code from accessing resources out of their bounds. Pro7 and Laptop3 support all of the SMM Protections that ICL supports. Kernel mode drivers that access SMM use SMM interrupts (SMI). Reducing the available attack surface is import; defense in depth. Surface reduces the attack surface by reducing the number of SMI handlers on Surface devices, to two handlers; the realtime clock and UEFI variables.

The main thing I suggest you check for in regards to Secure Guard being enabled is the Secure System process in the Task Manager.

The concept of Secure System and Secure Launch seem to used inter changeably in places resulting in confusion along with the fact that Surface PC’s take a different approach to System Guard/Secure launch. Unfortunately, I have not been able to track down a consistent explanation of all of this so I hope you at least have a better idea of what System Guard is and does, plus maybe how to enable it if you wanted.

In Part 5 of this series I’ll take a look at:

Credential Guard

Troubleshoot Windows 365 Business Cloud PC setup issues

image

This, unfortunately, was the error that keep greeting me whenever I tried to set up a Windows 365 Business Cloud PC:

Setup failed, please reset your cloud PC

I repeated the reset process over and over but still no luck. I then came across the following article from Microsoft:

Troubleshoot Windows 365 Business Cloud PC setup issues

which helped me greatly and I recommend you follow through that article and suggestions it makes. I therefore thought I’d share my process in troubleshooting this issue, because there are some things the article doesn’t specifically call out that I’ll mention to help you.

The first learning was that the Windows Business Cloud PC creating process creates a new account called

CloudPCBPRT

the user principal name for this appears like:

package_<GUID>@domain.com

i.e.

package_62531965-0931-10d5-9adef-0e4a7179b539e@domain.com

so, you need to ensure this exists in your active Directory.

The next learning from that article was:

Make sure there are no MFA conditional access policies for that first user. MFA must remain turned off during any setup attempts. After all Cloud PCs are successfully set up across your organization, you may turn on MFA for this user.

In essence, during the very first set up of your Windows Business Cloud PC environment you’ll need to do this using an account that doesn’t have MFA enabled. After that, accounts can have MFA enable, but it’s important that the very first account you use with Windows Business Cloud PC doesn’t have MFA enabled.

Remember, there are various ways to enforce MFA inside a tenant, directly, via Security Defaults and also using Conditional Access. Check that your initial user has all these options disabled. I’d suggest it is also a good idea to ensure the account CloudPCBPRT does not have any MFA enforcement either.

Now, the thing that I found the Microsoft article didn’t cover off was:

1. Checking that any Conditional Access policies are not blocking the join process. In my case, I have policies that prevent users adding devices via Conditional Access unless they are joining compliant devices. Ensure that these policies are not being applied to that initial user during set up. Again, double check that CloudPCBPRT is also excluded from such policies.

2. It turns out that even though I have an Australian Microsoft 365 subscription, the virtual machines where provisions for Windows Business Cloud PC from the Microsoft datacenters in Singapore. Thus, I needed to further adjust my Conditional Access policies to allow logins from this region as I generally restrict all logins to tenant to be from Australia only. As before, ensure CloudPCBPRT, can login to your tenant from the region where the VMs are provisioned.

Once I had made all those changes I could create the initial Windows Business Cloud PC and then go on and create another Windows Cloud PC for my ‘normal’ production account. And as you can see, I’m now one of the cool kids:

image

In summary then, your troubleshooting for Windows Business Cloud PC should start with the Microsoft article and if you are still having issues, check and adjust your Conditional Access policies to allow that first account to get set up. I’d also make sure that the account CloudPCBPRT is generally excluded from things like MFA and strict Conditional Access policies. Once I’d done all that I could do everything I needed.

All the Guards–Part 3

This article is a part of a series. The previous article can be found here:

All the Guards – Part 2 (Virtualization Based Security)

In this article I’m going to focus on the next component:

Device Guard

Device Guard is a group of key features, designed to harden a computer system against malware. Its focus is preventing malicious code from running by ensuring only known good code can run.


It’s worth noting here that these are enterprise features, and as such are included only in the Windows Enterprise client.


Device Guard consists of three primary components:
     – Configurable Code Integrity (CCI) – Ensures that only trusted code runs from the boot loader onwards. Requires code integrity policies
     – VSM Protected Code Integrity – Moves Kernel Mode Code Integrity (KMCI) and Hypervisor Code Integrity (HVCI) components into VSM, hardening them from attack.
     – Platform and UEFI Secure Boot – Ensuring the boot binaries and UEFI firmware are signed and have not been tampered with


When these features are enabled together, the system is protected by Device Guard, providing class leading malware resistance in Windows 10.

But:

Why we no longer use the Device Guard brand

When we originally promoted Device Guard, we did so with a specific security promise in mind. Although there were no direct dependencies between WDAC and HVCI, we intentionally focused our discussion around the lockdown state achieved when using them together. However, since HVCI relies on Windows virtualization-based security, it has hardware, firmware, and kernel driver compatibility requirements that some older systems can’t meet. This misled many people to assume that if systems couldn’t use HVCI, they couldn’t use WDAC either.


WDAC has no specific hardware or software requirements other than running Windows 10, which means customers were denied the benefits of this powerful application control capability due to Device Guard confusion.

But there is this article:

Windows 10 Device Guard and Credential Guard Demystified

that still talks about Device Guard??

also this:

Overview of Device Guard in Windows Server 2016

From what I can determine the major component to focus here is not Device Guard but:

Code integrity

So from:

Device Guard signing

Device Guard signing is a Device Guard feature that gives admins a single place to sign catalog files and code integrity policies. After admins have created catalog files for unsigned apps and signed the catalog files, they can add the signers to a code integrity policy.

Device Guard is a feature set that consists of both hardware and software system integrity hardening features. These features use new virtualization-based security options and the trust-nothing mobile device operating system model. A key feature in this model is called configurable code integrity, which allows your organization to choose exactly which software or trusted software publishers are allowed to run code on your client machines. Also, Device Guard offers organizations a way to sign existing line-of-business (LOB) applications so that they can trust their own code, without the requirement that the application be repackaged. Also, this same method of signing allows organizations to trust individual third-party applications.

From what I can understand of all this is that part of Device Guard kind of still exists but to implement you would need to implement:

Sign code integrity policy with Device Guard signing

The other part that was Device Guard is now Windows Defender Application Control (WDAC):

Deploying Windows Defender Application Control (WDAC) policies

The confusion about Device Guard is compounded by the way it is referred to in Endpoint Manager, for example here in the Windows 10 security baseline policy:

image

Here, it seems that Device Guard refers to things like Virtualization Based Security and items yet to be covered in this series, System Guard and Credential Guard.

Device Guard is good example of where all of this gets very confusing. It kind of exists but it doesn’t exist. It also seems to be referenced differently in different places. From what I can determine, unless you want to go down the path of signing your applications so they can all be verified at boot then don’t worry about Device Guard. Where you will need to consider some of the Device Guard feature is if you choose to implement Windows Defender Application Control which I have covered off previously here:

Windows Defender Application Control (WDAC) basics

and here

Basics of deploying Windows Defender Application Control (WDAC) using Intune

WDAC is more focused on software rather than hardware, while Device Guard, in its original form, was more about hardware. Again, very confusing. Unfortunately, the confusion with all these Guards doesn’t end here, so let’s move onto the next component:

Next – System Guard

All the Guards–Part 2

This article is a part of a series. The previous article can be found here:

All the Guards – Part 1 (Secure Boot)

In this article I’m going to focus on the next component:

Virtualization Based Security (VBS)

In order to use VSM, you’ll need a number of hardware features to be present and enabled in the firmware of the machine:
     – UEFI running in Native Mode (not Compatibility/CSM/Legacy mode)
     – Windows 64bit and it’s associated requirements
     – Second Layer Address Translation (SLAT) and Virtualization Extensions (Eg, Intel VT or AMD V)
A Trusted Platform Module (TPM) is recommended.

There is a more details in link in the above article of what you need but most modern PC’s today should be capable, however you may want to check this article:

The potential performance impact of Device Guard (HVCI)

The idea is that by enabling virtualization on devices, then you can start to “sand box” and isolate different processes on a machine in their own unique and protected container. However, to achieve all that (which will be covered in upcoming articles) you’ll need to enable virtualization on your device.

image

Various policies and configurations can achieve this for you automatically but to do it manually open Control Panel, then select Programs and Features and then Turn Windows features on or off on the left. Scroll through the list of features and expand the Hyper-V one as shown above. Select Hyper-V Hypervisor as shown, and then select OK to save and update your device configuration. Typically, you’ll also need to reboot your device for virtualization to be enabled.

Here are others ways you can enable this feature:

Enable virtualization-based protection of code integrity

I will also note that new Surface PC’s will come with this feature enabled per:

New Surface PCs enable virtualization-based security (VBS) by default to empower customers to do more, securely

There is a small performance hit to your device as is now running virtualised processes, however on most modern Windows devices you should not really notice this.

With that now complete we are ready to look at the next phase of this process:

Next – Device Guard

All the Guards–Part 1

A while back I wrote an article about all the Defender products Microsoft has:

All the Defenders

Turns out that Microsoft also has a range of “Guard” products as well. In general, you can think of Microsoft Guard products as interfacing and working in combination with the physical device to enhance the security of your environment.

You’ll also find that there is plenty of cross over between Defender and Guard products, for example, Windows Defender Application Guard (WDAG).

What I’m going to try and do here is look specifically at all the products that have the name ‘guard’ in them and show how they help improve the security of your environment. I will readily admit, that because of the integration of hardware and software here, getting definitive answers on many questions has proved extremely challenging. Thus, I’ll do my best here to share what I have learned but I’m sure there is still more to uncover.

To commence this journey we need to examine the actual Windows 10 boot process, which is nicely covered in this article from Microsoft:

Secure the Windows 10 boot process

and from which I’ll quote:

Secure Boot

When the PC starts, the firmware checks the signature of each piece of boot software, including UEFI firmware drivers (also known as Option ROMs), EFI applications, and the operating system. If the signatures are valid, the PC boots, and the firmware gives control to the operating system.


When a PC equipped with UEFI starts, the PC first verifies that the firmware is digitally signed, reducing the risk of firmware rootkits. If Secure Boot is enabled, the firmware examines the bootloader’s digital signature to verify that it hasn’t been modified. If the bootloader is intact, the firmware starts the bootloader only if one of the following conditions is true:


– The bootloader was signed using a trusted certificate. In the case of PCs certified for Windows 10, the Microsoft® certificate is trusted.
– The user has manually approved the bootloader’s digital signature. This allows the user to load non-Microsoft operating systems.

The first step you’ll need to take is to ensure that your UEFI boot is enabled on your device. You can follow this article:

Enable Secure Boot on your device

To verify you have Secure Boot enabled you can:

image

Run the system configuration utility (Start | MSINFO) which should show you something like:

image

Here you should find both the BIOS mode set to UEFI and the Secure Boot State set to ON.

image

You can also run the PowerShell command:

confirm-securebootuefi

as an administrator as shown above, which should return as True.

image

 Finally, you can also open Windows Defender on your device, select Device Security and under the Secure boot option, shown above, you should see Secure boot is ON.

Windows 10 startup process

The above, from the Secure the Windows 10 boot process gives you a good idea of how the boot sequence proceeds. To again quote the article:

Trusted Boot

Trusted Boot takes over where Secure Boot leaves off. The bootloader verifies the digital signature of the Windows 10 kernel before loading it. The Windows 10 kernel, in turn, verifies every other component of the Windows startup process, including the boot drivers, startup files, and ELAM. If a file has been modified, the bootloader detects the problem and refuses to load the corrupted component. Often, Windows 10 can automatically repair the corrupted component, restoring the integrity of Windows and allowing the PC to start normally.

Measured Boot

Working with the TPM and non-Microsoft software, Measured Boot in Windows 10 allows a trusted server on the network to verify the integrity of the Windows startup process. Measured Boot uses the following process:


    1. The PC’s UEFI firmware stores in the TPM a hash of the firmware, bootloader, boot drivers, and everything that will be loaded before the anti-malware app.
     2. At the end of the startup process, Windows starts the non-Microsoft remote attestation client. The trusted attestation server sends the client a unique key.
     3. The TPM uses the unique key to digitally sign the log recorded by the UEFI.
     4. The client sends the log to the server, possibly with other security information.


Depending on the implementation and configuration, the server can now determine whether the client is healthy and grant the client access to either a limited quarantine network or to the full network.

Windows 10 includes the application programming interfaces to support Measured Boot, but you’ll need non-Microsoft tools to implement a remote attestation client and trusted attestation server to take advantage of it.

Now that the boot process is complete and secure, thanks to Secure Boot, we can move onto the next phase in protection with Windows 10 Guards,

Next – Virtualization Based Security