Executive Summary
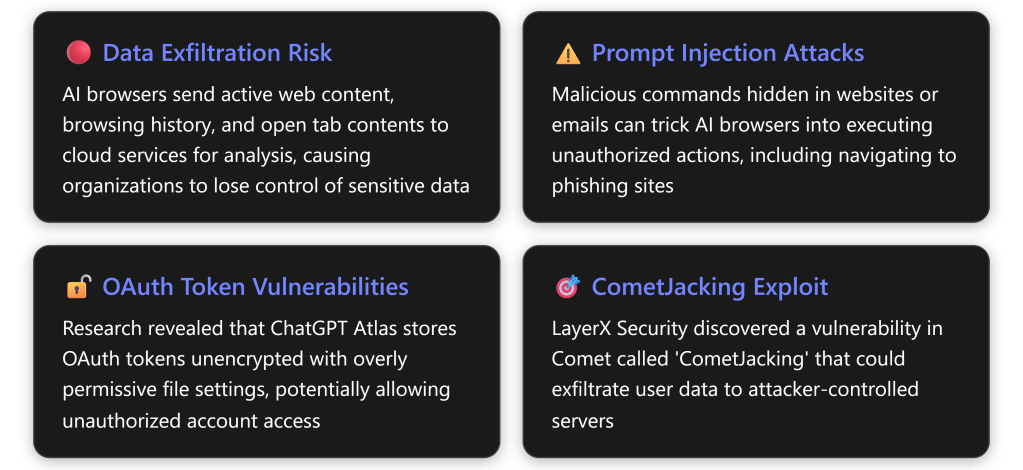
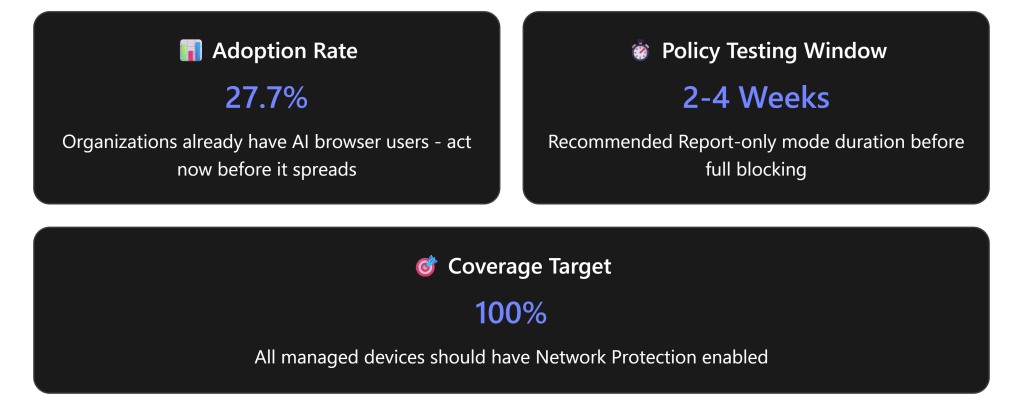
In December 2025, Gartner issued an urgent advisory recommending that organizations “block all AI browsers for the foreseeable future” due to critical cybersecurity risks.AI browsers like Perplexity’s Comet and OpenAI’s ChatGPT Atlas introduce threats including irreversible data loss, prompt injection vulnerabilities, and unauthorized credential access.With 27.7% of organizations already having at least one user with an AI browser installed,the time to act is now. [computerworld.com]
This comprehensive guide provides step-by-step instructions for configuring Microsoft 365 Business Premium (M365 BP), specifically Microsoft Defender for Cloud Apps, to detect, monitor, and block AI-enabled browsers like Comet from accessing your enterprise resources.
Understanding the AI Browser Threat Landscape
Why AI Browsers Are Dangerous
According to Gartner analysts, “The real issue is that the loss of sensitive data to AI services can be irreversible and untraceable. Organizations may never recover lost data.” [computerworld.com]
Key Security Concerns:
- Autonomous Actions Without Oversight – AI browsers can autonomously navigate websites, fill out forms, and complete transactions while authenticated, creating accountability concerns for erroneous or malicious actions [computerworld.com]
- Traditional Controls Are Inadequate – “Traditional controls are inadequate for the new risks introduced by AI browsers, and solutions are only beginning to emerge,” according to Gartner’s senior director analyst Evgeny Mirolyubov [computerworld.com]
- Multi-Modal Communication Gaps – A major gap exists in inspecting multi-modal communications with browsers, including voice commands to AI browsers [computerworld.com]
- Immature Security Posture – Discovered vulnerabilities highlight broader concerns about the maturity of AI browser technology, with solutions likely taking “a matter of years rather than months” to mature [computerworld.com]
Prerequisites and Licensing Requirements
Required Licenses
To implement comprehensive AI browser blocking, you need: [wolkenman….dpress.com]
| License Option | What’s Included |
|---|---|
| Microsoft 365 Business Premium + E5 Security Add-on | Defender for Cloud Apps + Defender for Endpoint |
| Microsoft 365 E5 / A5 / G5 | Full suite including Conditional Access App Control |
| Enterprise Mobility + Security E5 | Defender for Cloud Apps + Defender for Endpoint |
| Microsoft 365 F5 Security & Compliance | All required components |
| Microsoft 365 Business Premium + Defender for Cloud Apps Add-on | Minimum required configuration |
Technical Prerequisites
Before implementing blocking policies, ensure: [learn.microsoft.com], [learn.microsoft.com]
- ✅ Microsoft Defender for Cloud Apps license (standalone or bundled)
- ✅ Microsoft Entra ID P1 license (standalone or bundled)
- ✅ Microsoft Defender for Endpoint deployed and configured
- ✅ Cloud Protection enabled in Defender for Endpoint [learn.microsoft.com]
- ✅ Network Protection enabled in Defender for Endpoint [learn.microsoft.com]
- ✅ Admin permissions – Global Administrator or Security Administrator role
- ✅ Microsoft Defender Browser Protection extension installed on non-Edge browsers [learn.microsoft.com]
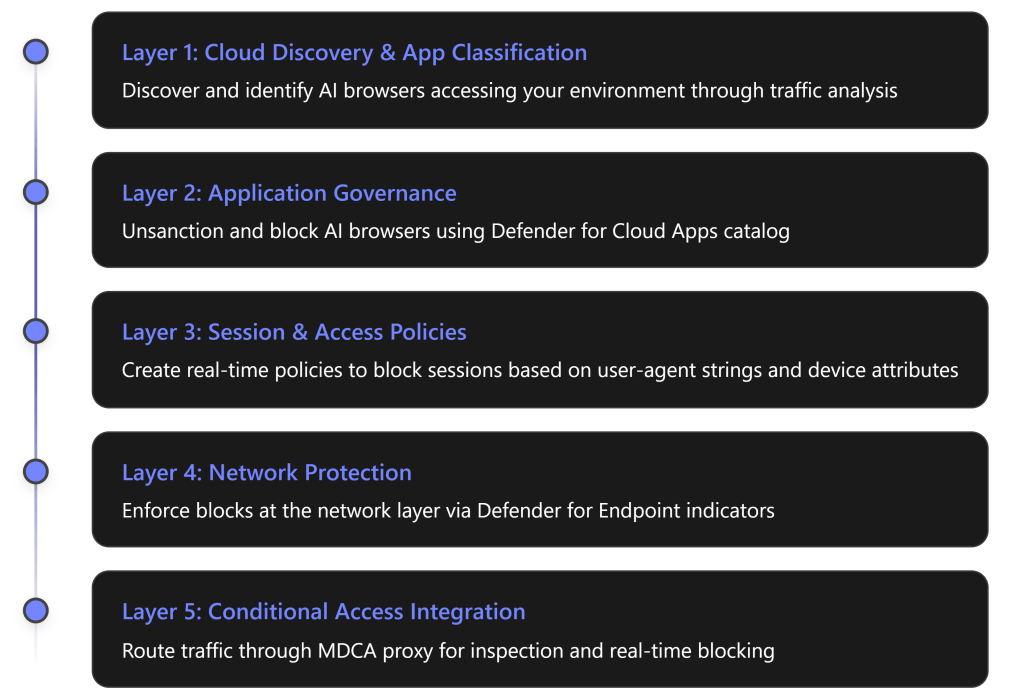
Multi-Layered Defense Strategy
Blocking AI browsers requires a comprehensive, defense-in-depth approach using multiple Microsoft 365 security layers:
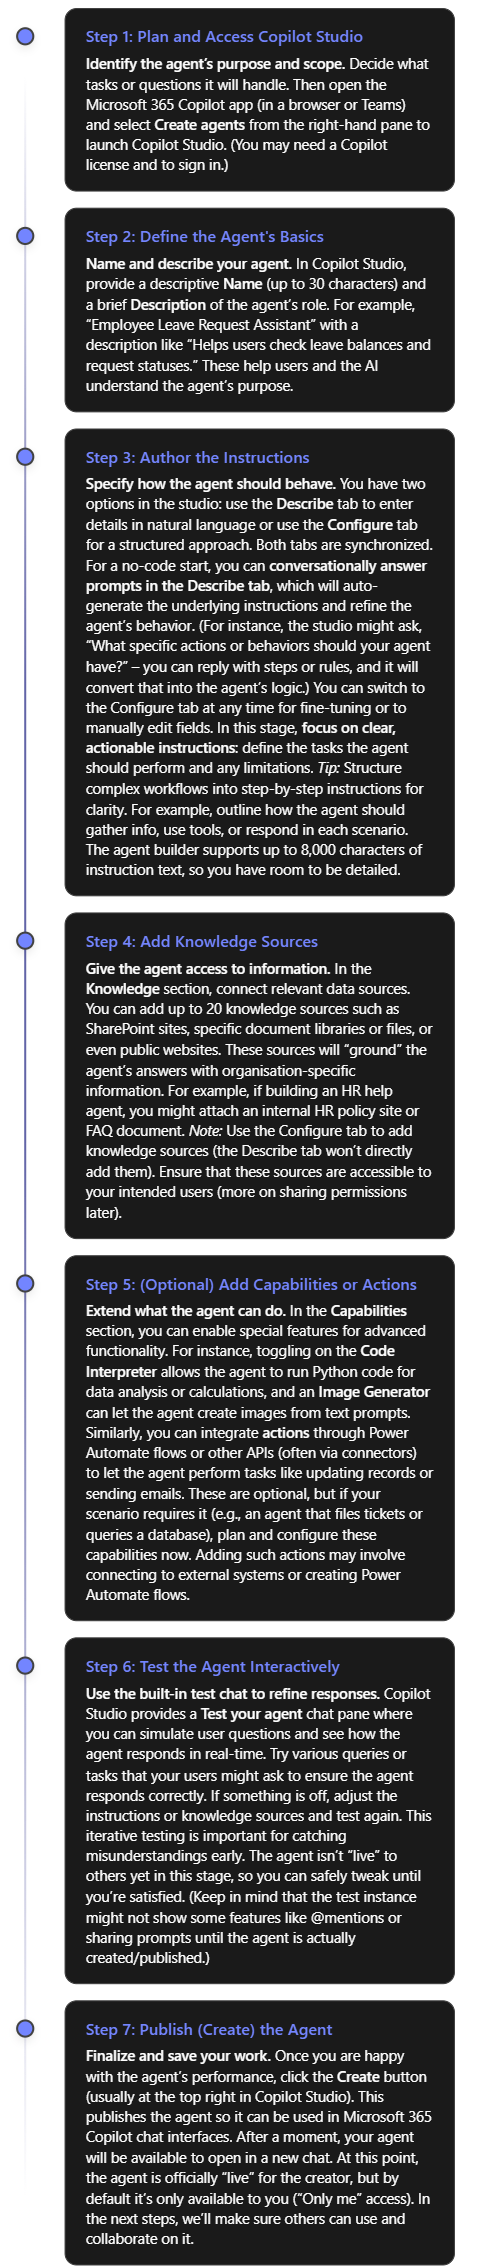
Configuration Guide: Step-by-Step Implementation
Phase 1: Enable Cloud Discovery for AI Applications
Objective: Gain visibility into which AI browsers and applications are being used in your organization.
Step 1.1: Access Cloud Discovery Dashboard
- Navigate to Microsoft Defender Portal (https://security.microsoft.com)
- Go to Cloud Apps → Cloud Discovery → Dashboard
- Set the time range to Last 90 days for comprehensive analysis [wolkenman….dpress.com]
Step 1.2: Filter for Generative AI Applications
- In the Cloud Discovery dashboard, click Category filter
- Select “Generative AI” from the category list [wolkenman….dpress.com]
- Review discovered AI applications with their risk scores
- Note applications with High Risk status (red indicators) [wolkenman….dpress.com]
Step 1.3: Identify AI Model Providers and MCP Servers
Beyond browsers, also identify: [wolkenman….dpress.com]
- AI – Model Providers (Azure OpenAI API, Google Gemini API, Anthropic Claude API)
- AI – MCP Servers (Model Context Protocol servers)
Navigate to: Cloud Apps → Cloud App Catalog → Filter by “AI – Model Providers” and “AI – MCP Servers”
Phase 2: Configure Defender for Endpoint Integration
Objective: Enable automatic blocking of unsanctioned apps through network-level enforcement.
Step 2.1: Enable Enforce App Access
- In Microsoft Defender Portal, navigate to:
- Settings → Cloud Apps → Cloud Discovery → Enforce App Access [wolkenman….dpress.com]
- Toggle “Automatically block unsanctioned apps” to ON
- This creates automatic indicators in Defender for Endpoint when apps are marked as unsanctioned [wolkenman….dpress.com]
Step 2.2: Verify Network Protection Status
Ensure Network Protection is enabled for all browsers: [wolkenman….dpress.com]
- Navigate to Settings → Endpoints → Configuration Management
- Go to Enforcement Scope → Network Protection
- Verify status is set to “Block mode” (not just Audit mode)
- Apply to All devices or specific device groups
Why This Matters: Network Protection ensures that blocks work across all browsers (Chrome, Firefox, etc.), not just Microsoft Edge. [wolkenman….dpress.com]
Phase 3: Unsanction and Block Comet Browser
Objective: Mark Comet and other AI browsers as unsanctioned to trigger automatic blocking.
Step 3.1: Search for Comet in Cloud App Catalog
- Go to Cloud Apps → Cloud App Catalog
- Use the search function to find “Comet” or “Perplexity”
- Click on the application to review its risk assessment
Note: If Comet hasn’t been discovered yet in your environment, you can still add custom URLs for blocking (see Phase 6).
Step 3.2: Unsanction the Application
- Click the three dots (⋮) at the end of the application row
- Select “Unsanctioned” [learn.microsoft.com]
- A confirmation dialog will appear indicating the app will be blocked by Defender for Endpoint [wolkenman….dpress.com]
- Click Confirm
Step 3.3: Verify Indicator Creation
- Navigate to Settings → Endpoints → Indicators → URLs/Domains [wolkenman….dpress.com]
- Confirm that domains associated with Comet appear with action “Block execution”
- Processing may take 5-15 minutes
Example domains that may be blocked:
*.perplexity.aicomet.perplexity.ai- Related CDN and API endpoints
Phase 4: Create Conditional Access Policies
Objective: Route traffic through Defender for Cloud Apps proxy for deep inspection and control.
Step 4.1: Create Base Conditional Access Policy
- Sign in to Microsoft Entra Admin Center (https://entra.microsoft.com)
- Navigate to Protection → Conditional Access → Policies
- Click + New policy [learn.microsoft.com]
Step 4.2: Configure Policy Settings
Policy Name: Block AI Browsers via Session Control
Assignments: [learn.microsoft.com]
| Setting | Configuration |
|---|---|
| Users | Select All users (exclude break-glass accounts) |
| Target Resources | Select Office 365, SharePoint Online, Exchange Online |
| Conditions | Optional: Add device platform, location filters |
Access Controls: [learn.microsoft.com]
- Under Session → Select “Use Conditional Access App Control”
- Choose “Use custom policy”
- Click Select
Enable Policy: Set to Report-only initially for testing [learn.microsoft.com]
Step 4.3: Save and Validate
- Click Create
- Wait 5-10 minutes for policy propagation
- Test with a pilot user account
Critical Note: Ensure the “Microsoft Defender for Cloud Apps – Session Controls” application is NOT blocked by other Conditional Access policies, or session controls will fail. [learn.microsoft.com]
Phase 5: Create Session Policies to Block AI Browser User Agents
Objective: Create real-time session policies that identify and block AI browsers based on user-agent strings and behavioral patterns.
Step 5.1: Create Access Policy for User-Agent Blocking
This is one of the most effective methods to block specific browsers like Comet. [securityhq.com]
- In Microsoft Defender Portal, navigate to:
- Cloud Apps → Policies → Policy Management → Conditional Access tab [learn.microsoft.com]
- Click Create policy → Access policy [learn.microsoft.com]
Step 5.2: Configure Access Policy Details
Basic Information: [learn.microsoft.com]
| Field | Value |
|---|---|
| Policy Name | Block AI Browsers - Comet and Similar Agents |
| Policy Severity | High |
| Category | Access control |
| Description | Blocks access attempts from AI-enabled browsers including Comet, Atlas, and other agentic browsers based on user-agent detection |
Step 5.3: Set Activity Filters
Activities matching all of the following: [learn.microsoft.com]
- App: Select applications to protect
- Office 365
- Exchange Online
- SharePoint Online
- Microsoft Teams
- OneDrive for Business
- Client app: Select Browser [learn.microsoft.com]
- User agent tag:
- Contains “Comet”
- Or create custom user-agent filter (see Step 5.4)
- Device type: (Optional) Apply to specific device types
Step 5.4: Create Custom User-Agent String Filters
While Defender for Cloud Apps doesn’t expose direct user-agent string matching in the UI by default, you can leverage activity filters: [securityhq.com]
Known AI Browser User-Agent Patterns to Block:
User-Agent patterns (Create separate policies or use contains logic):
- Contains "Comet"
- Contains "Perplexity"
- Contains "axios" (common in automated tools)
- Contains "ChatGPT" (for Atlas browser)
- Contains "AI-Browser"
- Contains "agentic"
Advanced Method – Using Session Policy with Inspection:
- Create a Session Policy instead of Access Policy
- Set Session control type: to “Block activities” [learn.microsoft.com]
- Under Activity type, select relevant activities
- In Inspection method, configure content inspection rules
Step 5.5: Set Actions
Actions:
- Select “Block”
- Enable “Notify users” with custom message:
Access Denied: AI-Enabled Browser Detected

Your organization's security policy prohibits the use of AI-enabled browsers
(such as Comet, Atlas, or similar tools) to access corporate resources due to
data security and compliance requirements.

Please use Microsoft Edge, Chrome, or Firefox to access this resource.

If you believe this is an error, contact your IT helpdesk.
Step 5.6: Enable Governance Actions
- Select “Send email to user”
- Select “Alert severity” as High
- Enable “Create an alert for each matching event”
Step 5.7: Activate the Policy
- Review all settings
- Click Create
- Policy becomes active immediately
- Monitor via Activity Log for matches
Phase 6: Block Comet Domains via Custom Indicators
Objective: Manually add Comet-related domains to Defender for Endpoint indicators for network-level blocking.
Step 6.1: Identify Comet-Related Domains
Based on Perplexity’s infrastructure, key domains include: [computerworld.com]
Primary Domains:
- perplexity.ai
- www.perplexity.ai
- comet.perplexity.ai
- api.perplexity.ai

CDN and Supporting Infrastructure:
- *.perplexity.ai (wildcard)
- assets.perplexity.ai
- cdn.perplexity.ai
Step 6.2: Create URL/Domain Indicators
- Navigate to Settings → Endpoints → Indicators → URLs/Domains
- Click + Add item
For each domain, configure:
| Field | Value |
|---|---|
| Indicator | perplexity.ai |
| Action | Block |
| Scope | All device groups (or specific groups) |
| Title | Block Perplexity Comet Browser |
| Description | Blocks access to Perplexity Comet AI browser per organizational security policy |
| Severity | High |
| Generate alert | Yes |
- Click Save
- Repeat for all identified domains
Step 6.3: Test Domain Blocking
- From a test device with Defender for Endpoint installed
- Navigate to
https://www.perplexity.aiin any browser - You should see: [wolkenman….dpress.com]
This site has been blocked by your organization
Microsoft Defender SmartScreen blocked this unsafe site

This web page was blocked by Microsoft Defender Application Control
perplexity.ai has been blocked by your IT administrator
Phase 7: Create Cloud Discovery Policies for Alerting
Objective: Set up automated alerts when AI browsers are detected in your environment.
Step 7.1: Create App Discovery Policy
- Navigate to Cloud Apps → Policies → Policy Management
- Click Create policy → App discovery policy [learn.microsoft.com]
Step 7.2: Configure Discovery Policy
Policy Template: Use “New risky app” template or create custom [learn.microsoft.com]
| Field | Configuration |
|---|---|
| Policy Name | Alert on New AI Browser Detection |
| Category | Cloud discovery |
| Risk score | High and Medium |
| App category | Select “Generative AI” |
| Traffic volume | Greater than 10 MB (adjust as needed) |
Filters:
- App category equals Generative AI
- Risk score less than or equal to 6 (out of 10)
- App tag equals Unsanctioned
Governance Actions:
- Send email to security team
- Create alert with High severity
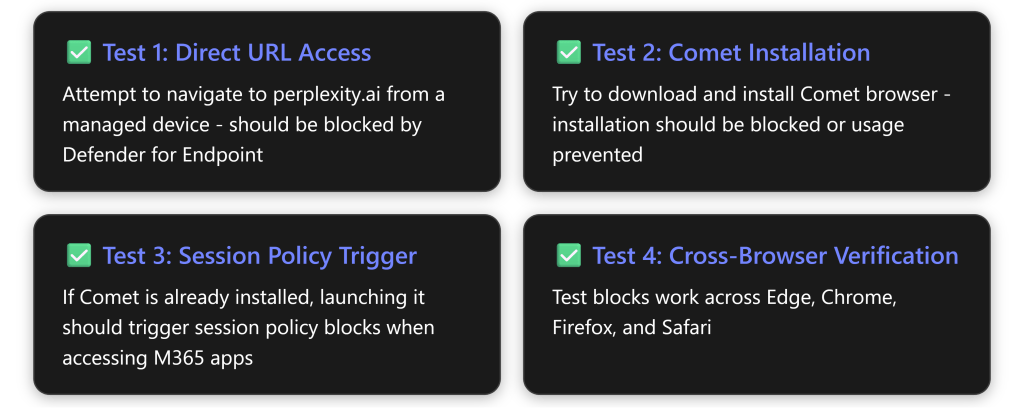
Testing and Validation
Validation Checklist
Monitoring and Reporting
Activity Log Monitoring:
- Cloud Apps → Activity Log
- Filter by:
- Policy: Select your AI browser blocking policies
- Action taken: Block
- Date range: Last 7 days
Defender for Endpoint Alerts:
- Incidents & Alerts → Alerts
- Filter by:
- Category: Custom indicator block
- Title: Contains “Perplexity” or “Comet”
Advanced Configuration Options
Option 1: Device Compliance Requirements
Combine AI browser blocking with device compliance:
- In Conditional Access policy, add Conditions → Device platforms
- Require devices to be Compliant or Hybrid Azure AD Joined
- Use Intune compliance policies to check for:
- Comet browser installation (custom script detection)
- Other AI browser installations
Option 2: Warn and Educate Mode
Before full blocking, consider “Warn and Educate” mode: [learn.microsoft.com]
- Set indicators to “Warn” instead of “Block”
- Users see warning message but can proceed (with logging)
- Collect usage data for 2-4 weeks
- Transition to Block mode after user education
Option 3: Scoped Blocking by Device Groups
Target specific departments first:
- In Defender for Endpoint, create device groups:
- Finance Team
- Executive Leadership
- High-Risk Departments
- Apply indicators only to these groups initially
- Expand gradually after validation
Option 4: DLP Integration for Data Leaving via AI Browsers
Even with blocks, ensure data leakage prevention:
- Create Microsoft Purview DLP policies
- Target “All locations” including endpoints
- Configure rules to detect sensitive data:
- Credit card numbers
- Social Security numbers
- Confidential project names
- Block upload/sharing of sensitive content
Identifying Comet Browser Technical Indicators
User-Agent String Analysis
While official Comet user-agent strings aren’t publicly documented by Perplexity, AI browsers typically exhibit these patterns:
Common AI Browser User-Agent Characteristics:
Mozilla/5.0 (Platform) ... Comet/[version]
Mozilla/5.0 (Platform) ... Perplexity/[version]
Chromium-based with custom identifiers
May contain "AI", "Agent", "Agentic" in UA string
Detection Strategy:
- Review Activity Log in Defender for Cloud Apps
- Filter for unknown/suspicious user agents
- Export activity data with user-agent strings
- Analyze patterns using PowerShell or Excel
- Update policies based on findings
Network Traffic Patterns
Comet communicates with Perplexity cloud infrastructure: [computerworld.com]
- High-frequency API calls to
api.perplexity.ai - WebSocket connections for real-time AI responses
- Upload of page content and browsing context
- Telemetry to Perplexity servers
Monitor via Defender for Cloud Apps:
- Cloud Apps → Activity Log
- Filter by IP address ranges (if known)
- Look for unusual upload patterns
Troubleshooting Common Issues
Issue 1: Blocks Not Working in Chrome/Firefox
Symptom: Comet/Perplexity sites accessible in non-Edge browsers
Solution: [wolkenman….dpress.com]
- Verify Network Protection is enabled in Defender for Endpoint
- Check Settings → Endpoints → Configuration Management
- Ensure status is “Block” not “Audit”
- Restart browser and test again
Issue 2: Conditional Access Policy Not Triggering
Symptom: Users can access M365 apps without session controls
Solution:
- Verify Conditional Access policy is in “On” mode (not Report-only) [learn.microsoft.com]
- Check that “Microsoft Defender for Cloud Apps – Session Controls” app is not blocked
- Ensure apps are listed as “Monitored” in Conditional Access App Control [securityhq.com]
- Clear browser cache and test in incognito mode
Issue 3: Legitimate Traffic Being Blocked
Symptom: False positives blocking valid user activity
Solution:
- Review Activity Log for specific blocked events
- Refine user-agent filters to be more specific
- Create exception policies for legitimate tools
- Use “Exclude” filters in policies for specific users/groups
Issue 4: Indicators Not Appearing in Defender for Endpoint
Symptom: Unsanctioned apps don’t create indicators
Solution:
- Verify “Enforce App Access” is enabled [wolkenman….dpress.com]
- Check that Defender for Endpoint integration is active
- Wait 15-30 minutes for synchronization
- Manually create indicators if automatic creation fails
Best Practices and Recommendations
Strategic Recommendations
- Phased Rollout Approach
- Week 1-2: Report-only mode, gather usage data
- Week 3-4: Warn mode for user education
- Week 5+: Full block mode enforcement
- User Communication Strategy[computerworld.com]
- Send organization-wide email explaining policy
- Provide approved alternatives
- Create FAQ document
- Offer training on secure browsing practices
- Continuous Monitoring
- Review Cloud Discovery weekly for new AI apps
- Monitor activity logs daily for policy violations
- Track emerging AI browser releases
- Update indicators quarterly
- Exception Process
- Create formal request process for exceptions
- Require executive approval for high-risk apps
- Document business justification
- Apply additional controls for approved exceptions (DLP, session monitoring)
- Defense in Depth[wolkenman….dpress.com]
- Don’t rely solely on browser blocking
- Implement data loss prevention (DLP)
- Use endpoint detection and response (EDR)
- Enable Microsoft Purview for data governance
- Deploy insider risk management
Policy Comparison Table
| Method | Scope | Effectiveness | User Experience | Management Overhead |
|---|---|---|---|---|
| Cloud Discovery + Unsanctioning | Network-wide | ⭐⭐⭐⭐⭐ | Transparent (blocked before access) | Low (automated) |
| Session Policies | M365 Apps only | ⭐⭐⭐⭐ | May show warning messages | Medium (requires tuning) |
| Access Policies | M365 Apps only | ⭐⭐⭐⭐⭐ | Blocks before session starts | Medium |
| Manual Indicators | All network traffic | ⭐⭐⭐⭐ | Transparent | High (manual updates) |
| Conditional Access | Cloud apps only | ⭐⭐⭐⭐ | May require re-authentication | Low |
Recommended Combination: Use Cloud Discovery + Unsanctioning AND Access Policies for comprehensive coverage.
Staying Current: Monitoring New AI Browsers
AI browsers are rapidly evolving. Stay ahead of threats:
Monthly Review Checklist
✅ Cloud App Catalog Updates
- Review newly discovered apps in Generative AI category
- Check for new AI Model Providers
- Assess risk scores of emerging tools
✅ Threat Intelligence
- Monitor Gartner reports on AI browser security [gartner.com]
- Follow Microsoft Security Blog
- Subscribe to CISA alerts
- Track CVE databases for AI browser vulnerabilities
✅ Policy Effectiveness
- Review blocked connection attempts
- Analyze bypass attempts
- Update user-agent filters
- Refine domain lists
Emerging AI Browsers to Monitor
Beyond Comet and Atlas, watch for:
- Brave Leo Browser (AI-enhanced features)
- Opera One (integrated AI)
- Arc Browser (with AI capabilities)
- SigmaOS (AI-powered browsing)
- Browser Company products
Compliance and Documentation
Required Documentation
Maintain these records for audit purposes:
- Policy Documentation
- Policy names, purposes, and justifications
- Configuration settings and filters
- Approval chains and stakeholder sign-offs
- Change Log
- Policy modifications
- Domain additions/removals
- Exception approvals
- Incident Reports
- Blocked access attempts
- Policy violations
- User complaints and resolutions
- Risk Assessment
- Why AI browsers are blocked
- Business impact analysis
- Alternative solutions provided to users
Regulatory Considerations
Consider these compliance frameworks:
| Framework | Relevance |
|---|---|
| GDPR | Data processing outside organization control |
| HIPAA | Protected health information exfiltration risk |
| SOX | Financial data protection requirements |
| PCI DSS | Cardholder data security |
| NIST 800-53 | Access control requirements |
Conclusion: Taking Action Against AI Browser Risks
The threat posed by AI browsers like Perplexity’s Comet is real, immediate, and growing. With security experts uniformly recommending that organizations “block all AI browsers for the foreseeable future,”the time for action is now—not later. [pcmag.com], [gartner.com]
Key Takeaways:
- Gartner’s Warning is Clear: AI browsers introduce “irreversible and untraceable” data loss risks that traditional controls cannot adequately mitigate [computerworld.com]
- Multi-Layered Defense is Essential: Combining Cloud Discovery, Session Policies, Access Policies, and Network Protection provides comprehensive coverage
- Microsoft 365 Business Premium Provides the Tools: With Defender for Cloud Apps and Defender for Endpoint, you have enterprise-grade capabilities to detect and block AI browsers
- User Education is Critical: Technical controls must be paired with clear communication about why AI browsers pose risks and what alternatives are approved
- Continuous Vigilance Required: The AI browser landscape evolves rapidly; monthly reviews of your defenses are essential [computerworld.com]
Immediate Action Steps
This Week:
- ✅ Enable Cloud Discovery and filter for Generative AI apps
- ✅ Review current AI browser usage in your organization
- ✅ Enable “Enforce App Access” in Defender for Cloud Apps
- ✅ Verify Network Protection is enabled in Defender for Endpoint
Next Week:
- ✅ Create Conditional Access policy routing traffic to MDCA
- ✅ Unsanction Comet and other AI browsers
- ✅ Create custom domain indicators for Perplexity infrastructure
- ✅ Deploy in Report-only mode for pilot group
Within 30 Days:
- ✅ Create Access Policies with user-agent filtering
- ✅ Enable full blocking mode organization-wide
- ✅ Communicate policy to all users
- ✅ Establish ongoing monitoring processes
Additional Resources
Microsoft Documentation:
- Control cloud apps with policies – Microsoft Defender for Cloud Apps [learn.microsoft.com]
- Govern discovered apps – Microsoft Defender for Cloud Apps [learn.microsoft.com]
- Create session policies – Microsoft Defender for Cloud Apps [learn.microsoft.com]
- Create access policies – Microsoft Defender for Cloud Apps [learn.microsoft.com]
Security Research:
- Gartner: Cybersecurity Must Block AI Browsers for Now [gartner.com]
- Keep AI browsers out of your enterprise, warns Gartner – Computerworld [computerworld.com]
- Security Experts Warn Companies to ‘Block All AI Browsers Now’ – PCMag [pcmag.com]
Community Resources:
- Defender for Cloud Apps block AI apps on your workplace – Wolkenman.nl [wolkenman….dpress.com]
- Block Malicious User Agents in Microsoft 365 – SecurityHQ [securityhq.com]