Much of the protection with Microsoft Defender for Endpoint is taken care of for you automatically, but let’s say you want to conduct an investigation/remediation process manually. How would you achieve this?

Step 1
Login to the Microsoft 365 Security admin portal with the appropriate permissions. Select Devices from the Assets menu on the left.
You should see a list of the devices that Defender for Endpoint knows about. Select the machine in question to display it’s detailed information as shown above.
In the top right of this dialog on the right you will see an ellipse (three dots). Select these three dots to reveal an actions menu.
Step 2
Now you need to decide how aggressive you want to be during this investigation as that will have a direct impact on the end users experience on the device.
Level 1

The most aggressive option, that will have the greatest impact on the user is select the Isolate Device from the menu as shown above.

On the dialog that appears, enter a comment and select the Confirm button. Don’t select the option to Allow Outlook, Teams and Skype for Business while device is isolated.
This device isolation feature disconnects the compromised device from the network while retaining connectivity to the Defender for Endpoint service, which continues to monitor the device. This allow you to initiate a live response session. It also prevents an attacker from accessing the device remotely.
More information – Microsoft Defender for Endpoint device isolation
More information – Defender for Endpoint device execution restrictions
Level 2
This is less impactful to the end user and similar to the previous step.

Select the Isolate Device from the menu as shown above.

Here, select the option to Allow Outlook, Teams and Skype for Business while device is isolated.
Enter a comment and select the Confirm button.
This device isolation feature disconnects the compromised device from the network while retaining connectivity to the Defender for Endpoint service, which continues to monitor the device. This allow you to initiate a live response session, while preventing an attacker gaining remote access. It will also allow the end user to continue using Outlook, Teams and Skype for Business while you conduct the investigation. However, it does not permit connection to anywhere else, including the Internet.
More information – Microsoft Defender for Endpoint device isolation
More information – Defender for Endpoint device execution restrictions
Level 3

From the menu select Restrict App Execution as shown above.
This applies a code integrity policy remotely that only allows files to run if they are signed by a Microsoft issued certificate. This method of restriction can help prevent an attacker from controlling compromised devices and performing further malicious activities. Thus, Office applications (Word, Excel, Outlook, etc), Edge browser, etc can now run without restriction. However, non Microsoft signed applications can’t.
Typically, a malicious program on the device can now not execute however the user can still continue to work inside certified Microsoft applications.

Enter a comment and select the Confirm button to complete the restriction process.
More information – Microsoft defender for Endpoint Restrict app execution
More information – Defender for Endpoint device execution restrictions
Step 3

The device will display a notification like that shown above.
Step 4
You can now take whatever actions you need to complete the investigation ready for return to service
Step 5
Remove any restrictions. To do, all you need to do to achieve this is return to the ellipse menu and select option to remove the restriction.

Here that would be Remove app restriction as shown above.
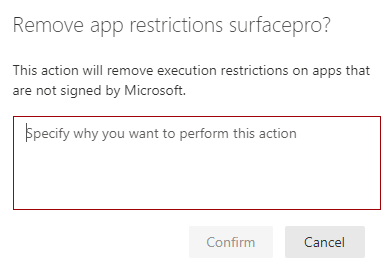
You’ll again simply need to add comment and select the Confirm button to remove the restriction.
So, that’s how you can intervene manually with security incidents if you need to at different impact levels for end users.


