Thoughts on being a modern IT Professional

Here’s a presentation that I gave recently on being a “Modern IT Professional”.

The skills required to successfully manage IT have been shifting for a number of years now. Do you know what major expertise will be required to successfully support customer IT systems in the future? How do you go about not only acquiring these, but also maintaining them in the fast paced, ever changing, environment of tomorrow? This session will arm you with the technical and personal capabilities you’ll need to master into the future to ensure you have a long, fruitful, successful and most importantly, profitable career.

So you wanna buy Bitcoin?

A lot of people have become very interested in Bitcoin thanks to its recent run up in price. Many are also interested to dip their toe into this new world of the ‘Internet of money’. So how do you go about actually buying (and potentially selling Bitcoin)?

You are going to start out wanting to exchange your dollars for Bitcoin. This means you’ll need to take some money out of your own personal wallet and look for someone to sell you Bitcoin. You could wander the street looking for someone to sell you some Bitcoin but the chances of you finding someone are pretty slim. That means you’ll need to go to an exchange which brings buyers and sellers of commodities (in this case Bitcoin) together.

Of course all of this exchange stuff is now done electronically, so the first step is that you’ll need to sign up to a Bitcoin exchange.

There are lots of exchanges around the world that will allow you to purchase Bitcoin however my choice is:

http://btcmarkets.net

I like them because they are local here in Australia and are part of the Australian Digital Commerce Association. You can of course choose any exchange you wish but my advice would be to do some searches for reviews on the Bitcoin exchange before you sign up. Remember, that although Bitcoin exchanges are ‘like’ normal stock exchanges in the functions they perform, they are not as regulated and consumers are not as well protected. Don’t overlook what happened at the Mt Gox exchange a few years ago. So, as with anything Bitcoin, do your homework first.

The above video will show you the process of setting up and account and buying Bitcoin via BTC markets. The process will be very similar on whatever Bitcoin exchange you choose.

When you set up an account at an exchange you’ll need to:

1. Provide proof of you identity. This can be done via submitting a utility bill that contains your details which will then be reviewed by a real person.

2. Set a login and password. Make sure that both of these are strong and that you record these somewhere safe. It is also recommended that you enable two factor authentication on your login to increase its security. Two factor simply means you’ll need to enter your password and typically a randomly generated code from an app on your phone to gain access to your account. This means if your password is ever stolen access till won’t be granted unless the code generator is also available. Again, make sure you copy everything you do here to a safe location.

You’ll next need to transfer funds into you new Bitcoin exchange account so you can buy Bitcoin on the market. There are various way to do this but some form of electronic transfer from your bank account is probably the easiest and cheapest. Also keep an eye on the cost of these transfers as they can eat into you funds, especially if you are only starting out with a small investment (which is recommended).

So now you should have a Bitcoin exchange account as well as some funds in that account. Next step, is to actually purchase Bitcoin. To do this you basically place an order on the Exchange to buy Bitcoin. You can purchase Bitcoin up to the amount of funds you have in the exchange.

There are typically two ways to order on an exchange. ‘At Market’ means you will simply purchase Bitcoin at whatever the market is willing to sell it to you for. These trades are usually executed immediately and happen at the current trading price of Bitcoin. ‘At Limit’ means you set a price at which you are willing to buy Bitcoin. Until someone is found willing to sell you Bitcoin for this amount a trade will not execute.

Thus, think of an ‘at market’ purchase as an immediate buy order and ‘at limit’ as waiting for a set price. Most people will execute ‘at market’ so they can obtain Bitcoin as soon as possible.

All things going well, the exchange will match a Bitcoin seller with your request to buy Bitcoin and the trade will be made. There will also typically be a small transaction fee associated with this trade (a commission for the exchange to facilitate the process).

Now your exchange account will have the funds you deposited withdrawn (and sent to the Bitcoin seller) and you will receive an amount of Bitcoin in return (from the Bitcoin seller). Congratulations, you are now the proud owner of Bitcoin. Welcome to the Internet of Money.

Your Bitcoin funds reside inside a digital wallet at the exchange. This wallet is provided to you generally free of charge by the exchange. It is however best practice to transfer your Bitcoin from the exchange wallet to a wallet you control.

As with Bitcoin exchanges, the range of Bitcoin wallets is vast. Again, it is important to do your research here and find a digital wallet that suits you. My choice was:

http://exodus.io

and

https://airbitz.co/

The reason I chose two is that I wanted one wallet on my desktop (Exodus) and one on my mobile devices (Airbitz). Some wallets support both environments, some don’t. At the end of the day you can have as many wallets as you wish and transfer funds between them as you see fit.

I won’t cover setting up a digital wallet here because it is generally pretty straight forward. However, what I will say is make sure you document EVERYTHING about the setup of the wallet and understand how to BACKUP and RESTORE it because once your funds are in that personal wallet you are solely responsible for the safety of that wallet. Lose access to that wallet and you lose access to your funds. So, backup, backup and backup again.

The main reason I wanted my own wallet is so that I am in full control of my funds and also that exchange wallets are a honey pot for those trying to steal money. If an exchange has lots of customers, most of whom leave their money in exchange wallet, then that is a very juicy target for hackers. Again, lessons from history see Mt Gox.

Your personal digital wallet will have a string of digits like so:

1Q48VMiR152XNuDEkfV3khFdiYoBPGH4V4

that is the transfer address you use to move you funds from the exchange wallet to your personal wallet. Make sure you get that transfer address correct because once you transfer any funds, even incorrectly, they are GONE. Remember, because this is still new technology, there are not a lot of default safety nets here. The emphasis falls on YOU to check everything. In theory, this default protection is what you pay for when you use the traditional banking system but why should you pay for that if you can do it yourself?

After a few minutes you should see that your personal digital wallet has the funds you transferred form the exchange wallet. Be patient, the transfer can take 10 or so minutes to complete.

If you wish to buy more Bitcoin you add more funds to you exchange account, go to the market and purchase more. To sell Bitcoin, you transfer from your personal wallet back to the exchange and then sell on the market.

All of this is a little technical but it is certainly getting much easier. In summary then you need to:

1. Set up an account on a Bitcoin exchange

2. Transfer funds into your exchange account

3. Buy Bitcoin on the market at the exchange

4. Transfer the Bitcoin to your own personal digital wallet (recommended)

Hopefully, that will get you started in the world of cryptocurrency. make sure you do your research when it comes to both exchanges and wallets before you proceed. I’ll go into more depth on all of these topics soon so watch out for more articles from me on Bitcoin, blockchain and cryptocurrency.

CIAOPS Need to Know Azure Webinar–November 2017

pexels-photo-325229

We’ll cover the usual news and updates from everything Azure and then do a deep dive into Azure Virtual machines. Of course, you can bring along all your questions as well and I’ll do my best to answer them for you.

You can register for free at:

November Azure Webinar Registrations

The details are:

CIAOPS Need to Know Azure Webinar – November 2017
Friday 1st of December 2017
2pm – 3pm Sydney Time

All sessions are recorded and posted to the CIAOPS Academy.

There of course will also be open Q and A so make sure you bring your questions for me and I’ll do my best to answer them.

The CIAOPS Need to Know Webinars are free to attend but if you want to receive the recording of the session you need to sign up as a CIAOPS patron which you can do here:

http://www.ciaopspatron.com

or purchase them individually at:

http://www.ciaopsacademy.com/

Also feel free at any stage to email me directly via director@ciaops.com with your webinar topic suggestions.

I’d also appreciate you sharing information about this webinar with anyone you feel may benefit from the session.

CIAOPS Need to Know Office 365 Webinar–November 2017

laptop-eyes-technology-computer

November is once again super busy but I’m still going to give my monthly webinar focused on Office 365. I am scheduling this month’s free Office 365 webinar on Friday the 1st of December from 11am – 12pm. There is lots of news to cover (especially from the upcoming Microsoft Summit in Sydney) and we’ll also be doing a deep dive into SharePoint best practices. Not a session to miss.

You can register for free at:

November Webinar Registrations

The details are:

CIAOPS Need to Know Webinar – November 2017
Friday 1st of December 2017
11am – 12am Sydney Time

All sessions are recorded and posted to the CIAOPS Academy.

There of course will also be open Q and A so make sure you bring your questions for me and I’ll do my best to answer them.

The CIAOPS Need to Know Webinars are free to attend but if you want to receive the recording of the session you need to sign up as a CIAOPS patron which you can do here:

http://www.ciaopspatron.com

or purchase them individually at:

http://www.ciaopsacademy.com/

Also feel free at any stage to email me directly via director@ciaops.com with your webinar topic suggestions.

I’d also appreciate you sharing information about this webinar with anyone you feel may benefit from the session.

Microsoft 365 Windows 10 Device configuration mappings

Microsoft 365 Business allows you to configure Windows 10 devices that are connected. This management is typically done by Intune at the back end while Microsoft 365 Business provides a simplified interface over these settings. However, what settings in Microsoft 365 map to Intune?

The best place to start to understand this mapping is the following document from Microsoft:

How do protection features in Microsoft 365 Business map to Intune settings

image

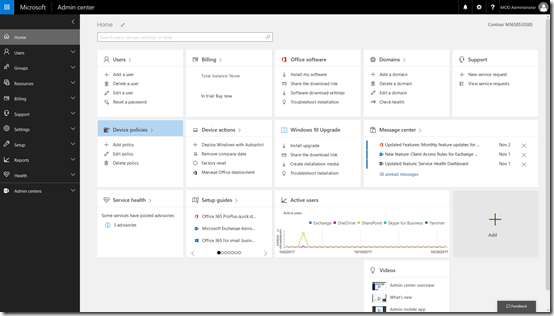
Start by navigating to the Admin center in your Microsoft 365 for Business tenant.

image

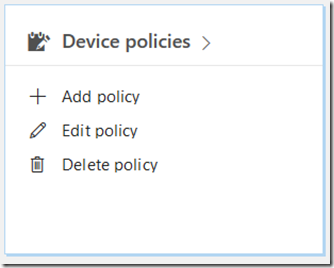
Locate the Device policies tile and select it.

image

You may see a number of policies here but one should be named Windows 10 device configuration as shown above. Select this.

image

You should be taken to the Edit policy dialog as shown above.

Select the Edit hyperlink at the right of the Windows 10 protection line (the second option from the top).

image

If you expand the display you should see a list of all the options and their status as shown above.

The question now is, how do these map to settings in Intune?

To view the settings in Intune you’ll need to login to the Azure portal for that tenant and then navigate to the Intune option.

image

The easiest way to find the Intune settings is to do a search in the top right and then select Intune from the results.

image

You should see the Intune console displayed as shown above.

image

From the available options, select Device Configuration. From the blade that appears then select Policies. You should then see a policy that matches the one in the Microsoft 365 for Business console (here Windows 10 device configuration).

Select the policy name.

image

From the new blade that appears select Properties.

image

This should open another blade like shown above. The last option on this blade should be Settings. Select this.

image

This will open a Device restrictions blade with lots of different settings as you can see above. This is where most the mapped settings from Microsoft 365 are.

clip_image001[5]

Working from the top, the Help protect PCs from web-based threats using Windows Defender Antivirus maps to Windows Defender Antivirus as shown.

image

However, only 3 of the 28 options are set and they are:

clip_image001[7]

clip_image001[9]

clip_image001[11]

Next in Microsoft 365 Business is Help protect PCs from web-based threats in Microsoft Edge,

clip_image001[13]

This maps to SmartScreen for Microsoft Edge in Windows Defender Smart Screen.

clip_image001[15]

image

The next option is Turn off device screen when idle for:

clip_image001[17]which maps to Maximum minutes of inactivity until screen locks in Password.

clip_image001[19]

The option Allow users to download apps from Windows store maps to a Custom URI that I haven’t been able to locate in Intune.

image

I’m still researching what that actually maps to. More soon.

Next is Allow users to access Cortana

clip_image001[21]maps to Cortana in General in Intune.

image

image

Next, Allow users to receive Windows tips and advertisements from Microsoft.

clip_image001[23]which maps to Windows spotlight in Intune.

image

Finally, Keep Windows 10 devices up to date automatically

image

is actually configured from the Software updates option in Intune.

clip_image001[29]

From the main Intune blade select Software updates. From the blade that then appears select Windows 10 Update rings. Then form the new blade select Update policy for Windows 10 devices.

clip_image001[31]

Select the policy and then Properties from the blade that appears.

At the bottom of the Properties page select Settings. This should then show a blade like that shown above.

clip_image001[33]

If the Microsoft 365 Business setting is ON the Service Branch will be set to Semi-Annual Channel (Targeted) like so:

clip_image001[35]

If the Microsoft 365 Business setting is OFF, the Service Branch will be set to Semi-Annual like so:

clip_image001[37]

You can review these update channels here:

Assign devices to servicing channels for Windows 10 updates

So making any changes in the Microsoft 365 Business console will be reflected in the Intune console. However, if you change these settings in Intune and then try and update them you seem to get an error like so

image

I would have thought that I could change the settings in any console but that doesn’t appear to be the case. I currently can’t find any confirmation of this but I will publish anything I find. So for now the guidance is – only make changes in the Microsoft 365 Business Admin Center.

There are a number of other policies in Microsoft 365 Business that I’ll cover in upcoming posts.

The End of the Domain Controller

Here is my keynote presentation from the Ingram Micro Cloud Connection 2017.

The end of the Domain Controller – A new era, a new opportunity

If businesses no longer require a traditional domain controller what does that means for the IT resellers? How can you utilise the latest cloud services to not only provide identity but security and management for customers? Will this mean a change of business model or simply an integration of new services and techniques into your current offerings? This session will help you understand the direction your business needs to focus on to take full advantage of the evolving cloud services that are fast making traditional domain controllers redundant.

When good Flows go rogue

At about 2.15am local time this morning, two Microsoft Flows in my Office 365 tenant went rogue and started blasting select email addresses with continual emails.

The two Flows in question I used to handle registrations for my regular monthly webinars. You can read more about how I created these here:

Using Microsoft Flow for event confirmations

Basically, they are triggered by a submission from Typeform. They then send the registrant a confirmation email as well as writing the details to a SharePoint list. These Flows are linear and incorporate no looping. These Flows had run successfully for over 12 months and had not been edited, changed or even viewed in a few weeks.

However, at approximately 2.15am local time, both of these Flows started to execute repeatedly sending hundreds of emails to a select group of people who had previously registered for the webinars.

image

The above shows a very small sample of the the sent items from the mailbox in question.

The mailbox sending out the emails from the rogue Flows was not my production mailbox so when I checked my production inbox just before 6 am local time when I awoke, I was quickly made aware of the issue from various people.

I immediately logged into the tenant with the rogue Flows and disabled the Flows but emails continued to be sent. I then went in and deleted the Flows but email continued to be sent. I therefore went in and created an Exchange transport rule to prevent that mailbox from sending anything further.

At that point the emails stopped being sent. In hindsight, that could have been from exhaustion of emails queued to be sent upon disabling the Flows. Whatever the reason, outbound emails had apparently stopped.

I immediately then logged a support request with Microsoft to confirm that the rogue Flows where not still running in the background, even though I had deleted them.

My request was escalated to the SharePoint Team who look after Flow. All the details of my situation were recorded and verified via a screen sharing session.

With the Exchange transport rule still in place I looked at the Flow Admin and found:

clip_image001

I then downloaded the CSV file to get more details and found:

clip_image001[5]

The two rogue Flows had each run almost 5,000 times. Clearly an issue.

At this stage Microsoft is still investigating the issue behind the scenes and I have removed the Exchange transport rule and confirmed emails are not being sent. Thus, it appears the rogue Flows have ceased.

What is interesting here is that the Flows that went rogue were only designed to run once someone completed the online Typeform. However, overnight they decided to run over and over again obviously caught in some sort of loop.

My guess as to the cause is that the Typeform connector used with Microsoft Flow received some type of update causing it to replay previous registrations over and over. The strange part is the fact that it kept repeating even though it was never designed to loop.

I am sorry to those people who received over 600 emails from me due to this issue and if it keeps happening or reoccurs please contact me asap and let me know.

With both Flows now deleted I am going to have to rebuild them but the question is how (can?) I prevent something like this happening again?

My current thinking is that I move the registrations to their own dedicated email box that I can, in the worst situation, completely delete if needed. I also need to work out some sort of rule that prevents constant email being sent if they exceed a threshold (say 10 emails in 10 seconds) and take appropriate action.

I’ll have to have a think about how (or if) I can do this and how I go about creating and monitoring any new Flows I create. I welcome any suggestions people might have on how I can prevent a recurrence.

A painful example of what happens when automation breaks.