To fulfill this priority, MSPs should standardize clients on Microsoft 365 Business Premium and fully leverage its cloud services. The following steps outline how to modernize IT operations and workflows using Business Premium’s capabilities. Each step focuses on core actions MSPs can take to deliver the outcomes described in item two of the blog post – namely, a more efficient, secure, and collaborative SMB workplace.
Step-by-Step Implementation
Migrate to a Cloud-First Platform: Begin by moving clients off legacy systems and onto Microsoft 365 Business Premium for all core services. This means migrating email to Exchange Online, files to OneDrive/SharePoint Online, and adopting Teams for communications. Standardizing on Business Premium consolidates productivity apps and security tools into one suite, eliminating silos and legacy on-premise servers. Outcome: A unified, cloud-based environment that reduces maintenance overhead and improves reliability (no more patching local servers or managing disparate apps).
Strengthen Identity and Access Management: Leverage Business Premium’s Azure AD Premium P1 features to secure and streamline user access. Enable multi-factor authentication (MFA) for all users (if not already enforced via Security Defaults) and configure Conditional Access policies to allow only compliant, trusted sign-ins. Set up Self-Service Password Reset to empower users to resolve login issues without helpdesk intervention. Outcome: Tighter security with less friction – users enjoy single sign-on to cloud apps and self-service account management, while MSPs see fewer password reset tickets and reduced breach risk.
Implement Modern Device Management: Use Intune (Endpoint Manager), which is included in Business Premium, to manage and secure all client devices centrally. Enroll Windows PCs via Azure AD Join and Windows Autopilot for zero-touch provisioning of new devices. Enforce standard security policies across endpoints – e.g. require antivirus (Defender for Business), enable BitLocker encryption on laptops, and push OS updates automatically. For mobile/BYOD, apply Intune App Protection (MAM) so users can work on personal devices without compromising company data. Outcome: Consistent, automated device configuration and compliance. New employees get productive faster with pre-configured devices, and ongoing device hygiene (updates, AV, encryption) is maintained without constant manual effort.
Maximize Collaboration & Productivity Tools: Deploy and configure Microsoft Teams as the hub for teamwork (chat, meetings, and project collaboration) in each client organization. Create structured Teams/Channels for departments or projects to reduce email overload and improve knowledge sharing. Move shared files from old file servers or disparate cloud storage into SharePoint Online/Teams so everyone accesses the same cloud-stored documents with version control and easy sharing. Encourage use of OneDrive for Desktop (Known Folder Move) to automatically back up users’ PC files to the cloud, protecting data and enabling work-from-anywhere. Provide user training and best practices on using Office apps, Teams, and cloud storage effectively. Outcome: Employees work more efficiently and flexibly – they can co-edit documents in real time, find information quickly, and collaborate from any location. This improves overall business productivity and reduces time wasted on outdated workflows.
Automate Workflows and Standardize Processes: Identify repetitive tasks that consume your team’s or the client’s time and automate them using Microsoft 365 tools. For example, use Power Automate (included with M365 with standard connectors) to create simple workflows like alerting the team of new client requests, or automating employee onboarding (provisioning accounts, Teams access, welcome emails). In Intune, set up compliance policies and auto-remediation (like auto-installing missing apps or settings) to minimize manual intervention on devices. Leverage Microsoft 365 Lighthouse (a free tool for partners managing multiple Business Premium tenants) to apply uniform security configurations and monitor all clients at scale. Outcome: Automation and consistent policies reduce human error and free up technician time. Routine actions (user setup, software updates, incident notifications) happen faster and more reliably, allowing the MSP to serve more clients without proportional headcount increases.
Monitor, Optimize, and Evolve: Establish metrics to track the impact of these initiatives – e.g. reduction in support tickets, faster onboarding time, or increased Teams usage. Use the Microsoft 365 Admin Center reports and Secure Score to monitor security posture and product adoption. Regularly review these insights to spot areas for improvement. For instance, if Secure Score shows weak points (like users not enrolling in MFA or devices not compliant), fine-tune your policies or provide targeted user training. Stay up-to-date with Microsoft 365 updates (new features, deprecations, and best practices) by scheduling quarterly service reviews. Continuously refine the program: maybe introduce new capabilities like Microsoft Viva for employee experience or Copilot AI features as they become relevant for SMBs. Outcome: The MSP keeps clients’ environments running optimally and evolves their modern workplace over time. By proactively adapting to changes and iterating on policies, you ensure the efficiency gains and business benefits of the cloud-first approach are sustained and grow even further.
Why This Program Works: Microsoft 365 Business Premium provides an integrated suite of tools that cover the productivity, security, and management needs of SMBs. By executing the steps above, an MSP helps clients fully utilize what they’re already paying for – from Office apps to advanced security – instead of piecemeal solutions. The result is a streamlined IT environment where:
Users have a seamless, productive experience (one login, access to all work resources anywhere, easy collaboration);
SMB Owners see better outcomes (fewer disruptions, higher employee output, stronger protection of data); and
The MSP can manage each client more efficiently (centralized policies, less firefighting, more time to focus on strategic improvements).
By focusing on this priority, MSPs turn the promise of digital transformation into tangible day-to-day improvements for small business clients, using the robust toolset of Microsoft 365 Business Premium as the enabler.
Priority #1 (2026): Elevate SMB Cybersecurity and Resilience. The first key priority for MSPs serving SMBs in 2026 is to strengthen clients’ security posture in the face of rising cyber threats. Microsoft 365 Business Premium – a comprehensive productivity and security suite for up to 300 users – is an ideal foundation for this goal, as it includes Office apps, Teams, advanced security (Microsoft Defender), and device management (Intune) in one package. Below is a practical step-by-step program leveraging Business Premium to achieve the outcomes outlined in Priority #1, focusing on identity protection, device and data security, threat prevention, and continuous improvement. The most critical actions (enabling MFA, device compliance, threat protection) are presented first, followed by supporting measures for sustainment. [techcommun…rosoft.com]
Step 1: Enable MFA and Conditional Access for All Users
Action: Immediately protect user identities by requiring multi-factor authentication (MFA) on all accounts and applying Azure AD Conditional Access policies (enabled by Business Premium’s Entra ID Premium P1 license). Start by turning on MFA for every user, ideally via Conditional Access rather than per-user settings. For example, define a policy in Entra ID that requires MFA for all logins and blocks access from risky sign-in locations or legacy authentication protocols. Use Conditional Access “trusted locations” and device compliance conditions to fine-tune access (e.g. skip MFA on known safe networks, but enforce it elsewhere). Also enable self-service password reset with MFA (another Entra ID P1 feature) so users can securely reset credentials without helpdesk intervention. [prescripti….solutions][prescripti….solutions], [dev.to][dev.to]
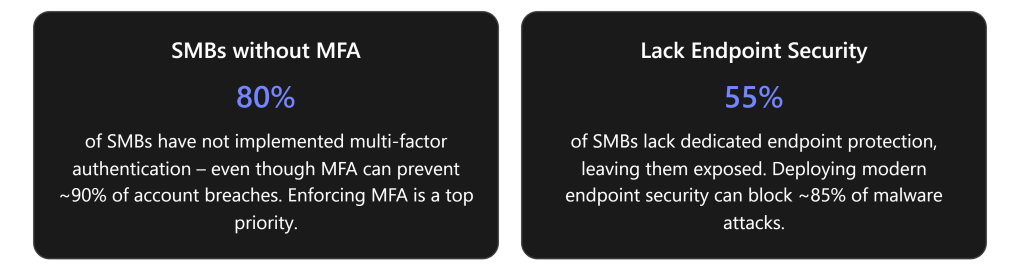
Outcome:Dramatically reduced risk of account breaches. By implementing MFA and intelligent access rules, stolen passwords alone can’t compromise the business. This is critical given that the vast majority of SMB breaches involve compromised credentials – enabling MFA can prevent ~90% of such attacks. Conditional Access gives precise control over who and what conditions can access cloud resources, moving beyond basic security defaults to a true Zero Trust stance. Administrators gain visibility and control, rather than relying on implicit trust. [totalassure.com][prescripti….solutions]
Best Practices: Roll this out tenant-wide using Azure AD Security Defaults off + custom policies on. Start with a baseline policy (e.g. require MFA for all users) and test using the “What If” tool in Conditional Access to verify the rules before enforcing. Educate users about the new MFA requirement in advance to ensure smooth adoption. For MSPs, standardize a template Conditional Access policy that you can deploy across all client tenants for consistency. (Microsoft 365 Business Premium is the only Business SKU that supports these Conditional Access policies, unlocking this enterprise-grade security for SMBs.) [prescripti….solutions]
Step 2: Onboard and Secure All Devices with Intune
Action: Establish device management and compliance enforcement using Microsoft Intune (included in Business Premium). Enroll every work device – laptops, desktops, and mobile devices – into Intune for centralized management. Configure automatic enrollment for Azure AD-joined or hybrid AD-joined devices so that any new device a user signs in to is prompted to enroll in Intune. For BYOD scenarios, use App Protection Policies (MAM) for mobile apps to secure company data without full device enrollment. Once devices are under management, apply compliance policies: require a minimum OS version/patch level, enable BitLocker encryption on Windows 10/11, enforce password complexity, and block jailbroken or non-compliant devices. Tie these policies back into Conditional Access – e.g. allow access to corporate apps only from compliant (Intune-managed, policy-adherent) devices. [dev.to][dev.to], [dev.to]
Outcome:Only trusted, secure devices can access company data. Intune enrollment and compliance policies ensure every PC or mobile device meets security standards (up-to-date OS, encryption on, malware protection) before it accesses email or files. Lost or stolen devices can be remotely wiped to protect data. BYOD users get secure access via app sandboxes without risking a data leak. Uniform device management reduces the chance of an unpatched laptop or unauthorized device becoming a breach entry point. For SMBs, this brings enterprise-level endpoint governance – a major step up from the unregulated device access many had before. [dev.to]
Best Practices: Use Intune’s security baselines or template profiles for SMB-friendly settings (there are recommended baseline configurations for Windows, Edge, etc.). Implement Microsoft Defender antivirus policies via Intune to ensure real-time protection is active on all endpoints (Business Premium’s Defender for Business will also cover this – see Step 3). Leverage Windows Autopilot for zero-touch provisioning of new devices to streamline onboarding for new hires or hardware refreshes. MSPs should document a standard device configuration (OS build, required apps, policies) and apply it uniformly across clients for efficiency. Prerequisite: Ensure each Windows device is Windows Pro or higher (Business Premium includes Windows 11 Pro upgrade rights), which is required for Azure AD join and Intune MDM enrollment. [dev.to]
Step 3: Deploy Advanced Threat Protection for Email and Endpoints
Action: Now protect data, email, and endpoints from threats using Business Premium’s built-in Microsoft Defender solutions. In the Microsoft 365 Defender portal, configure Microsoft Defender for Office 365 (Plan 1) – included in Business Premium – to guard against phishing and malware in Exchange, OneDrive, SharePoint, and Teams. Enable Safe Attachments and Safe Links policies so that email attachments and URLs are scanned in real time for threats. Turn on anti-phishing policies to use machine learning for detecting spoofed or suspicious emails. Next, deploy Microsoft Defender for Business (endpoint protection) to all workstations and supported mobile devices. Onboard devices to Defender via Intune security tasks or local script: Intune can push the Defender agent onboarding configuration to each PC automatically. This provides next-generation antivirus, endpoint detection and response (EDR), and threat intelligence on those devices, equivalent to enterprise Defender for Endpoint P1. Ensure that Microsoft 365 Apps (Office desktop apps) are also deployed and kept updated (this can be done via Intune app deployment) so that users have the latest security-enhanced versions of Office. [prescripti….solutions][prescripti….solutions], [prescripti….solutions][dev.to]
Outcome:Proactive threat prevention and detection across email and devices. Phishing emails and malicious links are neutralized before users click on them, greatly reducing successful breaches via email (the #1 attack vector for SMBs). Every managed endpoint runs enterprise-grade antivirus/EDR, alerting you to malware or abnormal behavior and allowing quick response (isolation, remediation) via the Defender portal. This closes the gap where over half of SMBs had no endpoint monitoring. By using the integrated Defender suite, threats are tracked holistically – for example, if a user clicks a phishing link, you can see if that device later showed odd behavior, all in one dashboard. Overall, SMB clients get a dramatically improved security posture: common threats like ransomware and credential-stealing malware are stopped in real time, and any incidents are flagged immediately for investigation. [totalassure.com], [prescripti….solutions][totalassure.com]
Best Practices:Customize anti-phishing rules to protect high-risk users (like execs) by enabling impersonation protection and adding trusted senders/domains to prevent false positives. Use Attack Simulation Training (if available as an add-on or via Defender for Office P2) to run simulated phishing campaigns and educate users – human error is still a leading cause of incidents. In Defender for Business (endpoint), set up automated investigation and remediation so that when an alert fires, the system can attempt to quarantine files or rollback changes automatically. Also configure alerting to MSP administrators (via email or Teams) for high-severity incidents so nothing slips by. If clients use additional security products (firewalls, etc.), integrate those signals where possible or at least ensure roles are clear to avoid gaps.
Step 4: Protect Sensitive Data and Ensure Compliance
Action: Implement basic data protection policies using Microsoft 365’s built-in capabilities, to prevent accidental data leaks and bolster compliance with any industry regulations. In the Microsoft Purview compliance portal (accessible with Business Premium), configure Data Loss Prevention (DLP) policies for common sensitive data types – for example, prevent emails or Teams chats from sharing credit card numbers, social security numbers, or other PII outside the organization. Even the base Business Premium license allows setting up Exchange Online DLP rules to detect sensitive info and either warn the user or block the message. Enable BitLocker drive encryption via Intune (as noted in Step 2) to ensure data on laptops is safe even if lost. Encourage use of OneDrive/SharePoint for file storage instead of local disks, so that data benefits from cloud security controls and backups. Also consider applying Sensitivity Labels (if available) to classify documents – for instance, tag files as “Confidential” vs “Public” – and apply encryption or access restrictions based on those labels. Sensitivity labeling (via Azure Information Protection Plan 1, included in EMS) lets protection travel with the file (the label policies can encrypt files or prevent external sharing). Finally, if clients have compliance requirements (like HIPAA, GDPR, or cyber insurance mandates), use the Compliance Manager in Purview to assess and track adherence to various control frameworks. [techcommun…rosoft.com], [techcommun…rosoft.com][dev.to][techcommun…rosoft.com]
Outcome:Minimized risk of data leakage and compliance violations. DLP policies will automatically block or report attempts to send sensitive customer data where it doesn’t belong (e.g. someone accidentally emailing a client’s credit card info). Encryption and labeling ensure that even if files are stolen or misdirected, unauthorized parties can’t read them. These measures give SMBs protections similar to large enterprises, keeping client trust and meeting legal requirements without heavy overhead. In sectors like finance or healthcare, these safeguards are essential and can be a selling point for the MSP’s services. Even for less regulated businesses, showing that strong data controls are in place differentiates your offering and reduces the chance of costly incidents. [techcommun…rosoft.com]
Best Practices: Start with pre-built templates in the DLP policy creation wizard (e.g. template for GDPR data, or US Financial Data) and customize as needed, rather than building rules from scratch. Pilot the DLP policies in audit mode first – this logs potential violations without blocking – to fine-tune the rules and minimize false positives. Educate the client’s employees about what the policies mean if they trigger (e.g. if they see a popup that they’re about to share sensitive info, they should heed it). Keep the compliance configuration lean: focus on a few high-impact policies rather than trying to cover every scenario at once. As a managed service, periodically review policy reports and adjust them to the client’s evolving needs. Additional tip: If clients require more advanced compliance features (insider risk management, encryption customer key, etc.), Microsoft now offers add-on suites for Business Premium – you can plan for these as an upsell, but the base Business Premium already provides a solid starting point. [techcommun…rosoft.com], [techcommun…rosoft.com]
Step 5: Continuous Monitoring, Improvement, and User Education
Action:Operationalize security as an ongoing program. Leverage Microsoft Secure Score to continuously assess each client tenant’s security posture and identify improvement actions. Secure Score aggregates recommendations across Azure AD, Intune, Defender, and more – use it monthly to track progress (for example, after deploying MFA and device compliance, the score will rise) and to spot any regressions. For MSPs managing many customers, set up Microsoft 365 Lighthouse – a free tool for partners – which provides a unified dashboard to monitor security alerts, device compliance, and user risk across all your Business Premium customer tenants. In Lighthouse, configure alerts and incident queues so your team can respond quickly to any customer’s issues from one screen. Additionally, implement a routine of security awareness training for users: deliver short training modules or phishing simulation (third-party tools or Microsoft’s Attack Simulator if available) on a regular basis. Users should learn to recognize phishing attempts, use MFA properly, and follow clean device practices, reinforcing the technology measures with good behavior. Perform periodic security reviews (e.g. quarterly business reviews focused on security) with each client: show them improvements (metrics like Secure Score increase, or number of threats blocked), discuss new threats or Microsoft feature updates, and plan next steps. This keeps the client engaged and aware of the value being delivered. [cloudpartn…rosoft.com][prnewswire.com], [totalassure.com]
Outcome:Sustained high security posture and adaptability. By treating security as a continuous cycle, MSPs ensure that the initial gains from deploying Business Premium do not erode over time. The organization’s defenses stay current with emerging threats – for instance, if new ransomware tactics appear, you adjust policies or training accordingly. Centralized tools like Secure Score and Lighthouse provide measurable validation of security improvements and help catch any gaps (e.g. if an admin turned off a policy by mistake, score would drop). Regular user training fosters a security-first culture, attacking the human element of risk (notably, 95% of breaches involve some human error as a factor). Overall, the MSP can demonstrate ongoing value through reports and dashboards, and SMB clients maintain confidence that their protection is always up-to-date. In practical terms, this reduces incident rates and ensures faster response when issues do occur, limiting damage and downtime. [totalassure.com]
Best Practices: Automate what you can – for example, set Secure Score reports to email out monthly and use Lighthouse’s task automation or Azure scripts for common remediations (some Secure Score improvement actions can even be triggered via Graph API). Keep a runbook for incident response so that if an alert comes in (e.g. a detected malware outbreak), your team knows the steps to investigate and remediate promptly. Engage in Microsoft’s partner security communities or training (Microsoft offers MSP-specific workshops and bootcamps for Business Premium security) to stay ahead of new features (like recent additions in Entra ID or Defender). Finally, regularly revisit Priority #1’s objectives with the client’s leadership – as you improve their baseline, the conversation can evolve from “fixing vulnerabilities” to enabling new capabilities securely (e.g. deploying Microsoft 365 Copilot or other advanced tools in a secure manner), aligning security improvements with business goals. [cloudpartn…rosoft.com]
Summary of Steps, Tools, and Outcomes: The table below summarizes each step in the program, the key Microsoft 365 Business Premium tools used, expected outcomes, and prerequisites or setup notes for each step:
Step
Microsoft 365 Business Premium Tools
Expected Outcome
Prerequisites/Notes
1. Enforce MFA & Conditional Access
Azure AD (Entra ID) Premium P1 – Conditional Access policies; Microsoft Authenticator app for MFA
All user logins are protected by MFA and risk-based policies, drastically reducing unauthorized access [totalassure.com]. Only compliant, verified sign-ins are allowed (Zero Trust) [prescripti….solutions].
Business Premium licenses assigned to all users. Disable legacy auth and inform users about MFA rollout. Have break-glass admin account excluded from CA (for safety).
2. Manage & Secure Devices (Intune)
Microsoft Intune (Endpoint Manager); Azure AD join; Compliance Policy and Configuration Profile features; Autopilot deployment
100% of PCs and mobile devices accessing corporate data are inventoried and meet security standards (encrypted, updated, protected) [dev.to]. Ability to remotely wipe lost devices. No unmanaged or outdated device can access data.
Devices running supported OS (Win 10/11 Pro, iOS, Android). Users sign in with Entra ID accounts. Configure baseline policies (enrollment required, BitLocker ON, etc.) before enforcement.
3. Deploy Threat Protection (Email & Endpoint)
Microsoft Defender for Office 365 (Plan 1) – Safe Links, Safe Attachments, Anti-phishing; Microsoft Defender for Business (endpoint AV/EDR) via Intune or script; Microsoft 365 Defender security portal
Phishing emails and malware are actively blocked or quarantined before causing harm [prescripti….solutions]. Every endpoint has next-gen antivirus and is monitored for threats (with alerts to IT) [prescripti….solutions]. Rapid detection and response to incidents, reducing breach impact.
Exchange Online mailboxes in use (for Defender for O365 to apply). Endpoint devices enrolled in Intune or accessible to run onboarding script. Admins should familiarize with Defender portal and set notification rules.
4. Protect Data & Compliance
Microsoft Purview compliance portal – Data Loss Prevention policies; Sensitivity Labels (AIP); BitLocker (via Intune); Exchange Online retention and data encryption settings
Sensitive data (financial, personal, etc.) is identified and controlled – preventing accidental leaks via email or Teams [techcommun…rosoft.com]. All laptops have encrypted drives, and company data is safer in cloud storage. Supports regulatory compliance and client data privacy commitments.
Identify key data types to protect (e.g. HIPAA data, credit cards). Business Premium includes basic DLP; for advanced needs, consider add-ons [techcommun…rosoft.com]. Roll out in stages to avoid user friction.
5. Monitor & Improve Continuously
Microsoft Secure Score (security.microsoft.com); Microsoft 365 Lighthouse (multi-tenant management); Azure AD risk reports; User training content (Microsoft Learn or third-party)
Sustained security posture with quantifiable improvements (higher Secure Score). Threats and alerts across all clients are centralized for fast response [cloudpartn…rosoft.com]. Users are more security-aware, reducing risky behavior. The MSP can proactively address issues and demonstrate ongoing value.
Set a schedule (monthly/quarterly) for reviews. Lighthouse requires CSP partner access to customer tenants. Use reports to show value to clients. Keep admins and users updated on new features and threats (e.g., via newsletters or training sessions).
Each of these steps builds upon the previous to form a comprehensive security program. By standardizing on Microsoft 365 Business Premium across their SMB clientele, MSPs can deliver enterprise-grade protection in a repeatable, cost-effective way. The result for Priority #1 is clear: stronger defenses against cyberattacks, improved compliance, and a more resilient business for clients, all achieved with the integrated toolset that Business Premium provides, backed by Microsoft’s latest innovations. This step-by-step roadmap not only fulfills the outcomes detailed in item one of the outlook, but also creates a platform for MSPs to continue expanding services (such as advanced compliance, analytics, or AI solutions) in a secure manner throughout 2026 and beyond. [prescripti….solutions].
Managed Service Providers (MSPs) serving small and medium-sized businesses (SMBs) must elevate their game in 2026 to meet rising expectations and rapid technology changes. Globally, the MSP market continues to expand (projected at $424–$511 billion by 2026), and SMBs are channeling unprecedented investments (over $90 billion in new managed IT spending through 2026). However, with this opportunity comes intense pressure: clients demand better cybersecurity, optimized cloud services, meaningful use of AI, improved service experiences, strict compliance, greater automation, and skilled support. Many MSPs today struggle with gaps in these areas – from reactive security postures to talent shortages – which must be addressed for sustained growth. [deskday.com]
The table below summarizes key operational areas, where MSPs often fall short at present, and the essential focus and actions needed in 2026 to improve:
Area
Current Gaps / Needs Improvement
2026 Focus & Actions
Cybersecurity
Reactive approach prevalent; advanced threat detection, incident response, and user security training are often insufficient[provaltech.com].
Focus often limited to migration; many lack expertise in multi-cloud management, cost optimization, and robust cloud security [deskday.com].
Provide end-to-end cloud support: manage hybrid/multi-cloud environments, practice FinOps for cost control, ensure cloud backup & DR, and leverage edge computing for low-latency needs [deskday.com], [deskday.com].
AI Integration
Slow adoption of AI – only ~30% of MSPs use AI to automate tasks, as others remain cautious or lack skills [kaseya.com] (smaller MSPs risk falling behind larger competitors [channele2e.com]).
Embed AI in operations: deploy AI-driven ticket triage/chatbots for Tier-1 support, use predictive analytics to prevent outages, and develop client-facing AI solutions (e.g. deploying productivity AI tools) [deskday.com], [channele2e.com].
Customer Experience
Often seen as mere IT vendors rather than strategic partners – value reporting and proactive guidance lag behind client expectations [channele2e.com].
Elevate client engagement: act as a vCIO with business-aligned IT roadmaps, conduct outcome-focused QBRs, provide transparent ROI dashboards (e.g. uptime improved, incidents prevented), and personalize support [channele2e.com], [provaltech.com].
Compliance & Governance
Proactive compliance management is not standard – many SMBs lack guidance on regulatory requirements and data governance [deskday.com].
Offer compliance-as-a-service: audit and ensure adherence to standards (GDPR, HIPAA, PCI), deliver automated compliance reports, and keep clients ahead of regulatory changes (adopt “compliance-first” service design) [deskday.com], [deskday.com].
Process Automation
Operations still too manual – MSPs waste 100+ hours/month on tasks (ticket entry, reporting) due to disjointed tools and <25% workflow automation [suppfusion.com], [suppfusion.com].
Maximize automation: integrate PSA/RMM and other tools to eliminate duplicate data entry [kaseya.com], use scripts/RPA for routine maintenance, auto-generate reports (e.g. for QBRs) to free time for strategic work [suppfusion.com], [suppfusion.com].
Workforce Development
Skill shortages and burnout persist – over 52% of MSPs cite hiring skilled staff as a top challenge[deskday.com], and overworked teams (59% working holidays) reflect understaffing [kaseya.com].
Bolster talent and capacity: invest in upskilling (certifications, training) [provaltech.com], improve work-life balance by offloading work (e.g. outsource NOC/SOC via white-label partners) [deskday.com], and create clear career paths to retain experts [provaltech.com].
Below, we dive into each of these focus areas, examining what MSPs are not doing well today and how they can improve in 2026, with examples and global trends in mind.
1. Strengthening Cybersecurity & Resilience
Cybersecurity is the number-one growth driver in managed services, yet many MSPs’ security offerings haven’t kept pace with evolving threats. What’s not done well: Too often, MSP security is reactive – providing basic antivirus, firewalls, and backups – but lacking in proactive threat hunting, continuous monitoring, and incident response planning. Many providers still treat security as an add-on, rather than baking it into every service. Crucially, clients now expect more: they want their MSP to be a comprehensive security partner, handling advanced threats and compliance needs, not just a help-desk for cyber issues. For example, SMBs are increasingly asking MSPs for help with compliance and cyber insurance requirements – areas in which some MSPs are underprepared. [deskday.com][provaltech.com]
Focus for 2026: MSPs must shift from reactive to proactive security. This means adopting 24×7 threat monitoring and rapid response capabilities. For instance, a provider might set up a managed detection and response (MDR) service or partner with a Security Operations Center (SOC) to monitor client networks around the clock for intrusions. MSPs should implement zero-trust security frameworks (verify every user/device), enforce multi-factor authentication (MFA) everywhere, and regularly test backup and disaster recovery plans. Security awareness training for client employees is also key – many breaches start with human error, so MSPs should run phishing simulations and training sessions to harden the human element.
Moreover, expanding compliance services is critical. Compliance has become “table stakes” for clients in regulated industries like healthcare, finance, and manufacturing. Yet not all MSPs offer systematic compliance support today. In 2026, leading MSPs will offer Compliance-as-a-Service – e.g. continuous monitoring of compliance (using tools aligned to standards like HIPAA, PCI DSS, GDPR), automated audit reporting, and guiding clients through regulatory changes. An MSP might, for example, maintain a compliance dashboard for each client that tracks data backup practices, access controls, software patch levels, and other policy requirements in real-time. By doing so, the MSP not only protects the client’s data but also helps them avoid fines or legal issues. [deskday.com]
Example Action – Cybersecurity:One MSP serving many SMB law firms realized its basic security package was insufficient. In 2026, it invested in an AI-enhanced threat detection system and partnered with a specialized managed SIEM provider to filter and analyze logs across all client sites. It also began conducting quarterly security posture reviews for each client, showing how many attacks were blocked and recommending next steps (like encrypting all mobile devices). This proactive stance not only reduced incidents but also reassured clients with compliance concerns (e.g. demonstrating support for GDPR and emerging privacy laws). As a result, the MSP could “command premium pricing” for its security-centric services while building deeper trust with customers. [deskday.com]
In summary, cybersecurity in 2026 should permeate every aspect of an MSP’s offerings. The MSPs that succeed will be those who anticipate threats (using advanced tools and intelligence), respond swiftly to incidents, and ensure clients meet security compliance mandates. Given that cybersecurity services are growing ~18% annually (faster than the overall MSP market), investing in these capabilities is both a defensive move and a major growth opportunity. [deskday.com]
2. Optimizing Cloud Services & Infrastructure
Cloud services have become a core component of SMB IT strategies worldwide, but MSPs often struggle to move beyond basic cloud enablement. Current weaknesses: Many MSPs excel at initial cloud migrations (moving an SMB’s servers or applications to AWS/Azure or a private cloud), but fall short in ongoing optimization and multi-cloud expertise. As more businesses adopt complex architectures – e.g. hybrid clouds (mix of on-prem and cloud) and multi-cloud deployments – MSPs need deeper skill in managing and optimizing these environments. In practice, some providers still treat cloud management as a set-and-forget hosting task, missing opportunities to fine-tune performance, optimize costs, or update security configurations continuously. SMB clients, however, increasingly expect their MSP to be the cloud expert who can navigate these complexities: nearly 48% of SMBs now rely on MSPs for public cloud management (a figure climbing each year). [deskday.com]
Focus for 2026:End-to-end cloud lifecycle management should be a priority. MSPs must go beyond provisioning to deliver ongoing optimization, cost management, and integration across cloud platforms. One key area is cost optimization (FinOps) – cloud costs can spiral out of control for SMBs who lack the expertise to right-size resources. An MSP in 2026 should regularly analyze clients’ cloud usage, eliminate waste (e.g. unused VMs or over-provisioned storage), and advise on reserved instances or savings plans. This proactive cost management demonstrates tangible value. In fact, experts note that MSPs should invest in cloud optimization capabilities to meet evolving demand. [channele2e.com]
MSPs also need to handle multi-cloud and hybrid environments confidently. With 73% of organizations using hybrid cloud and multi-cloud adoption doubling in recent years, a provider might, for example, manage an SMB’s Azure infrastructure alongside a Salesforce SaaS and an on-prem file server – ensuring they all work together. Skills in cloud orchestration and monitoring tools (that work across AWS/Azure/GCP) are essential. Security in the cloud is another improvement area: MSPs should implement cloud security best practices like regular cloud vulnerability scans, proper identity & access management, encryption of data at rest and in transit, and configuration audits (using benchmarks such as CIS benchmarks for cloud). [deskday.com]
Emerging technologies present both a challenge and opportunity. Edge computing and IoT integration are on the rise, especially for industries needing real-time data processing (manufacturing, retail, smart devices). In response, MSPs should be prepared to manage distributed edge infrastructure – for example, deploying and monitoring mini-servers or appliances at client sites or in the field that sync with central cloud systems. By developing solutions for edge computing (like local data processing coupled with cloud analytics), an MSP can differentiate itself for clients who require low-latency performance. [deskday.com]
Example Action – Cloud:An MSP with several SMB clients in e-commerce noticed their cloud bills were climbing while performance issues lingered. In 2026, the MSP introduced a Cloud Cost & Performance Audit service. Using cloud management tools, it analyzed each client’s resource utilization and identified overspending (e.g. servers running at 5% utilization). It then implemented auto-scaling and schedule-based resources (shutting down non-critical systems after hours) for those clients, cutting cloud costs by 20%. They also added a multi-cloud backup solution – replicating critical data from the primary AWS environment to an Azure data center – to bolster resilience. The clients not only saved money but also gained confidence that their cloud setup was optimized and fault-tolerant, something they wouldn’t have achieved on their own.
In short, MSPs in 2026 should provide holistic cloud stewardship: from architecture planning and migration through continuous optimization, security, and new tech integration. As SMBs continue to increase spending on cloud and related services, MSPs who deliver efficiency and reliability in the cloud will deepen customer loyalty and attract new business. [channele2e.com]
3. Embracing AI-Driven Solutions and Automation
AI integration is shifting from a buzzword to a competitive necessity for MSPs. By 2026, AI won’t be optional – it will be woven into service delivery for efficiency and smarter support. Where MSPs are lagging: A surprising number of MSPs have been slow to leverage AI in their operations. Surveys show roughly 30% of MSPs are already using AI to eliminate repetitive tasks, but the majority have not yet implemented such solutions, with some firms cautious about AI’s risks or lacking in-house expertise. This reluctance is problematic: AI is rapidly changing MSP economics by automating Tier-1 support tasks, and providers not leveraging AI will struggle to compete on cost and service quality. In essence, larger MSPs (often backed by investors) are racing ahead with AI, widening the efficiency gap over smaller players. [kaseya.com][channele2e.com]
Focus for 2026: MSPs should embed AI across their workflows to enhance both internal efficiency and customer value. A primary application is in the service desk: deploying AI-driven chatbots or virtual agents that can handle common support queries and basic troubleshooting. By 2026, an AI-powered system can automatically categorize and route tickets, suggest solutions, or even resolve issues (like password resets or simple network glitches) without human intervention. In fact, analysts predict widespread service desk automation could cut ticket volumes by 40–60% and drastically speed up resolution times. This frees up human technicians to focus on more complex issues, improving overall support quality. It’s telling that 87% of MSPs plan to increase AI investments by 2026 – the tools are becoming more accessible (built into RMM/PSA software, for instance) and MSPs recognize the ROI. [deskday.com]
Beyond support, predictive analytics is a game-changer. MSPs should use AI to analyze system logs and performance metrics to predict and prevent failures – for example, forecasting when a server might fail or when storage will run out, so they can fix it before it causes downtime. This predictive maintenance approach was once a luxury but is increasingly expected as part of proactive managed services.
MSPs can also extend AI to augment decision-making and reporting. Modern AI tools can comb through an SMB client’s data and provide insights, such as identifying security anomalies or highlighting usage trends. Some MSPs are starting to use generative AI to draft clearer client communications or create executive summaries of IT performance for quarterly reports. In 2026, we’ll see successful MSPs providing clients with AI-generated insights – for example, an automated monthly report that not only lists incidents resolved, but explains in plain language how those IT events affected the client’s business and recommends improvements (all generated with minimal human editing). [deskday.com]
Furthermore, MSPs should consider offering AI-related services to customers. SMBs often lack the knowledge to implement AI solutions themselves, so an MSP can step in as a guide. This could include setting up an AI-powered analytics platform for a client’s sales data, or integrating an AI chatbot on a client’s website for customer service. Since 55% of businesses expect their MSPs to adopt and deploy AI tech by 2026, showing expertise in practical AI applications can be a major selling point. [deskday.com]
Example Action – AI:A mid-sized MSP in 2025 handled thousands of tickets monthly and struggled with slow response times. In 2026, they integrated an AI service bot into their ticketing system. The bot uses natural language processing to understand incoming emails and chat requests from users – it automatically resolved simple issues (password resets, Wi-Fi setup instructions) and pulled up relevant knowledge base articles for technicians on more complex problems. The result was a 50% reduction in human-handled Level-1 tickets and much faster first responses. Additionally, the MSP began offering an “AI Advisory” service to clients: helping SMBs pilot tools like Microsoft’s AI Copilots or AI-based CRM add-ons to streamline their own business workflows. This not only generated a new revenue stream but also positioned the MSP as an innovation partner.
In sum, AI and automation are key to MSP efficiency and differentiation in 2026. MSPs should aim to automate away the grunt work – from repetitive troubleshooting to data reporting – so they can deliver faster service at scale. Those who fail to leverage AI will find themselves with higher costs and slower service, unable to match “AI-powered” competitors. Embracing AI is thus both a defensive strategy (to stay efficient) and an offensive one (to offer new intelligent services). [channele2e.com]
4. Enhancing Customer Experience and Strategic Value
As technology solutions commoditize, customer experience (CX) and the strategic value an MSP provides become critical differentiators. Today’s SMB clients don’t just want IT support; they want a partner who understands their business and helps it grow. Where MSPs fall short: Many MSPs still operate in a reactive, technical mindset – fixing what’s broken and maintaining systems – but not engaging at the business level or clearly demonstrating value. Clients are increasingly scrutinizing costs and asking, “What am I getting for this monthly fee?”. If the MSP only talks in technical terms (uptime, tickets closed) without linking to business outcomes, clients may feel the partnership is not delivering enough. In fact, MSP industry experts observe that successful MSPs now “sell outcomes, not just services,” using benchmarks and reviews to prove their worth. Many providers have been slow to adopt this outcomes-focused approach. [channele2e.com]
Another aspect of CX is responsiveness and personalization. SMB customers can feel neglected if their provider treats them like just another ticket number. Some MSPs could do better in maintaining regular communication, soliciting feedback, and tailoring their support to each client’s unique needs. It’s telling that clients are asking for more guidance – for example, they want help choosing which software matters, which investments to prioritize, and clarity on why MSP recommendations are made. If MSPs aren’t providing this guidance, clients may seek someone who will. [provaltech.com]
Focus for 2026: MSPs should strive to become trusted advisors to their SMB clients, not just IT fixers. This means deeply understanding each client’s industry, business goals, and challenges, and then aligning technology strategies accordingly. A concrete step is to institute regular strategic meetings – often Quarterly Business Reviews (QBRs) – but these must evolve from perfunctory report-outs to forward-looking planning sessions. Rather than just reciting metrics, the MSP should use QBRs to discuss “Here’s how your IT environment improved your business this quarter, and here’s what we recommend for the next quarter to support your goals.” For example, tie in how a new collaboration tool led to faster project completion for the client, or how the MSP’s quick incident response saved X hours of downtime, preserving the client’s revenue. Actionable outcomes should be the focus of these meetings. [provaltech.com]
To support these strategic discussions, MSPs need to provide clear, tangible reporting of value. Gone are the days of sending a generic monthly uptime report that clients might not even read. In 2026, MSPs should leverage dashboards and analytics to show key performance indicators (KPIs) that matter to the client’s leadership – whether it’s the number of cyber attacks blocked (indicating risk reduction), the time to resolve issues (operational efficiency), or improvements in system performance that enable employee productivity. As one channel expert noted, benchmarks, business reviews, and analytics dashboards have become must-haves for MSPs to prove their value. Clients also “expect more proof of value” – they want to know what was prevented, what improved, how security posture changed, and what’s coming next. Ensuring your data is clean and presented in an accessible way is vital – e.g. an MSP might implement a customer portal where the client can log in anytime to see ticket status, security alerts, and project updates in real time. [channele2e.com][provaltech.com]
Improving customer experience also involves being proactive and consultative. An MSP should bring new ideas to the client: for instance, recommending a workflow automation tool to an accounting firm client because the MSP knows reducing manual data entry could save them money. This kind of proactive solutioneering shows the MSP is thinking about the client’s business, not just waiting for instructions. Industry trends show that clients in mature markets now expect MSPs to help predict and prevent issues and to speak the language of business outcomes. Instead of waiting for clients to ask for a technology, the MSP should be saying “We’ve analyzed your operations and we think adopting XYZ software could improve your customer satisfaction by 10%, let us help you implement it.” [deskday.com]
Personalization and responsiveness remain key to CX. Simple gestures like having a dedicated account manager who really knows the client’s environment, or sending quick status updates during a major incident, go a long way in building trust. Also, timely support (meeting or exceeding SLAs) is part of the experience – even with automation, MSPs must ensure that when a human touch is needed, they are prompt and effective.
Example Action – Customer Experience:Consider an MSP serving a chain of retail stores. Historically, they just kept the POS systems running. In 2026, the MSP shifts approach: they schedule quarterly strategy sessions with the retailer’s management. In one QBR, they present a dashboard showing that over the holiday season, their support kept 99.9% uptime, preventing an estimated 5 hours of downtime (which, for the retailer, translates to an estimated $50k of sales not lost). They also highlight that by upgrading the store’s Wi-Fi and installing a new inventory management app (their suggestion last quarter), the client’s inventory turnover improved noticeably. Going forward, the MSP recommends a customer analytics tool to help the retailer personalize marketing – a bit outside pure IT infrastructure, but a tech solution aligned to growing the retailer’s business. The client, seeing the MSP’s advice consistently improve outcomes, now views the MSP as a strategic partner rather than just an IT supplier, leading to a long-term contract and openness to more services.[provaltech.com]
In essence, the MSPs that win in 2026 will pair excellent technical service with high-touch, value-driven customer engagement. They will measure their success in the client’s terms (productivity, risk reduction, growth support) and continuously communicate that value. This shift from “vendor” to “partner” status not only improves client satisfaction but provides MSPs with opportunities to broaden their services (since satisfied clients trust them with more tasks). As one MSP CEO put it, support is essential “but strategic guidance becomes the real differentiator”. [provaltech.com]
5. Navigating Compliance and Regulatory Demands
In a world of escalating data regulations and industry-specific rules, compliance has become a critical area where MSPs need to step up. SMBs often lack dedicated compliance officers or expertise, so they look to their MSPs for help in governing IT systems according to laws and standards. Current state: Not all MSPs currently include compliance management in their service portfolio. Many focus on technology uptime and security, assuming compliance (e.g., with data privacy laws or industry regulations) is the client’s responsibility. This gap means SMBs might be unaware of vulnerabilities or violations until an audit or breach occurs. Given the proliferation of regulations – from GDPR and CCPA (privacy) to PCI DSS (payment security), HIPAA (health data), or even sector-specific cybersecurity mandates – MSPs that ignore compliance are leaving clients exposed. In 2025, forward-looking MSPs identified compliance as a major opportunity, noting that continuous compliance monitoring and audit support could command premium services. Yet execution is lagging: compliance is often addressed in a piecemeal way (e.g., enabling encryption here or there) rather than through a structured program. [deskday.com]
Focus for 2026:Make compliance and governance a proactive service, not an afterthought. MSPs should familiarize themselves with the key regulations affecting their client base. For example, if you support medical clinics, HIPAA guidelines on data protection and breach notification should be second nature; if you serve European customers, GDPR’s requirements for data handling and breach reporting must be baked into your processes. In practical terms, MSPs need to audit their clients’ systems for compliance gaps regularly. This could entail running tools that check for data that’s stored without proper encryption, or ensuring that access rights are configured according to least privilege principles.
Offering Compliance-as-a-Service (CaaS) can differentiate an MSP. CaaS might include services such as: policy development (helping an SMB craft an IT usage policy or data retention policy), continuous monitoring (monitoring logins, file transfers, and configurations against compliance benchmarks), and automated compliance reporting. For instance, an MSP can use dashboard tools to map a client’s status against frameworks like NIST or ISO 27001, showing which controls are in place and which need attention. Prior to audits or assessments, the MSP can run an “audit readiness” exercise to fix issues. It’s also wise to educate clients – e.g., hold an annual workshop on new laws (such as updates to privacy regulations) that the client needs to know about. [deskday.com]
Compliance efforts go hand-in-hand with security improvements, but have a distinct business value: they reduce risk of legal penalties and build trust with the client’s customers. SMBs may not have realized their MSP could help here, so proactively offering this service in 2026 can meet an unmet need. Industry data suggests MSPs especially in mature markets (US, Canada, EU, ANZ) are starting to adopt a “compliance-first” service design approach, making compliance a core part of every solution due to strict regulations in these regions. This trend will likely spread worldwide as more countries introduce data protection laws. [deskday.com]
Example Action – Compliance:A small finance company (client of an MSP) faces strict regulations (PCI DSS for credit card data and new cybersecurity mandates from their government). The MSP decides in 2026 to create a Compliance Dashboard for this client. Each month, the dashboard scans the client’s systems: checking that all devices have the latest security patches, that antivirus is active, that only approved personnel accessed sensitive databases, and that backups were performed. The MSP shares this dashboard during monthly calls, so the client sees they are, say, 98% compliant with PCI requirements, with specific recommendations to get to 100%. When the client undergoes its annual audit, the MSP helps generate the required reports (e.g. user access logs, incident logs) at a click of a button. The audit passes without major findings – a stark improvement from previous years. The client’s executives now sleep better knowing compliance is continuously watched by their MSP.
In short, MSPs in 2026 should integrate compliance into their offerings to protect clients not just from hackers, but also from regulators. This involves staying current on relevant laws, leveraging tools to automate compliance checks, and guiding clients through the complex maze of requirements. By doing so, MSPs add a layer of strategic value (shielding clients from fines and reputational damage) and strengthen their role as a long-term partner. Given that regulatory scrutiny is only increasing globally, a proactive stance on compliance is both a defensive necessity and a chance to build trust (clients will know their MSP “has their back” on more than just tech). [deskday.com]
6. Driving Efficiency with Process Automation
Operational efficiency is the backbone of MSP profitability and service quality. Yet, many MSPs today are held back by inefficient, manual processes, which translates into slower service for clients and squeezed margins for the MSP. What’s not working: Despite great advancements in management tools, surveys reveal that MSP teams still spend excessive time on low-value, repetitive tasks. For example, one study found MSP staff spend over 100 hours per month on manual chores like re-entering ticket data between systems, preparing reports for QBRs, and reconciling billing—tasks that could be automated. In interviews, managers admitted that engineers spend “half their week” babysitting these processes instead of focusing on higher-level projects. There’s wide acknowledgment (95% of MSP leaders agree) that automation is required for growth, and that repetitive busywork is blocking strategic initiatives. However, most MSPs estimate they’ve automated fewer than 25% of their core workflows so far. The reasons cited include lack of time to set up automations, disparate tools that don’t talk to each other, and the complexity of custom scripting. This is a clear area where MSPs are not doing well enough currently – they know automation is key, but progress has been uneven and slow. [suppfusion.com]
Focus for 2026: The coming year should be when MSPs aggressively streamline and automate their operations. Efficiency isn’t just about saving money – it directly impacts customer satisfaction (faster, error-free service) and the MSP’s ability to scale without adding headcount. Here are key targets for automation:
Integrating Systems: A major source of inefficiency is when the PSA (professional services automation tool, for tickets/billing) doesn’t integrate with the RMM (remote monitoring and management) or other tools – technicians end up copying data from one system to another. In 2026, MSPs should ensure their core platforms are tightly integrated or consider moving to unified platforms. It’s telling that 95% of MSPs say integrating RMM, PSA, backup, and documentation tools is essential. For instance, if a monitoring alert can automatically generate a ticket in the PSA (with all relevant info attached), and that in turn updates documentation and billing records, it cuts out a lot of swivel-chair work. Many MSPs are pursuing tool consolidation – using fewer, more integrated tools – to achieve this. [kaseya.com][deskday.com]
Automating Routine Tasks: Every MSP has a set of mundane tasks that happen daily or weekly – applying patches, updating antivirus definitions, onboarding a new user account, checking backup status, etc. Scripting and RPA (Robotic Process Automation) can handle many of these. By 2026, MSPs should have automated patch management across client devices (with approvals for exceptions), scheduled scripts to resolve common alerts (e.g., auto-restart a service if it stops), and automatic user provisioning workflows (so when a client hires someone, the MSP’s system creates the necessary accounts and permissions through a predefined script). Many MSP tools come with automation capabilities that may be underutilized; now is the time to exploit them fully. As one industry CEO quipped, 2025 was the year of “we should automate that,” and 2026 is the year MSPs must do it – you can’t scale without automation. [provaltech.com]
Eliminating Duplicate Work in Client Reporting: As discussed in the CX section, account managers often spend hours collating data for client reports. Automating this reporting is a quick win. MSPs can set up their PSA or BI (business intelligence) tools to pull metrics (tickets resolved, SLA compliance, security events) and generate a polished report or dashboard with minimal human input. This might involve adopting a reporting tool or writing some integrations, but it pays off every quarter, and it allows account managers to spend time on analysis rather than assembly. Some MSPs are adopting client-facing dashboards that are always up-to-date, drastically reducing the need to manually build slide decks. [suppfusion.com]
Workflow Automation and AI Ops: Beyond individual tasks, MSPs should examine end-to-end workflows for automation opportunities. For instance, when a monitoring alert comes in (say CPU usage high on a server), a fully automated workflow might create a ticket, run a diagnostic script on the server, attach the results to the ticket, and if a simple threshold condition is met (like a runaway process), even attempt a remediation (kill or restart the process). If that fixes it, the system closes the ticket with notes; if not, it escalates to a human. Achieving such “self-healing” workflows is increasingly possible with AI Ops tools and advanced scripting. The concept of a “Zero-Touch MSP” – where AI handles 90% of tickets and routine changes – is on the horizon and some SMB-focused MSPs will start approaching that model by mastering their vendors’ automation features. [techaisle.com]
To get there, MSPs should overcome barriers by allocating time for automation projects (maybe dedicating a staff member a few hours a week to building automations) and leveraging community scripts and best practices. The new generation of MSP owners, often backed by private equity, are already pushing for this operational efficiency as a mandate. [suppfusion.com], [suppfusion.com]
Example Action – Automation:A 20-person MSP found its engineers were drowning in repetitive tasks and using 10+ different tools that didn’t sync well. In 2026, they embarked on an “Automation Sprint”: First, they consolidated from 3 separate monitoring and ticketing systems to a single unified platform to reduce context switching. Next, they identified the top 5 daily tasks that ate up engineer time – patching Windows, adding new Office365 accounts for clients, resetting passwords, updating tickets, and compiling monthly reports. They created scripts for each: patches now deploy automatically with reports of success/failure; a simple form was built for clients to request new accounts which triggers an automated user creation in all relevant systems; a self-service password reset tool was rolled out; ticket updates between their systems and a major client’s system were linked via API to stop double entry. They also set up a dashboard that pulls data from their PSA to auto-generate QBR slides. Over a few months, they measured a reduction of ~120 hours of busywork per month across the team. Technicians now spend those hours on project work and learning new skills, which benefits both the MSP and its clients through faster project delivery and more informed staff.[kaseya.com][suppfusion.com]
The lesson is clear: streamlining operations through automation is no longer optional. In 2026, the most successful MSPs will be those who have turned efficiency into a competitive advantage – enabling them to offer faster response times, more consistent service, and even innovative pricing models (because automation can reduce the cost to serve). Clients ultimately benefit from this through fewer errors and quicker service. As MSP commentary notes, the new wave of MSP leadership “expects operational efficiency and scalability” and will prioritize automation and data-driven processes to stay competitive. MSPs should do the same, treating automation not as a one-off project but as an ongoing discipline (continuously finding new ways to eliminate waste and streamline as tools evolve). [suppfusion.com]
7. Investing in Workforce Development and Talent
Behind every successful MSP is a skilled and motivated team. In 2026, human talent remains irreplaceable – even as AI and automation handle more tasks – because people drive the complex problem-solving, relationship management, and strategic planning that set top MSPs apart. The problem: The MSP industry is facing serious talent challenges. There’s a well-documented shortage of IT professionals, especially in high-demand areas like cybersecurity and cloud architecture. According to industry surveys, 52% of MSPs identify hiring and recruiting as their primary challenge, and 68% of IT leaders in MSPs struggle to find cloud and security expertise. The talent gap often forces MSPs to either overwork their existing staff or turn down business. Indeed, burnout is an issue: nearly 40% of MSP techs were working 50+ hour weeks in recent years and 59% had to work through holidays to keep up with workload. Such strain leads to high turnover, which creates a vicious cycle of understaffing. [deskday.com][kaseya.com]
Moreover, MSPs sometimes underinvest in training their staff. In the rush of daily operations, keeping engineers’ skillsets up-to-date (with new certifications or learning emerging technologies) can fall by the wayside. This leaves teams ill-prepared for new service offerings (like managing a new cloud platform or a new security tool) that clients might demand.
Focus for 2026: MSPs need a multi-pronged strategy to build and maintain a strong workforce, treating talent as a long-term investment:
Upskilling and Continuous Learning: Make 2026 the year your MSP implements a formal training program. This could include paying for certifications (e.g. Azure/AWS certifications, cybersecurity certs like CISSP, vendor-specific courses for popular tools). It might mean allocating each engineer a certain number of training hours per quarter that are sacrosanct. By upskilling existing employees, MSPs can fill skill gaps internally. For example, turning a good systems admin into a cloud architect through a structured learning path benefits the MSP far more than trying to hire a cloud architect in a tight market. As one MSP CEO advises, “the MSPs that grow will be the ones that develop the people they already have.”. Also, encourage knowledge sharing within the team (senior engineers mentoring juniors, internal workshops, etc.), which can accelerate learning and increase engagement. [provaltech.com]
Use External Support to Augment Staff: When hiring is tough, lean on creative solutions like outsourcing or partnerships. Many MSPs are turning to white-label service providers or contractors for certain functions – e.g. using an outsourced Network Operations Center (NOC) or Security Operations Center (SOC) service that operates under the MSP’s brand. This way, you can offer 24/7 coverage or specialized skills (like advanced cybersecurity analysis) without having to hire for every role. Notably, white-label partnerships have grown ~80% over three years in the MSP space. For an MSP, this could mean partnering with a third-party to handle after-hours support or level-1 tickets, relieving your core team at night. Or outsourcing complex tasks like mobile app support to a niche firm. The key is to convert fixed labor costs into flexible resources – scaling up when needed, scaling down when not, while your clients still experience a seamless service. In 2026, MSPs should evaluate which services are better done in-house versus through partners, and not be afraid to offload non-core or hard-to-hire areas. [deskday.com]
Improve Work-Life Balance and Retention: Recognize that burnout will cause you to lose the talent you have. MSP leadership should institute policies to protect their teams from perpetual overwork. This might involve hiring ahead of demand when possible, using automation (as above) to remove after-hours pager fatigue, and enforcing time-off so people can recharge. Flexible work arrangements (remote work options, which are common now) can help retain employees too. Additionally, create clear career paths within the MSP. One reason people leave is the feeling of stagnation; show your techs how they can progress to senior roles, lead specialist positions, or even vCIO-type consulting roles as they grow. Regular 1:1s discussing career goals and aligning training to those goals can improve morale and loyalty. [provaltech.com]
Leverage Vendor Training and Communities: Many tech vendors (Microsoft, Cisco, security vendors, etc.) offer extensive training resources for their partners. In the next year, make sure to tap into these vendor-backed training programs. For example, if a new security product is launched that you plan to offer, send engineers to the vendor’s certification course early. Encouraging staff to participate in MSP communities or events (like user groups, webinars, industry conferences) can also spark new ideas and professional growth, which they bring back to your business. The channel is expecting more vendor support in this area – so take advantage of it. [channele2e.com]
Example Action – Workforce:A growing MSP of 15 employees had trouble hiring senior cloud engineers in 2025. In 2026, they took a different approach: they identified two junior techs with interest in cloud and enrolled them in an accelerated Azure training program (funded by the MSP). Within months, those juniors earned certifications and started taking on cloud project work under supervision, filling much of the gap. To cover overnight shifts, the MSP contracted with a reputable NOC service that would handle alerts from midnight to 6 AM, so their on-call engineers could actually rest at night. They also instituted “Tech Fridays” – every second Friday afternoon, the company sets aside client work and all staff focus on learning: taking an online course, lab time, or sharing knowledge with peers. This became a valued perk and led to cross-training (e.g. the security specialist taught a class on advanced firewall management to others). By year-end, employee satisfaction (measured via survey) was up significantly, the MSP’s attrition dropped to near-zero, and their enhanced skills meant they could offer new services (like Azure database management) without external hires.
In summary, solving the talent puzzle is vital for 2026. MSPs should treat their employees as their greatest asset, because they are. A combination of developing internal talent, easing workloads through smart resourcing and automation, and fostering a positive work environment will pay dividends. Not only will this ensure you have the skills to deliver all the advanced services discussed (security, cloud, AI, etc.), but clients will notice stability and expertise in their interactions (frequent turnover or junior, untrained support is a red flag to many customers). Given the tight labor market, MSPs that invest in people will be the ones with the capacity to grow and innovate, whereas those that neglect it may find they can’t meet client needs or quality standards due to staffing shortfalls.
Conclusion: Succeeding in 2026 – From MSP to Business Partner
Entering 2026, MSPs globally – especially those catering to SMBs – must retool and refocus across these critical operational areas. The overarching theme is moving up the value chain: from putting out IT fires to delivering strategic prevention; from offering generic services to providing specialized, client-tailored solutions; from using people for every task to harnessing automation and AI for scalability. The challenges are real – cyber threats are more serious, technology is more complex, competition is fiercer, and clients are more demanding. But so are the opportunities: SMBs are investing heavily in technology and rely on MSPs more than ever for expertise. The MSPs that proactively improve in the areas discussed – security, cloud, AI, customer success, compliance, efficiency, and talent – will position themselves to capture this growth. [deskday.com]
It’s worth noting that in mature IT markets, clients now expect MSPs to behave almost like consulting partners with automation engines, blending advisory insight with flawless execution. This is a useful vision for 2026: an MSP that can talk business outcomes, ensure compliance and security, implement cutting-edge tech (cloud/AI) smoothly, and continually optimize its own operations behind the scenes. Achieving all of this at once is daunting, so MSPs should prioritize incrementally: for example, “secure first, automate second” – shoring up cybersecurity and compliance before layering fancy AI, since automation without security just accelerates risk. They should also pick a focus – mastering one vertical or technical specialty at a time – rather than try to do everything broadly. [deskday.com]
By addressing what is not being done well today and committing to these improvements, MSPs can transform their businesses in 2026. The payoff will be stronger customer relationships (and contract renewals), higher margins (through efficiency and premium services), and sustainable growth even in competitive markets. In contrast, MSPs that cling to the old break-fix, “one-size-fits-all” mindset will increasingly struggle – facing commoditization and client churn as they fail to meet rising standards. [deskday.com]
In conclusion, 2026 is set to be a pivotal year for the MSP industry. It will reward providers who are bold and strategic – those who invest in AI and automation, build deep security and compliance capabilities, tailor their services to client needs, and nurture talented teams. MSPs that embrace these changes will not just survive the evolving landscape, they will thrive as indispensable partners in their customers’ success. The blueprint is clear; now it’s about execution. As the industry saying goes, the MSPs who evolve will lead, and those who don’t will be left behind. By focusing on the areas outlined above, MSPs can ensure they are on the leading side of that equation in 2026.
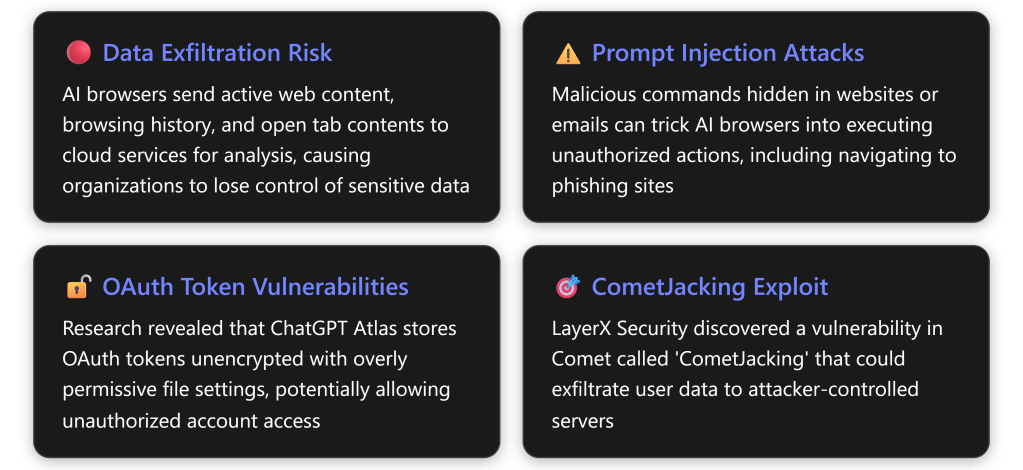
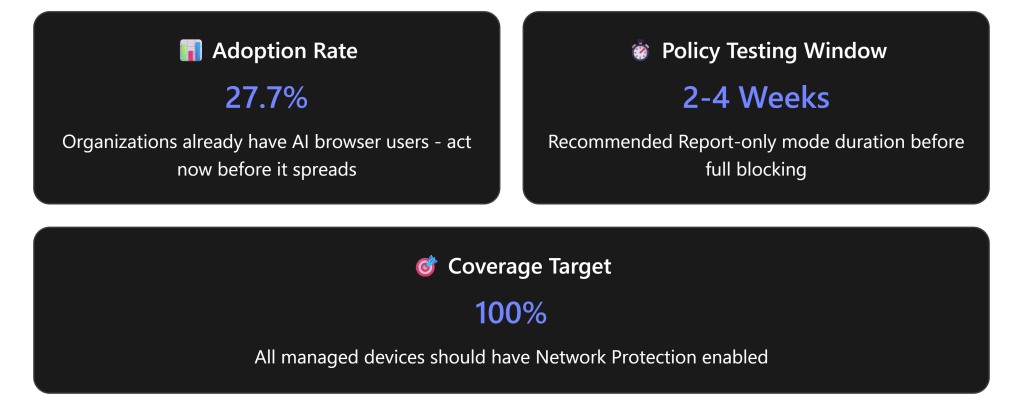
In December 2025, Gartner issued an urgent advisory recommending that organizations “block all AI browsers for the foreseeable future” due to critical cybersecurity risks.AI browsers like Perplexity’s Comet and OpenAI’s ChatGPT Atlas introduce threats including irreversible data loss, prompt injection vulnerabilities, and unauthorized credential access.With 27.7% of organizations already having at least one user with an AI browser installed,the time to act is now. [computerworld.com]
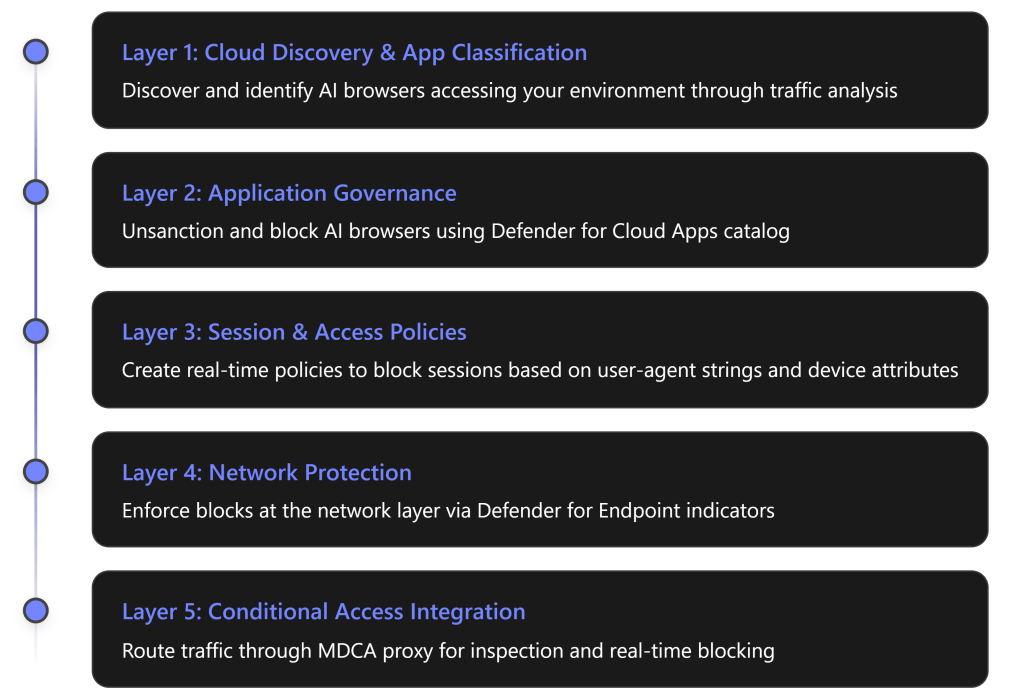
This comprehensive guide provides step-by-step instructions for configuring Microsoft 365 Business Premium (M365 BP), specifically Microsoft Defender for Cloud Apps, to detect, monitor, and block AI-enabled browsers like Comet from accessing your enterprise resources.
Understanding the AI Browser Threat Landscape
Why AI Browsers Are Dangerous
According to Gartner analysts, “The real issue is that the loss of sensitive data to AI services can be irreversible and untraceable. Organizations may never recover lost data.” [computerworld.com]
Key Security Concerns:
Autonomous Actions Without Oversight – AI browsers can autonomously navigate websites, fill out forms, and complete transactions while authenticated, creating accountability concerns for erroneous or malicious actions [computerworld.com]
Traditional Controls Are Inadequate – “Traditional controls are inadequate for the new risks introduced by AI browsers, and solutions are only beginning to emerge,” according to Gartner’s senior director analyst Evgeny Mirolyubov [computerworld.com]
Multi-Modal Communication Gaps – A major gap exists in inspecting multi-modal communications with browsers, including voice commands to AI browsers [computerworld.com]
Immature Security Posture – Discovered vulnerabilities highlight broader concerns about the maturity of AI browser technology, with solutions likely taking “a matter of years rather than months” to mature [computerworld.com]
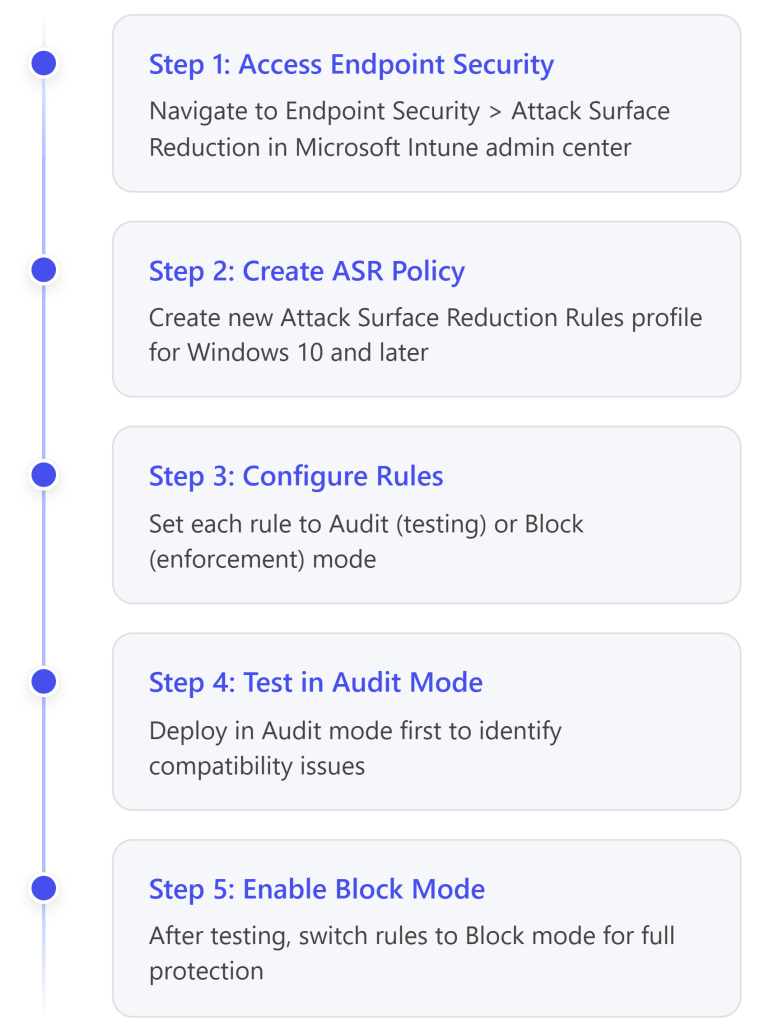
Navigate to Settings → Endpoints → Configuration Management
Go to Enforcement Scope → Network Protection
Verify status is set to “Block mode” (not just Audit mode)
Apply to All devices or specific device groups
Why This Matters: Network Protection ensures that blocks work across all browsers (Chrome, Firefox, etc.), not just Microsoft Edge. [wolkenman….dpress.com]
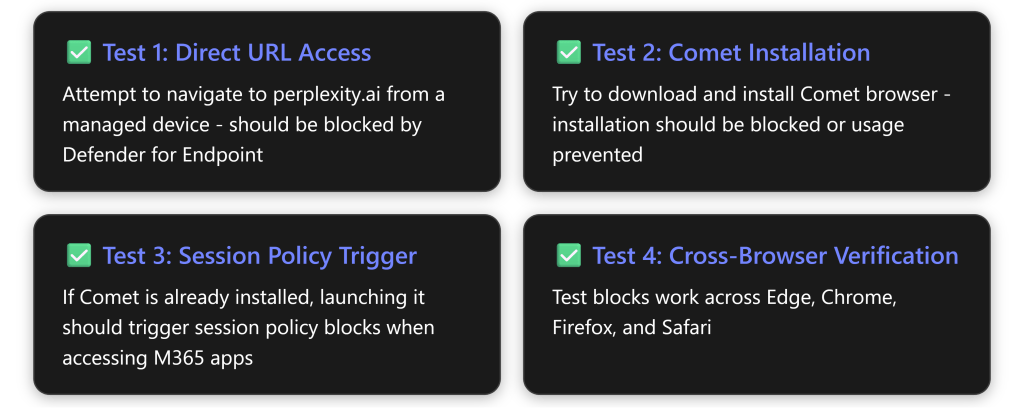
Phase 3: Unsanction and Block Comet Browser
Objective: Mark Comet and other AI browsers as unsanctioned to trigger automatic blocking.
Step 3.1: Search for Comet in Cloud App Catalog
Go to Cloud Apps → Cloud App Catalog
Use the search function to find “Comet” or “Perplexity”
Click on the application to review its risk assessment
Note: If Comet hasn’t been discovered yet in your environment, you can still add custom URLs for blocking (see Phase 6).
Step 3.2: Unsanction the Application
Click the three dots (⋮) at the end of the application row
Critical Note: Ensure the “Microsoft Defender for Cloud Apps – Session Controls” application is NOT blocked by other Conditional Access policies, or session controls will fail. [learn.microsoft.com]
Phase 5: Create Session Policies to Block AI Browser User Agents
Objective: Create real-time session policies that identify and block AI browsers based on user-agent strings and behavioral patterns.
Step 5.1: Create Access Policy for User-Agent Blocking
This is one of the most effective methods to block specific browsers like Comet. [securityhq.com]
Device type: (Optional) Apply to specific device types
Step 5.4: Create Custom User-Agent String Filters
While Defender for Cloud Apps doesn’t expose direct user-agent string matching in the UI by default, you can leverage activity filters: [securityhq.com]
Known AI Browser User-Agent Patterns to Block:
User-Agent patterns (Create separate policies or use contains logic):
- Contains "Comet"
- Contains "Perplexity"
- Contains "axios" (common in automated tools)
- Contains "ChatGPT" (for Atlas browser)
- Contains "AI-Browser"
- Contains "agentic"
Advanced Method – Using Session Policy with Inspection:
In Inspection method, configure content inspection rules
Step 5.5: Set Actions
Actions:
Select “Block”
Enable “Notify users” with custom message:
Access Denied: AI-Enabled Browser Detected

Your organization's security policy prohibits the use of AI-enabled browsers
(such as Comet, Atlas, or similar tools) to access corporate resources due to
data security and compliance requirements.

Please use Microsoft Edge, Chrome, or Firefox to access this resource.

If you believe this is an error, contact your IT helpdesk.
Step 5.6: Enable Governance Actions
Select “Send email to user”
Select “Alert severity” as High
Enable “Create an alert for each matching event”
Step 5.7: Activate the Policy
Review all settings
Click Create
Policy becomes active immediately
Monitor via Activity Log for matches
Phase 6: Block Comet Domains via Custom Indicators
Objective: Manually add Comet-related domains to Defender for Endpoint indicators for network-level blocking.
Step 6.1: Identify Comet-Related Domains
Based on Perplexity’s infrastructure, key domains include: [computerworld.com]
This site has been blocked by your organization
Microsoft Defender SmartScreen blocked this unsafe site

This web page was blocked by Microsoft Defender Application Control
perplexity.ai has been blocked by your IT administrator
Phase 7: Create Cloud Discovery Policies for Alerting
Objective: Set up automated alerts when AI browsers are detected in your environment.
Step 7.1: Create App Discovery Policy
Navigate to Cloud Apps → Policies → Policy Management
Users see warning message but can proceed (with logging)
Collect usage data for 2-4 weeks
Transition to Block mode after user education
Option 3: Scoped Blocking by Device Groups
Target specific departments first:
In Defender for Endpoint, create device groups:
Finance Team
Executive Leadership
High-Risk Departments
Apply indicators only to these groups initially
Expand gradually after validation
Option 4: DLP Integration for Data Leaving via AI Browsers
Even with blocks, ensure data leakage prevention:
Create Microsoft Purview DLP policies
Target “All locations” including endpoints
Configure rules to detect sensitive data:
Credit card numbers
Social Security numbers
Confidential project names
Block upload/sharing of sensitive content
Identifying Comet Browser Technical Indicators
User-Agent String Analysis
While official Comet user-agent strings aren’t publicly documented by Perplexity, AI browsers typically exhibit these patterns:
Common AI Browser User-Agent Characteristics:
Mozilla/5.0 (Platform) ... Comet/[version]
Mozilla/5.0 (Platform) ... Perplexity/[version]
Chromium-based with custom identifiers
May contain "AI", "Agent", "Agentic" in UA string
Detection Strategy:
Review Activity Log in Defender for Cloud Apps
Filter for unknown/suspicious user agents
Export activity data with user-agent strings
Analyze patterns using PowerShell or Excel
Update policies based on findings
Network Traffic Patterns
Comet communicates with Perplexity cloud infrastructure: [computerworld.com]
High-frequency API calls to api.perplexity.ai
WebSocket connections for real-time AI responses
Upload of page content and browsing context
Telemetry to Perplexity servers
Monitor via Defender for Cloud Apps:
Cloud Apps → Activity Log
Filter by IP address ranges (if known)
Look for unusual upload patterns
Troubleshooting Common Issues
Issue 1: Blocks Not Working in Chrome/Firefox
Symptom: Comet/Perplexity sites accessible in non-Edge browsers
Recommended Combination: Use Cloud Discovery + Unsanctioning AND Access Policies for comprehensive coverage.
Staying Current: Monitoring New AI Browsers
AI browsers are rapidly evolving. Stay ahead of threats:
Monthly Review Checklist
✅ Cloud App Catalog Updates
Review newly discovered apps in Generative AI category
Check for new AI Model Providers
Assess risk scores of emerging tools
✅ Threat Intelligence
Monitor Gartner reports on AI browser security [gartner.com]
Follow Microsoft Security Blog
Subscribe to CISA alerts
Track CVE databases for AI browser vulnerabilities
✅ Policy Effectiveness
Review blocked connection attempts
Analyze bypass attempts
Update user-agent filters
Refine domain lists
Emerging AI Browsers to Monitor
Beyond Comet and Atlas, watch for:
Brave Leo Browser (AI-enhanced features)
Opera One (integrated AI)
Arc Browser (with AI capabilities)
SigmaOS (AI-powered browsing)
Browser Company products
Compliance and Documentation
Required Documentation
Maintain these records for audit purposes:
Policy Documentation
Policy names, purposes, and justifications
Configuration settings and filters
Approval chains and stakeholder sign-offs
Change Log
Policy modifications
Domain additions/removals
Exception approvals
Incident Reports
Blocked access attempts
Policy violations
User complaints and resolutions
Risk Assessment
Why AI browsers are blocked
Business impact analysis
Alternative solutions provided to users
Regulatory Considerations
Consider these compliance frameworks:
Framework
Relevance
GDPR
Data processing outside organization control
HIPAA
Protected health information exfiltration risk
SOX
Financial data protection requirements
PCI DSS
Cardholder data security
NIST 800-53
Access control requirements
Conclusion: Taking Action Against AI Browser Risks
The threat posed by AI browsers like Perplexity’s Comet is real, immediate, and growing. With security experts uniformly recommending that organizations “block all AI browsers for the foreseeable future,”the time for action is now—not later. [pcmag.com], [gartner.com]
Key Takeaways:
Gartner’s Warning is Clear: AI browsers introduce “irreversible and untraceable” data loss risks that traditional controls cannot adequately mitigate [computerworld.com]
Multi-Layered Defense is Essential: Combining Cloud Discovery, Session Policies, Access Policies, and Network Protection provides comprehensive coverage
Microsoft 365 Business Premium Provides the Tools: With Defender for Cloud Apps and Defender for Endpoint, you have enterprise-grade capabilities to detect and block AI browsers
User Education is Critical: Technical controls must be paired with clear communication about why AI browsers pose risks and what alternatives are approved
Continuous Vigilance Required: The AI browser landscape evolves rapidly; monthly reviews of your defenses are essential [computerworld.com]
Immediate Action Steps
This Week:
✅ Enable Cloud Discovery and filter for Generative AI apps
✅ Review current AI browser usage in your organization
✅ Enable “Enforce App Access” in Defender for Cloud Apps
✅ Verify Network Protection is enabled in Defender for Endpoint
Next Week:
✅ Create Conditional Access policy routing traffic to MDCA
✅ Unsanction Comet and other AI browsers
✅ Create custom domain indicators for Perplexity infrastructure
✅ Deploy in Report-only mode for pilot group
Within 30 Days:
✅ Create Access Policies with user-agent filtering
The Essential Eight Mitigation Strategy #3 – Configure Microsoft Office Macro Settings requires organizations to disable Office macros by default for users without a demonstrated business need.1In cloud-only environments using Microsoft 365 Business Premium and Microsoft Intune, this can be achieved through multiple complementary approaches:
Configuration Profiles (Settings Catalog or Imported Administrative Templates)
Attack Surface Reduction (ASR) Rules
Microsoft Defender for Endpoint capabilities (included in Business Premium)
However, there is an important limitation: Microsoft 365 Business Premium includes Microsoft 365 Apps for Business, which has limited support for the Office Cloud Policy Service—only privacy-related policies are supported.2For full macro control policies, you must use Configuration Profiles in Intune instead.3
Microsoft provides pre-built configuration profiles aligned with ACSC guidance. This is the fastest and most reliable method for Essential Eight compliance.
Step-by-Step: Import ACSC Office Hardening Policy
Detailed Steps:9
Create Target User Group
Create an Azure AD security group for “All Office Users”
This group will receive Office apps and hardening policies
Method 2: Manual Configuration Using Settings Catalog
If you prefer granular control, you can manually configure macro policies using Intune’s Settings Catalog.
Step-by-Step: Create Custom Macro Blocking Policy
Create New Settings Catalog Policy
Navigate to: Microsoft Intune admin center (intune.microsoft.com)
Go to: Devices > Configuration policies > Create > New Policy
Platform: Windows 10 and later
Profile type: Settings catalog
Name: “Office Macro Security – Disable All Macros”
Configure Settings for Each Office Application
The following settings must be configured for each Office application (Word, Excel, PowerPoint, Access, Outlook):1415
Microsoft Office 2016 (Global Settings)
Setting Path
Configuration
Microsoft Office 2016 > Security Settings
Automation Security
Enabled
– Set Automation Security level
Disable macros by default
Disable VBA for Office applications
Enabled
Security Settings > Trust Center
Allow mix of policy and user locations
Disabled
Microsoft Excel 2016
Setting Path
Configuration
Excel Options > Security > Trust Center
VBA Macro Notification Settings
Enabled
– VBA Macro Notification
Disable all without notification
Block macros from running in Office files from the Internet
Enabled
Trust access to Visual Basic Project
Disabled
Turn off trusted documents
Enabled
Turn off Trusted Documents on the network
Enabled
Excel Options > Security > Trust Center > Trusted Locations
Allow Trusted Locations on the network
Disabled
Disable all trusted locations
Enabled
Microsoft Word 2016
Setting Path
Configuration
Word Options > Security > Trust Center
VBA Macro Notification Settings
Enabled
– VBA Macro Notification
Disable all without notification
Block macros from running in Office files from the Internet
Enabled
Trust access to Visual Basic Project
Disabled
Turn off trusted documents
Enabled
Turn off Trusted Documents on the network
Enabled
Word Options > Security > Trust Center > Trusted Locations
Allow Trusted Locations on the network
Disabled
Disable all trusted locations
Enabled
Microsoft PowerPoint 2016
Setting Path
Configuration
PowerPoint Options > Security > Trust Center
VBA Macro Notification Settings
Enabled
– VBA Macro Notification
Disable all without notification
Block macros from running in Office files from the Internet
Enabled
Trust access to Visual Basic Project
Disabled
Turn off trusted documents
Enabled
Turn off Trusted Documents on the network
Enabled
PowerPoint Options > Security > Trust Center > Trusted Locations
Allow Trusted Locations on the network
Disabled
Disable all trusted locations
Enabled
Microsoft Access 2016
Setting Path
Configuration
Application Settings > Security > Trust Center
VBA Macro Notification Settings
Enabled
– VBA Macro Notification
Disable all without notification
Block macros from running in Office files from the Internet
Enabled
Turn off trusted documents
Enabled
Turn off Trusted Documents on the network
Enabled
Application Settings > Security > Trust Center > Trusted Locations
Allow Trusted Locations on the network
Disabled
Disable all trusted locations
Enabled
Microsoft Outlook 2016
Setting Path
Configuration
Security > Trust Center
Apply macro security settings to macros, add-ins and additional actions
Enabled
Security settings for macros
Enabled
– Security Level
Never warn, disable all
Assign the Policy
Assignments: Select your target user or device groups
Review + Create
Attack Surface Reduction (ASR) Rules for Essential Eight Compliance
Can ASR Rules Meet Essential Eight Requirements?
Yes, partially. Windows Attack Surface Reduction rules provide critical additional protections that complement macro blocking policies and help meet Essential Eight requirements.1617
ASR rules are included with Microsoft 365 Business Premium via Microsoft Defender for Business and can be deployed through Intune.18
Essential Eight-Relevant ASR Rules
The following ASR rules directly support Essential Eight mitigation strategies:1920
ASR Rules for Office Macro Security
ASR Rule Name
GUID
Essential Eight Alignment
ISM Control
Block Win32 API calls from Office macros
92e97fa1-2edf-4476-bdd6-9dd0b4dddc7b
✅ Required – Prevents macros from making dangerous system calls
ISM-1673
Block Office applications from creating child processes
Review alerts in the Microsoft 365 Defender portal (security.microsoft.com)
Validate ASR Rule Effectiveness
Navigate to: Microsoft 365 Defender portal > Reports > Attack surface reduction rules
Review triggered events for each ASR rule
Identify false positives and create exclusions if needed
Exception Management: Allowing Trusted Macros
Some users may have legitimate business requirements for macros. The Essential Eight framework accommodates this through Trusted Publishers or Trusted Locations.30
Option 1: Trusted Publishers (Recommended)
Trusted Publishers use digital signatures to verify macro authenticity. This is the preferred method for Essential Eight compliance.31
Step-by-Step: Enable Trusted Publishers
Create Exception Group
Create Azure AD group: “Office Macro Users – Trusted Publishers”
Create Azure AD security groups (“All Office Users”, “Macro Exception Users”)
Document current macro usage across organization
Establish exception approval process
Communicate changes to end users
Phase 2: Baseline Policy Deployment
Download ACSC Office Hardening policy from GitHub
Import policy to Intune Configuration Profiles
Download and import OLE prevention PowerShell script
Assign policies to pilot group
Test policy application on pilot devices
Phase 3: ASR Rule Deployment
Create ASR policy in Endpoint Security
Configure 5 Office-related ASR rules in Audit mode
Assign to pilot group
Monitor events in Microsoft 365 Defender for 2-4 weeks
Phase 4: Production Rollout
Review audit logs for false positives
Create ASR exclusions if needed
Switch ASR rules to Block mode
Expand deployment to all users
Configure Trusted Publisher policies for exception users
Phase 5: Ongoing Management
Monitor Defender for Endpoint alerts
Review exception requests quarterly
Validate Trusted Publisher certificates annually
Update policies as new ISM controls are released
Conclusion
Meeting the Essential Eight requirements for disabling Office macros in a cloud-only environment with Microsoft 365 Business Premium is achievable through:
Intune Configuration Profiles: Disable macros at the Office application level using Settings Catalog or imported administrative templates
Attack Surface Reduction Rules: Deploy complementary ASR rules to block macro-related attack behaviors
Exception Management: Use Trusted Publishers for users with legitimate macro needs
Continuous Monitoring: Leverage Microsoft Defender for Endpoint for visibility and alerting
While Office Cloud Policy Service has limitations with Business Premium, Intune Configuration Profiles provide full macro control capabilities needed for Essential Eight compliance. ASR rules successfully accommodate Essential Eight requirements by providing the necessary technical controls, particularly ISM-1673 (blocking Win32 API calls from macros).
The combination of these approaches provides defense-in-depth aligned with ACSC guidance and enables organizations to achieve Essential Eight Maturity Level 3 for macro security.
References
Microsoft Official Documentation
Microsoft Learn – Essential Eight Guidance
Essential Eight configure Microsoft Office macro settings
The CIAOPS Academy has now reached the end of lts life. I will soon remove the ability to subscribe to any existing courses and aim to fully close it down within the next twelve (12) months. Existing subscribers will still be able to access any courses until full closure in December 2026, however no additional course will be added and existing courses will not be updated.
Why have I decided to do this? The main reasons are:
1. When I look at the metrics I see that well below 5% of course subscriber’s complete their course. Most complete nothing more than the first lesson.
2. Microsoft is changing the the M365 screens more and more regularly. People want courses to match the exact current displays in M365 and this would require an inordinate amount of work on my part refreshing each course as the interfaces continue to evolve and change.
3. In a world of AI, YouTube, etc people no longer want full courses. They instead, typically, consume content piecemeal and on demand. Few are willing to invest in a multi-lesson course it seems.
4. I rarely receive feedback on the existing course content or what people would like to see made available in new courses. People are looking elsewhere for their information.
For these and other reasons (e.g. increasing hosting costs) I have decided to fully shut down the CIAOPS Academy.
I will be moving all new content directly into the CIAOPS Patron Community (www.ciaopspatron.com) going forward. You can still sign up to my free Microsoft Team. You can use Robert.Agent to have all your M365 question answered directly via email.
In an evolving landscape where AI is rapidly commoditising knowledge, the CIAOPS Academy is losing relevancy and simply becoming too hard to maintain and I believe this is mirrored in fewer and fewer people consuming the course material.
All good things must come to and end and so it is for the CIAOPS Academy.
Important: Mailbox Auditing is Already ON by Default
Good news! Since 2019, Microsoft automatically enables mailbox auditing for all Exchange Online organizations. This means logging is already active for your mailboxes without requiring any manual configuration.
Should You Enable All Available Logging?
No, you should NOT enable all available logging. Here’s why:
Microsoft’s Recommendation: Use the default audit configuration, which Microsoft automatically manages and updates
Storage Impact: Audit logs consume storage space in each mailbox’s Recoverable Items folder (counts against the 30GB default limit)
Performance Consideration: Excessive logging can impact mailbox performance
Automatic Updates: Microsoft automatically adds new important actions to the default audit configuration as they’re released
What’s Logged by Default
The default configuration logs these critical actions:
Result should show False (meaning auditing is enabled)
Step 3: Check Current Mailbox Audit Status
# For a specific mailbox
Get-Mailbox -Identity "user@domain.com" | Format-List Name,AuditEnabled,DefaultAuditSet

# For all mailboxes
Get-Mailbox -ResultSize Unlimited | Format-Table Name,AuditEnabled,DefaultAuditSet
Step 4: Use Default Settings (Recommended)
# Restore default auditing for a mailbox that was customized
Set-Mailbox -Identity "user@domain.com" -DefaultAuditSet Admin,Delegate,Owner
Step 5: Only If Necessary – Customize Specific Actions
# Example: Add MailboxLogin tracking for owner actions
Set-Mailbox -Identity "user@domain.com" -AuditOwner @{Add="MailboxLogin"}

# Example: Set specific admin actions (overwrites defaults - not recommended)
Set-Mailbox -Identity "user@domain.com" -AuditAdmin MessageBind,FolderBind,HardDelete
Step 6: Configure Retention Period
# Default is 90 days, can extend up to 365 days (E5 license required for >180 days)
Set-Mailbox -Identity "user@domain.com" -AuditLogAgeLimit 180

# Apply to all mailboxes
Get-Mailbox -ResultSize Unlimited | Set-Mailbox -AuditLogAgeLimit 180
Step 7: Verify Configuration
# Check what actions are being audited
Get-Mailbox -Identity "user@domain.com" | Select-Object -ExpandProperty AuditAdmin
Get-Mailbox -Identity "user@domain.com" | Select-Object -ExpandProperty AuditDelegate
Get-Mailbox -Identity "user@domain.com" | Select-Object -ExpandProperty AuditOwner
Method 2: Microsoft 365 Admin Center (Limited Options)
Note: The GUI provides limited mailbox audit configuration options. Most settings require PowerShell.
Government contractors with security clearance requirements
Legal hold scenarios requiring complete activity documentation
3. Forensic Investigations
Use Case: Post-incident analysis
Determining if a compromised account’s emails were actually read
Investigating data exfiltration attempts
Proving or disproving unauthorized access claims
Building timeline of activities during security incidents
4. Privileged Account Monitoring
Use Case: Enhanced monitoring for administrative accounts
Service accounts that shouldn’t have regular email activity
Shared mailboxes with sensitive information
Discovery mailboxes used for legal searches
Executive assistant mailboxes with delegated access
Best Practices If You Enable FolderBind/MessageBind for Owners
1. Selective Implementation
# Enable only for specific high-risk mailboxes
Set-Mailbox -Identity "CEO@company.com" -AuditOwner @{Add="FolderBind","MessageBind"}

# Create a list of VIP users
$VIPUsers = "CEO@company.com","CFO@company.com","Legal@company.com"
foreach ($user in $VIPUsers) {
    Set-Mailbox -Identity $user -AuditOwner @{Add="FolderBind","MessageBind"}
}
DLP policies: Focus on preventing data loss rather than tracking all access
The MailItemsAccessed Alternative (E5 Licenses)
For organizations with E5 licenses, MailItemsAccessed is a superior alternative that:
Intelligently aggregates similar activities (reduces noise by 80-90%)
Provides both sync and bind operation tracking
Includes deduplication (removes duplicate entries within 1-hour windows)
Records InternetMessageId for precise message tracking
Better suited for forensic investigations
Automatically enabled for E5 users
Summary Recommendation
Enable FolderBind/MessageBind for owners ONLY when:
You have specific compliance or security requirements
Monitoring high-risk individuals or during investigations
You have the resources to analyze the massive data volume
Storage and performance impacts have been evaluated
You’ve implemented automated analysis tools
Otherwise: Stick with the default configuration and use alternative methods like DLP policies, insider risk management, and the MailItemsAccessed action (for E5 users) for more effective security monitoring.
Implementing Conditional Access policies requiring device compliance in Microsoft 365 requires careful planning and a phased approach to minimize disruption while maintaining security. This comprehensive guide provides step-by-step instructions specifically tailored for small businesses.
1. Prerequisites and Initial Setup
Required Licenses
Microsoft Entra ID P1 or P2 – Required for Conditional Access
Microsoft Intune – Required for device compliance management
Microsoft 365 Business Premium or higher for small businesses
Essential Preparations
Configure Emergency Access Accounts
Create at least two emergency access (break-glass) accounts
Exclude these accounts from ALL Conditional Access policies
Store credentials securely and separately
Create Device Compliance Policies First
Define minimum OS version requirements
Set encryption requirements
Configure password/PIN requirements
Establish jailbreak/root detection settings
Enable User Registration for MFA
Allow users to register authentication methods before enforcing policies
Communicate registration requirements to all users
2. Phased Rollout Strategy
Phase 1: Foundation (Weeks 1-2)
Objective: Establish baseline security and prepare infrastructure
Create policies in Report-Only Mode
Block legacy authentication protocols
Secure the MFA registration page
Target privileged accounts first with phishing-resistant MFA
Phase 2: Pilot Testing (Weeks 2-4)
Objective: Test with limited user groups
Pilot Group Selection
Start with 5-10% of your organization
Include IT staff and willing early adopters
Avoid executives and VIPs initially
Ensure representation from different departments
Creating the Policy in Report-Only Mode
Navigate to Microsoft Entra admin center → Conditional Access → Policies
Create new policy with these settings:
Name: “Require Device Compliance – Pilot”
Users: Select pilot group
Cloud apps: Start with non-critical apps
Grant: Require device to be marked as compliant
Enable policy: Report-only
Phase 3: Gradual Expansion (Weeks 4-8)
Objective: Progressively include more users and applications
Automated Phased Rollout Approach
If using the Conditional Access Optimization Agent (requires Microsoft Security Copilot):
The agent automatically creates a 5-phase rollout plan
Groups are assigned based on risk and impact analysis
Automatic progression between phases based on success metrics